Note
Access to this page requires authorization. You can try signing in or changing directories.
Access to this page requires authorization. You can try changing directories.
Many applications have more than a single component. For example, you might have a frontend that's publicly accessible and connects to a backend API or web app. The backend resources might connect to a database, storage account, key vault, another virtual machine, or a combination of these resources. This architecture is the foundation of an N-tier application. It's important that applications like this are architected to protect backend resources to the greatest extent possible.
This tutorial describes how to deploy a secure N-tier application with a frontend web app that connects to another network-isolated web app. All traffic is isolated within your Azure Virtual Network by using Virtual Network integration and private endpoints. For more comprehensive guidance that includes other scenarios, see:
In this tutorial, you:
- Create a virtual network and subnets for App Service virtual network integration
- Create private DNS zones and private endpoints
- Configure virtual network integration in App Service
- Disable basic authentication in App service
- Continuously deploy to a locked down backend web app
Prerequisites
The tutorial uses two sample Node.js apps hosted on GitHub. If you don't already have a GitHub account, create an account for free.
If you don't have an Azure account, create a free account before you begin.
To complete this tutorial:
Use the Bash environment in Azure Cloud Shell. For more information, see Get started with Azure Cloud Shell.

If you prefer to run CLI reference commands locally, install the Azure CLI. If you're running on Windows or macOS, consider running Azure CLI in a Docker container. For more information, see How to run the Azure CLI in a Docker container.
If you're using a local installation, sign in to the Azure CLI by using the az login command. To finish the authentication process, follow the steps displayed in your terminal. For other sign-in options, see Authenticate to Azure using Azure CLI.
When you're prompted, install the Azure CLI extension on first use. For more information about extensions, see Use and manage extensions with the Azure CLI.
Run az version to find the version and dependent libraries that are installed. To upgrade to the latest version, run az upgrade.
Review the scenario architecture
This tutorial demonstrates how to configure an architecture illustrated in the following diagram. The scenario represents one of the possible N-tier configurations in App Service. You can use the concepts covered in this tutorial to build more complex N-tier apps.
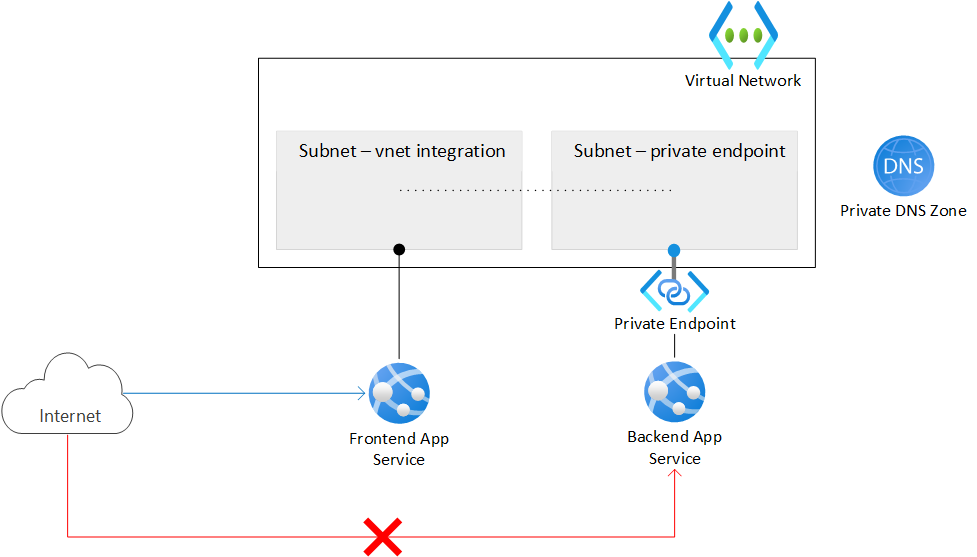
The architecture has a virtual network that contains two subnets. One subnet is integrated with the frontend web app, and the other subnet has a private endpoint for the backend web app. The virtual network blocks all inbound network traffic, except traffic that targets the integrated frontend app.
A frontend web app is integrated into the virtual network and accessible from the public internet.
A backend web app is accessible only through the private endpoint in the virtual network.
A private endpoint integrates with the backend web app and makes the web app accessible through a private IP address.
A Private DNS zone enables resolution of a DNS name to the private endpoint IP address.
Note
To configure virtual network integration and private endpoints, you need the Basic tier of Azure App Service or a higher tier. The Free tier doesn't support these features.
The scenario in this tutorial provides the following behavior:
- Public traffic to the backend app is blocked.
- Outbound traffic from App Service routes to the virtual network and can reach the backend app.
- App Service can perform DNS resolution to the backend app.
Create the two web apps
You need two App Service web apps, one for the frontend and one for the backend. The apps can run in the same region location. To set up virtual network integration and work with private endpoints, use at least the Basic tier of Azure App Service. You configure the virtual network integration and other settings later.
Create a resource group to manage all resources for this tutorial.
Set the
<resource-group>placeholder to the name for your new resource group, such aszava-resources. Set the<region-location>placeholder to the region for your new resource group, such aseastus.# Define variables for the resource group name and region location resourceGroupName=<resource-group> regionLocation=<region-location> # Create the resource group az group create --name $resourceGroupName --location $regionLocationFor more information, see the az group create command reference.
Create an App Service plan for your resources.
Set the
<app-service-plan>placeholder to the name for your new App Service plan, such aszava-app-service-plan.The tutorial example sets the
--skuparameter toP1V3(Premium V3). You can use this value or specify a different SKU. The SKU must support the required networking features for this tutorial. Select the Basic tier or higher.# Define a variable for the App Service plan name appServicePlanName=<app-service-plan> # Create the App Service plan az appservice plan create --name $appServicePlanName --resource-group $resourceGroupName --is-linux --location $regionLocation --sku P1V3For more information, see the az appservice plan create command reference.
Create the frontend and backend web apps.
The tutorial example creates two sample Node.js apps, where the runtime language version is
NODE:24-lts. If you prefer to use your own apps, set the--runtimeparameter<language-version>value accordingly. You can run theaz webapp list-runtimescommand for the list of available runtimes:az webapp list-runtimesSet the
<frontend-app-name>placeholder to the name for your new frontend web app, such aszava-frontend-app. The name must be globally unique and consist of valid characters (a-z,0-9,-). Likewise, set the<backend-app-name>placeholder to the name for your new backend web app, such aszava-backend-app.# Define variables for the App Service web app names frontendAppName=<frontend-app-name> backendAppName=<backend-app-name> # Create the web apps az webapp create --name $frontendAppName --resource-group $resourceGroupName --plan $appServicePlanName --runtime "NODE:24-lts" az webapp create --name $backendAppName --resource-group $resourceGroupName --plan $appServicePlanName --runtime "NODE:24-lts"For more information, see the az webapp create command reference.
Create the network infrastructure
The virtual network infrastructure consists of the following resources:
- An Azure Virtual Network instance
- A subnet for the App Service virtual network integration
- Another subnet for the private endpoint
- An Azure Private DNS zone
- A private endpoint
Create an Azure virtual network.
Set the
<virtual-network-name>placeholder to the name for your new virtual network, such aszava-virtual-network. The name must be globally unique.# Define a variable for the virtual network name virtualNetworkName=<virtual-network-name> # Create the virtual network az network vnet create --resource-group $resourceGroupName --location $regionLocation --name $virtualNetworkName --address-prefixes 10.0.0.0/16For more information, see the az network vnet create command reference.
Create a subnet for the App Service virtual network integration.
Set the
<network-integration-subnet>placeholder to the name for your new subnet that supports virtual network integration, such aszava-integration-subnet.For App Service, the virtual network integration subnet is recommended to have a CIDR block of
/26at a minimum./24is more than sufficient.--delegations Microsoft.Web/serverfarmsspecifies that the subnet is delegated for App Service virtual network integration.# Define a variable for the integration subnet name networkIntegrationSubnet=<network-integration-subnet> # Create the subnet for virtual network integration az network vnet subnet create --resource-group $resourceGroupName --vnet-name $virtualNetworkName --name $networkIntegrationSubnet \ --address-prefixes 10.0.0.0/24 --delegations Microsoft.Web/serverfarms \ --disable-private-endpoint-network-policies falseFor more information, see the az network vnet subnet create command reference.
Create another subnet for the private endpoints.
Set the
<private-endpoint-subnet>placeholder to the name for your new subnet that supports the private endpoint, such aszava-endpoint-subnet.# Define a variable for the private endpoint subnet name privateEndpointSubnet=<private-endpoint-subnet> # Create the subnet for the private endpoint az network vnet subnet create --resource-group $resourceGroupName --vnet-name $virtualNetworkName --name $privateEndpointSubnet \ --address-prefixes 10.0.1.0/24 \ --disable-private-endpoint-network-policies trueFor private endpoint subnets, you must disable private endpoint network policies by setting the
--disable-private-endpoint-network-policiesflag totrue. For more information, see the Optional parameters for the az network vnet subnet create command.Note
The
--private-endpoint-network-policiesflag might soon replace the--disable-private-endpoint-network-policiesflag.Create the Azure Private DNS zone.
Set the
<private-zone-name>placeholder to the name for your new Private DNS zone, such aszava-private.azurewebsites.net.# Define a variable for the Private DNS zone privateDNSZone=<private-zone-name> # Create the Private DNS zone az network private-dns zone create --resource-group $resourceGroupName --name $privateDNSZoneFor more information, see the az network vnet subnet create command reference. For more information about configuring the Private DNS zone, see Azure service DNS zone configuration.
Note
If you create the private endpoint in the Azure portal, an Azure Private DNS zone is created for your configuration automatically. For procedural consistency in this tutorial, you create the Private DNS zone and private endpoint separately by using the Azure CLI.
Link the Private DNS zone to the virtual network.
Set the
<dns-link-name>placeholder to the name for your new DNS link, such aszava-private-link.# Define a variable for the DNS link name dnsLinkName=<dns-link-name> # Create the link between the Private DNS zone and the virtual network az network private-dns link vnet create --resource-group $resourceGroupName --name $dnsLinkName --zone-name $privateDNSZone \ --virtual-network $virtualNetworkName --registration-enabled FalseFor more information, see the az network private-dns link vnet create command reference.
In the private endpoint subnet of your virtual network, create a private endpoint for your backend web app.
Set the
<private-endpoint-name>placeholder to the name of the new private endpoint for your backend web app, such aszava-backend-endpoint. Set the<service-connection-name>placeholder to the name of the new service connection, such aszava-backend-connection.# Define variables for the private endpoint and service connection privateEndpointName=<private-endpoint-name> serviceConnectionName=<service-connection-name> # Get the resource ID of the backend web app resourceId=$(az webapp show --resource-group $resourceGroupName --name $backendAppName --query id --output tsv) # Create the private endpoint for the backend web app by using the resource ID az network private-endpoint create --resource-group $resourceGroupName --name $privateEndpointName --location $regionLocation \ --connection-name $serviceConnectionName --private-connection-resource-id $resourceId \ --group-id sites --vnet-name $virtualNetworkName --subnet $privateEndpointSubnetFor more information, see the az network private-endpoint create command reference.
Link the private endpoint to the Private DNS zone with a DNS Zone group for the backend web app private endpoint.
Set the
<dns-zone-group-name>placeholder to the name for your new DNS Zone group, such aszava-dns-zone-group. The DNS zone group helps with automatic update of the Private DNS zone when the private endpoint is updated.# Define a variable for the DNS Zone group dnsZoneGroupName=<dns-zone-group-name> # Link the private endpoint to the Private DNS az network private-endpoint dns-zone-group create --resource-group $resourceGroupName --endpoint-name $privateEndpointName \ --name $dnsZoneGroupName --private-dns-zone $privateDNSZone --zone-name $privateDNSZoneFor more information, see the az network private-endpoint dns-zone-group create command reference.
Confirm direct access to your private endpoint is denied.
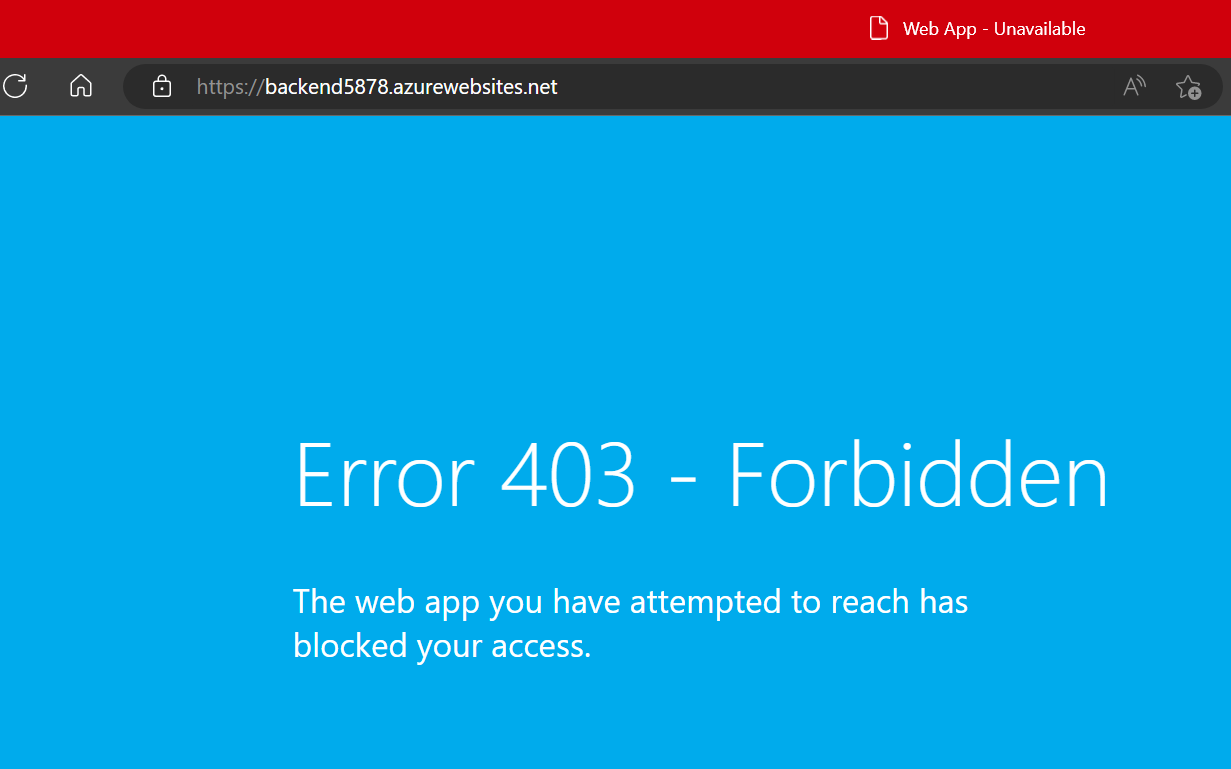
When you create a private endpoint for an App Service app, public access is implicitly disabled. If you try to access your backend web app by using its default URL, your access is denied.
In a browser, enter the default URL for your backend web app, such as
<backend-app-name>.azurewebsites.net.The browser message indicates direct access is denied:
For more information on App Service access restrictions with private endpoints, see Azure App Service access restrictions.
Configure virtual network integration
After you create the virtual network infrastructure, you can set up virtual network integration on your frontend web app. Virtual network integration allows outbound traffic to flow directly into the virtual network. By default, only local IP traffic defined in the RFC-1918 > Private Address Space protocol route to the virtual network. This level of routing is what you need to enable private endpoints.
Enable virtual network integration on your frontend web app. The following command assumes the subnet and web app are located in the same resource group.
az webapp vnet-integration add --resource-group $resourceGroupName --name $frontendAppName --vnet $virtualNetworkName --subnet $networkIntegrationSubnet
For more information, see the az webapp vnet-integration add command reference.
To route all traffic to the virtual network, see Manage virtual network integration routing. Routing all traffic can also be used if you want to route internet traffic through your virtual network, such as through an Azure Virtual Network NAT or Azure Firewall.
Enable deployment to the backend web app
Because your backend web app isn't publicly accessible, you must allow your continuous deployment tool to reach your app by making the SCM site publicly accessible from the internet. The main web app itself can continue to deny all traffic.
Enable public access for the back-end web app.
az webapp update --resource-group $resourceGroupName --name $backendAppName --set publicNetworkAccess=EnabledSet the unmatched rule action for the main web app to deny all traffic.
This setting denies public access to the main web app even though the general app access setting is set to allow public access.
az resource update --resource-group $resourceGroupName --name $backendAppName --namespace Microsoft.Web \
   --resource-type sites --set properties.siteConfig.ipSecurityRestrictionsDefaultAction=Deny
Set the unmatched rule action for the SCM site to allow all traffic.
az resource update --resource-group $resourceGroupName --name $backendAppName --namespace Microsoft.Web \
   --resource-type sites --set properties.siteConfig.scmIpSecurityRestrictionsDefaultAction=Allow
Restrict FTP and SCM access
Because your backend SCM site is publicly accessible, you need to lock it down with better security.
Disable FTP access for both the frontend and backend web app:
az resource update --resource-group $resourceGroupName --name ftp --namespace Microsoft.Web \
   --resource-type basicPublishingCredentialsPolicies --parent sites/<frontend-app-name> --set properties.allow=false

az resource update --resource-group $resourceGroupName --name ftp --namespace Microsoft.Web \
   --resource-type basicPublishingCredentialsPolicies --parent sites/<backend-app-name> --set properties.allow=false
Disable basic authentication access to the WebDeploy ports and SCM/advanced tool sites for both web apps:
az resource update --resource-group $resourceGroupName --name scm --namespace Microsoft.Web \
   --resource-type basicPublishingCredentialsPolicies --parent sites/<frontend-app-name> --set properties.allow=false

az resource update --resource-group $resourceGroupName --name scm --namespace Microsoft.Web \
   --resource-type basicPublishingCredentialsPolicies --parent sites/<backend-app-name> --set properties.allow=false
When you disable basic authentication on App Service, you limit access to the FTP and SCM endpoints to users registered with Microsoft Entra ID. This action further secures your apps. For more information on disabling basic authentication including how to test and monitor logins, see Disabling basic authentication on App Service.
Configure continuous deployment with GitHub Actions
For this procedure, you need two apps that are ready to deploy to your App Service frontend and backend apps. To access the web apps, you need a service principal and continuous deployment with GitHub Actions.
Get web apps for deployment testing
The Azure Samples repositories on GitHub provide sample Node.js apps for deployment.
In a browser, go to the Node.js Backend sample app.
Fork the GitHub repository so you have your own copy to make changes. This sample builds a 'Hello World' app. You deploy this app to your backend web app.
Repeat the same process for the Node.js Frontend sample app.
Fork the GitHub repository so you have your own copy to make changes. This sample builds a web app that fetches and displays the content of a URL. You deploy this app to your frontend web app.
Configure the service principal
You need a service principal for your frontend web app and backend web app.
Create a service principal.
Set the
<service-principal-name>placeholder to the name for your new service principal, such aszava-service-principal.Replace the other
<placeholder>parameter values with the information for your own resources.# Define a variable for the service principal name servicePrincipalName=<service-principal-name> # Link the private endpoint to the Private DNS az ad sp create-for-rbac --name <service-principal-name> --role contributor --scopes \ /subscriptions/<subscription-ID>/resourceGroups/<resource-group>/providers/Microsoft.Web/sites/<frontend-app-name> \ /subscriptions/<subscription-ID>/resourceGroups/<resource-group>/providers/Microsoft.Web/sites/<backend-app-name>The output is a JSON object with the role assignment credentials that provide access to your App Service apps.
{
  "appId": "00001111-aaaa-2222-bbbb-3333cccc4444",
  "displayName": "<service-principal-name>",
  "password": "0Aa!1Bb!2Cc!3Dd!4Ee!5Ff!6Gg!7Hh!8Ii!9Jj!",
  "tenantId": "aaaabbbb-6666-cccc-7777-dddd8888eeee"
}
The JSON includes your service principal password, which is visible only at this time.
Tip
It's a good practice to grant minimum access. In this example, the scope is limited to just the apps, not the entire resource group.
Copy the JSON object so you have a record of your service principal name.
Provide your service principal credentials to the Azure sign in operation as part of your GitHub Action workflow.
Store the credentials as GitHub secrets that are referenced in your workflow.
In a browser, go to the forked repository for your backend Node.js app on GitHub.
Go to Settings > Security > Secrets and variables > Actions.
Select New repository secret and create a secret for each of the following settings.
Use the values from your JSON output.
Setting Value Example AZURE_CLIENT_ID <application/client-id>00001111-aaaa-2222-bbbb-3333cccc4444AZURE_TENANT_ID <tenant-id>aaaabbbb-6666-cccc-7777-dddd8888eeeeAZURE_SUBSCRIPTION_ID <subscription-id>cccc2c2c-dd3d-ee4e-ff5f-aaaaaa6a6a6aRepeat this process for the forked repository for your frontend Node.js app on GitHub.
Set up continuous deployment with GitHub Actions
You can set up continuous deployment with GitHub Actions.
In the Azure portal, go to the Overview page for your frontend web app.
In the left menu, select Deployment > Deployment center.
In the Settings tab, set the Source option to GitHub:
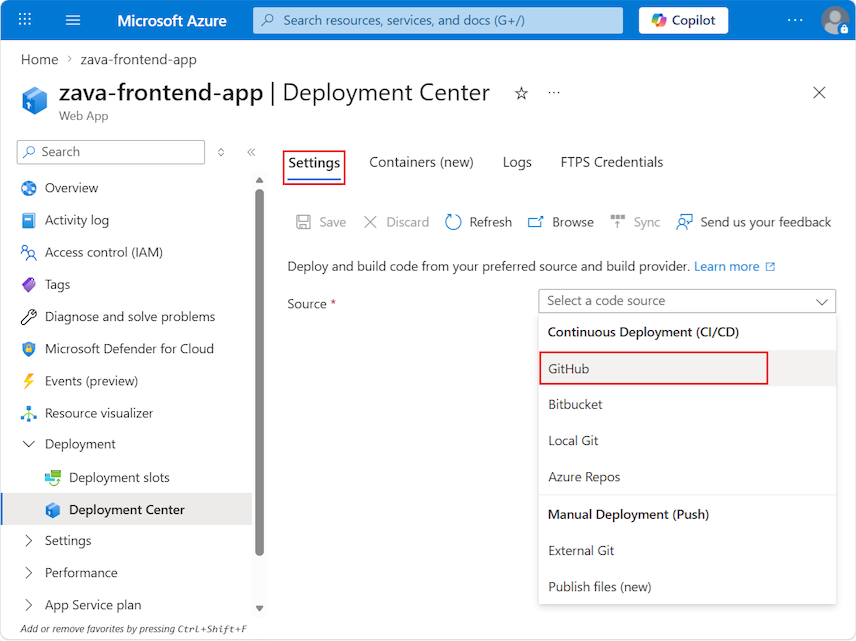
If you're deploying from GitHub for the first time, select Authorize and follow the authorization prompts. If you want to deploy from a different user's repository, select Change Account.
After you authorize your Azure account with GitHub, select the Organization, Repository, and Branch to configure CI/CD for. If you can't find an organization or repository, you might need to enable more permissions on GitHub. For more information, see Manage user access to your organization's repositories.
Setting Value Organization <your-GitHub-organization>Repository <forked-repository-name>Branch main Select Save.
Repeat this process for your backend web app and the corresponding forked repository.
Validate connections and app access
Now you're ready to check the connections and access to your frontend and backend web apps.
Try browsing directly to your backend web app with its URL,
https://<backend-app-name>.azurewebsites.net.You should see the following browser message:
If you can reach the app, then check your configuration:
Confirm the private endpoint is correctly set up.
Confirm the access restrictions for your app are set to deny all traffic for the main web app.
Now try browsing directly to your frontend web app with its URL,
https://<frontend-app-name>.azurewebsites.net.When the connection succeeds, you see the following page:
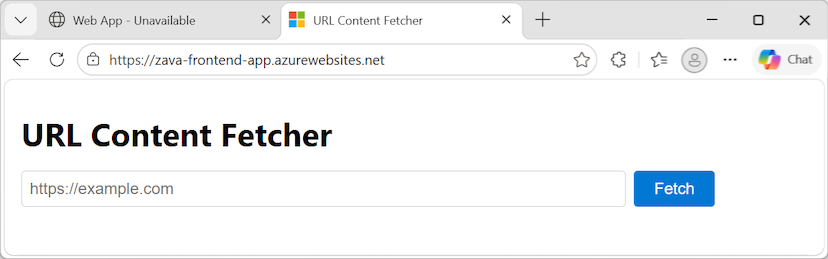
In the URL box, enter the URL for your backend web app,
https://<backend-app-name>.azurewebsites.net, and select Fetch.If you set up the connections properly, the page refreshes to show the message content from the backend web app:
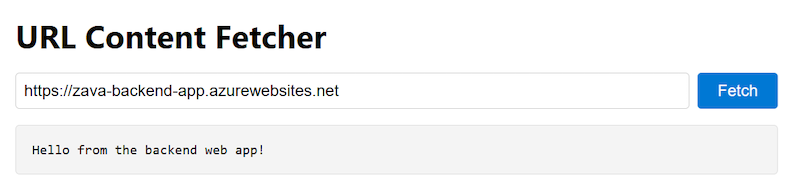
All outbound traffic from the frontend web app routes through the virtual network. Your frontend web app is securely connecting to your backend web app through the private endpoint.
If something is wrong with your connections, you see the Error 403 - Forbidden message in the output.
Establish an SSH session and open a remote shell
Validate the frontend web app is reaching the backend web app over the private link by using SSH to a frontend instance.
Establish an SSH session to the web container of your app and open a remote shell in your browser:
az webapp ssh --resource-group $resourceGroupName --name $frontendAppNameFor more information, see the az webapp ssh command reference.
After the shell opens in your browser, confirm your backend web app is being reached by using the private IP of your backend web app.
In the following commands, replace the
<placeholder>parameter values with the information for your own resource.Run the
nslookupcommand:nslookup <backend-app-name>.azurewebsites.netRun the
curlcommand to validate the site content again:curl https://<backend-app-name>.azurewebsites.net
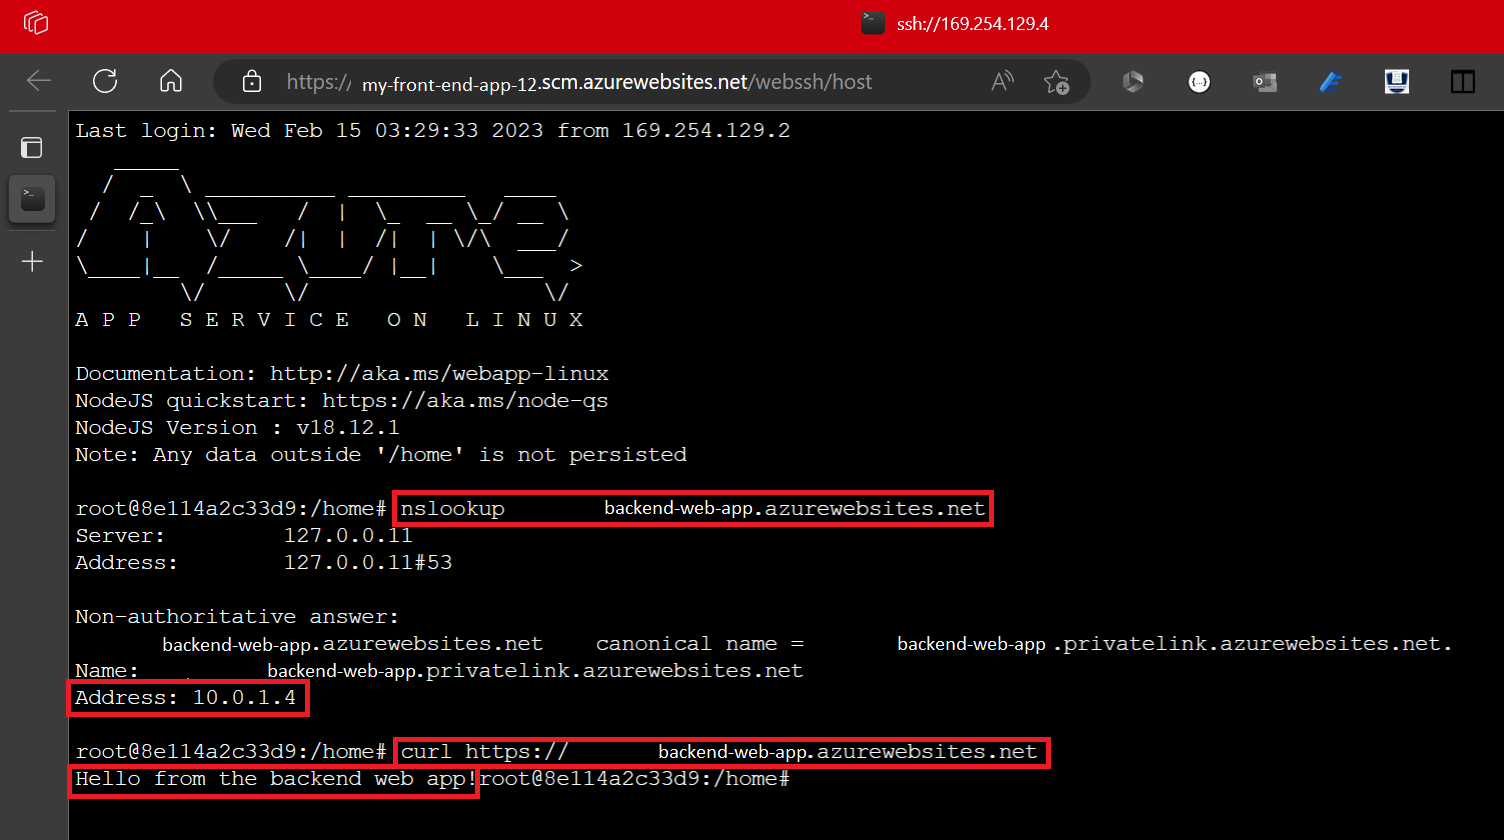
The
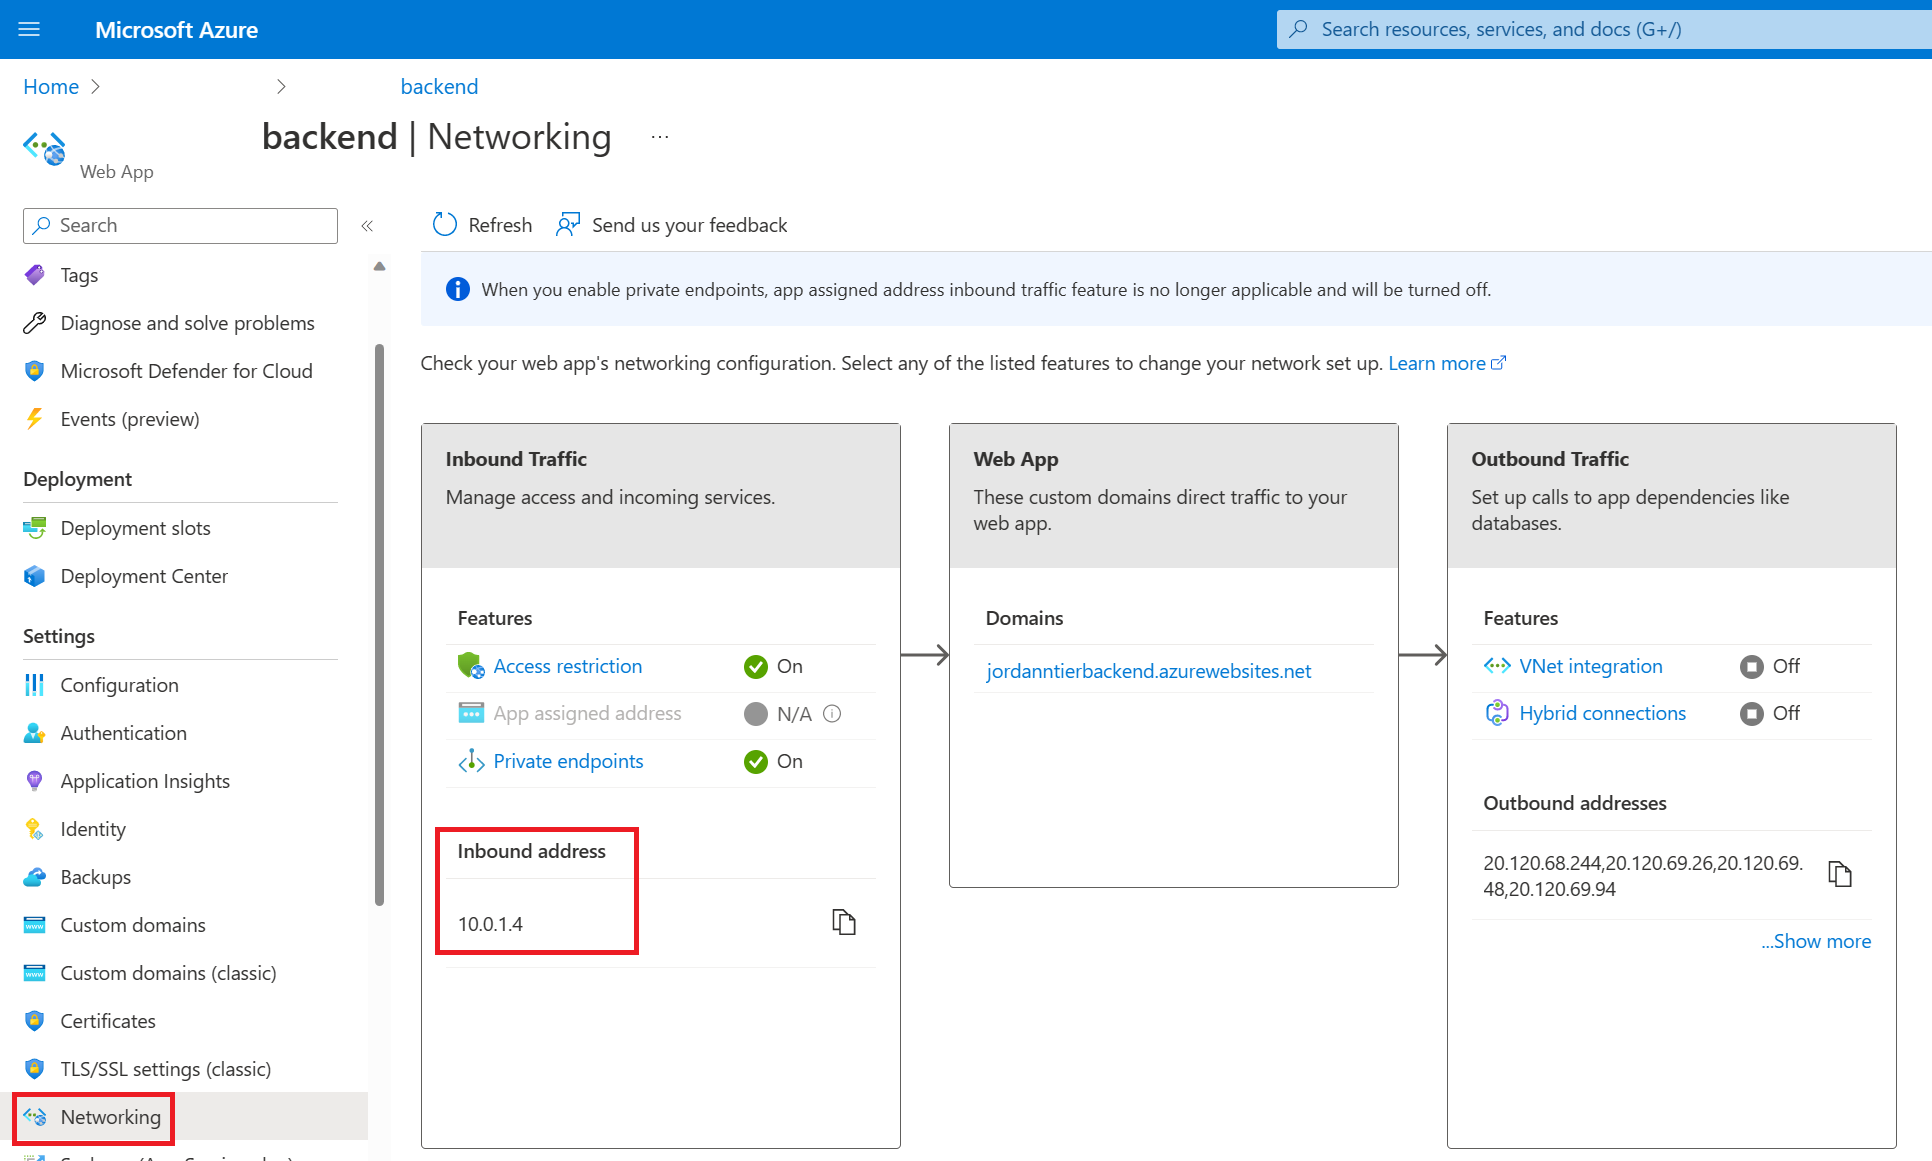
nslookupcommand should resolve to the private IP address of your backend web app. The private IP address should be an address from your virtual network.You can confirm your private IP address in the Azure portal. Go to the Settings > Networking page for your backend web app.
Repeat the same
nslookupandcurlcommands from another terminal (one that isn't an SSH session on your frontend instances).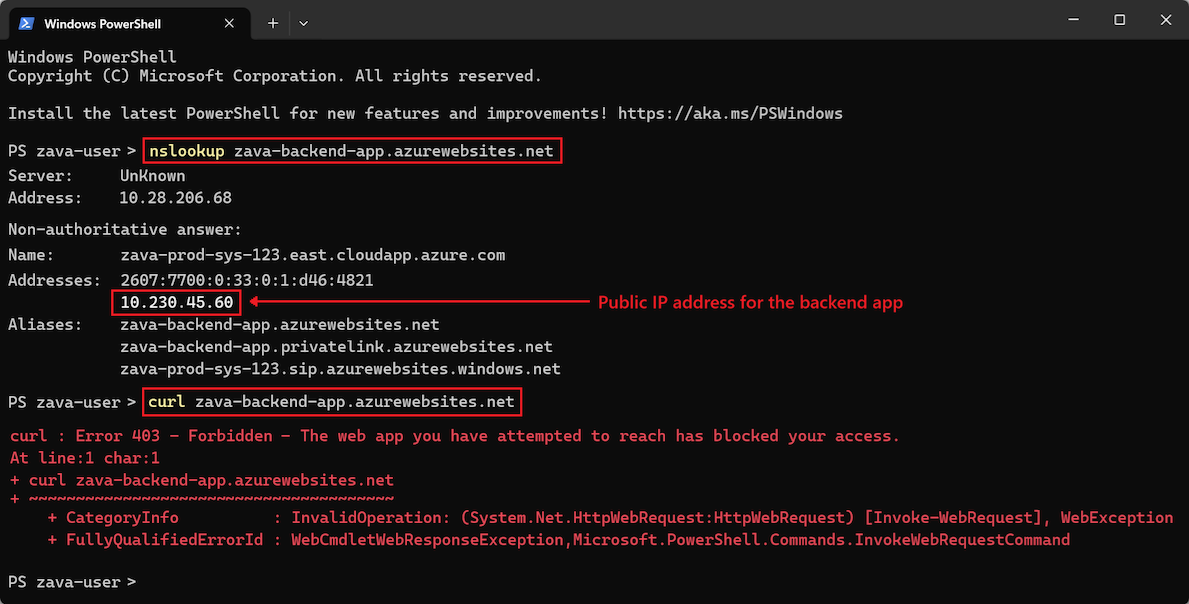
The
nslookupcommand returns the public IP for the backend web app. Because public access to the backend web app is disabled, if you try to reach the public IP, you get an access denied error. This error means the site isn't accessible from the public internet, which is the intended behavior.The
nslookupcommand doesn't resolve to the private IP because the address is resolvable only from within the virtual network through the private DNS zone. Only the frontend web app is within the virtual network. If you try to run thecurlcommand on the backend web app from the external terminal, the returned HTML contains the Error 403 message, Forbidden - The web app you have attempted to reach has blocked your access. Some terminals also display the same HTML as the error page returned when you attempt to directly access the backend web app.
Clean up resources
In the preceding steps, you created Azure resources in a resource group. If you don't expect to need these resources in the future, delete the resource group by running the following command in the Cloud Shell.
Replace the <placeholder> parameter value with the information for your own resource:
az group delete --name <resource-group>
This command can take several minutes to complete.
Frequently asked questions
In this tutorial, you deployed a baseline infrastructure to support a secure N-tier web app. App Service provides features that can help you ensure you're running applications that follow security best practices and recommendations.
This section contains answers to frequently asked questions that can help you further secure your apps and deploy and manage your resources according to best practices.
Deploy with other methods than a service principal
In this tutorial, you disabled basic authentication. You can't authenticate with the backend SCM site by using a username and password, or by using a publish profile. However, rather that authenticating by using a service principal, you can use OpenID Connect credentials.
Configure GitHub Actions deployment in App Service
Azure autogenerates a workflow file in your repository. New commits in the selected repository and branch deploy continuously into your App Service app. You can track the commits and deployments on the Logs tab in GitHub.
A default workflow file that uses a publish profile to authenticate to App Service is added to your GitHub repository. You can view this file by going to the <repo-name>/.github/workflows/ directory.
Confirm safe public access of the backend SCM site
When you lock down FTP and SCM access, you can ensure that only principals backed by Microsoft Entra can access the SCM endpoint, even though the endpoint is publicly accessible. This setting helps to reassure you that your backend web app is still secure.
Deploy without an open backend SCM site
If you're concerned about enabling public access to the SCM site, or you have policy restrictions, consider other App Service deployment options like running from a ZIP package.
Deploy this architecture with a template
The resources you created in this tutorial can be deployed by using an Azure Resource Manager template (ARM template) or Bicep template. The application connected to a backend web app Bicep file allows you to create a secure N-tier app solution.
To learn how to deploy ARM and Bicep templates, see Deploy Bicep files with the Azure CLI.