Note
Access to this page requires authorization. You can try signing in or changing directories.
Access to this page requires authorization. You can try changing directories.
Important
Advanced rule is currently in preview. See the Supplemental Terms of Use for Microsoft Azure Previews for legal terms that apply to Azure features that are in beta, preview, or otherwise not yet released into general availability.
This feature isn't supported for Multisite listeners and Layer 4 TCP/TLS proxy
In this tutorial, you use the Azure portal to configure header-based routing through Azure Application Gateway Advanced Rules. You create routing rules that direct traffic to different backend pools based on custom HTTP headers. This tutorial uses an existing Application Gateway with a basic routing rule, a listener, a default backend pool, and default backend settings.
Prerequisites
- An Azure account with an active subscription. If you don't have an Azure account, you can create one for free.
- An application gateway with a basic routing rule, a listener, a default backend pool, and default backend settings.
- A second backend pool and backend settings for the application version that receives requests with the
X-App-Version: v2header.
Sign in to Azure
Sign in to the Azure portal with your Azure account.
Create an application gateway
Note
The Azure portal Create Application Gateway experience currently doesn't support configuration of an Advanced Routing Rule. For convenience, you can update a Basic rule to an Advanced Routing Rule after the gateway is deployed.
Follow Quickstart: Direct web traffic with Azure Application Gateway - Azure portal to deploy an application gateway with a basic rule. Before you continue, add a second backend pool and backend settings for the v2 application target.
Configure Advanced Routing rule
Using your existing listener and its port number with an Advanced rule, update the existing Basic rule to an Advanced rule.
- Go to the application gateway resource you created. You can also choose an existing resource.
- Open Rules from the left menu.
- Select the basic rule that you want to update to an advanced rule.
Listener tab
When you select an existing Basic listener, you see that the fields under the tab are prefilled. If you create a new Advanced Rule, enter the following details:
- Rule name - Enter a name for the rule.
- Rule Priority - Enter a numeric value. The system processes rules with lower values first.
Routing tab
For Rule type, select Advanced to update the rule from basic.
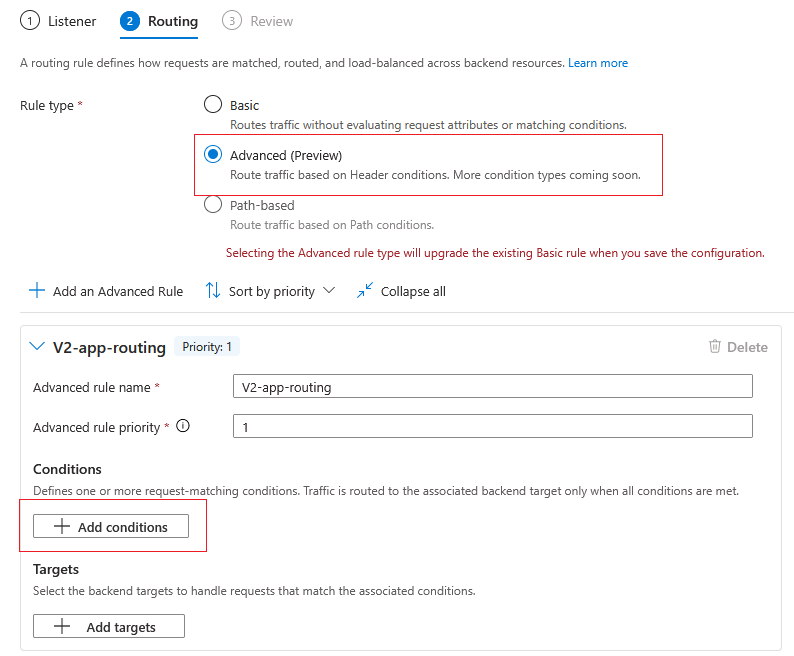
In the Advanced rule section, configure these values:
Setting Value Advanced rule name Use the name V2-app-routing.Advanced rule priority Specify an integer value that determines evaluation order. Lower values are evaluated first. Note
The Advanced Rule Priority value is different from the primary Rule Priority value you filled earlier. The Advanced Rule priority value applies to each nested rule within an Advanced Routing Map.
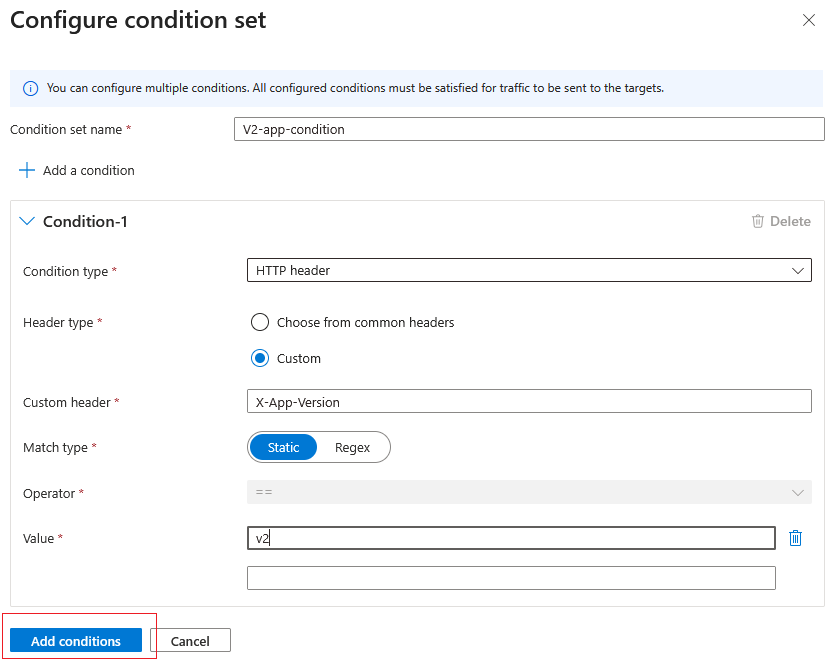
Under Conditions, select + Add conditions to configure one or multiple conditions under a conditions set using these values:
Setting Value Condition set name Use V2-app-condition.Condition type Select HTTP header. Header type Select Custom. Custom header Enter X-App-Version.Match type Select Static for an exact value match. Value Enter v2.Select Add Conditions. This step doesn't save the configuration yet.
Under Targets, select + Add Targets, and configure these values:
Setting Value Target type Select Backend pool. Backend pool Select the backend pool that you created for the v2 version of the application. Backend settings Select the backend HTTP settings that you created for the v2 application. 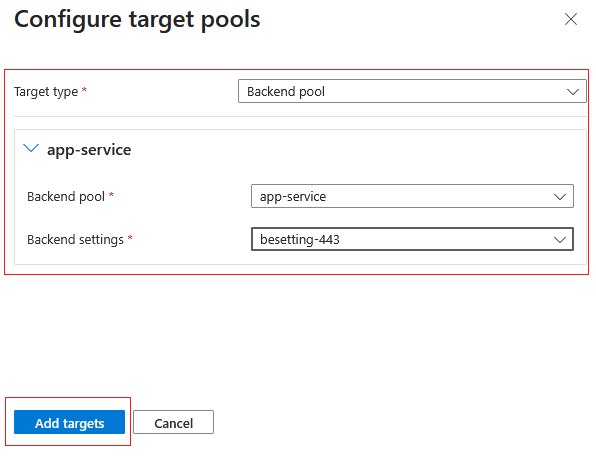
Now, let's complete the default routing configuration. Any incoming request that doesn't include custom header "X-App-Version:v2" must be routed to the default backend pool.
In Default targets, verify that Target and Backend Settings contain the values from the basic rule.
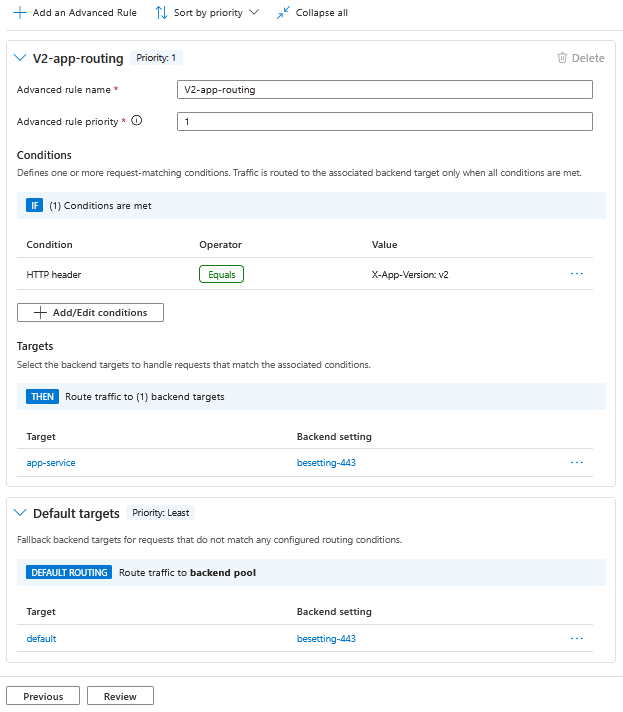
Select Review.
Review tab
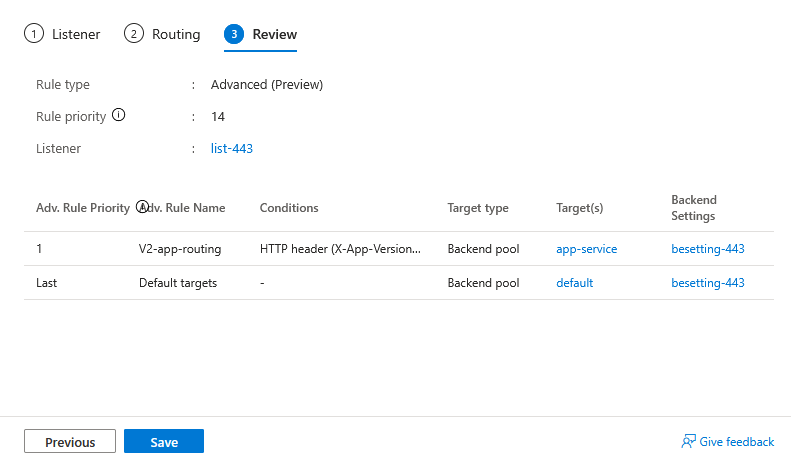
This page is read-only and provides a summary of the configurations you completed. You can review and make any corrections if necessary by selecting the Previous button.
Review the advanced rule, condition set, conditional backend target, and default backend target. Select Previous to correct any values.
Select Save.
Test the Application Gateway
Test the advanced routing rule by using cURL to send three HTTP requests to the Application Gateway's public IP address: one without the X-App-Version header, one with X-App-Version: v2, and one with a different value.
Get the Application Gateway IP address
- In the left menu, select Overview.
- Copy the Frontend public IP address.
Test with cURL
# Test request without the header (routes to default pool)
curl http://<FRONTEND-IP>/

# Test request with custom header (routes to V2 Backend Pool)
curl -H "X-App-Version: v2" http://<FRONTEND-IP>/

# Test request with different header value (routes to default pool)
curl -H "X-App-Version: none" http://<FRONTEND-IP>/
Clean up resources
When you no longer need the resources, delete the resource group and all related resources:
- In the Azure portal, search for and select Resource groups.
- Select the resource group you created for the deployment of the gateway in this tutorial.
- On the resource group page, select Delete resource group.
- Enter the resource group name for confirmation and then select Delete.