How to: Manage your data feeds
Important
Starting on the 20th of September, 2023 you won’t be able to create new Metrics Advisor resources. The Metrics Advisor service is being retired on the 1st of October, 2026.
Learn how to manage your onboarded data feeds in Metrics Advisor. This article guides you through managing data feeds in Metrics Advisor.
Edit a data feed
Note
The following details cannot be changed after a data feed has been created.
- Data feed ID
- Created Time
- Dimension
- Source Type
- Granularity
Only the administrator of a data feed is allowed to make changes to it.
On the data feed list page, you can pause, reactivate, delete a data feed:
Pause/Reactivate: Select the Pause/Play button to pause/reactivate a data feed.
Delete: Select Delete button to delete a data feed.
If you change the ingestion start time, you need to verify the schema again. You can change it by clicking Edit in the data feed detail page.
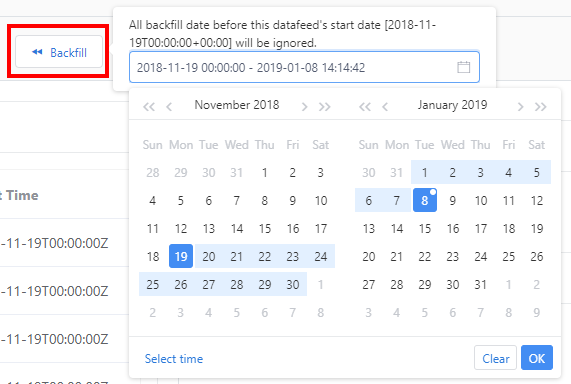
Backfill your data feed
Select the Backfill button to trigger an immediate ingestion on a time-stamp, to fix a failed ingestion or override the existing data.
- The start time is inclusive.
- The end time is exclusive.
- Anomaly detection is re-triggered on selected range only.
Manage permission of a data feed
Azure operations can be divided into two categories - control plane and data plane. You use the control plane to manage resources in your subscription. You use the data plane to use capabilities exposed by your instance of a resource type. Metrics Advisor requires at least a 'Reader' role to use its capabilities, but cannot perform edit/delete action to the resource itself.
Within Metrics Advisor there're other fine-grained roles to enable permission control on specific entities, like data feeds, hooks, credentials etc. There are two types of roles:
- Administrator: Has full permissions to manage a data feed, hook, credentials, etc. including modify and delete.
- Viewer: Has access to a read-only view of the data feed, hook, credentials, etc.
Advanced settings
There are several optional advanced settings when creating a new data feed, they can be modified in data feed detail page.
Ingestion options
Ingestion time offset: By default, data is ingested according to the specified granularity. For example, a metric with a daily timestamp will be ingested one day after its timestamp. You can use the offset to delay the time of ingestion with a positive number, or advance it with a negative number.
Max concurrency: Set this parameter if your data source supports limited concurrency. Otherwise leave at the default setting.
Stop retry after: If data ingestion has failed, it will retry automatically within a period. The beginning of the period is the time when the first data ingestion happened. The length of the period is defined according to the granularity. If leaving the default value (-1), the value will be determined according to the granularity as below.
Granularity Stop Retry After Daily, Custom (>= 1 Day), Weekly, Monthly, Yearly 7 days Hourly, Custom (< 1 Day) 72 hours Min retry interval: You can specify the minimum interval when retrying pulling data from source. If leaving the default value (-1), the retry interval will be determined according to the granularity as below.
Granularity Minimum Retry Interval Daily, Custom (>= 1 Day), Weekly, Monthly 30 minutes Hourly, Custom (< 1 Day) 10 minutes Yearly 1 day
Fill gap when detecting:
Note
This setting won't affect your data source and will not affect the data charts displayed on the portal. The auto-filling only occurs during anomaly detection.
Sometimes series are not continuous. When there are missing data points, Metrics Advisor will use the specified value to fill them before anomaly detection to improve accuracy. The options are:
- Using the value from the previous actual data point. This is used by default.
- Using a specific value.
Action link template:
Action link templates are used to predefine actionable HTTP urls, which consist of the placeholders %datafeed, %metric, %timestamp, %detect_config, and %tagset. You can use the template to redirect from an anomaly or an incident to a specific URL to drill down.

Once you've filled in the action link, click Go to action link on the incident list's action option, and diagnostic tree's right-click menu. Replace the placeholders in the action link template with the corresponding values of the anomaly or incident.
| Placeholder | Examples | Comment |
|---|---|---|
%datafeed |
- | Data feed ID |
%metric |
- | Metric ID |
%detect_config |
- | Detect config ID |
%timestamp |
- | Timestamp of an anomaly or end time of a persistent incident |
%tagset |
%tagset, [%tagset.get("Dim1")], [ %tagset.get("Dim1", "filterVal")] |
Dimension values of an anomaly or top anomaly of an incident. The filterVal is used to filter out matching values within the square brackets. |
Examples:
If the action link template is
https://action-link/metric/%metric?detectConfigId=%detect_config:- The action link
https://action-link/metric/1234?detectConfigId=2345would go to anomalies or incidents under metric1234and detect config2345.
- The action link
If the action link template is
https://action-link?[Dim1=%tagset.get('Dim1','')&][Dim2=%tagset.get('Dim2','')]:- The action link would be
https://action-link?Dim1=Val1&Dim2=Val2when the anomaly is{ "Dim1": "Val1", "Dim2": "Val2" }. - The action link would be
https://action-link?Dim2=Val2when the anomaly is{ "Dim1": "", "Dim2": "Val2" }, since[Dim1=***&]is skipped for the dimension value empty string.
- The action link would be
If the action link template is
https://action-link?filter=[Name/Dim1 eq '%tagset.get('Dim1','')' and ][Name/Dim2 eq '%tagset.get('Dim2','')']:- The action link would be
https://action-link?filter=Name/Dim1 eq 'Val1' and Name/Dim2 eq 'Val2'when the anomaly is{ "Dim1": "Val1", "Dim2": "Val2" }, - The action link would be
https://action-link?filter=Name/Dim2 eq 'Val2'when anomaly is{ "Dim1": "", "Dim2": "Val2" }since[Name/Dim1 eq '***' and ]is skipped for the dimension value empty string.
- The action link would be
"Data feed not available" alert settings
A data feed is considered as not available if no data is ingested from the source within the grace period specified from the time the data feed starts ingestion. An alert is triggered in this case.
To configure an alert, you need to create a hook first. Alerts will be sent through the hook configured.
Grace period: The Grace period setting is used to determine when to send an alert if no data points are ingested. The reference point is the time of first ingestion. If an ingestion fails, Metrics Advisor will keep trying at a regular interval specified by the granularity. If it continues to fail past the grace period, an alert will be sent.
Auto snooze: When this option is set to zero, each timestamp with Not Available triggers an alert. When a setting other than zero is specified, continuous timestamps after the first timestamp with not available are not triggered according to the setting specified.