Note
Access to this page requires authorization. You can try signing in or changing directories.
Access to this page requires authorization. You can try changing directories.
Many manufacturers need to provide data about their manufactured products to their customers in digital and machine-readable form. Sometimes a law such as the European Commission's Digital Product Passport legislation mandates this requirement. To provide this data, manufacturers often create an industrial dataspace between their enterprise systems and their customer's systems. The dataspace provides a secure, point-to-point communication channel for digital product data between the manufacturer and the customer.
Important
In order for this solution to be deployed, you must first perform the Azure Data Explorer deployment.
What is an industrial dataspace?
An industrial dataspace is a virtual environment designed to facilitate the secure and efficient exchange of data between different organizations within an industrial ecosystem. An industrial dataspace focuses on the following key principles:
- Data sovereignty: It ensures that data providers retain control over their data, including who can access it and under what conditions.
- Interoperability: It uses standardized protocols and governance models to enable seamless data sharing across various platforms and industries.
- Collaboration: It supports collaborative efforts by allowing different stakeholders to share and utilize data for mutual benefit.
These principles are relevant in the context of Industry 4.0, where interconnected systems and data-driven decision-making are crucial for optimizing industrial processes and creating resilient supply chains.
The following diagram shows an overview of the solution:
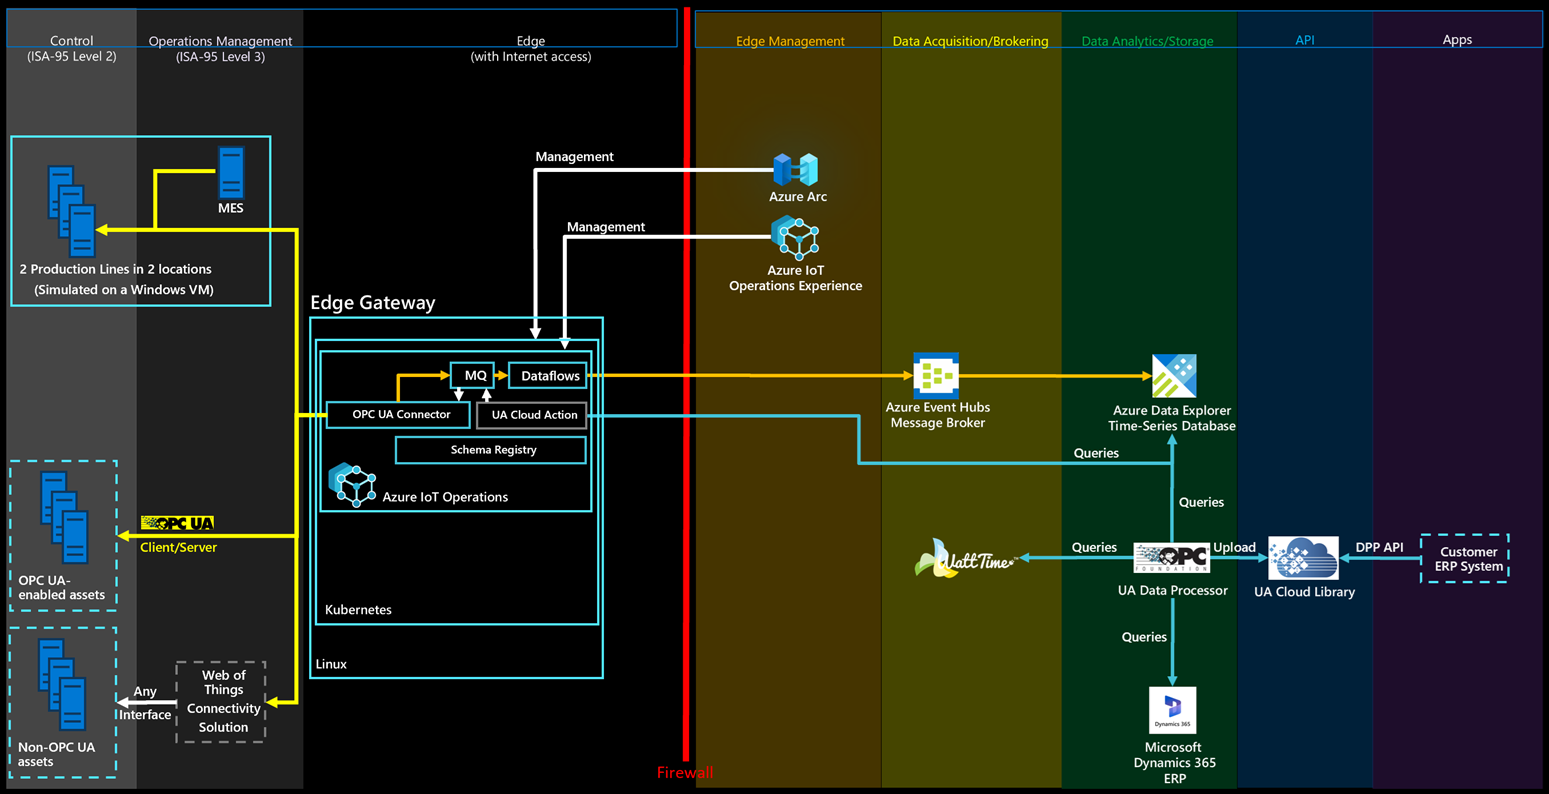
All the required components to enable the industrial dataspace are deployed to Azure during the Azure Data Explorer workflow.
Provide a carbon footprint for your produced products via the Digital Product Passport
Providing the Product Carbon Footprint (PCF) is one of the most popular use cases for industrial dataspaces. It's increasingly important in the buying decision for customers. Products with a low PCF are popular, but accurately calculating the PCF is hard. The Green-House Gas (GHG) Protocol is a common calculation method for the PCF. It splits up the calculation task into scope 1, scope 2, and scope 3 emissions. This example and reference solution focuses on calculating scope 2 emissions from the simulated production lines. Scope 2 emissions are the emissions produced during a production process. The simulated stations along the production lines provide energy consumption data. This data is used to calculate the scope 2 carbon footprint for each produced product, if the marginal carbon intensity of the electrical energy consumed is known for the location of the simulated production lines. This information is optionally retrieved from a non-Microsoft cloud service operated by WattTime. If the WattTime service isn't configured, the calculation uses an average value.
IEC 62541 Open Platform Communication Unified Architecture (OPC UA)
This reference solution supports Digital Product Passport (DPP) data modeling in a machine-readable and standardized fashion with OPC UA. This approach is aligned with the new OPC Foundation Cloud Initiative and simplifies modeling because it taps into the large OPC UA ecosystem. You can use any OPC UA modeling tool such as the Siemens OPC UA Modeling Editor (SiOME) or the CESMII Smart Manufacturing Profile Designer with the reference solution. The reference solution also uses the OPC UA Nodeset file format.
This example automatically creates a Product Carbon Footprint (PCF) for a sample of the simulated products produced and stores the DPPs in an UA Cloud Library. The UA Cloud Library is provided as an open-source reference solution by the OPC Foundation. The configuration of the deployed UA Cloud Library happens automatically during the deployment workflow and comes with its own dashboard. To access the dashboard, navigate to the Overview page of the UA Cloud Library container app from the Azure portal, and select the Application URL displayed. The UA Cloud Library comes with its own Explorer that can be used to inspect produced DPPs.
Retrieve a Digital Product Passport (DPP) via the DPP Lifecycle API
The UA Cloud Library exposes a Swagger (OpenAPI) UI that you can use to browse the DPPs produced by the simulation and retrieve a specific one through the EN 18222 DPP Lifecycle API. Follow these steps:
Open the Swagger UI. In the Azure portal, navigate to your resource group and open the UA Cloud Library container app (named
<resource-group-name>-ua-cloudlibrary). On its Overview page, copy the Application URL (for examplehttps://<resource-group-name>-ua-cloudlibrary.<region>.azurecontainerapps.io). Open that URL in a browser and append/swaggerto reach the Swagger UI.Authorize as admin. In the Swagger UI, select the Authorize button (top right).
- Username:
admin - Password: the value of the admin password you provided when you deployed the reference solution (the same password used for the deployment's Virtual Machine).
Enter these credentials and select Authorize, then Close. Subsequent requests from the Swagger UI are now sent with the admin credentials.
- Username:
List the available DPPs. Expand the GET
/infomodel/namespacesoperation and select Try it out > Execute. The response lists the information-model namespaces stored in the UA Cloud Library, including the DPPs produced by the simulation. Note the identifier (dppId) of the DPP you want to retrieve.Retrieve a specific DPP. Expand the GET
/v1/dpps/{dppId}operation, select Try it out, paste thedppIdfrom the previous step into thedppIdfield, and select Execute. The response body contains the full Digital Product Passport JSON document, including the calculated Product Carbon Footprint (PCF), for that product.
Tip
The same calls work outside the Swagger UI with any HTTP client (for example curl) by sending the Basic authentication header, for example:
curl -u admin:<ServicePassword> https://<application-url>/infomodel/namespaces
curl -u admin:<ServicePassword> https://<application-url>/v1/dpps/<dppId>
Configure the WattTime service (Optional)
To optionally configure the WattTime service for a more accurate carbon footprint calculation:
- Go to Register New User and choose a username and password for the service. You need these credentials later in this guide.
- From a Windows command prompt, enter
wslto start the Windows Subsystem for Linux. If WSL isn't yet installed on your computer, install it by runningwsl --installand reboot your computer. - To register your user account, enter the following command, making sure you replace
<username>and<password>with the values you chose previously:curl -L -X POST -d '{"username":"<username>","password":"<password>","email":"john@johnson.com"}' https://api.watttime.org/register --header 'Content-Type: application/json' --header 'Accept: application/json'. - From Windows Subsystem for Linux, run
echo -n '<username>:<password>' | base64, and copy the generated value. - To validate your registration, sign in to the service using the following command, making sure you replace
<YOUR_ACCESS_TOKEN>with the token from the previous step:curl -L -X GET https://api.watttime.org/login -H 'Authorization: Basic <YOUR_ACCESS_TOKEN>'. If the validation succeeds, you get a token as a response. - Contact WattTime to upgrade your free account to a pro account. The free account only gives you access to the CAISO_North sub-region, but you need access to the location of the simulated production lines in Munich and Seattle.
- Wait until you receive an email from WattTime that your account was upgraded to a pro account. Then, from the Azure portal, navigate to the Azure Container App instance for the deployed UA Data Processor. Follow the steps in Add environment variables on existing container apps, navigate to the Environment variables section of the Edit a container panel, select Manual entry for the Source field, and enter your WattTime username and password in the Value field of the two existing environment variables WATTTIME_USER and WATTTIME_PASSWORD. Select Save and then Create to deploy a new revision of your UA Data Processor.