Note
Access to this page requires authorization. You can try signing in or changing directories.
Access to this page requires authorization. You can try changing directories.
Data from App Configuration can be loaded as App Settings in a .NET application. For more information, see the quickstart. However, as is designed by the .NET, the App Settings can only refresh upon application restart. The App Configuration .NET provider is a .NET Standard library. It supports caching and refreshing configuration dynamically without application restart. This tutorial shows how you can implement dynamic configuration updates in a .NET background service.
In this tutorial, you learn how to:
- Set up your .NET background service to update its configuration in response to changes in an App Configuration store.
- Consume the latest configuration in your background service.
Prerequisites
- An Azure account with an active subscription. Create one for free.
- An App Configuration store, as shown in the tutorial for creating a store.
- .NET SDK 6.0 or later - also available in the Azure Cloud Shell.
Add a key-value
Add the following key-value to the App Configuration store and leave Label and Content Type with their default values. For more information about how to add key-values to a store using the Azure portal or the CLI, go to Create a key-value.
| Key | Value |
|---|---|
| TestApp:Settings:Message | Data from Azure App Configuration |
Create a .NET background service
You use the .NET command-line interface (CLI) to create a new .NET app project. The advantage of using the .NET CLI over Visual Studio is that it's available across the Windows, macOS, and Linux platforms. Alternatively, use the preinstalled tools available in the Azure Cloud Shell.
Create a new folder for your project.
In the new folder, run the following command to create a new .NET background service project:
dotnet new worker
Reload data from App Configuration
Add references to the
Microsoft.Extensions.Configuration.AzureAppConfigurationNuGet package by running the following command:dotnet add package Microsoft.Extensions.Configuration.AzureAppConfigurationRun the following command to restore packages for your project:
dotnet restoreOpen Program.cs and add the following statements:
using Microsoft.Extensions.Configuration;
using Microsoft.Extensions.Configuration.AzureAppConfiguration;
Connect to App Configuration using Microsoft Entra ID (recommended), or a connection string.
You use the
DefaultAzureCredentialto authenticate to your App Configuration store. Follow the instructions to assign your credential the App Configuration Data Reader role. Be sure to allow sufficient time for the permission to propagate before running your application.// Existing code in Program.cs // ... ... var builder = Host.CreateApplicationBuilder(args); builder.Configuration.AddAzureAppConfiguration(options => { string endpoint = Environment.GetEnvironmentVariable("Endpoint"); options.Connect(new Uri(endpoint), new DefaultAzureCredential()); // Load all keys that start with `TestApp:` and have no label. .Select("TestApp:*") // Reload configuration if any selected key-values have changed. .ConfigureRefresh(refreshOptions => { refreshOptions.RegisterAll(); }); // Register the refresher so that the Worker service can consume it through DI builder.Services.AddSingleton(options.GetRefresher()); }); // The rest of existing code in Program.cs // ... ...Inside the
ConfigureRefreshmethod, you call theRegisterAllmethod to instruct the App Configuration provider to reload the entire configuration whenever it detects a change in any of the selected key-values (those starting with TestApp: and having no label). For more information about monitoring configuration changes, see Best practices for configuration refresh.Tip
You can add a call to the
refreshOptions.SetRefreshIntervalmethod to specify the minimum time between configuration refreshes. In this example, you use the default value of 30 seconds. Adjust to a higher value if you need to reduce the number of requests made to your App Configuration store.Open Worker.cs. Inject
IConfigurationandIConfigurationRefresherto theWorkerservice and log the configuration data from App Configuration.public class Worker : BackgroundService { private readonly ILogger<Worker> _logger; private readonly IConfiguration _configuration; private readonly IConfigurationRefresher _refresher; public Worker(ILogger<Worker> logger, IConfiguration configuration, IConfigurationRefresher refresher) { _logger = logger ?? throw new ArgumentNullException(nameof(logger)); _configuration = configuration ?? throw new ArgumentNullException(nameof(configuration)); _refresher = refresher ?? throw new ArgumentNullException(nameof(refresher)); } protected override async Task ExecuteAsync(CancellationToken stoppingToken) { while (!stoppingToken.IsCancellationRequested) { // Intentionally not await TryRefreshAsync to avoid blocking the execution. _refresher.TryRefreshAsync(stoppingToken); if (_logger.IsEnabled(LogLevel.Information)) { _logger.LogInformation(_configuration["TestApp:Settings:Message"] ?? "No data."); } await Task.Delay(TimeSpan.FromSeconds(30), stoppingToken); } } }Calling the
ConfigureRefreshmethod alone won't cause the configuration to refresh automatically. You call theTryRefreshAsyncmethod from the interfaceIConfigurationRefresherto trigger a refresh. This design is to avoid requests sent to App Configuration even when your application is idle. You can include theTryRefreshAsynccall where you consider your application active. For example, it can be when you process an incoming message, an order, or an iteration of a complex task. It can also be in a timer if your application is active all the time. In this example, you callTryRefreshAsyncevery time the background service is executed. Note that, even if the callTryRefreshAsyncfails for any reason, your application will continue to use the cached configuration. Another attempt will be made when the configured refresh interval has passed and theTryRefreshAsynccall is triggered by your application activity again. CallingTryRefreshAsyncis a no-op before the configured refresh interval elapses, so its performance impact is minimal, even if it's called frequently.
Build and run the app locally
Set an environment variable.
Set the environment variable named Endpoint to the endpoint of your App Configuration store found under the Overview of your store in the Azure portal.
If you use the Windows command prompt, run the following command and restart the command prompt to allow the change to take effect:
setx Endpoint "<endpoint-of-your-app-configuration-store>"If you use PowerShell, run the following command:
$Env:Endpoint = "<endpoint-of-your-app-configuration-store>"If you use macOS or Linux, run the following command:
export Endpoint='<endpoint-of-your-app-configuration-store>'Run the following command to build the app.
dotnet buildAfter the build successfully completes, run the following command to run the app locally.
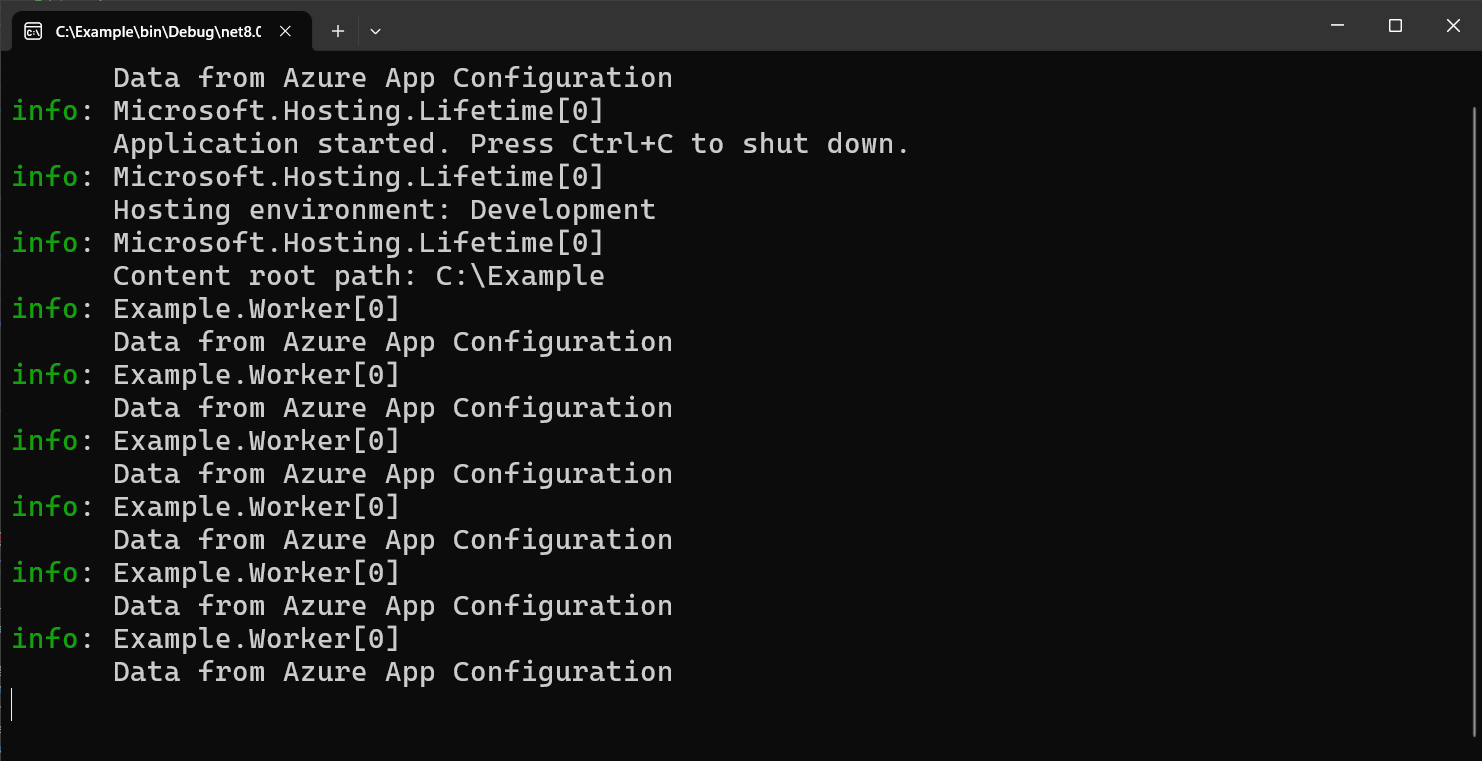
dotnet runYou should see the following outputs in the console.
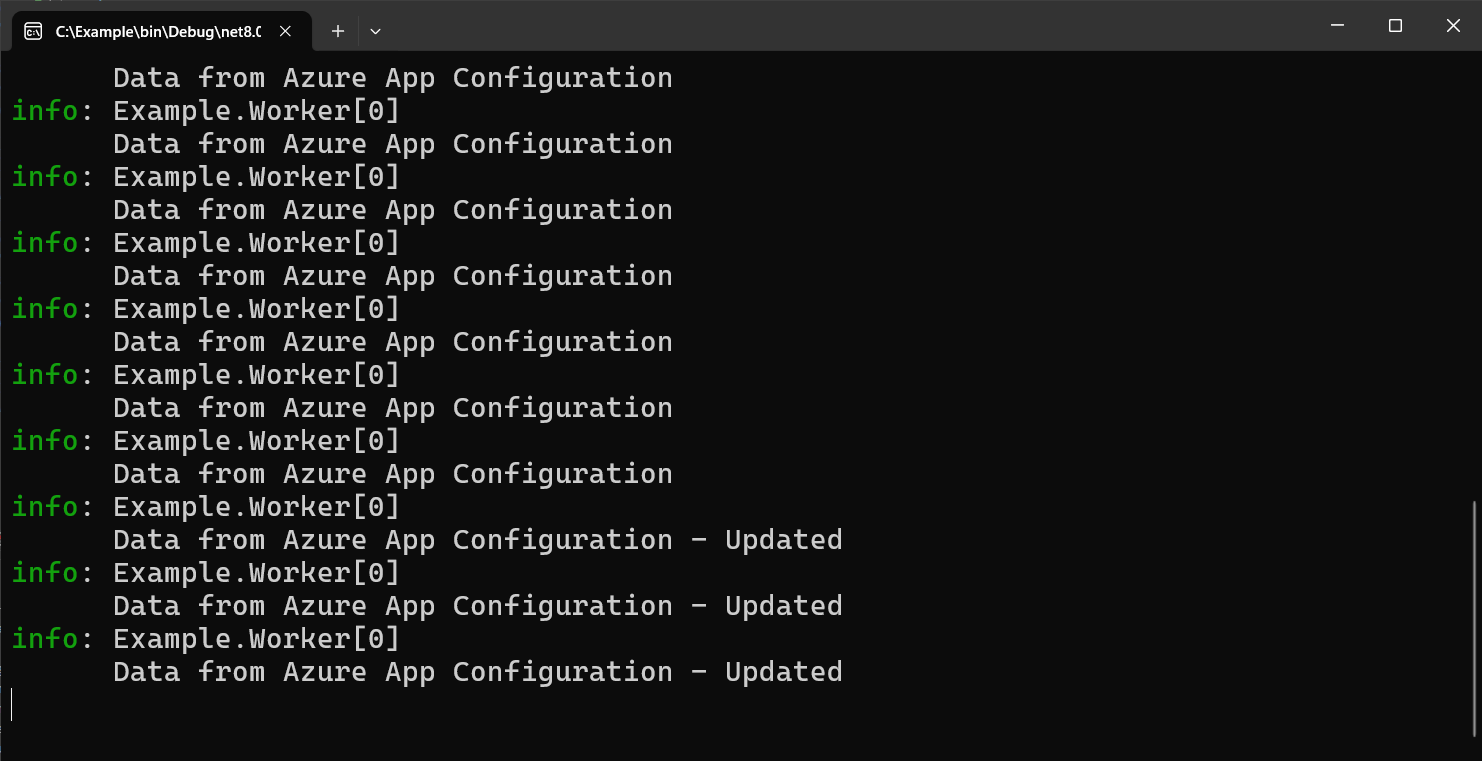
In the Azure portal, navigate to the Configuration explorer of your App Configuration store, and update the value of the following key.
Key Value TestApp:Settings:Message Data from Azure App Configuration - Updated Wait a few moments for the refresh interval time window to pass. You will see the console outputs changed.
Clean up resources
If you don't want to continue using the resources created in this article, delete the resource group you created here to avoid charges.
Important
Deleting a resource group is irreversible. The resource group and all the resources in it are permanently deleted. Ensure that you don't accidentally delete the wrong resource group or resources. If you created the resources for this article inside a resource group that contains other resources you want to keep, delete each resource individually from its respective pane instead of deleting the resource group.
- Sign in to the Azure portal, and select Resource groups.
- In the Filter by name box, enter the name of your resource group.
- In the result list, select the resource group name to see an overview.
- Select Delete resource group.
- You're asked to confirm the deletion of the resource group. Enter the name of your resource group to confirm, and select Delete.
After a few moments, the resource group and all its resources are deleted.
Next steps
In this tutorial, you enabled your .NET background service to dynamically refresh configuration settings from App Configuration. To learn how to enable dynamic configuration in an ASP.NET Web Application, continue to the next tutorial:
To learn how to use an Azure managed identity to streamline the access to App Configuration, continue to the next tutorial: