Note
Access to this page requires authorization. You can try signing in or changing directories.
Access to this page requires authorization. You can try changing directories.
Important
Azure Cache for Redis announced its retirement timeline for all SKUs. We recommend moving your existing Azure Cache for Redis instances to Azure Managed Redis as soon as you can.
Migration guidance:
- Migrate Basic, Standard, and Premium tiers to Azure Managed Redis
- Migrate Enterprise tier to Azure Managed Redis
For more details about the retirement:
In this article, you learn how to move Azure Cache for Redis instances to a different Azure region. You might move your resources to another region for many reasons:
- To take advantage of a new Azure region.
- To deploy features or services available in specific regions only.
- To meet internal policy and governance requirements.
- To respond to capacity planning requirements.
If you're looking to migrate to Azure Cache for Redis from on-premises, cloud-based VMs, or another hosting service, we recommend you see Migrate to Azure Cache for Redis.
The tier of Azure Cache for Redis you use determines the option that's best for you.
| Cache Tier | Options |
|---|---|
| Premium | Geo-replication, create a new cache, dual-write to two caches, export and import data via RDB file, or migrate programmatically |
| Basic or Standard | Create a new cache, dual-write to two caches, or migrate programmatically |
| Enterprise or Enterprise Flash | Create a new cache or export and import data with an RDB file, or migrate programmatically |
Passive geo-replication (Premium)
Prerequisites
To configure geo-replication between two caches, the following prerequisites must be met:
- Both caches are Premium tier caches.
- Both caches are in the same Azure subscription.
- The secondary linked cache is either the same cache size or a larger cache size than the primary linked cache.
- Both caches already exist and are running.
Prepare
To move your cache instance to another region, you need to create a second premium cache instance in the desired region. Once both caches are running, you can set up geo-replication between the two cache instances.
Note
Data transfer between Azure regions is charged at standard bandwidth rates.
Some features aren't supported with geo-replication:
- Zone Redundancy isn't supported with geo-replication.
- Persistence isn't supported with geo-replication.
Conditions for geo-replications support:
- Clustering is supported if both caches have clustering enabled and have the same number of shards.
- Caches in different VNets are supported with caveats. See Can I use geo-replication with my caches in a VNet? for more information.
After geo-replication is configured, the following restrictions apply to your linked cache pair:
- The secondary linked cache is read-only. You can read from it, but you can't write any data to it.
- If you choose to read from the Geo-Secondary instance when a full data sync is happening between the Geo-Primary and the Geo-Secondary, such as when either Geo-Primary or Geo-Secondary is updated and on some reboot scenarios as well, the Geo-Secondary instance throws errors on any Redis operation against it until the full data sync between Geo-Primary and Geo-Secondary is complete.
- Applications reading from Geo-Secondary should be built to fall back to the Geo-Primary whenever the Geo-Secondary is throwing such errors.
- Any data that was in the secondary linked cache before the link was added is removed. If the geo-replication is later removed however, the replicated data remains in the secondary linked cache.
- You can't scale either cache while the caches are linked.
- You can't change the number of shards if the cache has clustering enabled.
- You can't enable persistence on either cache.
- You can Export from either cache.
- You can't Import into the secondary linked cache.
- You can't delete either linked cache, or the resource group that contains them, until you unlink the caches. For more information, see Why did the operation fail when I tried to delete my linked cache?
- If the caches are in different regions, network egress costs apply to the data moved across regions. For more information, see How much does it cost to replicate my data across Azure regions?
- Failover is not automatic. You must start the failover from the primary to the secondary inked cache. For more information on how to fail over a client application, see Initiate a failover from geo-primary to geo-secondary.
Move
To link two caches together for geo-replication, first select Geo-replication from the Resource menu of the cache that you intend to be the primary linked cache. Next, select Add cache replication link from Geo-replication on the left.
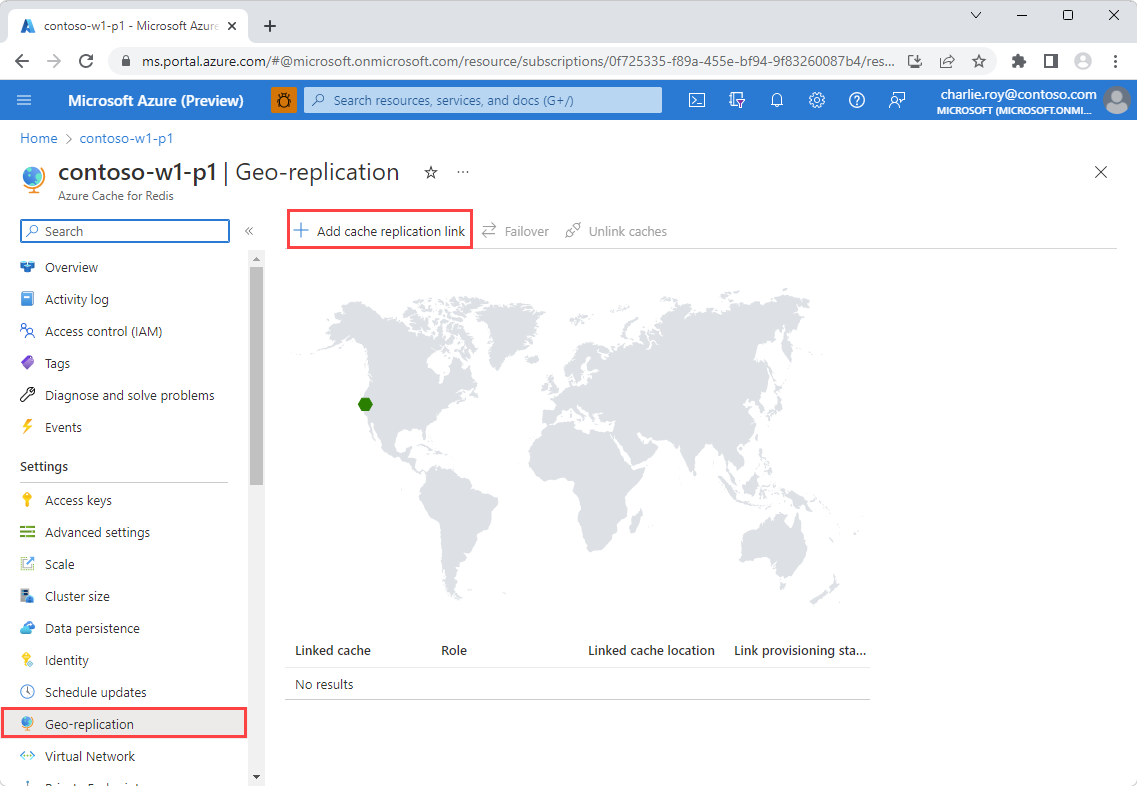
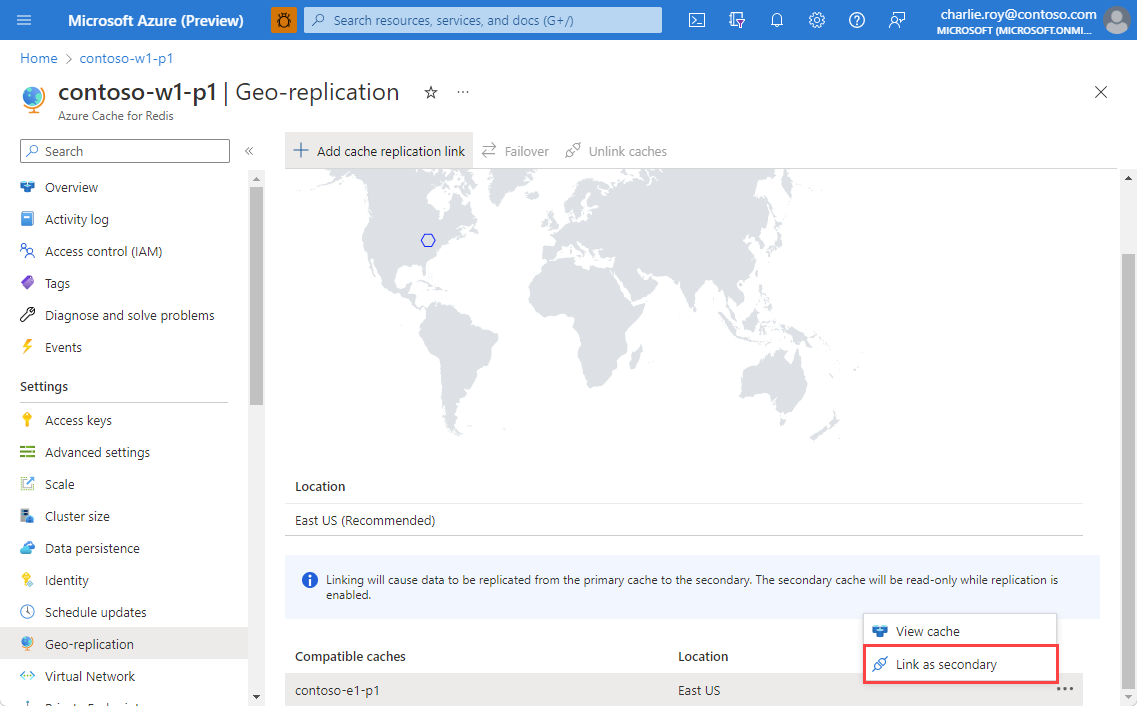
Select the name of your intended secondary cache from the Compatible caches list. If your secondary cache isn't displayed in the list, verify that the Geo-replication prerequisites for the secondary cache are met. To filter the caches by region, select the region in the map to display only those caches in the Compatible caches list.

You can also start the linking process or view details about the secondary cache by using the context menu.
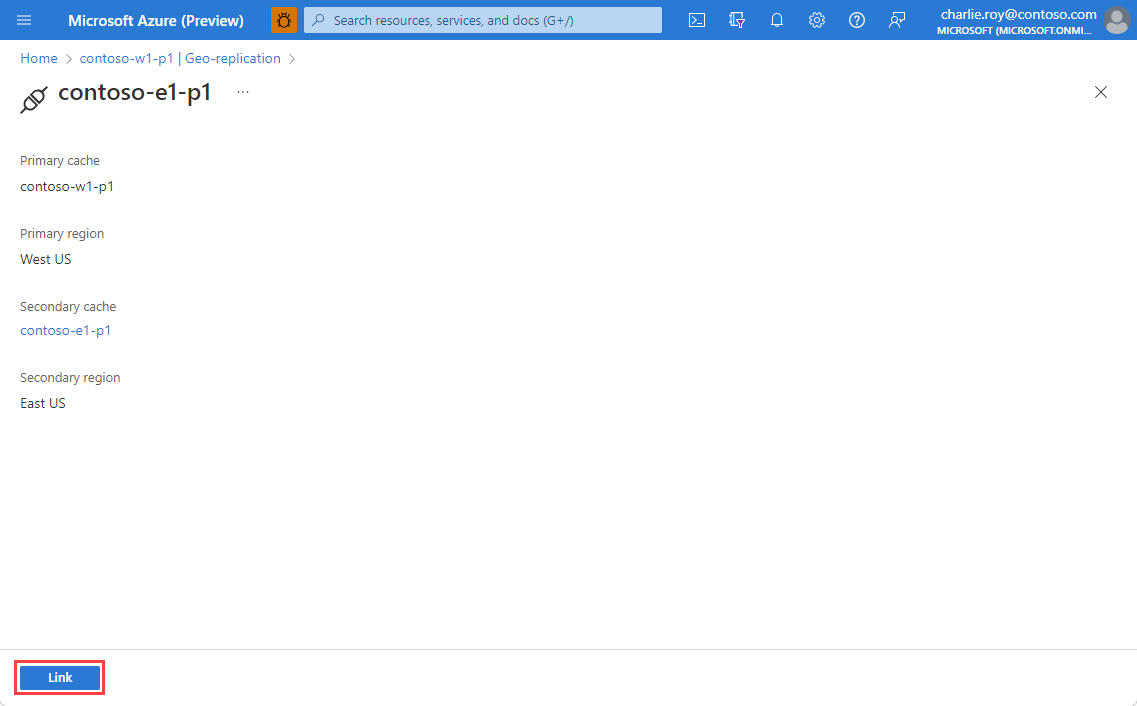
Select Link to link the two caches together and begin the replication process.
Verify
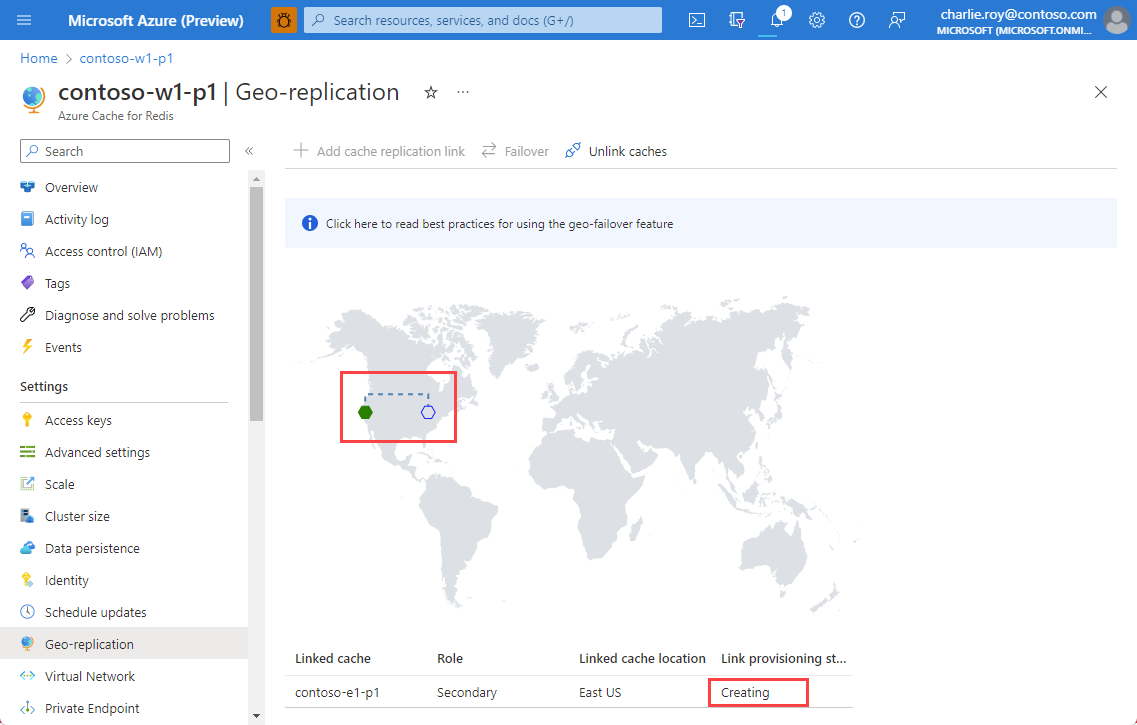
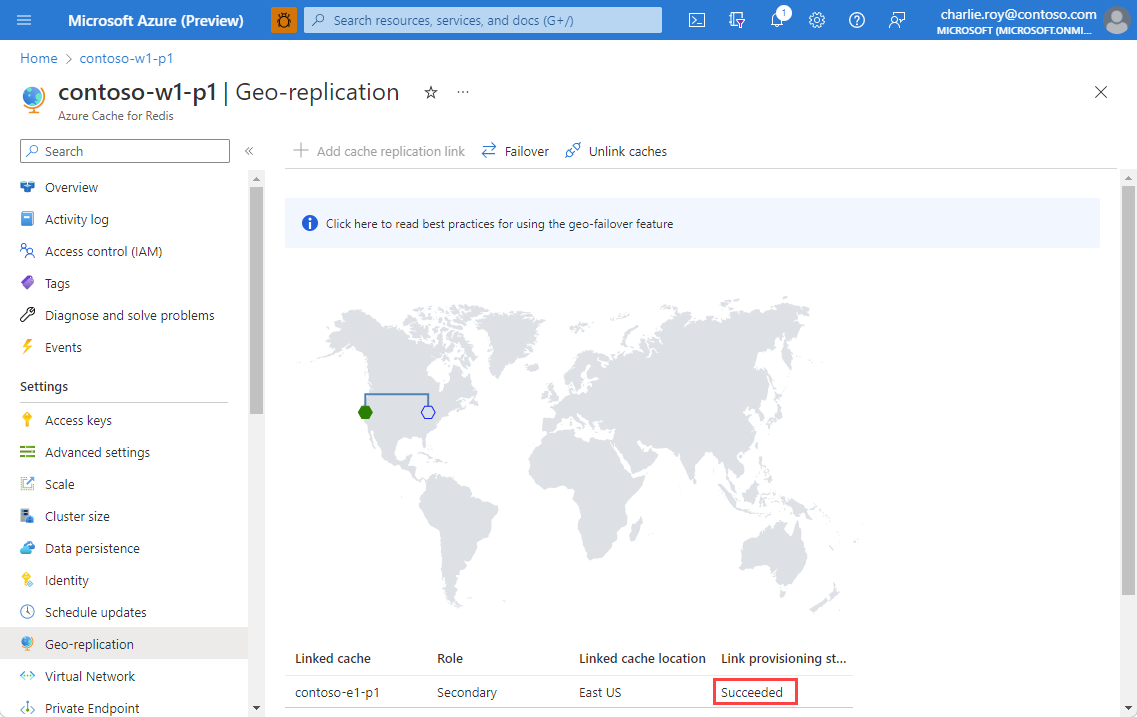
You can view the progress of the replication process using Geo-replication on the left.
You can also view the linking status on the left, using Overview, for both the primary and secondary caches.
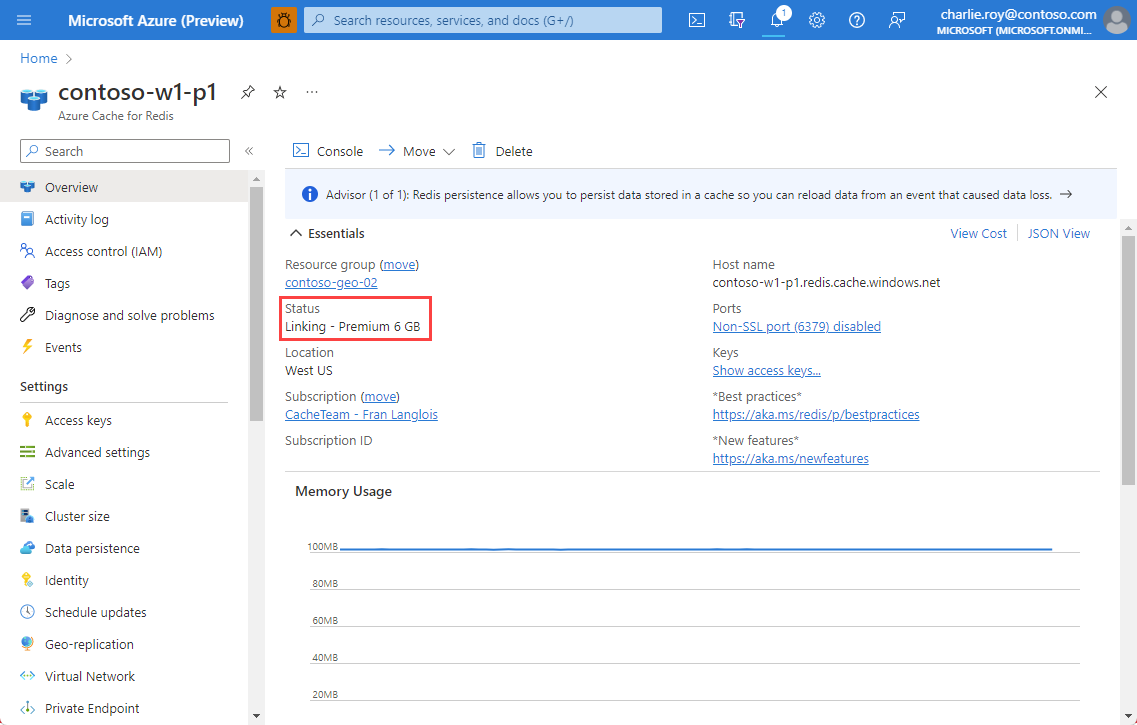
Once the replication process is complete, the Link status changes to Succeeded.
The primary linked cache remains available for use during the linking process. The secondary linked cache isn't available until the linking process completes.
Clean up source resources
Once your new cache in the targeted region is populated with all necessary data, remove the link between the two caches and delete the original instance.
To remove the link between two caches and stop geo-replication, select Unlink caches from the Geo-replication on the left.
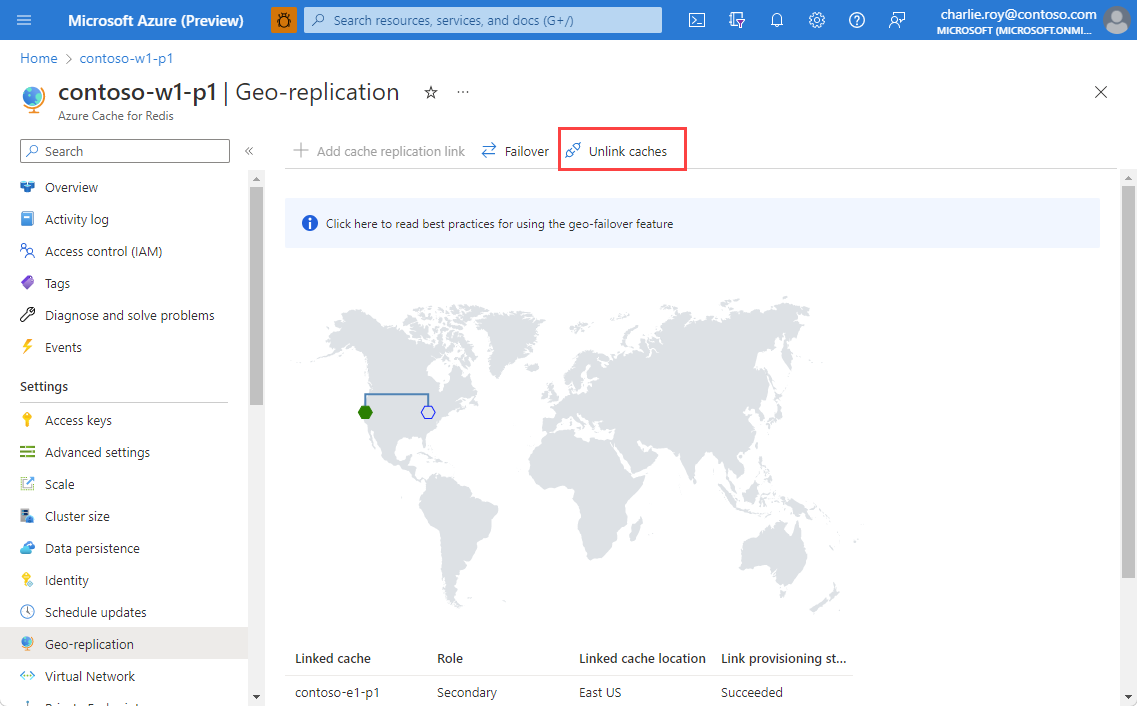
When the unlinking process completes, the secondary cache is available for both reads and writes.
Note
When the geo-replication link is removed, the replicated data from the primary linked cache remains in the secondary cache.
- Delete the original instance.
Create a new cache (All tiers)
Prerequisites
- Azure subscription - create one for free
Prepare
If you don't need to maintain your data during the move, the easiest way to move regions is to create a new cache instance in the targeted region and connect your application to it. For example, if you use Redis as a look-aside cache of database records, you can easily rebuild the cache from scratch.
Move
In the Azure portal, search for and select Azure Cache for Redis.
On the Azure Cache for Redis page, select Create > Azure Cache for Redis.
On the Basics tab of the New Redis Cache page, configure the following settings:
- Subscription: Select the subscription to use.
- Resource group: Select a resource group, or select Create new and enter a new resource group name. Putting all your app resources in the same resource group lets you easily manage or delete them together.
- Name: Enter a cache name that's unique in the region. The name must:
- Be a string of 1 to 63 characters.
- Contain only numbers, letters, and hyphens.
- Start and end with a number or letter.
- Not contain consecutive hyphens.
- Region: Select an Azure region near other services that use your cache.
- Cache SKU: Select a SKU to determine the available sizes, performance, and features for your cache.
- Cache size: Select a cache size. For more information, see Azure Cache for Redis overview.

Select the Networking tab, or select Next: Networking.
On the Networking tab, select a connectivity method to use for the cache. Private Endpoint is recommended for security. If you select Private Endpoint, select Add private endpoint and create the private endpoint.
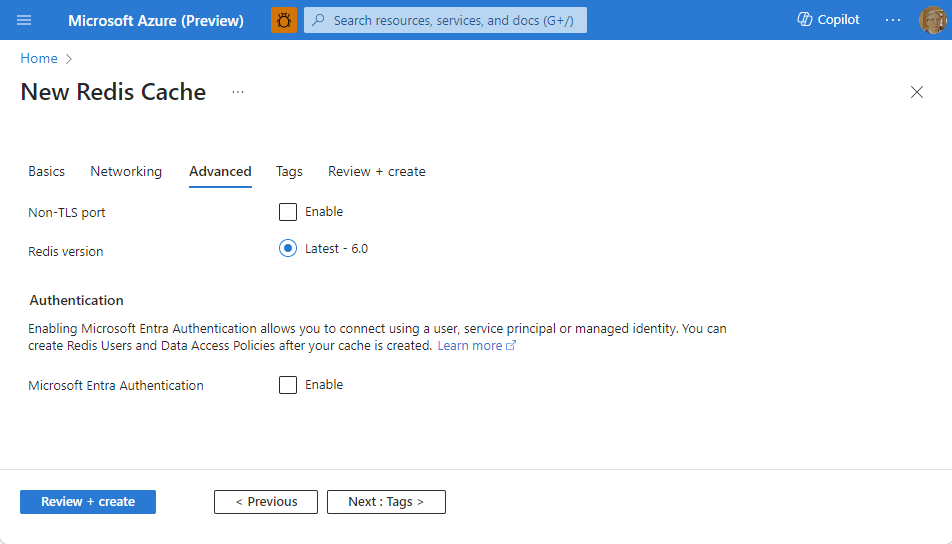
Select the Advanced tab, or select Next: Advanced.
On the Advanced pane, configure the following options:
- Select Microsoft Entra Authentication or Access Keys Authentication. Microsoft Entra Authentication is enabled by default.
- Choose whether to Enable the non-TLS port.
- For a Premium cache, you can configure or disable Availability zones. You can't disable availability zones after the cache is created. For a Standard cache, availability zones are allocated automatically. Availability zones aren't available for Basic SKU.
- For a Premium cache, configure the settings for Replica count, Clustering and Shard count, System-assigned managed identity, and Data persistence.
The following image shows the Advanced tab for the Standard SKU.
Important
Use Microsoft Entra ID with managed identities to authorize requests against your cache if possible. Authorization using Microsoft Entra ID and managed identity provides better security and is easier to use than shared access key authorization. For more information about using managed identities with your cache, see Use Microsoft Entra ID for cache authentication.
Optionally, select the Tags tab or select Next: Tags, and enter tag names and values to categorize your cache resources.
Select Review + create, and once validation passes, select Create.
The new cache deployment takes several minutes. You can monitor deployment progress on the portal Azure Cache for Redis page. When the cache Status displays Running, the cache is ready to use.
Finally, update your application to use the new instances.
Clean up source resources
Once your new cache in the targeted region is running, delete the original instance.
Export and import data with an RDB file (Premium, Enterprise, Enterprise Flash)
Open-source Redis defines a standard mechanism for taking a snapshot of a cache's in-memory dataset and saving it to a file. This file, called RDB, can be read by another Redis cache. Azure Cache for Redis Premium and Enterprise supports importing data into a cache instance with RDB files. You can use an RDB file to transfer data from an existing cache to Azure Cache for Redis.
Important
RDB file format can change between Redis versions and might not maintain backward-compatibility. The Redis version of the cache you're exporting from should be the same or lower than the version of your new cache instance.
Prerequisites
- Both caches are Premium tier or Enterprise tier caches.
- The second cache is either the same cache size or a larger cache size than the original cache.
- The Redis version of the cache you're exporting from should be the same or lower than the version of your new cache instance.
Prepare
To move your cache instance to another region, you'll need to create a second premium cache instance in the desired region.
Move
For more information on how to import and export data in Azure Cache for Redis. see Import and Export data in Azure Cache for Redis.
Update your application to use the new cache instance.
Verify
You can monitor the progress of the import operation by following the notifications from the Azure portal, or by viewing the events in the audit log.
Clean up source resources
Once your new cache in the targeted region is running, delete the original instance.
Dual-write to two caches (Basic, Standard, and Premium)
Rather than moving data directly between caches, you can use your application to write data to both an existing cache and a new one you're setting up. The application initially reads data from the existing cache initially. When the new cache has the necessary data, you switch the application to that cache and retire the old one. Let's say, for example, you use Redis as a session store and the application sessions are valid for seven days. After writing to the two caches for a week, you'll be certain the new cache contains all non-expired session information. You can safely rely on it from that point onward without concern over data loss.
Prerequisites
- The second cache is either the same cache size or a larger cache size than the original cache.
Prepare
To move your cache instance to another region, you'll need to create a second cache instance in the desired region.
Move
General steps to implement this option are:
Modify application code to write to both the new and the original instances.
Continue reading data from the original instance until the new instance is sufficiently populated with data.
Update the application code to reading and writing from the new instance only.
Clean up source resources
Once your new cache in the targeted region is running, delete the original instance.
Migrate programmatically (All tiers)
You can create a custom migration process by programmatically reading data from an existing cache and writing them into Azure Cache for Redis. This open-source tool can be used to copy data from one Azure Cache for Redis instance to another instance in a different Azure Cache region. A compiled version is available as well. You may also find the source code to be a useful guide for writing your own migration tool.
Note
This tool isn't officially supported by Microsoft.
Prerequisites
- The second cache is either the same cache size or a larger cache size than the original cache.
Prepare
- Create a VM in the region where the existing cache is located. If your dataset is large, choose a relatively powerful VM to reduce copying time.
- To move your cache instance to another region, you'll need to create a second cache instance in the desired region.
Move
After creating a VM in the region where the existing cache is located and creating a new cache in the desired region, the general steps to implement this option are:
Flush data from the new cache to ensure that it's empty. This step is required because the copy tool itself doesn't overwrite any existing key in the target cache.
Important
Make sure to NOT flush from the source cache.
Use an application such as the open-source tool above to automate the copying of data from the source cache to the target. Remember that the copy process could take a while to complete depending on the size of your dataset.
Clean up source resources
Once your new cache in the targeted region is running, delete the original instance.
Next steps
Learn more about Azure Cache for Redis features.