Working with containers and Azure Functions
This article demonstrates the support that Azure Functions provides for working with containerized function apps running in an Azure Container Apps environment. Support for hosting function app containers in Container Apps is currently in preview. For more information, see Azure Container Apps hosting of Azure Functions.
This article demonstrates the support that Azure Functions provides for working with function apps running in Linux containers.
Choose the hosting environment for your containerized function app at the top of the article.
If you want to jump right in, the following article shows you how to create your first function running in a Linux container and deploy the image from a container registry to a supported Azure hosting service:
Create your first containerized Azure Functions on Azure Container Apps
To learn more about deployments to Azure Container Apps, see Azure Container Apps hosting of Azure Functions.
Creating containerized function apps
Functions makes it easy to deploy and run your function apps as Linux containers, which you create and maintain. Functions maintains a set of language-specific base images that you can use when creating containerized function apps.
Important
When creating your own containers, you are required to keep the base image of your container updated to the latest supported base image. Supported base images for Azure Functions are language-specific and are found in the Azure Functions base image repos.
The Functions team is committed to publishing monthly updates for these base images. Regular updates include the latest minor version updates and security fixes for both the Functions runtime and languages. You should regularly update your container from the latest base image and redeploy the updated version of your container.
For a complete example of how to create the local containerized function app from the command line and publish the image to a container registry, see Create a function app in a local container.
Generate the Dockerfile
Functions tooling provides a Docker option that generates a Dockerfile with your functions code project. You can use this file with Docker to create your functions in a container that derives from the correct base image (language and version).
The way you create a Dockerfile depends on how you create your project.
When you create a Functions project using Azure Functions Core Tools, include the
--dockeroption when you run thefunc initcommand, as in the following example:func init --dockerYou can also add a Dockerfile to an existing project by using the
--docker-onlyoption when you run thefunc initcommand in an existing project folder, as in the following example:func init --docker-only
For a complete example, see Create a function app in a local container.
Creating your function app in a container
With a Core Tools-generated Dockerfile in your code project, you can use Docker to create the containerized function app on your local computer. The following docker build command creates an image of your containerized functions from the project in the local directory:
docker build --tag <DOCKER_ID>/<IMAGE_NAME>:v1.0.0 .
For an example of how to create the container, see Build the container image and verify locally.
Update an image in the registry
When you make changes to your functions code project or need to update to the latest base image, you need to rebuild the container locally and republish the updated image to your chosen container registry. The following command rebuilds the image from the root folder with an updated version number and pushes it to your registry:
az acr build --registry <REGISTRY_NAME> --image <LOGIN_SERVER>/azurefunctionsimage:v1.0.1 .
Replace <REGISTRY_NAME> with your Container Registry instance and <LOGIN_SERVER> with the login server name.
At this point, you need to update the deployment to use the new image. The following example updates the function app to use the new image:
az functionapp config container set --image <IMAGE_NAME> --registry-password <SECURE_PASSWORD>--registry-username <USER_NAME> --name <APP_NAME> --resource-group <RESOURCE_GROUP>
In this example, <IMAGE_NAME> is the full name of the new image with version. Private registries require you to supply a username and password. Store these credentials securely.
You should also consider enabling continuous deployment.
Azure portal create using containers
When you create a function app in the Azure portal, you can choose to deploy the function app from an image in a container registry. To learn how to create a containerized function app in a container registry, see Creating your function app in a container.
The following steps create and deploy an existing containerized function app from a container registry.
From the Azure portal menu or the Home page, select Create a resource.
In the New page, select Compute > Function App.
On the Basics page, use the function app settings as specified in the following table:
Setting Suggested value Description Subscription Your subscription The subscription in which you create your function app. Resource Group myResourceGroup Name for the new resource group in which you create your function app. You should create a resource group because there are known limitations when creating new function apps in an existing resource group. Function App name Unique name* Name that identifies your new function app. Valid characters are a-z(case insensitive),0-9, and-.Do you want to deploy code or container image? Container image Deploy a containerized function app from a registry. To create a function app in registry, see Create a function app in a local container. Region Preferred region Select a region that's near you or near other services that your functions can access.
*App name must be globally unique among all Azure Functions hosted apps.
In Hosting options and plans, choose Functions Premium.
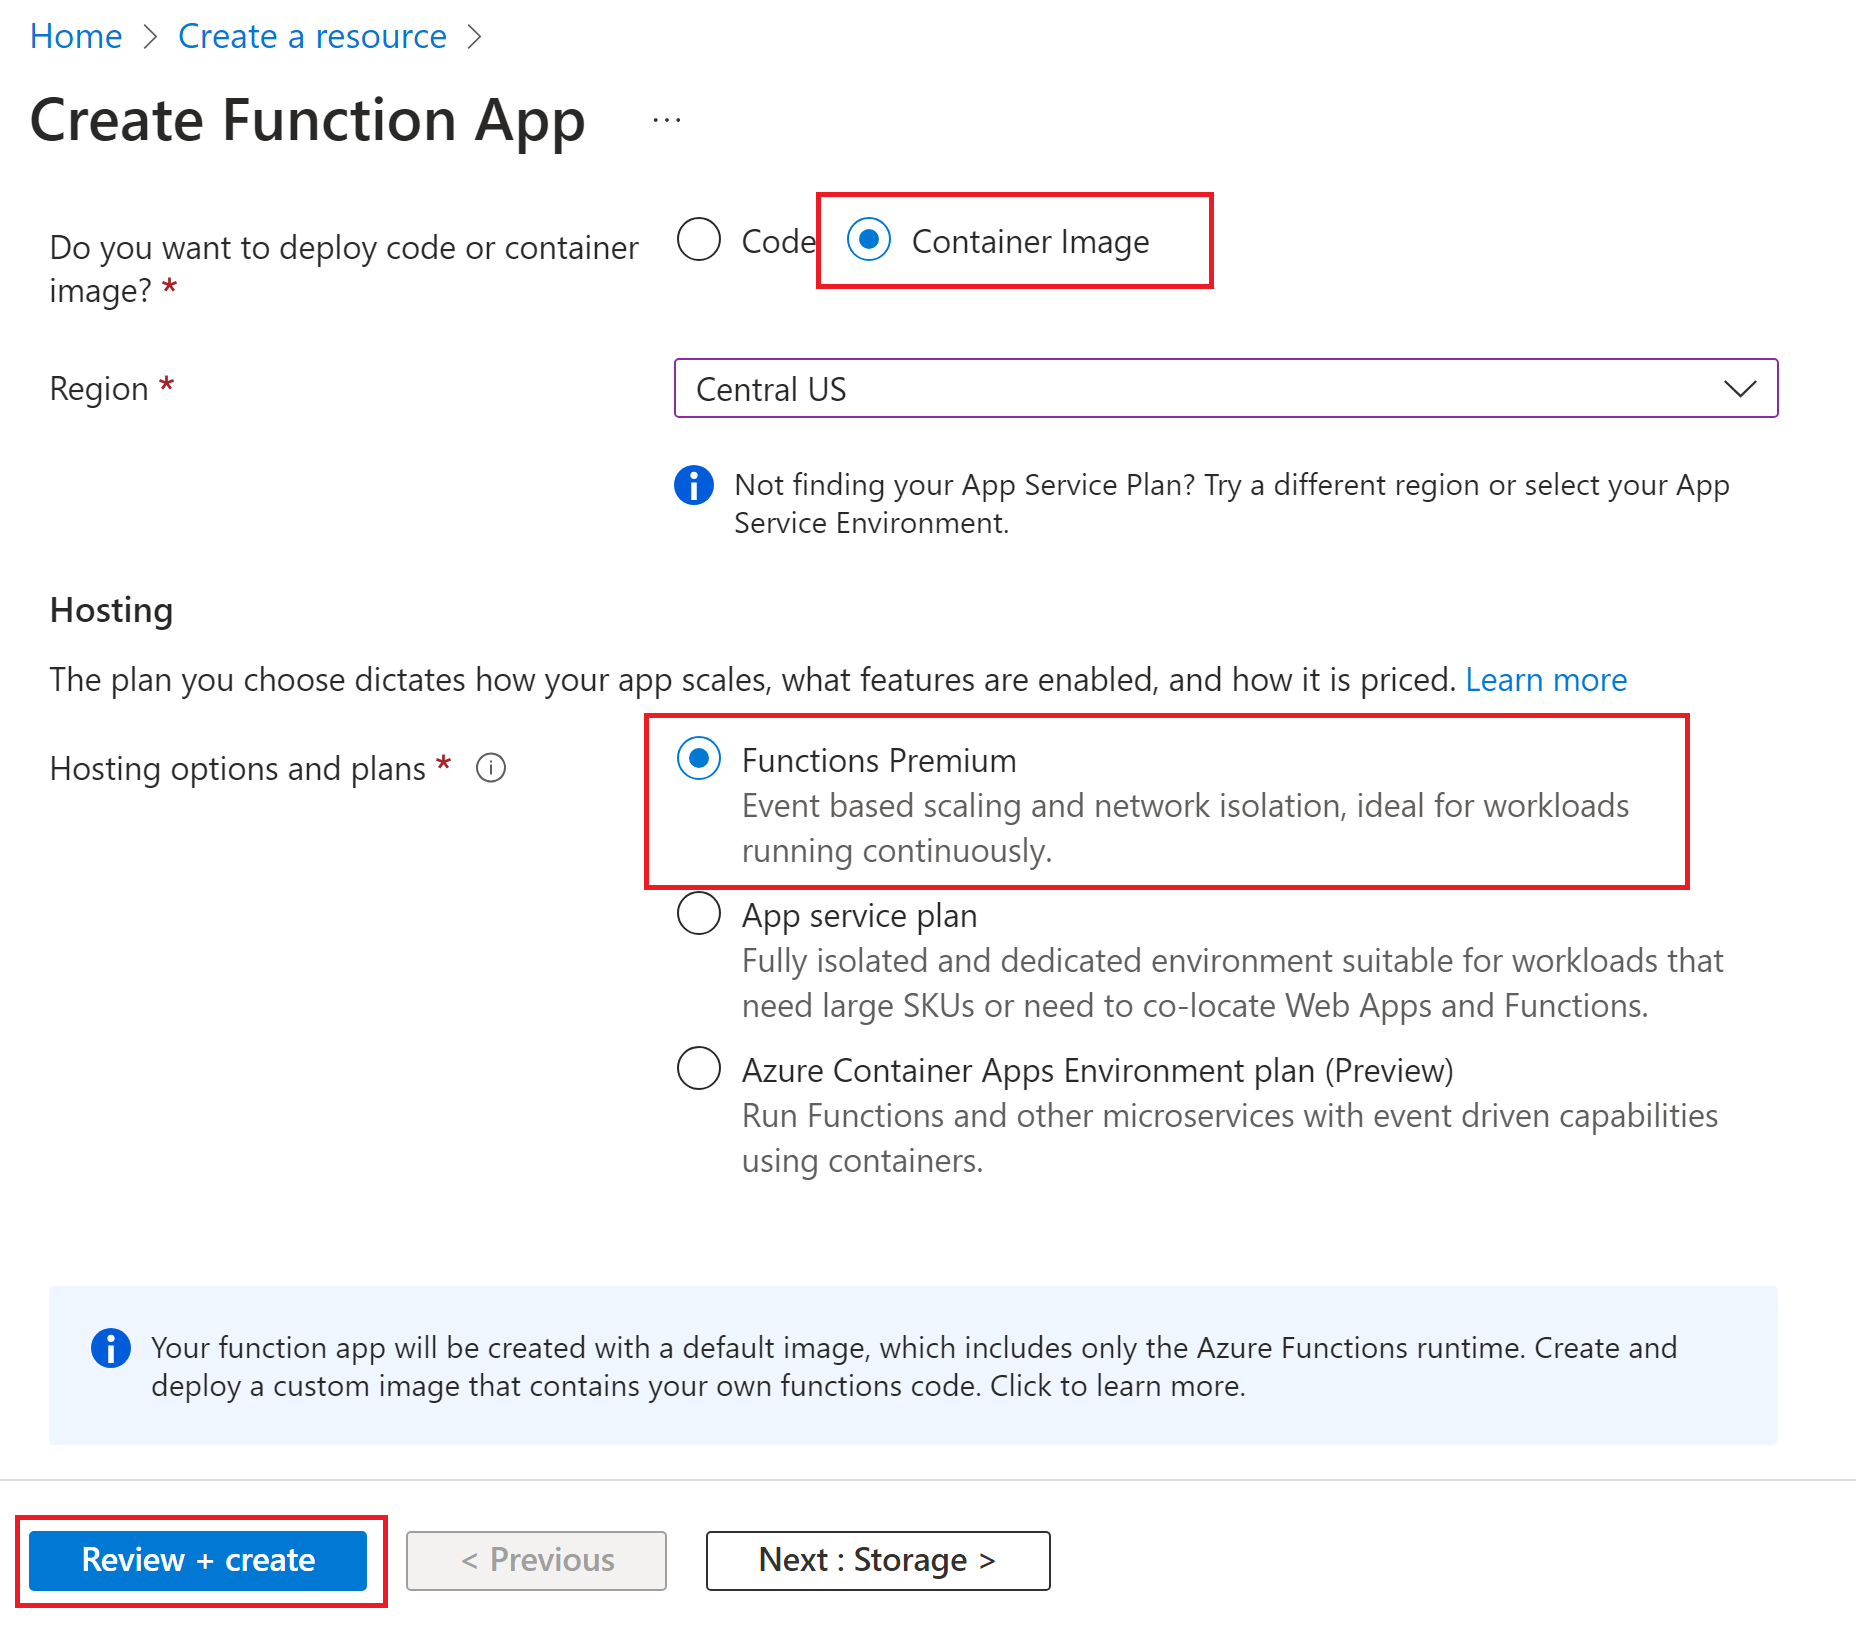
This creates a function app hosted by Azure Functions in the Premium plan, which supports dynamic scaling. You can also choose to run in an App Service plan, but in this kind of dedicated plan you must manage the scaling of your function app.
*App name must be unique within the Azure Container Apps environment. Not all regions are supported in the preview. For more information, see Considerations for Container Apps hosting.
In Hosting options and plans, choose Azure Container Apps Environment plan.
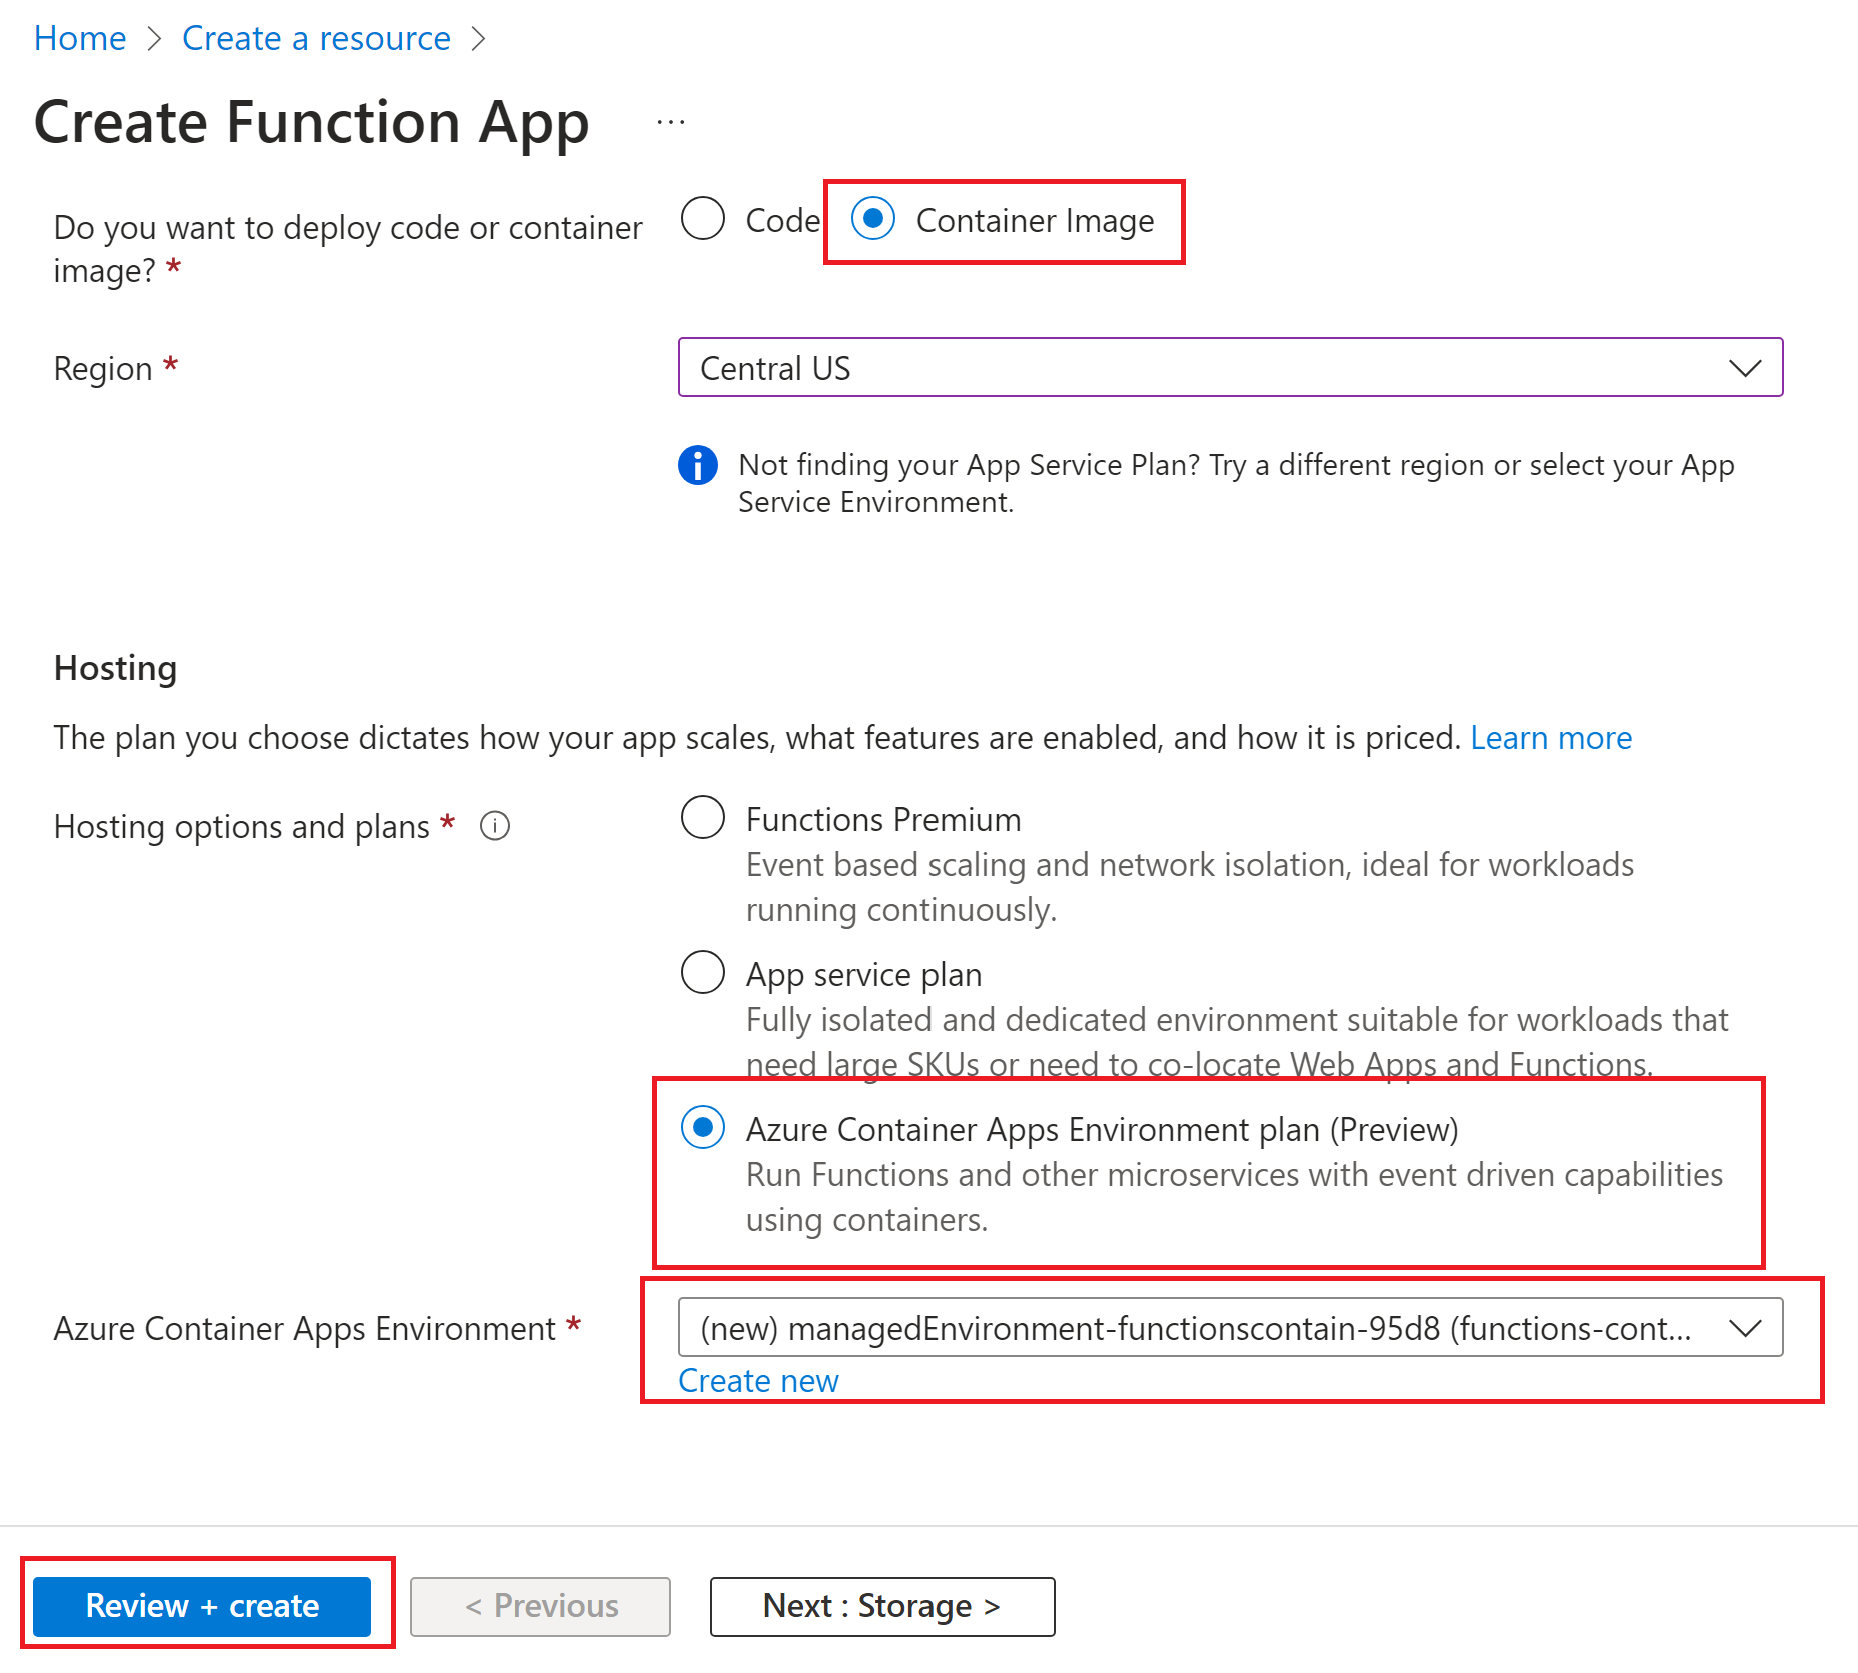
This creates a new Azure Container Apps Environment resource to host your function app container. For more information, see Azure Container Apps hosting of Azure Functions.
By default, the environment is created in a Consumption plan without zone redundancy, to minimize costs. You can also choose an existing Container Apps environment. To learn about environments, see Azure Container Apps environments.
- Accept the default options of creating a new storage account on the Storage tab and a new Application Insight instance on the Monitoring tab. You can also choose to use an existing storage account or Application Insights instance.
Select the Deployment tab and unselect Use quickstart image. If you don't do this, the function app is deployed from the base image for your function app language.
Choose your Image type, public or private. Choose Private if you're using Azure Container Registry or some other private registry. Supply the Image name, including the registry prefix. If you're using a private registry, provide the image registry authentication credentials.
Select Review + create to review the app configuration selections.
On the Review + create page, review your settings, and then select Create to provision the function app and deploy your container image from the registry.
Select Review + create to review the app configuration selections.
On the Review + create page, review your settings, and then select Create to provision the function app using a default base image.
After your function app resource is created, select Go to resource and in the function app page select Deployment center.
In the Deployment center, you can connect your container registry as the source of the image. You can also enable GitHub Actions or Azure Pipelines for more robust continuous deployment of updates to your container in the registry.
Work with images in Azure Functions
When your function app container is deployed from a registry, Functions maintains information about the source image. Use the following commands to get data about the image or change the deployment image used:
az functionapp config container show: returns information about the image used for deployment.az functionapp config container set: change registry settings or update the image used for deployment, as shown in the previous example.
Container Apps workload profiles
Workload profiles are feature of Container Apps that let you better control your deployment resources. Azure Functions on Azure Container Apps also supports workload profiles. For more information, see Workload profiles in Azure Container Apps.
You can create and manage workload profiles using the Azure CLI or in the Azure portal.
You enable workload profiles when you create your container app environment. For an example, see Create a container app in a profile.
You can add, edit, and delete profiles in your environment. For an example, see Add profiles.
When you create a containerized function app in an environment that has workload profiles enabled, you should also specify the profile in which to run. You do this by using the --workload-profile-name parameter of the az functionapp create command, like in this example:
az functionapp create --name <APP_NAME> --storage-account <STORAGE_NAME> --environment MyContainerappEnvironment --resource-group AzureFunctionsContainers-rg --functions-version 4 --runtime <LANGUAGE_STACK> --image <IMAGE_URI> --workload-profile-name PROFILE_NAME> --cpu <CPU_COUNT> --memory <MEMORY_SIZE>
In the az functionapp create command, the --environment parameter specifies the Container Apps environment and the --image parameter specifies the image to use for the function app. In this example, replace <STORAGE_NAME> with the name you used in the previous section for the storage account. Also, replace <APP_NAME> with a globally unique name appropriate to you.
Also, replace <CPU_COUNT> with your desired number of virtual CPUs, with a minimum of 0.5 up to the maximum allowed by the profile. For <MEMORY_SIZE>, choose a dedicated memory amount from 1 GB up to the maximum allowed by the profile.
Application settings
Azure Functions lets you work with application settings for containerized function apps in the standard way. For more information, see Use application settings.
Enable continuous deployment to Azure
Important
Webhook-based deployment isn't currently supported when running your container in an Elastic Premium plan. If you need to use the continuous deployment method described in this section, instead deploy your container in an App Service plan. When running in an Elastic Premium plan, you need to manually restart your app whenever you make updates to your container in the repository.
You can enable Azure Functions to automatically update your deployment of an image whenever you update the image in the registry.
Use the following command to enable continuous deployment and to get the webhook URL:
az functionapp deployment container config --enable-cd --query CI_CD_URL --output tsv --name <APP_NAME> --resource-group AzureFunctionsContainers-rgThe
az functionapp deployment container configcommand enables continuous deployment and returns the deployment webhook URL. You can retrieve this URL at any later time by using theaz functionapp deployment container show-cd-urlcommand.As before, replace
<APP_NAME>with your function app name.Copy the deployment webhook URL to the clipboard.
Open Docker Hub, sign in, and select Repositories on the navigation bar. Locate and select the image, select the Webhooks tab, specify a Webhook name, paste your URL in Webhook URL, and then select Create.
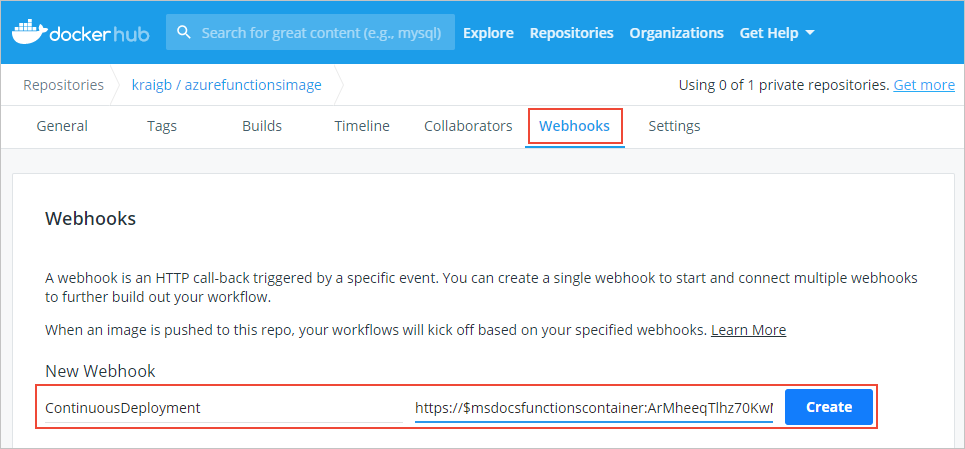
With the webhook set, Azure Functions redeploys your image whenever you update it in Docker Hub.
Enable SSH connections
SSH enables secure communication between a container and a client. With SSH enabled, you can connect to your container using App Service Advanced Tools (Kudu). For easy connection to your container using SSH, Azure Functions provides a base image that has SSH already enabled. You only need to edit your Dockerfile, then rebuild, and redeploy the image. You can then connect to the container through the Advanced Tools (Kudu).
In your Dockerfile, append the string
-appserviceto the base image in yourFROMinstruction, as in the following example:FROM mcr.microsoft.com/azure-functions/node:4-node18-appserviceThis example uses the SSH-enabled version of the Node.js version 18 base image. Visit the Azure Functions base image repos to verify that you're using the latest version of the SSH-enabled base image.
Rebuild the image by using the
docker buildcommand, replace the<DOCKER_ID>with your Docker Hub account ID, as in the following example.docker build --tag <DOCKER_ID>/azurefunctionsimage:v1.0.0 .Push the updated image to Docker Hub, which should take considerably less time than the first push. Only the updated segments of the image need to be uploaded now.
docker push <DOCKER_ID>/azurefunctionsimage:v1.0.0Azure Functions automatically redeploys the image to your functions app; the process takes place in less than a minute.
In a browser, open
https://<app_name>.scm.azurewebsites.net/and replace<app_name>with your unique name. This URL is the Advanced Tools (Kudu) endpoint for your function app container.Sign in to your Azure account, and then select the SSH to establish a connection with the container. Connecting might take a few moments if Azure is still updating the container image.
After a connection is established with your container, run the
topcommand to view the currently running processes.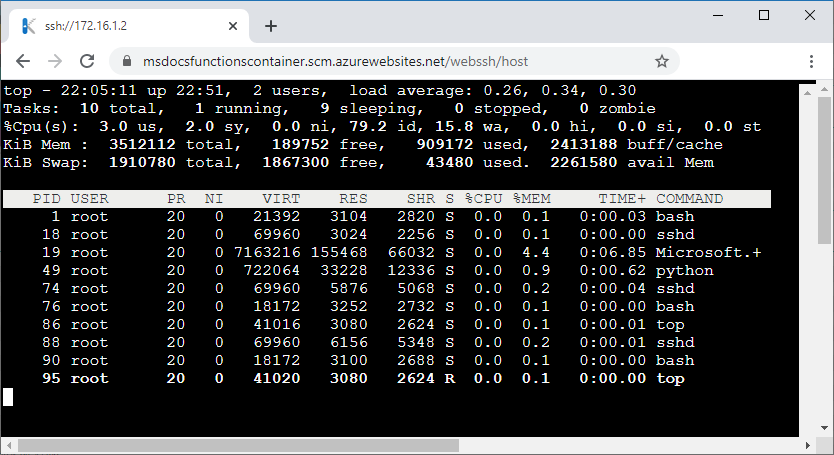
Next steps
The following articles provide more information about deploying and managing containers:
Feedback
Coming soon: Throughout 2024 we will be phasing out GitHub Issues as the feedback mechanism for content and replacing it with a new feedback system. For more information see: https://aka.ms/ContentUserFeedback.
Submit and view feedback for