Azure Managed Lustre file system prerequisites
This article explains prerequisites that you must configure before creating an Azure Managed Lustre file system.
Network prerequisites
Azure Managed Lustre file systems exist in a virtual network subnet. The subnet contains the Lustre Management Service (MGS) and handles all client interactions with the virtual Lustre cluster.
You can't move a file system from one network or subnet to another after you create the file system.
Azure Managed Lustre accepts only IPv4 addresses. IPv6 isn't supported.
Network size requirements
The size of subnet that you need depends on the size of the file system you create. The following table gives a rough estimate of the minimum subnet size for Azure Managed Lustre file systems of different sizes.
| Storage capacity | Recommended CIDR prefix value |
|---|---|
| 4 TiB to 16 TiB | /27 or larger |
| 20 TiB to 40 TiB | /26 or larger |
| 44 TiB to 92 TiB | /25 or larger |
| 96 TiB to 196 TiB | /24 or larger |
| 200 TiB to 400 TiB | /23 or larger |
Other network size considerations
When you plan your virtual network and subnet, take into account the requirements for any other services you want to locate within the Azure Managed Lustre subnet or virtual network.
If you're using an Azure Kubernetes Service (AKS) cluster with your Azure Managed Lustre file system, you can locate the AKS cluster in the same subnet as the file system. In this case, you must provide enough IP addresses for the AKS nodes and pods in addition to the address space for the Lustre file system. If you use more than one AKS cluster within the virtual network, make sure the virtual network has enough capacity for all resources in all of the clusters. To learn more about network strategies for Azure Managed Lustre and AKS, see AKS subnet access.
If you plan to use another resource to host your compute VMs in the same virtual network, check the requirements for that process before creating the virtual network and subnet for your Azure Managed Lustre system. When planning multiple clusters within the same subnet, it's necessary to use an address space large enough to accommodate the total requirements for all clusters.
Subnet access and permissions
By default, no specific changes need to be made to enable Azure Managed Lustre. If your environment includes restricted network or security policies, the following guidance should be considered:
| Access type | Required network settings |
|---|---|
| DNS access | Use the default Azure-based DNS server. |
| Access between hosts | Allow inbound and outbound access between hosts within the Azure Managed Lustre subnet. As an example, access to TCP port 22 (SSH) is necessary for cluster deployment. |
| Azure cloud service access | Configure your network security group to permit the Azure Managed Lustre file system to access Azure cloud services from within the file system subnet. Add an outbound security rule with the following properties: - Port: Any - Protocol: Any - Source: Virtual Network - Destination: "AzureCloud" service tag - Action: Allow Note: Configuring the Azure cloud service also enables the necessary configuration of the Azure Queue service. For more information, see Virtual network service tags. |
| Lustre network port access | Your network security group must allow inbound and outbound access on port 988 and ports 1019-1023. No other services can reserve or use these ports on your Lustre clients. The default rules 65000 AllowVnetInBound and 65000 AllowVnetOutBound meet this requirement. |
For detailed guidance about configuring a network security group for Azure Managed Lustre file systems, see Create and configure a network security group.
Known limitations
The following known limitations apply to virtual network settings for Azure Managed Lustre file systems:
- Azure Managed Lustre and Azure NetApp Files resources can't share a subnet. If you use the Azure NetApp Files service, you must create your Azure Managed Lustre file system in a separate subnet. The deployment fails if you try to create an Azure Managed Lustre file system in a subnet that currently contains, or has previously contained, Azure NetApp Files resources.
- If you use the
ypbinddaemon on your clients to maintain Network Information Services (NIS) binding information, you must ensure thatypbinddoesn't reserve port 988. You can either manually adjust the ports thatypbindreserves, or ensure that your system startup infrastructure starts your Lustre client mount before startingypbind.
Note
After you create your Azure Managed Lustre file system, several new network interfaces appear in the file system's resource group. Their names start with amlfs- and end with -snic. Don't change any settings on these interfaces. Specifically, leave the default value, enabled, for the Accelerated networking setting. Disabling accelerated networking on these network interfaces degrades your file system's performance.
Blob integration prerequisites (optional)
If you plan to integrate your Azure Managed Lustre file system with Azure Blob Storage, complete the following prerequisites before you create your file system.
To learn more about blob integration, see Use Azure Blob storage with an Azure Managed Lustre file system.
Azure Managed Lustre works with storage accounts that have hierarchical namespace enabled and storage accounts with a non-hierarchical, or flat, namespace. The following minor differences apply:
- For a storage account with hierarchical namespace enabled, Azure Managed Lustre reads POSIX attributes from the blob header.
- For a storage account that does not have hierarchical namespace enabled, Azure Managed Lustre reads POSIX attributes from the blob metadata. A separate, empty file with the same name as your blob container contents is created to hold the metadata. This file is a sibling to the actual data directory in the Azure Managed Lustre file system.
To integrate Azure Blob Storage with your Azure Managed Lustre file system, you must create or configure the following resources before you create the file system:
Storage account
You must create a storage account or use an existing one. The storage account must have the following settings:
- Account type - A compatible storage account type. To learn more, see Supported storage account types.
- Access roles - Role assignments that permit the Azure Managed Lustre system to modify data. To learn more, see Required access roles.
- Access keys - The storage account must have the storage account key access setting set to Enabled.
Supported storage account types
The following storage account types can be used with Azure Managed Lustre file systems:
| Storage account type | Redundancy |
|---|---|
| Standard | Locally redundant storage (LRS), geo-redundant storage (GRS) Zone-redundant storage (ZRS), read-access-geo-redundant storage (RAGRS), geo-zone-redundant storage (GZRS), read-access-geo-zone-redundant storage (RA-GZRS) |
| Premium - Block blobs | LRS, ZRS |
For more information about storage account types, see Types of storage accounts.
Access roles for blob integration
Azure Managed Lustre needs authorization to access your storage account. Use Azure role-based access control (Azure RBAC) to give the file system access to your blob storage.
A storage account owner must add these roles before creating the file system:
Important
You must add these roles before you create your Azure Managed Lustre file system. If the file system can't access your blob container, file system creation fails. Validation performed before the file system is created can't detect container access permission problems. It can take up to five minutes for the role settings to propagate through the Azure environment.
To add the roles for the service principal HPC Cache Resource Provider, follow these steps:
- Navigate your storage account, and select Access control (IAM) in the left navigation pane.
- Select Add > Add role assignment to open the Add role assignment page.
- Assign the role.
- Add HPC Cache Resource Provider to that role.
Tip
If you can't find the HPC Cache Resource Provider, search for storagecache instead. storagecache Resource Provider was the service principal name before general availability of the product.
- Repeat steps 3 and 4 to add each role.
For detailed steps, see Assign Azure roles using the Azure portal.
Blob containers
You must have two separate blob containers in the same storage account, which are used for the following purposes:
- Data container: A blob container in the storage account that contains the files you want to use in the Azure Managed Lustre file system.
- Logging container: A second container for import/export logs in the storage account. You must store the logs in a different container from the data container.
Note
You can add files to the file system later from clients. However, files added to the original blob container after you create the file system won't be imported to the Azure Managed Lustre file system unless you create an import job.
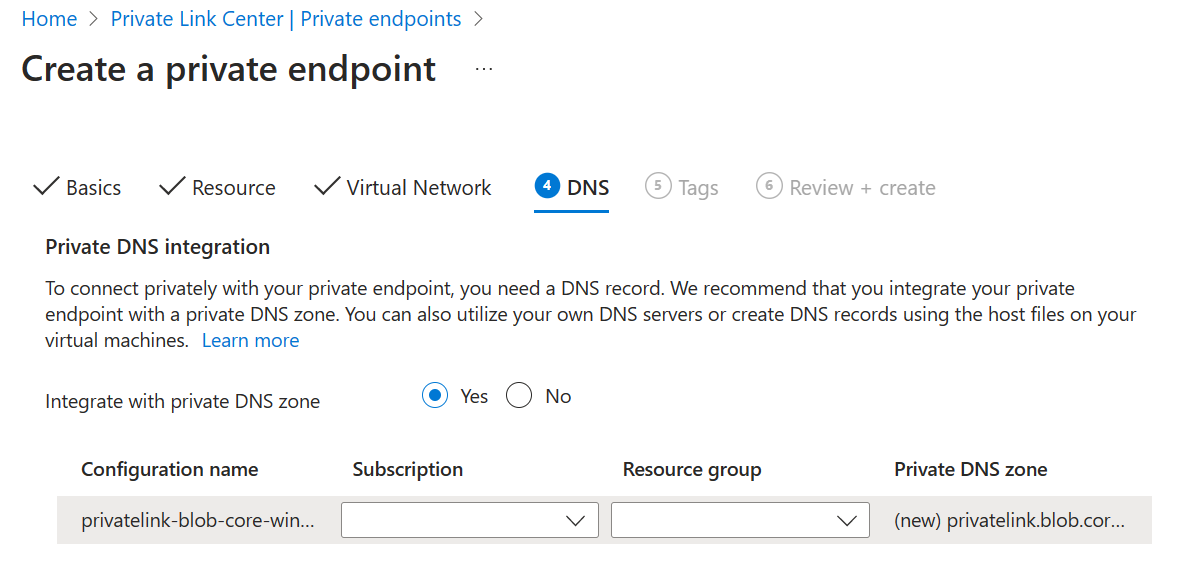
Private endpoints (optional)
If you're using a private endpoint with your blob setup, in order to ensure Azure Managed Lustre can resolve the SA name, you must enable the private endpoint setting Integrate with private DNS Zone during the creation of a new endpoint.
- Integrate with Private DNS zone: Must be set to Yes.