Note
Access to this page requires authorization. You can try signing in or changing directories.
Access to this page requires authorization. You can try changing directories.
In this article, you learn how to plan, install, and use Azure Managed Lustre in Azure Kubernetes Service (AKS) with the Azure Lustre CSI Driver for Kubernetes. This driver is based on the Container Support Interface (CSI) specification.
You can use the Azure Lustre CSI Driver for Kubernetes to access Azure Managed Lustre storage as persistent storage volumes from Kubernetes containers deployed in AKS.
Compatible Kubernetes versions
The Azure Lustre CSI Driver for Kubernetes is compatible with AKS. Other Kubernetes installations are not currently supported.
AKS Kubernetes versions 1.21 and later are supported. This support includes all versions currently available when you're creating a new AKS cluster.
Important
The Azure Lustre CSI Driver for Kubernetes currently works only with the Ubuntu Linux OS SKU for node pools of AKS.
Compatible Lustre versions
The Azure Lustre CSI Driver for Kubernetes is compatible with Azure Managed Lustre. Other Lustre installations are not currently supported.
Azure Lustre CSI Driver Versions
The following driver versions are supported:
| Driver version | Image | Supported k8s version | Lustre client version | Dynamic Provisioning |
|---|---|---|---|---|
| main branch | mcr.microsoft.com/oss/v2/kubernetes-csi/azurelustre-csi:latest | 1.21+ | 2.15.5 | ✅ |
| v0.3.0 | mcr.microsoft.com/oss/v2/kubernetes-csi/azurelustre-csi:v0.3.0 | 1.21+ | 2.15.5 | ✅ |
| v0.2.0 | mcr.microsoft.com/oss/v2/kubernetes-csi/azurelustre-csi:v0.2.0 | 1.21+ | 2.15.5 | ❌ |
| v0.1.18 | mcr.microsoft.com/oss/v2/kubernetes-csi/azurelustre-csi:v0.1.18 | 1.21+ | 2.15.5 | ❌ |
| v0.1.17 | mcr.microsoft.com/oss/v2/kubernetes-csi/azurelustre-csi:v0.1.17 | 1.21+ | 2.15.5 | ❌ |
| v0.1.15 | mcr.microsoft.com/oss/v2/kubernetes-csi/azurelustre-csi:v0.1.15 | 1.21+ | 2.15.4 | ❌ |
| v0.1.14 | mcr.microsoft.com/oss/v2/kubernetes-csi/azurelustre-csi:v0.1.14 | 1.21+ | 2.15.3 | ❌ |
| v0.1.13 | mcr.microsoft.com/oss/v2/kubernetes-csi/azurelustre-csi:v0.1.13 | 1.21+ | 2.15.4 | ❌ |
| v0.1.12 | mcr.microsoft.com/oss/v2/kubernetes-csi/azurelustre-csi:v0.1.12 | 1.21+ | 2.15.3 | ❌ |
| v0.1.11 | mcr.microsoft.com/oss/v2/kubernetes-csi/azurelustre-csi:v0.1.11 | 1.21+ | 2.15.1 | ❌ |
| v0.1.10 | mcr.microsoft.com/oss/v2/kubernetes-csi/azurelustre-csi:v0.1.10 | 1.21+ | 2.15.2 | ❌ |
For a complete list of all driver releases and their changelog, see the Azure Lustre CSI driver releases page.
Prerequisites
- An Azure account with an active subscription. Create an account for free.
- A terminal environment with the Azure CLI tools installed. See Get started with the Azure CLI.
- kubectl, the Kubernetes management tool, installed in your terminal environment. See Quickstart: Deploy an Azure Kubernetes Service (AKS) cluster by using the Azure CLI.
- An Azure Managed Lustre deployment. See the Azure Managed Lustre documentation.
- Network connectivity between your AKS cluster and Azure Managed Lustre virtual network. See network architecture planning below for configuration options.
Plan your AKS deployment
When you're deploying Azure Kubernetes Service, several options affect the operation between AKS and Azure Managed Lustre.
Determine the network type to use with AKS
AKS supports multiple networking models, each with different capabilities and use cases. All networking models work with the Azure Lustre CSI Driver for Kubernetes, but they have different requirements for virtual networking and cluster setup.
For comprehensive information about choosing the right networking model for your specific requirements, see Azure Kubernetes Service CNI networking overview.
When creating an AKS cluster in the Azure portal, you'll see the following networking options:
Recommended Options:
Azure CNI Overlay (Recommended)
- Conserves VNet IP address space by using logically separate CIDR ranges for pods
- Supports maximum cluster scale (5000 nodes and 250 pods per node)
- Simple IP address management
- Best choice for most scenarios
Azure CNI Pod Subnet
- Pods get full VNet connectivity and can be directly reached via their private IP address
- Requires larger, non-fragmented VNet IP address space
- Choose this if you need direct external access to pod IPs
Legacy Options (Not Recommended for New Deployments):
Azure CNI Node Subnet (Legacy)
- Limited scale and inefficient use of VNet IPs
- Only recommended if you specifically need a managed VNet for your cluster, see AKS Legacy Container Networking Interfaces (CNI)
Kubenet (Retiring)
- Being retired March 31, 2028. For more information, see AKS use Kubenet.
- Limited scale and requires manual route management
- Plan to migrate to Azure CNI Overlay before the retirement date
For detailed information on networking models, see Azure Kubernetes Service CNI networking overview.
Determine the network architecture for interconnectivity of AKS and Azure Managed Lustre
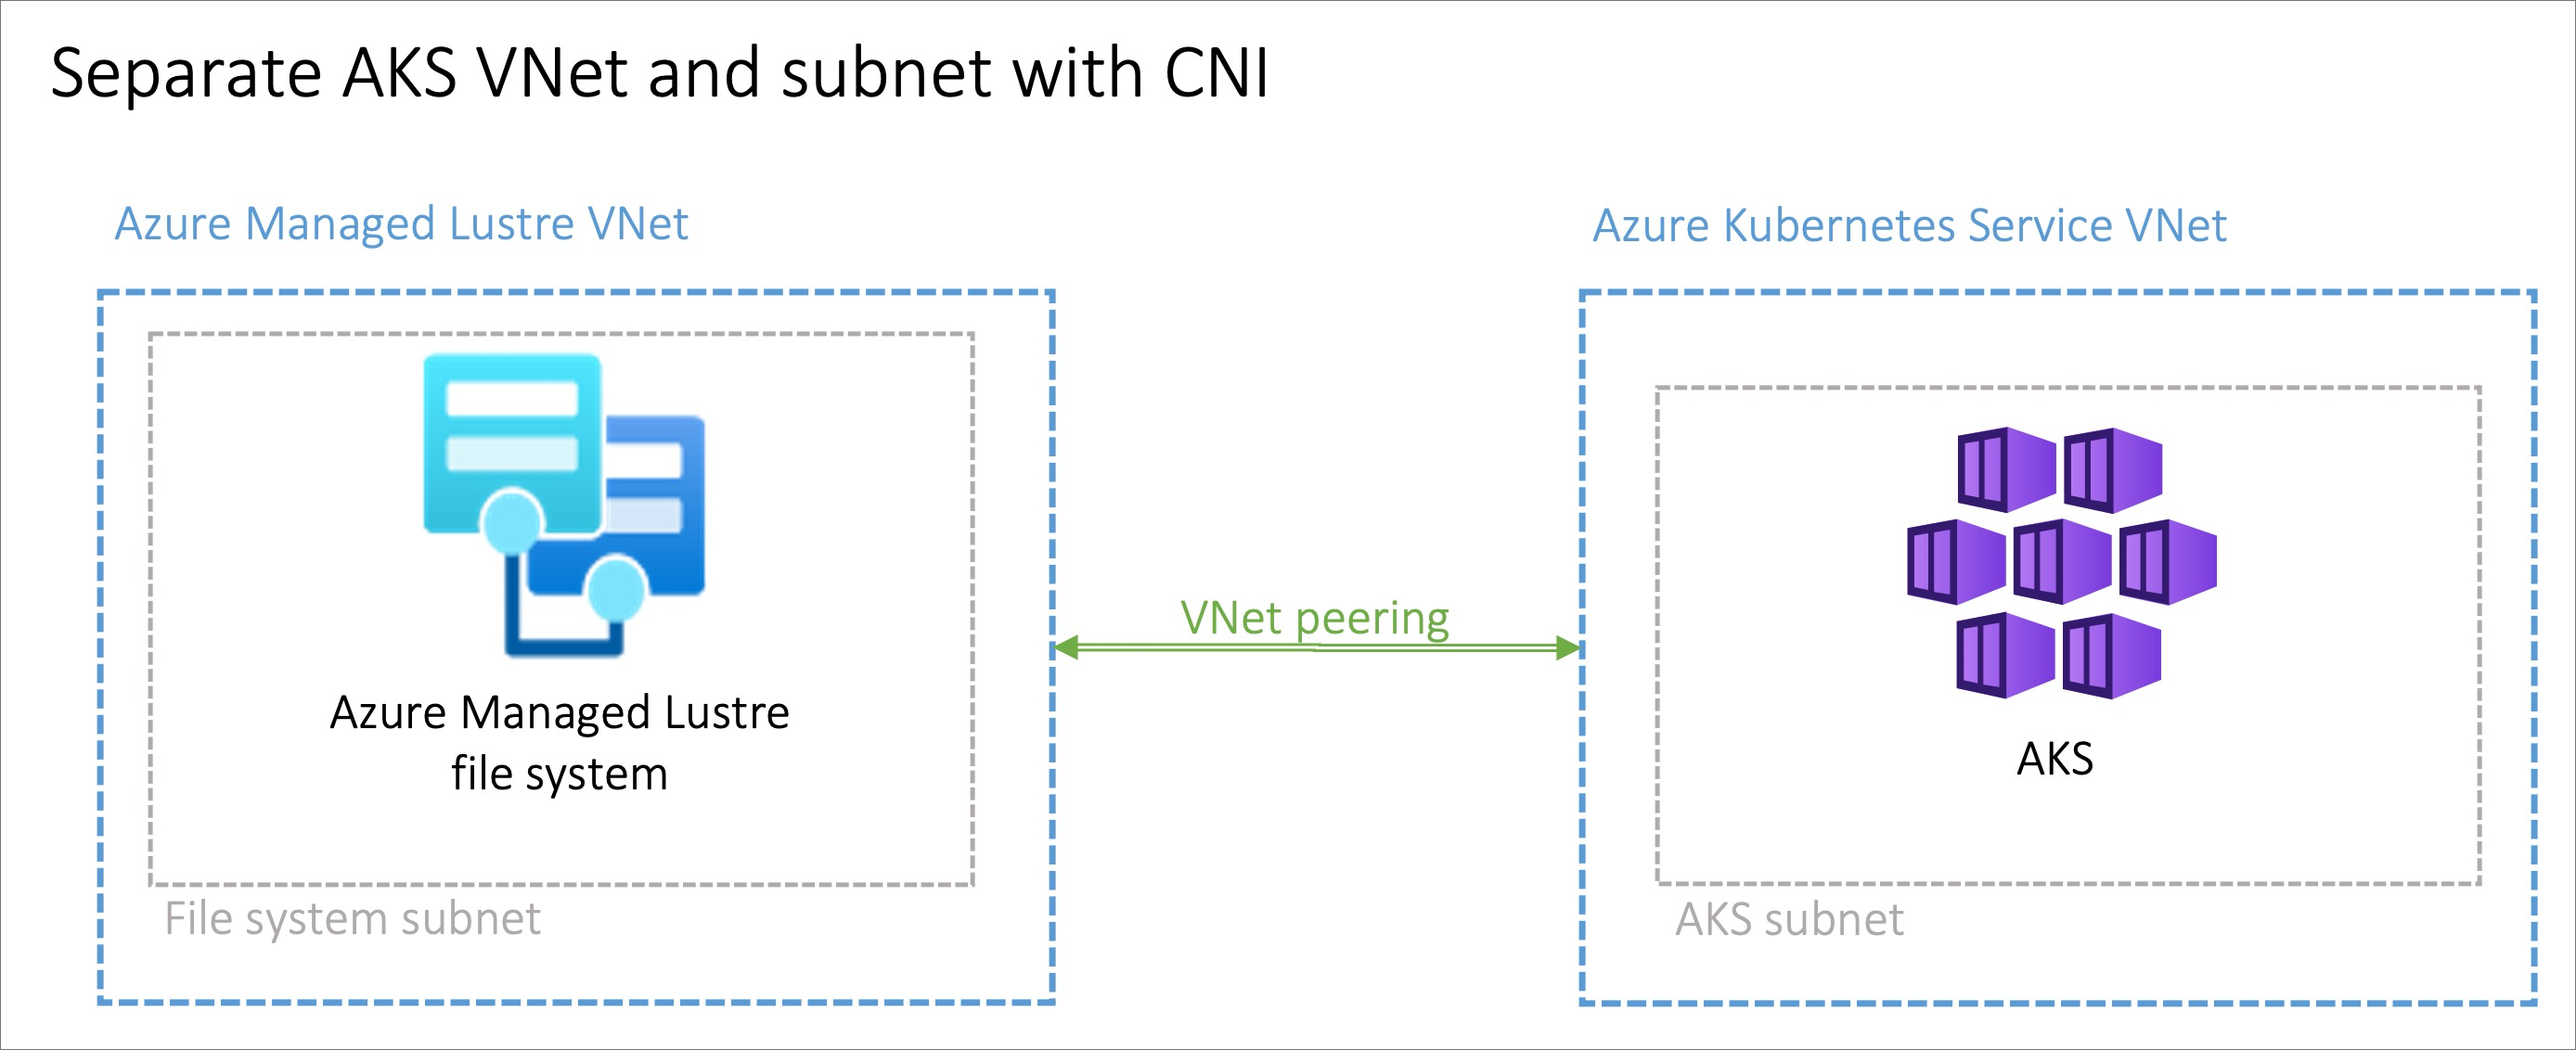
Azure Managed Lustre operates within a private virtual network. Your AKS instance must have network connectivity to the Azure Managed Lustre virtual network. There are two common ways to configure the networking between Azure Managed Lustre and AKS:
- Install AKS in its own virtual network and create a virtual network peering with the Azure Managed Lustre virtual network.
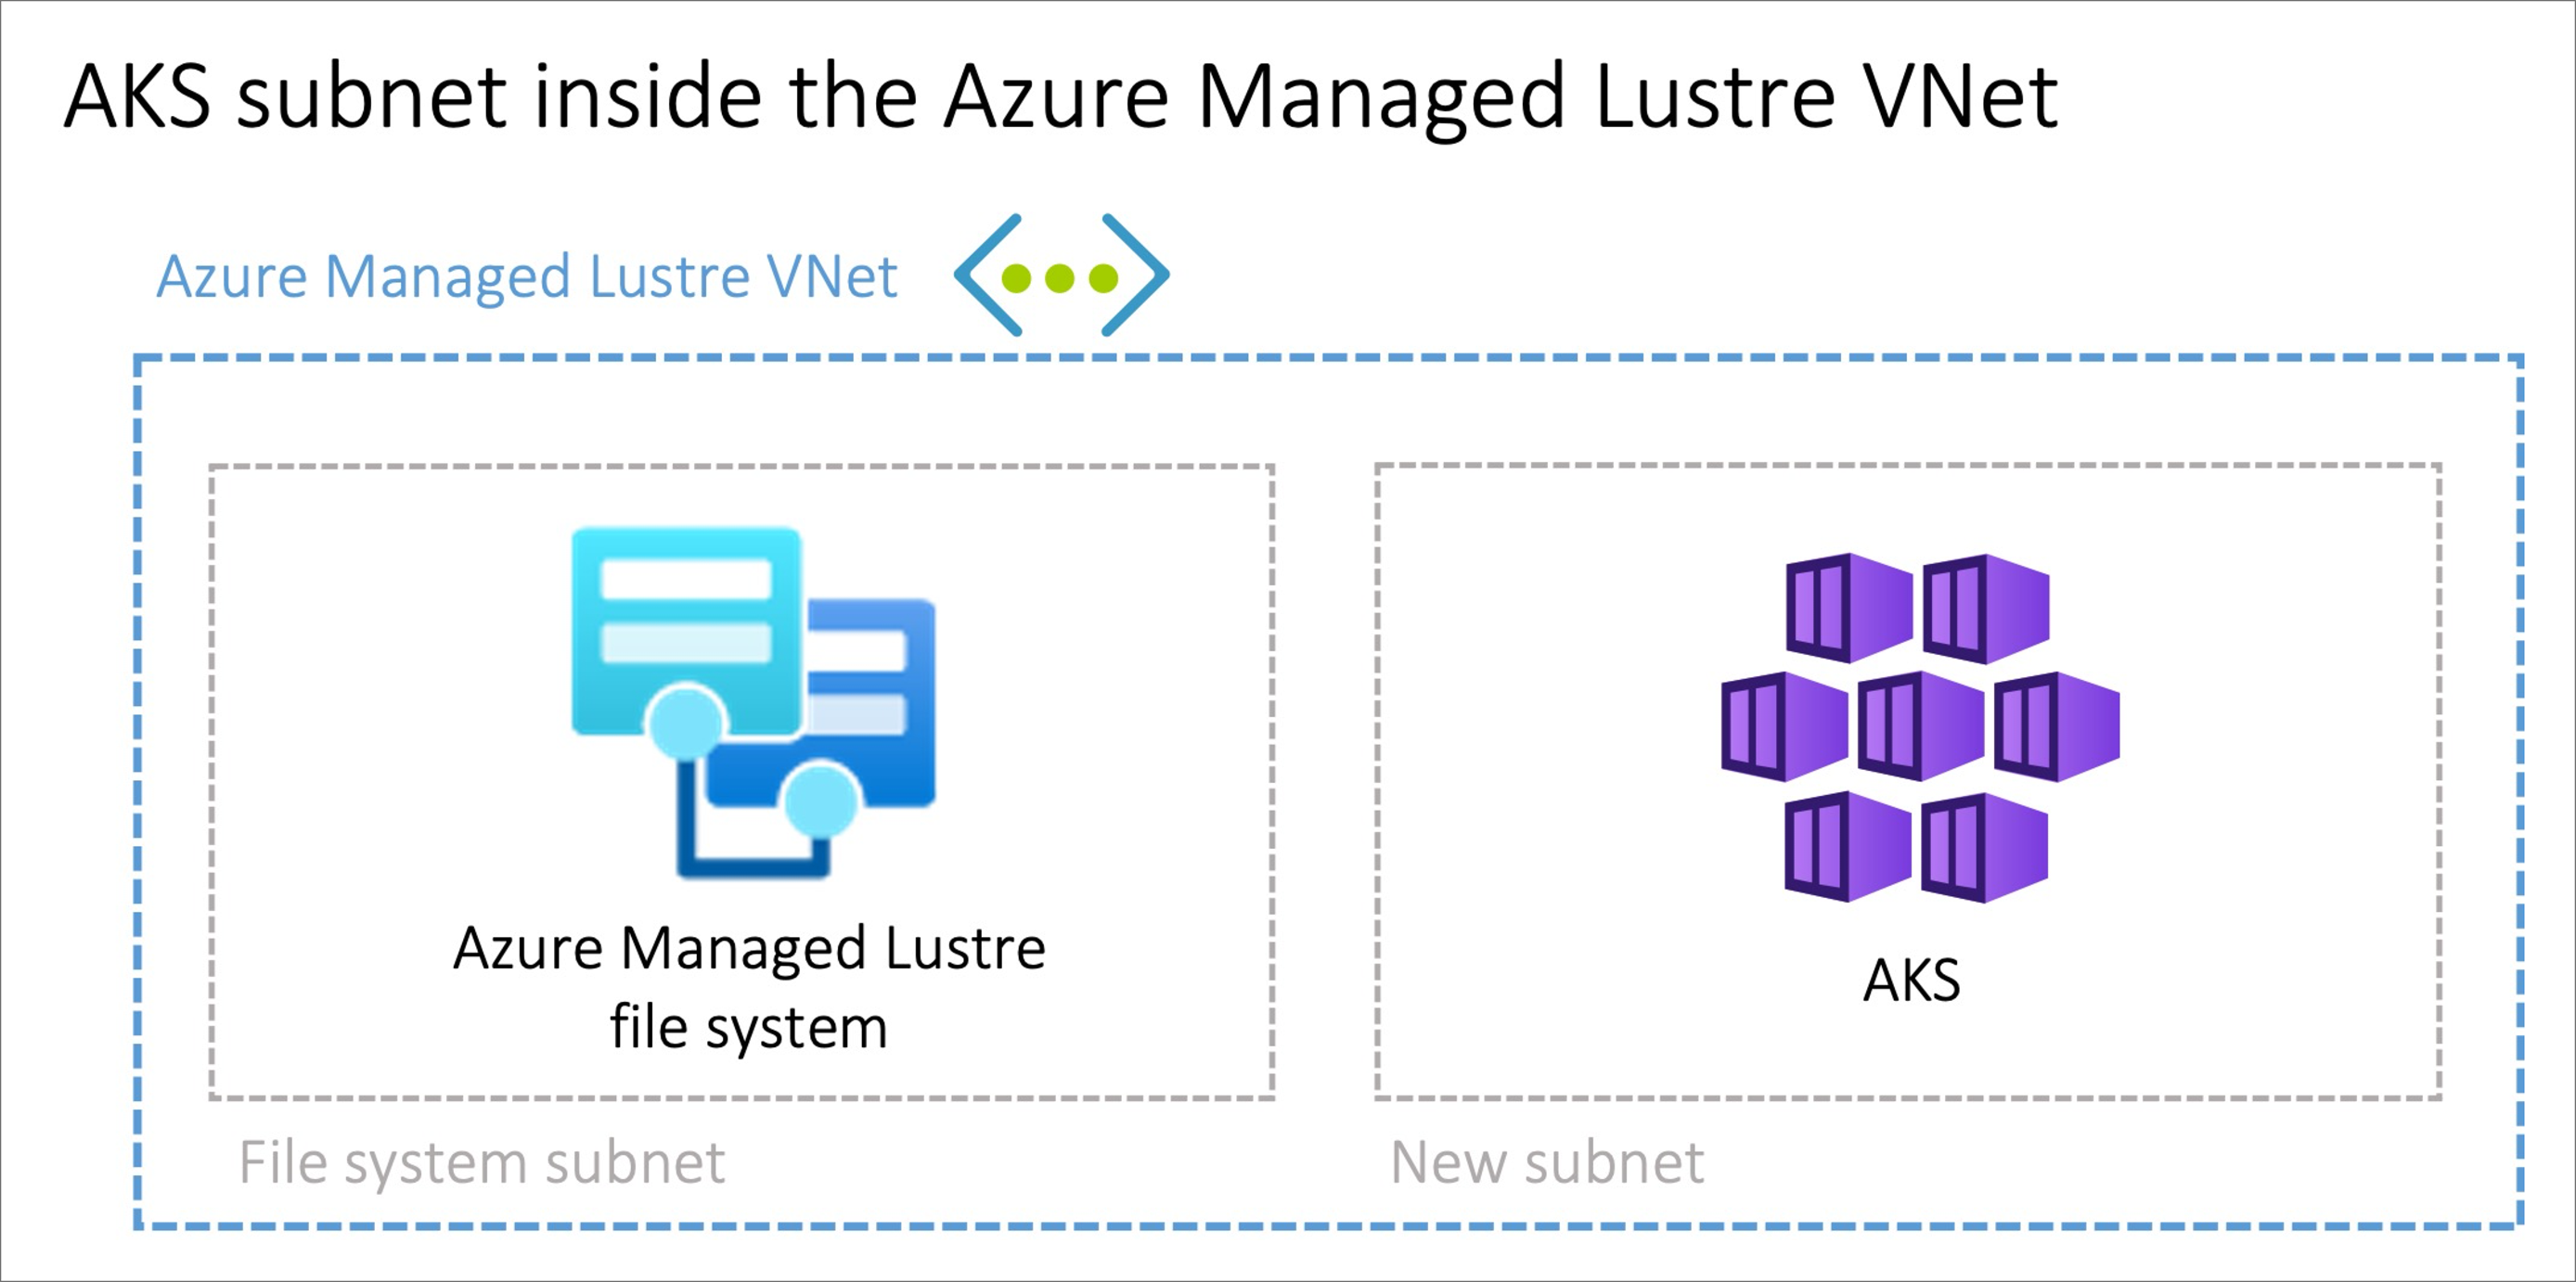
- Use the Bring your own Azure virtual network option in AKS to install AKS in a new subnet on the Azure Managed Lustre virtual network.
Note
We don't recommend that you install AKS in the same subnet as Azure Managed Lustre.
Peering AKS and Azure Managed Lustre virtual networks
The option to peer two virtual networks has the advantage of separating the management of the networks into different privileged roles. Peering can also provide additional flexibility, because you can implement it across Azure subscriptions or regions. Virtual network peering requires coordination between the two networks to avoid choosing conflicting IP network spaces.
Installing AKS in a subnet on the Azure Managed Lustre virtual network
The option to install the AKS cluster in the Azure Managed Lustre virtual network with the Bring your own Azure virtual network feature in AKS can be advantageous in scenarios where the network is managed singularly. You'll need to create an additional subnet, sized to meet your AKS networking requirements, in the Azure Managed Lustre virtual network.
There is no privilege separation for network management when you're provisioning AKS on the Azure Managed Lustre virtual network. The AKS service principal needs privileges on the Azure Managed Lustre virtual network.
Provisioning Methods
The Azure Lustre CSI Driver supports two provisioning methods:
Dynamic Provisioning (Available in v0.3.0+)
Dynamic provisioning allows the CSI driver to automatically create Azure Managed Lustre file systems on-demand when persistent volume claims are created.
Note
Dynamic provisioning is available starting with Azure Lustre CSI Driver version 0.3.0. For more information, see the v0.3.0 release notes.
Static Provisioning
Static provisioning uses an existing Azure Managed Lustre file system. This method involves:
- Creating storage classes that reference existing Lustre clusters
- Manually specifying the Lustre file system name and MGS IP address
- Suitable for scenarios where you have preexisting Lustre infrastructure
Choose the method that best fits your use case. Dynamic provisioning is documented first below, followed by static provisioning instructions.
Dynamic Provisioning
Dynamic provisioning automatically creates Azure Managed Lustre file systems on-demand when persistent volume claims are created. This feature became available in CSI driver version 0.3.0.
Prerequisites for dynamic provisioning
Permissions
Important
Before using this CSI driver to dynamically create Azure Managed Lustre clusters, the kubelet identity must have the correct permissions granted to it.
The kubelet identity requires the following permissions:
- Read and write access to the resource group where clusters will be created
- Network permissions to create and manage subnets if needed
- Azure Managed Lustre service permissions
For detailed permission requirements, see the Driver Parameters documentation.
Network requirements
- An existing virtual network and subnet for the Azure Managed Lustre cluster
- Sufficient IP addresses available in the subnet for the cluster
- Proper network security group rules to allow Lustre traffic
Create an AKS cluster for dynamic provisioning
If you haven't already created your AKS cluster, create a cluster deployment. See Deploy an Azure Kubernetes Service (AKS) cluster by using the Azure portal.
Create a virtual network peering for dynamic provisioning
Note
Skip this network peering step if you installed AKS in a subnet on the Azure Managed Lustre virtual network.
The AKS virtual network is created in a separate resource group from the AKS cluster's resource group. You can find the name of this resource group by going to your AKS cluster in the Azure portal, going to Properties, and finding the Infrastructure resource group. This resource group contains the virtual network that needs to be paired with the Azure Managed Lustre virtual network. It matches the pattern MC_<aks-rg-name>_<aks-cluster-name>_<region>.
To peer the AKS virtual network with your Azure Managed Lustre virtual network, consult Virtual network peering.
Tip
Due to the naming of the MC_ resource groups and virtual networks, names of networks can be similar or the same across multiple AKS deployments. When you're setting up peering, be careful to choose the AKS networks that you intend to choose.
Connect to the AKS cluster for dynamic provisioning
Open a terminal session with access to the Azure CLI tools and sign in to your Azure account:
az loginSign in to the Azure portal.
Find your AKS cluster. On the Overview pane, select the Connect button, and then copy the command for Download cluster credentials.
In your terminal session, paste in the command to download the credentials. The command is similar to:
az aks get-credentials --subscription <AKS_subscription_id> --resource_group <AKS_resource_group_name> --name <name_of_AKS>Install kubectl if it's not present in your environment:
az aks install-cliVerify that the current context is the AKS cluster where you just installed the credentials and that you can connect to it:
kubectl config current-context
kubectl get deployments --all-namespaces=true
Install the driver for dynamic provisioning
To install the Azure Lustre CSI Driver for Kubernetes, run the following command:
curl -skSL https://raw.githubusercontent.com/kubernetes-sigs/azurelustre-csi-driver/main/deploy/install-driver.sh | bash
To get sample commands for a local installation, see Install the Azure Lustre CSI driver on a Kubernetes cluster.
Create a Storage Class for dynamic provisioning
Create a file called storageclass_dynprov_lustre.yaml and copy in the following YAML. Edit the parameters as needed for your environment:
apiVersion: storage.k8s.io/v1
kind: StorageClass
metadata:
  name: azurelustre-dynprov
provisioner: azurelustre.csi.azure.com
parameters:
  sku-name: "AMLFS-Durable-Premium-125"  # Choose appropriate SKU
  zone: "1"  # Specify zone if required for your SKU/location
  maintenance-day-of-week: "Sunday"
  maintenance-time-of-day-utc: "22:00"
  location: "eastus"  # Optional: defaults to AKS cluster location
  resource-group: "my-resource-group"  # Optional: defaults to AKS cluster RG
  vnet-name: "my-vnet"  # Optional: defaults to AKS cluster VNET
  subnet-name: "my-subnet"  # Optional: defaults to AKS cluster subnet
reclaimPolicy: Delete  # Change to "Retain" to keep clusters after PVC deletion
volumeBindingMode: Immediate
---
# Optional: Resource quota to limit number of clusters
apiVersion: v1
kind: ResourceQuota
metadata:
  name: pvc-lustre-dynprov-quota
spec:
  hard:
    azurelustre-dynprov.storageclass.storage.k8s.io/persistentvolumeclaims: "1"
Apply the Storage Class to your AKS cluster:
kubectl apply -f storageclass_dynprov_lustre.yaml
Create a Persistent Volume Claim for dynamic provisioning
Create a file called pvc_storageclass_dynprov.yaml and copy in the following YAML:
apiVersion: v1
kind: PersistentVolumeClaim
metadata:
  name: pvc-lustre-dynprov
spec:
  accessModes:
    - ReadWriteMany
  storageClassName: azurelustre-dynprov
  resources:
    requests:
      storage: 48Ti  # Minimum size for AMLFS-Durable-Premium-125
Apply the PVC to your AKS cluster:
kubectl apply -f pvc_storageclass_dynprov.yaml
Monitor cluster creation
The Azure Managed Lustre cluster creation may take 10 minutes or more. You can monitor the progress:
kubectl describe pvc pvc-lustre-dynprov
While creating, the status will be Pending with a message like:
Waiting for a volume to be created either by the external provisioner 'azurelustre.csi.azure.com'...
Once ready, it will have a Bound status with a success message.
Create a pod for dynamic provisioning
Create a file called pod_echo_date_dynprov.yaml and copy in the following YAML:
apiVersion: v1
kind: Pod
metadata:
  name: lustre-echo-date-dynprov
spec:
  containers:
  - image: mcr.microsoft.com/oss/nginx/nginx:1.15.5-alpine
    name: lustre-echo-date-dynprov
    command:
      - "/bin/sh"
      - "-c"
      - "while true; do echo $(date) >> /mnt/lustre/outfile; sleep 1; done"
    volumeMounts:
    - name: lustre-storage
      mountPath: /mnt/lustre
  volumes:
  - name: lustre-storage
    persistentVolumeClaim:
      claimName: pvc-lustre-dynprov
Apply the pod to your AKS cluster:
kubectl apply -f pod_echo_date_dynprov.yaml
Verify dynamic provisioning
After the pod is running, you can verify that the dynamically created Azure Managed Lustre file system is mounted correctly:
kubectl exec -it lustre-echo-date-dynprov -- df -h
You should see the Azure Managed Lustre file system mounted at /mnt/lustre.
Clean up dynamic resources
To delete the dynamically created resources:
kubectl delete pvc pvc-lustre-dynprov
If the storage class has reclaimPolicy: Delete, this will also delete the Azure Managed Lustre cluster. If set to Retain, you must delete the cluster manually when no longer needed.
Static Provisioning
Static provisioning allows you to use an existing Azure Managed Lustre file system with your AKS cluster by manually creating the necessary Kubernetes resources.
Prerequisites for static provisioning
- An existing Azure Managed Lustre file system. For more information on creating an Azure Managed Lustre file system, see Create an Azure Managed Lustre file system.
- The MGS IP address and internal file system name from your Azure Managed Lustre cluster
Create an Azure Managed Lustre file system cluster for static provisioning
If you haven't already created your Azure Managed Lustre file system cluster, create the cluster now. For instructions, see Create an Azure Managed Lustre file system by using the Azure portal. Static provisioning requires an existing Azure Managed Lustre file system.
Create an AKS cluster for static provisioning
If you haven't already created your AKS cluster, create a cluster deployment. See Deploy an Azure Kubernetes Service (AKS) cluster by using the Azure portal.
Create a virtual network peering for static provisioning
Note
Skip this network peering step if you installed AKS in a subnet on the Azure Managed Lustre virtual network.
The AKS virtual network is created in a separate resource group from the AKS cluster's resource group. You can find the name of this resource group by going to your AKS cluster in the Azure portal, going to Properties, and finding the Infrastructure resource group. This resource group contains the virtual network that needs to be paired with the Azure Managed Lustre virtual network. It matches the pattern MC_<aks-rg-name>_<aks-cluster-name>_<region>.
To peer the AKS virtual network with your Azure Managed Lustre virtual network, consult Virtual network peering.
Tip
Due to the naming of the MC_ resource groups and virtual networks, names of networks can be similar or the same across multiple AKS deployments. When you're setting up peering, be careful to choose the AKS networks that you intend to choose.
Connect to the AKS cluster for static provisioning
Open a terminal session with access to the Azure CLI tools and sign in to your Azure account:
az loginSign in to the Azure portal.
Find your AKS cluster. On the Overview pane, select the Connect button, and then copy the command for Download cluster credentials.
In your terminal session, paste in the command to download the credentials. The command is similar to:
az aks get-credentials --subscription <AKS_subscription_id> --resource_group <AKS_resource_group_name> --name <name_of_AKS>Install kubectl if it's not present in your environment:
az aks install-cliVerify that the current context is the AKS cluster where you just installed the credentials and that you can connect to it:
kubectl config current-context
kubectl get deployments --all-namespaces=true
Install the driver for static provisioning
To install the Azure Lustre CSI Driver for Kubernetes, run the following command:
curl -skSL https://raw.githubusercontent.com/kubernetes-sigs/azurelustre-csi-driver/main/deploy/install-driver.sh | bash
To get sample commands for a local installation, see Install the Azure Lustre CSI driver on a Kubernetes cluster.
Create and configure a persistent volume for static provisioning
To create a persistent volume for an existing Azure Managed Lustre file system:
Copy the following configuration files from the /docs/examples/ folder in the azurelustre-csi-driver repository. If you cloned the repository when you installed the driver, you have local copies available already.
- storageclass_existing_lustre.yaml
- pvc_storageclass.yaml
If you don't want to clone the entire repository, you can download each file individually. Open each of the following links, copy the file's contents, and then paste the contents into a local file with the same file name.
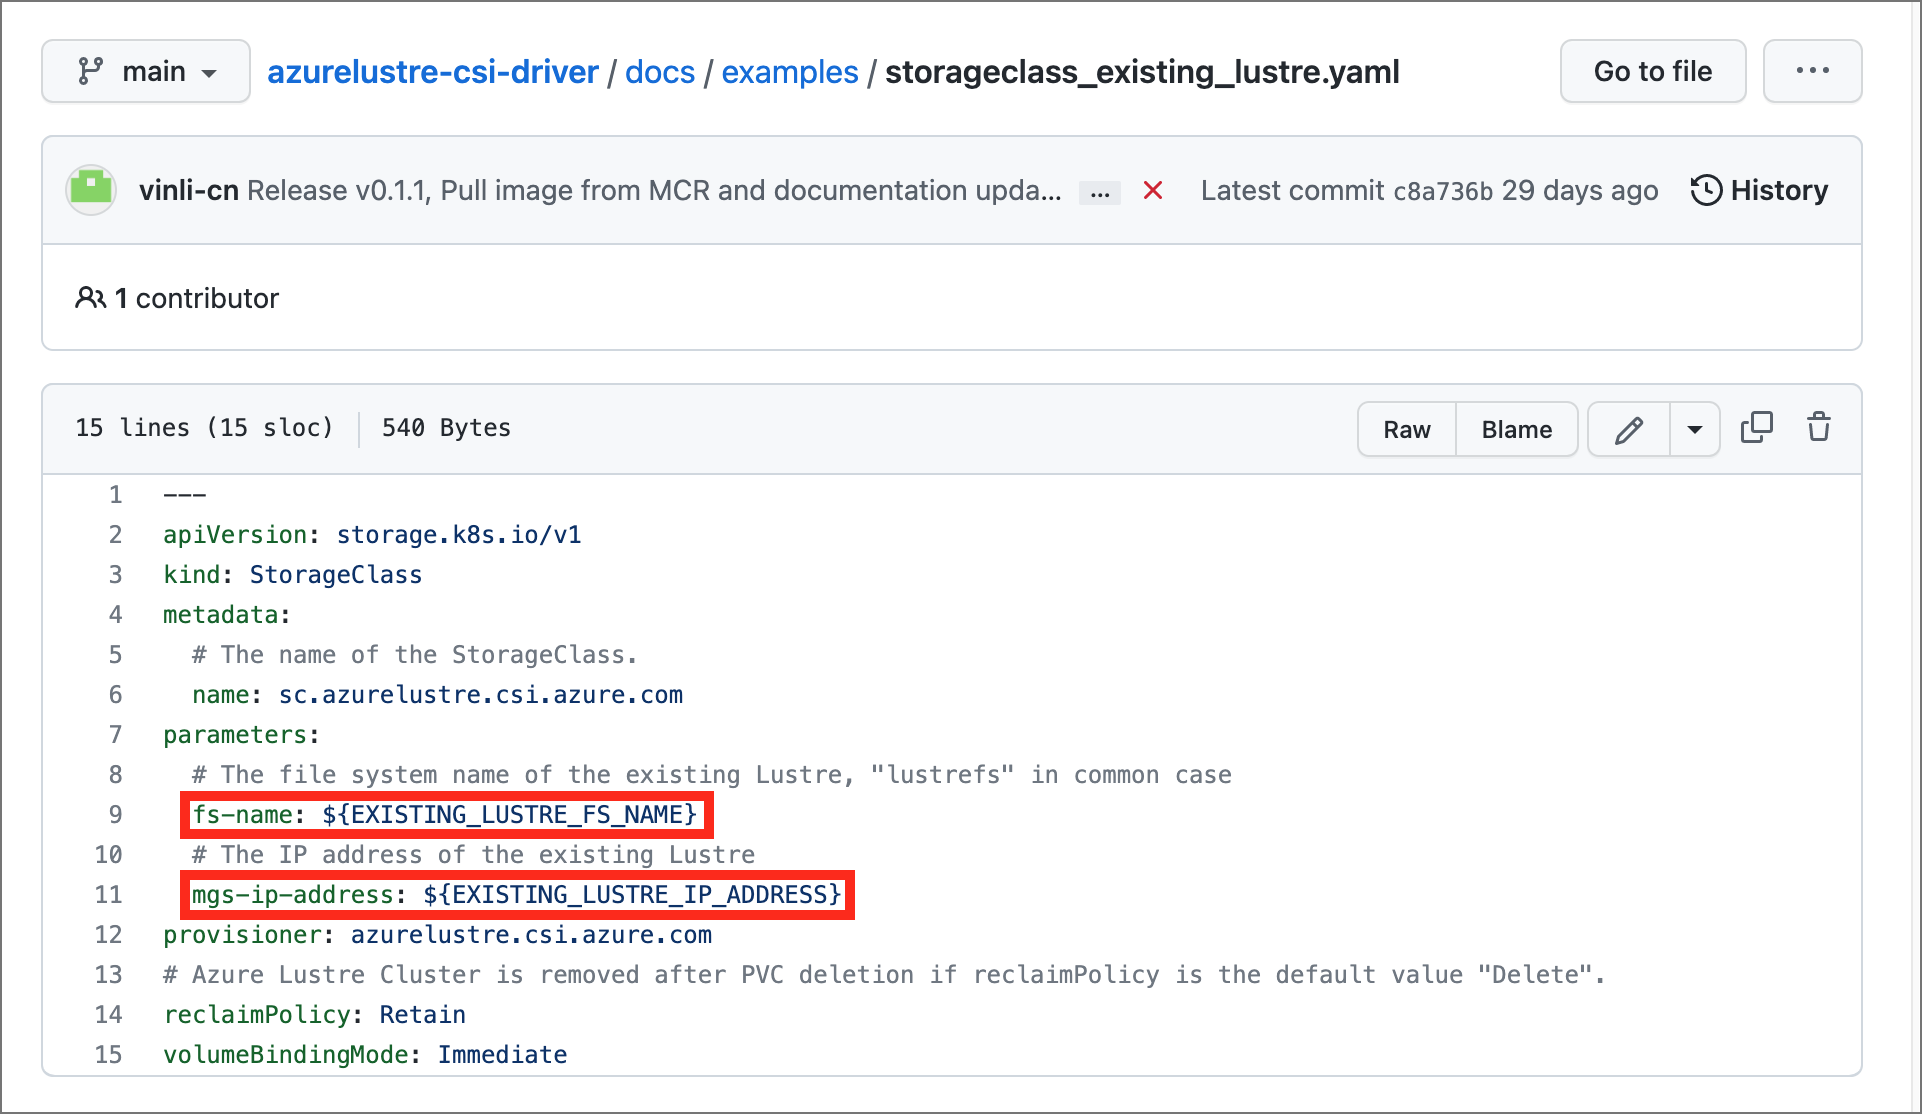
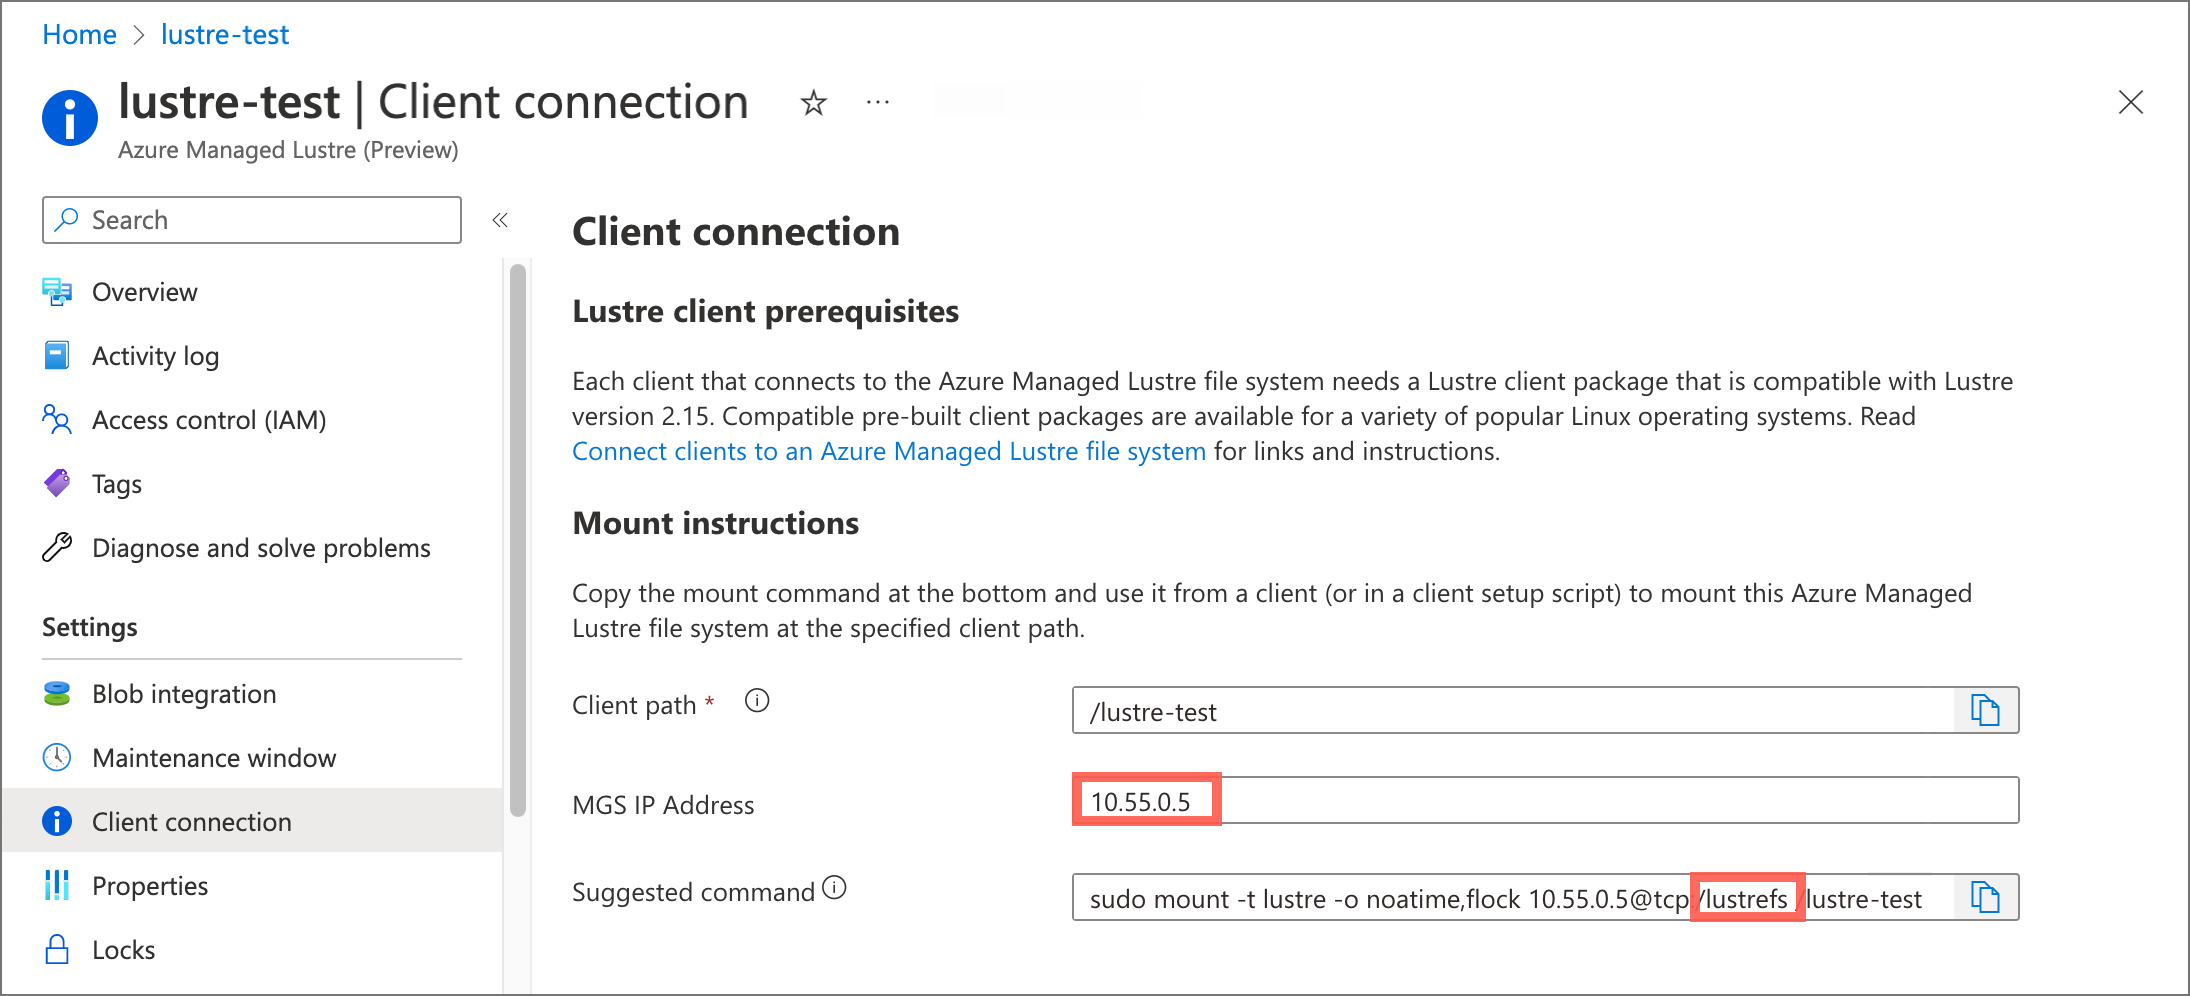
In the storageclass_existing_lustre.yaml file, update the internal name of the Lustre cluster and the Lustre Management Service (MGS) IP address.
Both settings are displayed in the Azure portal, on the Client connection pane for your Azure Managed Lustre file system.
Make these updates:
Replace
EXISTING_LUSTRE_FS_NAMEwith the system-assigned internal name of the Lustre cluster in your Azure Managed Lustre file system. The internal name is usuallylustrefs. The internal name isn't the name that you gave the file system when you created it.The suggested
mountcommand includes the name highlighted in the following address string.
Replace
EXISTING_LUSTRE_IP_ADDRESSwith the MGS IP address.
To create the storage class and the persistent volume claim, run the following
kubectlcommand:kubectl create -f storageclass_existing_lustre.yaml kubectl create -f pvc_storageclass.yaml
Create a pod for static provisioning
Create a pod that uses the PVC to mount the Azure Managed Lustre file system.
Create a file called pod_echo_date.yaml and copy in the following YAML:
apiVersion: v1
kind: Pod
metadata:
  name: lustre-echo-date
spec:
  containers:
  - image: mcr.microsoft.com/oss/nginx/nginx:1.15.5-alpine
    name: lustre-echo-date
    command:
      - "/bin/sh"
      - "-c"
      - "while true; do echo $(date) >> /mnt/lustre/outfile; sleep 1; done"
    volumeMounts:
    - name: lustre-storage
      mountPath: /mnt/lustre
  volumes:
  - name: lustre-storage
    persistentVolumeClaim:
      claimName: pvc-lustre
Apply the pod to your AKS cluster:
kubectl apply -f pod_echo_date.yaml
Verify static provisioning
After the pod is running, you can verify that the Azure Managed Lustre file system is mounted correctly:
kubectl exec -it lustre-echo-date -- df -h
You should see the Azure Managed Lustre file system mounted at /mnt/lustre.
To view timestamps in the console during writes, run the following command:
kubectl logs -f lustre-echo-date
Clean up static resources
To clean up resources when you're done:
kubectl delete pod lustre-echo-date
kubectl delete pvc pvc-lustre
kubectl delete storageclass azurelustre-static
Important
This only deletes the Kubernetes resources. The Azure Managed Lustre file system itself will continue to exist and can be reused.
Validate Container Image Signatures
Azure Lustre CSI Driver signs its container images to allow users to verify the integrity and origin of the images they use. Signing utilizes a public/private key pair to prove that Microsoft built a container image by creating a digital signature and adding it to the image. This section provides the steps to verify that an image was signed by Microsoft.
Understanding Image Security in Kubernetes System Components
Container images used by the Azure Lustre CSI Driver are deployed in the kube-system namespace, which is considered a trusted system namespace in Kubernetes. For security and operational reasons, image integrity policies are typically not enforced on system namespaces because:
- Bootstrap Requirements: System components like CSI drivers must start before policy enforcement systems (like Gatekeeper and Ratify) are available
- Trusted Components: Images in
kube-systemare core Kubernetes infrastructure components managed by trusted providers - Operational Stability: Enforcing policies on policy enforcement components themselves could prevent cluster functionality
However, you can still verify the integrity of CSI driver images before deployment.
Pre-Deployment Image Verification
Before deploying the Azure Lustre CSI Driver, you can verify the digital signatures and authenticity of the container images using Microsoft's public signing certificates:
Verify Image Signatures with Notation CLI
Download Notation CLI:
export NOTATION_VERSION=1.3.2
curl -LO https://github.com/notaryproject/notation/releases/download/v$NOTATION_VERSION/notation_$NOTATION_VERSION\_linux_amd64.tar.gz
sudo tar xvzf notation_$NOTATION_VERSION\_linux_amd64.tar.gz -C /usr/bin/ notation
Download the Microsoft signing public certificate:
curl -sSL "https://www.microsoft.com/pkiops/certs/Microsoft%20Supply%20Chain%20RSA%20Root%20CA%202022.crt" -o msft_signing_cert.crtAdd the certificate to notation CLI:
notation cert add --type ca --store supplychain msft_signing_cert.crtCheck the certificate in notation:
notation cert lsThe output of the command looks like the following example:
STORE TYPE  STORE NAME  CERTIFICATE
ca          supplychain msft_signing_cert.crt
Create a trustpolicy file for Azure Lustre CSI Driver images:
Create a file called
trustpolicy.json:{ "version": "1.0", "trustPolicies": [ { "name": "supplychain", "registryScopes": [ "*" ], "signatureVerification": { "level" : "strict" }, "trustStores": [ "ca:supplychain" ], "trustedIdentities": [ "x509.subject: CN=Microsoft SCD Products RSA Signing,O=Microsoft Corporation,L=Redmond,ST=Washington,C=US" ] } ] }Use notation to verify Azure Lustre CSI Driver images:
notation policy import trustpolicy.json
export NOTATION_EXPERIMENTAL=1

# Verify the controller image
notation verify --allow-referrers-api mcr.microsoft.com/oss/v2/kubernetes-csi/azurelustre-csi:v0.3.0
The output of a successful verification looks like the following example:
Successfully verified signature for mcr.microsoft.com/oss/v2/kubernetes-csi/azurelustre-csi@sha256:a1b2c3d4e5f6789012345678901234567890abcdef1234567890abcdef123456
Application Workload Image Integrity
For enhanced security in production environments, consider enabling AKS Image Integrity to automatically validate container image signatures for your application workloads. While CSI driver images in the kube-system namespace are typically excluded from policy enforcement, you can configure image integrity policies for your application namespaces.
To learn more about implementing image integrity policies for your application workloads, see Image Integrity in Azure Kubernetes Service (AKS).
Troubleshooting
For troubleshooting issues with the Azure Lustre CSI Driver, see the CSI driver troubleshooting guide in the GitHub repository.
Common issues include:
- Network connectivity problems between AKS and Azure Managed Lustre - verify virtual network peering or subnet configuration
- Incorrect configuration - double-check the MGS IP address and file system name in your storage class configuration
- Pod scheduling issues - ensure you're using Ubuntu Linux OS SKU for node pools, as this is the only supported configuration
- Permission issues - verify that the AKS service principal has appropriate permissions on the Azure Managed Lustre virtual network
For dynamic provisioning specific issues:
- Authentication/authorization errors - verify kubelet identity permissions for creating Azure Managed Lustre clusters
- SKU and zone validation errors - ensure the specified SKU is supported in your region and zone configuration is correct
- Network IP address availability - confirm sufficient IP addresses are available in the target subnet
- Quota limitations - check both Kubernetes resource quotas and Azure subscription quotas for Azure Managed Lustre clusters
For additional troubleshooting resources, see: