Note
Access to this page requires authorization. You can try signing in or changing directories.
Access to this page requires authorization. You can try changing directories.
NFSv4 introduces the concept of an ID authentication domain. Azure NetApp Files uses the entry value defaultv4iddomain.com as the authentication domain, and NFS clients use their own configuration to authenticate users that want to access files on those volumes. By default, NFS clients will use the DNS domain name as the NFSv4 ID domain. You can override this setting by using the NFSv4 configuration file named idmapd.conf.
If authentication domain settings on NFS client and Azure NetApp Files do not match, file access may be denied as the NFSv4 user and group mapping may fail. When this happens, the users and groups that do not match properly will squash the user and group configured in the idmapd.conf file (generally, nobody:99) and an event will be logged on the client.
This article explains the default behavior of user/group mapping and how to configure NFS clients correct to authenticate properly and allow access.
Default behavior of user/group mapping
The root user mapping can illustrate what happens if there is a mismatch between the Azure NetApp Files and NFS clients. The installation process of an application often requires the use of the root user. Azure NetApp Files can be configured to allow access for root.
In the following directory listing example, the user root mounts a volume on a Linux client that uses its default configuration localdomain for the ID authentication domain, which is different from Azure NetApp Files’ default configuration of defaultv4iddomain.com.

In the listing of the files in the directory, file1 shows as being mapped to nobody, when it should be owned by the root user.
There are two ways to adjust the authentication domain on both sides: Azure NetApp Files as NFS server and Linux as NFS clients:
Central user management: If you're already using a central user management such as Active Directory Domain Services (AD DS), you can configure their Linux clients to use LDAP and set the domain configured in AD DS as authentication domain. At the server side, you must enable the AD domain service for Azure NetApp Files and create LDAP-enabled volumes. The LDAP-enabled volumes automatically use the domain configured in AD DS as their authentication domain.
For more information about this process, see Enable Active Directory Domain Services (AD DS) LDAP authentication for NFS volumes.
Manually configure the Linux client: If you are not using a central user management for your Linux clients, you can manually configure the Linux clients to match the default authentication domain of Azure NetApp Files for non-LDAP enabled volumes.
In this section we’ll focus on how to configure the Linux client and how to change the Azure NetApp Files authentication domain for all non-LDAP enabled volumes.
Configure NFSv4.1 ID domain for non-LDAP volumes
You can specify a desired NFSv4.1 ID domain for all non-LDAP volumes using the Azure portal. This setting applies to all non-LDAP volumes across all NetApp accounts in the same subscription and region. It does not affect LDAP-enabled volumes in the same NetApp subscription and region.
Register the feature
Azure NetApp Files supports the ability to set the NFSv4.1 ID domain for all non-LDAP volumes in a subscription using the Azure portal. You need to register the feature before using it for the first time. After registration, the feature is enabled and works in the background.
Register the feature:
Register-AzProviderFeature -ProviderNamespace Microsoft.NetApp -FeatureName ANFNFSV4IDDomainCheck the status of the feature registration:
Note
The RegistrationState can remain in the
Registeringstate for up to 60 minutes before changing toRegistered. Wait until the status isRegisteredbefore continuing.Get-AzProviderFeature -ProviderNamespace Microsoft.NetApp -FeatureName ANFNFSV4IDDomain
You can also use Azure CLI commands az feature register and az feature show to register the feature and display the registration status.
Steps
Under the Azure NetApp Files subscription, select NFSv4.1 ID Domain.
Select Configure.
To use the default domain
defaultv4iddomain.com, select the box next to Use Default NFSv4 ID Domain. To use another domain, uncheck the text box and provide the name of the NFSv4.1 ID domain.
Select Save.

Configure NFSv4.1 ID domain in NFS clients
Edit the
/etc/idmapd.conffile on the NFS client.
Uncomment the line#Domain(that is, remove the#from the line), and change the valuelocaldomainas follows:- If the volume isn't enabled for LDAP, either use the default domain
defaultv4iddomain.comby specifyingDomain = defaultv4iddomain.com, or specify the NFSv4.1 ID domain as configured in Azure NetApp Files. - If the volume is enabled for LDAP, set
Domainto the domain that is configured in the Active Directory Connection on your NetApp account. For instance, ifcontoso.comis the configured domain in the NetApp account, then setDomain = contoso.com.
The following examples show the initial configuration of
/etc/idmapd.confbefore changes:[General] Verbosity = O Pipefs—Directory = /run/rpc_pipefs # set your own domain here, if it differs from FQDN minus hostname # Domain = localdomain [Mapping] Nobody-User = nobody Nobody-Group = nogroupThe following example shows updated configuration of non-LDAP NFSv4.1 volumes for default domain
defaultv4iddomain.com:[General] Verbosity = O Pipefs—Directory = /run/rpc_pipefs # set your own domain here, if it differs from FQDN minus hostname Domain = defaultv4iddomain.com [Mapping] Nobody-User = nobody Nobody-Group = nogroupThe following example shows updated configuration of LDAP-enabled NFSv4.1 volumes. In this example,
contoso.comis the configured domain in the NetApp account:[General] Verbosity = O Pipefs—Directory = /run/rpc_pipefs # set your own domain here, if it differs from FQDN minus hostname Domain = contoso.com [Mapping] Nobody-User = nobody Nobody-Group = nogroup- If the volume isn't enabled for LDAP, either use the default domain
Unmount any currently mounted NFS volumes.
Update the
/etc/idmapd.conffile.Clear the keyring of the NFS
idmapper(nfsidmap -c).Mount the NFS volumes as required.
The following example shows the resulting user/group change:

As the example shows, the user/group has now changed from nobody to root.
Behavior of other (nonroot) users and groups
Azure NetApp Files supports local users and groups (created locally on the NFS client and represented by user and group IDs) and corresponding ownership and permissions associated with files or folders in NFSv4.1 volumes. However, the service doesn't automatically solve for mapping local users and groups across NFS clients. Users and groups created on one host may or may not exist on another NFS client (or exist with different user and group IDs), and will therefore not map correctly as outlined in the example below.
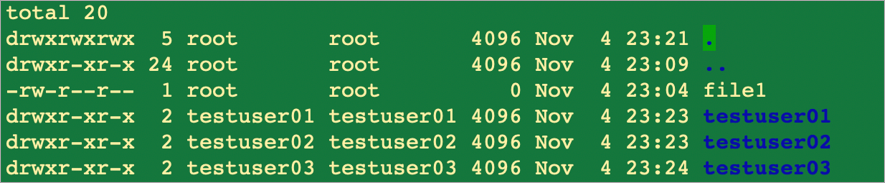
In the following example, Host1 has three user accounts (testuser01, testuser02, testuser03):
On Host2, no corresponding user accounts exist, but the same volume is mounted on both hosts:
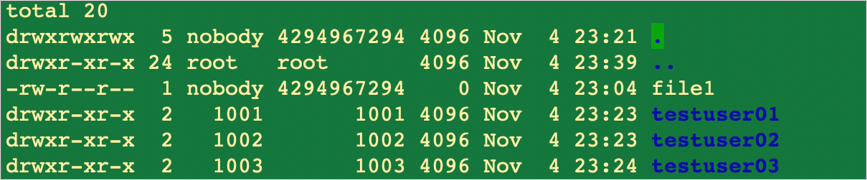
To resolve this issue, either create the missing accounts on the NFS client or configure your NFS clients to use the LDAP server that Azure NetApp Files is using for centrally managed UNIX identities.