You can change the default settings of the Azure portal to meet your own preferences.
To view and manage your portal settings, select the Settings menu icon in the global controls, which are located in the page header at the top right of the screen.
Within Portal settings, you'll see different sections. This article describes the available options for each section.
Directories + subscriptions
Directories + subscriptions lets you manage directories (Azure tenants) and set subscription filters.
Switch and manage directories
In the Directories section, you'll see your Current directory (the directory, or Azure tenant, that you're currently signed in to).
The Startup directory shows the default directory when you sign in to the Azure portal (or Last visited if you've chosen that option). To choose a different startup directory, select change to open Appearance + startup views, where you can change your selection.
To see a full list of directories to which you have access, select All Directories.
To mark a directory as a favorite, select its star icon. Those directories will be listed in the Favorites section.
To switch to a different directory, find the directory that you want to work in, then select the Switch button in its row.
Subscription filters
You can choose the subscriptions that are filtered by default when you sign in to the Azure portal. This can be helpful if you have a primary list of subscriptions you work with but use others occasionally.
Important
After you apply a subscription filter, you'll only see subscriptions that match that filter, across all portal experiences. You won't be able to work with other subscriptions that are excluded from the selected filter. Any new subscriptions that are created after the filter was applied may not be shown if the filter criteria don't match. To see them, you must update the filter criteria to include other subscriptions in the portal, or select Advanced filters and use the Default filter to always show all subscriptions.
Certain features, such as Management groups or Security Center, may show subscriptions that don't match your filter criteria. However, you won't be able to perform operations on those subscriptions (such as moving a subscription between management groups) unless you adjust your filters to include the subscriptions that you want to work with.
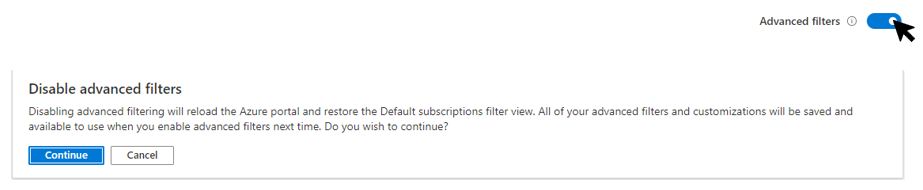
To use customized filters, select Advanced filters. You'll be prompted to confirm before continuing.
After you continue, Advanced filters appears in the left navigation menu of Portal settings. You can create and manage multiple subscription filters here. Your currently selected subscriptions are saved as an imported filter that you can use again. You'll see this filter selected in Directories + subscriptions.
If you want to stop using advanced filters, select the toggle again to restore the default subscription view. Any custom filters you've created are saved and will be available to use if you enable Advanced filters in the future.
Advanced filters
After enabling Advanced filters, you can create, modify, or delete subscription filters by selecting Modify advanced filters.
The Default filter shows all subscriptions to which you have access. This filter is used if there are no other filters, or when the active filter fails to include any subscriptions.
You may also see a filter named Imported-filter, which includes all subscriptions that had been selected previously.
To change the filter that is currently in use, select Activate next to that filter.
Create a filter
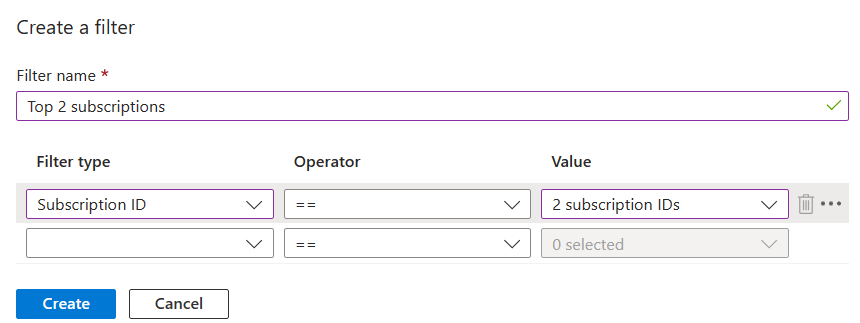
To create a new filter, select Create a filter. You can create up to ten filters.
Each filter must have a unique name that is between 8 and 50 characters long and contains only letters, numbers, and hyphens.
After you've named your filter, enter at least one condition. In the Filter type field, select Management group, Subscription ID, Subscription name, or Subscription state. Then select an operator and the value to filter on.
When you're finished adding conditions, select Create. Your filter will then appear in the list in Active filters.
Modify or delete a filter
You can modify or rename an existing filter by selecting the pencil icon in that filter's row. Make your changes, and then select Apply.
Note
If you modify a filter that is currently active, and the changes result in 0 subscriptions, the Default filter will become active instead. You can't activate a filter which doesn't include any subscriptions.
To delete a filter, select the trash can icon in that filter's row. You can't delete the Default filter or a filter that is currently active.
Appearance + startup views
The Appearance + startup views pane has two sections. The Appearance section lets you choose menu behavior, your color theme, and whether to use a high-contrast theme.
The Startup views section lets you set options for what you see when you first sign in to the Azure portal.
Portal menu behavior
The Menu behavior section lets you choose how the Azure portal menu appears.
Flyout: The menu is hidden until you need it. You can select the menu icon in the upper left hand corner to open or close the menu.
Docked: The menu is always visible. You can collapse the menu to provide more working space.
Service menu behavior
The Service menu behavior section lets you choose how items in service menus are displayed.
Collapsed: Groups of commands in service menus will appear collapsed. You can still manually select any top-level item to display the commands within that menu group.
Expanded: Groups of commands in service menus will appear expanded. You can still manually select any top-level item to collapse that menu group.
Choose a theme or enable high contrast
The theme that you choose affects the background and font colors that appear in the Azure portal. In the Theme section, you can select from one of four preset color themes. Select each thumbnail to find the theme that best suits you.
Alternatively, you can choose a theme from the High contrast theme section. These themes can make the Azure portal easier to read, especially if you have a visual impairment. Selecting either the white or black high-contrast theme will override any other theme selections.
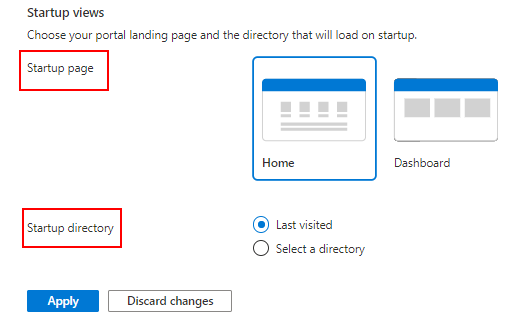
Choose a startup page
Choose one of the following options for Startup page. This setting determines which page you see when you first sign in to the Azure portal.
Home: Displays the home page, with shortcuts to popular Azure services, a list of resources you've used most recently, and useful links to tools, documentation, and more.
Dashboard: Displays your most recently used dashboard. Dashboards can be customized to create a workspace designed just for you. For more information, see Create and share dashboards in the Azure portal.
Manage startup directory options
Choose one of the following options to control which directory (Azure tenant) to work in when you first sign in to the Azure portal.
Last visited: When you sign in to the Azure portal, you'll start in the same directory from your previous visit.
Select a directory: Choose this option to select a specific directory. You'll start in that directory every time you sign in to the Azure portal, even if you had been working in a different directory last time.
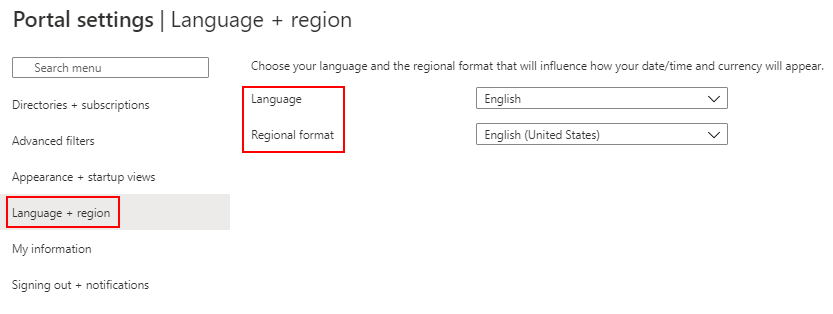
Language + region
Here, you can choose the language used in the Azure portal. You can also select a regional format to determine the format for dates, time, and currency.
Note
These language and regional settings affect only the Azure portal. Documentation links that open in a new tab or window use your browser's settings to determine the language to display.
Language
Use the drop-down list to select from the list of available languages. This setting controls the language you see for text throughout the Azure portal. Azure portal supports the following 18 languages in addition to English: Chinese (Simplified), Chinese (Traditional), Czech, Dutch, French, German, Hungarian, Indonesian, Italian, Japanese, Korean, Polish, Portuguese (Brazil), Portuguese (Portugal), Russian, Spanish, Swedish, and Turkish.
Regional format
Select an option to control the way dates, time, numbers, and currency are shown in the Azure portal.
The options shown in the Regional format drop-down list correspond to the Language options. For example, if you select English as your language, and then select English (United States) as the regional format, currency is shown in U.S. dollars. If you select English as your language and then select English (Europe) as the regional format, currency is shown in euros. If you prefer, you can select a regional format that is different from your language selection.
After making the desired changes to your language and regional format settings, select Apply.
My information
My information lets you provide information specific to your Azure experience.
Email setting
The email address you provide here is used when we need to contact you for updates on Azure services, billing, support, or security issues. You can change this address at any time.
You can also indicate whether you'd like to receive additional emails about Microsoft Azure and other Microsoft products and services. If you select the checkbox to receive these emails, you'll be prompted to select the country/region in which you'll receive these emails. Note that certain countries/regions may not be available. You only need to specify a country/region if you want to receive these additional emails; selecting a country/region isn't required in order to receive emails about your Azure account at the address you provide in this section.
Portal personalization
In this section, you can optionally share information about how you plan to use Azure. This information helps us provide tips, tools, and recommendations that are relevant to the tasks and services that you're interested in.
To provide this information, select one or more items from the list. You can change your selections at any time.
Export, restore, and delete user settings
Near the top of My information, you'll see options to export, restore, or delete settings.
Export user settings
Information about your custom settings is stored in Azure. You can export the following user data:
Private dashboards in the Azure portal
User settings like favorite subscriptions or directories
Themes and other custom portal settings
To export your portal settings, select Export settings from the top of the My information pane. This creates a JSON file that contains your user settings data.
Due to the dynamic nature of user settings and risk of data corruption, you can't import settings from the JSON file. However, you can use this file to review the settings you selected. It can be useful to have an exported backup of your selections if you choose to delete your settings and private dashboards.
Restore default settings
If you've made changes to the Azure portal settings and want to discard them, select Restore default settings from the top of the My information pane. You'll be prompted to confirm this action. If you do so, any changes you've made to your Azure portal settings are lost. This option doesn't affect dashboard customizations.
Delete user settings and dashboards
Information about your custom settings is stored in Azure. You can delete the following user data:
Private dashboards in the Azure portal
User settings, such as favorite subscriptions or directories
Themes and other custom portal settings
It's a good idea to export and review your settings before you delete them, as described in the previous section. Rebuilding dashboards or redoing custom settings can be time-consuming.
To delete your portal settings, select Delete all settings and private dashboards from the top of My information. You'll be prompted to confirm the deletion. When you do so, all settings customizations will return to the default settings, and all of your private dashboards will be lost.
Signing out + notifications
This pane lets you manage pop-up notifications and session timeouts.
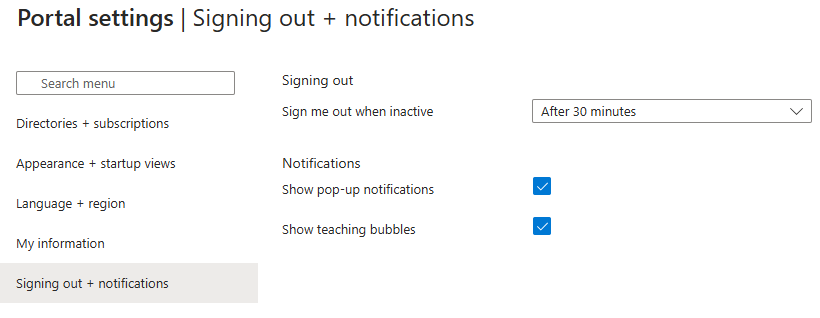
Signing out
The inactivity timeout setting helps to protect resources from unauthorized access if you forget to secure your workstation. After you've been idle for a while, you're automatically signed out of your Azure portal session. As an individual, you can change the timeout setting for yourself. If you're an admin, you can set it at the directory level for all your users in the directory.
Change your individual timeout setting (user)
In the drop-down menu next to Sign me out when inactive, choose the duration after which your Azure portal session is signed out if you're idle.
Select Apply to save your changes. After that, if you're inactive during the portal session, Azure portal will sign out after the duration you set.
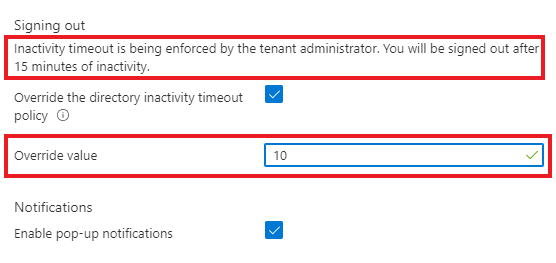
If your admin has enabled an inactivity timeout policy, you can still choose your own timeout duration, but it must be shorter than the directory-level setting. To do so, select Override the directory inactivity timeout policy, then enter a time interval for the Override value.
Change the directory timeout setting (admin)
Users with the Global Administrator role can enforce the maximum idle time before a session is signed out. This inactivity timeout setting applies to all users in the Azure tenant. Once it's set, all new sessions will comply with the new timeout settings. The change won't apply to signed-in users until their next sessions.
Global Administrators can't specify different settings for individual users in the tenant. However, each user has the option to set a shorter timeout interval for themselves. Users can't change their individual timeout setting to a longer interval than the current option set by a Global Administrator.
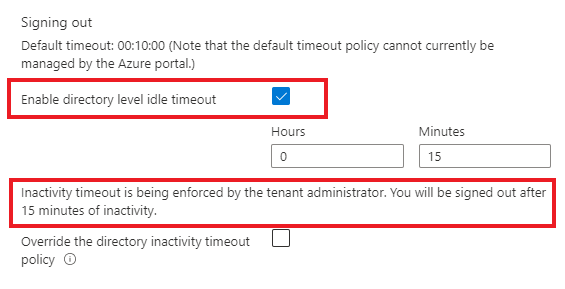
To enforce an idle timeout setting for all users of the Azure portal, sign in with a Global Administrator account, then select Enable directory level idle timeout to turn on the setting. Next, enter the Hours and Minutes for the maximum time that a user can be inactive before their session is automatically signed out. After you select Apply, this setting will apply to all users in the directory.
To confirm that the inactivity timeout policy is set correctly, select Notifications from the global page header and verify that a success notification is listed.
To change a previously selected timeout, any Global Administrator can follow these steps again to apply a new timeout interval. If a Global Administrator unchecks the box for Enable directory level idle timeout, the previous setting will remain in place by default for all users; however, each user can change their individual setting to whatever they prefer.
Enable or disable pop-up notifications
Notifications are system messages related to your current session. They provide information such as showing your current credit balance, confirming your last action, or letting you know when resources you created become available. When pop-up notifications are turned on, the messages briefly display in the top corner of your screen.
To enable or disable pop-up notifications, select or clear Show pop-up notifications.
To read all notifications received during your current session, select the Notifications icon from the global header.
To view notifications from previous sessions, look for events in the Activity log. For more information, see View the Activity log.
Enable or disable teaching bubbles
Teaching bubbles may appear in the portal when new features are released. These bubbles contain information to help you understand how new features work.
To enable or disable teaching bubbles in the portal, select or clear Show teaching bubbles.