Note
Access to this page requires authorization. You can try signing in or changing directories.
Access to this page requires authorization. You can try changing directories.
In this quickstart, you create Node.js sender and receiver applications that send and receive messages by using Hybrid Connections WebSockets in Azure Relay. To learn about Azure Relay in general, see Azure Relay.
In this quickstart, you take the following steps:
- Create a Relay namespace by using the Azure portal.
- Create a hybrid connection in that namespace by using the Azure portal.
- Write a server (listener) console application to receive messages.
- Write a client (sender) console application to send messages.
- Run applications.
Prerequisites
- Node.js.
- An Azure subscription. If you don't have one, create a free account before you begin.
Create a namespace
Sign in to the Azure portal.
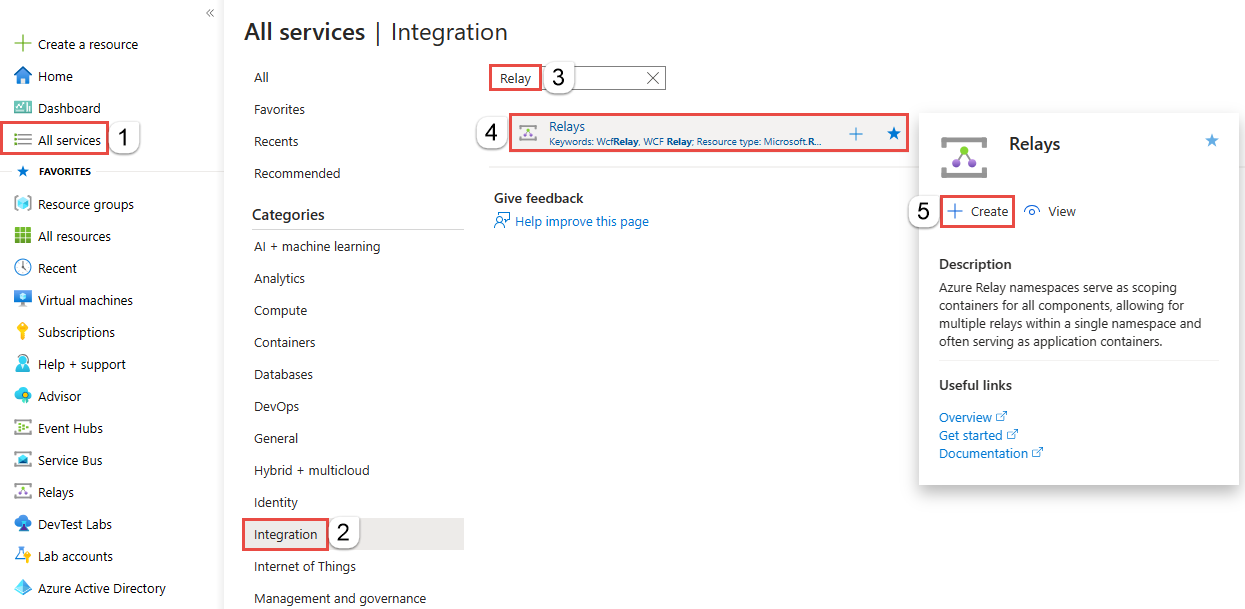
Select All services on the left menu. Select Integration, search for Relays, move the mouse over Relays, and then select Create.
On the Create namespace page, follow these steps:
Choose an Azure subscription in which to create the namespace.
For Resource group, choose an existing resource group in which to place the namespace, or create a new one.
Enter a name for the Relay namespace.
Select the region in which your namespace should be hosted.
Select Review + create at the bottom of the page.
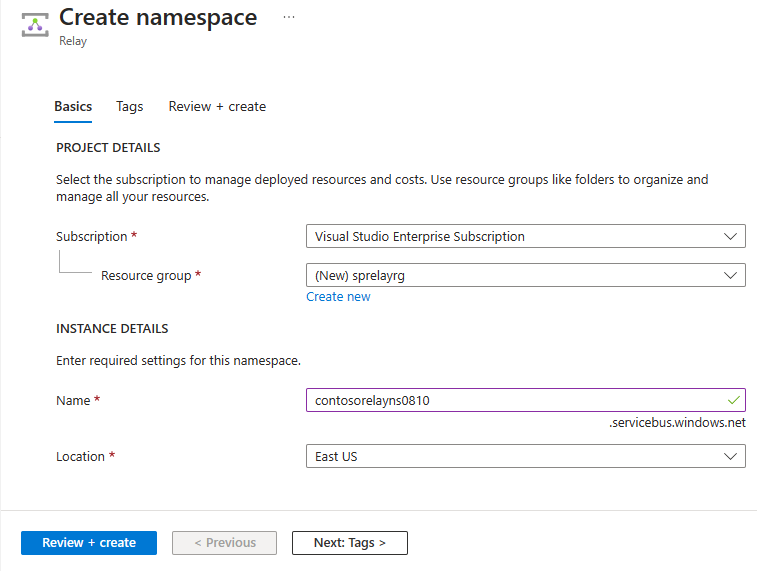
On the Review + create page, select Create.
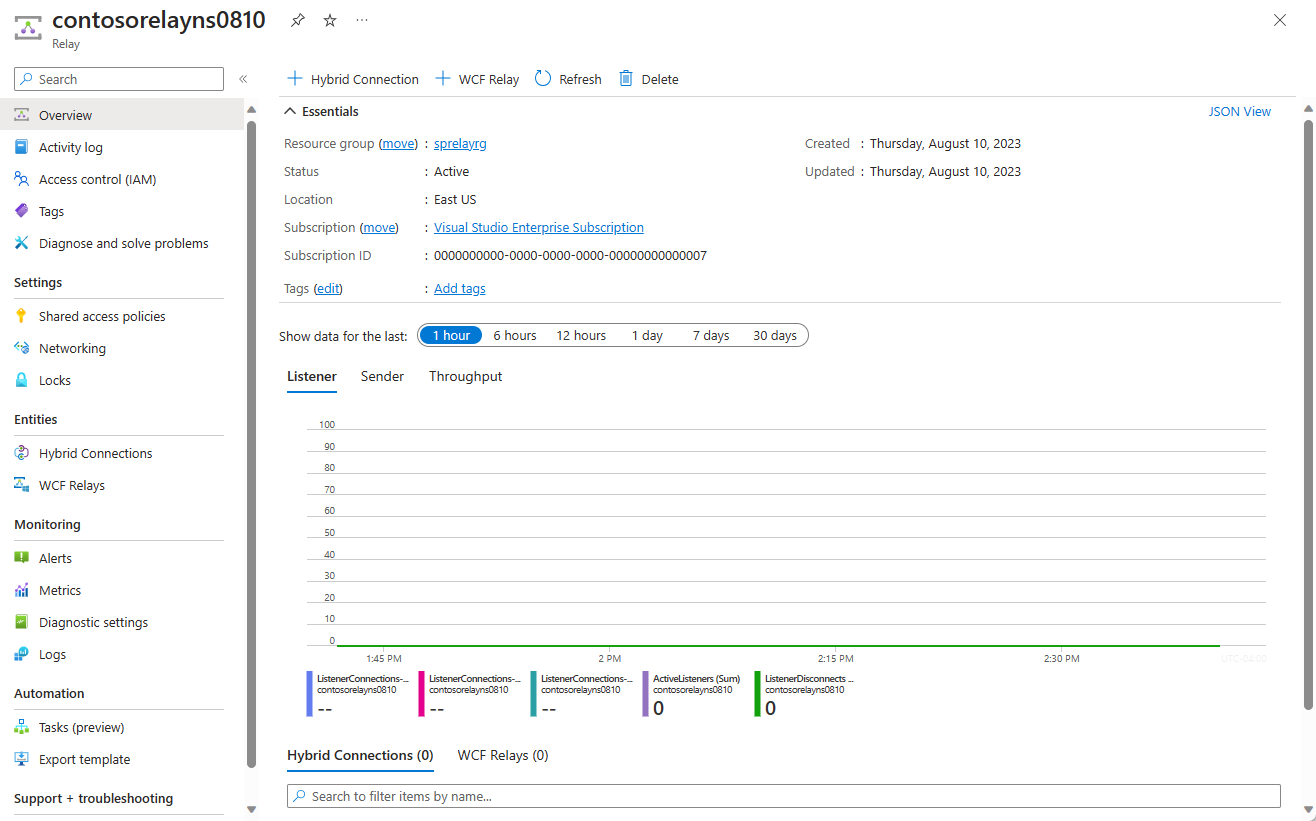
After a few minutes, you see the Relay page for the namespace.
Get management credentials
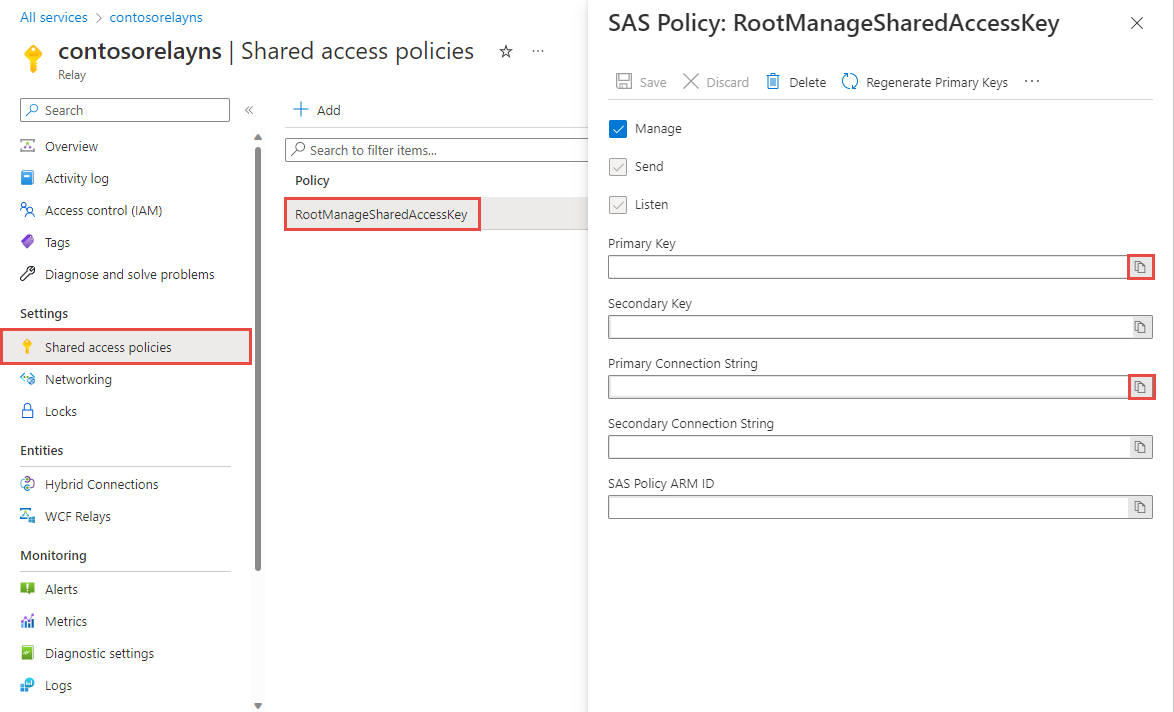
On the Relay page, select Shared access policies on the left menu.
On the Shared access policies page, select RootManageSharedAccessKey.
Under SAS Policy: RootManageSharedAccessKey, select the Copy button next to Primary Connection String. This action copies the connection string to your clipboard for later use. Paste this value into Notepad or some other temporary location.
Repeat the preceding step to copy and paste the value of Primary key to a temporary location for later use.
Create a hybrid connection
On the Relay page for your namespace, follow these steps to create a hybrid connection.
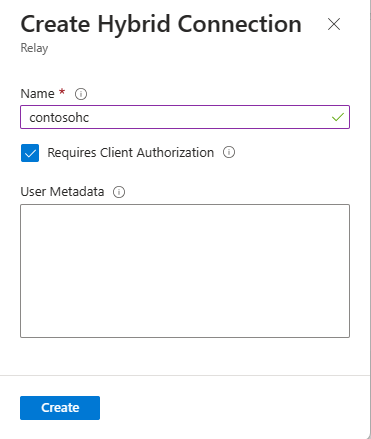
On the left menu, Under Entities, select Hybrid Connections, and then select + Hybrid Connection.

On the Create Hybrid Connection page, enter a name for the hybrid connection, and select Create.
Create a server application (listener)
To listen and receive messages from the Relay, write a Node.js console application.
Create a Node.js application
Create a new JavaScript file called listener.js.
Add the Relay package
Run npm install hyco-ws from a Node command prompt in your project folder.
Write some code to receive messages
Add the following constant to the top of the
listener.jsfile.const WebSocket = require('hyco-ws');Add the following constants to the
listener.jsfile for the hybrid connection details. Replace the placeholders in brackets with the values you obtained when you created the hybrid connection.const ns- The Relay namespace. Be sure to use the fully qualified namespace name; for example,{namespace}.servicebus.windows.net.const path- The name of the hybrid connection.const keyrule- Name of your Shared Access Policies key, which isRootManageSharedAccessKeyby default.const key- The primary key of the namespace you saved earlier.
Add the following code to the
listener.jsfile:var wss = WebSocket.createRelayedServer( { server : WebSocket.createRelayListenUri(ns, path), token: WebSocket.createRelayToken('http://' + ns, keyrule, key) }, function (ws) { console.log('connection accepted'); ws.onmessage = function (event) { console.log(event.data); }; ws.on('close', function () { console.log('connection closed'); }); }); console.log('listening'); wss.on('error', function(err) { console.log('error' + err); });Here's what your listener.js file should look like:
const WebSocket = require('hyco-ws');

const ns = "{RelayNamespace}";
const path = "{HybridConnectionName}";
const keyrule = "{SASKeyName}";
const key = "{SASKeyValue}";

var wss = WebSocket.createRelayedServer(
    {
        server : WebSocket.createRelayListenUri(ns, path),
        token: WebSocket.createRelayToken('http://' + ns, keyrule, key)
    },
    function (ws) {
        console.log('connection accepted');
        ws.onmessage = function (event) {
            console.log(event.data);
        };
        ws.on('close', function () {
            console.log('connection closed');
        });
});

console.log('listening');

wss.on('error', function(err) {
    console.log('error' + err);
});
Create a client application (sender)
To send messages to the Relay, write a Node.js console application.
Create a Node.js application
Create a new JavaScript file called sender.js.
Add the Relay Node Package Manager package
Run npm install hyco-ws from a Node command prompt in your project folder.
Write some code to send messages
Add the following
constantsto the top of thesender.jsfile.const WebSocket = require('hyco-ws'); const readline = require('readline') .createInterface({ input: process.stdin, output: process.stdout });Add the following constants to the
sender.jsfile for the hybrid connection details. Replace the placeholders in brackets with the values you obtained when you created the hybrid connection.const ns- The Relay namespace. Be sure to use the fully qualified namespace name; for example,{namespace}.servicebus.windows.net.const path- The name of the hybrid connection.const keyrule- Name of your Shared Access Policies key, which isRootManageSharedAccessKeyby default.const key- The primary key of the namespace you saved earlier.
Add the following code to the
sender.jsfile:WebSocket.relayedConnect( WebSocket.createRelaySendUri(ns, path), WebSocket.createRelayToken('http://'+ns, keyrule, key), function (wss) { readline.on('line', (input) => { wss.send(input, null); }); console.log('Started client interval.'); wss.on('close', function () { console.log('stopping client interval'); process.exit(); }); } );Here's what your sender.js file should look like:
const WebSocket = require('hyco-ws'); const readline = require('readline') .createInterface({ input: process.stdin, output: process.stdout }); const ns = "{RelayNamespace}"; const path = "{HybridConnectionName}"; const keyrule = "{SASKeyName}"; const key = "{SASKeyValue}"; WebSocket.relayedConnect( WebSocket.createRelaySendUri(ns, path), WebSocket.createRelayToken('http://'+ns, keyrule, key), function (wss) { readline.on('line', (input) => { wss.send(input, null); }); console.log('Started client interval.'); wss.on('close', function () { console.log('stopping client interval'); process.exit(); }); } );
Note
The sample code in this article uses a connection string to authenticate to an Azure Relay namespace to keep the tutorial simple. We recommend that you use Microsoft Entra ID authentication in production environments, rather than using connection strings or shared access signatures, which can be more easily compromised. For detailed information and sample code for using the Microsoft Entra ID authentication, see Authenticate and authorize an application with Microsoft Entra ID to access Azure Relay entities and Authenticate a managed identity with Microsoft Entra ID to access Azure Relay resources.
Run the applications
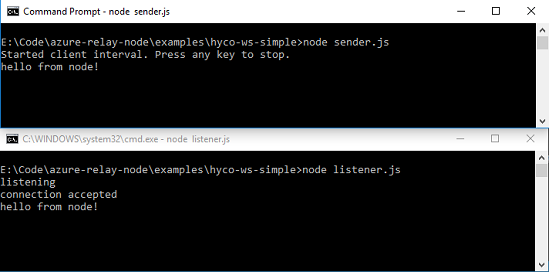
Run the server application: from a Node.js command prompt type
node listener.js.Run the client application: from a Node.js command prompt type
node sender.js, and enter some text.Ensure that the server application console outputs the text that was entered in the client application.
Congratulations, you have created an end-to-end Hybrid Connections application using Node.js!
Next steps
In this quickstart, you created Node.js client and server applications that used WebSockets to send and receive messages. The Hybrid Connections feature of Azure Relay also supports using HTTP to send and receive messages. To learn how to use HTTP with Azure Relay Hybrid Connections, see the Node.js HTTP quickstart.
In this quickstart, you used Node.js to create client and server applications. To learn how to write client and server applications using .NET Framework, see the .NET WebSockets quickstart or the .NET HTTP quickstart.