Note
Access to this page requires authorization. You can try signing in or changing directories.
Access to this page requires authorization. You can try changing directories.
To share modules within your organization, you can create a private module registry. You can then publish modules to that registry and give read access to users who need to deploy the modules. After the modules are shared in the registries, you can reference them from your Bicep files. To use public modules, see Bicep Modules.
To work with module registries, you must have Bicep CLI version 0.4.1008 or later. To use with Azure CLI, you must have version 2.31.0 or later. To use with Azure PowerShell, you must have version 7.0.0 or later.
Training resources
See the Share Bicep modules by using private registries Learn module for step-by-step guidance about parameters.
Configure private registry
A Bicep registry is hosted on Azure Container Registry (ACR). Use the following steps to configure your registry for modules.
If you already have a container registry, you can use it. If you need to create a container registry, see Quickstart: Create a container registry by using a Bicep file.
You can use any of the available registry SKUs for the module registry. Registry geo-replication provides users with a local presence or as a hot-backup.
Get the login server name. You need this name when linking to the registry from your Bicep files. The format of the login server name is:
<registry-name>.azurecr.io.To get the login server name, use Get-AzContainerRegistry.
Get-AzContainerRegistry -ResourceGroupName "<resource-group-name>" -Name "<registry-name>" | Select-Object LoginServerTo publish modules to a registry, you must have permission to push an image. To deploy a module from a registry, you must have permission to pull the image. For more information about the roles that grant adequate access, see Azure Container Registry roles and permissions.
Depending on the type of account you use to deploy the module, you may need to customize which credentials are used. These credentials are needed to get the modules from the registry. By default, credentials are obtained from Azure CLI or Azure PowerShell. You can customize the precedence for getting the credentials in the bicepconfig.json file. For more information, see Credentials for restoring modules.
Important
The private container registry is only available to users with the required access. However, it's accessed through the public internet. For more security, you can require access through a private endpoint. See Connect privately to an Azure container registry using Azure Private Link.
The private container registry must have the policy azureADAuthenticationAsArmPolicy set to enabled. If azureADAuthenticationAsArmPolicy is set to disabled, you'll get a 401 (Unauthorized) error message when publishing modules. See Azure Container Registry introduces the Conditional Access policy.
Publish files to registry
After setting up the container registry, you can publish files to it. Use the publish command and provide any Bicep files you intend to use as modules. Specify the target location for the module in your registry. The publish command creates an ARM template, which is stored in the registry. This means if publishing a Bicep file that references other local modules, these modules are fully expanded as one JSON file and published to the registry.
Publish-AzBicepModule -FilePath ./storage.bicep -Target br:exampleregistry.azurecr.io/bicep/modules/storage:v1 -DocumentationUri https://www.contoso.com/exampleregistry.html
With Bicep CLI version 0.27.1 or newer, you can publish a module with the Bicep source code in addition to the compiled JSON template. If a module is published with the Bicep source code to a registry, you can press F12 (Go to Definition) from Visual Studio Code to see the Bicep code. The Bicep extension version 0.27 or new is required to see the Bicep file.
Publish-AzBicepModule -FilePath ./storage.bicep -Target br:exampleregistry.azurecr.io/bicep/modules/storage:v1 -DocumentationUri https://www.contoso.com/exampleregistry.html -WithSource
With the with source switch, you see another layer in the manifest:

If the Bicep module references a module in a Private Registry, the ACR endpoint is visible. To hide the full endpoint, you can configure an alias for the private registry.
View files in registry
To see the published module in the portal:
Sign in to the Azure portal.
Search for container registries.
Select your registry.
Select Services -> Repositories from the left menu.
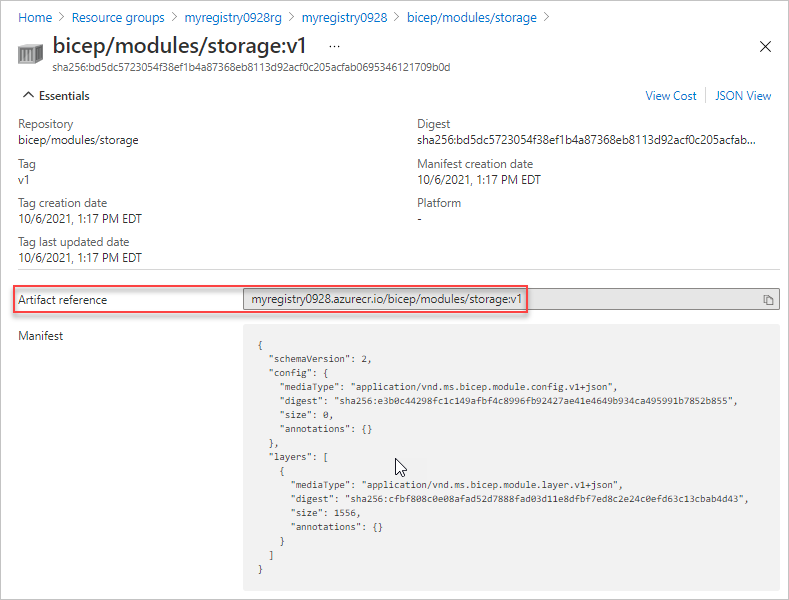
Select the module path (repository). In the preceding example, the module path name is bicep/modules/storage.
Select the tag. In the preceding example, the tag is v1.
The Artifact reference matches the reference you use in the Bicep file.
You're now ready to reference the file in the registry from a Bicep file. For examples of the syntax to use for referencing an external module, see Bicep modules.
Working with Bicep registry files
When using bicep files that are hosted in a remote registry, it's important to understand how your local machine interacts with the registry. When you first declare the reference to the registry, your local editor tries to communicate with the Azure Container Registry and download a copy of the registry to your local cache.
The local cache is found in:
On Windows
%USERPROFILE%\.bicep\br\<registry-name>.azurecr.io\<module-path\<tag>On Linux
/home/<username>/.bicepOn Mac
~/.bicep
Your local machine can recognize any changes made to the remote registry until you run a restore with the specified file that includes the registry reference.
az bicep restore --file <bicep-file> [--force]
For more information, see the restore command.
Next steps
- To learn about modules, see Bicep modules.
- To configure aliases for a module registry, see Add module settings in the Bicep config file.
- For more information about publishing and restoring modules, see Bicep CLI commands.