Note
Access to this page requires authorization. You can try signing in or changing directories.
Access to this page requires authorization. You can try changing directories.
Learn how to use deployment scripts in Azure Resource Manager templates (ARM templates). Deployment scripts can be used to perform custom steps that can't be done by ARM templates. For example, creating a self-signed certificate. In this tutorial, you create a template to deploy an Azure key vault, and then use a Microsoft.Resources/deploymentScripts resource in the same template to create a certificate and then add the certificate to the key vault. To learn more about deployment script, see Use deployment scripts in ARM templates.
Important
Two deployment script resources, a storage account and a container instance, are created in the same resource group for script execution and troubleshooting. These resources are usually deleted by the script service when the script execution gets in a terminal state. You're billed for the resources until the resources are deleted. To learn more, see Clean up deployment script resources.
This tutorial covers the following tasks:
- Open a quickstart template
- Edit the template
- Deploy the template
- Debug the failed script
- Clean up resources
For a Learn module that covers deployment scripts, see Extend ARM templates by using deployment scripts.
Prerequisites
To complete this article, you need:
A user-assigned managed identity. This identity is used to perform Azure-specific actions in the script. To create one, see User-assigned managed identity. You need the identity ID when you deploy the template. The format of the identity is:
/subscriptions/<SubscriptionID>/resourcegroups/<ResourceGroupName>/providers/Microsoft.ManagedIdentity/userAssignedIdentities/<IdentityID>Use the following CLI script to get the ID by providing the resource group name and the identity name.
echo "Enter the Resource Group name:" &&
read resourceGroupName &&
az identity list -g $resourceGroupName
Open a Quickstart template
Instead of creating a template from scratch, you open a template from Azure Quickstart Templates. Azure Quickstart Templates is a repository for ARM templates.
The template used in this quickstart is called Create an Azure Key Vault and a secret. The template creates a key vault, and then adds a secret to the key vault.
From Visual Studio Code, select File > Open File.
In File name, paste the following URL:
https://raw.githubusercontent.com/Azure/azure-quickstart-templates/master/quickstarts/microsoft.keyvault/key-vault-create/azuredeploy.jsonSelect Open to open the file.
Select File > Save As to save the file as azuredeploy.json to your local computer.
Edit the template
Make the following changes to the template:
Clean up the template (optional)
The original template adds a secret to the key vault. To simplify the tutorial, remove the following resource:
Microsoft.KeyVault/vaults/secrets
Remove the following two parameter definitions:
secretNamesecretValue
If you choose not to remove these definitions, you need to specify the parameter values during the deployment.
Configure the key vault access policies
The deployment script adds a certificate to the key vault. Configure the key vault access policies to give the permission to the managed identity:
Add a parameter to get the managed identity ID:
"identityId": {
  "type": "string",
  "metadata": {
    "description": "Specifies the ID of the user-assigned managed identity."
  }
},
Add a parameter for configuring the key vault access policies so that the managed identity can add certificates to the key vault:
"certificatesPermissions": {
  "type": "array",
  "defaultValue": [
    "get",
    "list",
    "update",
    "create"
  ],
  "metadata": {
  "description": "Specifies the permissions to certificates in the vault. Valid values are: all, get, list, update, create, import, delete, recover, backup, restore, manage contacts, manage certificate authorities, get certificate authorities, list certificate authorities, set certificate authorities, delete certificate authorities."
  }
}
Update the existing key vault access policies of the
Microsoft.KeyVault/vaultsresource to:"accessPolicies": [ { "objectId": "[parameters('objectId')]", "tenantId": "[parameters('tenantId')]", "permissions": { "keys": "[parameters('keysPermissions')]", "secrets": "[parameters('secretsPermissions')]", "certificates": "[parameters('certificatesPermissions')]" } }, { "objectId": "[reference(parameters('identityId'), '2018-11-30').principalId]", "tenantId": "[parameters('tenantId')]", "permissions": { "keys": "[parameters('keysPermissions')]", "secrets": "[parameters('secretsPermissions')]", "certificates": "[parameters('certificatesPermissions')]" } } ],There are two policies defined, one for the signed-in user, and the other is for the managed identity. The signed-in user only needs the list permission to verify the deployment. To simplify the tutorial, the same certificate is assigned to both the managed identity and the signed-in users.
Add the deployment script
Add three parameters that are used by the deployment script:
"certificateName": {
  "type": "string",
  "defaultValue": "DeploymentScripts2019"
},
"subjectName": {
  "type": "string",
  "defaultValue": "CN=contoso.com"
},
"utcValue": {
  "type": "string",
  "defaultValue": "[utcNow()]"
}
Add a
deploymentScriptsresource:Note
Because the inline deployment scripts are enclosed in double quotes, the strings inside the deployment scripts need to be enclosed in single quotes instead. The PowerShell escape character is the backtick (
`).{ "type": "Microsoft.Resources/deploymentScripts", "apiVersion": "2023-08-01", "name": "createAddCertificate", "location": "[resourceGroup().location]", "dependsOn": [ "[resourceId('Microsoft.KeyVault/vaults', parameters('keyVaultName'))]" ], "identity": { "type": "UserAssigned", "userAssignedIdentities": { "[parameters('identityId')]": { } } }, "kind": "AzurePowerShell", "properties": { "forceUpdateTag": "[parameters('utcValue')]", "azPowerShellVersion": "3.0", "timeout": "PT30M", "arguments": "[format(' -vaultName {0} -certificateName {1} -subjectName {2}', parameters('keyVaultName'), parameters('certificateName'), parameters('subjectName'))]", // can pass an argument string, double quotes must be escaped "scriptContent": " param( [string] [Parameter(Mandatory=$true)] $vaultName, [string] [Parameter(Mandatory=$true)] $certificateName, [string] [Parameter(Mandatory=$true)] $subjectName ) $ErrorActionPreference = 'Stop' $DeploymentScriptOutputs = @{} $existingCert = Get-AzKeyVaultCertificate -VaultName $vaultName -Name $certificateName if ($existingCert -and $existingCert.Certificate.Subject -eq $subjectName) { Write-Host 'Certificate $certificateName in vault $vaultName is already present.' $DeploymentScriptOutputs['certThumbprint'] = $existingCert.Thumbprint $existingCert | Out-String } else { $policy = New-AzKeyVaultCertificatePolicy -SubjectName $subjectName -IssuerName Self -ValidityInMonths 12 -Verbose # private key is added as a secret that can be retrieved in the Resource Manager template Add-AzKeyVaultCertificate -VaultName $vaultName -Name $certificateName -CertificatePolicy $policy -Verbose # it takes a few seconds for KeyVault to finish $tries = 0 do { Write-Host 'Waiting for certificate creation completion...' Start-Sleep -Seconds 10 $operation = Get-AzKeyVaultCertificateOperation -VaultName $vaultName -Name $certificateName $tries++ if ($operation.Status -eq 'failed') { throw 'Creating certificate $certificateName in vault $vaultName failed with error $($operation.ErrorMessage)' } if ($tries -gt 120) { throw 'Timed out waiting for creation of certificate $certificateName in vault $vaultName' } } while ($operation.Status -ne 'completed') $newCert = Get-AzKeyVaultCertificate -VaultName $vaultName -Name $certificateName $DeploymentScriptOutputs['certThumbprint'] = $newCert.Thumbprint $newCert | Out-String } ", "cleanupPreference": "OnSuccess", "retentionInterval": "P1D" } }The
deploymentScriptsresource depends on the key vault resource and the role assignment resource. It has these properties:identity: Deployment script uses a user-assigned managed identity to perform the operations in the script.kind: Specify the type of script. Currently, only PowerShell scripts are supported.forceUpdateTag: Determine whether the deployment script should be executed even if the script source hasn't changed. Can be current time stamp or a GUID. To learn more, see Run script more than once.azPowerShellVersion: Specifies the Azure PowerShell module version to be used. Currently, deployment script supports version 2.7.0, 2.8.0, and 3.0.0.timeout: Specify the maximum allowed script execution time specified in the ISO 8601 format. Default value is P1D.arguments: Specify the parameter values. The values are separated by spaces.scriptContent: Specify the script content. To run an external script, useprimaryScriptURIinstead. For more information, see Use external script. Declaring$DeploymentScriptOutputsis only required when testing the script on a local machine. Declaring the variable allows the script to be run on a local machine and in adeploymentScriptresource without having to make changes. The value assigned to$DeploymentScriptOutputsis available as outputs in the deployments. For more information, see Work with outputs from PowerShell deployment scripts or Work with outputs from CLI deployment scripts.cleanupPreference: Specify the preference on when to delete the deployment script resources. The default value is Always, which means the deployment script resources are deleted despite the terminal state (Succeeded, Failed, Canceled). In this tutorial, OnSuccess is used so that you get a chance to view the script execution results.retentionInterval: Specify the interval for which the service retains the script resources after it reaches a terminal state. Resources will be deleted when this duration expires. Duration is based on ISO 8601 pattern. This tutorial uses P1D, which means one day. This property is used whencleanupPreferenceis set to OnExpiration. This property isn't enabled currently.
The deployment script takes three parameters:
keyVaultName,certificateName, andsubjectName. It creates a certificate, and then adds the certificate to the key vault.$DeploymentScriptOutputsis used to store output value. To learn more, see Work with outputs from PowerShell deployment scripts or Work with outputs from CLI deployment scripts.The completed template can be found here.
To see the debugging process, place an error in the code by adding the following line to the deployment script:
Write-Output1 $keyVaultNameThe correct command is
Write-Outputinstead ofWrite-Output1.Select File > Save to save the file.
Deploy the template
Sign in to the Azure Cloud Shell
Choose your preferred environment by selecting either PowerShell or Bash (for CLI) on the upper-left corner. Restarting the shell is required when you switch.
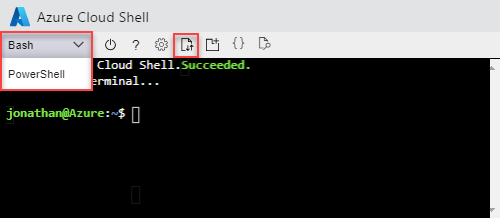
Select Upload/download files, and then select Upload. See the previous screenshot. Select the file you saved in the previous section. After uploading the file, you can use the
lscommand and thecatcommand to verify the file was uploaded successfully.Run the following Azure CLI or Azure PowerShell script to deploy the template.
echo "Enter a project name that is used to generate resource names:" && read projectName && echo "Enter the location (i.e. centralus):" && read location && echo "Enter your email address used to sign in to Azure:" && read upn && echo "Enter the user-assigned managed identity ID:" && read identityId && adUserId=$((az ad user show --id ${upn}) | jq -r '.id') && resourceGroupName="${projectName}rg" && keyVaultName="${projectName}kv" && az group create --name $resourceGroupName --location $location && az deployment group create --resource-group $resourceGroupName --template-file "$HOME/azuredeploy.json" --parameters identityId=$identityId keyVaultName=$keyVaultName objectId=$adUserIdThe deployment script service needs to create additional deployment script resources for script execution. The preparation and the cleanup process can take up to one minute to complete in addition to the actual script execution time.
The deployment failed because the invalid command,
Write-Output1is used in the script. You will get an error saying:The term 'Write-Output1' is not recognized as the name of a cmdlet, function, script file, or operable program. Check the spelling of the name, or if a path was included, verify that the path is correct and try again.The deployment script execution result is stored in the deployment script resources for the troubleshooting purpose.
Debug the failed script
Sign in to the Azure portal.
Open the resource group. It's the project name with rg appended. You will see two additional resources in the resource group. These resources are referred as deployment script resources.
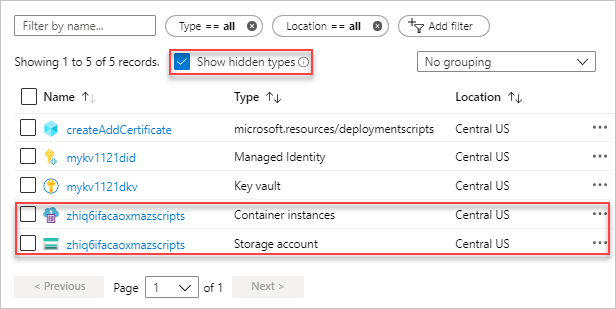
Both files have the azscripts suffix. One is a storage account and the other is a container instance.
Select Show hidden types to list the
deploymentScriptsresource.Select the storage account with the azscripts suffix.
Select the File shares tile. You will see an azscripts folder that contains the deployment script execution files.
Select azscripts. You will see two folders azscriptinput and azscriptoutput. The input folder contains a system PowerShell script file and the user deployment script files. The output folder contains a executionresult.json and the script output file. You can see the error message in executionresult.json. The output file isn't there because the execution failed.
Remove the Write-Output1 line and redeploy the template.
When the second deployment runs successfully, the deployment script resources will be removed by the script service, because the cleanupPreference property is set to OnSuccess.
Clean up resources
When the Azure resources are no longer needed, clean up the resources you deployed by deleting the resource group.
- From the Azure portal, select Resource group from the left menu.
- Enter the resource group name in the Filter by name field.
- Select the resource group name.
- Select Delete resource group from the top menu.
Next steps
In this tutorial, you learned how to use a deployment script in ARM templates. To learn how to deploy Azure resources based on conditions, see: