Note
Access to this page requires authorization. You can try signing in or changing directories.
Access to this page requires authorization. You can try changing directories.
Azure SignalR Service supports Microsoft Entra ID for authorizing requests with Microsoft Entra applications.
This article explains how to set up your resource and code to authenticate requests to the resource using a Microsoft Entra application.
Register an application in Microsoft Entra ID
The first step is to Register an application in Microsoft Entra ID:
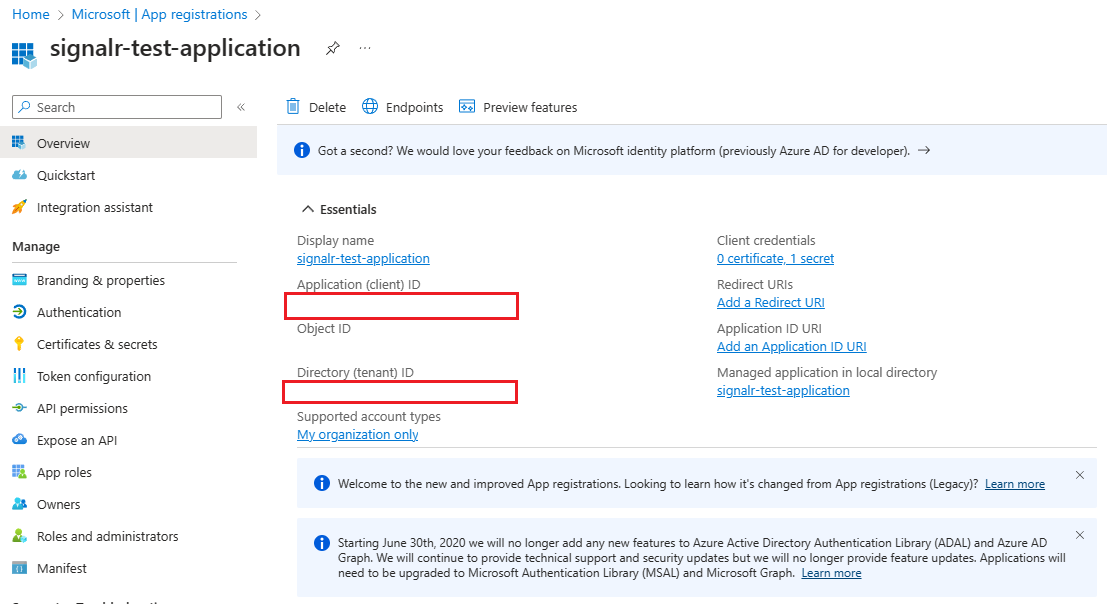
After you register your application, you can find the Application (client) ID and Directory (tenant) ID values on the application's overview page. These GUIDs can be useful in the following steps.
Add credentials
After registering an app, you can add certificates, client secrets (a string), or federated identity credentials as credentials to your confidential client app registration. Credentials allow your application to authenticate as itself, requiring no interaction from a user at runtime, and are used by confidential client applications that access a web API.
Add role assignments in the Azure portal
The following steps describe how to assign a SignalR App Server role to a service principal or a managed identity for an Azure SignalR Service resource. For detailed steps, see Assign Azure roles by using the Azure portal.
Note
You can assign a role to any scope, including management group, subscription, resource group, or single resource. To learn more about scope, see Understand scope for Azure RBAC.
In the Azure portal, go to your Azure SignalR Service resource.
On the left pane, select Access control (IAM).
Select Add > Add role assignment.

On the Role tab, select SignalR App Server. Other Azure SignalR Service built-in roles depend on your scenario.
Role Description Use case SignalR App Server Access to the APIs that create server connections and generate keys. Most commonly used for an app server with an Azure SignalR resource running in Default mode. SignalR Service Owner Full access to all data-plane APIs, including REST APIs, the APIs that create server connections, and the APIs that generate keys/tokens. Used for a negotiation server with an Azure SignalR Service resource running in Serverless mode. It requires both REST API permissions and authentication API permissions. SignalR REST API Owner Full access to data-plane REST APIs. Used for the Azure SignalR Management SDK to manage connections and groups, but it doesn't make server connections or handle negotiation requests. SignalR REST API Reader Read-only access to data-plane REST APIs. Used when you write a monitoring tool that calls read-only REST APIs. Select Next.
For Microsoft Entra application:
- In the Assign access to row, select User, group, or service principal.
- In the Members row, choose select members, and then choose the identity in the pop-up window.
For managed identity for Azure resources:
- In the Assign access to row, select Managed identity.
- In the Members row, choose select members, and then choose the application in the pop-up window.
Select Next.
Review your assignment, and then select Review + assign to confirm the role assignment.
Important
Newly added role assignments might take up to 30 minutes to propagate.
To learn more about how to assign and manage Azure roles, see:
- Assign Azure roles by using the Azure portal
- Assign Azure roles by using the REST API
- Assign Azure roles by using Azure PowerShell
- Assign Azure roles by using the Azure CLI
- Assign Azure roles by using Azure Resource Manager templates
Configure Microsoft.Azure.SignalR app server SDK for C#
Azure SignalR server SDK for C#
The Azure SignalR server SDK leverages the Azure.Identity library to generate tokens for connecting to resources. Click to explore detailed usages.
Note
The tenantId must match the tenantId of the tenant where your SignalR resource is in.
Use Microsoft Entra application with certificate
services.AddSignalR().AddAzureSignalR(option =>
{
    var credential = new ClientCertificateCredential("tenantId", "clientId", "path-to-cert");

    option.Endpoints = [
      new ServiceEndpoint(new Uri(), "https://<resource>.service.signalr.net"), credential);
    ];
});
Use Microsoft Entra application with client secret
services.AddSignalR().AddAzureSignalR(option =>
{
    var credential = new ClientSecretCredential("tenantId", "clientId", "clientSecret");

    option.Endpoints = [
      new ServiceEndpoint(new Uri(), "https://<resource>.service.signalr.net"), credential);
    ];
});
Use Microsoft Entra application with Federated identity
In the case of your organization disabled the usage of client secret/certificate, you can configure the application to trust a managed identity for authentication.
To learn more about it, see Configure an application to trust a managed identity (preview).
Note
Configure an application to trust a managed identity is a preview feature.
services.AddSignalR().AddAzureSignalR(option =>
{
    var msiCredential = new ManagedIdentityCredential("msiClientId");

    var credential = new ClientAssertionCredential("tenantId", "appClientId", async (ctoken) =>
    {
        // Entra ID US Government: api://AzureADTokenExchangeUSGov
        // Entra ID China operated by 21Vianet: api://AzureADTokenExchangeChina
        var request = new TokenRequestContext([$"api://AzureADTokenExchange/.default"]);
        var response = await msiCredential.GetTokenAsync(request, ctoken).ConfigureAwait(false);
        return response.Token;
    });

    option.Endpoints = [
        new ServiceEndpoint(new Uri(), "https://<resource>.service.signalr.net"), credential);
    ];
});
This credential will use the user-assigned managed identity to generate a clientAssertion and use it to exchange for a clientToken for authentication.
The appClientId and tenantId should be the enterprise application that you provisioned in the tenant of SignalR resource.
Use multiple endpoints
Credentials can be different for different endpoints.
In this sample, the Azure SignalR SDK will connect to resource1 with client secret and connect to resource2 with certificate.
services.AddSignalR().AddAzureSignalR(option =>
{
    var credential1 = new ClientSecretCredential("tenantId", "clientId", "clientSecret");
    var credential2 = new ClientCertificateCredential("tenantId", "clientId", "path-to-cert");

    option.Endpoints = new ServiceEndpoint[]
    {
        new ServiceEndpoint(new Uri("https://<resource1>.service.signalr.net"), credential1),
        new ServiceEndpoint(new Uri("https://<resource2>.service.signalr.net"), credential2),
    };
});
More sample can be found in this Sample link
Azure SignalR Service bindings in Azure Functions
Azure SignalR Service bindings in Azure Functions use application settings in the portal or local.settings.json locally to configure Microsoft Entra application identities to access your Azure SignalR Service resources.
First, you need to specify the service URI of Azure SignalR Service. The key of the service URI is serviceUri. It starts with a connection name prefix (which defaults to AzureSignalRConnectionString) and a separator. The separator is an underscore (__) in the Azure portal and a colon (:) in the local.settings.json file. You can customize the connection name by using the binding property ConnectionStringSetting. Continue reading to find the sample.
Then, you choose whether to configure your Microsoft Entra application identity in predefined environment variables or in SignalR-specified variables.
Configure an identity in predefined environment variables
See Environment variables for the list of predefined environment variables. When you have multiple services, we recommend that you use the same application identity, so that you don't need to configure the identity for each service. Other services might also use these environment variables, based on the settings of those services.
For example, to use client secret credentials, configure the identity as follows in the local.settings.json file:
{
  "Values": {
    "<CONNECTION_NAME_PREFIX>:serviceUri": "https://<SIGNALR_RESOURCE_NAME>.service.signalr.net",
    "AZURE_CLIENT_ID": "...",
    "AZURE_CLIENT_SECRET": "...",
    "AZURE_TENANT_ID": "..."
  }
}
In the Azure portal, add settings as follows:
 <CONNECTION_NAME_PREFIX>__serviceUri=https://<SIGNALR_RESOURCE_NAME>.service.signalr.net
AZURE_CLIENT_ID = ...
AZURE_TENANT_ID = ...
AZURE_CLIENT_SECRET = ...
Configure an identity in SignalR-specified variables
SignalR-specified variables share the same key prefix with the serviceUri key. Here's the list of variables that you might use:
clientIdclientSecrettenantId
Here are the samples to use client secret credentials in the local.settings.json file:
{
  "Values": {
    "<CONNECTION_NAME_PREFIX>:serviceUri": "https://<SIGNALR_RESOURCE_NAME>.service.signalr.net",
    "<CONNECTION_NAME_PREFIX>:clientId": "...",
    "<CONNECTION_NAME_PREFIX>:clientSecret": "...",
    "<CONNECTION_NAME_PREFIX>:tenantId": "..."
  }
}
In the Azure portal, add settings as follows:
<CONNECTION_NAME_PREFIX>__serviceUri = https://<SIGNALR_RESOURCE_NAME>.service.signalr.net
<CONNECTION_NAME_PREFIX>__clientId = ...
<CONNECTION_NAME_PREFIX>__clientSecret = ...
<CONNECTION_NAME_PREFIX>__tenantId = ...
Next steps
See the following related articles: