Tutorial: Configure active geo-replication and failover (Azure SQL Database)
Applies to: ![]() Azure SQL Database
Azure SQL Database
This article shows you how to configure active geo-replication for Azure SQL Database using the Azure portal or Azure CLI and to initiate failover.
For failover groups, see Failover groups with Azure SQL Database and Failover groups with Azure SQL Managed Instance.
Prerequisites
To complete this tutorial, you need a single Azure SQL Database. To learn how to create a single database with Azure portal, Azure CLI, or PowerShell, see Quickstart: Create a single database - Azure SQL Database.
Add a secondary database
The following steps create a new secondary database in a geo-replication partnership.
To add a secondary database, you must be the subscription owner or co-owner.
The secondary database has the same name as the primary database and has, by default, the same service tier and compute size. The secondary database can be a single database or a pooled database. For more information, see DTU-based purchasing model and vCore-based purchasing model. After the secondary is created and seeded, data begins replicating from the primary database to the new secondary database.
If your secondary replica is used only for disaster recovery (DR) and doesn't have any read or write workloads, you can save on licensing costs by designating the database for standby when you configure a new active geo-replication relationship. Review license-free standby replica to learn more.
Note
If the partner database already exists, (for example, as a result of terminating a previous geo-replication relationship) the command fails.
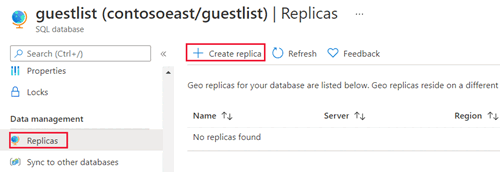
In the Azure portal, browse to the database that you want to set up for geo-replication.
On the SQL Database page, select your database, scroll to Data management, select Replicas, and then select Create replica.
Select or create the server for the secondary database, and configure the Compute + storage options if necessary. You can select any region for your secondary server, but we recommend the paired region.
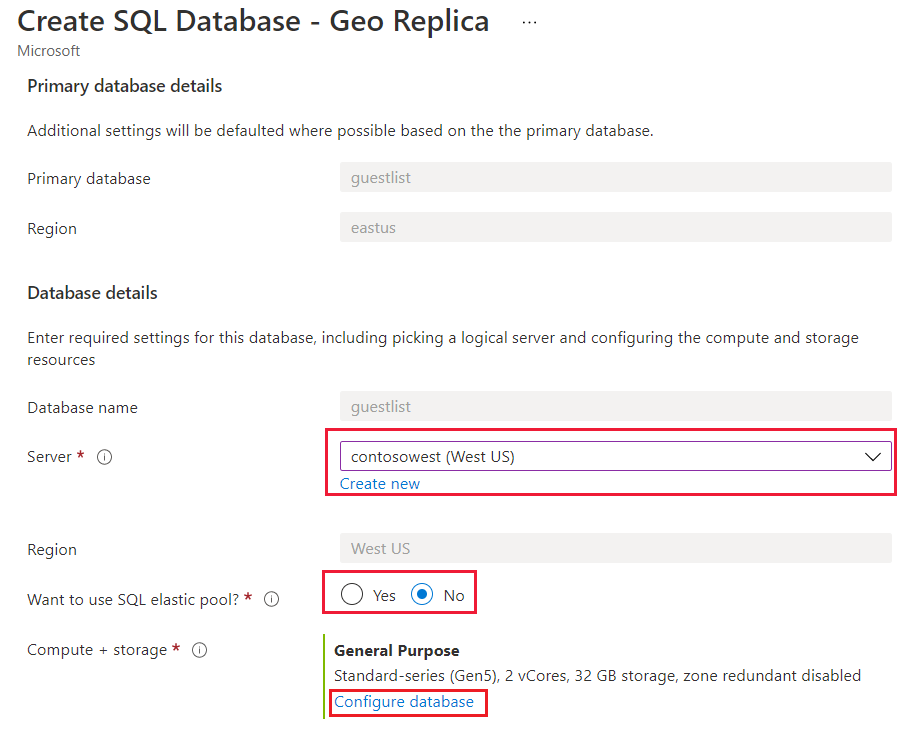
Optionally, you can add a secondary database to an elastic pool. To create the secondary database in a pool, select Yes next to Want to use SQL elastic pool? and select a pool on the target server. A pool must already exist on the target server. This workflow doesn't create a pool.
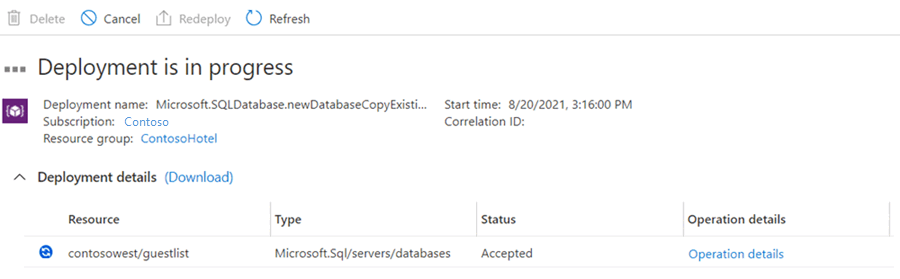
Click Review + create, review the information, and then click Create.
The secondary database is created and the deployment process begins.
When the deployment is complete, the secondary database displays its status.
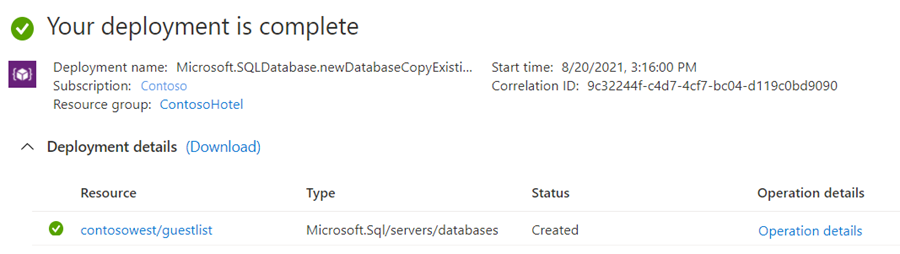
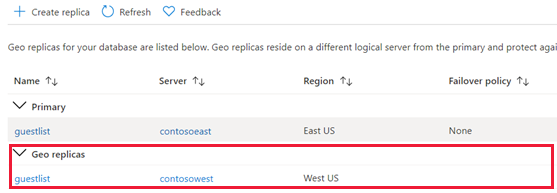
Return to the primary database page, and then select Replicas. Your secondary database is listed under Geo replicas.


Initiate a failover
The secondary database can be switched to become the primary.
In the Azure portal, browse to the primary database in the geo-replication partnership.
Scroll to Data management, and then select Replicas.
In the Geo replicas list, select the database you want to become the new primary, select the ellipsis, and then select Forced failover.
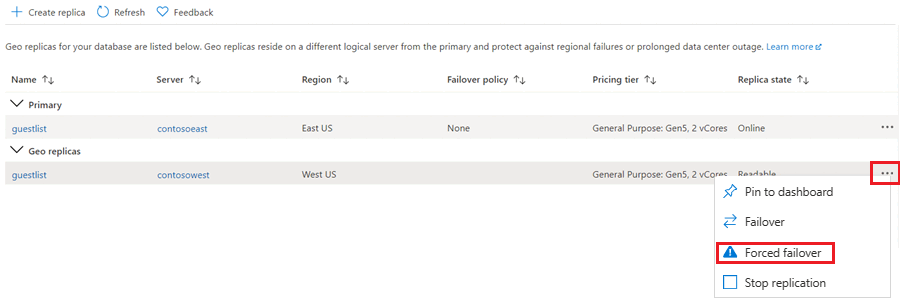
Select Yes to begin the failover.

The command immediately switches the secondary database into the primary role. This process normally should complete within 30 seconds or less.
There's a short period during which both databases are unavailable, on the order of 0 to 25 seconds, while the roles are switched. If the primary database has multiple secondary databases, the command automatically reconfigures the other secondaries to connect to the new primary. The entire operation should take less than a minute to complete under normal circumstances.
Remove secondary database
This operation permanently stops the replication to the secondary database, and changes the role of the secondary to a regular read-write database. If the connectivity to the secondary database is broken, the command succeeds but the secondary doesn't become read-write until after connectivity is restored.
- In the Azure portal, browse to the primary database in the geo-replication partnership.
- Select Replicas.
- In the Geo replicas list, select the database you want to remove from the geo-replication partnership, select the ellipsis, and then select Stop replication.
- A confirmation window opens. Click Yes to remove the database from the geo-replication partnership. (Set it to a read-write database not part of any replication.)
Cross-subscription geo-replication
Use Transact-SQL (T-SQL) create a geo-secondary in a subscription different from the subscription of the primary (whether under the same tenant of Microsoft Entra ID (formerly Azure Active Directory) or not), follow the steps in this section.
Add the IP address of the client machine executing the T-SQL commands in this example, to the server firewalls of both the primary and secondary servers. You can confirm that IP address by executing the following query while connected to the primary server from the same client machine.
select client_net_address from sys.dm_exec_connections where session_id = @@SPID;For more information, see Configure firewall.
In the
masterdatabase on the primary server, create a SQL authentication login dedicated to active geo-replication setup. Adjust login name and password as needed.create login geodrsetup with password = 'ComplexPassword01';In the same database, create a user for the login, and add it to the
dbmanagerrole:create user geodrsetup for login geodrsetup; alter role dbmanager add member geodrsetup;Take note of the SID value of the new login. Obtain the SID value using the following query.
select sid from sys.sql_logins where name = 'geodrsetup';Connect to the primary database (not the
masterdatabase), and create a user for the same login.create user geodrsetup for login geodrsetup;In the same database, add the user to the
db_ownerrole.alter role db_owner add member geodrsetup;In the
masterdatabase on the secondary server, create the same login as on the primary server, using the same name, password, and SID. Replace the hexadecimal SID value in the sample command below with the one obtained in Step 4.create login geodrsetup with password = 'ComplexPassword01', sid=0x010600000000006400000000000000001C98F52B95D9C84BBBA8578FACE37C3E;In the same database, create a user for the login, and add it to the
dbmanagerrole.create user geodrsetup for login geodrsetup; alter role dbmanager add member geodrsetup;Connect to the
masterdatabase on the primary server using the newgeodrsetuplogin, and initiate geo-secondary creation on the secondary server. Adjust database name and secondary server name as needed. Once the command is executed, you can monitor geo-secondary creation by querying the sys.dm_geo_replication_link_status view in the primary database, and the sys.dm_operation_status view in themasterdatabase on the primary server. The time needed to create a geo-secondary depends on the primary database size.alter database [dbrep] add secondary on server [servername];After the geo-secondary is successfully created, the users, logins, and firewall rules created by this procedure can be removed.
Note
Cross-subscription geo-replication operations including setup and geo-failover are only supported using Databases Create or Update REST API & T-SQL commands.
Adding a geo-secondary using T-SQL is not supported when connecting to the primary server over a private endpoint. If a private endpoint is configured but public network access is allowed, adding a geo-secondary is supported when connected to the primary server from a public IP address. Once a geo-secondary is added, public network access can be denied.
Creating a geo-secondary on a logical server in a different Microsoft Entra tenant is not supported when Microsoft Entra-only authentication is enabled on either primary or secondary logical server.
Next steps
- To learn more about active geo-replication, see active geo-replication.
- To learn about failover groups, see Failover groups
- For a business continuity overview and scenarios, see Business continuity overview.
- Save on licensing costs by designating your secondary DR replica for standby. 1
Feedback
Coming soon: Throughout 2024 we will be phasing out GitHub Issues as the feedback mechanism for content and replacing it with a new feedback system. For more information see: https://aka.ms/ContentUserFeedback.
Submit and view feedback for