The following steps outline the process of creating a new Azure SQL Database logical server and a new database with a user-assigned managed identity assigned.
Browse to the Select SQL deployment option page in the Azure portal.
If you aren't already signed in to Azure portal, sign in when prompted.
Under SQL databases, leave Resource type set to Single database, and select Create.
On the Basics tab of the Create SQL Database form, under Project details, select the desired Azure Subscription.
For Resource group, select Create new, enter a name for your resource group, and select OK.
For Database name enter your desired database name.
For Server, select Create new, and fill out the New server form with the following values:
- Server name: Enter a unique server name. Server names must be globally unique for all servers in Azure, not just unique within a subscription.
- Server admin login: Enter an admin login name, for example:
azureuser.
- Password: Enter a password that meets the password requirements, and enter it again in the Confirm password field.
- Location: Select a location from the dropdown list
Select Next: Networking at the bottom of the page.
On the Networking tab, for Connectivity method, select Public endpoint.
For Firewall rules, set Add current client IP address to Yes. Leave Allow Azure services and resources to access this server set to No.
Select Next: Security at the bottom of the page.
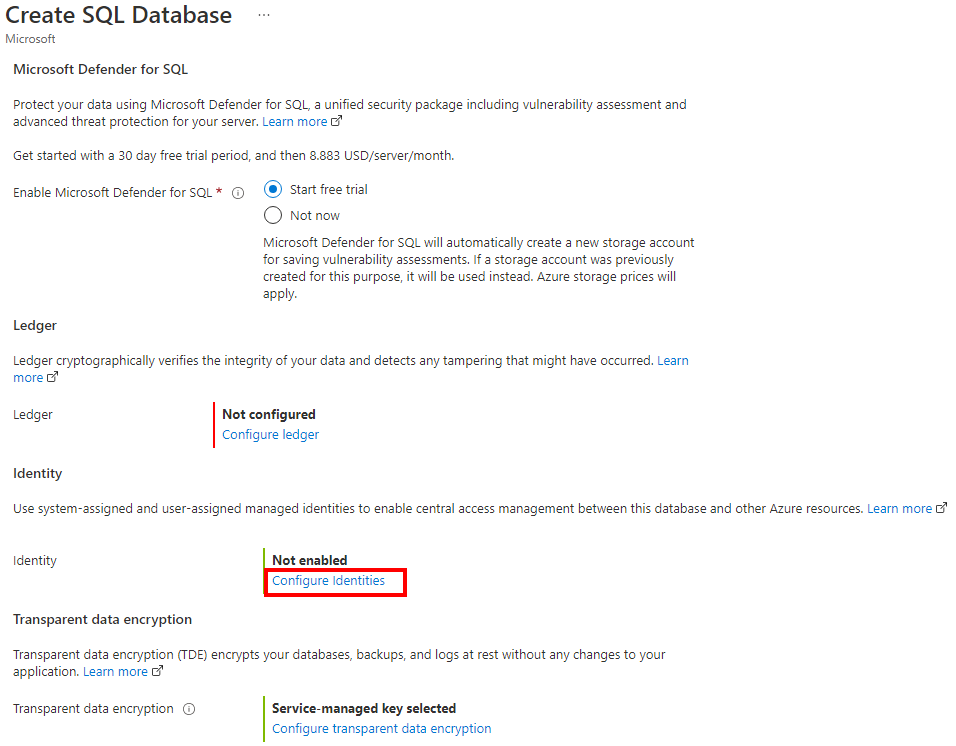
On the Security tab, under Identity, select Configure Identities.
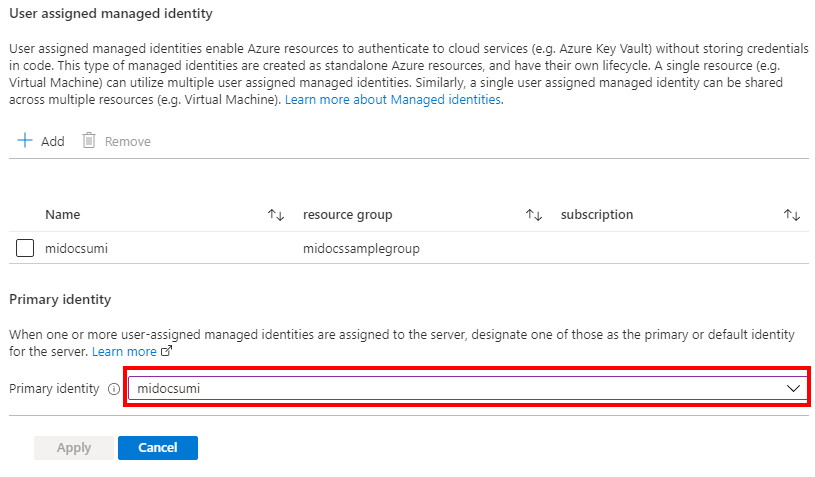
On the Identity pane, under User assigned managed identity, select Add. Select the desired Subscription and then under User assigned managed identities select the desired user assigned managed identity from the selected subscription. Then select the Select button.
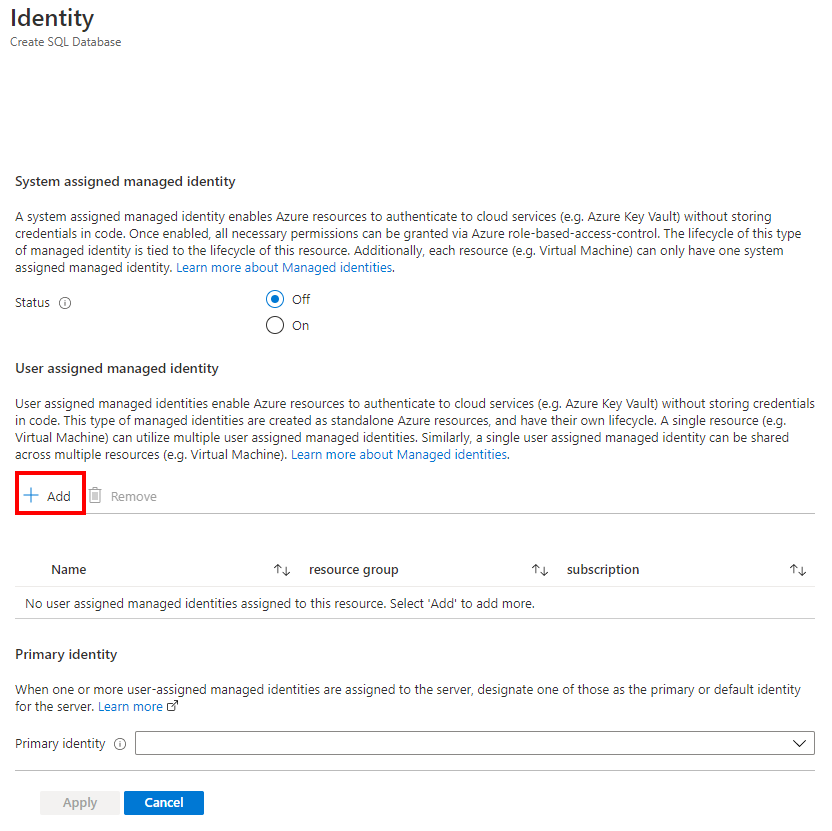

Under Primary identity, select the same user-assigned managed identity selected in the previous step.
Note
If the system-assigned managed identity is the primary identity, the Primary identity field must be empty.
Select Apply
Select Review + create at the bottom of the page
On the Review + create page, after reviewing, select Create.
The Azure CLI command az sql server create is used to provision a new logical server. The below command will provision a new server with a user-assigned managed identity. The example will also enable Microsoft Entra-only authentication, and set a Microsoft Entra admin for the server.
The server SQL Administrator login will be automatically created and the password will be set to a random password. Since SQL Authentication connectivity is disabled with this server creation, the SQL Administrator login won't be used.
The server Microsoft Entra admin will be the account you set for <AzureADAccount>, and can be used to manage the server.
Replace the following values in the example:
<subscriptionId>: Your subscription ID can be found in the Azure portal<ResourceGroupName>: Name of the resource group for your logical server<managedIdentity>: The user-assigned managed identity. Can also be used as the primary identity.<primaryIdentity>: The primary identity you want to use as the server identity<AzureADAccount>: Can be a Microsoft Entra user or group. For example, DummyLogin<AzureADAccountSID>: The Microsoft Entra Object ID for the user<ServerName>: Use a unique logical server name<Location>: Location of the server, such as westus, or centralus
subscription_id=<subscriptionId>
resource_group=<ResourceGroupName>
managed_identity=<managedIdentity>
primary_identity=<primaryIdentity>
azure_ad_account=<AzureADAccount>
azure_ad_account_sid=<AzureADAccountSID>
server_name=<ServerName>
location=<Location>

az sql server create \
  --assign-identity \
  --identity-type UserAssigned \
  --user-assigned-identity-id /subscriptions/$subscription_id/resourceGroups/$resource_group/providers/Microsoft.ManagedIdentity/userAssignedIdentities/$managed_identity \
  --primary-user-assigned-identity-id /subscriptions/$subscription_id/resourceGroups/$resource_group/providers/Microsoft.ManagedIdentity/userAssignedIdentities/$primary_identity \
  --enable-ad-only-auth \
  --external-admin-principal-type User \
  --external-admin-name $azure_ad_account \
  --external-admin-sid $azure_ad_account_sid \
  -g $resource_group \
  -n $server_name \
  -l $location
For more information, see az sql server create.
Note
The above example provisions a server with only a user-assigned managed identity. You could set the --identity-type to be UserAssigned,SystemAssigned if you wanted both types of managed identities to be created with the server.
To check the server status after creation, see the following command:
az sql server show --name <ServerName> --resource-group <ResourceGroupName> --expand-ad-admin
The PowerShell command New-AzSqlServer is used to provision a new Azure SQL logical server. The below command will provision a new server with a user-assigned managed identity. The example will also enable Microsoft Entra-only authentication, and set a Microsoft Entra admin for the server.
The server SQL Administrator login will be automatically created and the password will be set to a random password. Since SQL Authentication connectivity is disabled with this server creation, the SQL Administrator login won't be used.
The server Microsoft Entra admin will be the account you set for <AzureADAccount>, and can be used to manage the server.
Replace the following values in the example:
<ResourceGroupName>: Name of the resource group for your logical server<Location>: Location of the server, such as West US, or Central US<ServerName>: Use a unique logical server name<subscriptionId>: Your subscription ID can be found in the Azure portal<managedIdentity>: The user-assigned managed identity. Can also be used as the primary identity<primaryIdentity>: The primary identity you want to use as the server identity<AzureADAccount>: Can be a Microsoft Entra user or group. For example, DummyLogin
$server = @{
    ResourceGroupName = "<ResourceGroupName>"
    Location = "<Location>"
    ServerName = "<ServerName>"
    ServerVersion = "12.0"
    AssignIdentity = $true
    IdentityType = "UserAssigned"
    UserAssignedIdentityId = "/subscriptions/<subscriptionId>/resourceGroups/<ResourceGroupName>/providers/Microsoft.ManagedIdentity/userAssignedIdentities/<managedIdentity>"
    PrimaryUserAssignedIdentityId = "/subscriptions/<subscriptionId>/resourceGroups/<ResourceGroupName>/providers/Microsoft.ManagedIdentity/userAssignedIdentities/<primaryIdentity>"
    ExternalAdminName = "<AzureADAccount>"
    EnableActiveDirectoryOnlyAuthentication = $true
}

New-AzSqlServer @server
For more information, see New-AzSqlServer.
Note
The above example provisions a server with only a user-assigned managed identity. You could set the -IdentityType to be "UserAssigned,SystemAssigned" if you wanted both types of managed identities to be created with the server.
To check the server status after creation, see the following command:
Get-AzSqlServer -ResourceGroupName "<ResourceGroupName>" -ServerName "<ServerName>" -ExpandActiveDirectoryAdministrator
The Servers - Create Or Update REST API can be used to create a logical server with a user-assigned managed identity.
The script below will provision a logical server, set the Microsoft Entra admin as <AzureADAccount>, and enable Microsoft Entra-only authentication. The server SQL Administrator login will also be created automatically and the password will be set to a random password. Since SQL Authentication connectivity is disabled with this provisioning, the SQL Administrator login won't be used.
The Microsoft Entra admin, <AzureADAccount> can be used to manage the server when the provisioning is complete.
Replace the following values in the example:
<tenantId>: Can be found by going to the Azure portal, and going to your Microsoft Entra ID resource. In the Overview pane, you should see your Tenant ID<subscriptionId>: Your subscription ID can be found in the Azure portal<ServerName>: Use a unique logical server name<ResourceGroupName>: Name of the resource group for your logical server<AzureADAccount>: Can be a Microsoft Entra user or group. For example, DummyLogin<Location>: Location of the server, such as westus2, or centralus<objectId>: Can be found by going to the Azure portal, and going to your Microsoft Entra ID resource. In the User pane, search for the Microsoft Entra user and find their Object ID<managedIdentity>: The user-assigned managed identity. Can also be used as the primary identity<primaryIdentity>: The primary identity you want to use as the server identity
Import-Module Azure
Import-Module MSAL.PS

$tenantId = '<tenantId>'
$clientId = '1950a258-227b-4e31-a9cf-717495945fc2' # Static Microsoft client ID used for getting a token
$subscriptionId = '<subscriptionId>'
$uri = "urn:ietf:wg:oauth:2.0:oob"
$authUrl = "https://login.windows.net/$tenantId"
$serverName = "<ServerName>"
$resourceGroupName = "<ResourceGroupName>"

Login-AzAccount -tenantId $tenantId

# login as a user with SQL Server Contributor role or higher

# Get a token

$result = Get-MsalToken -RedirectUri $uri -ClientId $clientId -TenantId $tenantId -Scopes "https://management.core.windows.net/.default"

#Authentication header
$authHeader = @{
'Content-Type'='application\json; '
'Authorization'=$result.CreateAuthorizationHeader()
}

# Enable Azure AD-only auth and sets a user-managed identity as the server identity
# No server admin is specified, and only Azure AD admin and Azure AD-only authentication is set to true
# Server admin (login and password) is generated by the system
# The sid is the Azure AD Object ID for the user
# Replace all values in a <>

$body = '{
"location": "<Location>",
"identity": {"type" : "UserAssigned", "UserAssignedIdentities" : {"/subscriptions/<subscriptionId>/resourceGroups/<ResourceGroupName>/providers/Microsoft.ManagedIdentity/userAssignedIdentities/<managedIdentity>" : {}}},
"properties": { "PrimaryUserAssignedIdentityId":"/subscriptions/<subscriptionId>/resourceGroups/<ResourceGroupName>/providers/Microsoft.ManagedIdentity/userAssignedIdentities/<primaryIdentity>","administrators":{ "login":"<AzureADAccount>", "sid":"<objectId>", "tenantId":"<tenantId>", "principalType":"User", "azureADOnlyAuthentication":true }
  }
}'

# Provision the server

Invoke-RestMethod -Uri https://management.azure.com/subscriptions/$subscriptionId/resourceGroups/$resourceGroupName/providers/Microsoft.Sql/servers/$serverName/?api-version=2020-11-01-preview -Method PUT -Headers $authHeader -Body $body -ContentType "application/json"
Note
The above example provisions a server with only a user-assigned managed identity. You could set the "type" to be "UserAssigned,SystemAssigned" if you wanted both types of managed identities to be created with the server.
To check the server status, you can use the following script:
$uri = 'https://management.azure.com/subscriptions/'+$subscriptionId+'/resourceGroups/'+$resourceGroupName+'/providers/Microsoft.Sql/servers/'+$serverName+'?api-version=2020-11-01-preview&$expand=administrators/activedirectory'

$response=Invoke-WebRequest -Uri $uri -Method PUT -Headers $authHeader -Body $body -ContentType "application/json"

$response.statuscode

$response.content
Here's an example of an ARM template that creates an Azure SQL Database logical server with a user-assigned managed identity. The template also adds a Microsoft Entra admin set for the server and enables Microsoft Entra-only authentication, but this can be removed from the template example.
For more information and ARM templates, see Azure Resource Manager templates for Azure SQL Database.
Use a Custom deployment in the Azure portal, and Build your own template in the editor. Next, Save the configuration once you pasted in the example.
To get your user-assigned managed identity Resource ID, search for Managed Identities in the Azure portal. Find your managed identity, and go to Properties. An example of your UMI Resource ID will look like /subscriptions/<subscriptionId>/resourceGroups/<ResourceGroupName>/providers/Microsoft.ManagedIdentity/userAssignedIdentities/<managedIdentity>.
{
    "$schema": "https://schema.management.azure.com/schemas/2019-04-01/deploymentTemplate.json#",
    "contentVersion": "1.0.0.1",
    "parameters": {
        "server": {
            "type": "string",
            "defaultValue": "[uniqueString('sql', resourceGroup().id)]",
            "metadata": {
                "description": "The name of the logical server."
            }
        },
        "location": {
            "type": "string",
            "defaultValue": "[resourceGroup().location]",
            "metadata": {
                "description": "Location for all resources."
            }
        },
        "aad_admin_name": {
            "type": "String",
            "metadata": {
                "description": "The name of the Azure AD admin for the SQL server."
            }
        },
        "aad_admin_objectid": {
            "type": "String",
            "metadata": {
                "description": "The Object ID of the Azure AD admin."
            }
        },
        "aad_admin_tenantid": {
            "type": "String",
            "defaultValue": "[subscription().tenantId]",
            "metadata": {
                "description": "The Tenant ID of the Azure Active Directory"
            }
        },
        "aad_admin_type": {
            "defaultValue": "User",
            "allowedValues": [
                "User",
                "Group",
                "Application"
            ],
            "type": "String"
        },
        "aad_only_auth": {
            "defaultValue": true,
            "type": "Bool"
        },
        "user_identity_resource_id": {
            "defaultValue": "",
            "type": "String",
            "metadata": {
                "description": "The Resource ID of the user-assigned managed identity, in the form of /subscriptions/<subscriptionId>/resourceGroups/<ResourceGroupName>/providers/Microsoft.ManagedIdentity/userAssignedIdentities/<managedIdentity>."
            }
        },
        "AdminLogin": {
            "minLength": 1,
            "type": "String"
        },
        "AdminLoginPassword": {
            "type": "SecureString"
        }
    },
    "resources": [
        {
            "type": "Microsoft.Sql/servers",
            "apiVersion": "2020-11-01-preview",
            "name": "[parameters('server')]",
            "location": "[parameters('location')]",
            "identity": {
                "type": "UserAssigned",
                "UserAssignedIdentities": {
                    "[parameters('user_identity_resource_id')]": {}
                }
            },
            "properties": {
                "administratorLogin": "[parameters('AdminLogin')]",
                "administratorLoginPassword": "[parameters('AdminLoginPassword')]",
                "PrimaryUserAssignedIdentityId": "[parameters('user_identity_resource_id')]",
                "administrators": {
                    "login": "[parameters('aad_admin_name')]",
                    "sid": "[parameters('aad_admin_objectid')]",
                    "tenantId": "[parameters('aad_admin_tenantid')]",
                    "principalType": "[parameters('aad_admin_type')]",
                    "azureADOnlyAuthentication": "[parameters('aad_only_auth')]"
                }
            }
        }
    ]
}

