Note
Access to this page requires authorization. You can try signing in or changing directories.
Access to this page requires authorization. You can try changing directories.
Applies to: ![]() Azure SQL Database
Azure SQL Database
Application requests to Azure SQL Database must be authenticated. Although there are multiple options for authenticating to Azure SQL Database, you should prioritize passwordless connections in your applications when possible. Traditional authentication methods that use passwords or secret keys create security risks and complications. Visit the passwordless connections for Azure services hub to learn more about the advantages of moving to passwordless connections. The following tutorial explains how to migrate an existing Python application to connect to Azure SQL Database to use passwordless connections instead of a username and password solution.
The mssql-python driver provides built-in support for Microsoft Entra authentication, making passwordless connections straightforward with minimal code changes.
Configure the Azure SQL Database
Passwordless connections use Microsoft Entra authentication to connect to Azure services, including Azure SQL Database. Microsoft Entra authentication, you can manage identities in a central location to simplify permission management. Learn more about configuring Microsoft Entra authentication for your Azure SQL Database:
For this migration guide, ensure you have a Microsoft Entra admin assigned to your Azure SQL Database.
Navigate to the Microsoft Entra page of your logical server.
Select Set admin to open the Microsoft Entra ID flyout menu.
In the Microsoft Entra ID flyout menu, search for the user you want to assign as admin.
Select the user and choose Select.


Configure your local development environment
Passwordless connections can be configured to work for both local and Azure hosted environments. In this section, you apply configurations to allow individual users to authenticate to Azure SQL Database for local development.
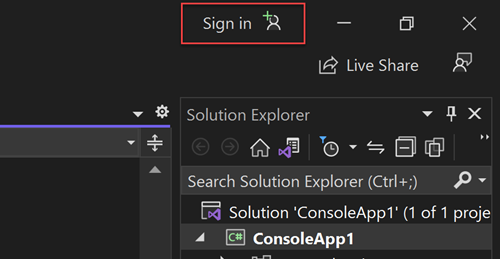
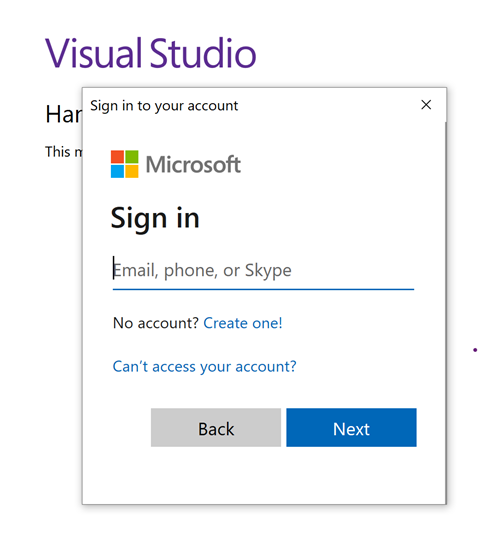
Sign-in to Azure
For local development, make sure you're signed in with the same Microsoft Entra account you want to use to access Azure SQL Database. You can authenticate via popular development tools, such as the Azure CLI or Azure PowerShell. The development tools with which you can authenticate vary across languages.
Sign in to Azure through the Azure CLI using the following command. This works on Windows, macOS, and Linux.
az login
Create a database user and assign roles
Create a user in Azure SQL Database. The user should correspond to the Azure account you used to sign-in locally in the Sign-in to Azure section.
In the Azure portal, browse to your SQL database and select Query editor (preview).
Select Continue as
<your-username>on the right side of the screen to sign into the database using your account.On the query editor view, run the following T-SQL commands:
CREATE USER [user@domain] FROM EXTERNAL PROVIDER;
ALTER ROLE db_datareader ADD MEMBER [user@domain];
ALTER ROLE db_datawriter ADD MEMBER [user@domain];
ALTER ROLE db_ddladmin ADD MEMBER [user@domain];
GO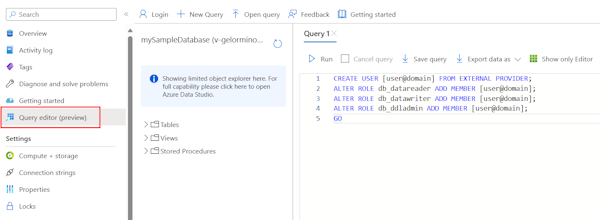
Running these commands assigns the SQL DB Contributor role to the account specified. This role allows the identity to read, write, and modify the data and schema of your database. For more information about the roles assigned, see Fixed-database roles.

Update the local connection configuration
Migrating to passwordless connections with mssql-python requires only a connection string change. The driver has built-in support for Microsoft Entra authentication modes, eliminating the need for manual token handling.
from os import getenv
from dotenv import load_dotenv
from mssql_python import connect

load_dotenv()

connection_string = getenv("AZURE_SQL_CONNECTIONSTRING")

def get_all():
    with connect(connection_string) as conn:
        cursor = conn.cursor()
        cursor.execute("SELECT * FROM Persons")
        # Do something with the data
    return
To update the referenced connection string (AZURE_SQL_CONNECTIONSTRING) for local development, create a .env file in your project folder with the passwordless connection string format using ActiveDirectoryDefault authentication:
AZURE_SQL_CONNECTIONSTRING=Server=tcp:<database-server-name>.database.windows.net,1433;Database=<database-name>;Encrypt=yes;TrustServerCertificate=no;Connection Timeout=30;Authentication=ActiveDirectoryDefault
ActiveDirectoryDefault automatically discovers credentials from multiple sources (Azure CLI, environment variables, Visual Studio, etc.) without requiring interactive login. This approach is convenient for development but adds latency because it tries each credential source in sequence.
Important
ActiveDirectoryDefault is intended for local development only. It tries multiple authentication methods in sequence, which adds latency and can cause unexpected behavior in production. For production applications, use the specific authentication method for your scenario:
- Azure App Service/Functions: Use
ActiveDirectoryMSI(managed identity) - Interactive user login: Use
ActiveDirectoryInteractive - Service principal: Use
ActiveDirectoryServicePrincipal
Test the app
Run your app locally and verify that the connections to Azure SQL Database are working as expected. Keep in mind that it can take several minutes for changes to Azure users and roles to propagate through your Azure environment. Your application is now configured to run locally without developers having to manage secrets in the application itself.
Configure the Azure hosting environment
Once your app is configured to use passwordless connections locally, the same code can authenticate to Azure SQL Database after it's deployed to Azure. The sections that follow explain how to configure a deployed application to connect to Azure SQL Database using a managed identity. Managed identities provide an automatically managed identity in Microsoft Entra ID (formerly Azure Active Directory) for applications to use when connecting to resources that support Microsoft Entra authentication. Learn more about managed identities:
Create the managed identity
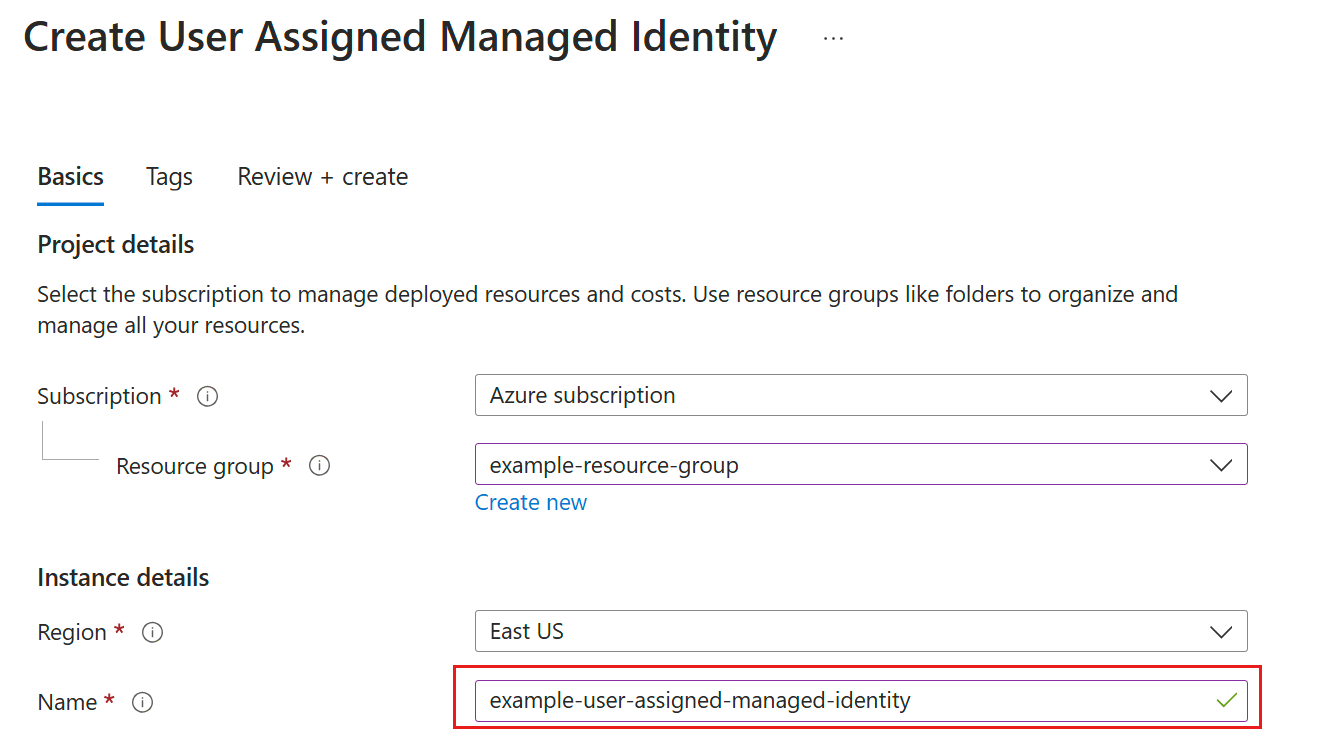
Create a user-assigned managed identity using the Azure portal or the Azure CLI. Your application uses the identity to authenticate to other services.
- At the top of the Azure portal, search for Managed identities. Select the Managed Identities result.
- Select + Create at the top of the Managed Identities overview page.
- On the Basics tab, enter the following values:
- Subscription: Select your desired subscription.
- Resource group: Select your desired resource group.
- Region: Select a region near your location.
- Name: Enter a recognizable name for your identity, such as MigrationIdentity.
- Select Review + create at the bottom of the page.
- When the validation checks finish, select Create. Azure creates a new user-assigned identity.
After the resource is created, select Go to resource to view the details of the managed identity.
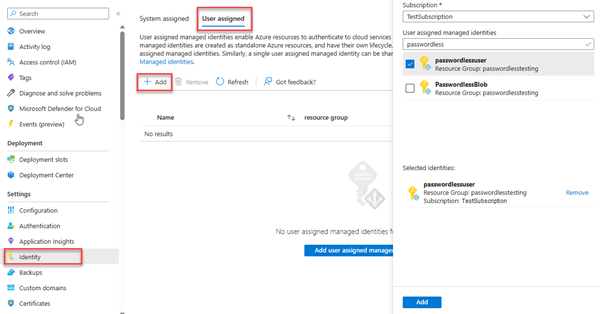
Associate the managed identity with your web app
Configure your web app to use the user-assigned managed identity you created.
Complete the following steps in the Azure portal to associate the user-assigned managed identity with your app. These same steps apply to the following Azure services:
- Azure Spring Apps
- Azure Container Apps
- Azure virtual machines
- Azure Kubernetes Service
Navigate to the overview page of your web app.
Select Identity from the left navigation.
On the Identity page, switch to the User assigned tab.
Select + Add to open the Add user assigned managed identity flyout.
Select the subscription you used previously to create the identity.
Search for the MigrationIdentity by name and select it from the search results.
Select Add to associate the identity with your app.

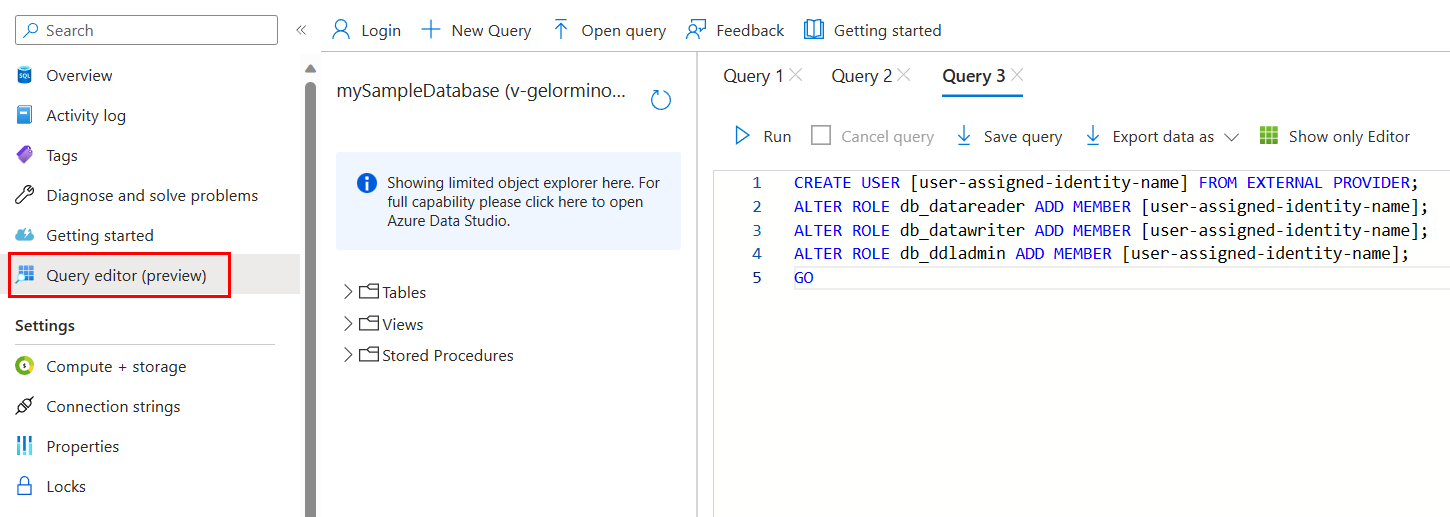
Create a database user for the identity and assign roles
Create a SQL database user that maps back to the user-assigned managed identity. Assign the necessary SQL roles to the user to allow your app to read, write, and modify the data and schema of your database.
In the Azure portal, browse to your SQL database and select Query editor (preview).
Select Continue as
<username>on the right side of the screen to sign into the database using your account.On the query editor view, run the following T-SQL commands:
CREATE USER [user-assigned-identity-name] FROM EXTERNAL PROVIDER;
ALTER ROLE db_datareader ADD MEMBER [user-assigned-identity-name];
ALTER ROLE db_datawriter ADD MEMBER [user-assigned-identity-name];
ALTER ROLE db_ddladmin ADD MEMBER [user-assigned-identity-name];
GO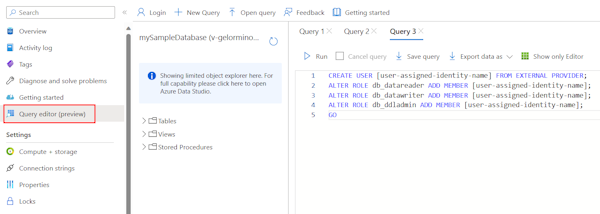
Running these commands assigns the SQL DB Contributor role to the user-assigned managed identity. This role allows the identity to read, write, and modify the data and schema of your database.
Important
Use caution when assigning database user roles in enterprise production environments. In those scenarios, the app shouldn't perform all operations using a single, elevated identity. Try to implement the principle of least privilege by configuring multiple identities with specific permissions for specific tasks.
You can read more about configuring database roles and security on the following resources:
Update the connection string
Update your Azure app configuration to use the passwordless connection string format with ActiveDirectoryMSI authentication for managed identity.
Connection strings can be stored as environment variables in your app hosting environment. The following instructions focus on App Service, but other Azure hosting services provide similar configurations.
Server=tcp:<database-server-name>.database.windows.net,1433;Database=<database-name>;Encrypt=yes;TrustServerCertificate=no;Connection Timeout=30;Authentication=ActiveDirectoryMSI
<database-server-name> is the name of your Azure SQL Database server and <database-name> is the name of your Azure SQL Database.
Create an app setting for the managed identity client ID
To use the user-assigned managed identity, create an AZURE_CLIENT_ID environment variable and set it equal to the client ID of the managed identity. You can set this variable in the Configuration section of your app in the Azure portal. You can find the client ID in the Overview section of the managed identity resource in the Azure portal.
Save your changes and restart the application if it doesn't do so automatically.
Note
When using a user-assigned managed identity, include the client ID in the connection string using the User Id parameter:
Server=tcp:<database-server-name>.database.windows.net,1433;Database=<database-name>;Encrypt=yes;TrustServerCertificate=no;Connection Timeout=30;Authentication=ActiveDirectoryMSI;User Id=<managed-identity-client-id>
If you omit the User Id parameter, the driver uses the system-assigned managed identity if one is configured.
Test the application
Test your app to make sure everything is still working. It can take a few minutes for all of the changes to propagate through your Azure environment.