Note
Access to this page requires authorization. You can try signing in or changing directories.
Access to this page requires authorization. You can try changing directories.
Applies to: ![]() Azure SQL Database
Azure SQL Database
This article shows you how to import or export an Azure SQL Database when Allow Azure services and resources to access this server is set to OFF. The how-to article uses an Azure virtual machine to run SqlPackage to perform the import or export operation.
The Allow Azure services and resources to access this server setting is visible in the Azure portal under the Security menu in the resource menu, Networking, in the Exceptions section. For more information on this setting, see Azure SQL Database network access controls.
Sign in to the Azure portal
Sign in to the Azure portal.
Create the Azure virtual machine
Create an Azure virtual machine by selecting the Deploy to Azure button.
This template allows you to deploy a simple Windows virtual machine using a few different options for the Windows version, using the latest patched version. This deploys an A2 size VM in the resource group location and returns the fully qualified domain name of the VM.

For more information including an Azure Quickstart Template, see Deploy a simple Windows VM.
Connect to the virtual machine
The following steps show you how to connect to your virtual machine using a remote desktop connection.
After deployment completes, go to the virtual machine resource.
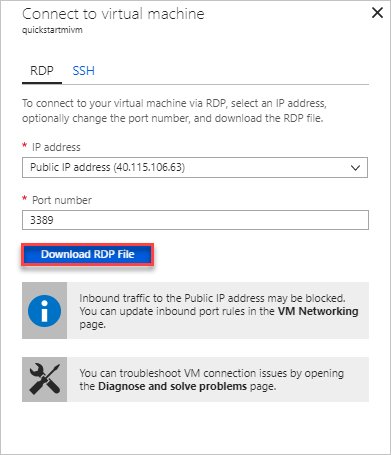
Select Connect.
A Remote Desktop Protocol file (.rdp file) form appears with the public IP address and port number for the virtual machine.
Note
There are multiple ways to connect to a VM. This tutorial uses Remote Desktop Protocol (RDP) to connect to the VM, but a newer solution to use Azure Bastion is an alternative that would work well, if you have deployed Bastion in your environment. You can also use SSH to connect to your VM.
Select Download RDP File.
Close the Connect to virtual machine form.
To connect to your VM, open the downloaded RDP file.
When prompted, select Connect.
- On a Mac, you need an RDP client such as this Remote Desktop Client from the Mac App Store.
Enter the username and password you specified when creating the virtual machine, then choose OK.
You might receive a certificate warning during the sign-in process. Choose Yes or Continue to proceed with the connection.
Install SqlPackage
Download and install the latest version of SqlPackage. For more information, see SqlPackage.
Create a firewall rule to allow the VM access to the database
First, add the virtual machine's public IP address to the server's firewall. The following steps create a server-level IP firewall rule for your virtual machine's public IP address, and enable connectivity from the virtual machine.
Select SQL databases from the left-hand menu and then select your database on the SQL databases page. The overview page for your database opens, showing you the fully qualified server name (for example:
sql-svr.database.windows.net) and provides options for further configuration.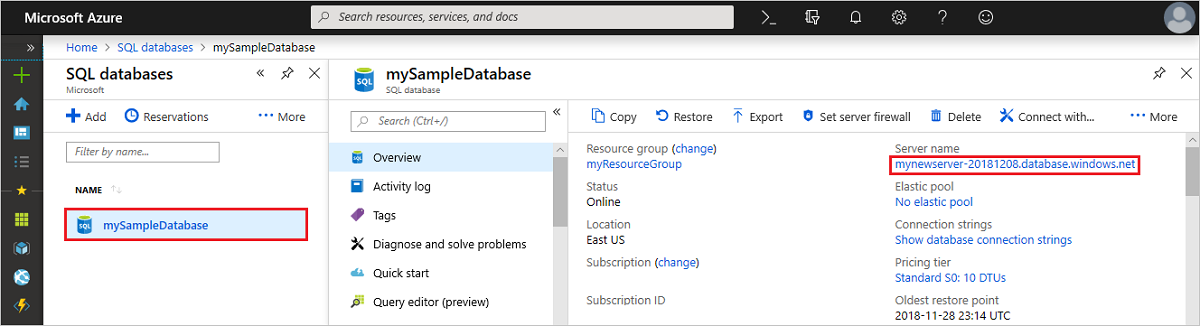
Copy this fully qualified server name to use when connecting to your server and its databases.
Select Set server firewall on the toolbar.
On the Networking page, in the Public access tab, in the Firewall settings section, select Add your client IPv4 address. This adds your virtual machine's public IP address to a new server-level IP firewall rule. A server-level IP firewall rule can open port 1433 for a single IP address or a range of IP addresses.
Select Save. A server-level IP firewall rule is created for your virtual machine's public IP address opening port 1433 on the server.

Export a database using SqlPackage
To export an Azure SQL Database using the SqlPackage command-line utility, see Export parameters and properties. The SqlPackage utility ships with the latest versions of SQL Server Management Studio and SQL Server Data Tools, or you can download the latest version of SqlPackage.
For more information and step to create a BACPAC file, see Export to a BACPAC file.
We recommend the use of the SqlPackage utility for scale and performance in most production environments. For a SQL Server Customer Advisory Team blog about migrating using BACPAC files, see Migrating from SQL Server to Azure SQL Database using BACPAC Files.
This example shows how to export a database using SqlPackage with Active Directory Universal Authentication. Replace with values that are specific to your environment.
SqlPackage /a:Export /tf:testExport.bacpac /scs:"Data Source=<servername>.database.windows.net;Initial Catalog=MyDB;" /ua:True /tid:"apptest.onmicrosoft.com"
Import a database using SqlPackage
To import a SQL Server database using the SqlPackage command-line utility, see import parameters and properties. SqlPackage has the latest SQL Server Management Studio and SQL Server Data Tools. You can also download the latest version of SqlPackage.
For scale and performance, we recommend using SqlPackage in most production environments rather than using the Azure portal. For a SQL Server Customer Advisory Team blog about migrating using BACPAC files, see migrating from SQL Server to Azure SQL Database using BACPAC Files.
The following SqlPackage command imports the AdventureWorks2022 database from local storage to an Azure SQL Database. It creates a new database called myMigratedDatabase with a Premium service tier and a P6 Service Objective. Change these values as appropriate for your environment.
SqlPackage /a:import /tcs:"Data Source=<serverName>.database.windows.net;Initial Catalog=myMigratedDatabase>;User Id=<userId>;Password=<password>" /sf:AdventureWorks2022.bacpac /p:DatabaseEdition=Premium /p:DatabaseServiceObjective=P6
Important
To connect to Azure SQL Database from behind a corporate firewall, the firewall must have port 1433 open.
This example shows how to import a database using SqlPackage with Active Directory Universal Authentication.
SqlPackage /a:Import /sf:testExport.bacpac /tdn:NewDacFX /tsn:apptestserver.database.windows.net /ua:True /tid:"apptest.onmicrosoft.com"
Performance considerations
Export speeds vary due to many factors (for example, data shape) so it's impossible to predict what speed should be expected. SqlPackage can take considerable time, particularly for large databases.
For best performance, try the following strategies:
- Make sure no other workload is running on the database. Create a copy before export might be the best solution to ensure no other workloads are running.
- Increase database service level objective (SLO) to better handle the export workload (primarily read I/O). If the database is currently GP_Gen5_4, perhaps a Business Critical tier would help with read workload.
- Make sure there are clustered indexes particularly for large tables.
- Virtual machines (VMs) should be in the same region as the database to help avoid network constraints.
- VMs should have SSD with adequate size for generating temp artifacts before uploading to blob storage.
- VMs should have adequate core and memory configuration for the specific database.
Store the imported or exported BACPAC file
The BACPAC file can be stored in Azure Blobs, or Azure Files.
To achieve the best performance, use Azure Files. SqlPackage operates with the filesystem so it can access Azure Files directly.
To reduce cost, use Azure Blobs, which cost less than a premium Azure file share. However, it requires you to copy the BACPAC file between the blob and the local file system before the import or export operation. As a result, the process takes longer.
To upload or download BACPAC files, see Transfer data with AzCopy and Blob storage, and Transfer data with AzCopy and file storage.
Depending on your environment, you might need to Configure Azure Storage firewalls and virtual networks.
Related content
- To learn how to connect to and query an imported SQL Database, see Quickstart: Azure SQL Database: Use SQL Server Management Studio to connect and query data.
- For a SQL Server Customer Advisory Team blog about migrating using BACPAC files, see Migrating from SQL Server to Azure SQL Database using BACPAC Files.
- For a discussion of the entire SQL Server database migration process, including performance recommendations, see SQL Server database migration to Azure SQL Database.
- To learn how to manage and share storage keys and shared access signatures securely, see Azure Storage Security Guide.