Note
Access to this page requires authorization. You can try signing in or changing directories.
Access to this page requires authorization. You can try changing directories.
Applies to: ![]() Azure SQL Database
Azure SQL Database
Configure a database in SQL Database and client application for failover to a remote region and test a failover plan. You learn how to:
- Create a failover group
- Run a Java application to query a database in SQL Database
- Test failover
If you don't have an Azure subscription, create a free account before you begin.
Prerequisites
Note
This article uses the Azure Az PowerShell module, which is the recommended PowerShell module for interacting with Azure. To get started with the Az PowerShell module, see Install Azure PowerShell. To learn how to migrate to the Az PowerShell module, see Migrate Azure PowerShell from AzureRM to Az.
Important
The PowerShell Azure Resource Manager (AzureRM) module was deprecated on February 29, 2024. All future development should use the Az.Sql module. Users are advised to migrate from AzureRM to the Az PowerShell module to ensure continued support and updates. The AzureRM module is no longer maintained or supported. The arguments for the commands in the Az PowerShell module and in the AzureRM modules are substantially identical. For more about their compatibility, see Introducing the new Az PowerShell module.
To complete the tutorial, make sure you've installed the following items:
- Azure PowerShell
- A single database in Azure SQL Database. To create one use,
- The tutorial uses the
AdventureWorksLTsample database, which is the optional sample database loaded when you create a new Azure SQL Database.
Important
Be sure to set up firewall rules to use the public IP address of the computer on which you're performing the steps in this tutorial. Database-level firewall rules will replicate automatically to the secondary server.
For information see Create a database-level firewall rule or to determine the IP address used for the server-level firewall rule for your computer see Quickstart: Create a server-level firewall rule in Azure portal.
Create a failover group
Using Azure PowerShell, create failover groups between an existing server and a new server in another region. Then add the sample database to the failover group.
Important
This sample requires Azure PowerShell Az 1.0 or later. Run Get-Module -ListAvailable Az to see which versions are installed.
If you need to install, see Install Azure PowerShell module.
Run Connect-AzAccount to sign in to Azure.
To create a failover group, run the following script:
$admin = "<adminName>"
$password = "<password>"
$resourceGroup = "<resourceGroupName>"
$location = "<resourceGroupLocation>"
$server = "<serverName>"
$database = "<databaseName>"
$drLocation = "<disasterRecoveryLocation>"
$drServer = "<disasterRecoveryServerName>"
$failoverGroup = "<globallyUniqueFailoverGroupName>"

# create a backup server in the failover region
New-AzSqlServer -ResourceGroupName $resourceGroup -ServerName $drServer `
    -Location $drLocation -SqlAdministratorCredentials $(New-Object -TypeName System.Management.Automation.PSCredential `
    -ArgumentList $admin, $(ConvertTo-SecureString -String $password -AsPlainText -Force))

# create a failover group between the servers
New-AzSqlDatabaseFailoverGroup –ResourceGroupName $resourceGroup -ServerName $server `
    -PartnerServerName $drServer –FailoverGroupName $failoverGroup –FailoverPolicy Automatic -GracePeriodWithDataLossHours 2

# add the database to the failover group
Get-AzSqlDatabase -ResourceGroupName $resourceGroup -ServerName $server -DatabaseName $database | `
    Add-AzSqlDatabaseToFailoverGroup -ResourceGroupName $resourceGroup -ServerName $server -FailoverGroupName $failoverGroup
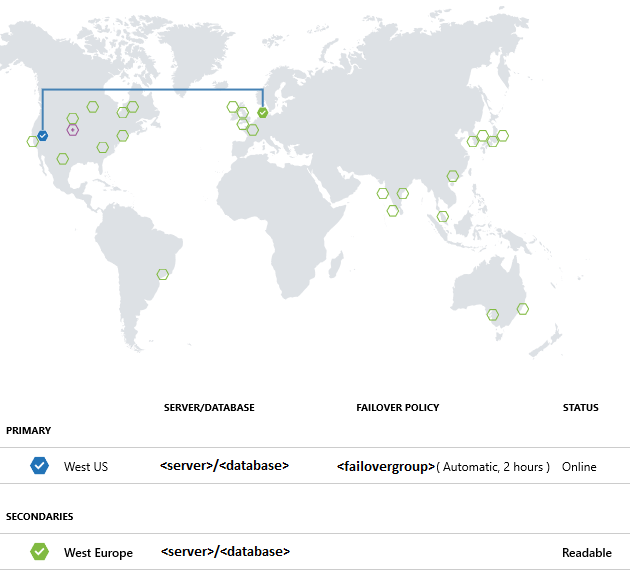
Geo-replication settings can also be changed in the Azure portal, by selecting your database, then Settings > Geo-Replication.
Run the sample project
In the console, create a Maven project with the following command:
mvn archetype:generate "-DgroupId=com.sqldbsamples" "-DartifactId=SqlDbSample" "-DarchetypeArtifactId=maven-archetype-quickstart" "-Dversion=1.0.0"Type Y and press Enter.
Change directories to the new project.
cd SqlDbSampleUsing your favorite editor, open the pom.xml file in your project folder.
Add the Microsoft JDBC Driver for SQL Server dependency by adding the following
dependencysection. The dependency must be pasted within the largerdependenciessection.<dependency> <groupId>com.microsoft.sqlserver</groupId> <artifactId>mssql-jdbc</artifactId> <version>6.1.0.jre8</version> </dependency>Specify the Java version by adding the
propertiessection after thedependenciessection:<properties> <maven.compiler.source>1.8</maven.compiler.source> <maven.compiler.target>1.8</maven.compiler.target> </properties>Support manifest files by adding the
buildsection after thepropertiessection:<build> <plugins> <plugin> <groupId>org.apache.maven.plugins</groupId> <artifactId>maven-jar-plugin</artifactId> <version>3.0.0</version> <configuration> <archive> <manifest> <mainClass>com.sqldbsamples.App</mainClass> </manifest> </archive> </configuration> </plugin> </plugins> </build>Save and close the pom.xml file.
Open the App.java file located in
..\SqlDbSample\src\main\java\com\sqldbsamplesand replace the contents with the following code:package com.sqldbsamples; import java.sql.Connection; import java.sql.Statement; import java.sql.PreparedStatement; import java.sql.ResultSet; import java.sql.Timestamp; import java.sql.DriverManager; import java.util.Date; import java.util.concurrent.TimeUnit; public class App { private static final String FAILOVER_GROUP_NAME = "<your failover group name>"; // add failover group name private static final String DB_NAME = "<your database>"; // add database name private static final String USER = "<your admin>"; // add database user private static final String PASSWORD = "<password>"; // add database password private static final String READ_WRITE_URL = String.format("jdbc:" + "sqlserver://%s.database.windows.net:1433;database=%s;user=%s;password=%s;encrypt=true;" + "hostNameInCertificate=*.database.windows.net;loginTimeout=30;", FAILOVER_GROUP_NAME, DB_NAME, USER, PASSWORD); private static final String READ_ONLY_URL = String.format("jdbc:" + "sqlserver://%s.secondary.database.windows.net:1433;database=%s;user=%s;password=%s;encrypt=true;" + "hostNameInCertificate=*.database.windows.net;loginTimeout=30;", FAILOVER_GROUP_NAME, DB_NAME, USER, PASSWORD); public static void main(String[] args) { System.out.println("#######################################"); System.out.println("## GEO DISTRIBUTED DATABASE TUTORIAL ##"); System.out.println("#######################################"); System.out.println(""); int highWaterMark = getHighWaterMarkId(); try { for(int i = 1; i < 1000; i++) { // loop will run for about 1 hour System.out.print(i + ": insert on primary " + (insertData((highWaterMark + i)) ? "successful" : "failed")); TimeUnit.SECONDS.sleep(1); System.out.print(", read from secondary " + (selectData((highWaterMark + i)) ? "successful" : "failed") + "\n"); TimeUnit.SECONDS.sleep(3); } } catch(Exception e) { e.printStackTrace(); } } private static boolean insertData(int id) { // Insert data into the product table with a unique product name so we can find the product again String sql = "INSERT INTO SalesLT.Product " + "(Name, ProductNumber, Color, StandardCost, ListPrice, SellStartDate) VALUES (?,?,?,?,?,?);"; try (Connection connection = DriverManager.getConnection(READ_WRITE_URL); PreparedStatement pstmt = connection.prepareStatement(sql)) { pstmt.setString(1, "BrandNewProduct" + id); pstmt.setInt(2, 200989 + id + 10000); pstmt.setString(3, "Blue"); pstmt.setDouble(4, 75.00); pstmt.setDouble(5, 89.99); pstmt.setTimestamp(6, new Timestamp(new Date().getTime())); return (1 == pstmt.executeUpdate()); } catch (Exception e) { return false; } } private static boolean selectData(int id) { // Query the data previously inserted into the primary database from the geo replicated database String sql = "SELECT Name, Color, ListPrice FROM SalesLT.Product WHERE Name = ?"; try (Connection connection = DriverManager.getConnection(READ_ONLY_URL); PreparedStatement pstmt = connection.prepareStatement(sql)) { pstmt.setString(1, "BrandNewProduct" + id); try (ResultSet resultSet = pstmt.executeQuery()) { return resultSet.next(); } } catch (Exception e) { return false; } } private static int getHighWaterMarkId() { // Query the high water mark id stored in the table to be able to make unique inserts String sql = "SELECT MAX(ProductId) FROM SalesLT.Product"; int result = 1; try (Connection connection = DriverManager.getConnection(READ_WRITE_URL); Statement stmt = connection.createStatement(); ResultSet resultSet = stmt.executeQuery(sql)) { if (resultSet.next()) { result = resultSet.getInt(1); } } catch (Exception e) { e.printStackTrace(); } return result; } }Save and close the App.java file.
In the command console, run the following command:
mvn packageStart the application that will run for about 1 hour until stopped manually, allowing you time to run the failover test.
mvn -q -e exec:java "-Dexec.mainClass=com.sqldbsamples.App"####################################### ## GEO DISTRIBUTED DATABASE TUTORIAL ## ####################################### 1. insert on primary successful, read from secondary successful 2. insert on primary successful, read from secondary successful 3. insert on primary successful, read from secondary successful ...
Test failover
Run the following scripts to simulate a failover and observe the application results. Notice how some inserts and selects will fail during the database migration.
You can check the role of the disaster recovery server during the test with the following command:
(Get-AzSqlDatabaseFailoverGroup -FailoverGroupName $failoverGroup `
    -ResourceGroupName $resourceGroup -ServerName $drServer).ReplicationRole
To test a failover:
Start a manual failover of the failover group:
Switch-AzSqlDatabaseFailoverGroup -ResourceGroupName $resourceGroup `
 -ServerName $drServer -FailoverGroupName $failoverGroup
Revert failover group back to the primary server:
Switch-AzSqlDatabaseFailoverGroup -ResourceGroupName $resourceGroup `
 -ServerName $server -FailoverGroupName $failoverGroup