Note
Access to this page requires authorization. You can try signing in or changing directories.
Access to this page requires authorization. You can try changing directories.
Applies to: ![]() Azure SQL Database
Azure SQL Database ![]() Azure SQL Managed Instance
Azure SQL Managed Instance ![]() SQL database in Fabric
SQL database in Fabric
The high-level steps in this walkthrough are:
- Create an Azure Storage account, or find an existing suitable account to use.
- Create a container in this storage account.
- Grant the Database Engine required access to the container using either an RBAC role assignment, or a SAS token.
- Create a credential in the database or instance where you create the event session.
- Create, start, and use an event session.
Create a storage account and container
For a detailed description of how to create a storage account in Azure Storage, see Create a storage account. You learn how to create a storage account using Azure portal, PowerShell, Azure SQL, an ARM template, or a Bicep template.
Use an account that:
- Is a
Standard general-purpose v2account. - Has its redundancy type matching the redundancy of the Azure SQL database, elastic pool, or managed instance where event sessions are created.
- For locally redundant Azure SQL resources, use LRS, GRS, or RA-GRS. For zone-redundant Azure SQL resources, use ZRS, GZRS, or RA-GZRS. For more information, see Azure Storage redundancy.
- Uses the
Hotblob access tier. - Is in the same Azure region as the Azure SQL database, elastic pool, Fabric capacity, or SQL managed instance.
- Doesn't have the hierarchical namespace enabled.
Next, create a container in this storage account using Azure portal. You can also create a container using PowerShell, or using Azure CLI.
Note the names of the storage account and container you created. You will use them in the following steps.
First, grant access to the container. To read and write event data, the Database Engine requires specific access to the container. You can grant this access in one of two ways, depending on your choice of authentication type:
If using managed identity with Microsoft Entra authentication, you assign the Storage Blob Data Contributor RBAC role for the container to the managed identity of the Azure SQL logical server or Azure SQL managed instance.
If using secret-based authentication, you create a SAS token for the container.
To use this authentication type, the Allow storage account key access option must be enabled. For more information, see Prevent Shared Key authorization for an Azure Storage account.
Grant access using managed identity
In the Azure portal, navigate to the Identity page of your Azure SQL logical server or Azure SQL managed instance, and make sure that a managed identity is assigned. For more information, see Managed identities in Microsoft Entra for Azure SQL.
In the Azure portal, navigate to the storage container where you want to store event data. On the Access Control (IAM) page, select Add to assign the Storage Blob Data Contributor RBAC role to the managed identity of the logical server or SQL managed instance.
If the logical server or SQL managed instance has its system assigned managed identity enabled, assign the role to that identity. If the system assigned identity is disabled, but there is one or more user assigned identities, assign the role to the user assigned identity designated as the primary identity.
For more information, see Assign an Azure role for access to blob data.
Create a credential to instruct the Database Engine to authenticate to Azure Storage using managed identity for a specific container URL.
In Azure SQL Database and SQL database in Microsoft Fabric, create a database-scoped credential. Using a client tool such as SSMS, open a new query window, connect to the database where you create the event session, and paste the following T-SQL batch. Make sure you're connected to your user database, and not to the
masterdatabase.Note
Executing the following T-SQL batch requires the
CONTROLdatabase permission. By default, the permission is held by the database owner (dbo), by the members of thedb_ownerdatabase role, and by the administrator of the logical server./* (Re-)create a database scoped credential if needed. */ IF EXISTS (SELECT 1 FROM sys.database_credentials WHERE name = 'https://<storage-account-name>.blob.core.windows.net/<container-name>' ) DROP DATABASE SCOPED CREDENTIAL [https://<storage-account-name>.blob.core.windows.net/<container-name>]; /* The name of the credential must match the URL of the blob container. When using managed identity, the credential does not contain a secret. */ CREATE DATABASE SCOPED CREDENTIAL [https://<storage-account-name>.blob.core.windows.net/<container-name>] WITH IDENTITY = 'MANAGED IDENTITY';
Before executing this batch, make the following change:
- In all three occurrences of
https://<storage-account-name>.blob.core.windows.net/<container-name>, replace<storage-account-name>with the name of your storage account, and replace<container-name>with the name of your container.
Grant access using a SAS token
In the Azure portal, navigate to the storage account and container that you created. Select the container, and navigate to Settings > Shared access tokens.
The SAS token must satisfy the following requirements:
- Permissions set to
Read,Write,Delete,List. - The Start time and Expiry time must encompass the lifetime of the event session. The SAS token you create only works within this time interval.
- Have no IP address restrictions.
Select the Generate SAS token and URL button. The SAS token is in the Blob SAS token box. You can copy it to use in the next step.
Important
The SAS token provides read and write access to this container. Treat it as you would treat a password or any other secret.

- Permissions set to
Create a credential to store the SAS token.
Store the SAS token in a database-scoped credential. Using a client tool such as SSMS, open a new query window, connect to the database where you create the event session, and paste the following T-SQL batch. Make sure you're connected to your user database, and not to the
masterdatabase.Note
Executing the following T-SQL batch requires the
CONTROLdatabase permission. By default, the permission is held by the database owner (dbo), by the members of thedb_ownerdatabase role, and by the administrator of the logical server./* Create a master key to protect the secret of the credential */ IF NOT EXISTS (SELECT 1 FROM sys.symmetric_keys WHERE name = '##MS_DatabaseMasterKey##') CREATE MASTER KEY; /* (Re-)create a database scoped credential if needed. */ IF EXISTS ( SELECT 1 FROM sys.database_credentials WHERE name = 'https://<storage-account-name>.blob.core.windows.net/<container-name>' ) DROP DATABASE SCOPED CREDENTIAL [https://<storage-account-name>.blob.core.windows.net/<container-name>]; /* The name of the credential must match the URL of the blob container. The secret is the SAS token for the container. */ CREATE DATABASE SCOPED CREDENTIAL [https://<storage-account-name>.blob.core.windows.net/<container-name>] WITH IDENTITY = 'SHARED ACCESS SIGNATURE', SECRET = '<sas-token>';Before executing this batch, make the following changes:
- In all three occurrences of
https://<storage-account-name>.blob.core.windows.net/<container-name>, replace<storage-account-name>with the name of your storage account, and replace<container-name>with the name of your container. - In the
SECRETclause, replace<sas-token>with the SAS token you copied in the previous step.
- In all three occurrences of

Create, start, and stop an event session
Once the credential is created, you can create the event session. Unlike creating the credential, creating an event session doesn't require the CONTROL permission. Once the credential is created, you can create event sessions even if you have more restricted permissions. See Permissions for the specific permissions needed.
In SQL Server Management Studio (SSMS), connect to the Azure SQL Database logical server.
Expand the Extended Events node under the Management folder.
Right-click on the Sessions folder, and select New Session....
On the General page, enter a name for the session, which will be
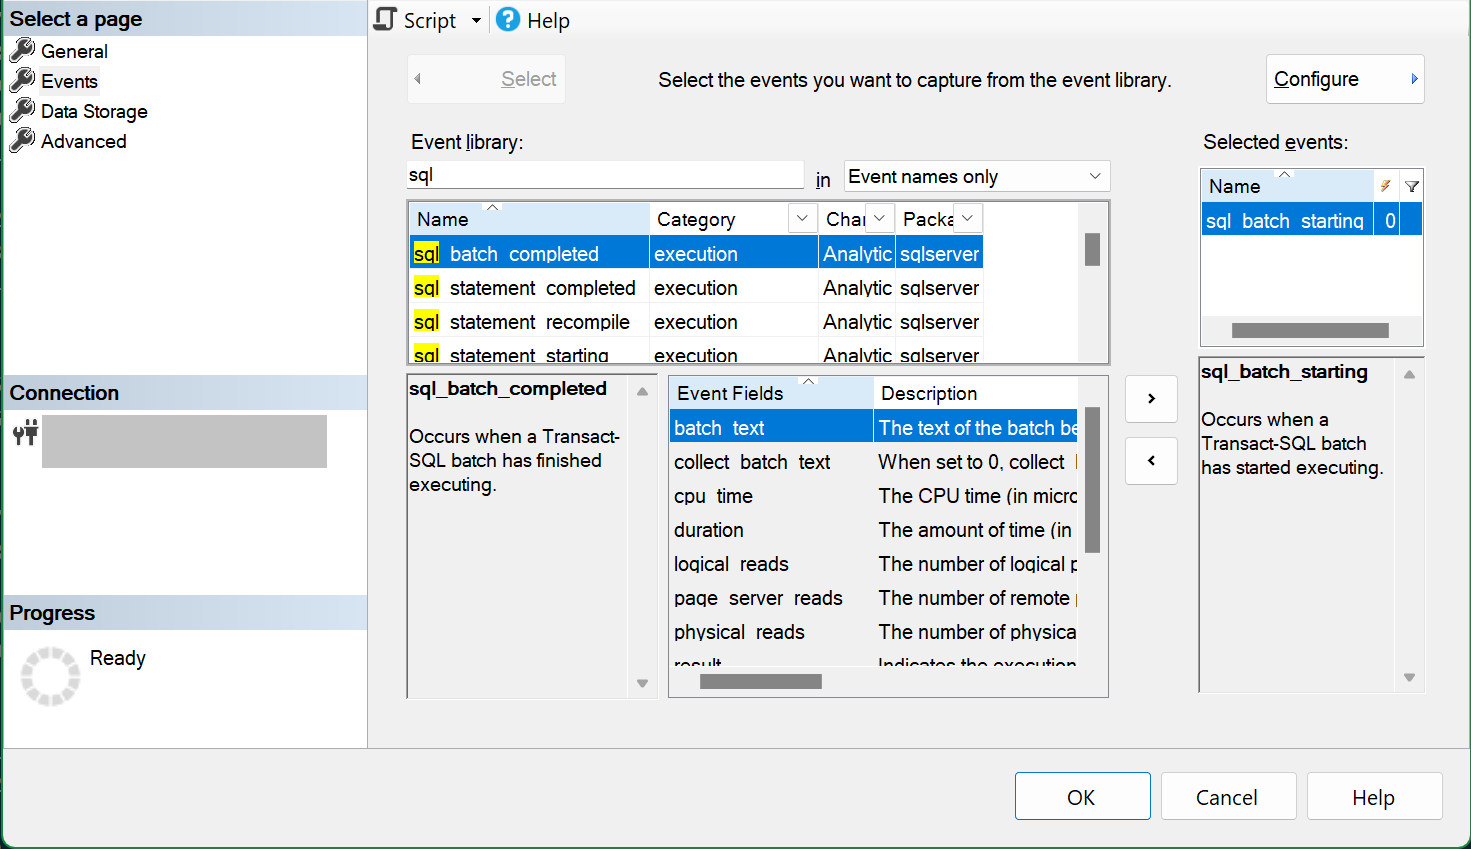
example-sessionfor the following code sample.On the Events page, select one or more events to add to the session. In this example, we selected the
sql_batch_startingevent.On the Data Storage page, select
event_fileas the target type.- For a local event file, select the local file target.
- For an event file blob stored in Azure Storage, paste the URL of the storage container in the Storage URL box. Type a forward slash (
/) at the end of this URL, followed by the file (blob) name. For example,https://<storage-account-name>.blob.core.windows.net/<container-name>/example-session.xel.
On the Data Storage page, select
event_fileas the target type, and paste the URL of the storage container in the Storage URL box. Type a forward slash (/) at the end of this URL, followed by the file (blob) name. In our example, the blob name isexample-session.xel, and the entire URL ishttps://<storage-account-name>.blob.core.windows.net/<container-name>/example-session.xel.Note
For SQL Managed Instance, instead of pasting the storage container URL on the Data storage page, use the Script button to create a T-SQL script of the session. Specify the container URL as the value for the
filenameargument, similar to the SQL Managed Instance example below, and execute the script to create the session.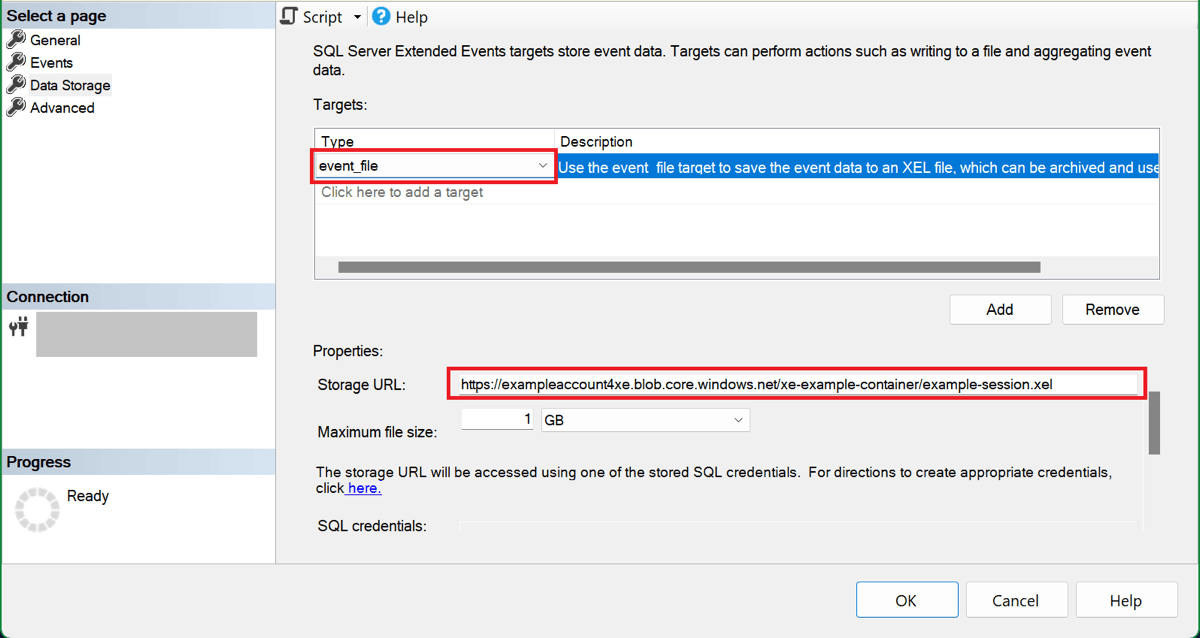
Now that the session is configured, you can select the Script button to create a T-SQL script of the session, to save it for later. Here's the script for our example session:
CREATE EVENT SESSION [example-session] ON DATABASE
ADD EVENT sqlserver.sql_batch_starting
ADD TARGET package0.event_file
    (SET filename=N'https://<storage-account-name>.blob.core.windows.net/<container-name>/example-session.xel');
GO


Select OK to create the session.
In Object Explorer, expand the Sessions folder to see the event session you created. By default, the session isn't started when it's created. To start the session, right-click on the session name, and select Start Session. You can later stop it by similarly selecting Stop Session, once the session is running.
As T-SQL batches are executed, the session writes events to the example-session.xel blob in the storage container.
To stop the session, right-click it in Object Explorer, and select Stop Session.
Troubleshoot event sessions with an event_file target in Azure Storage
The following list contains errors that you might encounter when starting an extended event session that uses Azure Storage, with the possible explanations for the error.
- The operating system returned error 5: 'Access is denied.'
- If using managed identity authentication:
- The managed identity used by the database engine doesn't have the required RBAC role assignment. For more information, see Grant access using managed identity.
- The storage account firewall is enabled and an exception to allow trusted Azure services to access the storage account is also enabled, but a
Microsoft.Sql/serversresource instance for the logical server hasn't been added to the list of resource instances that are granted access. For more information, see Grant access from Azure resource instances. - If using a network security perimeter with enforced mode, the database and the storage account aren't in the same perimeter.
- If using SAS token authentication:
- The storage account firewall is enabled. This is not supported for event sessions that use SAS token authentication.
- The SAS token doesn't have sufficient permissions, or has expired. For more information, see Grant access using a SAS token.
- If using a network security perimeter with enforced mode, access rules to allow unrestricted outbound communication from the database and unrestricted inbound communication to the storage account aren't in place.
- If using managed identity authentication:
- The operating system returned error 86: 'The specified network password is not correct.'
- There is no database-scoped credential (for Azure SQL Database) or server-scoped credential (for Azure SQL Managed Instance or SQL Server) with the name matching the blob container URL. For more information, see the examples to Grant access using managed identity or Grant access using a SAS token.
- The credential name ends with a slash (
/). The credential name should end with the container name not including the trailing slash.
- The operating system returned error 3: 'The system cannot find the path specified.'
- The container specified in the blob container URL doesn't exist.
- The operating system returned error 13: 'The data is invalid.'
- There is an immutability policy on the blob container. Immutable storage isn't supported for event sessions.
- The storage account has the hierarchical namespace enabled. Storage accounts with hierarchical namespace enabled aren't supported for event sessions.
View event data
You can view event data in the SQL Server Management Studio (SSMS) event viewer UI, where you can use filters and aggregations to analyze the data you captured. For more information on using the event viewer in SSMS, see View event data in SQL Server Management Studio.
View event data using T-SQL
To read event session data using T-SQL, use the sys.fn_xe_file_target_read_file() function. To use this function in a database or instance different from the one where the event session is created, you need to grant access on the container to the Database Engine on the storage container with the event data blobs. See Grant access using managed identity or Grant access using a SAS token.
For a more detailed walkthrough, see Create an event session in SSMS.
Download xel files from Azure storage
Tip
If you use SSMS v19.2 or later, you do not need to download xel files as described in this section. In these versions, SSMS reads the xel files for each session directly from the Azure Storage container. For more information, see the Improving Extended Events in Azure SQL blog.
Download the xel blob for the session from the storage container and save it as a local file. In Azure portal, find the storage account you used, select Containers under Data storage, and select the container you created for your event session. The blob for the session has the session name as the first part of its name, with a numeric suffix. Select the ellipsis (...) to show the context menu for the blob, and select Download.
You can install Azure Storage Explorer to download multiple xel blobs in one operation.
Once the xel file is downloaded, open it in SSMS. On the SSMS main menu, go to File and select Open. If you have a single xel file, select File... and browse to the file you downloaded. If you have multiple xel files generated by the same event session (known as rollover files), you can use the Merge Extended Event Files... dialog to open all of them in the event viewer.