Note
Access to this page requires authorization. You can try signing in or changing directories.
Access to this page requires authorization. You can try changing directories.
Applies to: ![]() Azure SQL Managed Instance
Azure SQL Managed Instance
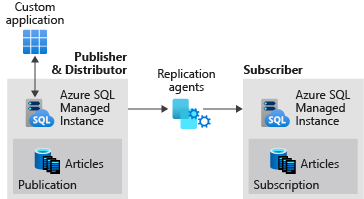
Transactional replication allows you to replicate data from one database to another hosted on either SQL Server or Azure SQL Managed Instance. SQL Managed Instance can be a publisher, distributor, or subscriber in the replication topology. See transactional replication configurations for available configurations.
In this tutorial, you learn how to:
- Configure a SQL managed instance as a replication publisher and distributor.
- Configure a SQL managed instance as a replication subscriber.
This tutorial is intended for an experienced audience and assumes that the user is familiar with deploying and connecting to both SQL managed instances and SQL Server VMs within Azure.
Note
This article describes the use of transactional replication in Azure SQL Managed Instance. It's unrelated to failover groups, an Azure SQL Managed Instance feature that allows you to create complete readable replicas of individual instances. There are other considerations when configuring transactional replication with failover groups.
Requirements
Configuring SQL Managed Instance to function as a publisher and/or a distributor requires:
- The publisher SQL managed instance is on the same virtual network as the distributor and the subscriber, or VNet peering or VPN gateways have been configured between the virtual networks of all three entities.
- Connectivity uses SQL Authentication between replication participants.
- An Azure storage account share for the replication working directory.
- Port 445 (TCP outbound) is open in the security rules of NSG for the SQL managed instances to access the Azure file share. If you encounter the error
failed to connect to azure storage <storage account name> with os error 53, you'll need to add an outbound rule to the NSG of the appropriate SQL Managed Instance subnet.
1 - Create a resource group
Use the Azure portal to create a resource group with the name SQLMI-Repl.
2 - Create SQL managed instances
Use the Azure portal to create two SQL managed instances on the same virtual network and subnet. For example, name the two SQL managed instances:
sql-mi-publisher(along with some characters for randomization)sql-mi-subscriber(along with some characters for randomization)
You'll also need to Configure an Azure VM to connect to your SQL managed instances.
3 - Create an Azure storage account
Create an Azure storage account for the working directory, and then create a file share within the storage account.
Copy the file share path in the format of:
\\storage-account-name.file.core.windows.net\file-share-name
Example: \\replstorage.file.core.windows.net\replshare
Copy the storage access keys in the format of:
DefaultEndpointsProtocol=https;AccountName=<Storage-Account-Name>;AccountKey=****;EndpointSuffix=core.windows.net
Example:
DefaultEndpointsProtocol=https;AccountName=replstorage;AccountKey=123456789aBcDeFgHiJkLmNoPqRsTuVwXyZ==;EndpointSuffix=core.windows.net
For more information, see Manage storage account access keys.
4 - Create a publisher database
Connect to your publisher SQL managed instance (sql-mi-publisher) using SQL Server Management Studio, and run the following Transact-SQL (T-SQL) code to create your publisher database:
USE [master]
GO

CREATE DATABASE [ReplTran_PUB]
GO

USE [ReplTran_PUB]
GO
CREATE TABLE ReplTest (
  ID INT NOT NULL PRIMARY KEY,
  c1 VARCHAR(100) NOT NULL,
  dt1 DATETIME NOT NULL DEFAULT getdate()
)
GO

USE [ReplTran_PUB]
GO

INSERT INTO ReplTest (ID, c1) VALUES (6, 'pub')
INSERT INTO ReplTest (ID, c1) VALUES (2, 'pub')
INSERT INTO ReplTest (ID, c1) VALUES (3, 'pub')
INSERT INTO ReplTest (ID, c1) VALUES (4, 'pub')
INSERT INTO ReplTest (ID, c1) VALUES (5, 'pub')
GO
SELECT * FROM ReplTest
GO
5 - Create a subscriber database
Connect to your subscriber SQL managed instance (sql-mi-subscriber) using SQL Server Management Studio, and run the following T-SQL code to create your empty subscriber database:
USE [master]
GO

CREATE DATABASE [ReplTran_SUB]
GO

USE [ReplTran_SUB]
GO
CREATE TABLE ReplTest (
  ID INT NOT NULL PRIMARY KEY,
  c1 VARCHAR(100) NOT NULL,
  dt1 DATETIME NOT NULL DEFAULT getdate()
)
GO
6 - Configure distribution
Connect to your publisher SQL managed instance (sql-mi-publisher) using SQL Server Management Studio, and run the following T-SQL code to configure your distribution database.
USE [master]
GO

EXEC sp_adddistributor @distributor = @@ServerName;
EXEC sp_adddistributiondb @database = N'distribution';
GO
7 - Configure publisher to use distributor
On your publisher SQL managed instance (sql-mi-publisher), change the query execution to SQLCMD mode, and run the following code to register the new distributor with your publisher.
:setvar username loginUsedToAccessSourceManagedInstance
:setvar password passwordUsedToAccessSourceManagedInstance
:setvar file_storage "\\storage-account-name.file.core.windows.net\file-share-name"
-- example: file_storage "\\replstorage.file.core.windows.net\replshare"
:setvar file_storage_key "DefaultEndpointsProtocol=https;AccountName=<Storage-Account-Name>;AccountKey=****;EndpointSuffix=core.windows.net"
-- example: file_storage_key "DefaultEndpointsProtocol=https;AccountName=replstorage;AccountKey=123456789aBcDeFgHiJkLmNoPqRsTuVwXyZ==;EndpointSuffix=core.windows.net"

USE [master]
EXEC sp_adddistpublisher
  @publisher = @@ServerName,
  @distribution_db = N'distribution',
  @security_mode = 0,
  @login = N'$(username)',
  @password = N'$(password)',
  @working_directory = N'$(file_storage)',
  @storage_connection_string = N'$(file_storage_key)'; -- Remove this parameter for on-premises publishers
Note
Be sure to use only backslashes (\) for the file_storage parameter. Using a forward slash (/) can cause an error when connecting to the file share.
This script configures a local publisher on the SQL managed instance, adds a linked server, and creates a set of jobs for the SQL Server agent.
8 - Create publication and subscriber
Using SQLCMD mode, run the following T-SQL script to enable replication for your database, and configure replication between your publisher, distributor, and subscriber.
-- Set variables
:setvar username sourceLogin
:setvar password sourcePassword
:setvar source_db ReplTran_PUB
:setvar publication_name PublishData
:setvar object ReplTest
:setvar schema dbo
:setvar target_server "sql-mi-subscriber.wdec33262scj9dr27.database.windows.net"
:setvar target_username targetLogin
:setvar target_password targetPassword
:setvar target_db ReplTran_SUB

-- Enable replication for your source database
USE [$(source_db)]
EXEC sp_replicationdboption
  @dbname = N'$(source_db)',
  @optname = N'publish',
  @value = N'true';

-- Create your publication
EXEC sp_addpublication
  @publication = N'$(publication_name)',
  @status = N'active';

-- Configure your log reader agent
EXEC sp_changelogreader_agent
  @publisher_security_mode = 0,
  @publisher_login = N'$(username)',
  @publisher_password = N'$(password)',
  @job_login = N'$(username)',
  @job_password = N'$(password)';

-- Add the publication snapshot
EXEC sp_addpublication_snapshot
  @publication = N'$(publication_name)',
  @frequency_type = 1,
  @publisher_security_mode = 0,
  @publisher_login = N'$(username)',
  @publisher_password = N'$(password)',
  @job_login = N'$(username)',
  @job_password = N'$(password)';

-- Add the ReplTest table to the publication
EXEC sp_addarticle
  @publication = N'$(publication_name)',
  @type = N'logbased',
  @article = N'$(object)',
  @source_object = N'$(object)',
  @source_owner = N'$(schema)';

-- Add the subscriber
EXEC sp_addsubscription
  @publication = N'$(publication_name)',
  @subscriber = N'$(target_server)',
  @destination_db = N'$(target_db)',
  @subscription_type = N'Push';

-- Create the push subscription agent
EXEC sp_addpushsubscription_agent
  @publication = N'$(publication_name)',
  @subscriber = N'$(target_server)',
  @subscriber_db = N'$(target_db)',
  @subscriber_security_mode = 0,
  @subscriber_login = N'$(target_username)',
  @subscriber_password = N'$(target_password)',
  @job_login = N'$(username)',
  @job_password = N'$(password)';

-- Initialize the snapshot
EXEC sp_startpublication_snapshot
@publication = N'$(publication_name)';
9 - Modify agent parameters
Azure SQL Managed Instance is currently experiencing some backend issues with connectivity with the replication agents. While this issue is being addressed, the workaround is to increase the login timeout value for the replication agents.
Run the following T-SQL command on the publisher to increase the login timeout:
-- Increase login timeout to 150s
update msdb..sysjobsteps set command = command + N' -LoginTimeout 150'
where subsystem in ('Distribution','LogReader','Snapshot') and command not like '%-LoginTimeout %'
Run the following T-SQL command again if needed to set the login timeout back to the default value:
-- Increase login timeout to 30
update msdb..sysjobsteps set command = command + N' -LoginTimeout 30'
where subsystem in ('Distribution','LogReader','Snapshot') and command not like '%-LoginTimeout %'
To apply these changes restart all three agents.
10 - Test replication
Once replication is configured, you can test it by inserting new items on the publisher and watching the changes propagate to the subscriber.
Run the following T-SQL snippet to view the rows on the subscriber:
select * from dbo.ReplTest
Run the following T-SQL snippet to insert more rows on the publisher, and then check the rows again on the subscriber.
INSERT INTO ReplTest (ID, c1) VALUES (15, 'pub')
Clean up resources
To drop the publication, run the following T-SQL command:
-- Drops the publication
USE [ReplTran_PUB]
EXEC sp_droppublication @publication = N'PublishData'
GO
To remove the replication option from the database, run the following T-SQL command:
-- Disables publishing of the database
USE [ReplTran_PUB]
EXEC sp_removedbreplication
GO
To disable publishing and distribution, run the following T-SQL command:
-- Drops the distributor
USE [master]
EXEC sp_dropdistributor @no_checks = 1
GO
You can clean up your Azure resources by deleting the SQL Managed Instance resources from the resource group and then deleting the resource group SQLMI-Repl.