Note
Access to this page requires authorization. You can try signing in or changing directories.
Access to this page requires authorization. You can try changing directories.
Applies to: ![]() SQL Server on Azure VM
SQL Server on Azure VM
This tutorial explains how to configure an Always On availability group replica for SQL Server on Azure Virtual Machines (VMs) in an Azure region that is remote to the primary replica. You can use this configuration for disaster recovery (DR).
You can also use the steps in this article to extend an existing on-premises availability group to Azure.
This tutorial builds on the tutorial to manually deploy an availability group in multiple subnets in a single region. Mentions of the local region in this article refer to the virtual machines and availability group already configured in the first region. The remote region is the new infrastructure that's being added in this tutorial.
Overview
The following image shows a common deployment of an availability group on Azure virtual machines:
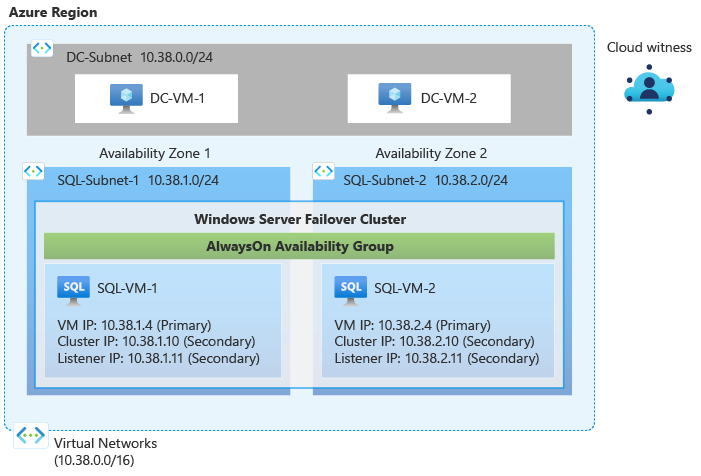
In the deployment shown in the diagram, all virtual machines are in one Azure region. The availability group replicas can have synchronous commit with automatic failover on SQL-VM-1 and SQL-VM-2. To build this architecture, see the availability group template or tutorial.
This architecture is vulnerable to downtime if the Azure region becomes inaccessible. To overcome this vulnerability, add a replica in a different Azure region. The following diagram shows how the new architecture looks:
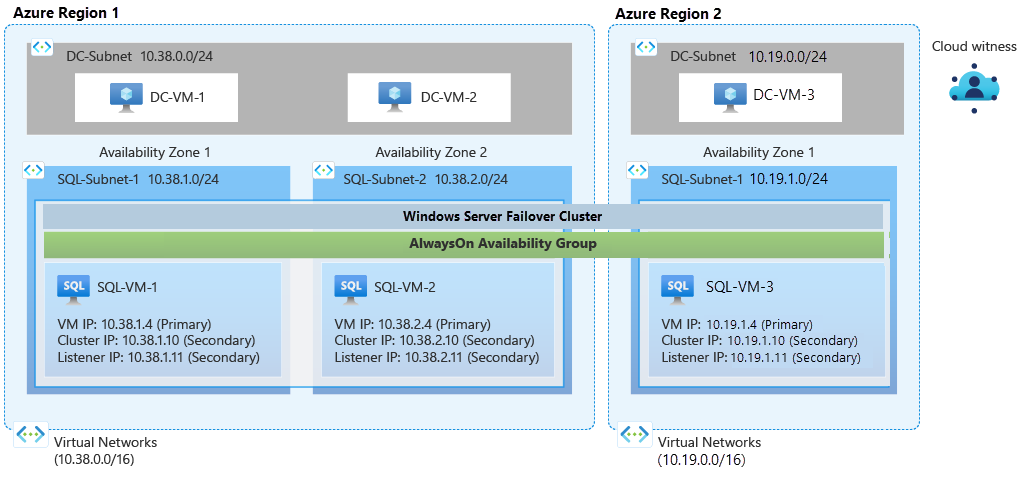
The diagram shows a new virtual machine called SQL-VM-3. SQL-VM-3 is in a different Azure region. It's added to the Windows Server failover cluster and can host an availability group replica. In this architecture, the replica in the remote region is normally configured with asynchronous commit availability mode and manual failover mode.
Note
An Azure availability set is required when more than one virtual machine is in the same region. If only one virtual machine is in the region, the availability set is not required.
You can place a virtual machine in an availability set only at creation time. If the virtual machine is already in an availability set, you can add a virtual machine for an additional replica later.
When availability group replicas are on Azure virtual machines in different Azure regions, you can connect the virtual networks by using virtual network peering or a site-to-site VPN gateway.
Important
This architecture incurs outbound data charges for data replicated between Azure regions. See Bandwidth pricing.
Create the network and subnet
Before you create a virtual network and subnet in a new region, decide on the address space, subnet network, cluster IP, and availability group listener IP addresses that you'll use for the remote region.
The following table lists details for the local (current) region and what will be set up in the new remote region.
| Type | Local | Remote region |
|---|---|---|
| Address space | 10.38.0.0/16 | 10.19.0.0/16 |
| DC Subnet network | 10.38.0.0/24 | 10.19.0.0/24 |
| SQL Subnet 1 network | 10.38.1.0/24 | 10.19.1.0/24 |
| SQL Subnet 2 network | 10.38.2.0/24 | n/a |
| Cluster IP 1 | 10.38.1.10 | 10.19.1.10 |
| Cluster IP 2 | 10.38.2.10 | n/a |
| Availability group listener IP 1 | 10.38.1.11 | 10.19.1.11 |
| Availability group listener IP 1 | 10.38.2.11 | n/a |
To create a virtual network and subnet in the new region in the Azure portal:
Go to your resource group in the Azure portal and select + Create.
Search for virtual network in the Marketplace search box, and then select the virtual network tile from Microsoft.
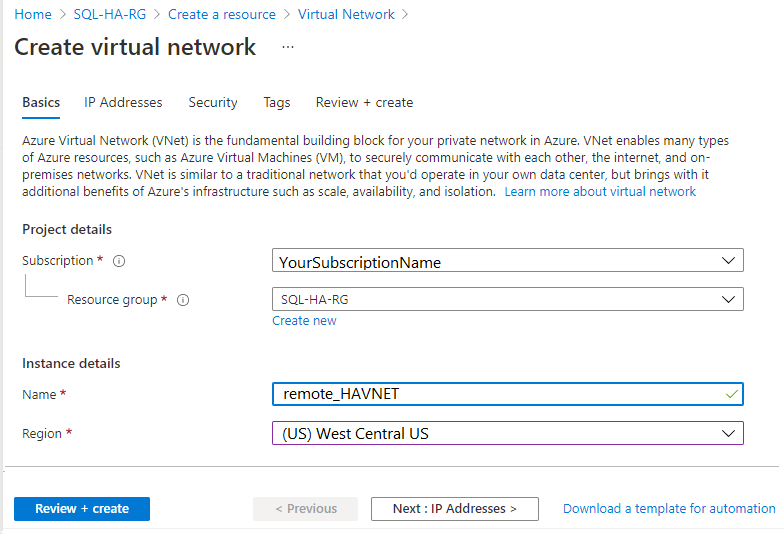
On the Create virtual network page, select Create. Then enter the following information on the Basics tab:
- Under Project details, for Subscription, select the appropriate Azure subscription. For Resource group, select the resource group that you created previously, such as SQL-HA-RG.
- Under Instance details, provide a name for your virtual network, such as remote_HAVNET. Then choose a new remote region.
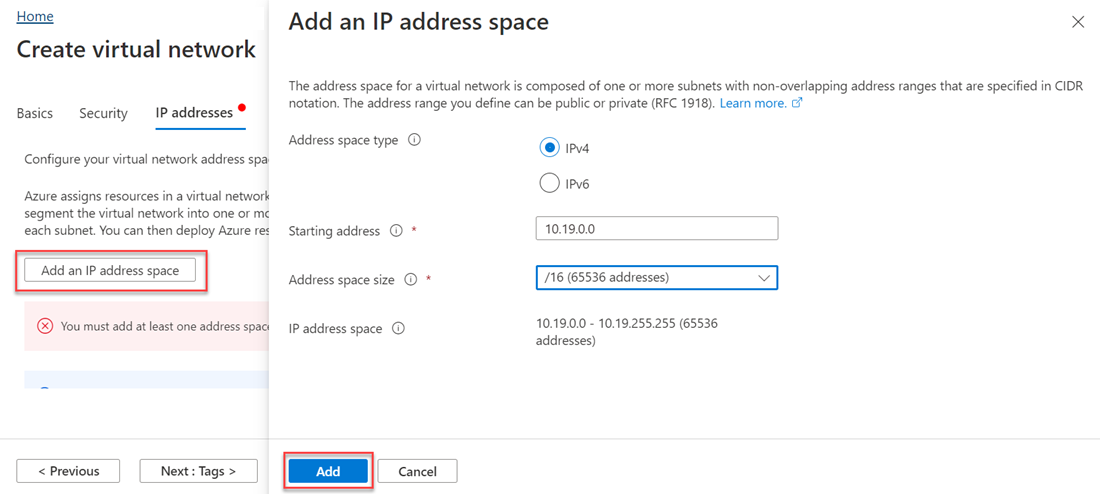
On the IP addresses tab, select the ellipsis (...) next to + Add a subnet. Select Delete address space to remove the existing address space, if you need a different address range.

Select Add an IP address space to open the pane to create the address space that you need. This tutorial uses the address space of the remote region: 10.19.0.0/16. Select Add.
Add subnets for the domain controller and the SQL Server.
Select + Add a subnet
Provide a value for the Subnet name, such as DC-Subnet.
Provide a unique subnet address range within the virtual network address space.
For example, if your address range is 10.19.0.0/16, enter these values for the DC-Subnet subnet: 10.19.1.0 for Starting address and /24 for Subnet size.
Select Add to add your new subnet.
Repeat the process for the SQL-subnet1. When complete, you should have a subnet for the domain controller in the remote region and a subnet for each SQL Server in the remote region. For example, in this tutorial, the remote region virtual network contains:
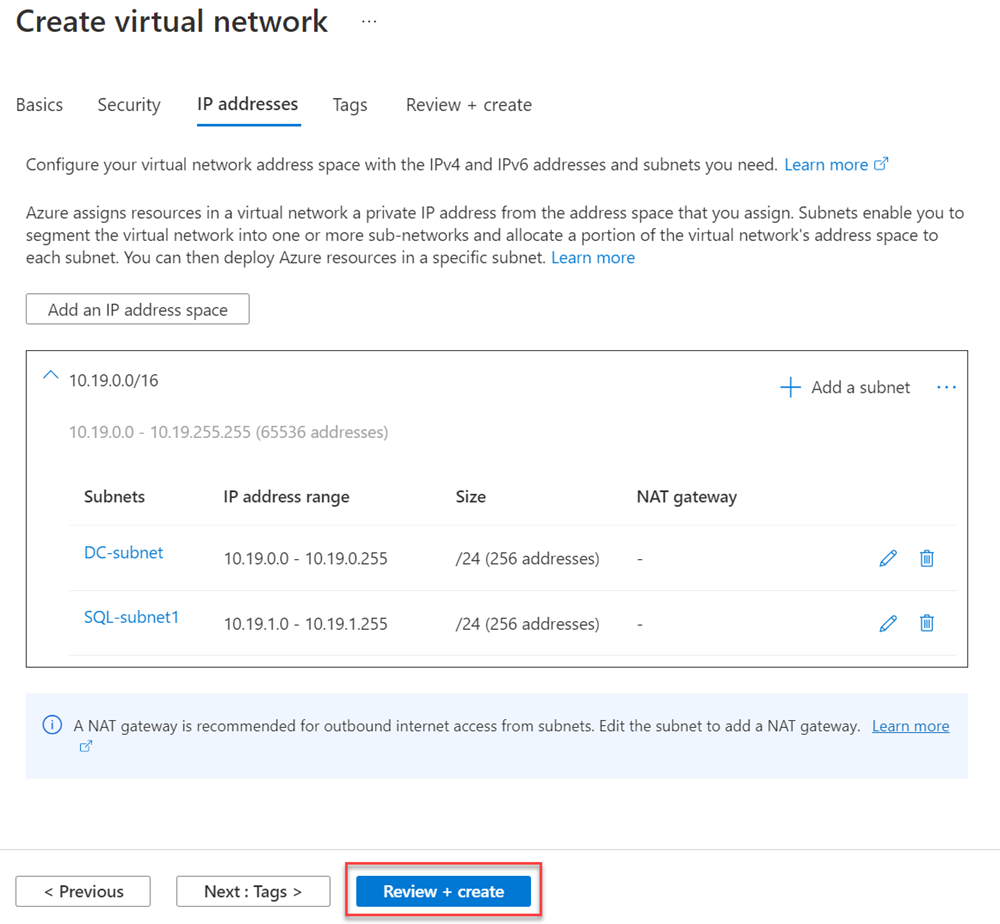
Select Review + create to create the virtual network.


Configure virtual network DNS
After you create the virtual network, configure it to use the DNS server from the local or primary domain controller.
To configure your virtual network for DNS, follow these steps:
- Go to your resource group in the Azure portal, and select your virtual network, such as remote-HAVNET.
- Select DNS servers under the Settings pane and then select Custom.
- Enter the private IP address you identified previously in the IP Address field, such as
10.38.0.4. - Select Save.
Connect the virtual networks in the two Azure regions
After you create the new virtual network and subnet, you're ready to connect the two regions so they can communicate with each other. There are two methods to do this:
Connect virtual networks with virtual network peering by using the Azure portal (recommended)
In some cases, you might have to use PowerShell to create the connection between virtual networks. For example, if you use different Azure accounts, you can't configure the connection in the portal. In this case, review Configure a network-to-network connection by using the Azure portal.
Configure a site-to-site VPN gateway connection by using the Azure portal
This tutorial uses virtual network peering. To configure virtual network peering:
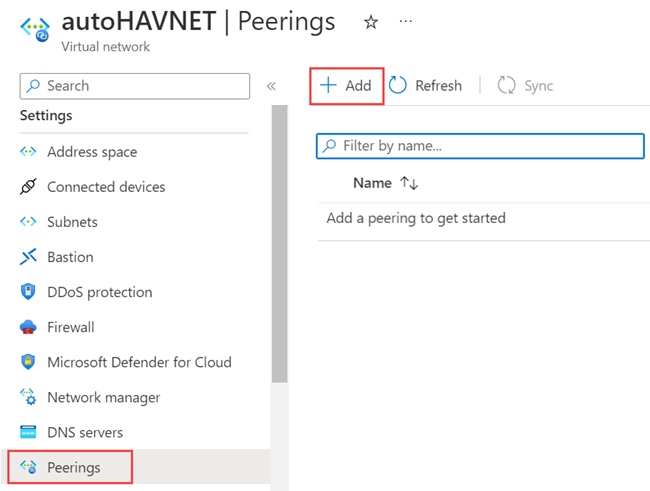
In the search box at the top of the Azure portal, type autoHAVNET, which is the virtual network in your local region. When autoHAVNET appears in the search results, select it.
Under Settings, select Peerings, and then select + Add.
Enter or select the following information, accept the defaults for the remaining settings, and then select Add.
Setting Value This virtual network Peering link name Enter autoHAVNET-remote_HAVNET for the name of the peering from autoHAVNET to the remote virtual network. Remote virtual network Peering link name Enter remote_HAVNET-autoHAVNET for the name of the peering from the remote virtual network to autoHAVNET. Subscription Select your subscription for the remote virtual network. Virtual network Select remote_HAVNET for the name of the remote virtual network. The remote virtual network can be in the same region of autoHAVNET or in a different region. 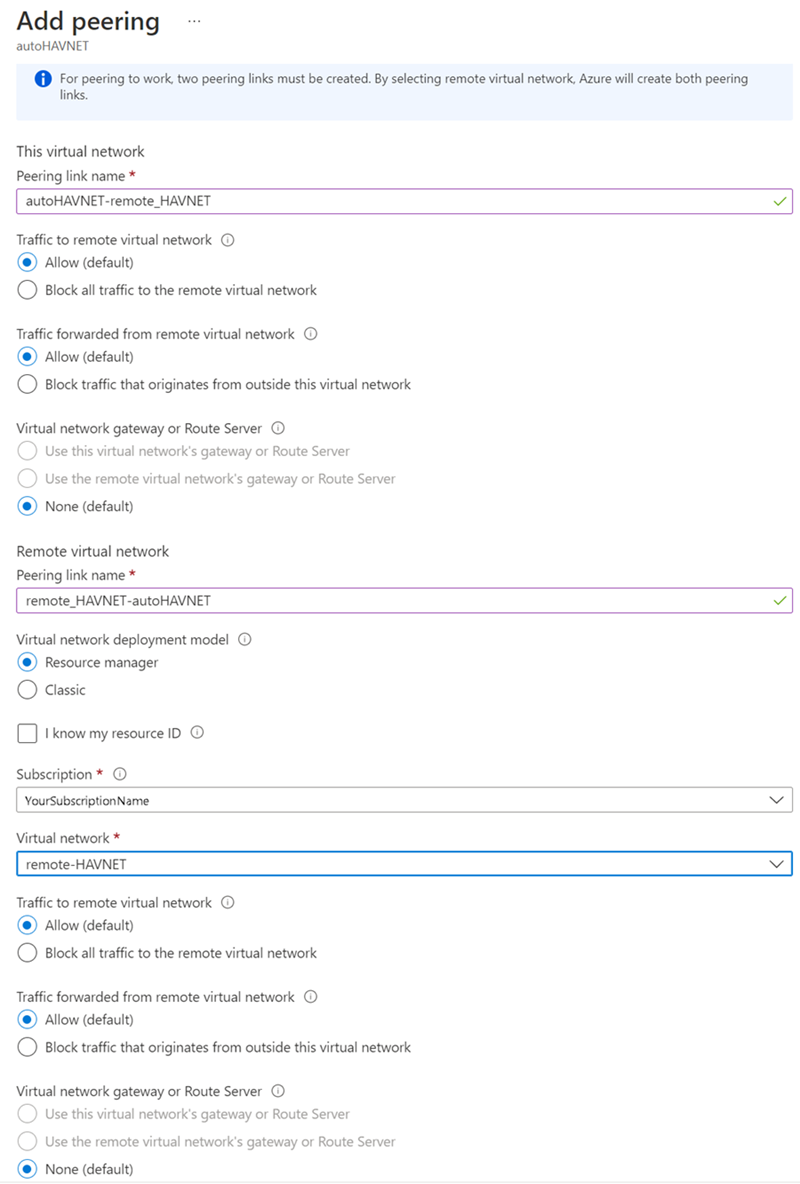
On the Peerings page, Peering status is Connected.
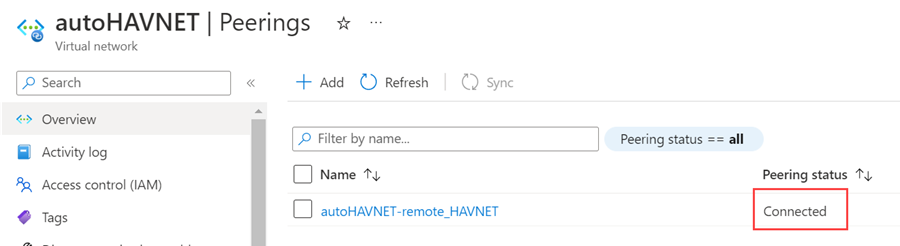
If you don't see a Connected status, select the Refresh button.


Create a domain controller
A domain controller in the new region is necessary to provide authentication if the primary site isn't available. To create the domain controller in the new region:
- Return to the SQL-HA-RG resource group.
- Select + Create.
- Type Windows Server 2016 Datacenter, and then select the Windows Server 2016 Datacenter result.
- In Windows Server 2016 Datacenter, verify that the deployment model is Resource Manager, and then select Create.
The following table shows the settings for the two machines:
| Setting | Value |
|---|---|
| Name | Remote domain controller: DC-VM-3 |
| VM disk type | SSD |
| User name | DomainAdmin |
| Password | Contoso!0000 |
| Subscription | Your subscription |
| Resource group | SQL-HA-RG |
| Location | Your location |
| Size | DS1_V2 |
| Storage | Use managed disks: Yes |
| Virtual network | remote_HAVNET |
| Subnet | DC-subnet |
| Public IP address | Same name as the VM |
| Network security group | Same name as the VM |
| Diagnostics | Enabled |
| Diagnostics storage account | Automatically created |
Azure creates the virtual machine.
Configure the domain controller
In the following steps, configure the DC-VM-3 machine as a domain controller for corp.contoso.com:
Set preferred DNS server address
The preferred DNS server address shouldn't be updated directly within a VM, it should be edited from the Azure portal, or PowerShell, or Azure CLI. The steps below are to make the change inside of the Azure portal:
Sign-in to the Azure portal.
In the search box at the top of the portal, enter Network interface. Select Network interfaces in the search results.
Select the network interface for the second domain controller that you want to view or change settings for from the list.
In Settings, select DNS servers.
Since this domain controller isn't in the same virtual network as the primary domain controller select Custom and input the IP address of the local domain controller, such as
10.38.0.4. The DNS server address you specify is assigned only to this network interface and overrides any DNS setting for the virtual network the network interface is assigned to.Select Save.
Return to the virtual machine in the Azure portal and restart the VM. Once the virtual machine has restarted, you can join the VM to the domain.
Join the domain
Next, join the corp.contoso.com domain. To do so, follow these steps:
- Remotely connect to the virtual machine with Bastion using the BUILTIN\DomainAdmin account.
- Open Server Manager, and select Local Server.
- Select WORKGROUP.
- In the Computer Name section, select Change.
- Select the Domain checkbox and type corp.contoso.com in the text box. Select OK.
- In the Windows Security popup dialog, specify the credentials for the default domain administrator account (CORP\DomainAdmin) and the password (Contoso!0000).
- When you see the "Welcome to the corp.contoso.com domain" message, select OK.
- Select Close, and then select Restart Now in the popup dialog.
Configure domain controller
Once your server has joined the domain, you can configure it as the second domain controller. To do so, follow these steps:
If you're not already connected, open Bastion session to your secondary domain controller, and open Server Manager Dashboard (which may be open by default).
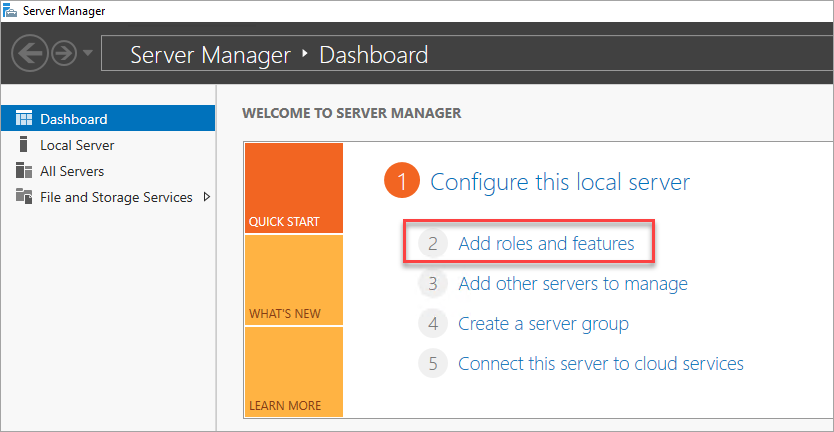
Select the Add roles and features link on the dashboard.
Select Next until you get to the Server Roles section.
Select the Active Directory Domain Services and DNS Server roles. When you're prompted, add any additional features that are required by these roles.
After the features finish installing, return to the Server Manager dashboard.
Select the new AD DS option on the left-hand pane.
Select the More link on the yellow warning bar.
In the Action column of the All Server Task Details dialog, select Promote this server to a domain controller.
Under Deployment Configuration, select Add a domain controller to an existing domain.
Select Select.
Connect by using the administrator account (CORP.CONTOSO.COM\domainadmin) and password (Contoso!0000).
In Select a domain from the forest, choose your domain and then select OK.
In Domain Controller Options, use the default values and set a DSRM password.
Note
The DNS Options page might warn you that a delegation for this DNS server can't be created. You can ignore this warning in non-production environments.
Select Next until the dialog reaches the Prerequisites check. Then select Install.
After the server finishes the configuration changes, restart the server.
Add second DC IP address to DNS
After your remote domain controller is configured, follow the same steps as before to identify the private IP address of the VM, and add the private IP address as a secondary custom DNS server in the virtual networks (both the local and remote virtual networks) of your resource group. Adding the secondary DNS server in the Azure portal enables redundancy of the DNS service.
Create a SQL Server VM
After the domain controller restarts, the next step is to create a SQL Server virtual machine in the new region.
Before you proceed, consider the following design decisions:
Availability - Availability Zones
For the highest level of redundancy, resiliency and availability deploy the VMs within separate Availability Zones. Availability Zones are unique physical locations within an Azure region. Each zone is made up of one or more datacenters with independent power, cooling, and networking. For Azure regions that don't support Availability Zones yet, use Availability Sets instead. Place all the VMs within the same Availability Set.
Storage - Azure Managed Disks
For the virtual machine storage, use Azure Managed Disks. Microsoft recommends Managed Disks for SQL Server virtual machines as they handle storage behind the scenes. For more information, see Azure Managed Disks Overview.
Network - Private IP addresses in production
For the virtual machines, this tutorial uses public IP addresses. A public IP address enables remote connection directly to the virtual machine over the internet and makes configuration steps easier. In production environments, Microsoft recommends only private IP addresses in order to reduce the vulnerability footprint of the SQL Server instance VM resource.
Network - Single NIC per server
Use a single NIC per server (cluster node). Azure networking has physical redundancy, which makes additional NICs unnecessary on a failover cluster deployed to an Azure virtual machine. The cluster validation report will warn you that the nodes are reachable only on a single network. You can ignore this warning when your failover cluster is on Azure virtual machines.
Create and configure the SQL Server VM
To create the SQL Server VM, go back to the SQL-HA-RG resource group, and then select Add. Search for the appropriate gallery item, select Virtual Machine, and then select From Gallery. Use the information in the following table to help you create the VMs:
| Page | Setting |
|---|---|
| Select the appropriate gallery item | SQL Server 2016 SP1 Enterprise on Windows Server 2016 |
| Virtual machine configuration: Basics | Name = SQL-VM-3 User Name = DomainAdmin Password = Contoso!0000 Subscription = Your subscription Resource group = SQL-HA-RG Location = Your remote region |
| Virtual machine configuration: Size | Size = DS2_V2 (2 vCPUs, 7 GB) The size must support SSD storage (premium disk support). |
| Virtual machine configuration: Settings | Storage: Use managed disks Virtual network = remote-HAVNET Subnet = SQL-subnet1 (10.19.1.0/24) Public IP address = Automatically generated Network security group = None Monitoring Diagnostics = Enabled Diagnostics storage account = Use an automatically generated storage account |
| Virtual machine configuration: SQL Server settings | SQL connectivity = Private (within Virtual Network) Port = 1433 SQL Authentication = Disabled Storage configuration = General Automated patching = Sunday at 2:00 Automated backup = Disabled Azure Key Vault integration = Disabled |
Note
The machine size suggested here is meant for testing availability groups in Azure virtual machines. For the best performance on production workloads, see the recommendations for SQL Server machine sizes and configuration in Checklist: Best practices for SQL Server on Azure VMs.
After the VM is fully provisioned, you need to configure it, join it to the corp.contoso.com domain, and grant CORP\Install administrative rights to the machines.
Configure SQL Server VMs
After VM creation completes, configure your SQL Server VMs by adding a secondary IP address to each VM, and joining them to the domain.
Add secondary IPs to SQL Server VMs
In the multi-subnet environment, assign secondary IP addresses to each SQL Server VM to use for the availability group listener, and for Windows Server 2016 and earlier, assign secondary IP addresses to each SQL Server VM for the cluster IP address as well. Doing this negates the need for an Azure Load Balancer, as is the requirement in a single subnet environment.
On Windows Server 2016 and earlier, you need to assign an additional secondary IP address to each SQL Server VM to use for the windows cluster IP since the cluster uses the Cluster Network Name rather than the default Distributed Network Name (DNN) introduced in Windows Server 2019. With a DNN, the cluster name object (CNO) is automatically registered with the IP addresses for all the nodes of the cluster, eliminating the need for a dedicated windows cluster IP address.
If you're on Windows Server 2016 and prior, follow the steps in this section to assign a secondary IP address to each SQL Server VM for both the availability group listener, and the cluster.
Important
If you're on Windows Server 2019 or later, only assign a secondary IP address for the availability group listener, and skip the steps to assign a windows cluster IP, unless you plan to configure your cluster with a virtual network name (VNN), in which case assign both IP addresses to each SQL Server VM as you would for Windows Server 2016.
To assign additional secondary IPs to the VMs, follow these steps:
Go to your resource group in the Azure portal and select the SQL Server VM, SQL-VM-3.
Select Networking in the Settings pane, and then select the Network Interface.
On the Network Interface page, select IP configurations in the Settings pane and then choose + Add to add an additional IP address.
On the Add IP configuration page, do the following:
- Specify the Name as the Windows Cluster IP, such as windows-cluster-ip for Windows 2016 and earlier. Skip this step if you're on Windows Server 2019 or later.
- Set the Allocation to Static.
- Enter an unused IP address in the same subnet (SQL-subnet-1) as the SQL Server VM (SQL-VM-1), such as
10.19.1.10. - Leave the Public IP address at the default of Disassociate.
- Select OK to finish adding the IP configuration.
Select + Add again to configure an additional IP address for the availability group listener (with a name such as availability-group-listener), again specifying an unused IP address in SQL-subnet-1 such as
10.19.1.11.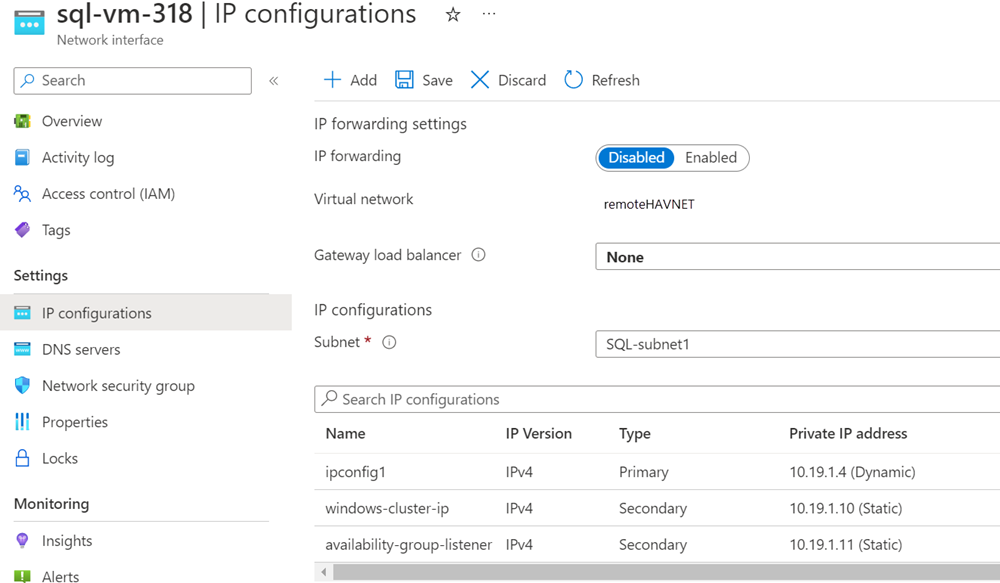

Now you're ready to join the corp.contoso.com.
Join the server to the domain
To join the VM to corp.contoso.com, use the following steps for the SQL Server VM:
- Remotely connect to the virtual machine with Bastion by using the BUILTIN\DomainAdmin account.
- In Server Manager, select Local Server.
- Select the WORKGROUP link.
- In the Computer Name section, select Change.
- Select the Domain check box, and enter corp.contoso.com in the text box. Then select OK.
- In the Windows Security pop-up dialog, specify the credentials for the default domain administrator account (CORP\DomainAdmin) and the password (Contoso!0000).
- When you see the "Welcome to the corp.contoso.com domain" message, select OK.
- Select Close, and then select Restart Now in the pop-up dialog.
Add accounts
The next task is to add the installation account as an administrator on the SQL Server VM, and then grant permission to that account and to local accounts within SQL Server. You can then update the SQL Server service account.
Add the CORP\Install user as an administrator on each cluster VM
After the SQL Server virtual machine restarts as a member of the domain, add CORP\Install as a member of the local administrators group:
Wait until the VM is restarted, and then open a Remote Desktop Protocol (RDP) connection from the primary domain controller. Sign in to SQL-VM-3 by using the CORP\DomainAdmin account.
Tip
In earlier steps, you were using the BUILTIN administrator account. Now that the server is in the domain, make sure that you sign in with the domain administrator account. In your RDP session, specify DOMAIN\username.
In Server Manager, select Tools, and then select Computer Management.
In the Computer Management window, expand Local Users and Groups, and then select Groups.
Double-click the Administrators group.
In the Administrator Properties dialog, select the Add button.
Enter the user as CORP\Install, and then select OK.
Select OK to close the Administrator Properties dialog.
Create a sign-in on each SQL Server VM for the installation account
Use the installation account (CORP\Install) to configure the availability group. This account needs to be a member of the sysadmin fixed server role on each SQL Server VM. The following steps create a sign-in for the installation account. Complete them on both SQL Server VMs.
Connect to the server through Bastion by using the <MachineName>\DomainAdmin account.
Open SQL Server Management Studio and connect to the local instance of SQL Server.
In Object Explorer, select Security.
Right-click Logins. Select New Login.
In Login - New, select Search.
Select Locations.
Enter the domain administrator's network credentials. Use the installation account (CORP\Install).
Set the sign-in to be a member of the sysadmin fixed server role.
Select OK.
Configure system account permissions
To create a system account and grant appropriate permissions, complete the following steps on each SQL Server instance:
Use the following script to create an account for
[NT AUTHORITY\SYSTEM]:USE [master] GO CREATE LOGIN [NT AUTHORITY\SYSTEM] FROM WINDOWS WITH DEFAULT_DATABASE=[master] GOGrant the following permissions to
[NT AUTHORITY\SYSTEM]:ALTER ANY AVAILABILITY GROUPCONNECT SQLVIEW SERVER STATE
The following script grants these permissions:
GRANT ALTER ANY AVAILABILITY GROUP TO [NT AUTHORITY\SYSTEM]
GO
GRANT CONNECT SQL TO [NT AUTHORITY\SYSTEM]
GO
GRANT VIEW SERVER STATE TO [NT AUTHORITY\SYSTEM]
GO
Set the SQL Server service accounts
On each SQL Server VM, complete the following steps to set the SQL Server service account. Use the accounts that you created when you configured the domain accounts.
- Open SQL Server Configuration Manager.
- Right-click the SQL Server service, and then select Properties.
- Set the account and password.
For SQL Server availability groups, each SQL Server VM needs to run as a domain account.
Add failover clustering to SQL Server VM
To add failover clustering features, complete the following steps on both SQL Server VMs:
Connect to the SQL Server virtual machine through Bastion by using the CORP\Install account. Open the Server Manager dashboard.
Select the Add roles and features link on the dashboard.

Select Next until you get to the Server Features section.
In Features, select Failover Clustering.
Add any required features.
Select Install.
Note
You can now automate this task, along with actually joining the SQL Server VMs to the failover cluster, by using the Azure CLI and Azure Quickstart Templates.
Tune network thresholds for a failover cluster
When you're running Windows failover cluster nodes in Azure VMs with SQL Server availability groups, change the cluster setting to a more relaxed monitoring state. This change will make the cluster more stable and reliable. For details, see IaaS with SQL Server: Tuning failover cluster network thresholds.
Configure the firewall on each SQL Server VM
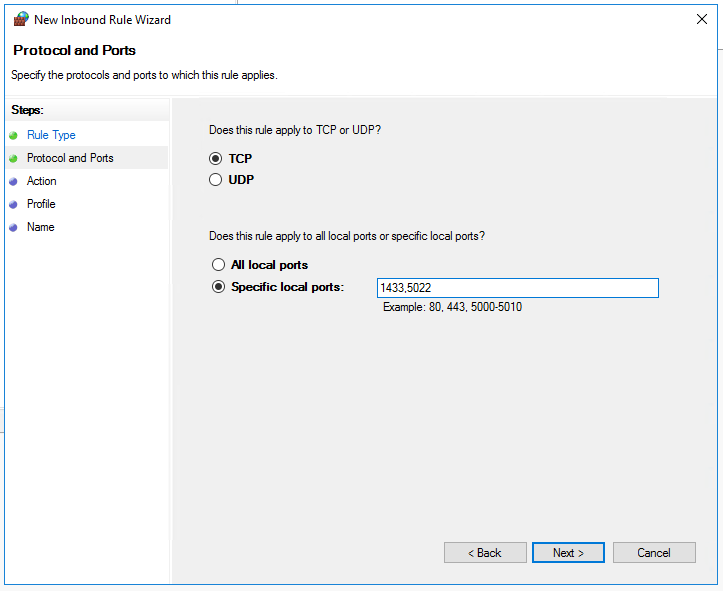
The availability group feature relies on traffic through the following TCP ports:
- SQL Server VM: Port 1433 for a default instance of SQL Server.
- Database mirroring endpoint: Any available port. Examples frequently use 5022.
Open these firewall ports on both SQL Server VMs. The method of opening the ports depends on the firewall solution that you use, and may vary from the Windows Firewall example provided in this section.
To open these ports on a Windows Firewall, follow these steps:
On the first SQL Server Start screen, launch Windows Firewall with Advanced Security.
On the left pane, select Inbound Rules. On the right pane, select New Rule.
For Rule Type, choose Port.
For the port, specify TCP and type the appropriate port numbers. See the following example:
Select Next.
On the Action page, select Allow the connection , and then select Next.
On the Profile page, accept the default settings, and then select Next.
On the Name page, specify a rule name (such as SQL Inbound) in the Name text box, and then select Finish.
Add SQL Server to the Windows Server failover cluster
The new SQL Server VM needs to be added to the Windows Server failover cluster that exists in your local region.
To add the SQL Server VM to the cluster:
Use Bastion to connect to a SQL Server VM in the existing cluster. Use a domain account that's an administrator on both SQL Server VMs and the witness server.
On the Server Manager dashboard, select Tools, and then select Failover Cluster Manager.
On the left pane, right-click Failover Cluster Manager, and then select Connect to Cluster.
In the Select Cluster window, under Cluster name, choose <Cluster on this server>. Then select OK.
In the browser tree, right-click the cluster and select Add Node.
In the Add Node Wizard, select Next.
On the Select Servers page, add the name of the new SQL Server instance. Enter the server name in Enter server name, select Add, and then select Next.
On the Validation Warning page, select No. (In a production scenario, you should perform the validation tests). Then, select Next.
On the Confirmation page, if you're using Storage Spaces, clear the Add all eligible storage to the cluster checkbox.
Warning
If you don't clear Add all eligible storage to the cluster, Windows detaches the virtual disks during the clustering process. As a result, they don't appear in Disk Manager or Explorer until the storage is removed from the cluster and reattached via PowerShell.
Select Next.
Select Finish.
Failover Cluster Manager shows that your cluster has a new node and lists it in the Nodes container.
Add the IP address for the Windows Server failover cluster
Note
On Windows Server 2019, the cluster creates a distributed server name instead of a cluster network name. If you're using Windows Server 2019, skip to Add an IP address for the availability group listener. You can create a cluster network name by using PowerShell. For more information, review the blog post Failover Cluster: Cluster Network Object.
Next, create the IP address resource and add it to the cluster for the new SQL Server VM:
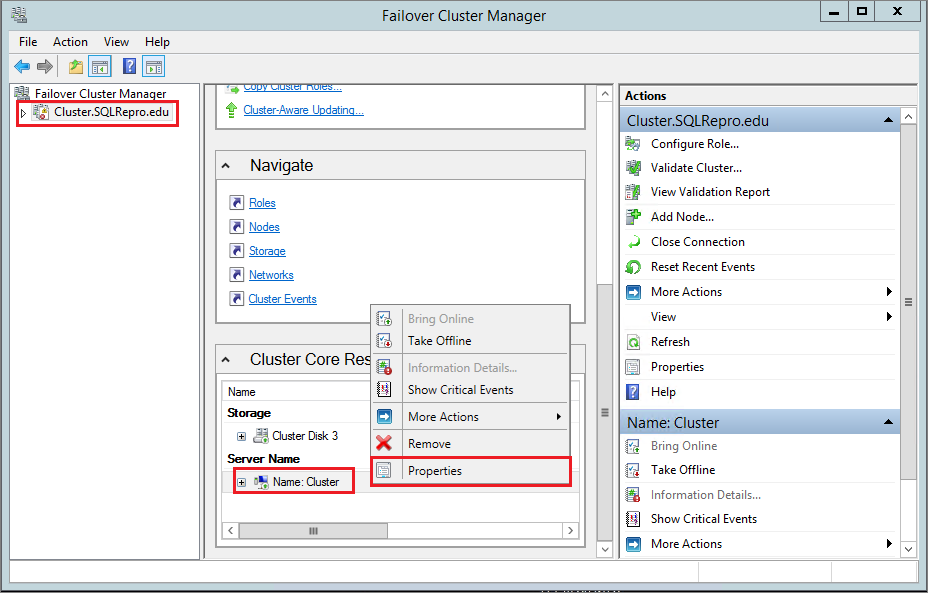
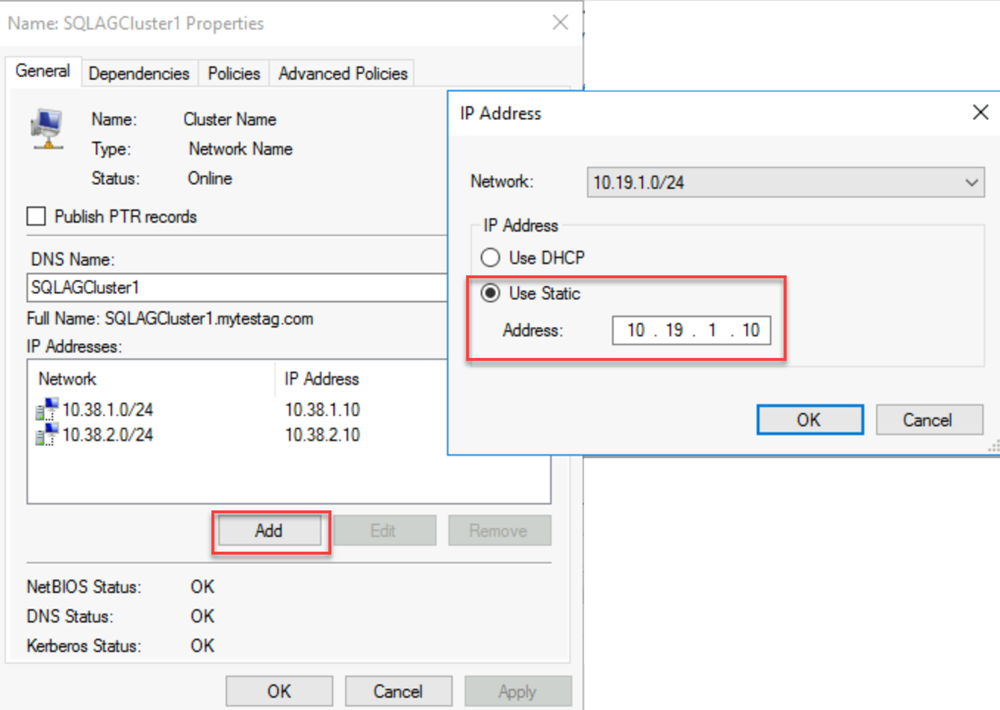
In Failover Cluster Manager, select the name of the cluster. Right-click the cluster name under Cluster Core Resources, and then select Properties:
In the Cluster Properties dialog, select Add under IP Addresses, and then add the IP address of the cluster name from the remote network region. Select OK in the IP Address dialog, and then select OK in the Cluster Properties dialog to save the new IP address.
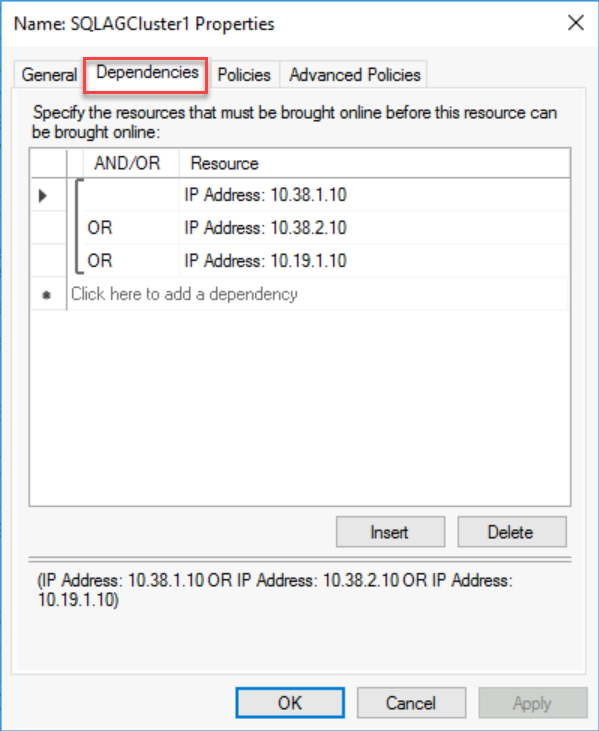
Add the IP address as a dependency for the cluster core name.
Open the Cluster Properties dialog once more, and select the Dependencies tab. Configure an OR dependency for the two IP addresses.


Add an IP address for the availability group listener
The IP address for the listener in the remote region needs to be added to the cluster. To add the IP address:
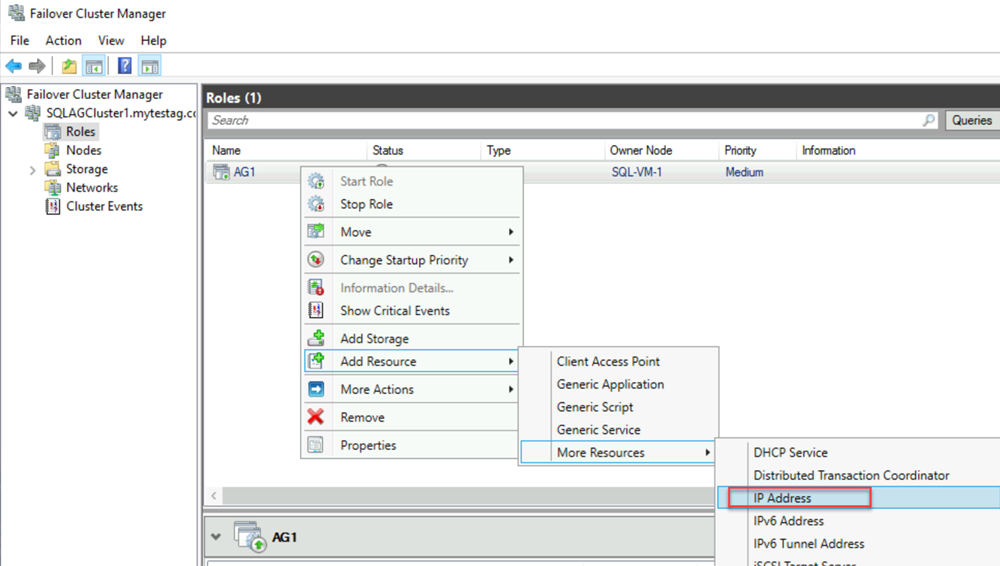
In Failover Cluster Manager, right-click the availability group role. Point to Add Resource, point to More Resources, and then select IP Address.
To configure this IP address, right-click the resource under Other Resources, and then select Properties.
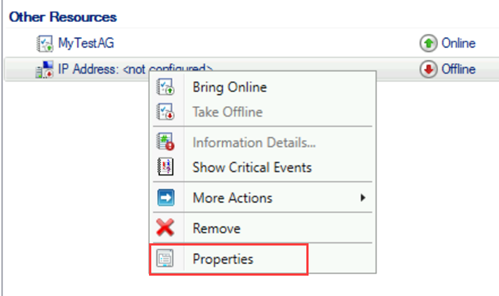
For Name, enter a name for the new resource. For Network, select the network from the remote datacenter. Select Static IP Address, and then in the Address box, assign the static IP address that you previously selected for the listener, in this tutorial is it 10.19.1.11.
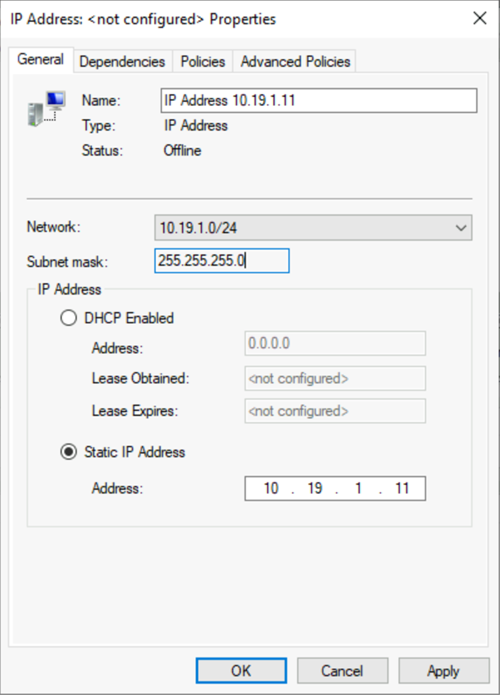
Select Apply, and then select OK.
Add the IP address resource as a dependency for the listener client access point (network name) cluster.
Right-click the listener client access point, and then select Properties. Browse to the Dependencies tab and add the new IP address resource to the listener client access point. The following screenshot shows a properly configured IP address cluster resource:
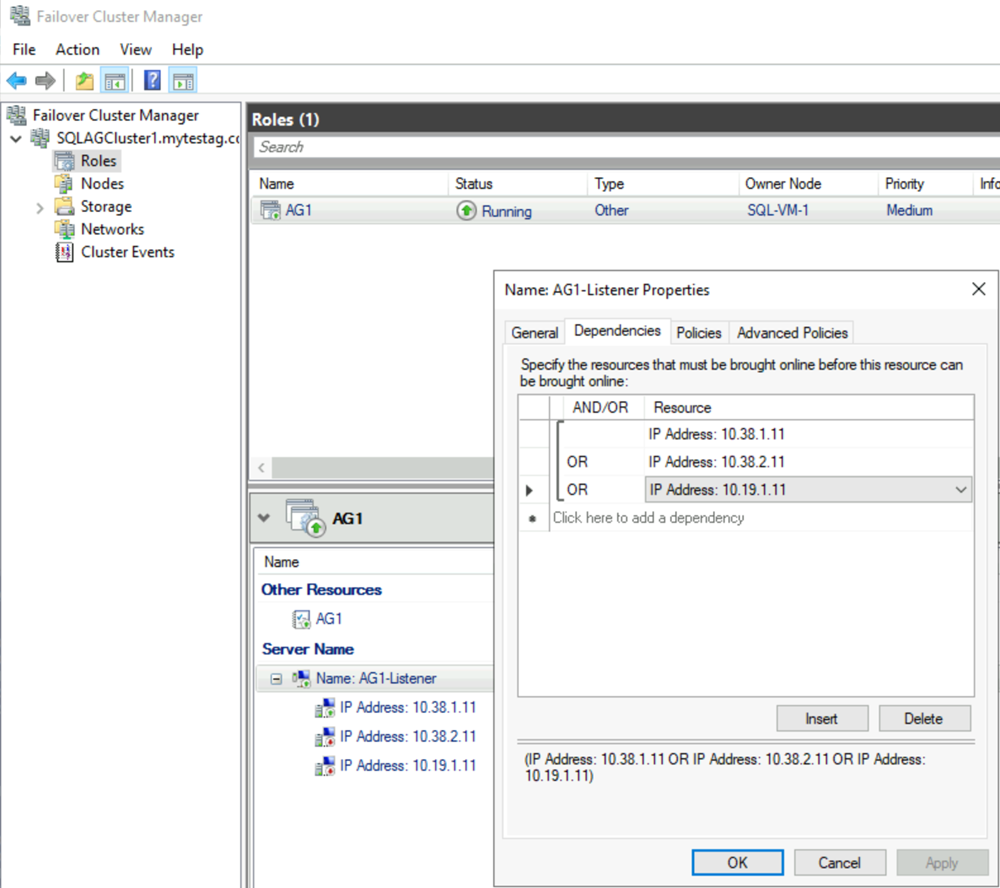
Important
The cluster resource group includes both IP addresses. Both IP addresses are dependencies for the listener client access point. Use the OR operator in the cluster dependency configuration.


Enable availability groups
Next, enable the Always On availability groups feature. Complete these steps on the new SQL Server VM:
From the Start screen, open SQL Server Configuration Manager.
In the browser tree, select SQL Server Services. Right-click the SQL Server (MSSQLSERVER) service, and then select Properties.
Select the AlwaysOn High Availability tab, and then select Enable AlwaysOn Availability Groups.
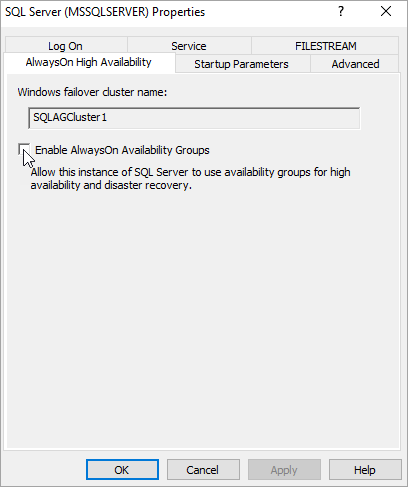
Select Apply. Select OK in the pop-up dialog.
Restart the SQL Server service.
Add a replica to the availability group
After SQL Server has restarted on the newly created virtual machine, you can add it as a replica to the availability group:
Open a remote desktop session to the primary SQL Server instance in the availability group, and then open SQL Server Management Studio (SSMS).
In Object Explorer in SSMS, open Always On High Availability > Availability Groups. Right-click your availability group name, and then select Add Replica.
Connect to the existing replica, and then select Next.
Select Add Replica and connect to the new SQL Server VM.
Important
A replica in a remote Azure region should be set to asynchronous replication with manual failover.
On the Select Initial Data Synchronization page, select Full and specify a shared network location. For the location, use the backup share that you created. In the example, it was \\<First SQL Server>\Backup\. Then select Next.
Note
Full synchronization takes a full backup of the database on the first instance of SQL Server and restores it to the second instance. For large databases, we don't recommend full synchronization because it might take a long time.
You can reduce this time by manually backing up the database and restoring it with
NO RECOVERY. If the database is already restored withNO RECOVERYon the second SQL Server instance before you configure the availability group, select Join only. If you want to take the backup after you configure the availability group, select Skip initial data synchronization.On the Validation page, select Next. This page should look similar to the following image:
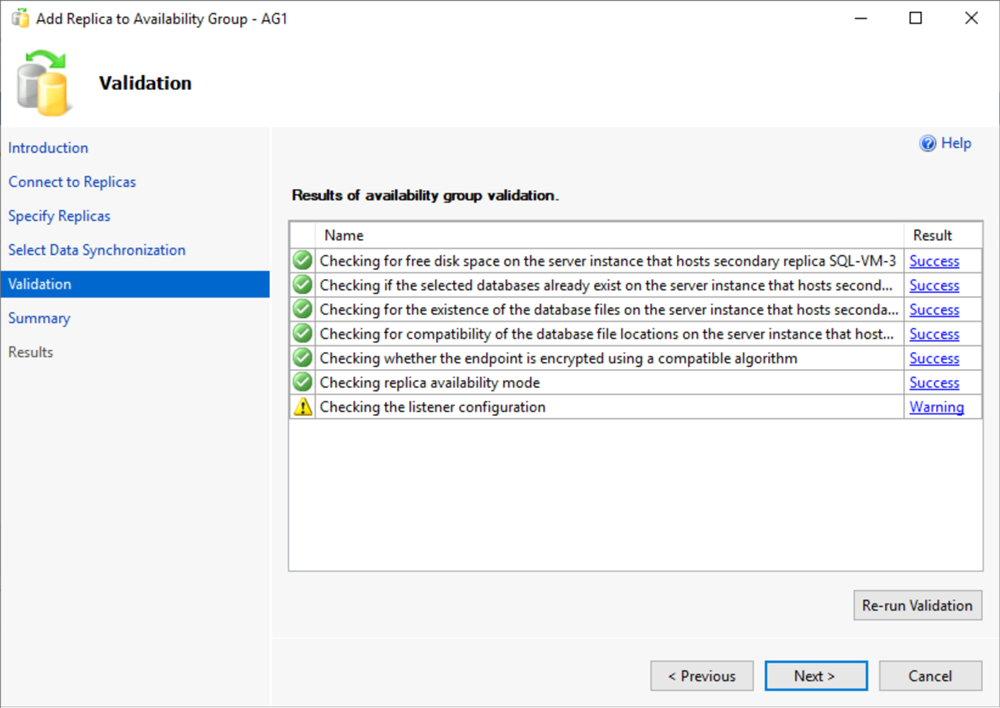
Note
A warning for the listener configuration says you haven't configured an availability group listener. You can ignore this warning because the listener is already set up.
On the Summary page, select Finish, and then wait while the wizard configures the new availability group. On the Progress page, you can select More details to view the detailed progress.
After the wizard finishes the configuration, inspect the Results page to verify that the availability group is successfully created.
Select Close to close the wizard.
Check the availability group
In Object Explorer, expand Always On High Availability, and then expand Availability Groups. Right-click the availability group and select Show Dashboard.
Your availability group dashboard should look similar to the following screenshot, now with another replica:

The dashboard shows the replicas, the failover mode of each replica, and the synchronization state.
Check the availability group listener
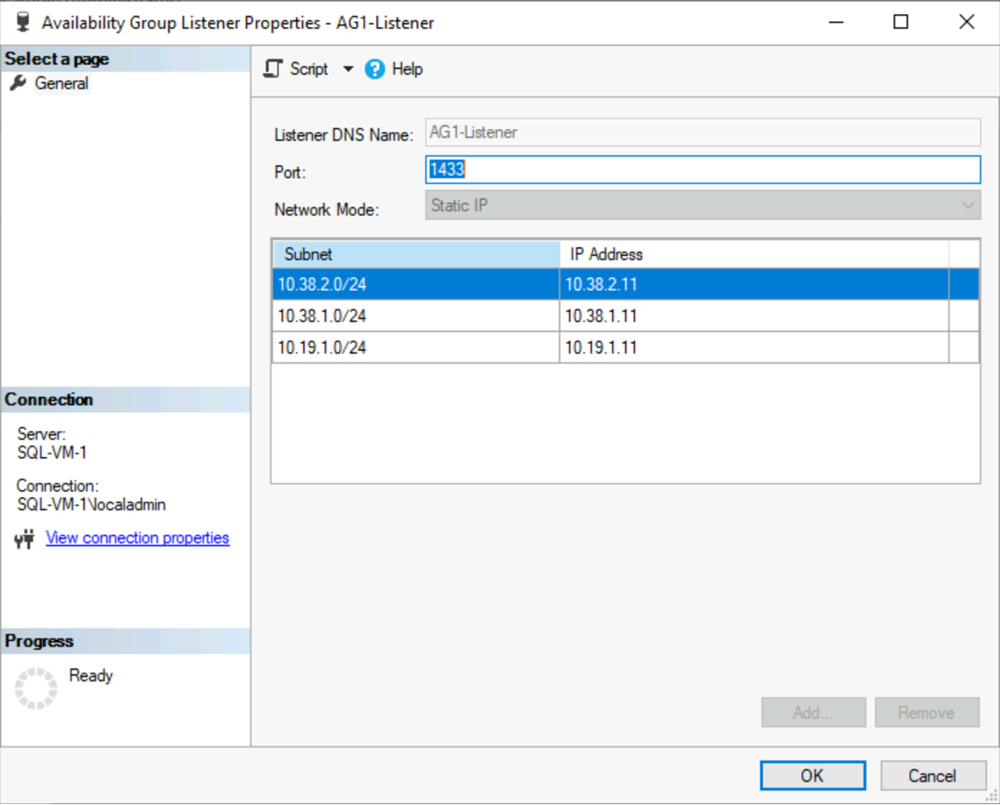
In Object Explorer, expand Always On High Availability, expand Availability Groups, and then expand Availability Group Listener.
Right-click the listener name and select Properties. All IP addresses should now appear for the listener (one in each region).
Set the connection for multiple subnets
The replica in the remote datacenter is part of the availability group, but it's in a different subnet. If this replica becomes the primary replica, application connection time-outs might occur. This behavior is the same as an on-premises availability group in a multiple-subnet deployment. To allow connections from client applications, either update the client connection or configure name resolution caching on the cluster network name resource.
Preferably, update the cluster configuration to set RegisterAllProvidersIP=1 and the client connection strings to set MultiSubnetFailover=Yes. See Connecting with MultiSubnetFailover.
If you can't modify the connection strings, you can configure name resolution caching. See Timeout occurs when you connect to an Always On listener in a multi-subnet environment.
Fail over to the remote region
To test listener connectivity to the remote region, you can fail the replica over to the remote region. While the replica is asynchronous, failover is vulnerable to potential data loss. To fail over without data loss, change the availability mode to synchronous and set the failover mode to automatic. Use the following steps:
In Object Explorer, connect to the instance of SQL Server that hosts the primary replica.
Under Always On Availability Groups, right-click your availability group and select Properties.
On the General page, under Availability Replicas, set the secondary replica on the disaster recovery (DR) site to use Synchronous Commit availability mode and Automatic failover mode.
If you have a secondary replica in same site as your primary replica for high availability, set this replica to Asynchronous Commit and Manual.
Select OK.
In Object Explorer, right-click the availability group and select Show Dashboard.
On the dashboard, verify that the replica on the DR site is synchronized.
In Object Explorer, right-click the availability group and select Failover. SQL Server Management Studio opens a wizard to fail over SQL Server.
Select Next, and select the SQL Server instance on the DR site. Select Next again.
Connect to the SQL Server instance on the DR site, and then select Next.
On the Summary page, verify the settings and select Finish.
After you test connectivity, move the primary replica back to your primary datacenter and set the availability mode back to its normal operating settings. The following table shows the normal operating settings for the architecture described in this article:
| Location | Server instance | Role | Availability mode | Failover mode |
|---|---|---|---|---|
| Primary datacenter | SQL-VM-1 | Primary | Synchronous | Automatic |
| Primary datacenter | SQL-VM-2 | Secondary | Synchronous | Automatic |
| Secondary or remote datacenter | SQL-VM-3 | Secondary | Asynchronous | Manual |
For more information about planned and forced manual failover, see the following articles:
- Perform a planned manual failover of an availability group (SQL Server)
- Perform a forced manual failover of an availability group (SQL Server)
Next steps
To learn more, see: