Note
Access to this page requires authorization. You can try signing in or changing directories.
Access to this page requires authorization. You can try changing directories.
Applies to: ![]() SQL Server on Azure VM
SQL Server on Azure VM
Tip
There are many methods to deploy an availability group. Simplify your deployment and eliminate the need for an Azure Load Balancer or distributed network name (DNN) for your Always On availability group by creating your SQL Server virtual machines (VMs) in multiple subnets within the same Azure virtual network. If you've already created your availability group in a single subnet, you can migrate it to a multi-subnet environment.
This article explains how to create a failover cluster instance (FCI) by using Storage Spaces Direct with SQL Server on Azure Virtual Machines (VMs). Storage Spaces Direct acts as a software-based virtual storage area network (VSAN) that synchronizes the storage (data disks) between the nodes (Azure VMs) in a Windows cluster.
To learn more, see an overview of FCI with SQL Server on Azure VMs and cluster best practices.
Note
It's now possible to lift and shift your failover cluster instance solution to SQL Server on Azure VMs using Azure Migrate. See Migrate failover cluster instance to learn more.
Overview
Storage Spaces Direct (S2D) supports two types of architectures: converged and hyperconverged. A hyperconverged infrastructure places the storage on the same servers that host the clustered application, so that storage is on each SQL Server FCI node.
The following diagram shows the complete solution, which uses hyperconverged Storage Spaces Direct with SQL Server on Azure VMs:
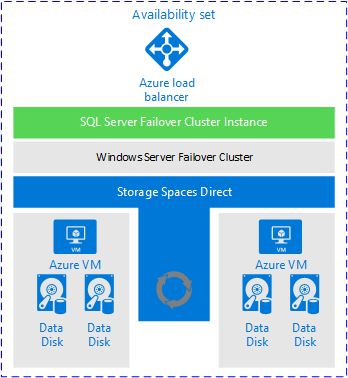
The preceding diagram shows the following resources in the same resource group:
- Two virtual machines in a Windows Server failover cluster. When a virtual machine is in a failover cluster, it's also called a cluster node or node.
- Each virtual machine has two or more data disks.
- Storage Spaces Direct synchronizes the data on the data disks and presents the synchronized storage as a storage pool.
- The storage pool presents a Cluster Shared Volume (CSV) to the failover cluster.
- The SQL Server FCI cluster role uses the CSV for the data drives.
- An Azure load balancer to hold the IP address for the SQL Server FCI for a single subnet scenario.
- An Azure availability set holds all the resources.
Note
You can create this entire solution in Azure from a template. An example of a template is available on the GitHub Azure quickstart templates page. This example isn't designed or tested for any specific workload. You can run the template to create a SQL Server FCI with Storage Spaces Direct storage connected to your domain. You can evaluate the template and modify it for your purposes.
Prerequisites
Before you complete the instructions in this article, you should already have:
- An Azure subscription. Get started with a free Azure account.
- Two or more prepared Azure Windows virtual machines in an availability set.
- An account that has permissions to create objects on both Azure virtual machines and in Active Directory.
- The latest version of PowerShell.
Create Windows Failover Cluster
The steps to create your Windows Server Failover Cluster differ between single subnet and multi-subnet environments. To create your cluster, follow the steps in the tutorial for either a multi-subnet scenario or a single subnet scenario. Though these tutorials create an availability group, the steps to create the cluster are the same for a failover cluster instance.
Configure quorum
Although the disk witness is the most resilient quorum option, it's not supported for failover cluster instances configured with Storage Spaces Direct. As such, the cloud witness is the recommended quorum solution for this type of cluster configuration for SQL Server on Azure VMs.
If you have an even number of votes in the cluster, configure the quorum solution that best suits your business needs. For more information, see Quorum with SQL Server VMs.
Validate the cluster
Validate the cluster in the Failover Cluster Manager UI or by using PowerShell.
To validate the cluster by using the UI, do the following on one of the virtual machines:
In Server Manager, select Tools, and then select Failover Cluster Manager.
Right-click the cluster in Failover Cluster Manager, select Validate Cluster to open the Validate a Configuration Wizard.
On the Validate a Configuration Wizard, select Next.
On the Select Servers or a Cluster page, enter the names of both virtual machines.
On the Testing options page, select Run only tests I select.
Select Next.
On the Test Selection page, select all tests except Storage:
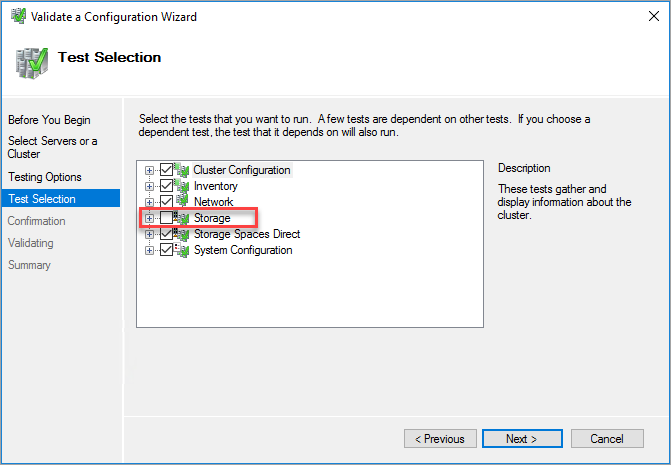
Select Next.
On the Confirmation page, select Next. The Validate a Configuration wizard runs the validation tests.
To validate the cluster by using PowerShell, run the following script from an administrator PowerShell session on one of the virtual machines:
Test-Cluster –Node ("<node1>","<node2>") –Include "Storage Spaces Direct", "Inventory", "Network", "System Configuration"
Add storage
The disks for Storage Spaces Direct need to be empty. They can't contain partitions or other data. To clean the disks, follow the instructions in Deploy Storage Spaces Direct.
-
The following PowerShell script enables Storage Spaces Direct:
Enable-ClusterS2DIn Failover Cluster Manager, you can now see the storage pool.
-
Storage Spaces Direct automatically creates a storage pool when you enable it. You're now ready to create a volume. The PowerShell cmdlet
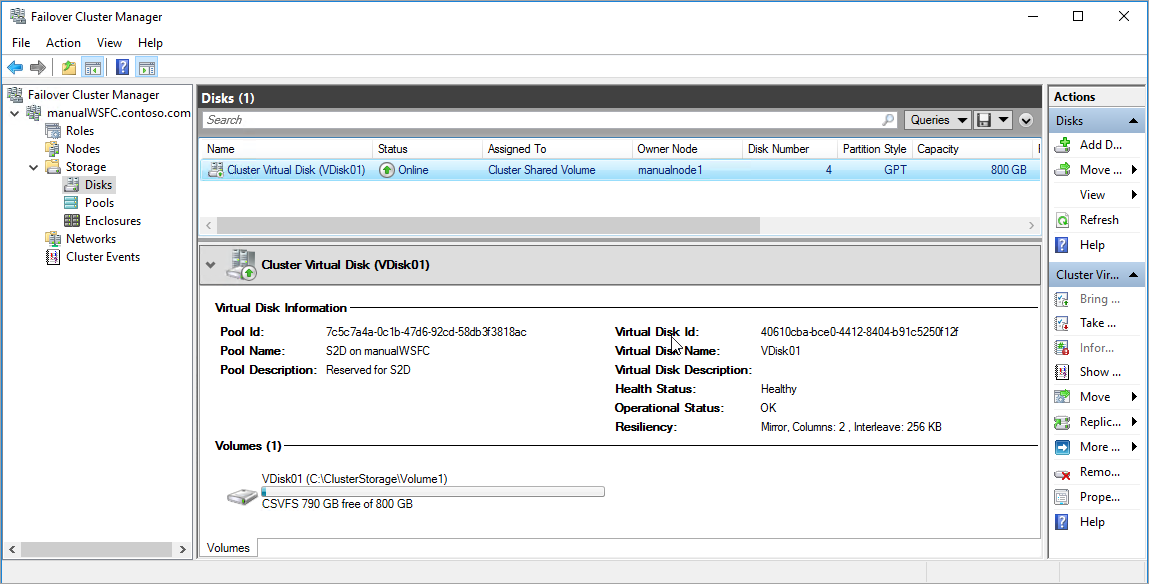
New-Volumeautomates the volume creation process. This process includes formatting, adding the volume to the cluster, and creating a CSV. This example creates an 800 gigabyte (GB) CSV:New-Volume -StoragePoolFriendlyName S2D* -FriendlyName VDisk01 -FileSystem CSVFS_REFS -Size 800GBAfter you've run the preceding command, an 800-GB volume is mounted as a cluster resource. The volume is at
C:\ClusterStorage\Volume1\.This screenshot shows a CSV with Storage Spaces Direct:
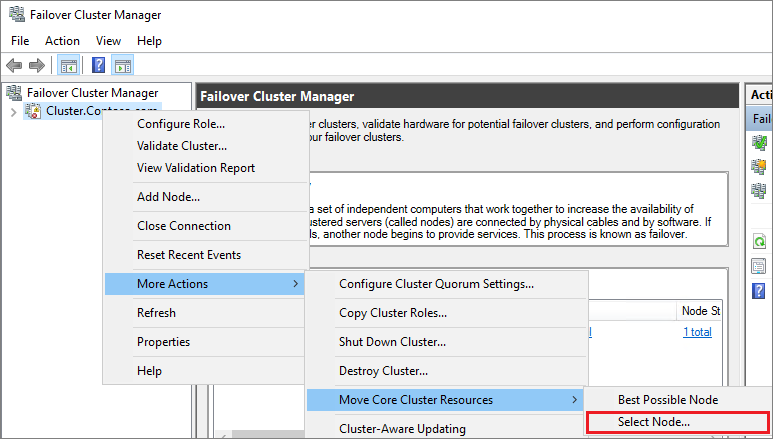
Test cluster failover
Test the failover of your cluster. In Failover Cluster Manager, right-click your cluster, select More Actions > Move Core Cluster Resource > Select node, and then select the other node of the cluster. Move the core cluster resource to every node of the cluster, and then move it back to the primary node. If you can successfully move the cluster to each node, you're ready to install SQL Server.
Create SQL Server FCI
After you've configured the failover cluster and all cluster components, including storage, you can create the SQL Server FCI.
Create first node in the SQL FCI
To create the first node in the SQL Server FCI, follow these steps:
Connect to the first virtual machine by using Bastion.
In Failover Cluster Manager, make sure all core cluster resources are on the first virtual machine. If necessary, move all resources to that virtual machine.
If the version of the operating system is Windows Server 2019 and the Windows Cluster was created using the default Distributed Network Name (DNN), then the FCI installation for SQL Server 2017 and below will fail with the error
The given key was not present in the dictionary.During installation, SQL Server setup queries for the existing Virtual Network Name (VNN) and doesn't recognize the Windows Cluster DNN. The issue has been fixed in SQL Server 2019 setup. For SQL Server 2017 and below, follow these steps to avoid the installation error:
- In Failover Cluster Manager, connect to the cluster, right-click Roles and select Create Empty Role.
- Right-click the newly created empty role, select Add Resource and select Client Access Point.
- Enter any name and complete the wizard to create the Client Access Point.
- After the SQL Server FCI installation completes, the role containing the temporary Client Access Point can be deleted.
Locate the installation media. If the virtual machine uses one of the Azure Marketplace images, the media is located at
C:\SQLServer_<version number>_Full. Select Setup.In SQL Server Installation Center, select Installation.
Select New SQL Server failover cluster installation. Follow the instructions in the wizard to install the SQL Server FCI.
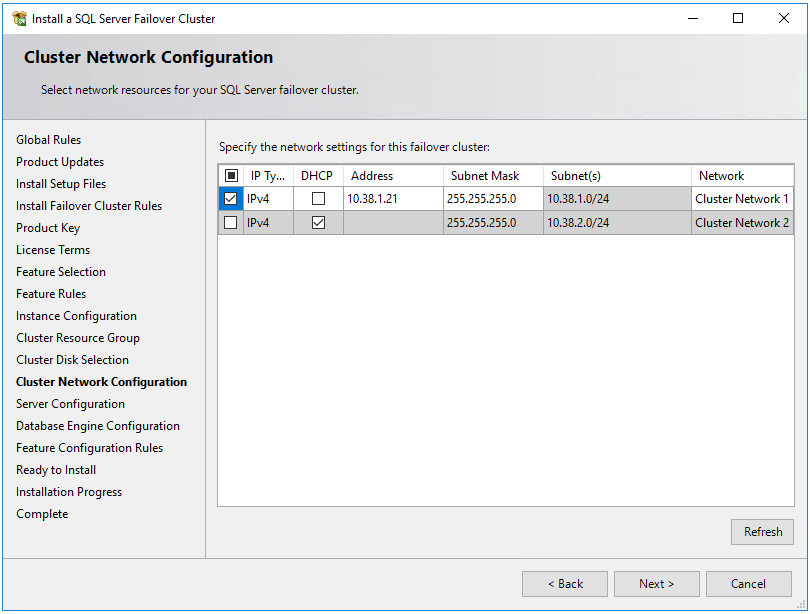
On the Cluster Network Configuration page, the IP you provide varies depending on if your SQL Server VMs were deployed to a single subnet, or multiple subnets.
- For a single subnet environment, provide the IP address that you plan to add to the Azure Load Balancer
- For a multi-subnet environment, provide the secondary IP address in the subnet of the first SQL Server VM that you previously designated as the IP address of the failover cluster instance network name:
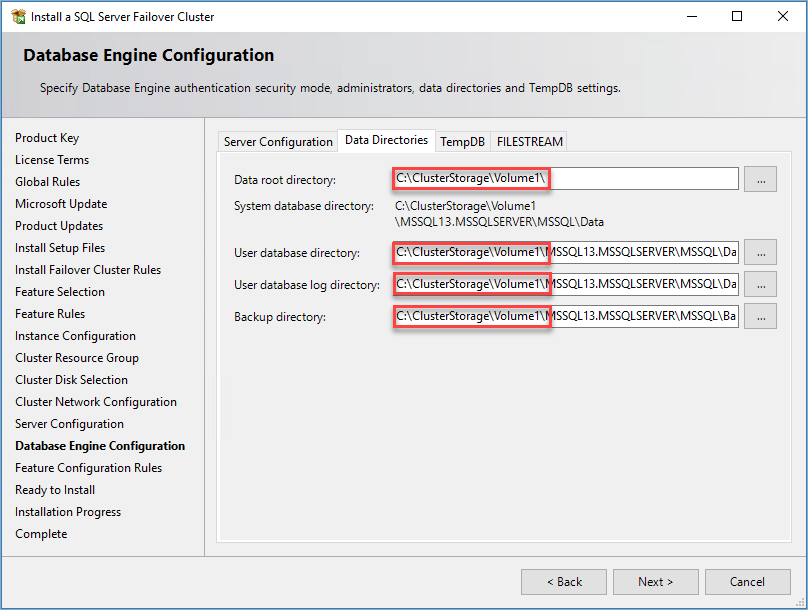
In Database Engine Configuration, The FCI data directories need to be on clustered storage. With Storage Spaces Direct, it's not a shared disk but a mount point to a volume on each server. Storage Spaces Direct synchronizes the volume between both nodes. The volume is presented to the cluster as a CSV. Use the CSV mount point for the data directories.
After you complete the instructions in the wizard, Setup installs a SQL Server FCI on the first node.
Add additional nodes the SQL FCI
To add an additional node to the SQL Server FCI, follow these steps:
After FCI installation succeeds on the first node, connect to the second node by using Bastion.
Open the SQL Server Installation Center. Select Installation.
Select Add node to a SQL Server failover cluster. Follow the instructions in the wizard to install SQL Server and add the node to the FCI.
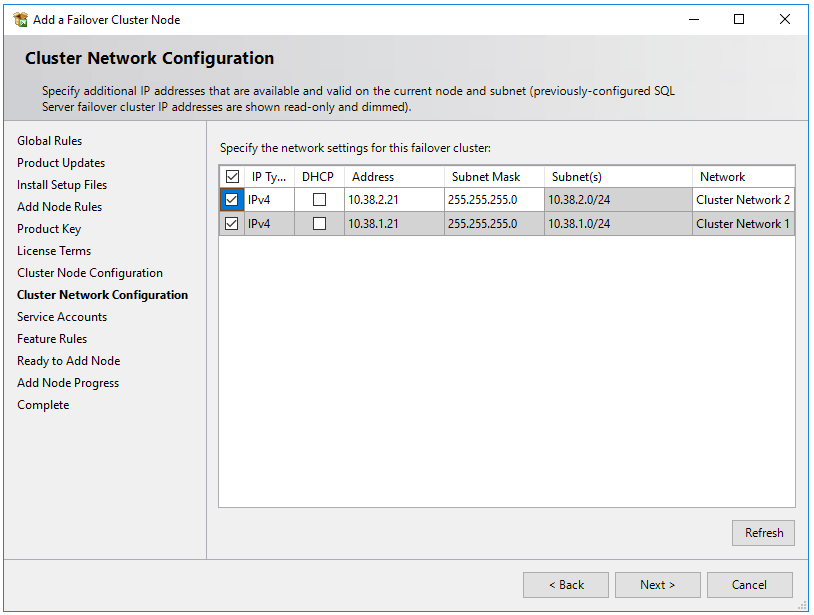
For a multi-subnet scenario, in Cluster Network Configuration, enter the secondary IP address in the subnet of the second SQL Server VM that you previously designated as the IP address of the failover cluster instance network name
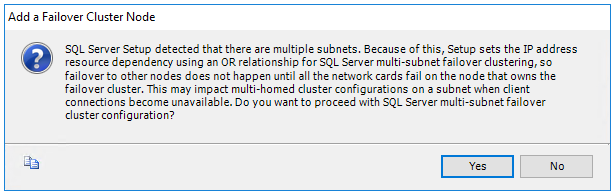
After selecting Next in Cluster Network Configuration, setup shows a dialog box indicating that SQL Server Setup detected multiple subnets as in the example image. Select Yes to confirm.
After you complete the instructions in the wizard, setup adds the second SQL Server FCI node.
Repeat these steps on any other nodes that you want to add to the SQL Server failover cluster instance.
Note
Azure Marketplace gallery images come with SQL Server Management Studio installed. If you didn't use a marketplace image, install the latest version of SQL Server Management Studio (SSMS).
Register with SQL IaaS Agent extension
To manage your SQL Server VM from the portal, register it with the SQL IaaS Agent extension. Note that only limited functionality will be available to SQL Server VMs that have failover clustered instances of SQL Server (FCIs).
Note
At this time, SQL Server failover cluster instances on Azure virtual machines registered with the SQL IaaS Agent extension only support a limited number of features available through basic registration, and not those that require the agent, such as automated backup, patching, Microsoft Entra authentication and advanced portal management. See the table of benefits to learn more.
Register a SQL Server VM with PowerShell (-LicenseType can be PAYG or AHUB):
# Get the existing compute VM
$vm = Get-AzVM -Name <vm_name> -ResourceGroupName <resource_group_name>

# Register SQL VM with SQL IaaS Agent extension
New-AzSqlVM -Name $vm.Name -ResourceGroupName $vm.ResourceGroupName -Location $vm.Location `
   -LicenseType <license_type>
Configure connectivity
If you deployed your SQL Server VMs in multiple subnets, skip this step. If you deployed your SQL Server VMs to a single subnet, then you'll need to configure an additional component to route traffic to your FCI. You can configure a virtual network name (VNN) with an Azure Load Balancer, or a distributed network name for a failover cluster instance. Review the differences between the two and then deploy either a distributed network name or a virtual network name and Azure Load Balancer for your failover cluster instance.
Limitations
Disks that have been attached as NTFS-formatted disks can be used with Storage Spaces Direct only if the disk eligibility option is unchecked, or cleared, when storage is being added to the cluster.
SQL Server FCIs registered with the SQL IaaS Agent extension don't support features that require the agent, such as automated backup, patching, Microsoft Entra authentication and advanced portal management. See the table of benefits for more information.
Failover cluster instances using Storage Spaces Direct as the shared storage do not support using a disk witness for the quorum of the cluster. Use a cloud witness instead.
Microsoft Distributed Transaction Coordinator (MSDTC) is not supported by SQL Server on Azure VM failover cluster instances deployed to Storage Spaces direct. Review FCI limitations for more information.
Microsoft Distributed Transaction Coordinator (MSDTC) is supported on Azure virtual machines starting with Windows Server 2019 and later when deployed to dedicated Clustered Shared Volumes (CSVs) and using a standard load balancer. MSDTC is not supported on Windows Server 2016 and earlier.
Limited extension support
At this time, SQL Server failover cluster instances on Azure virtual machines registered with the SQL IaaS Agent extension only support a limited number of features available through basic registration, and not those that require the agent, such as automated backup, patching, Microsoft Entra authentication and advanced portal management. See the table of benefits to learn more.
If your SQL Server VM has already been registered with the SQL IaaS Agent extension and you've enabled any features that require the agent, you need to delete the extension from the SQL Server VM by deleting the SQL virtual machine resource for the corresponding VMs, and then registering it with the SQL IaaS Agent extension again. When you're deleting the SQL virtual machine resource by using the Azure portal, clear the check box next to the correct virtual machine to avoid deleting the virtual machine.
Next steps
If Storage Spaces Direct isn't the appropriate FCI storage solution for you, consider creating your FCI by using Azure shared disks or Premium File Shares instead.
To learn more, see: