Note
Access to this page requires authorization. You can try signing in or changing directories.
Access to this page requires authorization. You can try changing directories.
This article describes how to back up Azure Disk using the Azure portal. You can also use REST API to create a Backup policy and configure backup for Azure Managed Disk.
Learn about the Azure Disk backup region availability, supported scenarios, and limitations.
Note
If the target disk is attached as a Persistent Volume to an AKS cluster, choose Azure Backup for AKS over the standalone Disk Backup solution. It enables backing up the disk as snapshots along with the containerized application in a Kubernetes-aware manner, all as a single unit. Additionally, you get Cross Region Restore and ransomware protection capabilities with AKS Backup.
Create a Backup vault
A Backup vault is a storage entity in Azure that holds backup data for various newer workloads that Azure Backup supports, such as Azure Database for PostgreSQL servers and Azure Disks. Backup vaults make it easy to organize your backup data, while minimizing management overhead. Backup vaults are based on the Azure Resource Manager model of Azure, which provides enhanced capabilities to help secure backup data.
Learn how to create a Backup vault.
Create backup policy for Azure Disks
To create a backup policy for Azure Disks, follow these steps:
Go to Business Continuity Center, and then select Manage > Protection policies.
On the Protection policies pane, select + Create policy > Create backup policy.
On the Start: Create Policy pane, select the Datasource type as Azure Disks, and then select Continue.
On the Create Backup Policy pane, on the Basics tab, enter a Policy name, and then under Vault, click Select.
Note
Although the selected vault may have the global-redundancy setting, currently Azure Disk Backup supports snapshot datastore only. All backups are stored in a resource group in your subscription and aren't copied to backup vault storage.

On the Select a Vault pane, select the vault from the list that you created, and then click Select.
On the Create Backup Policy pane, on the Schedule + retention tab, under Backup schedule, select the backup frequency.
Azure Disk Backup offers multiple backups per day. If you require more frequent backups, choose the Hourly backup frequency with the ability to take backups with intervals of every 1, 2, 4, 6, 8, or 12 hours. The backups are scheduled based on the Time interval selected. For example, if you select Every 4 hours, then the backups are taken at approximately in the interval of every 4 hours so the backups are distributed equally across the day. If a once a day backup is sufficient, then choose the Daily backup frequency. In the daily backup frequency, you can specify the time of the day when your backups are taken. It's important to note that the time of the day indicates the backup start time and not the time when the backup completes. The time required for completing the backup operation is dependent on various factors including size of the disk, and churn rate between consecutive backups. However, Azure Disk backup is an agentless backup that uses incremental snapshots, which doesn't impact the production application performance.
Under Retention rules, select retention settings that meet the recovery point objective (RPO) requirement.
The default retention rule applies if no other retention rule is specified. The default retention rule can be modified to change the retention duration, but it cannot be deleted. You can add a new retention rule by selecting Add retention rule.
You can pick first successful backup taken daily or weekly, and provide the retention duration that the specific backups are to be retained before they're deleted. This option is useful to retain specific backups of the day or week for a longer duration of time. All other frequent backups can be retained for a shorter duration.
Note
Azure Backup for Managed Disks uses incremental snapshots, which are limited to 500 snapshots per disk. At a point in time, you can have 500 snapshots for a disk. Thus, to prevent backup failure the retention duration is limited by the snapshot limit. To allow you to take on-demand backups aside from scheduled backups, backup policy limits the total backups to 450. Learn more about incremental snapshots for managed disks.
You can either set a maximum retention limit of 1 year or 450 disk snapshots, whichever reaches first. For example, if you opt for a backup frequency of 12 hours, then you can retain each recovery point for maximum 225 days as the snapshot limit is breached beyond that.
On the Review + create tab, select Create to complete the backup policy creation.
Note
- For Azure Disks belonging to Standard HDD, Standard SSD, and Premium SSD SKUs, you can define the backup schedule with Hourly frequency (of 1, 2, 4, 6, 8, or 12 hours) and Daily frequency.
- For Azure Disks belonging to Premium V2 and Ultra Disk SKUs, you can define the backup schedule with Hourly frequency of only 12 hours and Daily frequency.
Configure Azure Disk backup
Azure Disk backup supports only the operational tier backup. Copying of backups to the vault storage tier is currently not supported. The Backup vault storage redundancy setting (LRS/GRS) doesn’t apply to the backups stored in the operational tier.
Incremental snapshots are stored in a Standard Hard Disk Drive (HDD) storage, irrespective of the selected storage type of the parent disk. For more reliability, incremental snapshots are stored on Zone Redundant Storage (ZRS) by default in ZRS supported regions.Azure Disk backup supports cross-subscription (backup vault in one subscription and the source disk in another) backup and restore. Currently, cross-region backup and restore aren't supported by Azure Disk backup, that is, the backup vault and disk to back up are in different regions.
So, to use Azure Disk backup, ensure that the backup vault and disk to back up are in the same region.Once you configure the disk backup, you can’t change the Snapshot Resource Group that’s assigned to a backup instance.
To configure Azure Disk backup, follow these steps:
Go to Business Continuity Center, and then select + Configure protection.
On the Configure protection pane, select Resource managed by as Azure, Datasource type as Azure Disks, Solution as Azure Backup, and then select Continue.
On the Configure Backup pane, on the Basics tab, under Vault, click Select vault.
On the Select a Vault pane, select the Backup vault from the list you created, and then click Select.
Note
- Ensure that both the backup vault and the disk to be backed up are in same location.
- Azure Backup uses incremental snapshots of managed disks, which store only the delta changes to the disk as the last snapshot on Standard HDD storage, regardless of the storage type of the parent disk. For additional reliability, incremental snapshots are stored on Zone Redundant Storage (ZRS) by default in the ZRS supported regions. Currently, Azure Disk Backup supports operational backup of managed disks that doesn't copy backups to the Backup vault storage. So, the backup storage redundancy setting of the Backup vault doesn’t apply to the recovery points.
On the Configure Backup pane, on the Basics tab, select Next.
On the Backup policy tab, choose a Backup policy, and then select Next.
On the Datasources tab, select + Add/Edit to choose one or more Azure Managed Disks for which you want to configure backup.
Note
While the portal allows you to select multiple disks and configure backup, each disk is an individual backup instance. Currently, Azure Disk Backup only supports backup of individual disks. Point-in-time backup of multiple disks attached to a virtual machine isn't supported.
In the Azure portal, you can only select disks within the same subscription. If you have several disks to be backed up or if the disks reside in different subscriptions, you can use scripts (PowerShell/CLI) to automate.
See the support matrix for more information on the Azure Disk backup region availability, supported scenarios, and limitations.
Select Snapshot resource group and then select Validate to initiate prerequisites checks.
Choosing resource group for storing and managing snapshots:
Don't select the same resource group as that of the source disk.
As a guideline, it's recommended to create a dedicated resource group as a snapshot datastore to be used by the Azure Backup service. Having a dedicated resource group allows restricting access permissions on the resource group, providing safety and ease of management of the backup data.
You can use this resource group for storing snapshots across multiple disks that are being (or planned to be) backed up.
You can't create an incremental snapshot for a particular disk outside of that disk's subscription. So, choose the resource group within the same subscription where the disk needs to be backed up. Learn more about incremental snapshot for managed disks.
Once you configure the backup of a disk, you can’t change the Snapshot Resource Group that’s assigned to a backup instance.
When the validation is complete, check if there are any errors reported in the Backup readiness column.
Note
Validation might take few minutes to complete. Validation may fail if:
- A disk is unsupported. See the support matrix for unsupported scenarios for more information.
- The Backup vault managed identity does not have valid role assignments on the disk to be backed up or on the snapshot resource group where incremental snapshots are stored.
If the Role assignment not done error message displays in the Backup readiness column, the Backup vault managed identity needs role permissions on one or more selected disk(s) and/or on the Snapshot resource group.
To configure backup of managed disks, the following prerequisites are required:
Note
Backup vault uses managed identity to access other Azure resources. To configure a backup of managed disks, Backup Vault’s managed identity requires a set of permissions on the source disks and resource groups where snapshots are created and managed.
A system-assigned managed identity is restricted to one per resource and is tied to the lifecycle of this resource. To grant permissions to the managed identity, use Azure role-based access control (Azure RBAC). Managed identity is a service principal of a special type that may only be used with Azure resources. Learn more about managed identities.
- Assign the Disk Backup Reader role to Backup Vault’s managed identity on the Source disk that needs to be backed up.
- Assign the Disk Snapshot Contributor role to the Backup vault’s managed identity on the Resource group where backups are created and managed by the Azure Backup service. The disk snapshots are stored in a resource group within your subscription. To allow Azure Backup service to create, store, and manage snapshots, you need to provide permissions to the backup vault.
Note
The Configure Backup flow using Azure portal helps you in granting required role permissions to the above resources.
Select the checkbox next to each row with the Role assignment not done error message status in the Backup readiness column and select Add missing roles to automatically grant required role permissions for the Backup vault managed identity on selected resources.
Select Confirm to provide consent. Azure Backup automatically propagates role assignment changes on your behalf and tries to revalidate.
If you want to grand permission for the Backup vault managed identity to the selected disk(s) and snapshot resource group, select Resource in the Scope drop-down list.
Tip
If you plan to configure backup for other disks in the same resource group/subscription in future, you can choose to provide permission at the scope of resource group or subscription.
Note
- In some cases, it can take up to 30 minutes for the role assignments to propagate, causing revalidation failure. In this scenario, retry after some time.
- If the Add missing roles action fails to assign permissions with the error ‘Insufficient permission for role assignment’ in Backup readiness column, it indicates that you don’t have the privilege to assign role permissions. Choose Download role assignment template to download role assignments as scripts and seek support from your IT Administrator to run the scripts to complete the prerequisites.
After a successful validation, select Next.
On the Review and configure tab, select Configure backup to complete the backup configuration of selected disks.
Run an on-demand backup for Azure Disks
You can run an on-demand backup for Azure Disks at any time. This operation is useful if you want to create a backup outside of the scheduled backup times defined in the backup policy.
To run an on-demand backup for Azure Disks, follow these steps:
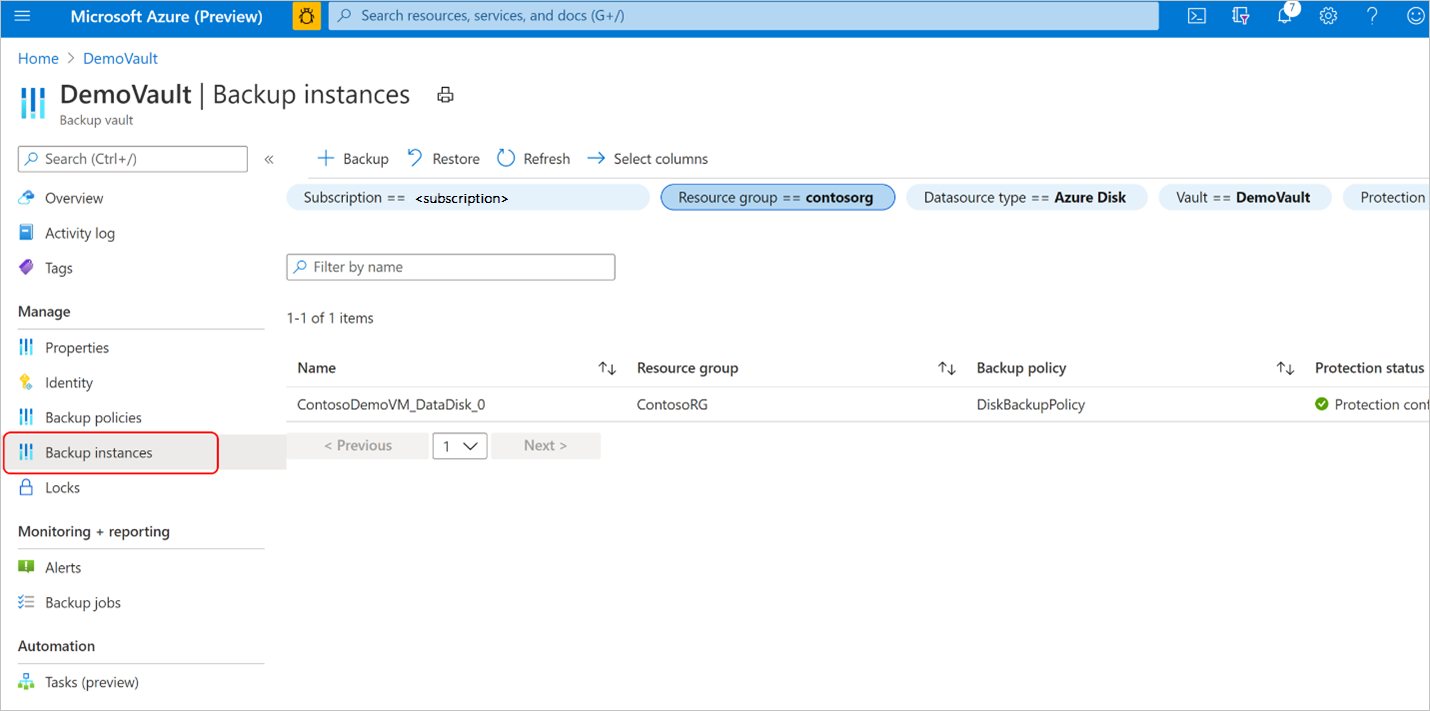
In the DemoVault Backup vault created in the previous step, go to Backup instances and select a backup instance.
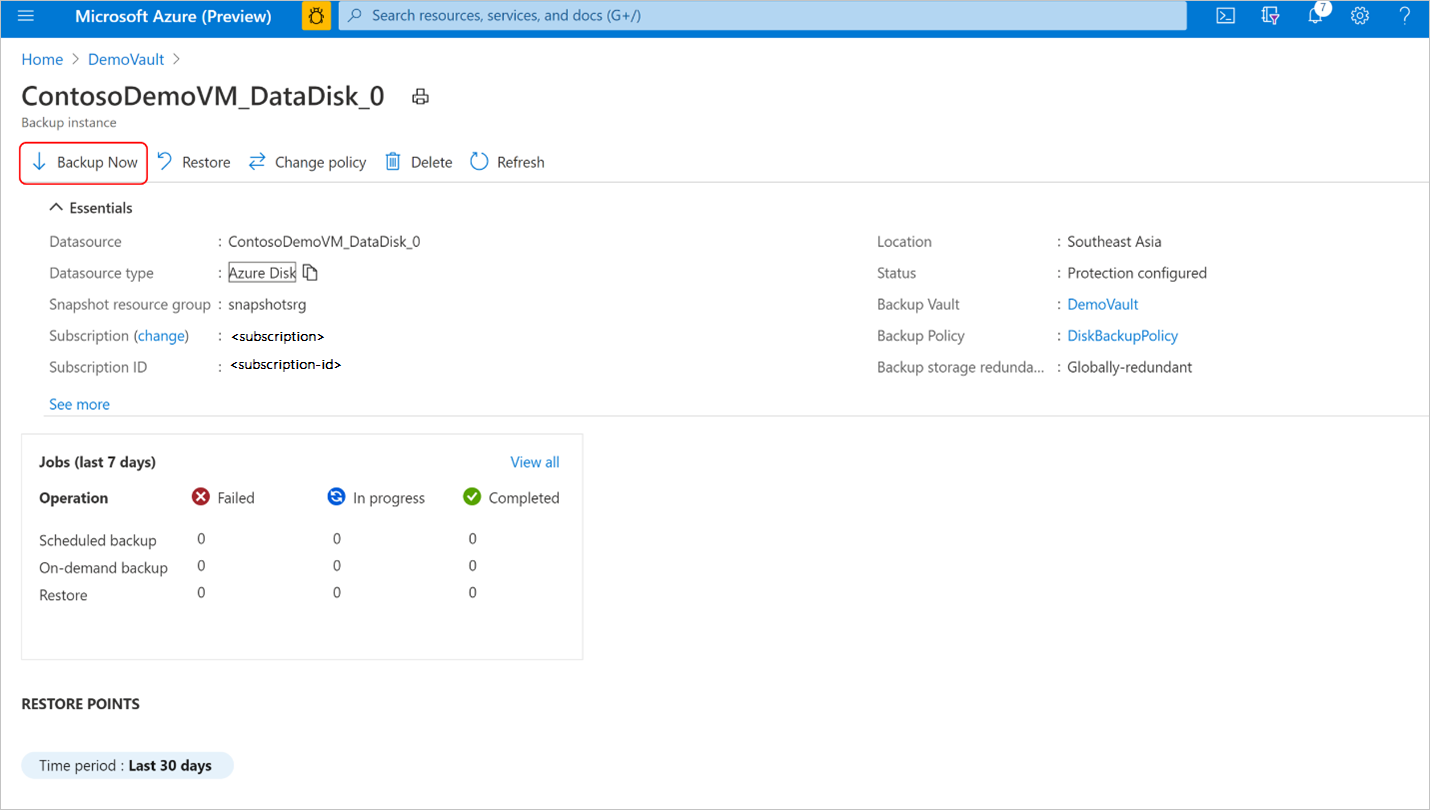
On the Backup instances pane, you can find:
- essential information including source disk name, the snapshot resource group where incremental snapshots are stored, backup vault, and backup policy.
- Job status showing summary of backup and restore operations and their status in the last seven days.
- A list of restore points for the selected time period.
Select Backup to initiate an on-demand backup.
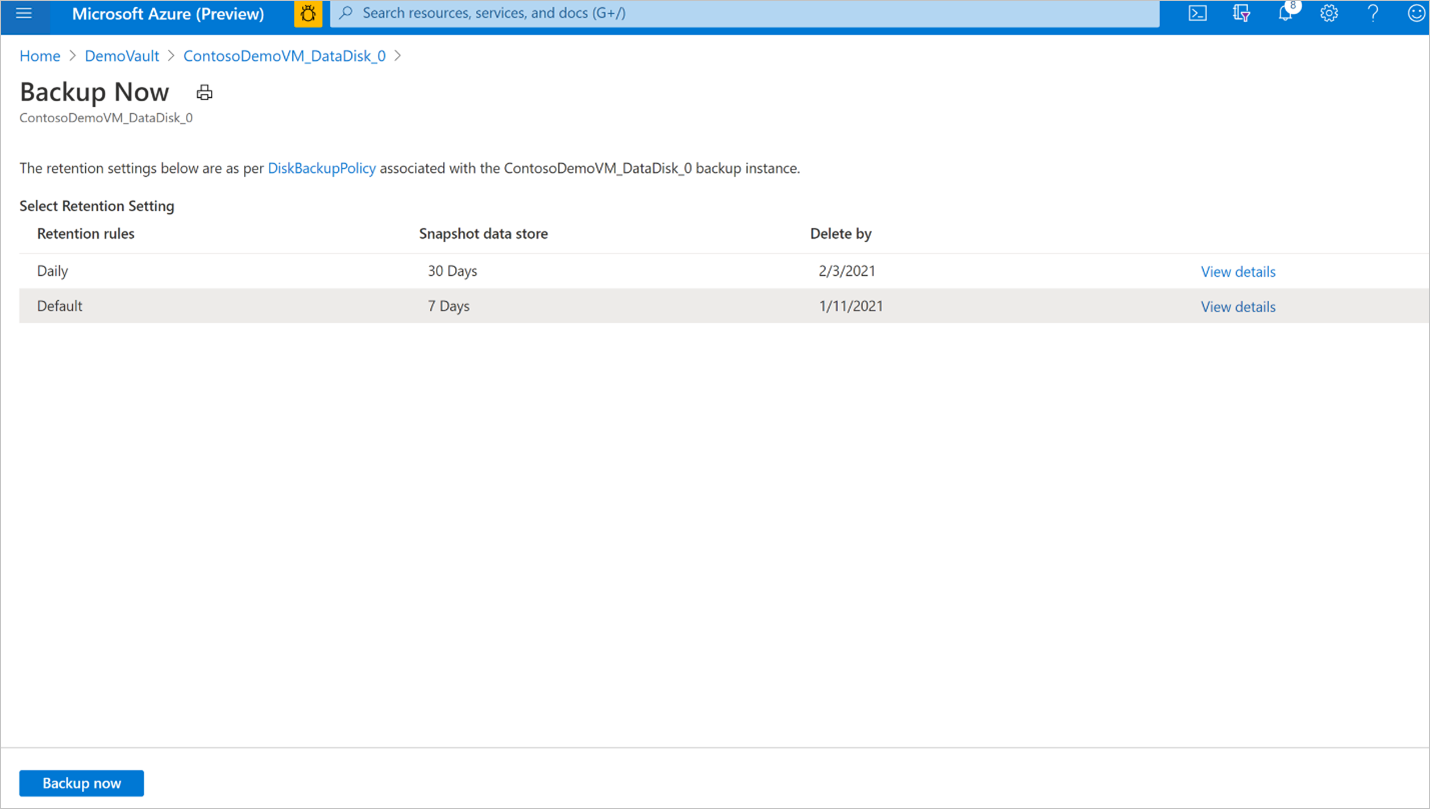
Select one of the retention rules associated with the backup policy. This retention rule determines the retention duration of this on-demand backup. Select Backup now to start the backup.
Track Azure Disk backup operations
The Azure Backup service creates a job for scheduled backups or if you trigger on-demand backup operation for tracking. Learn how to view the backup job status and details.
Next steps
Restore Managed Disk using Azure portal, Azure PowerShell, Azure CLI.


