Note
Access to this page requires authorization. You can try signing in or changing directories.
Access to this page requires authorization. You can try changing directories.
You can create a Batch pool with a certificate that can automatically be renewed. To do so, your pool must be created with a user-assigned managed identity that has access to the certificate in Azure Key Vault.
Create a user-assigned identity
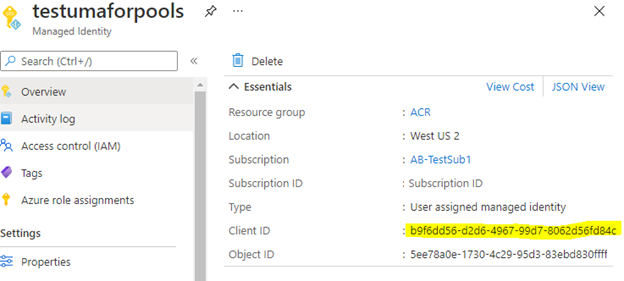
First, create your user-assigned managed identity in the same tenant as your Batch account. This managed identity doesn't need to be in the same resource group or even in the same subscription.
Be sure to note the Client ID of the user-assigned managed identity. You need this value later.
Create your certificate
Next, you need to create a certificate and add it to Azure Key Vault. If you haven't already created a key vault, you need to do that first. For instructions, see Quickstart: Set and retrieve a certificate from Azure Key Vault using the Azure portal.
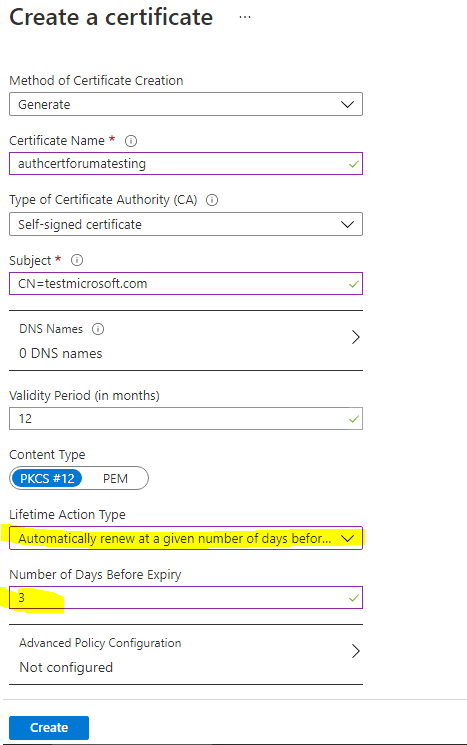
When creating your certificate, be sure to set Lifetime Action Type to automatically renew, and specify the number of days after which the certificate should renew.
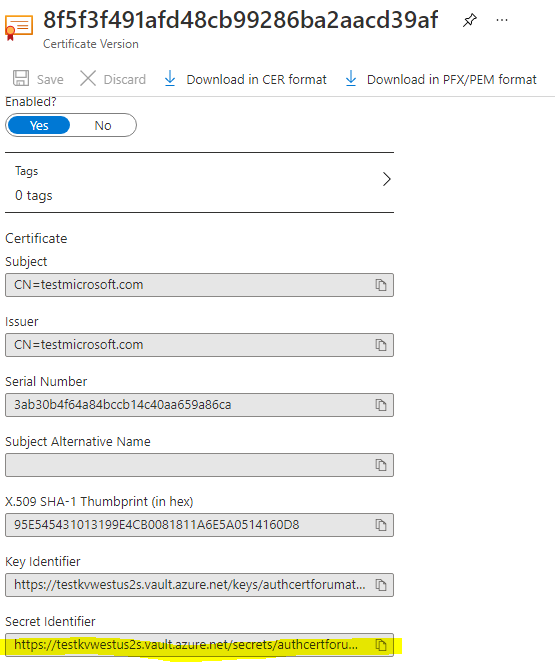
After your certificate has been created, make note of its Secret Identifier. You need this value later.
Add an access policy in Azure Key Vault
In your key vault, assign a Key Vault access policy that allows your user-assigned managed identity to access secrets and certificates. For detailed instructions, see Assign a Key Vault access policy using the Azure portal.
Create a Batch pool with a user-assigned managed identity
Create a Batch pool with your managed identity by using the Batch .NET management library. For more information, see Configure managed identities in Batch pools.
Tip
Existing pools cannot be updated with the Key Vault VM extension. You will need to recreate your pool.
The following example uses the Batch Management REST API to create a pool. Be sure to use your certificate's Secret Identifier for observedCertificates and your managed identity's Client ID for msiClientId, replacing the example data below.
REST API URI
PUT https://management.azure.com/subscriptions/<subscriptionid>/resourceGroups/<resourcegroupName>/providers/Microsoft.Batch/batchAccounts/<batchaccountname>/pools/<poolname>?api-version=2021-01-01
Request Body for Linux node
{
  "name": "test2",
  "type": "Microsoft.Batch/batchAccounts/pools",
  "properties": {
    "vmSize": "STANDARD_DS2_V2",
    "taskSchedulingPolicy": {
      "nodeFillType": "Pack"
    },
    "deploymentConfiguration": {
      "virtualMachineConfiguration": {
        "imageReference": {
          "publisher": "canonical",
          "offer": "ubuntuserver",
          "sku": "20.04-lts",
          "version": "latest"
        },
        "nodeAgentSkuId": "batch.node.ubuntu 20.04",
        "extensions": [
          {
            "name": "KVExtensions",
            "type": "KeyVaultForLinux",
            "publisher": "Microsoft.Azure.KeyVault",
            "typeHandlerVersion": "3.0",
            "autoUpgradeMinorVersion": true,
            "settings": {
              "secretsManagementSettings": {
                "pollingIntervalInS": "300",
                "certificateStoreLocation": "/var/lib/waagent/Microsoft.Azure.KeyVault",
                "requireInitialSync": true,
                "observedCertificates": [
                  "https://testkvwestus2s.vault.azure.net/secrets/authcertforumatesting/8f5f3f491afd48cb99286ba2aacd39af"
                ]
              },
              "authenticationSettings": {
                "msiEndpoint": "http://169.254.169.254/metadata/identity",
                "msiClientId": "b9f6dd56-d2d6-4967-99d7-8062d56fd84c"
              }
            }
          }
        ]
      }
    },
    "scaleSettings": {
      "fixedScale": {
        "targetDedicatedNodes": 1,
        "resizeTimeout": "PT15M"
      }
    }
  },
  "identity": {
    "type": "UserAssigned",
    "userAssignedIdentities": {
      "/subscriptions/aaaa0a0a-bb1b-cc2c-dd3d-eeeeee4e4e4e/resourceGroups/ACR/providers/Microsoft.ManagedIdentity/userAssignedIdentities/testumaforpools": {}
    }
  }
}
Request Body for Windows node
{
    "name": "test2",
    "type": "Microsoft.Batch/batchAccounts/pools",
    "properties": {
        "vmSize": "STANDARD_DS2_V2",
        "taskSchedulingPolicy": {
            "nodeFillType": "Pack"
        },
        "deploymentConfiguration": {
            "virtualMachineConfiguration": {
                "imageReference": {
                    "publisher": "microsoftwindowsserver",
                    "offer": "windowsserver",
                    "sku": "2022-datacenter",
                    "version": "latest"
                },
                "nodeAgentSkuId": "batch.node.windows amd64",
                "extensions": [
                    {
                        "name": "KVExtensions",
                        "type": "KeyVaultForWindows",
                        "publisher": "Microsoft.Azure.KeyVault",
                        "typeHandlerVersion": "3.0",
                        "autoUpgradeMinorVersion": true,
                        "settings": {
                            "secretsManagementSettings": {
                                "pollingIntervalInS": "300",
                                "requireInitialSync": true,
                                "observedCertificates": [
                                    {
                                        "url": "https://testkvwestus2s.vault.azure.net/secrets/authcertforumatesting/8f5f3f491afd48cb99286ba2aacd39af",
                                        "certificateStoreLocation": "LocalMachine",
                                        "keyExportable": true
                                    }
                                ]
                            },
                            "authenticationSettings": {
                                "msiEndpoint": "http://169.254.169.254/metadata/identity",
                                "msiClientId": "b9f6dd56-d2d6-4967-99d7-8062d56fd84c"
                            }
                        },
                    }
               ]
            }
        },
        "scaleSettings": {
            "fixedScale": {
                "targetDedicatedNodes": 1,
                "resizeTimeout": "PT15M"
            }
        },
    },
    "identity": {
        "type": "UserAssigned",
        "userAssignedIdentities": {
            "/subscriptions/aaaa0a0a-bb1b-cc2c-dd3d-eeeeee4e4e4e/resourceGroups/ACR/providers/Microsoft.ManagedIdentity/userAssignedIdentities/testumaforpools": {}
        }
    }
}
Validate the certificate
To confirm that the certificate is successfully deployed, log in to the compute node. You should see output similar to the following:
root@74773db5fe1b42ab9a4b6cf679d929da000000:/var/lib/waagent/Microsoft.Azure.KeyVault.KeyVaultForLinux-1.0.1363.13/status# cat 1.status
[{"status":{"code":0,"formattedMessage":{"lang":"en","message":"Successfully started Key Vault extension service. 2021-03-03T23:12:23Z"},"operation":"Service start.","status":"success"},"timestampUTC":"2021-03-03T23:12:23Z","version":"1.0"}]root@74773db5fe1b42ab9a4b6cf679d929da000000:/var/lib/waagent/Microsoft.Azure.KeyVault.KeyVaultForLinux-1.0.1363.13/status#
Troubleshooting Key Vault Extension
If Key Vault extension is configured incorrectly, the compute node might be in usable state. To troubleshoot Key Vault extension failure, you can temporarily set requireInitialSync to false and redeploy your pool, then the compute node is in idle state, you can log in to the compute node to check KeyVault extension logs for errors and fix the configuration issues. Visit following Key Vault extension doc link for more information.
Next steps
- Learn more about Managed identities for Azure resources.
- Learn how to use customer-managed keys with user-managed identities.