Note
Access to this page requires authorization. You can try signing in or changing directories.
Access to this page requires authorization. You can try changing directories.
APPLIES TO: SDK v4
You can create complex conversation flows using the dialogs library. This article covers how to manage complex conversations that branch and loop and how to pass arguments between different parts of the dialog.
Note
To build agents with your choice of AI services, orchestration, and knowledge, consider using the Microsoft 365 Agents SDK. The Agents SDK has support for C#, JavaScript or Python. You can learn more about the Agents SDK at aka.ms/agents. If you're looking for a SaaS-based agent platform, consider Microsoft Copilot Studio. If you have an existing bot built with the Bot Framework SDK, you can update your bot to the Agents SDK. You can review the core changes and updates at Bot Framework SDK to Agents SDK migration guidance. Support tickets for the Bot Framework SDK will no longer be serviced as of December 31, 2025.
Prerequisites
- Knowledge of bot basics, managing state, the dialogs library, and how to implement sequential conversation flow.
- A copy of the complex dialog sample in C#, JavaScript, Java, or Python.
About this sample
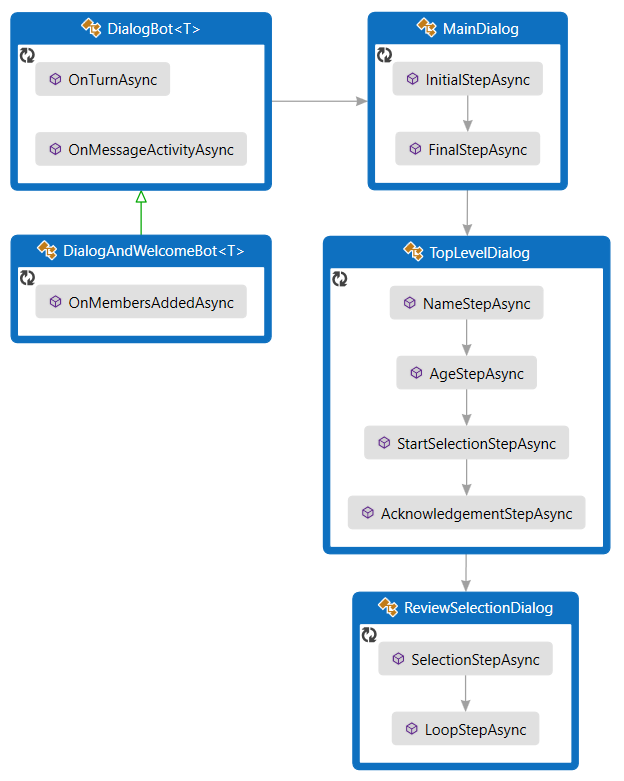
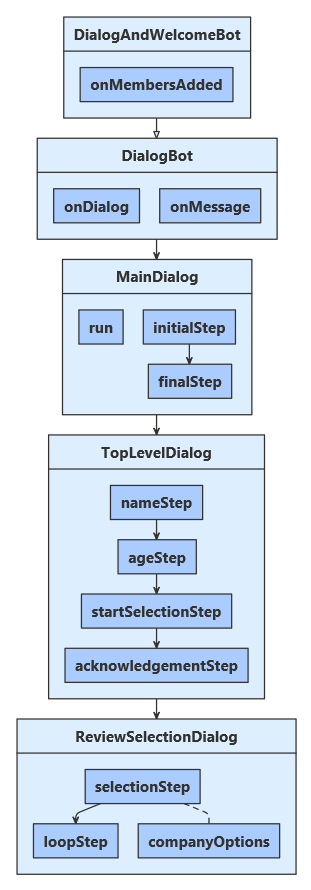
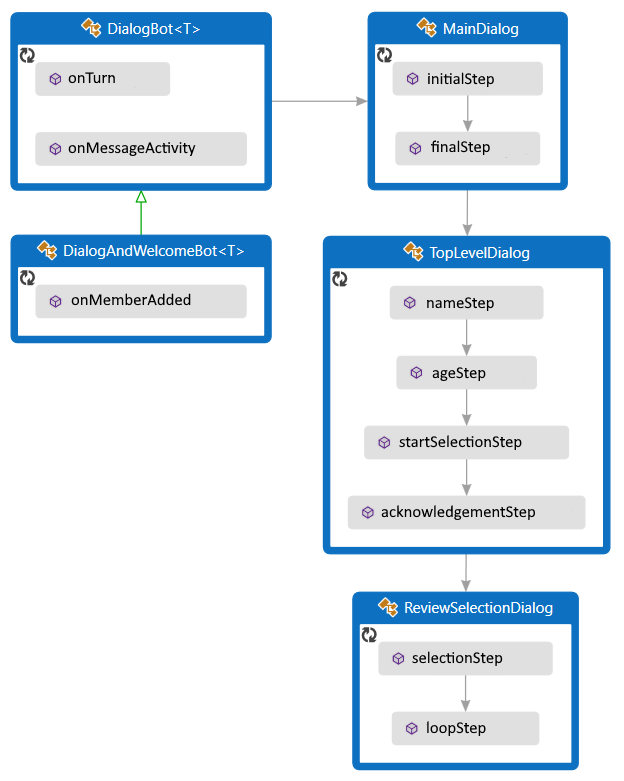
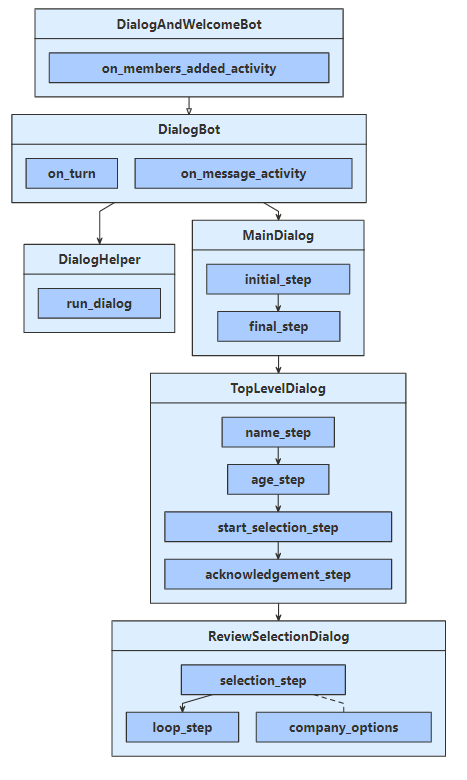
This sample represents a bot that can sign users up to review up to two companies from a list. The bot uses three component dialogs to manage the conversation flow. Each component dialog includes a waterfall dialog and any prompts needed to gather user input. These dialogs are described in more detail in the following sections. It uses conversation state to manage its dialogs and uses user state to save information about the user and which companies they want to review.
The bot derives from the activity handler. Like many of the sample bots, it welcomes the user, uses dialogs to handle messages from the user, and saves user and conversation state before the turn ends.
To use dialogs, install the Microsoft.Bot.Builder.Dialogs NuGet package.
Define the user profile
The user profile will contain information gathered by the dialogs, the user's name, age, and companies selected to review.
UserProfile.cs
/// <summary>Contains information about a user.</summary>
public class UserProfile
{
    public string Name { get; set; }

    public int Age { get; set; }

    // The list of companies the user wants to review.
    public List<string> CompaniesToReview { get; set; } = new List<string>();
Create the dialogs
This bot contains three dialogs:
- The main dialog starts the overall process and then summarizes the collected information.
- The top-level dialog collects the user information and includes branching logic, based on the user's age.
- The review-selection dialog allows the user to iteratively select companies to review. It uses looping logic to do so.
The main dialog
The main dialog has two steps:
- Start the top-level dialog.
- Retrieve and summarize the user profile that the top-level dialog collected, save that information to user state, and then signal the end of the main dialog.
Dialogs\MainDialog.cs
private async Task<DialogTurnResult> InitialStepAsync(WaterfallStepContext stepContext, CancellationToken cancellationToken)
{
    return await stepContext.BeginDialogAsync(nameof(TopLevelDialog), null, cancellationToken);
}

private async Task<DialogTurnResult> FinalStepAsync(WaterfallStepContext stepContext, CancellationToken cancellationToken)
{
    var userInfo = (UserProfile)stepContext.Result;

    string status = "You are signed up to review "
        + (userInfo.CompaniesToReview.Count is 0 ? "no companies" : string.Join(" and ", userInfo.CompaniesToReview))
        + ".";

    await stepContext.Context.SendActivityAsync(status);

    var accessor = _userState.CreateProperty<UserProfile>(nameof(UserProfile));
    await accessor.SetAsync(stepContext.Context, userInfo, cancellationToken);

    return await stepContext.EndDialogAsync(null, cancellationToken);
}
The top-level dialog
The top-level dialog has four steps:
- Ask for the user's name.
- Ask for the user's age.
- Either start the review-selection dialog or progress to the next step, based on the user's age.
- Finally, thank the user for participating and return the collected information.
The first step creates an empty user profile as part of the dialog state. The dialog starts with an empty profile and adds information to the profile as it progresses. When it ends, the last step returns the collected information.
In the third (start selection) step, the conversation flow branches, based on the user's age.
Dialogs\TopLevelDialog.cs
            stepContext.Values[UserInfo] = new UserProfile();

            var promptOptions = new PromptOptions { Prompt = MessageFactory.Text("Please enter your name.") };

            // Ask the user to enter their name.
            return await stepContext.PromptAsync(nameof(TextPrompt), promptOptions, cancellationToken);
        }

        private async Task<DialogTurnResult> AgeStepAsync(WaterfallStepContext stepContext, CancellationToken cancellationToken)
        {
            // Set the user's name to what they entered in response to the name prompt.
            var userProfile = (UserProfile)stepContext.Values[UserInfo];
            userProfile.Name = (string)stepContext.Result;

            var promptOptions = new PromptOptions { Prompt = MessageFactory.Text("Please enter your age.") };

            // Ask the user to enter their age.
            return await stepContext.PromptAsync(nameof(NumberPrompt<int>), promptOptions, cancellationToken);
        }

        private async Task<DialogTurnResult> StartSelectionStepAsync(WaterfallStepContext stepContext, CancellationToken cancellationToken)
        {
            // Set the user's age to what they entered in response to the age prompt.
            var userProfile = (UserProfile)stepContext.Values[UserInfo];
            userProfile.Age = (int)stepContext.Result;

            if (userProfile.Age < 25)
            {
                // If they are too young, skip the review selection dialog, and pass an empty list to the next step.
                await stepContext.Context.SendActivityAsync(
                    MessageFactory.Text("You must be 25 or older to participate."),
                    cancellationToken);
                return await stepContext.NextAsync(new List<string>(), cancellationToken);
            }
            else
            {
                // Otherwise, start the review selection dialog.
                return await stepContext.BeginDialogAsync(nameof(ReviewSelectionDialog), null, cancellationToken);
            }
        }

        private async Task<DialogTurnResult> AcknowledgementStepAsync(WaterfallStepContext stepContext, CancellationToken cancellationToken)
        {
            // Set the user's company selection to what they entered in the review-selection dialog.
            var userProfile = (UserProfile)stepContext.Values[UserInfo];
            userProfile.CompaniesToReview = stepContext.Result as List<string> ?? new List<string>();

            // Thank them for participating.
            await stepContext.Context.SendActivityAsync(
                MessageFactory.Text($"Thanks for participating, {((UserProfile)stepContext.Values[UserInfo]).Name}."),
                cancellationToken);

            // Exit the dialog, returning the collected user information.
            return await stepContext.EndDialogAsync(stepContext.Values[UserInfo], cancellationToken);
        }
    }
}
The review-selection dialog
The review-selection dialog has two steps:
- Ask the user to choose a company to review or
doneto finish.- If the dialog was started with any initial information, the information is available through the options property of the waterfall step context. The review-selection dialog can restart itself, and it uses this to allow the user to choose more than one company to review.
- If the user has already selected a company to review, that company is removed from the available choices.
- A
donechoice is added to allow the user to exit the loop early.
- Repeat this dialog or exit, as appropriate.
- If the user chose a company to review, add it to their list.
- If the user has chosen two companies or they chose to exit, end the dialog and return the collected list.
- Otherwise, restart the dialog, initializing it with the contents of their list.
Dialogs\ReviewSelectionDialog.cs
private async Task<DialogTurnResult> SelectionStepAsync(
    WaterfallStepContext stepContext,
    CancellationToken cancellationToken)
{
    // Continue using the same selection list, if any, from the previous iteration of this dialog.
    var list = stepContext.Options as List<string> ?? new List<string>();
    stepContext.Values[CompaniesSelected] = list;

    // Create a prompt message.
    string message;
    if (list.Count is 0)
    {
        message = $"Please choose a company to review, or `{DoneOption}` to finish.";
    }
    else
    {
        message = $"You have selected **{list[0]}**. You can review an additional company, " +
            $"or choose `{DoneOption}` to finish.";
    }

    // Create the list of options to choose from.
    var options = _companyOptions.ToList();
    options.Add(DoneOption);
    if (list.Count > 0)
    {
        options.Remove(list[0]);
    }

    var promptOptions = new PromptOptions
    {
        Prompt = MessageFactory.Text(message),
        RetryPrompt = MessageFactory.Text("Please choose an option from the list."),
        Choices = ChoiceFactory.ToChoices(options),
    };

    // Prompt the user for a choice.
    return await stepContext.PromptAsync(nameof(ChoicePrompt), promptOptions, cancellationToken);
}

private async Task<DialogTurnResult> LoopStepAsync(
    WaterfallStepContext stepContext,
    CancellationToken cancellationToken)
{
    // Retrieve their selection list, the choice they made, and whether they chose to finish.
    var list = stepContext.Values[CompaniesSelected] as List<string>;
    var choice = (FoundChoice)stepContext.Result;
    var done = choice.Value == DoneOption;

    if (!done)
    {
        // If they chose a company, add it to the list.
        list.Add(choice.Value);
    }

    if (done || list.Count >= 2)
    {
        // If they're done, exit and return their list.
        return await stepContext.EndDialogAsync(list, cancellationToken);
    }
    else
    {
        // Otherwise, repeat this dialog, passing in the list from this iteration.
        return await stepContext.ReplaceDialogAsync(InitialDialogId, list, cancellationToken);
    }
}
Run the dialogs
The dialog bot class extends the activity handler, and it contains the logic for running the dialogs. The dialog and welcome bot class extends the dialog bot to also welcome a user when they join the conversation.
The bot's turn handler repeats the conversation flow defined by the three dialogs. When it receives a message from the user:
- It runs the main dialog.
- If the dialog stack is empty, this will start the main dialog.
- Otherwise, the dialogs are still in mid-process, and this will continue the active dialog.
- It saves state, so that any updates to the user, conversation, and dialog state are persisted.
Bots\DialogBot.cs
public override async Task OnTurnAsync(ITurnContext turnContext, CancellationToken cancellationToken = default(CancellationToken))
{
    await base.OnTurnAsync(turnContext, cancellationToken);

    // Save any state changes that might have occurred during the turn.
    await ConversationState.SaveChangesAsync(turnContext, false, cancellationToken);
    await UserState.SaveChangesAsync(turnContext, false, cancellationToken);
}

protected override async Task OnMessageActivityAsync(ITurnContext<IMessageActivity> turnContext, CancellationToken cancellationToken)
{
    Logger.LogInformation("Running dialog with Message Activity.");

    // Run the Dialog with the new message Activity.
    await Dialog.RunAsync(turnContext, ConversationState.CreateProperty<DialogState>(nameof(DialogState)), cancellationToken);
}
Register services for the bot
Create and register services as needed:
- Basic services for the bot: an adapter and the bot implementation.
- Services for managing state: storage, user state, and conversation state.
- The root dialog the bot will use.
Startup.cs
// This method gets called by the runtime. Use this method to add services to the container.
public void ConfigureServices(IServiceCollection services)
{
    services.AddHttpClient().AddControllers().AddNewtonsoftJson(options =>
    {
        options.SerializerSettings.MaxDepth = HttpHelper.BotMessageSerializerSettings.MaxDepth;
    });

    // Create the Bot Framework Authentication to be used with the Bot Adapter.
    services.AddSingleton<BotFrameworkAuthentication, ConfigurationBotFrameworkAuthentication>();

    // Create the Bot Adapter with error handling enabled.
    services.AddSingleton<IBotFrameworkHttpAdapter, AdapterWithErrorHandler>();

    // Create the storage we'll be using for User and Conversation state. (Memory is great for testing purposes.)
    services.AddSingleton<IStorage, MemoryStorage>();

    // Create the User state. (Used in this bot's Dialog implementation.)
    services.AddSingleton<UserState>();
Note
Memory storage is used for testing purposes only and isn't intended for production use. Be sure to use a persistent type of storage for a production bot.
Test the bot
If you haven't done so already, install the Bot Framework Emulator.
Run the sample locally on your machine.
Start the Emulator, connect to your bot, and send messages as shown below.

Additional resources
For an introduction on how to implement a dialog, see implement sequential conversation flow, which uses a single waterfall dialog and a few prompts to ask the user a series of questions.
The Dialogs library includes basic validation for prompts. You can also add custom validation. For more information, see gather user input using a dialog prompt.
To simplify your dialog code and reuse it multiple bots, you can define portions of a dialog set as a separate class. For more information, see reuse dialogs.