Quickstart: Create a multi-service resource for Azure AI services
Learn how to create and manage a multi-service resource for Azure AI services. A multi-service resource allows you to access multiple Azure AI services with a single key and endpoint. It also consolidates billing from the services you use.
You can access Azure AI services through two different resources: A multi-service resource, or a single-service one.
- Multi-service resource:
- Access multiple Azure AI services with a single key and endpoint.
- Consolidates billing from the services you use.
- Single-service resource:
- Access a single Azure AI service with a unique key and endpoint for each service created.
- Most Azure AI services offer a free tier to try it out.
Azure AI services are Azure resources that you create under your Azure subscription. After you create a resource, you can use the keys and endpoint generated to authenticate your applications.
Supported services with a multi-service resource
The multi-service resource enables access to the following Azure AI services with a single key and endpoint. Use these links to find quickstart articles, samples, and more to start using your resource.
| Service | Description |
|---|---|
| Detect potentially offensive or unwanted content. | |
| Customize image recognition for your business. | |
| Turn documents into intelligent data-driven solutions. | |
| Detect and identify people and emotions in images. | |
| Build apps with industry-leading natural language understanding capabilities. | |
| Speech to text, text to speech, translation, and speaker recognition. | |
| Use AI-powered translation technology to translate more than 100 in-use, at-risk, and endangered languages and dialects.. | |
| Analyze content in images and videos. |
Prerequisites
- A valid Azure subscription - Create one for free.
- Your Azure account must have a
Cognitive Services Contributorrole assigned in order for you to agree to the responsible AI terms and create a resource. To get this role assigned to your account, follow the steps in the Assign roles documentation, or contact your administrator.
Create a new multi-service resource
The multi-service resource is listed under Azure AI services > Azure AI services multi-service account in the portal. To create a multi-service resource follow these instructions:
Select this link to create a multi-service resource: https://portal.azure.com/#create/Microsoft.CognitiveServicesAllInOne
On the Create page, provide the following information:
Project details Description Subscription Select one of your available Azure subscriptions. Resource group The Azure resource group that will contain your Azure AI services resource. You can create a new group or add it to a pre-existing group. Region The location of your Azure AI service instance. Different locations may introduce latency, but have no impact on the runtime availability of your resource. Name A descriptive name for your Azure AI services resource. For example, MyCognitiveServicesResource. Pricing tier The cost of your Azure AI services account depends on the options you choose and your usage. For more information, see the API pricing details. 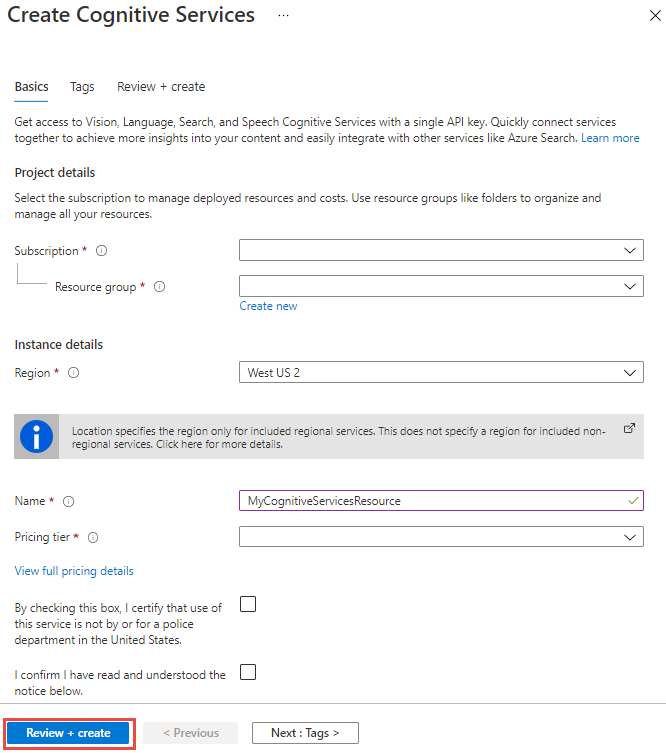
Configure other settings for your resource as needed, read and accept the conditions (as applicable), and then select Review + create.
Tip
If your subscription doesn't allow you to create an Azure AI services resource, you may need to enable the privilege of that Azure resource provider using the Azure portal, PowerShell command or an Azure CLI command. If you are not the subscription owner, ask the Subscription Owner or someone with a role of admin to complete the registration for you or ask for the /register/action privileges to be granted to your account.
Get the keys for your resource
After your resource is successfully deployed, select Next Steps > Go to resource.
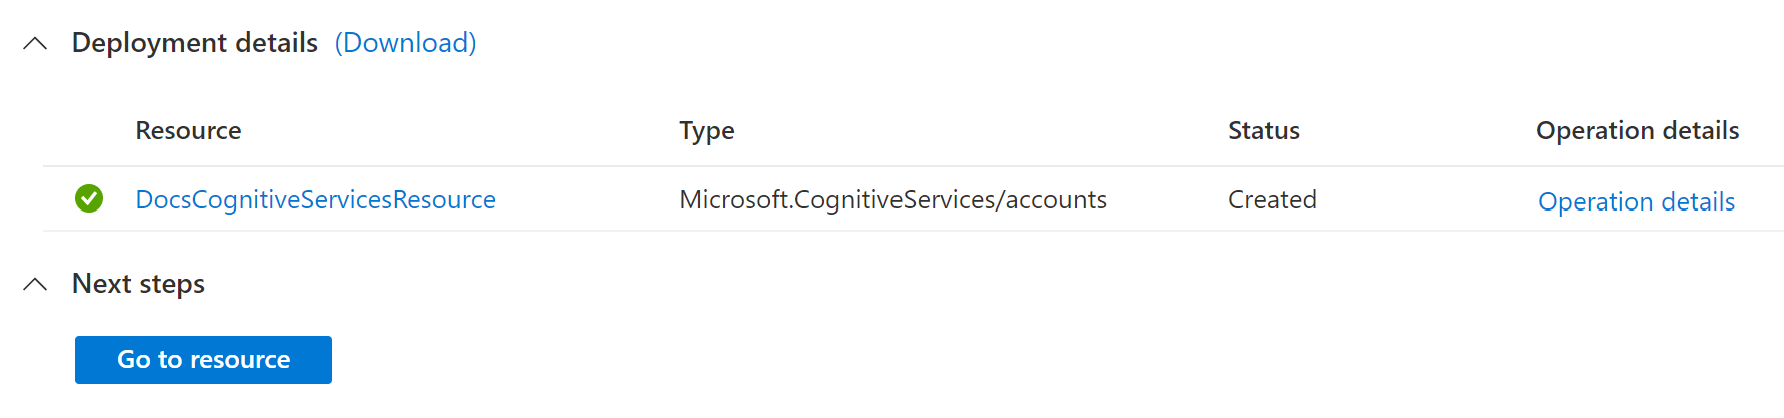
From the quickstart pane that opens, you can access the resource endpoint and manage keys.
Configure an environment variable for authentication
Your application must be authenticated to access Azure AI services resources. To set the environment variable for your resource key, open a console window, and follow the instructions for your operating system and development environment. To set the COGNITIVE_SERVICE_KEY environment variable, replace your-key with one of the keys for your resource.
For production, use a secure way of storing and accessing your credentials, such as a password-protected secret vault. For test, writing to an environment variable is standard practice, but keep in mind that environment variables are stored in clear text on the local machine.
Tip
Don't include the key directly in your code, and never post it publicly. See the Azure AI services security article for more authentication options like Azure Key Vault.
PowerShell includes an extensible solution, Secret Management, for storing secure strings in platforms such as Secret Store or Azure KeyVault.
To set up a secret store to host secure strings, see the article Getting started using secret store. Then use the following examples to store your api keys.
Set-Secret -Name COGNITIVE_SERVICE_KEY -value your-key
For test environments, you can either use PowerShell's $Env: syntax to set an environment variable for only the current session, or the setx command to retain the variable across sessions. Remember that these values are stored in clear text in Windows registry keys.
$Env:COGNITIVE_SERVICE_KEY = your-key
setx COGNITIVE_SERVICE_KEY your-key
After you add the environment variable using setx, you may need to restart any running consoles or other programs that will need to read the environment variable. For example, if you are using Visual Studio as your editor, restart Visual Studio before running the example.
To set the environment variable for your Speech resource region, follow the same steps. Set COGNITIVE_SERVICE_REGION to the region of your resource. For example, westus.
Clean up resources
If you want to clean up and remove an Azure AI services subscription, you can delete the resource or resource group. Deleting the resource group also deletes any other resources contained in the group.
- In the Azure portal, expand the menu on the left side to open the menu of services, and choose Resource Groups to display the list of your resource groups.
- Locate the resource group containing the resource to be deleted.
- If you want to delete the entire resource group, select the resource group name. On the next page, Select Delete resource group, and confirm.
- If you want to delete only the Azure AI services resource, select the resource group to see all the resources within it. On the next page, select the resource that you want to delete, select the ellipsis menu for that row, and select Delete.
Use this quickstart to create an Azure AI services resource using Azure Command-Line Interface (CLI) commands. After you create the resource, use the keys and endpoint generated for you to authenticate your applications.
Azure AI services are cloud-based artificial intelligence (AI) services that help developers build cognitive intelligence into applications without having direct AI or data science skills or knowledge. They are available through REST APIs and client library SDKs in popular development languages. Azure AI services enables developers to easily add cognitive features into their applications with cognitive solutions that can see, hear, speak, and analyze.
Prerequisites
- A valid Azure subscription - Create one for free.
- The Azure CLI
- Your Azure account must have a
Cognitive Services Contributorrole assigned in order for you to agree to the responsible AI terms and create a resource. To get this role assigned to your account, follow the steps in the Assign roles documentation, or contact your administrator. - If you're planning to use Spatial Analysis in Azure AI Vision or Text Analytics for Health in Azure AI Language, then you must create your first Vision or Language resources from the Azure portal so you can review and acknowledge the terms and conditions. You can do so here: Azure AI Language, Azure AI Vision. After that, you can create subsequent resources using any deployment tool (for example, SDK, CLI, or ARM template) under the same Azure subscription.
Install the Azure CLI and sign in
Install the Azure CLI. To sign into your local installation of the CLI, run the az login command:
az login
You can also use the green Try It button to run these commands in your browser.
Create a new Azure AI services resource group
Before you create an Azure AI services resource, you must have an Azure resource group to contain the resource. When you create a new resource, you can either create a new resource group, or use an existing one. This article shows how to create a new resource group.
Choose your resource group location
To create a resource, you'll need one of the Azure locations available for your subscription. You can retrieve a list of available locations with the az account list-locations command. Most Azure AI services can be accessed from several locations. Choose the one closest to you, or see which locations are available for the service.
Important
- Remember your Azure location, as you will need it when calling the Azure AI services resources.
- The availability of some Azure AI services can vary by region. For more information, see Azure products by region.
az account list-locations --query "[].{Region:name}" --out table
After you have your Azure location, create a new resource group in the Azure CLI using the az group create command. In the example below, replace the Azure location westus2 with one of the Azure locations available for your subscription.
az group create --name ai-services-resource-group --location westus2
Create an Azure AI services resource
Choose a service and pricing tier
When you create a new resource, you'll need to know the kind of service you want to use, along with the pricing tier (or SKU) you want. You'll use this and other information as parameters when you create the resource.
The following tables provide information about products and pricing for Azure AI services.
Multi-service
| Service | Kind |
|---|---|
| Multiple services. For more information, see the pricing page. | CognitiveServices |
Vision
| Service | Kind |
|---|---|
| Vision | ComputerVision |
| Custom Vision - Prediction | CustomVision.Prediction |
| Custom Vision - Training | CustomVision.Training |
| Face | Face |
| Document Intelligence | FormRecognizer |
Speech
| Service | Kind |
|---|---|
| Speech | SpeechServices |
Language
| Service | Kind |
|---|---|
| Language Understanding (LUIS) | LUIS |
| QnA Maker | QnAMaker |
| Language | TextAnalytics |
| Text Translation | TextTranslation |
Decision
| Service | Kind |
|---|---|
| Anomaly Detector | AnomalyDetector |
| Content Moderator | ContentModerator |
| Personalizer | Personalizer |
Azure OpenAI
| Service | Kind |
|---|---|
| Azure OpenAI | OpenAI |
Pricing tiers and billing
Pricing tiers (and the amount you're billed) are based on the number of transactions that you send by using your authentication information. Each pricing tier specifies the:
- Maximum number of allowed transactions per second (TPS).
- Service features enabled within the pricing tier.
- Cost for a predefined number of transactions. Going above this number will cause an extra charge, as specified in the pricing details for your service.
Note
Many of the Azure AI services have a free tier that you can use to try the service. To use the free tier, use F0 as the pricing tier for your resource.
You can find a list of available Azure AI services "kinds" with the az cognitiveservices account list-kinds command:
az cognitiveservices account list-kinds
Add a new resource to your resource group
To create and subscribe to a new Azure AI services resource, use the az cognitiveservices account create command. This command adds a new billable resource to the resource group you created earlier. When you create your new resource, you'll need to know the "kind" of service you want to use, along with its pricing tier (or SKU) and an Azure location:
You can create a Standard S0 multi-service resource named multi-service-resource with the command below.
az cognitiveservices account create --name multi-service-resource --resource-group ai-services-resource-group --kind CognitiveServices --sku F0 --location westus2 --yes
Tip
If your subscription doesn't allow you to create an Azure AI services resource, you may need to enable the privilege of that Azure resource provider using the Azure portal, PowerShell command or an Azure CLI command. If you are not the subscription owner, ask the Subscription Owner or someone with a role of admin to complete the registration for you or ask for the /register/action privileges to be granted to your account.
Get the keys for your resource
To log into your local installation of the Command-Line Interface(CLI), use the az login command.
az login
Use the az cognitiveservices account keys list command to get the keys for your resource.
az cognitiveservices account keys list --name multi-service-resource --resource-group ai-services-resource-group
Configure an environment variable for authentication
Your application must be authenticated to access Azure AI services resources. To set the environment variable for your resource key, open a console window, and follow the instructions for your operating system and development environment. To set the COGNITIVE_SERVICE_KEY environment variable, replace your-key with one of the keys for your resource.
For production, use a secure way of storing and accessing your credentials, such as a password-protected secret vault. For test, writing to an environment variable is standard practice, but keep in mind that environment variables are stored in clear text on the local machine.
Tip
Don't include the key directly in your code, and never post it publicly. See the Azure AI services security article for more authentication options like Azure Key Vault.
PowerShell includes an extensible solution, Secret Management, for storing secure strings in platforms such as Secret Store or Azure KeyVault.
To set up a secret store to host secure strings, see the article Getting started using secret store. Then use the following examples to store your api keys.
Set-Secret -Name COGNITIVE_SERVICE_KEY -value your-key
For test environments, you can either use PowerShell's $Env: syntax to set an environment variable for only the current session, or the setx command to retain the variable across sessions. Remember that these values are stored in clear text in Windows registry keys.
$Env:COGNITIVE_SERVICE_KEY = your-key
setx COGNITIVE_SERVICE_KEY your-key
After you add the environment variable using setx, you may need to restart any running consoles or other programs that will need to read the environment variable. For example, if you are using Visual Studio as your editor, restart Visual Studio before running the example.
To set the environment variable for your Speech resource region, follow the same steps. Set COGNITIVE_SERVICE_REGION to the region of your resource. For example, westus.
Pricing tiers and billing
Pricing tiers (and the amount you get billed) are based on the number of transactions you send using your authentication information. Each pricing tier specifies the:
- maximum number of allowed transactions per second (TPS).
- service features enabled within the pricing tier.
- The cost for a predefined number of transactions. Going above this amount will cause an extra charge as specified in the pricing details for your service.
Get current quota usage for your resource
Use the az cognitiveservices account list-usage command to get the usage for your resource.
az cognitiveservices account list-usage --name multi-service-resource --resource-group ai-services-resource-group --subscription subscription-name
Clean up resources
If you want to clean up and remove an Azure AI services resource, you can delete it or the resource group. Deleting the resource group also deletes any other resources contained in the group.
To remove the resource group and its associated resources, use the az group delete command.
az group delete --name ai-services-resource-group
Use this quickstart to create an Azure AI services resource using Azure PowerShell commands. After you create the resource, use the keys and endpoint generated for you to authenticate your applications.
Azure AI services are cloud-based artificial intelligence (AI) services that help developers build cognitive intelligence into applications without having direct AI or data science skills or knowledge. They are available through REST APIs and client library SDKs in popular development languages. Azure AI services enables developers to easily add cognitive features into their applications with cognitive solutions that can see, hear, speak, and analyze.
Prerequisites
- A valid Azure subscription - Create one for free.
- Azure PowerShell
- Your Azure account must have a
Cognitive Services Contributorrole assigned in order for you to agree to the responsible AI terms and create a resource. To get this role assigned to your account, follow the steps in the Assign roles documentation, or contact your administrator. - If you're planning to use Spatial Analysis in Azure AI Vision or Text Analytics for Health in Azure AI Language, then you must create your first Vision or Language resources from the Azure portal so you can review and acknowledge the terms and conditions. You can do so here: Azure AI Language, Azure AI Vision. After that, you can create subsequent resources using any deployment tool (for example, SDK, CLI, or ARM template) under the same Azure subscription.
Install Azure PowerShell and sign in
Install Azure PowerShell. To sign in, run the Connect-AzAccount command:
Connect-AzAccount
You can also use the green Try It button to run these commands in your browser.
Create a new Azure AI services resource group
Before you create an Azure AI services resource, you must have an Azure resource group to contain the resource. When you create a new resource, you can either create a new resource group, or use an existing one. This article shows how to create a new resource group.
Choose your resource group location
To create a resource, you'll need one of the Azure locations available for your subscription. You can retrieve a list of available locations with the Get-AzLocation command. Most Azure AI services can be accessed from several locations. Choose the one closest to you, or see which locations are available for the service.
Important
- Remember your Azure location, as you will need it when calling the Azure AI services resources.
- The availability of some Azure AI services can vary by region. For more information, see Azure products by region.
Get-AzLocation | Select-Object -Property Location, DisplayName
After you have your Azure location, create a new resource group in Azure PowerShell using the New-AzResourceGroup command. In the example below, replace the Azure location westus2 with one of the Azure locations available for your subscription.
New-AzResourceGroup -Name ai-services-resource-group -Location westus2
Create an Azure AI services resource
Choose a service and pricing tier
When you create a new resource, you'll need to know the kind of service you want to use, along with the pricing tier (or SKU) you want. You'll use this and other information as parameters when you create the resource.
The following tables provide information about products and pricing for Azure AI services.
Multi-service
| Service | Kind |
|---|---|
| Multiple services. For more information, see the pricing page. | CognitiveServices |
Vision
| Service | Kind |
|---|---|
| Vision | ComputerVision |
| Custom Vision - Prediction | CustomVision.Prediction |
| Custom Vision - Training | CustomVision.Training |
| Face | Face |
| Document Intelligence | FormRecognizer |
Speech
| Service | Kind |
|---|---|
| Speech | SpeechServices |
Language
| Service | Kind |
|---|---|
| Language Understanding (LUIS) | LUIS |
| QnA Maker | QnAMaker |
| Language | TextAnalytics |
| Text Translation | TextTranslation |
Decision
| Service | Kind |
|---|---|
| Anomaly Detector | AnomalyDetector |
| Content Moderator | ContentModerator |
| Personalizer | Personalizer |
Azure OpenAI
| Service | Kind |
|---|---|
| Azure OpenAI | OpenAI |
Pricing tiers and billing
Pricing tiers (and the amount you're billed) are based on the number of transactions that you send by using your authentication information. Each pricing tier specifies the:
- Maximum number of allowed transactions per second (TPS).
- Service features enabled within the pricing tier.
- Cost for a predefined number of transactions. Going above this number will cause an extra charge, as specified in the pricing details for your service.
Note
Many of the Azure AI services have a free tier that you can use to try the service. To use the free tier, use F0 as the pricing tier for your resource.
You can find a list of available Azure AI services "kinds" with the Get-AzCognitiveServicesAccountType command:
Get-AzCognitiveServicesAccountType
Add a new resource to your resource group
To create and subscribe to a new Azure AI services resource, use the New-AzCognitiveServicesAccount command. This command adds a new billable resource to the resource group you created earlier. When you create your new resource, you'll need to know the "kind" of service you want to use, along with its pricing tier (or SKU) and an Azure location:
You can create a Standard S0 multi-service resource named multi-service-resource with the command below.
New-AzCognitiveServicesAccount -ResourceGroupName ai-services-resource-group -Name multi-service-resource -Type CognitiveServices -SkuName F0 -Location westus2
Tip
If your subscription doesn't allow you to create an Azure AI services resource, you may need to enable the privilege of that Azure resource provider using the Azure portal, an Azure PowerShell command or an Azure CLI command. If you are not the subscription owner, ask the Subscription Owner or someone with a role of admin to complete the registration for you or ask for the /register/action privileges to be granted to your account.
Get the keys for your resource
Use the Get-AzCognitiveServicesAccountKey command to get the keys for your resource.
Get-AzCognitiveServicesAccountKey -Name multi-service-resource -ResourceGroupName ai-services-resource-group
Configure an environment variable for authentication
Your application must be authenticated to access Azure AI services resources. To set the environment variable for your resource key, open a console window, and follow the instructions for your operating system and development environment. To set the COGNITIVE_SERVICE_KEY environment variable, replace your-key with one of the keys for your resource.
For production, use a secure way of storing and accessing your credentials, such as a password-protected secret vault. For test, writing to an environment variable is standard practice, but keep in mind that environment variables are stored in clear text on the local machine.
Tip
Don't include the key directly in your code, and never post it publicly. See the Azure AI services security article for more authentication options like Azure Key Vault.
PowerShell includes an extensible solution, Secret Management, for storing secure strings in platforms such as Secret Store or Azure KeyVault.
To set up a secret store to host secure strings, see the article Getting started using secret store. Then use the following examples to store your api keys.
Set-Secret -Name COGNITIVE_SERVICE_KEY -value your-key
For test environments, you can either use PowerShell's $Env: syntax to set an environment variable for only the current session, or the setx command to retain the variable across sessions. Remember that these values are stored in clear text in Windows registry keys.
$Env:COGNITIVE_SERVICE_KEY = your-key
setx COGNITIVE_SERVICE_KEY your-key
After you add the environment variable using setx, you may need to restart any running consoles or other programs that will need to read the environment variable. For example, if you are using Visual Studio as your editor, restart Visual Studio before running the example.
To set the environment variable for your Speech resource region, follow the same steps. Set COGNITIVE_SERVICE_REGION to the region of your resource. For example, westus.
Pricing tiers and billing
Pricing tiers (and the amount you get billed) are based on the number of transactions you send using your authentication information. Each pricing tier specifies the:
- maximum number of allowed transactions per second (TPS).
- service features enabled within the pricing tier.
- The cost for a predefined number of transactions. Going above this amount will cause an extra charge as specified in the pricing details for your service.
Get current quota usage for your resource
Use the Get-AzCognitiveServicesAccountUsage command to get the usage for your resource.
Get-AzCognitiveServicesAccountUsage -ResourceGroupName ai-services-resource-group -Name multi-service-resource
Clean up resources
If you want to clean up and remove an Azure AI services resource, you can delete it or the resource group. Deleting the resource group also deletes any other resources contained in the group.
To remove the resource group and its associated resources, use the Remove-AzResourceGroup command.
Remove-AzResourceGroup -Name ai-services-resource-group
Reference documentation | Library source code | Package (NuGet) | Samples
C# prerequisites
- A valid Azure subscription - Create one for free.
- The current version of .NET Core.
- Your Azure account must have a
Cognitive Services Contributorrole assigned in order for you to agree to the responsible AI terms and create a resource. To get this role assigned to your account, follow the steps in the Assign roles documentation, or contact your administrator. - If you're planning to use Spatial Analysis in Azure AI Vision or Text Analytics for Health in Azure AI Language, then you must create your first Vision or Language resources from the Azure portal so you can review and acknowledge the terms and conditions. You can do so here: Azure AI Language, Azure AI Vision. After that, you can create subsequent resources using any deployment tool (for example, SDK, CLI, or ARM template) under the same Azure subscription.
Create an Azure Service Principal
To have your application interact with your Azure account, you need an Azure service principal to manage permissions. Follow the instructions in Create an Azure service principal.
When you create a service principal, you'll see it has a secret value, an ID, and an application ID. Save the application ID and secret to a temporary location for later steps.
Create a resource group
Before you create an Azure AI services resource, your account must have an Azure resource group to contain the resource. If you don't already have a resource group, create one in the Azure portal before continuing.
Create a new C# application
Create a new .NET Core application. In a console window (such as cmd, PowerShell, or Bash), use the dotnet new command to create a new console app with the name azure-management-quickstart. This command creates a simple "Hello World" C# project with a single source file: program.cs.
dotnet new console -n azure-management-quickstart
Change your directory to the newly created app folder. You can build the application with:
dotnet build
The build output should contain no warnings or errors.
...
Build succeeded.
 0 Warning(s)
 0 Error(s)
...
Install the client library
Within the application directory, install the Azure Management client library for .NET with the following command:
dotnet add package Azure.ResourceManager.CognitiveServices
dotnet add package Microsoft.Azure.Management.Fluent
dotnet add package Microsoft.Azure.Management.ResourceManager.Fluent
If you're using the Visual Studio IDE, the client library is available as a downloadable NuGet package.
Import libraries
Open program.cs and add the following using statements to the top of the file:
using System;
using Microsoft.Azure.Management.Fluent;
using Microsoft.Azure.Management.ResourceManager.Fluent;
using Microsoft.Azure.Management.ResourceManager.Fluent.Authentication;
using Microsoft.Azure.Management.CognitiveServices;
using Microsoft.Azure.Management.CognitiveServices.Models;
Authenticate the client
Add the following fields to the root of program.cs and populate their values, using the service principal you created and your Azure account information.
const string  service_principal_application_id = "PASTE_YOUR_SERVICE_PRINCIPAL_APPLICATION_ID_HERE";
const string  service_principal_secret = "PASTE_YOUR_SERVICE_PRINCIPAL_SECRET_HERE";

/* The ID of your Azure subscription. You can find this in the Azure Dashboard under Home > Subscriptions. */
const string  subscription_id = "PASTE_YOUR_SUBSCRIPTION_ID_HERE";

/* The Active Directory tenant ID. You can find this in the Azure Dashboard under Home > Azure Active Directory. */
const string  tenant_id = "PASTE_YOUR_TENANT_ID_HERE";

/* The name of the Azure resource group in which you want to create the resource.
You can find resource groups in the Azure Dashboard under Home > Resource groups. */
const string  resource_group_name = "PASTE_YOUR_RESOURCE_GROUP_NAME_HERE";

/* The name of the custom subdomain to use when you create the resource. This is optional.
For example, if you create a Bing Search v7 resource with the custom subdomain name 'my-search-resource',
your resource would have the endpoint https://my-search-resource.cognitiveservices.azure.com/.
Note not all Cognitive Services allow custom subdomain names. */
const string subdomain_name = "PASTE_YOUR_SUBDOMAIN_NAME_HERE";
Then, in your Main method, use these values to construct a CognitiveServicesManagementClient object. This object is needed for all of your Azure management operations.
var service_principal_credentials = new ServicePrincipalLoginInformation ();
service_principal_credentials.ClientId = service_principal_application_id;
service_principal_credentials.ClientSecret = service_principal_secret;

var credentials = SdkContext.AzureCredentialsFactory.FromServicePrincipal(service_principal_application_id, service_principal_secret, tenant_id, AzureEnvironment.AzureGlobalCloud);
var client = new CognitiveServicesManagementClient(credentials);
client.SubscriptionId = subscription_id;
Call management methods
Add the following code to your Main method to list available resources, create a sample resource, list your owned resources, and then delete the sample resource. You'll define these methods in the next steps.
    // Uncomment to list all available resource kinds, SKUs, and locations for your Azure account:
    //list_available_kinds_skus_locations(client);

    // Create a resource with kind TextTranslation, F0 (free tier), location global.
    create_resource(client, "test_resource", "TextTranslation", "F0", "Global");

    // List all resources for your Azure account and resource group:
    list_resources(client);

    // Delete the resource.
    delete_resource(client, "test_resource");

    Console.WriteLine("Press any key to exit.");
    Console.ReadKey();
Create an Azure AI services resource (C#)
To create and subscribe to a new Azure AI services resource, use the Create method. This method adds a new billable resource to the resource group you pass in. When creating your new resource, you'll need to know the "kind" of service you want to use, along with its pricing tier (or SKU) and an Azure location. The following method takes all of these as arguments and creates a resource.
static void create_resource(CognitiveServicesManagementClient client, string resource_name, string kind, string account_tier, string location)
{
    Console.WriteLine("Creating resource: " + resource_name + "...");
    /* NOTE If you do not want to use a custom subdomain name, remove the customSubDomainName
    property from CognitiveServicesAccountProperties. */
    CognitiveServicesAccount parameters =
        new CognitiveServicesAccount(null, null, kind, location, resource_name, new CognitiveServicesAccountProperties(customSubDomainName : subdomain_name), new Sku(account_tier));
    var result = client.Accounts.Create(resource_group_name, resource_name, parameters);
    Console.WriteLine("Resource created.");
    Console.WriteLine("ID: " + result.Id);
    Console.WriteLine("Kind: " + result.Kind);
    Console.WriteLine();
}
Choose a service and pricing tier
When you create a new resource, you'll need to know the "kind" of service you want to use, along with the pricing tier (or SKU) you want. You'll use this and other information as parameters when creating the resource. You can find a list of available Azure AI services "kinds" by calling the following method in your script:
static void list_available_kinds_skus_locations(CognitiveServicesManagementClient client)
{

    Console.WriteLine("Available SKUs:");
    var result = client.ResourceSkus.List();
    Console.WriteLine("Kind\tSKU Name\tSKU Tier\tLocations");
    foreach (var x in result) {
        var locations = "";
        foreach (var region in x.Locations)
        {
            locations += region;
        }
        Console.WriteLine(x.Kind + "\t" + x.Name + "\t" + x.Tier + "\t" + locations);
    };
}
The following tables provide information about products and pricing for Azure AI services.
Multi-service
| Service | Kind |
|---|---|
| Multiple services. For more information, see the pricing page. | CognitiveServices |
Vision
| Service | Kind |
|---|---|
| Vision | ComputerVision |
| Custom Vision - Prediction | CustomVision.Prediction |
| Custom Vision - Training | CustomVision.Training |
| Face | Face |
| Document Intelligence | FormRecognizer |
Speech
| Service | Kind |
|---|---|
| Speech | SpeechServices |
Language
| Service | Kind |
|---|---|
| Language Understanding (LUIS) | LUIS |
| QnA Maker | QnAMaker |
| Language | TextAnalytics |
| Text Translation | TextTranslation |
Decision
| Service | Kind |
|---|---|
| Anomaly Detector | AnomalyDetector |
| Content Moderator | ContentModerator |
| Personalizer | Personalizer |
Azure OpenAI
| Service | Kind |
|---|---|
| Azure OpenAI | OpenAI |
Pricing tiers and billing
Pricing tiers (and the amount you're billed) are based on the number of transactions that you send by using your authentication information. Each pricing tier specifies the:
- Maximum number of allowed transactions per second (TPS).
- Service features enabled within the pricing tier.
- Cost for a predefined number of transactions. Going above this number will cause an extra charge, as specified in the pricing details for your service.
Note
Many of the Azure AI services have a free tier that you can use to try the service. To use the free tier, use F0 as the pricing tier for your resource.
View your resources
To view all of the resources under your Azure account (across all resource groups), use the following method:
static void list_resources(CognitiveServicesManagementClient client)
{
    Console.WriteLine("Resources in resource group: " + resource_group_name);
    var result = client.Accounts.ListByResourceGroup(resource_group_name);
    foreach (var x in result)
    {
        Console.WriteLine("ID: " + x.Id);
        Console.WriteLine("Name: " + x.Name);
        Console.WriteLine("Type: " + x.Type);
        Console.WriteLine("Kind: " + x.Kind);
        Console.WriteLine();
    }
}
Delete a resource
The following method deletes the specified resource from the given resource group.
static void delete_resource(CognitiveServicesManagementClient client, string resource_name)
{
    Console.WriteLine("Deleting resource: " + resource_name + "...");
    client.Accounts.Delete (resource_group_name, resource_name);

    Console.WriteLine("Resource deleted.");
    Console.WriteLine();
}
Run the application
Run the application from your application directory with the dotnet run command.
dotnet run
Reference documentation | Library source code | Package (Maven)
Java prerequisites
- A valid Azure subscription - Create one for free.
- The current version of the Java Development Kit(JDK)
- The Gradle build tool, or another dependency manager.
- Your Azure account must have a
Cognitive Services Contributorrole assigned in order for you to agree to the responsible AI terms and create a resource. To get this role assigned to your account, follow the steps in the Assign roles documentation, or contact your administrator. - If you're planning to use Spatial Analysis in Azure AI Vision or Text Analytics for Health in Azure AI Language, then you must create your first Vision or Language resources from the Azure portal so you can review and acknowledge the terms and conditions. You can do so here: Azure AI Language, Azure AI Vision. After that, you can create subsequent resources using any deployment tool (for example, SDK, CLI, or ARM template) under the same Azure subscription.
Create an Azure Service Principal
To have your application interact with your Azure account, you need an Azure service principal to manage permissions. Follow the instructions in Create an Azure service principal.
When you create a service principal, you'll see it has a secret value, an ID, and an application ID. Save the application ID and secret to a temporary location for later steps.
Create a resource group
Before you create an Azure AI services resource, your account must have an Azure resource group to contain the resource. If you don't already have a resource group, create one in the Azure portal before continuing.
Create a new Java application
In a console window (such as cmd, PowerShell, or Bash), create a new directory for your app, and navigate to it.
mkdir myapp && cd myapp
Run the gradle init command from your working directory. This command will create essential build files for Gradle, including build.gradle.kts which is used at runtime to create and configure your application.
gradle init --type basic
When prompted to choose a DSL, select Kotlin.
From your working directory, run the following command:
mkdir -p src/main/java
Install the client library
This quickstart uses the Gradle dependency manager. You can find the client library and information for other dependency managers on the Maven Central Repository.
In your project's build.gradle.kts file, include the client library as an implementation statement, along with the required plugins and settings.
plugins {
    java
    application
}
application {
    mainClass.set("FormRecognizer")
}
repositories {
    mavenCentral()
}
dependencies {
    implementation(group = "com.microsoft.azure", name = "azure-mgmt-cognitiveservices", version = "1.10.0-beta")
}
Import libraries
Navigate to the new src/main/java folder and create a file called Management.java. Open it in your preferred editor or IDE and add the following import statements:
import com.azure.core.management.*;
import com.azure.core.management.profile.*;
import com.azure.identity.*;
import com.azure.resourcemanager.cognitiveservices.*;
import com.azure.resourcemanager.cognitiveservices.implementation.*;
import com.azure.resourcemanager.cognitiveservices.models.*;

import java.io.*;
import java.lang.Object.*;
import java.util.*;
import java.net.*;
Authenticate the client
Add a class in Management.java, and then add the following fields and their values inside of it. Populate their values, using the service principal you created and your other Azure account information.
/*
Be sure to use the service pricipal application ID, not simply the ID.
*/

private static String applicationId = "PASTE_YOUR_SERVICE_PRINCIPAL_APPLICATION_ID_HERE";
private static String applicationSecret = "PASTE_YOUR_SERVICE_PRINCIPAL_SECRET_HERE";

/* The ID of your Azure subscription. You can find this in the Azure Dashboard under Home > Subscriptions. */
private static String subscriptionId = "PASTE_YOUR_SUBSCRIPTION_ID_HERE";

/* The Active Directory tenant ID. You can find this in the Azure Dashboard under Home > Azure Active Directory. */
private static String tenantId = "PASTE_YOUR_TENANT_ID_HERE";

/* The name of the Azure resource group in which you want to create the resource.
You can find resource groups in the Azure Dashboard under Home > Resource groups. */
private static String resourceGroupName = "PASTE_YOUR_RESOURCE_GROUP_NAME_HERE";

/* The name of the custom subdomain to use when you create the resource. This is optional.
For example, if you create a Bing Search v7 resource with the custom subdomain name 'my-search-resource',
your resource would have the endpoint https://my-search-resource.cognitiveservices.azure.com/.
Note not all Cognitive Services allow custom subdomain names. */
private static String subDomainName = "PASTE_YOUR_SUBDOMAIN_NAME_HERE";
Then, in your main method, use these values to construct a CognitiveServicesManager object. This object is needed for all of your Azure management operations.
/* For more information see:
https://github.com/Azure/azure-sdk-for-java/blob/main/sdk/resourcemanager/docs/AUTH.md
*/

ClientSecretCredential credential = new ClientSecretCredentialBuilder()
    .clientId(applicationId)
    .clientSecret(applicationSecret)
    .tenantId(tenantId)
    .build();
AzureProfile profile = new AzureProfile(tenantId, subscriptionId, AzureEnvironment.AZURE);

CognitiveServicesManager client = CognitiveServicesManager.authenticate(credential, profile);
Call management methods
Add the following code to your Main method to list available resources, create a sample resource, list your owned resources, and then delete the sample resource. You'll define these methods in the next steps.
String resourceName = "test_resource";
String resourceKind = "TextTranslation";
String resourceSku = "F0";
Region resourceRegion = Region.US_WEST;

// Uncomment to list all available resource kinds, SKUs, and locations for your Azure account.
// list_available_kinds_skus_locations (client);

// Create a resource with kind Text Translation, SKU F0 (free tier), location US West.
String resourceId = create_resource (client, resourceName, resourceGroupName, resourceKind, resourceSku, resourceRegion);

// Uncomment this to list all resources for your Azure account.
// list_resources (client, resourceGroupName);

// Delete the resource.
delete_resource (client, resourceId);

/* NOTE: When you delete a resource, it is only soft-deleted. You must also purge it. Otherwise, if you try to create another
resource with the same name or custom subdomain, you will receive an error stating that such a resource already exists. */
purge_resource (client, resourceName, resourceGroupName, resourceRegion);
Create an Azure AI services resource (Java)
To create and subscribe to a new Azure AI services resource, use the create method. This method adds a new billable resource to the resource group you pass in. When creating your new resource, you'll need to know the "kind" of service you want to use, along with its pricing tier (or SKU) and an Azure location. The following method takes all of these as arguments and creates a resource.
public static String create_resource (CognitiveServicesManager client, String resourceName, String resourceGroupName, String resourceKind, String resourceSku, Region resourceRegion) {
    System.out.println ("Creating resource: " + resourceName + "...");

    /* NOTE: If you do not want to use a custom subdomain name, remove the withCustomSubDomainName
    setter from the AccountProperties object. */
    Account result = client.accounts().define(resourceName)
        .withExistingResourceGroup(resourceGroupName)
        // Note: Do not call withRegion() first, as it does not exist on the Blank interface returned by define().
        .withRegion(resourceRegion)
        .withKind(resourceKind)
        .withSku(new Sku().withName(resourceSku))
        .withProperties(new AccountProperties().withCustomSubDomainName(subDomainName))
        .create();

    System.out.println ("Resource created.");
    System.out.println ("ID: " + result.id());
    System.out.println ("Provisioning state: " + result.properties().provisioningState().toString());
    System.out.println ();

    return result.id();
}
Choose a service and pricing tier
When you create a new resource, you'll need to know the "kind" of service you want to use, along with the pricing tier (or SKU) you want. You'll use this and other information as parameters when creating the resource. You can find a list of available Azure AI services "kinds" by calling the following method:
public static void list_available_kinds_skus_locations (CognitiveServicesManager client) {
    System.out.println ("Available SKUs:");
    System.out.println("Kind\tSKU Name\tSKU Tier\tLocations");
    ResourceSkus skus = client.resourceSkus();
    for (ResourceSku sku : skus.list()) {
        String locations = String.join (",", sku.locations());
        System.out.println (sku.kind() + "\t" + sku.name() + "\t" + sku.tier() + "\t" + locations);
    }
}
The following tables provide information about products and pricing for Azure AI services.
Multi-service
| Service | Kind |
|---|---|
| Multiple services. For more information, see the pricing page. | CognitiveServices |
Vision
| Service | Kind |
|---|---|
| Vision | ComputerVision |
| Custom Vision - Prediction | CustomVision.Prediction |
| Custom Vision - Training | CustomVision.Training |
| Face | Face |
| Document Intelligence | FormRecognizer |
Speech
| Service | Kind |
|---|---|
| Speech | SpeechServices |
Language
| Service | Kind |
|---|---|
| Language Understanding (LUIS) | LUIS |
| QnA Maker | QnAMaker |
| Language | TextAnalytics |
| Text Translation | TextTranslation |
Decision
| Service | Kind |
|---|---|
| Anomaly Detector | AnomalyDetector |
| Content Moderator | ContentModerator |
| Personalizer | Personalizer |
Azure OpenAI
| Service | Kind |
|---|---|
| Azure OpenAI | OpenAI |
Pricing tiers and billing
Pricing tiers (and the amount you're billed) are based on the number of transactions that you send by using your authentication information. Each pricing tier specifies the:
- Maximum number of allowed transactions per second (TPS).
- Service features enabled within the pricing tier.
- Cost for a predefined number of transactions. Going above this number will cause an extra charge, as specified in the pricing details for your service.
Note
Many of the Azure AI services have a free tier that you can use to try the service. To use the free tier, use F0 as the pricing tier for your resource.
View your resources
To view all of the resources under your Azure account (across all resource groups), use the following method:
public static void list_resources (CognitiveServicesManager client, String resourceGroupName) {
    System.out.println ("Resources in resource group: " + resourceGroupName);
    // Note Azure resources are also sometimes referred to as accounts.
    Accounts accounts = client.accounts();
    for (Account account : accounts.listByResourceGroup(resourceGroupName)) {
        System.out.println ("ID: " + account.id());
        System.out.println ("Kind: " + account.kind ());
        System.out.println ("SKU Name: " + account.sku().name());
        System.out.println ("Custom subdomain name: " + account.properties().customSubDomainName());
        System.out.println ();
    }
}
Delete a resource
The following method deletes the specified resource from the given resource group.
public static void delete_resource (CognitiveServicesManager client, String resourceId) {
    System.out.println ("Deleting resource: " + resourceId + "...");
    client.accounts().deleteById (resourceId);
    System.out.println ("Resource deleted.");
    System.out.println ();
}
Reference documentation | Library source code | Package (npm) | Samples
JavaScript prerequisites
- A valid Azure subscription - Create one for free.
- The current version of Node.js
- Your Azure account must have a
Cognitive Services Contributorrole assigned in order for you to agree to the responsible AI terms and create a resource. To get this role assigned to your account, follow the steps in the Assign roles documentation, or contact your administrator. - If you're planning to use Spatial Analysis in Azure AI Vision or Text Analytics for Health in Azure AI Language, then you must create your first Vision or Language resources from the Azure portal so you can review and acknowledge the terms and conditions. You can do so here: Azure AI Language, Azure AI Vision. After that, you can create subsequent resources using any deployment tool (for example, SDK, CLI, or ARM template) under the same Azure subscription.
Create an Azure Service Principal
To have your application interact with your Azure account, you need an Azure service principal to manage permissions. Follow the instructions in Create an Azure service principal.
When you create a service principal, you'll see it has a secret value, an ID, and an application ID. Save the application ID and secret to a temporary location for later steps.
Create a resource group
Before you create an Azure AI services resource, your account must have an Azure resource group to contain the resource. If you don't already have a resource group, create one in the Azure portal before continuing.
Create a new Node.js application
In a console window (such as cmd, PowerShell, or Bash), create a new directory for your app, and navigate to it.
mkdir myapp && cd myapp
Run the init command to create a node application with a package.json file.
init
Create a file named index.js before going on.
Install the client library
Install the following npm packages:
npm install @azure/arm-cognitiveservices
npm install @azure/identity
Your app's package.json file will be updated with the dependencies.
Import libraries
Open your index.js script and import the following libraries.
"use strict";

/* To run this sample, install the following modules.
 * npm install @azure/arm-cognitiveservices @azure/identity
 */
var Arm = require("@azure/arm-cognitiveservices");
var Identity = require("@azure/identity");
Authenticate the client
Add the following fields to the root of your script and fill in their values, using the service principal you created and your Azure account information.
const service_principal_application_id =
  "PASTE_YOUR_SERVICE_PRINCIPAL_APPLICATION_ID_HERE";
const service_principal_secret = "PASTE_YOUR_SERVICE_PRINCIPAL_SECRET_HERE";

/* The ID of your Azure subscription. You can find this in the Azure Dashboard under Home > Subscriptions. */
const subscription_id = "PASTE_YOUR_SUBSCRIPTION_ID_HERE";

/* The Active Directory tenant ID. You can find this in the Azure Dashboard under Home > Azure Active Directory. */
const tenant_id = "PASTE_YOUR_TENANT_ID_HERE";

/* The name of the Azure resource group in which you want to create the resource.
You can find resource groups in the Azure Dashboard under Home > Resource groups. */
const resource_group_name = "PASTE_YOUR_RESOURCE_GROUP_NAME_HERE";

/* The name of the custom subdomain to use when you create the resource. This is optional.
For example, if you create a Bing Search v7 resource with the custom subdomain name 'my-search-resource',
your resource would have the endpoint https://my-search-resource.cognitiveservices.azure.com/.
Note not all Cognitive Services allow custom subdomain names.
*/
const subdomain_name = "PASTE_YOUR_SUBDOMAIN_NAME_HERE";
Next, add the following quickstart function to handle the main work of your program. The first block of code constructs a CognitiveServicesManagementClient object using the credential variables you entered above. This object is needed for all of your Azure management operations.
async function quickstart() {
  /* For more information see:
https://www.npmjs.com/package/@azure/arm-cognitiveservices/v/6.0.0
https://github.com/Azure/azure-sdk-for-js/blob/main/sdk/identity/identity/samples/AzureIdentityExamples.md#authenticating-a-service-principal-with-a-client-secret
*/
  const credentials = new Identity.ClientSecretCredential(
    tenant_id,
    service_principal_application_id,
    service_principal_secret
  );
  const client = new Arm.CognitiveServicesManagementClient(
    credentials,
    subscription_id
  );
  // Note Azure resources are also sometimes referred to as accounts.
  const accounts_client = client.accounts;
  const resource_skus_client = client.resourceSkus;
  const deleted_accounts_client = client.deletedAccounts;
Call management functions
Add the following code to the end of your quickstart function to list available resources, create a sample resource, list your owned resources, and then delete the sample resource. You'll define these functions in the next steps.
Create an Azure AI services resource (Node.js)
To create and subscribe to a new Azure AI services resource, use the Create function. This function adds a new billable resource to the resource group you pass in. When you create your new resource, you'll need to know the "kind" of service you want to use, along with its pricing tier (or SKU) and an Azure location. The following function takes all of these arguments and creates a resource.
async function create_resource(
  client,
  resource_name,
  resource_kind,
  resource_sku,
  resource_region
) {
  console.log("Creating resource: " + resource_name + "...");
  /* NOTE If you do not want to use a custom subdomain name, remove the customSubDomainName
property from the properties object. */
  var parameters = {
    sku: { name: resource_sku },
    kind: resource_kind,
    location: resource_region,
    properties: { customSubDomainName: subdomain_name },
  };
  return client
    .beginCreateAndWait(resource_group_name, resource_name, parameters)
    .then((result) => {
      console.log("Resource created.");
      console.log();
      console.log("ID: " + result.id);
      console.log("Kind: " + result.kind);
      console.log();
    })
    .catch((err) => {
      console.log(err);
    });
}
Choose a service and pricing tier
When you create a new resource, you'll need to know the "kind" of service you want to use, along with the pricing tier (or SKU) you want. You'll use this and other information as parameters when creating the resource. The following function lists the available Azure AI services "kinds."
async function list_available_kinds_skus_locations(client) {
  console.log("Available SKUs:");
  var result = client.list();
  console.log("Kind\tSKU Name\tSKU Tier\tLocations");
  for await (let item of result) {
    var locations = item.locations.join(",");
    console.log(item.kind + "\t" + item.name + "\t" + item.tier + "\t" + locations);
  }
}
The following tables provide information about products and pricing for Azure AI services.
Multi-service
| Service | Kind |
|---|---|
| Multiple services. For more information, see the pricing page. | CognitiveServices |
Vision
| Service | Kind |
|---|---|
| Vision | ComputerVision |
| Custom Vision - Prediction | CustomVision.Prediction |
| Custom Vision - Training | CustomVision.Training |
| Face | Face |
| Document Intelligence | FormRecognizer |
Speech
| Service | Kind |
|---|---|
| Speech | SpeechServices |
Language
| Service | Kind |
|---|---|
| Language Understanding (LUIS) | LUIS |
| QnA Maker | QnAMaker |
| Language | TextAnalytics |
| Text Translation | TextTranslation |
Decision
| Service | Kind |
|---|---|
| Anomaly Detector | AnomalyDetector |
| Content Moderator | ContentModerator |
| Personalizer | Personalizer |
Azure OpenAI
| Service | Kind |
|---|---|
| Azure OpenAI | OpenAI |
Pricing tiers and billing
Pricing tiers (and the amount you're billed) are based on the number of transactions that you send by using your authentication information. Each pricing tier specifies the:
- Maximum number of allowed transactions per second (TPS).
- Service features enabled within the pricing tier.
- Cost for a predefined number of transactions. Going above this number will cause an extra charge, as specified in the pricing details for your service.
Note
Many of the Azure AI services have a free tier that you can use to try the service. To use the free tier, use F0 as the pricing tier for your resource.
View your resources
To view all of the resources under your Azure account (across all resource groups), use the following function:
async function list_resources(client) {
  console.log("Resources in resource group: " + resource_group_name);
  var result = client.listByResourceGroup(resource_group_name);
  for await (let item of result) {
    console.log(item);
    console.log();
  }
}
Delete a resource
The following function deletes the specified resource from the given resource group.
async function delete_resource(client, resource_name) {
  console.log("Deleting resource: " + resource_name + "...");
  await client.beginDeleteAndWait(resource_group_name, resource_name);
  console.log("Resource deleted.");
  console.log();
}
Run the application
Add the following code to the bottom of your script to call your main quickstart function with error handling.
try {
  quickstart();
} catch (error) {
  console.log(error);
}
Then, in your console window, run the application with the node command.
node index.js
Reference documentation | Library source code | Package (PyPi) | Samples
Python prerequisites
- A valid Azure subscription - Create one for free.
- Python 3.x
- Your Azure account must have a
Cognitive Services Contributorrole assigned in order for you to agree to the responsible AI terms and create a resource. To get this role assigned to your account, follow the steps in the Assign roles documentation, or contact your administrator. - If you're planning to use Spatial Analysis in Azure AI Vision or Text Analytics for Health in Azure AI Language, then you must create your first Vision or Language resources from the Azure portal so you can review and acknowledge the terms and conditions. You can do so here: Azure AI Language, Azure AI Vision. After that, you can create subsequent resources using any deployment tool (for example, SDK, CLI, or ARM template) under the same Azure subscription.
Create an Azure Service Principal
To have your application interact with your Azure account, you need an Azure service principal to manage permissions. Follow the instructions in Create an Azure service principal.
When you create a service principal, you'll see it has a secret value, an ID, and an application ID. Save the application ID and secret to a temporary location for later steps.
Create a resource group
Before you create an Azure AI services resource, your account must have an Azure resource group to contain the resource. If you don't already have a resource group, create one in the Azure portal before continuing.
Create a new Python application
Create a new Python application in your preferred editor or IDE and navigate to your project in a console window.
Install the client library
You can install the client library with:
pip install azure-mgmt-cognitiveservices
Also install the Azure Identity library for Microsoft Entra token authentication support.
pip install azure-identity
Import libraries
Open your Python script and import the following libraries.
import time
from azure.identity import ClientSecretCredential
from azure.mgmt.cognitiveservices import CognitiveServicesManagementClient
from azure.mgmt.cognitiveservices.models import Account, Sku
Authenticate the client
Add the following fields to the root of your script and fill in their values, using the service principal you created and your Azure account information.
# Be sure to use the service pricipal application ID, not simply the ID.
service_principal_application_id = "PASTE_YOUR_SERVICE_PRINCIPAL_APPLICATION_ID_HERE"
service_principal_secret = "PASTE_YOUR_SERVICE_PRINCIPAL_SECRET_HERE"

# The ID of your Azure subscription. You can find this in the Azure Dashboard under Home > Subscriptions.
subscription_id = "PASTE_YOUR_SUBSCRIPTION_ID_HERE"

# The Active Directory tenant ID. You can find this in the Azure Dashboard under Home > Azure Active Directory.
tenant_id = "PASTE_YOUR_TENANT_ID_HERE"

# The name of the Azure resource group in which you want to create the resource.
# You can find resource groups in the Azure Dashboard under Home > Resource groups.
resource_group_name = "PASTE_YOUR_RESOURCE_GROUP_NAME_HERE"

# The name of the custom subdomain to use when you create the resource. This is optional.
# For example, if you create a Bing Search v7 resource with the custom subdomain name 'my-search-resource',
# your resource would have the endpoint https://my-search-resource.cognitiveservices.azure.com/.
# Note not all Cognitive Services allow custom subdomain names.
subdomain_name = "PASTE_YOUR_SUBDOMAIN_NAME_HERE"

# How many seconds to wait between checking the status of an async operation.
wait_time = 10
Then add the following code to construct a CognitiveServicesManagementClient object. This object is needed for all of your Azure management operations.
credential = ClientSecretCredential(tenant_id, service_principal_application_id, service_principal_secret)
client = CognitiveServicesManagementClient(credential, subscription_id)
Create an Azure AI services resource (Python)
To create and subscribe to a new Azure AI services resource, use the Create function. This function adds a new billable resource to the resource group you pass in. When you create your new resource, you'll need to know the "kind" of service you want to use, along with its pricing tier (or SKU) and an Azure location. The following function takes all of these arguments and creates a resource.
def create_resource (resource_name, kind, sku_name, location) :
    print("Creating resource: " + resource_name + "...")

# NOTE If you do not want to use a custom subdomain name, remove the customSubDomainName
# property from the properties object.
    parameters = Account(sku=Sku(name=sku_name), kind=kind, location=location, properties={ 'custom_sub_domain_name' : subdomain_name })

    poller = client.accounts.begin_create(resource_group_name, resource_name, parameters)
    while (False == poller.done ()) :
        print ("Waiting {wait_time} seconds for operation to finish.".format (wait_time = wait_time))
        time.sleep (wait_time)
# This will raise an exception if the server responded with an error.
    result = poller.result ()

    print("Resource created.")
    print()
    print("ID: " + result.id)
    print("Name: " + result.name)
    print("Type: " + result.type)
    print()
Choose a service and pricing tier
When you create a new resource, you'll need to know the "kind" of service you want to use, along with the pricing tier (or SKU) you want. You'll use this and other information as parameters when creating the resource. The following function lists the available Azure AI services "kinds."
def list_available_kinds_skus_locations():
    print("Available SKUs:")
    result = client.resource_skus.list()
    print("Kind\tSKU Name\tSKU Tier\tLocations")
    for x in result:
        locations = ",".join(x.locations)
        print(x.kind + "\t" + x.name + "\t" + x.tier + "\t" + locations)
The following tables provide information about products and pricing for Azure AI services.
Multi-service
| Service | Kind |
|---|---|
| Multiple services. For more information, see the pricing page. | CognitiveServices |
Vision
| Service | Kind |
|---|---|
| Vision | ComputerVision |
| Custom Vision - Prediction | CustomVision.Prediction |
| Custom Vision - Training | CustomVision.Training |
| Face | Face |
| Document Intelligence | FormRecognizer |
Speech
| Service | Kind |
|---|---|
| Speech | SpeechServices |
Language
| Service | Kind |
|---|---|
| Language Understanding (LUIS) | LUIS |
| QnA Maker | QnAMaker |
| Language | TextAnalytics |
| Text Translation | TextTranslation |
Decision
| Service | Kind |
|---|---|
| Anomaly Detector | AnomalyDetector |
| Content Moderator | ContentModerator |
| Personalizer | Personalizer |
Azure OpenAI
| Service | Kind |
|---|---|
| Azure OpenAI | OpenAI |
Pricing tiers and billing
Pricing tiers (and the amount you're billed) are based on the number of transactions that you send by using your authentication information. Each pricing tier specifies the:
- Maximum number of allowed transactions per second (TPS).
- Service features enabled within the pricing tier.
- Cost for a predefined number of transactions. Going above this number will cause an extra charge, as specified in the pricing details for your service.
Note
Many of the Azure AI services have a free tier that you can use to try the service. To use the free tier, use F0 as the pricing tier for your resource.
View your resources
To view all of the resources under your Azure account (across all resource groups), use the following function:
def list_resources():
    print("Resources in resource group: " + resource_group_name)
    result = client.accounts.list_by_resource_group(resource_group_name)
    for x in result:
        print(x.name)
        print(x)
        print()
Delete a resource
The following function deletes the specified resource from the given resource group.
def delete_resource(resource_name) :
    print("Deleting resource: " + resource_name + "...")

    poller = client.accounts.begin_delete(resource_group_name, resource_name)
    while (False == poller.done ()) :
        print ("Waiting {wait_time} seconds for operation to finish.".format (wait_time = wait_time))
        time.sleep (wait_time)
# This will raise an exception if the server responded with an error.
    result = poller.result ()

    print("Resource deleted.")
Call management functions
Add the following code to the bottom of your script to call the above functions. This code lists available resources, creates a sample resource, lists your owned resources, and then deletes the sample resource.
resource_name = "test_resource"
resource_kind = "TextTranslation"
resource_sku = "F0"
resource_location = "Global"

# Uncomment this to list all available resource kinds, SKUs, and locations for your Azure account.
#list_available_kinds_skus_locations ()

# Create a resource with kind Text Translation, SKU F0 (free tier), location global.
create_resource(resource_name, resource_kind, resource_sku, resource_location)

# Uncomment this to list all resources for your Azure account.
#list_resources()

# Delete the resource.
delete_resource(resource_name)

# NOTE: Deleting a resource only soft-deletes it. To delete it permanently, you must purge it.
# Otherwise, if you later try to create a resource with the same name, you will receive the following error:
# azure.core.exceptions.ResourceExistsError: (FlagMustBeSetForRestore) An existing resource with ID '<your resource ID>' has been soft-deleted. To restore the resource, you must specify 'restore' to be 'true' in the property. If you don't want to restore existing resource, please purge it first.
# Code: FlagMustBeSetForRestore

# Purge the resource.
purge_resource(resource_name, resource_location)
Run the application
Run your application from the command line with the python command.
python <your-script-name>.py
Next steps
- Now that you have a resource, you can authenticate your API requests to one of the supported Azure AI services.
Feedback
Coming soon: Throughout 2024 we will be phasing out GitHub Issues as the feedback mechanism for content and replacing it with a new feedback system. For more information see: https://aka.ms/ContentUserFeedback.
Submit and view feedback for