Note
Access to this page requires authorization. You can try signing in or changing directories.
Access to this page requires authorization. You can try changing directories.
Note
This document refers to the Microsoft Foundry (classic) portal.
🔍 View the Microsoft Foundry (new) documentation to learn about the new portal.
Azure OpenAI automatically encrypts your data when it's persisted to the cloud. The encryption protects your data and helps you meet your organizational security and compliance commitments. This article covers how Azure OpenAI handles encryption of data at rest, specifically training data and fine-tuned models. For information on how data provided by you to the service is processed, used, and stored, consult the data, privacy, and security article.
About Azure OpenAI encryption
Azure OpenAI data is encrypted and decrypted using FIPS 140-2 compliant 256-bit AES encryption. Encryption and decryption are transparent, meaning encryption and access are managed for you. Your data is secure by default and you don't need to modify your code or applications to take advantage of encryption.
About encryption key management
By default, your subscription uses Microsoft-managed encryption keys. There's also the option to manage your subscription with your own keys called customer-managed keys (CMK). CMK offers greater flexibility to create, rotate, disable, and revoke access controls. You can also audit the encryption keys used to protect your data.
Use customer-managed keys with Azure Key Vault
Customer-managed keys (CMK), also known as Bring your own key (BYOK), offer greater flexibility to create, rotate, disable, and revoke access controls. You can also audit the encryption keys used to protect your data.
You must use Azure Key Vault to store your customer-managed keys. You can either create your own keys and store them in a key vault, or you can use the Azure Key Vault APIs to generate keys. The Azure OpenAI resource and the key vault must be in the same region and in the same Microsoft Entra tenant, but they can be in different subscriptions. For more information about Azure Key Vault, see What is Azure Key Vault?.
To enable customer-managed keys, the key vault containing your keys must meet these requirements:
- You must enable both the Soft Delete and Do Not Purge properties on the key vault.
- If you use the Key Vault firewall, you must allow trusted Microsoft services to access the key vault.
- Key Vault Permissions:
- If you're using Azure RBAC, assign Key Vault Crypto Service Encryption User role to the managed identity.
- If you're using Vault Access Policies, grant key-specific permissions, get, unwrap key and wrap key, to the system-assigned or user-assigned managed identity of Azure OpenAI resource.
Only RSA and RSA-HSM keys of size 2048 are supported with Azure OpenAI encryption. For more information about keys, see Key Vault keys in About Azure Key Vault keys, secrets and certificates.
Enable your Azure OpenAI resource's managed identity
- Go to your Azure OpenAI resource.
- On the left, under Resource Management, select Identity.
- Switch the system-assigned managed identity status to On or add a user-assigned managed identity.
- Save your changes.
Grant Key Vault permissions to managed identity
Configure appropriate permissions for the system-assigned or user-assigned managed identity to access the Key Vault.
- Go to the Key Vault in the Azure portal.
- Select Access Control (IAM).
- Select + Add role assignment.
- Assign the Key Vault Crypto Service Encryption User role to the system-assigned or user-assigned managed identity of Azure OpenAI resource.
Enable customer-managed keys on your Azure OpenAI resource
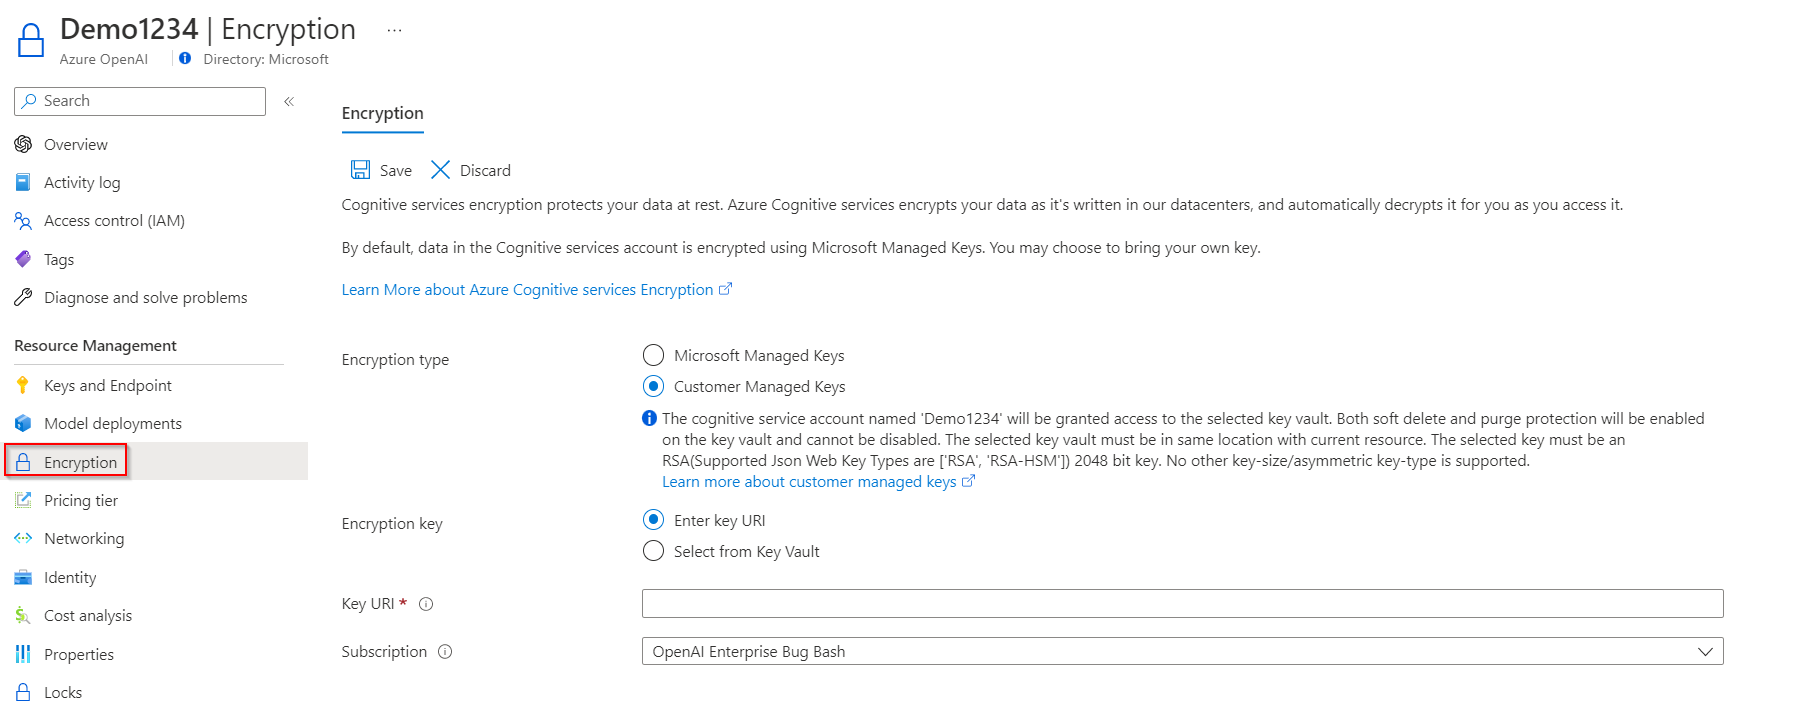
To enable customer-managed keys in the Azure portal, follow these steps:
Go to your Azure OpenAI resource.
On the left, under Resource Management, select Encryption.
Under Encryption type, select Customer Managed Keys, as shown in the following screenshot.
Specify a key
After you enable customer-managed keys, you can specify a key to associate with the Azure OpenAI resource.
Specify a key as a URI
To specify a key as a URI, follow these steps:
In the Azure portal, go to your key vault.
Under Objects, select Keys.
Select the desired key, and then select the key to view its versions. Select a key version to view the settings for that version.
Copy the Key Identifier value, which provides the URI.

Go back to your Azure OpenAI resource, and then select Encryption.
Under Encryption key, select Enter key URI.
Paste the URI that you copied into the Key URI box.

Under Subscription, select the subscription that contains the key vault.
Save your changes.
Select a key from a key vault
To select a key from a key vault, first make sure that you have a key vault that contains a key. Then follow these steps:
Go to your Azure OpenAI resource, and then select Encryption.
Under Encryption key, select Select from Key Vault.
Select the key vault that contains the key that you want to use.
Select the key that you want to use.

Save your changes.
Update the key version
When you create a new version of a key, update the Azure OpenAI resource to use the new version. Follow these steps:
- Go to your Azure OpenAI resource, and then select Encryption.
- Enter the URI for the new key version. Alternately, you can select the key vault and then select the key again to update the version.
- Save your changes.
Use a different key
To change the key that you use for encryption, follow these steps:
- Go to your Azure OpenAI resource, and then select Encryption.
- Enter the URI for the new key. Alternately, you can select the key vault and then select a new key.
- Save your changes.
Rotate customer-managed keys
You can rotate a customer-managed key in Key Vault according to your compliance policies. When the key is rotated, you must update the Azure OpenAI resource to use the new key URI. To learn how to update the resource to use a new version of the key in the Azure portal, see Update the key version.
Rotating the key doesn't trigger re-encryption of data in the resource. No further action is required from the user.
Revoke a customer-managed key
You can revoke a customer-managed encryption key by changing the access policy, by changing the permissions on the key vault, or by deleting the key.
To change the access policy of the managed identity that your registry uses, run the az-keyvault-delete-policy command:
az keyvault delete-policy \
  --resource-group <resource-group-name> \
  --name <key-vault-name> \
  --key_id <key-vault-key-id>
To delete the individual versions of a key, run the az-keyvault-key-delete command. This operation requires the keys/delete permission.
az keyvault key delete  \
  --vault-name <key-vault-name> \
  --id <key-ID>
Important
Revoking access to an active customer-managed key while CMK is still enabled will prevent downloading of training data and results files, fine-tuning new models, and deploying fine-tuned models. However, previously deployed fine-tuned models will continue to operate and serve traffic until those deployments are deleted.
Delete training, validation, and training results data
The Files API allows customers to upload their training data for the purpose of fine-tuning a model. This data is stored in Azure Storage, within the same region as the resource and logically isolated with their Azure subscription and API Credentials. Uploaded files can be deleted by the user via the DELETE API operation.
Delete fine-tuned models and deployments
The Fine-tunes API allows customers to create their own fine-tuned version of the OpenAI models based on the training data that you've uploaded to the service via the Files APIs. The trained fine-tuned models are stored in Azure Storage in the same region, encrypted at rest (either with Microsoft-managed keys or customer-managed keys) and logically isolated with their Azure subscription and API credentials. Fine-tuned models and deployments can be deleted by the user by calling the DELETE API operation.
Disable customer-managed keys
When you disable customer-managed keys, your Azure OpenAI resource is then encrypted with Microsoft-managed keys. To disable customer-managed keys, follow these steps:
- Go to your Azure OpenAI resource, and then select Encryption.
- Select Microsoft Managed Keys > Save.
When you previously enabled customer managed keys this also enabled a system assigned managed identity, a feature of Microsoft Entra ID. Once the system assigned managed identity is enabled, this resource will be registered with Microsoft Entra ID. After being registered, the managed identity will be given access to the Key Vault selected during customer managed key setup. You can learn more about Managed Identities.
Important
If you disable system assigned managed identities, access to the key vault will be removed and any data encrypted with the customer keys will no longer be accessible. Any features depended on this data will stop working.
Important
Managed identities do not currently support cross-directory scenarios. When you configure customer-managed keys in the Azure portal, a managed identity is automatically assigned under the covers. If you subsequently move the subscription, resource group, or resource from one Microsoft Entra directory to another, the managed identity associated with the resource is not transferred to the new tenant, so customer-managed keys may no longer work. For more information, see Transferring a subscription between Microsoft Entra directories in FAQs and known issues with managed identities for Azure resources.