Note
Access to this page requires authorization. You can try signing in or changing directories.
Access to this page requires authorization. You can try changing directories.
Reference documentation | Package (NuGet) | Additional samples on GitHub
In this quickstart, you learn the basics of working with custom keywords. A keyword is a word or short phrase, which allows your product to be voice activated. You create keyword models in Speech Studio. Then export a model file that you use with the Speech SDK in your applications.
Prerequisites
- An Azure subscription. You can create one for free.
- Create an AI Foundry resource for Speech in the Azure portal.
- Get the Speech resource key and region. After your Speech resource is deployed, select Go to resource to view and manage keys.
Create a keyword in Speech Studio
Before you can use a custom keyword, you need to create a keyword using the Custom Keyword page on Speech Studio. After you provide a keyword, it produces a .table file that you can use with the Speech SDK.
Important
Custom keyword models, and the resulting .table files, can only be created in Speech Studio.
You cannot create custom keywords from the SDK or with REST calls.
Go to the Speech Studio and Sign in. If you don't have a speech subscription, go to Create Speech Services.
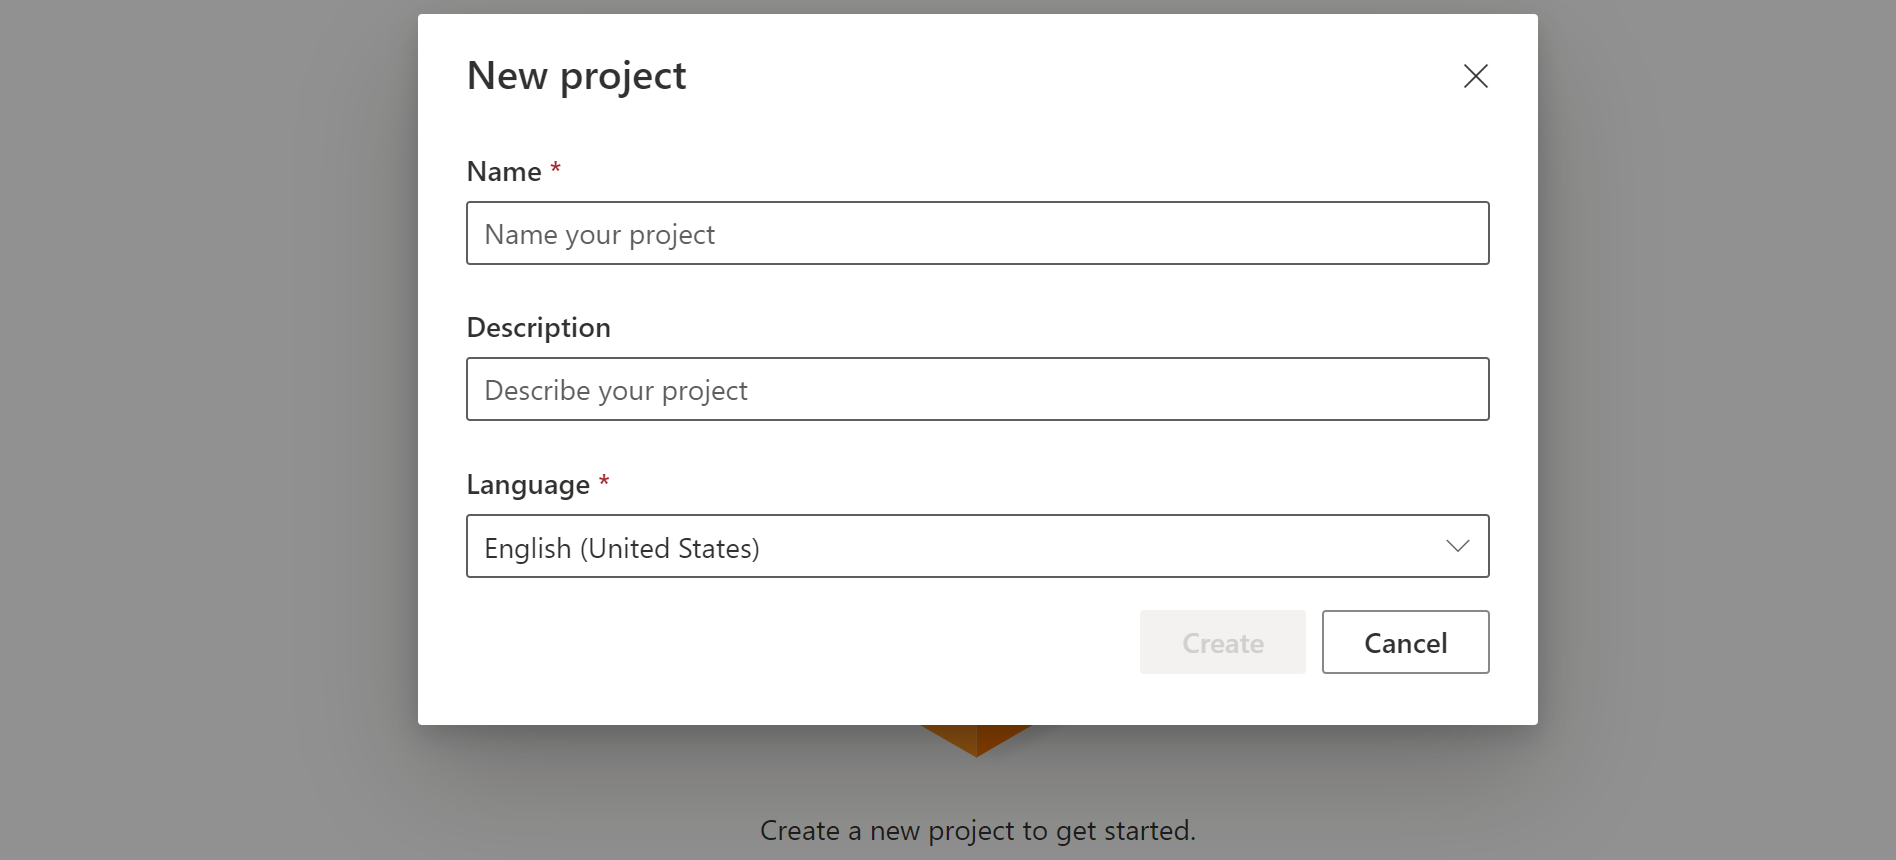
On the Custom Keyword page, select Create a new project.
Enter a Name, Description, and Language for your custom keyword project. You can only choose one language per project, and support is currently limited to English (United States) and Chinese (Mandarin, Simplified).
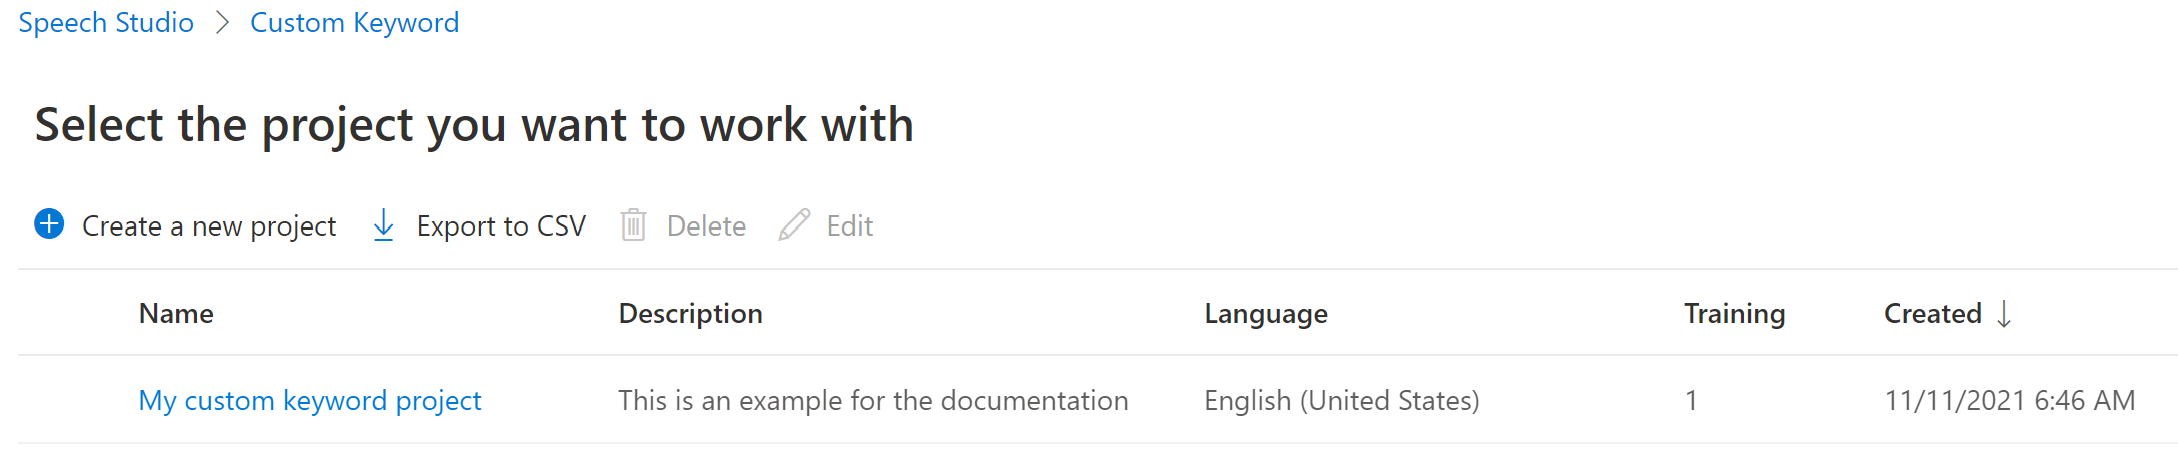
Select your project's name from the list.
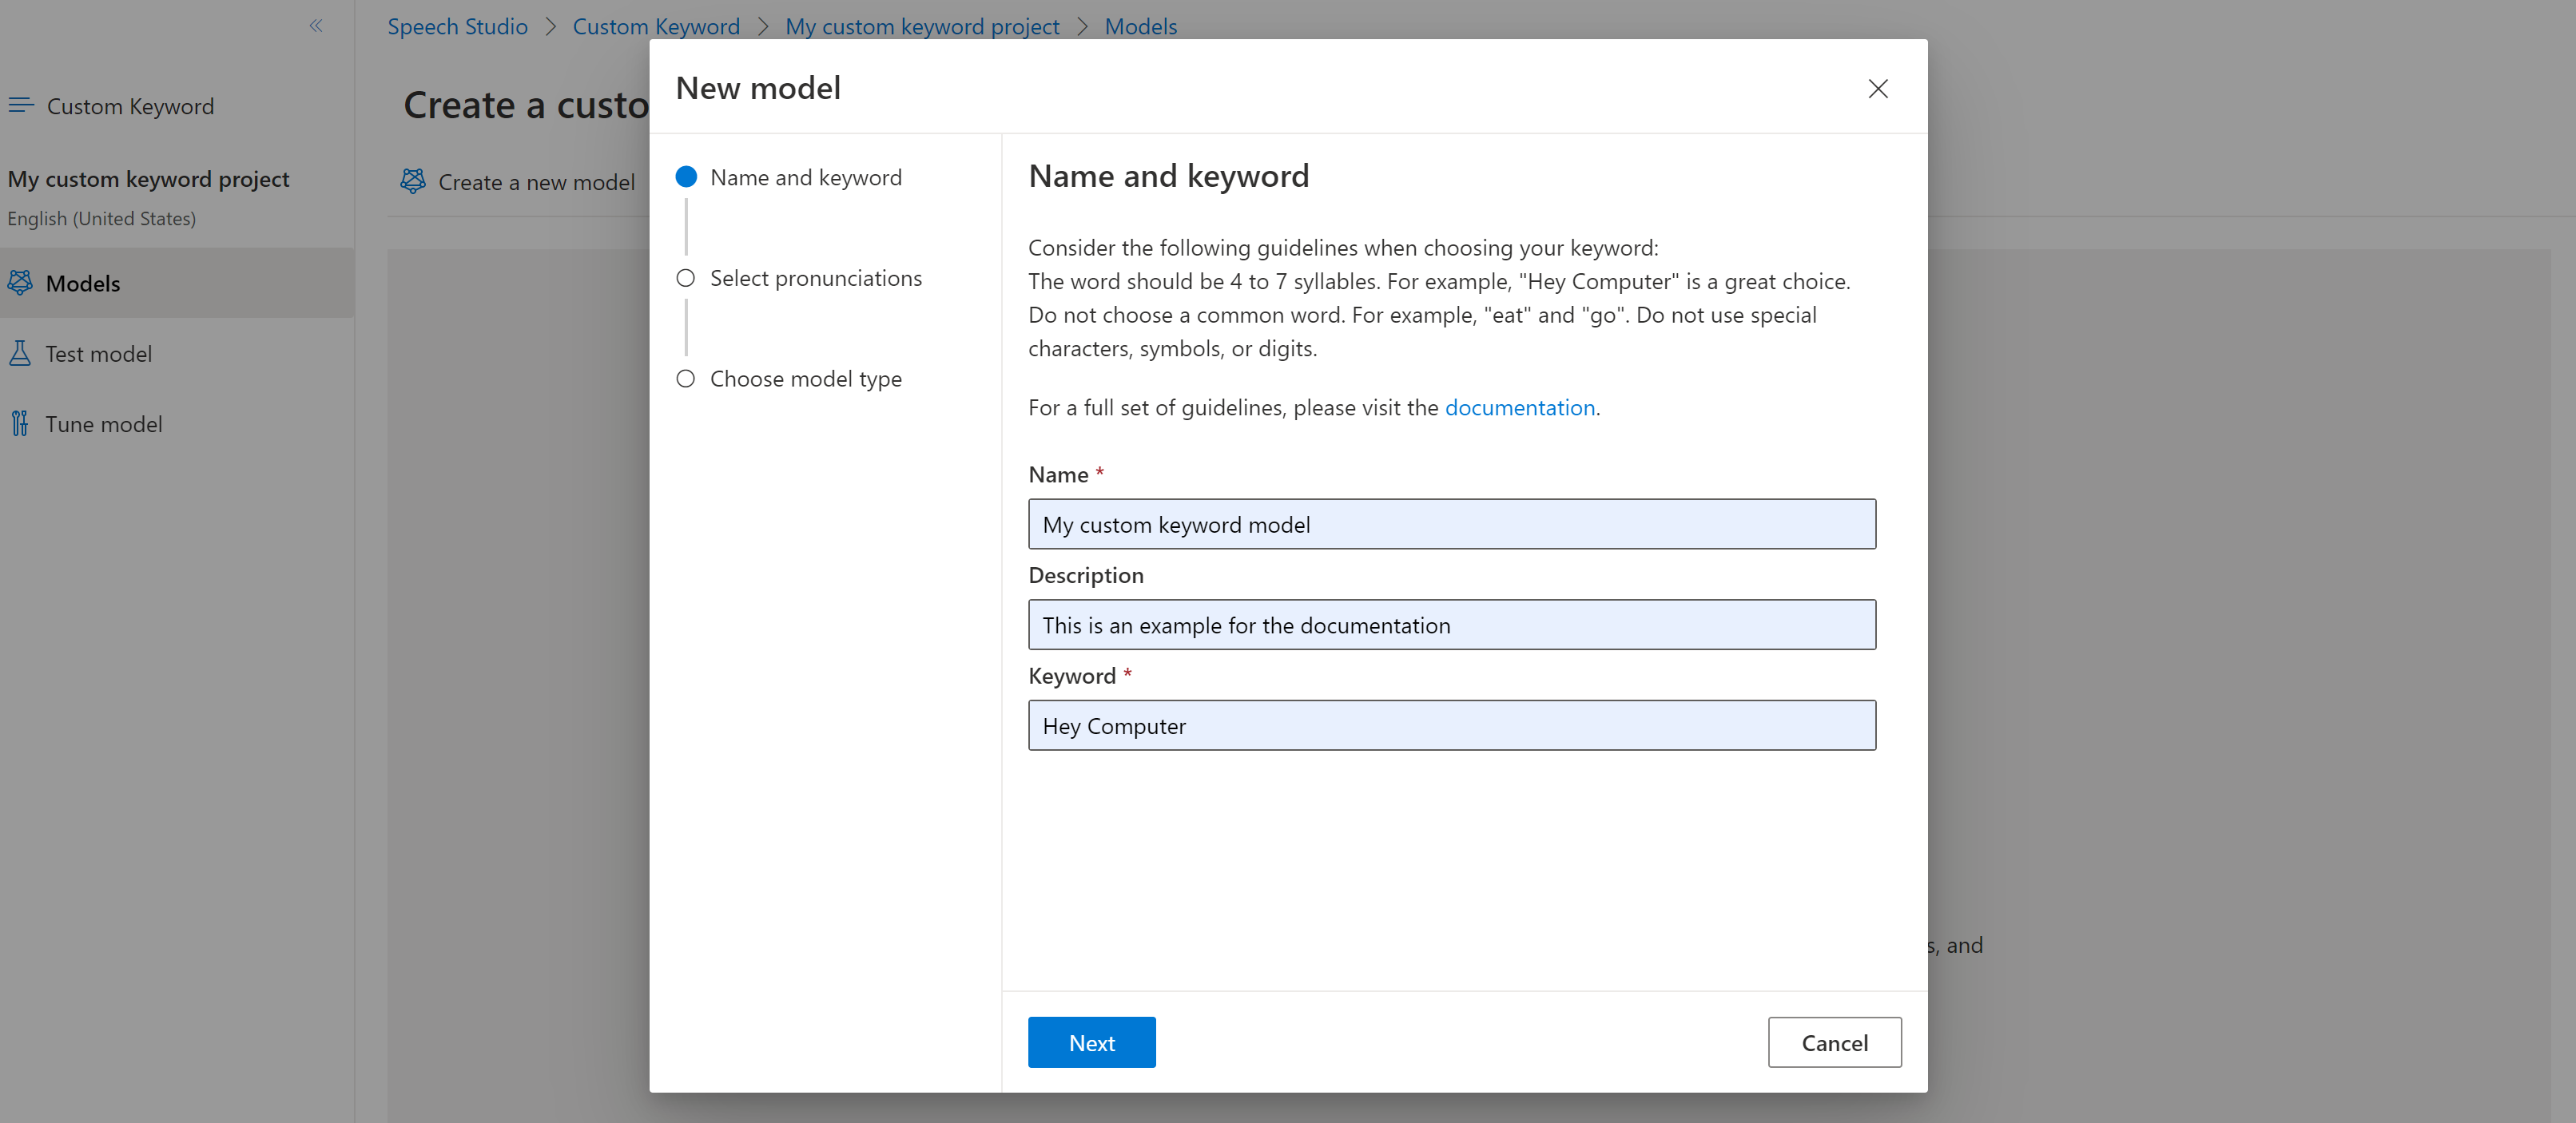
To create a custom keyword for your virtual assistant, select Create a new model.
Enter a Name for the model, Description, and Keyword of your choice, then select Next. See the guidelines on choosing an effective keyword.
The portal creates candidate pronunciations for your keyword. Listen to each candidate by selecting the play buttons and remove the checks next to any pronunciations that are incorrect.Select all pronunciations that correspond to how you expect your users to say the keyword and then select Next to begin generating the keyword model.

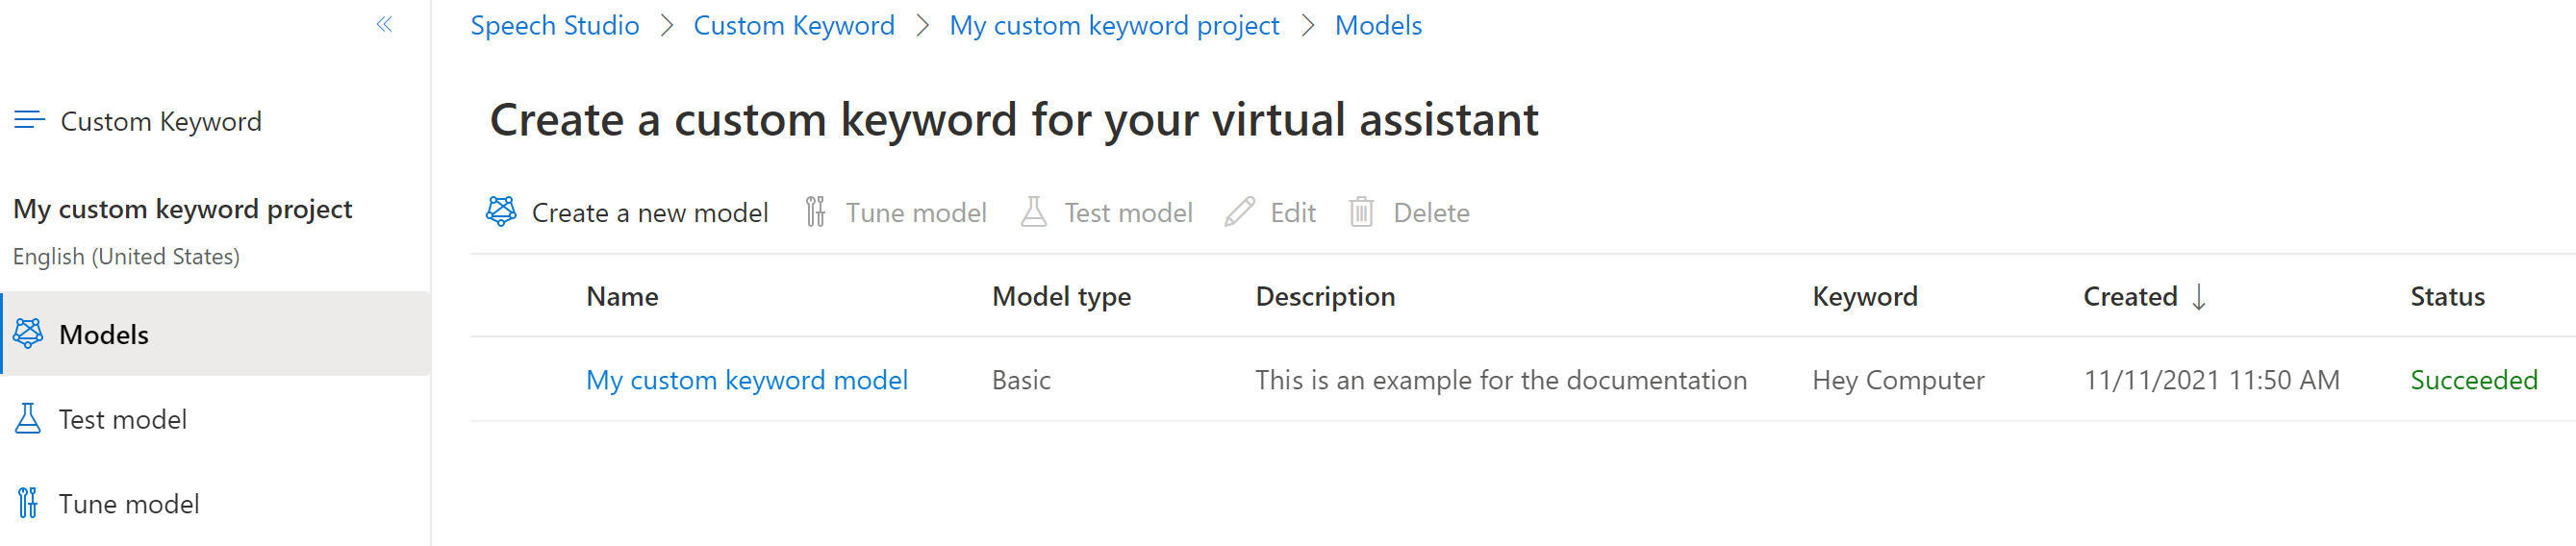
Select a model type, then select Create. You can view a list of regions that support the Advanced model type in the Keyword recognition region support documentation.
Because of high demand, training the basic model might take several hours. Training the advanced model could take up to a day to finish. The status changes from Processing to Succeeded when the training is complete.
From the collapsible menu on the left, select Tune for options to tune and download your model. The downloaded file is a
.ziparchive. Extract the archive, and you see a file with the.tableextension. You use the.tablefile with the SDK, so make sure to note its path.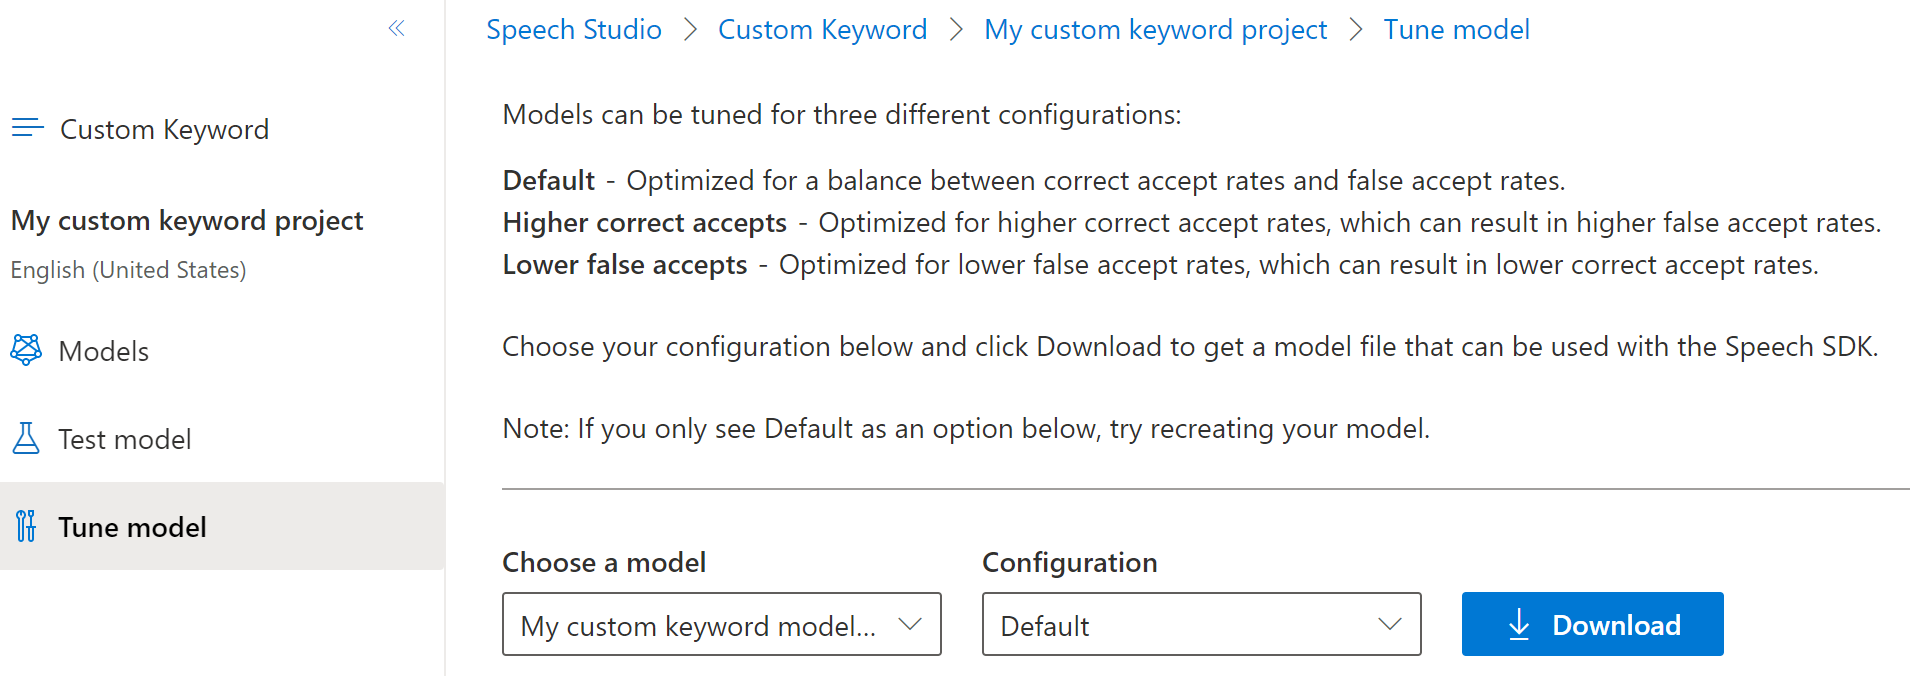
Use a keyword model with the Speech SDK
First, load your keyword model file using the FromFile() static function, which returns a KeywordRecognitionModel. Use the path to the .table file you downloaded from Speech Studio. Additionally, you create an AudioConfig using the default microphone, then instantiate a new KeywordRecognizer using the audio configuration.
using Microsoft.CognitiveServices.Speech;
using Microsoft.CognitiveServices.Speech.Audio;

var keywordModel = KeywordRecognitionModel.FromFile("your/path/to/Activate_device.table");
using var audioConfig = AudioConfig.FromDefaultMicrophoneInput();
using var keywordRecognizer = new KeywordRecognizer(audioConfig);
Important
If you prefer testing a keyword model directly with audio samples via the AudioConfig.fromStreamInput() method, make sure you use samples that have at least 1.5 seconds of silence before the first keyword. This is to provide an adequate time for the Keyword recognition engine to initialize and to get to the listening state prior to detecting the first keyword.
Next, running keyword recognition is done with one call to RecognizeOnceAsync() by passing your model object. This method starts a keyword recognition session that lasts until the keyword is recognized. Thus, you generally use this design pattern in multi-threaded applications, or in use cases where you might be waiting for a wake-word indefinitely.
KeywordRecognitionResult result = await keywordRecognizer.RecognizeOnceAsync(keywordModel);
Note
The example shown here uses local keyword recognition, since it does not require a SpeechConfig
object for authentication context, and does not contact the back-end.
Continuous recognition
Other classes in the Speech SDK support continuous recognition (for both speech and intent recognition) with keyword recognition. The SDK allows you to use the same code you would normally use for continuous recognition, with the ability to reference a .table file for your keyword model.
For speech to text, follow the same design pattern shown in the recognize speech guide to set up continuous recognition. Then, replace the call to recognizer.StartContinuousRecognitionAsync() with recognizer.StartKeywordRecognitionAsync(KeywordRecognitionModel), and pass your KeywordRecognitionModel object. To stop continuous recognition with keyword recognition, use recognizer.StopKeywordRecognitionAsync() instead of recognizer.StopContinuousRecognitionAsync().
Intent recognition uses an identical pattern with the StartKeywordRecognitionAsync and StopKeywordRecognitionAsync functions.
Reference documentation | Package (NuGet) | Additional samples on GitHub
The Speech SDK for C++ does support keyword recognition, but we haven't yet included a guide here. Please select another programming language to get started and learn about the concepts, or see the C++ reference and samples linked from the beginning of this article.
- An Azure subscription. You can create one for free.
- Create an AI Foundry resource for Speech in the Azure portal.
- Get the Speech resource key and region. After your Speech resource is deployed, select Go to resource to view and manage keys.
Create a keyword in Speech Studio
Before you can use a custom keyword, you need to create a keyword using the Custom Keyword page on Speech Studio. After you provide a keyword, it produces a .table file that you can use with the Speech SDK.
Important
Custom keyword models, and the resulting .table files, can only be created in Speech Studio.
You cannot create custom keywords from the SDK or with REST calls.
Go to the Speech Studio and Sign in. If you don't have a speech subscription, go to Create Speech Services.
On the Custom Keyword page, select Create a new project.
Enter a Name, Description, and Language for your custom keyword project. You can only choose one language per project, and support is currently limited to English (United States) and Chinese (Mandarin, Simplified).
Select your project's name from the list.
To create a custom keyword for your virtual assistant, select Create a new model.
Enter a Name for the model, Description, and Keyword of your choice, then select Next. See the guidelines on choosing an effective keyword.
The portal creates candidate pronunciations for your keyword. Listen to each candidate by selecting the play buttons and remove the checks next to any pronunciations that are incorrect.Select all pronunciations that correspond to how you expect your users to say the keyword and then select Next to begin generating the keyword model.
Select a model type, then select Create. You can view a list of regions that support the Advanced model type in the Keyword recognition region support documentation.
Because of high demand, training the basic model might take several hours. Training the advanced model could take up to a day to finish. The status changes from Processing to Succeeded when the training is complete.
From the collapsible menu on the left, select Tune for options to tune and download your model. The downloaded file is a
.ziparchive. Extract the archive, and you see a file with the.tableextension. You use the.tablefile with the SDK, so make sure to note its path.
Use a keyword model with the Speech SDK
See the reference documentation for using your Custom Keyword model with the Go SDK.
Reference documentation | Additional samples on GitHub
The Speech SDK for Java does support keyword recognition, but we haven't yet included a guide here. Please select another programming language to get started and learn about the concepts, or see the Java reference and samples linked from the beginning of this article.
Reference documentation | Package (npm) | Additional samples on GitHub | Library source code
The Speech SDK for JavaScript doesn't support keyword recognition. Please select another programming language or the JavaScript reference and samples linked from the beginning of this article.
Reference documentation | Package (download) | Additional samples on GitHub
In this quickstart, you learn the basics of working with custom keywords. A keyword is a word or short phrase, which allows your product to be voice activated. You create keyword models in Speech Studio. Then export a model file that you use with the Speech SDK in your applications.
Prerequisites
- An Azure subscription. You can create one for free.
- Create an AI Foundry resource for Speech in the Azure portal.
- Get the Speech resource key and region. After your Speech resource is deployed, select Go to resource to view and manage keys.
Create a keyword in Speech Studio
Before you can use a custom keyword, you need to create a keyword using the Custom Keyword page on Speech Studio. After you provide a keyword, it produces a .table file that you can use with the Speech SDK.
Important
Custom keyword models, and the resulting .table files, can only be created in Speech Studio.
You cannot create custom keywords from the SDK or with REST calls.
Go to the Speech Studio and Sign in. If you don't have a speech subscription, go to Create Speech Services.
On the Custom Keyword page, select Create a new project.
Enter a Name, Description, and Language for your custom keyword project. You can only choose one language per project, and support is currently limited to English (United States) and Chinese (Mandarin, Simplified).
Select your project's name from the list.
To create a custom keyword for your virtual assistant, select Create a new model.
Enter a Name for the model, Description, and Keyword of your choice, then select Next. See the guidelines on choosing an effective keyword.
The portal creates candidate pronunciations for your keyword. Listen to each candidate by selecting the play buttons and remove the checks next to any pronunciations that are incorrect.Select all pronunciations that correspond to how you expect your users to say the keyword and then select Next to begin generating the keyword model.
Select a model type, then select Create. You can view a list of regions that support the Advanced model type in the Keyword recognition region support documentation.
Because of high demand, training the basic model might take several hours. Training the advanced model could take up to a day to finish. The status changes from Processing to Succeeded when the training is complete.
From the collapsible menu on the left, select Tune for options to tune and download your model. The downloaded file is a
.ziparchive. Extract the archive, and you see a file with the.tableextension. You use the.tablefile with the SDK, so make sure to note its path.
Use a keyword model with the Speech SDK
See the sample on GitHub for using your Custom Keyword model with the Objective C SDK.
Reference documentation | Package (download) | Additional samples on GitHub
In this quickstart, you learn the basics of working with custom keywords. A keyword is a word or short phrase, which allows your product to be voice activated. You create keyword models in Speech Studio. Then export a model file that you use with the Speech SDK in your applications.
Prerequisites
- An Azure subscription. You can create one for free.
- Create an AI Foundry resource for Speech in the Azure portal.
- Get the Speech resource key and region. After your Speech resource is deployed, select Go to resource to view and manage keys.
Create a keyword in Speech Studio
Before you can use a custom keyword, you need to create a keyword using the Custom Keyword page on Speech Studio. After you provide a keyword, it produces a .table file that you can use with the Speech SDK.
Important
Custom keyword models, and the resulting .table files, can only be created in Speech Studio.
You cannot create custom keywords from the SDK or with REST calls.
Go to the Speech Studio and Sign in. If you don't have a speech subscription, go to Create Speech Services.
On the Custom Keyword page, select Create a new project.
Enter a Name, Description, and Language for your custom keyword project. You can only choose one language per project, and support is currently limited to English (United States) and Chinese (Mandarin, Simplified).
Select your project's name from the list.
To create a custom keyword for your virtual assistant, select Create a new model.
Enter a Name for the model, Description, and Keyword of your choice, then select Next. See the guidelines on choosing an effective keyword.
The portal creates candidate pronunciations for your keyword. Listen to each candidate by selecting the play buttons and remove the checks next to any pronunciations that are incorrect.Select all pronunciations that correspond to how you expect your users to say the keyword and then select Next to begin generating the keyword model.
Select a model type, then select Create. You can view a list of regions that support the Advanced model type in the Keyword recognition region support documentation.
Because of high demand, training the basic model might take several hours. Training the advanced model could take up to a day to finish. The status changes from Processing to Succeeded when the training is complete.
From the collapsible menu on the left, select Tune for options to tune and download your model. The downloaded file is a
.ziparchive. Extract the archive, and you see a file with the.tableextension. You use the.tablefile with the SDK, so make sure to note its path.
Use a keyword model with the Speech SDK
See the sample on GitHub for using your Custom Keyword model with the Objective C SDK. Although we don't currently have a Swift sample for parity, the concepts are similar.
Note
If you are going to use keyword recognition in your Swift application on iOS, note that new keyword models created in Speech Studio will require using either the Speech SDK xcframework bundle from https://aka.ms/csspeech/iosbinaryembedded or the MicrosoftCognitiveServicesSpeechEmbedded-iOS pod in your project.
Reference documentation | Package (PyPi) | Additional samples on GitHub
In this quickstart, you learn the basics of working with custom keywords. A keyword is a word or short phrase, which allows your product to be voice activated. You create keyword models in Speech Studio. Then export a model file that you use with the Speech SDK in your applications.
Prerequisites
- An Azure subscription. You can create one for free.
- Create an AI Foundry resource for Speech in the Azure portal.
- Get the Speech resource key and region. After your Speech resource is deployed, select Go to resource to view and manage keys.
Create a keyword in Speech Studio
Before you can use a custom keyword, you need to create a keyword using the Custom Keyword page on Speech Studio. After you provide a keyword, it produces a .table file that you can use with the Speech SDK.
Important
Custom keyword models, and the resulting .table files, can only be created in Speech Studio.
You cannot create custom keywords from the SDK or with REST calls.
Go to the Speech Studio and Sign in. If you don't have a speech subscription, go to Create Speech Services.
On the Custom Keyword page, select Create a new project.
Enter a Name, Description, and Language for your custom keyword project. You can only choose one language per project, and support is currently limited to English (United States) and Chinese (Mandarin, Simplified).
Select your project's name from the list.
To create a custom keyword for your virtual assistant, select Create a new model.
Enter a Name for the model, Description, and Keyword of your choice, then select Next. See the guidelines on choosing an effective keyword.
The portal creates candidate pronunciations for your keyword. Listen to each candidate by selecting the play buttons and remove the checks next to any pronunciations that are incorrect.Select all pronunciations that correspond to how you expect your users to say the keyword and then select Next to begin generating the keyword model.
Select a model type, then select Create. You can view a list of regions that support the Advanced model type in the Keyword recognition region support documentation.
Because of high demand, training the basic model might take several hours. Training the advanced model could take up to a day to finish. The status changes from Processing to Succeeded when the training is complete.
From the collapsible menu on the left, select Tune for options to tune and download your model. The downloaded file is a
.ziparchive. Extract the archive, and you see a file with the.tableextension. You use the.tablefile with the SDK, so make sure to note its path.
Use a keyword model with the Speech SDK
See the sample on GitHub for using your Custom Keyword model with the Python SDK.
Speech to text REST API reference | Speech to text REST API for short audio reference | Additional samples on GitHub
The Speech to text REST API doesn't support keyword recognition. Please select another programming language or the reference and samples linked from the beginning of this article.
The Speech CLI does support keyword recognition, but we haven't yet included a guide here. Please select another programming language to get started and learn about the concepts.