Note
Access to this page requires authorization. You can try signing in or changing directories.
Access to this page requires authorization. You can try changing directories.
Get started with Azure Communication Services by using the Communication Services calling SDK to add 1 on 1 video calling to your app. You learn how to start and answer a video call using the Azure Communication Services Calling SDK for JavaScript.
Sample Code
If you'd like to skip ahead to the end, you can download this quickstart as a sample on GitHub.
Note
Outbound calling to an Azure Communication Services user can be accessed using the Azure Communication Services UI Library. The UI Library enables developers to add a call client that is VoIP enabled into their application with only a couple lines of code.
Prerequisites
Obtain an Azure account with an active subscription. Create an account for free.
You need to have Node.js 18. You can use the msi installer to install it.
Create an active Communication Services resource. Create a Communication Services resource. You need to record your connection string for this quickstart.
Create a User Access Token to instantiate the call client. Learn how to create and manage user access tokens. You can also use the Azure CLI and run the command with your connection string to create a user and an access token.
az communication identity token issue --scope voip --connection-string "yourConnectionString"For details, see Use Azure CLI to Create and Manage Access Tokens.
Setting up
Create a new Node.js application
Open your terminal or command window create a new directory for your app, and navigate to it.
mkdir calling-quickstart && cd calling-quickstart
Run npm init -y to create a package.json file with default settings.
npm init -y
Install the package
Use the npm install command to install the Azure Communication Services Calling SDK for JavaScript.
npm install @azure/communication-common --save
npm install @azure/communication-calling --save
Set up the app framework
This quickstart uses webpack to bundle the application assets. Run the following command to install the webpack, webpack-cli and webpack-dev-server npm packages and list them as development dependencies in your package.json:
npm install copy-webpack-plugin@^11.0.0 webpack@^5.88.2 webpack-cli@^5.1.4 webpack-dev-server@^4.15.1 --save-dev
Here's the code:
Create an index.html file in the root directory of your project. We use this file to configure a basic layout that allows the user to place a 1:1 video call.
<!-- index.html -->
<!DOCTYPE html>
<html>
    <head>
        <title>Azure Communication Services - Calling Web SDK</title>
        <link rel="stylesheet" type="text/css" href="styles.css"/>
    </head>
    <body>
        <h4>Azure Communication Services - Calling Web SDK</h4>
        <input id="user-access-token"
            type="text"
            placeholder="User access token"
            style="margin-bottom:1em; width: 500px;"/>
        <button id="initialize-call-agent" type="button">Initialize Call Agent</button>
        <br>
        <br>
        <input id="callee-acs-user-id"
            type="text"
            placeholder="Enter callee's Azure Communication Services user identity in format: '8:acs:resourceId_userId'"
            style="margin-bottom:1em; width: 500px; display: block;"/>
        <button id="start-call-button" type="button" disabled="true">Start Call</button>
        <button id="hangup-call-button" type="button" disabled="true">Hang up Call</button>
        <button id="accept-call-button" type="button" disabled="true">Accept Call</button>
        <button id="start-video-button" type="button" disabled="true">Start Video</button>
        <button id="stop-video-button" type="button" disabled="true">Stop Video</button>
        <br>
        <br>
        <div id="connectedLabel" style="color: #13bb13;" hidden>Call is connected!</div>
        <br>
        <div id="remoteVideosGallery" style="width: 40%;" hidden>Remote participants' video streams:</div>
        <br>
        <div id="localVideoContainer" style="width: 30%;" hidden>Local video stream:</div>
        <!-- points to the bundle generated from client.js -->
        <script src="./main.js"></script>
    </body>
</html>
The following classes and interfaces handle some of the major features of the Azure Communication Services Calling SDK:
| Name | Description |
|---|---|
CallClient |
The main entry point to the Calling SDK. |
AzureCommunicationTokenCredential |
Implements the CommunicationTokenCredential interface, which is used to instantiate callAgent. |
CallAgent |
Used to start and manage calls. |
DeviceManager |
Used to manage media devices. |
Call |
Used for representing a Call |
LocalVideoStream |
Used for creating a local video stream for a camera device on the local system. |
RemoteParticipant |
Used for representing a remote participant in the Call |
RemoteVideoStream |
Used for representing a remote video stream from a Remote Participant. |
Create a file in the root directory of your project called index.js to contain the application logic for this quickstart. Add the following code to index.js:
// Make sure to install the necessary dependencies
const { CallClient, VideoStreamRenderer, LocalVideoStream } = require('@azure/communication-calling');
const { AzureCommunicationTokenCredential } = require('@azure/communication-common');
const { AzureLogger, setLogLevel } = require("@azure/logger");
// Set the log level and output
setLogLevel('verbose');
AzureLogger.log = (...args) => {
    console.log(...args);
};

// Calling web sdk objects
let callAgent;
let deviceManager;
let call;
let incomingCall;
let localVideoStream;
let localVideoStreamRenderer;

// UI widgets
let userAccessToken = document.getElementById('user-access-token');
let calleeAcsUserId = document.getElementById('callee-acs-user-id');
let initializeCallAgentButton = document.getElementById('initialize-call-agent');
let startCallButton = document.getElementById('start-call-button');
let hangUpCallButton = document.getElementById('hangup-call-button');
let acceptCallButton = document.getElementById('accept-call-button');
let startVideoButton = document.getElementById('start-video-button');
let stopVideoButton = document.getElementById('stop-video-button');
let connectedLabel = document.getElementById('connectedLabel');
let remoteVideosGallery = document.getElementById('remoteVideosGallery');
let localVideoContainer = document.getElementById('localVideoContainer');

/**
 * Using the CallClient, initialize a CallAgent instance with a CommunicationUserCredential which will enable us to make outgoing calls and receive incoming calls.
 * You can then use the CallClient.getDeviceManager() API instance to get the DeviceManager.
 */
initializeCallAgentButton.onclick = async () => {
    try {
        const callClient = new CallClient();
        tokenCredential = new AzureCommunicationTokenCredential(userAccessToken.value.trim());
        callAgent = await callClient.createCallAgent(tokenCredential)
        // Set up a camera device to use.
        deviceManager = await callClient.getDeviceManager();
        await deviceManager.askDevicePermission({ video: true });
        await deviceManager.askDevicePermission({ audio: true });
        // Listen for an incoming call to accept.
        callAgent.on('incomingCall', async (args) => {
            try {
                incomingCall = args.incomingCall;
                acceptCallButton.disabled = false;
                startCallButton.disabled = true;
            } catch (error) {
                console.error(error);
            }
        });

        startCallButton.disabled = false;
        initializeCallAgentButton.disabled = true;
    } catch(error) {
        console.error(error);
    }
}

/**
 * Place a 1:1 outgoing video call to a user
 * Add an event listener to initiate a call when the `startCallButton` is clicked:
 * First you have to enumerate local cameras using the deviceManager `getCameraList` API.
 * In this quickstart we're using the first camera in the collection. Once the desired camera is selected, a
 * LocalVideoStream instance will be constructed and passed within `videoOptions` as an item within the
 * localVideoStream array to the call method. Once your call connects it will automatically start sending a video stream to the other participant.
 */
startCallButton.onclick = async () => {
    try {
        const localVideoStream = await createLocalVideoStream();
        const videoOptions = localVideoStream ? { localVideoStreams: [localVideoStream] } : undefined;
        call = callAgent.startCall([{ communicationUserId: calleeAcsUserId.value.trim() }], { videoOptions });
        // Subscribe to the call's properties and events.
        subscribeToCall(call);
    } catch (error) {
        console.error(error);
    }
}

/**
 * Accepting an incoming call with video
 * Add an event listener to accept a call when the `acceptCallButton` is clicked:
 * After subscribing to the `CallAgent.on('incomingCall')` event, you can accept the incoming call.
 * You can pass the local video stream which you want to use to accept the call with.
 */
acceptCallButton.onclick = async () => {
    try {
        const localVideoStream = await createLocalVideoStream();
        const videoOptions = localVideoStream ? { localVideoStreams: [localVideoStream] } : undefined;
        call = await incomingCall.accept({ videoOptions });
        // Subscribe to the call's properties and events.
        subscribeToCall(call);
    } catch (error) {
        console.error(error);
    }
}

/**
 * Subscribe to a call obj.
 * Listen for property changes and collection updates.
 */
subscribeToCall = (call) => {
    try {
        // Inspect the initial call.id value.
        console.log(`Call Id: ${call.id}`);
        //Subscribe to call's 'idChanged' event for value changes.
        call.on('idChanged', () => {
            console.log(`Call Id changed: ${call.id}`);
        });

        // Inspect the initial call.state value.
        console.log(`Call state: ${call.state}`);
        // Subscribe to call's 'stateChanged' event for value changes.
        call.on('stateChanged', async () => {
            console.log(`Call state changed: ${call.state}`);
            if(call.state === 'Connected') {
                connectedLabel.hidden = false;
                acceptCallButton.disabled = true;
                startCallButton.disabled = true;
                hangUpCallButton.disabled = false;
                startVideoButton.disabled = false;
                stopVideoButton.disabled = false;
                remoteVideosGallery.hidden = false;
            } else if (call.state === 'Disconnected') {
                connectedLabel.hidden = true;
                startCallButton.disabled = false;
                hangUpCallButton.disabled = true;
                startVideoButton.disabled = true;
                stopVideoButton.disabled = true;
                console.log(`Call ended, call end reason={code=${call.callEndReason.code}, subCode=${call.callEndReason.subCode}}`);
            }
        });

        call.on('isLocalVideoStartedChanged', () => {
            console.log(`isLocalVideoStarted changed: ${call.isLocalVideoStarted}`);
        });
        console.log(`isLocalVideoStarted: ${call.isLocalVideoStarted}`);
        call.localVideoStreams.forEach(async (lvs) => {
            localVideoStream = lvs;
            await displayLocalVideoStream();
        });
        call.on('localVideoStreamsUpdated', e => {
            e.added.forEach(async (lvs) => {
                localVideoStream = lvs;
                await displayLocalVideoStream();
            });
            e.removed.forEach(lvs => {
               removeLocalVideoStream();
            });
        });

        // Inspect the call's current remote participants and subscribe to them.
        call.remoteParticipants.forEach(remoteParticipant => {
            subscribeToRemoteParticipant(remoteParticipant);
        });
        // Subscribe to the call's 'remoteParticipantsUpdated' event to be
        // notified when new participants are added to the call or removed from the call.
        call.on('remoteParticipantsUpdated', e => {
            // Subscribe to new remote participants that are added to the call.
            e.added.forEach(remoteParticipant => {
                subscribeToRemoteParticipant(remoteParticipant)
            });
            // Unsubscribe from participants that are removed from the call
            e.removed.forEach(remoteParticipant => {
                console.log('Remote participant removed from the call.');
            });
        });
    } catch (error) {
        console.error(error);
    }
}

/**
 * Subscribe to a remote participant obj.
 * Listen for property changes and collection updates.
 */
subscribeToRemoteParticipant = (remoteParticipant) => {
    try {
        // Inspect the initial remoteParticipant.state value.
        console.log(`Remote participant state: ${remoteParticipant.state}`);
        // Subscribe to remoteParticipant's 'stateChanged' event for value changes.
        remoteParticipant.on('stateChanged', () => {
            console.log(`Remote participant state changed: ${remoteParticipant.state}`);
        });

        // Inspect the remoteParticipants's current videoStreams and subscribe to them.
        remoteParticipant.videoStreams.forEach(remoteVideoStream => {
            subscribeToRemoteVideoStream(remoteVideoStream)
        });
        // Subscribe to the remoteParticipant's 'videoStreamsUpdated' event to be
        // notified when the remoteParticipant adds new videoStreams and removes video streams.
        remoteParticipant.on('videoStreamsUpdated', e => {
            // Subscribe to new remote participant's video streams that were added.
            e.added.forEach(remoteVideoStream => {
                subscribeToRemoteVideoStream(remoteVideoStream)
            });
            // Unsubscribe from remote participant's video streams that were removed.
            e.removed.forEach(remoteVideoStream => {
                console.log('Remote participant video stream was removed.');
            })
        });
    } catch (error) {
        console.error(error);
    }
}

/**
 * Subscribe to a remote participant's remote video stream obj.
 * You have to subscribe to the 'isAvailableChanged' event to render the remoteVideoStream. If the 'isAvailable' property
 * changes to 'true', a remote participant is sending a stream. Whenever availability of a remote stream changes
 * you can choose to destroy the whole 'Renderer', a specific 'RendererView' or keep them, but this will result in displaying blank video frame.
 */
subscribeToRemoteVideoStream = async (remoteVideoStream) => {
    let renderer = new VideoStreamRenderer(remoteVideoStream);
    let view;
    let remoteVideoContainer = document.createElement('div');
    remoteVideoContainer.className = 'remote-video-container';

    let loadingSpinner = document.createElement('div');
    loadingSpinner.className = 'loading-spinner';
    remoteVideoStream.on('isReceivingChanged', () => {
        try {
            if (remoteVideoStream.isAvailable) {
                const isReceiving = remoteVideoStream.isReceiving;
                const isLoadingSpinnerActive = remoteVideoContainer.contains(loadingSpinner);
                if (!isReceiving && !isLoadingSpinnerActive) {
                    remoteVideoContainer.appendChild(loadingSpinner);
                } else if (isReceiving && isLoadingSpinnerActive) {
                    remoteVideoContainer.removeChild(loadingSpinner);
                }
            }
        } catch (e) {
            console.error(e);
        }
    });

    const createView = async () => {
        // Create a renderer view for the remote video stream.
        view = await renderer.createView();
        // Attach the renderer view to the UI.
        remoteVideoContainer.appendChild(view.target);
        remoteVideosGallery.appendChild(remoteVideoContainer);
    }

    // Remote participant has switched video on/off
    remoteVideoStream.on('isAvailableChanged', async () => {
        try {
            if (remoteVideoStream.isAvailable) {
                await createView();
            } else {
                view.dispose();
                remoteVideosGallery.removeChild(remoteVideoContainer);
            }
        } catch (e) {
            console.error(e);
        }
    });

    // Remote participant has video on initially.
    if (remoteVideoStream.isAvailable) {
        try {
            await createView();
        } catch (e) {
            console.error(e);
        }
    }
}

/**
 * Start your local video stream.
 * This will send your local video stream to remote participants so they can view it.
 */
startVideoButton.onclick = async () => {
    try {
        const localVideoStream = await createLocalVideoStream();
        await call.startVideo(localVideoStream);
    } catch (error) {
        console.error(error);
    }
}

/**
 * Stop your local video stream.
 * This will stop your local video stream from being sent to remote participants.
 */
stopVideoButton.onclick = async () => {
    try {
        await call.stopVideo(localVideoStream);
    } catch (error) {
        console.error(error);
    }
}

/**
 * To render a LocalVideoStream, you need to create a new instance of VideoStreamRenderer, and then
 * create a new VideoStreamRendererView instance using the asynchronous createView() method.
 * You may then attach view.target to any UI element.
 */
createLocalVideoStream = async () => {
    const camera = (await deviceManager.getCameras())[0];
    if (camera) {
        return new LocalVideoStream(camera);
    } else {
        console.error(`No camera device found on the system`);
    }
}

/**
 * Display your local video stream preview in your UI
 */
displayLocalVideoStream = async () => {
    try {
        localVideoStreamRenderer = new VideoStreamRenderer(localVideoStream);
        const view = await localVideoStreamRenderer.createView();
        localVideoContainer.hidden = false;
        localVideoContainer.appendChild(view.target);
    } catch (error) {
        console.error(error);
    }
}

/**
 * Remove your local video stream preview from your UI
 */
removeLocalVideoStream = async() => {
    try {
        localVideoStreamRenderer.dispose();
        localVideoContainer.hidden = true;
    } catch (error) {
        console.error(error);
    }
}

/**
 * End current call
 */
hangUpCallButton.addEventListener("click", async () => {
    // end the current call
    await call.hangUp();
});
Create a file in the root directory of your project called styles.css to contain the application styling for this quickstart. Add the following code to styles.css:
/**
 * CSS for styling the loading spinner over the remote video stream
 */
.remote-video-container {
    position: relative;
}
.loading-spinner {
    border: 12px solid #f3f3f3;
    border-radius: 50%;
    border-top: 12px solid #ca5010;
    width: 100px;
    height: 100px;
    -webkit-animation: spin 2s linear infinite; /* Safari */
    animation: spin 2s linear infinite;
    position: absolute;
    margin: auto;
    top: 0;
    bottom: 0;
    left: 0;
    right: 0;
    transform: translate(-50%, -50%);
}
@keyframes spin {
    0% { transform: rotate(0deg); }
    100% { transform: rotate(360deg); }
}
/* Safari */
@-webkit-keyframes spin {
    0% { -webkit-transform: rotate(0deg); }
    100% { -webkit-transform: rotate(360deg); }
}
Add the webpack local server code
Create a file in the root directory of your project called webpack.config.js to contain the local server logic for this quickstart. Add the following code to webpack.config.js:
const path = require('path');
const CopyPlugin = require("copy-webpack-plugin");

module.exports = {
    mode: 'development',
    entry: './index.js',
    output: {
        filename: 'main.js',
        path: path.resolve(__dirname, 'dist'),
    },
    devServer: {
        static: {
            directory: path.join(__dirname, './')
        },
    },
    plugins: [
        new CopyPlugin({
            patterns: [
                './index.html'
            ]
        }),
    ]
};
Run the code
Use the webpack-dev-server to build and run your app. Run the following command to bundle the application host in a local webserver:
npx webpack serve --config webpack.config.js
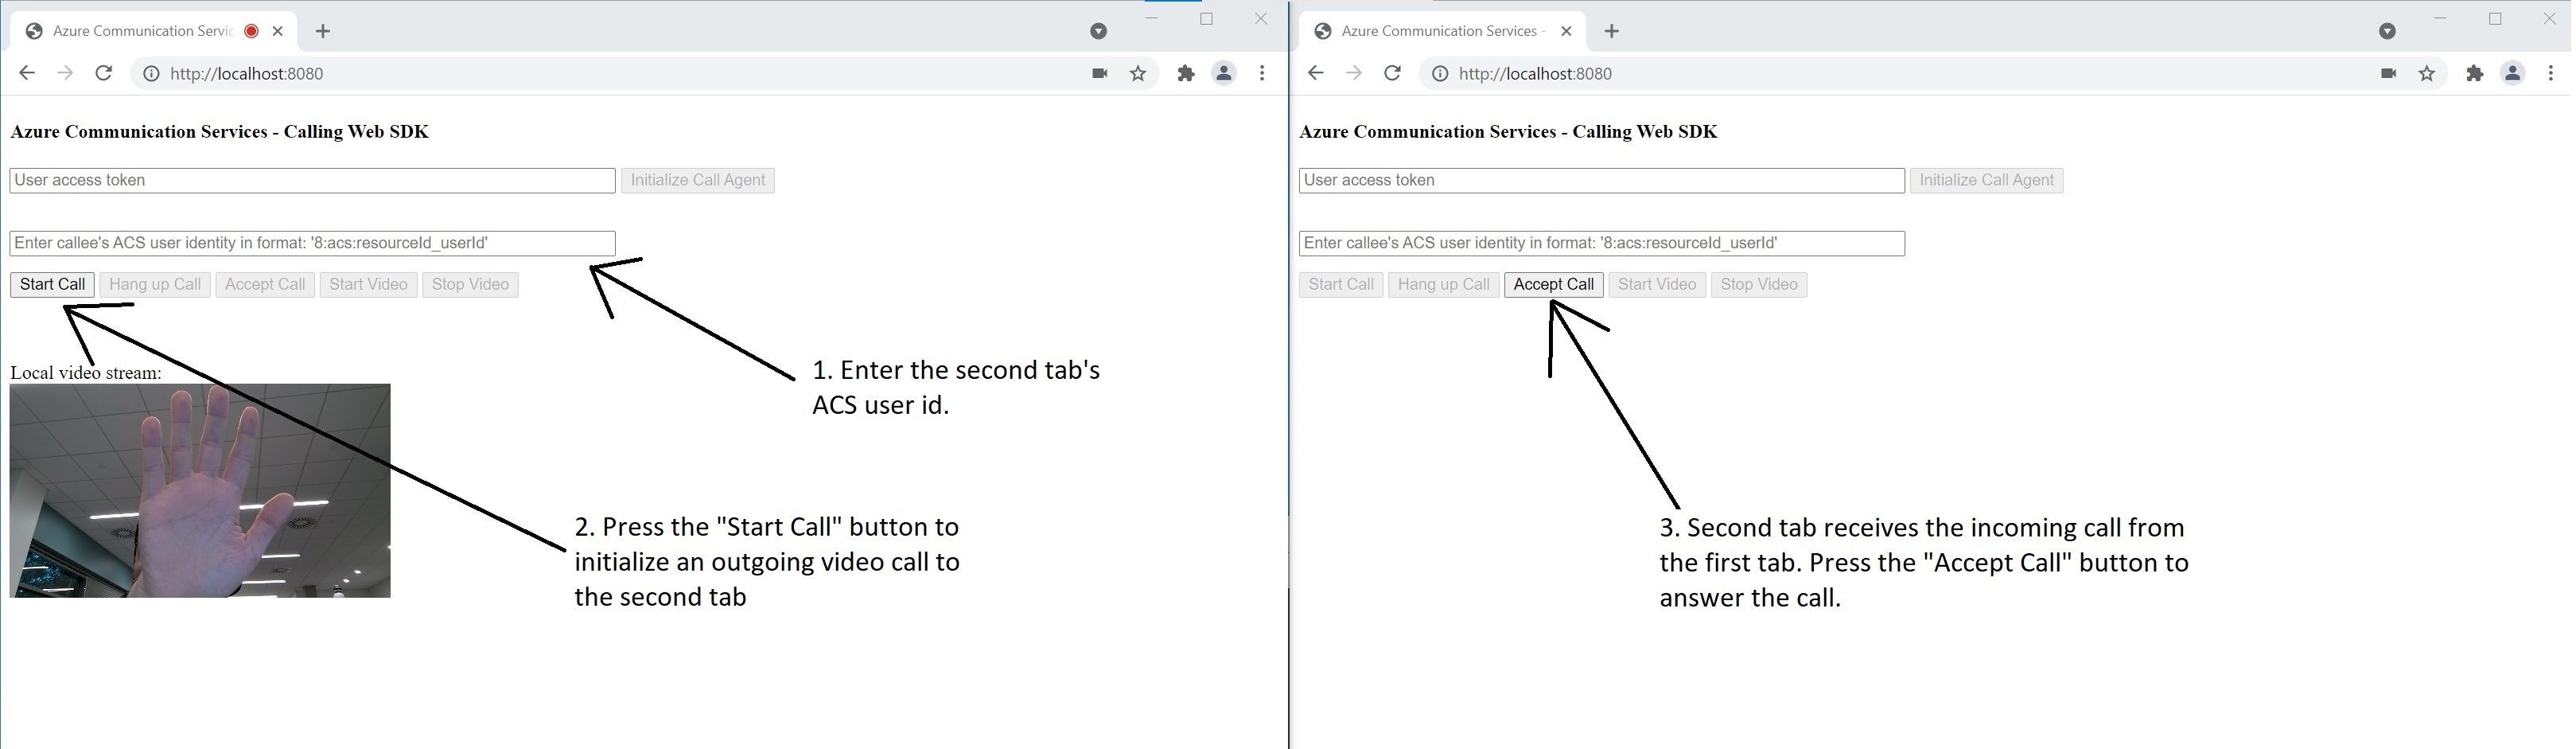
Open your browser and on two tabs navigate to http://localhost:8080/.You should see the following screen:

On the first tab, enter a valid user access token, and on the other tab enter another different valid user access token.
Refer to the user access token documentation, if you don't already have tokens available to use.
On both tabs, click on the "Initialize Call Agent" buttons. You should see the following screen:

On the first tab, enter the Azure Communication Services user identity of the second tab, and click the "Start Call" button. The first tab starts the outgoing call to the second tab, and the second tab's "Accept Call" button becomes enabled:
From the second tab, click on the "Accept Call" button and the call starts and connect. You should see the following screen:
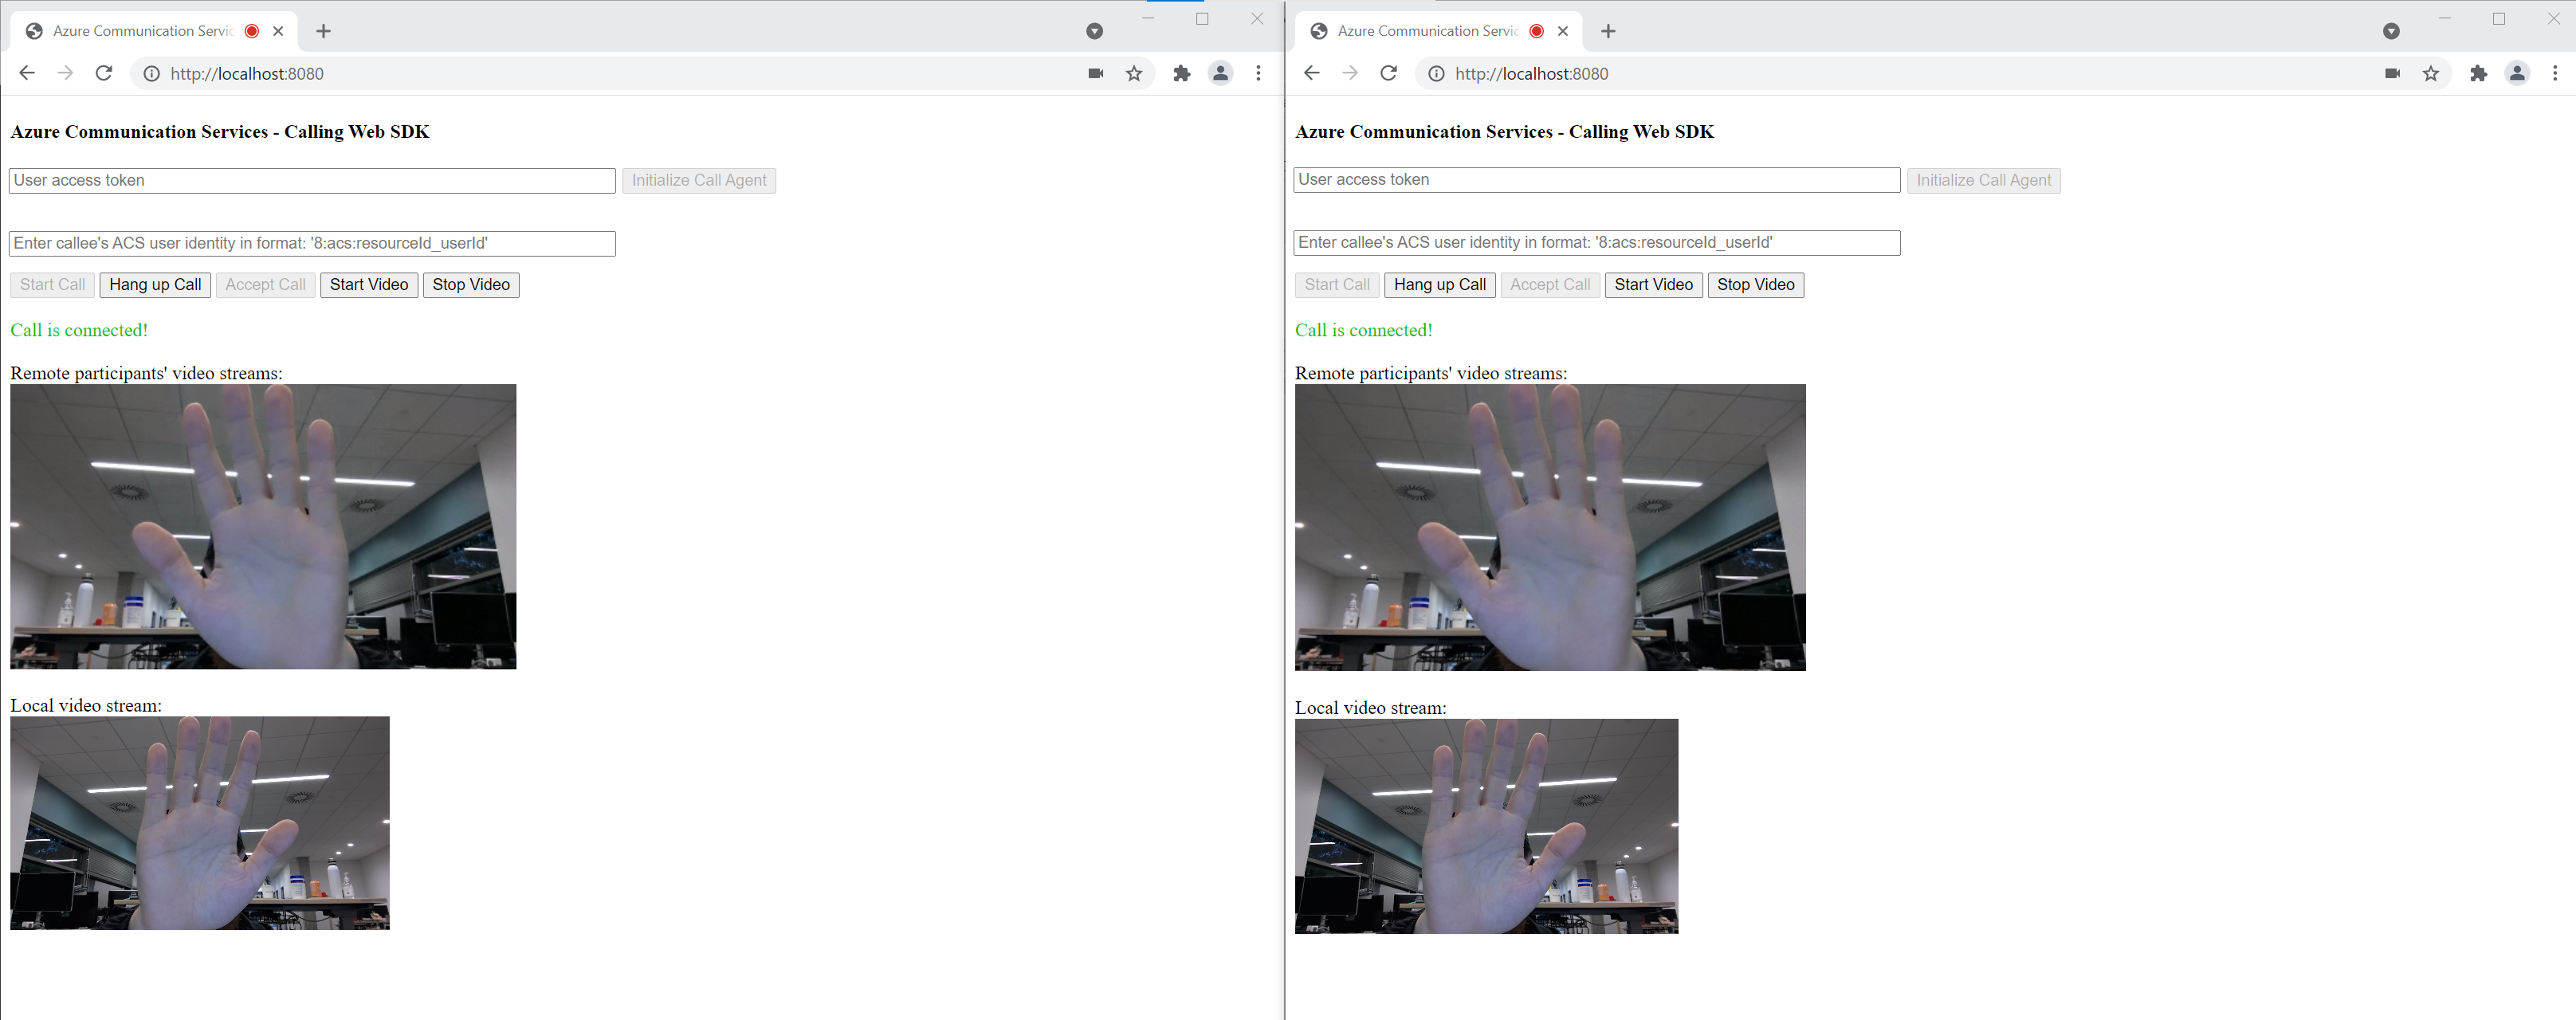
Both tabs are now successfully in a 1 to 1 video call. Both tabs can hear each other's audio and see each other video stream.
Get started with Azure Communication Services by using the Communication Services calling client library to add video calling to your app. Learn how to include 1:1 video calling, and how to create or join group calls. Additionally, you can start, answer, and join a video call by using the Azure Communication Services Calling SDK for Android.
If you want to get started with sample code, you can download the sample app.
Prerequisites
An Azure account with an active subscription. Create an account for free.
Android Studio, for creating your Android application.
A deployed Communication Services resource. Create a Communication Services resource. You need to record your connection string for this quickstart.
A User Access Token for your Azure Communication Service. You can also use the Azure CLI and run the command with your connection string to create a user and an access token.
az communication identity token issue --scope voip --connection-string "yourConnectionString"For details, see Use Azure CLI to Create and Manage Access Tokens.
Create an Android app with an empty activity
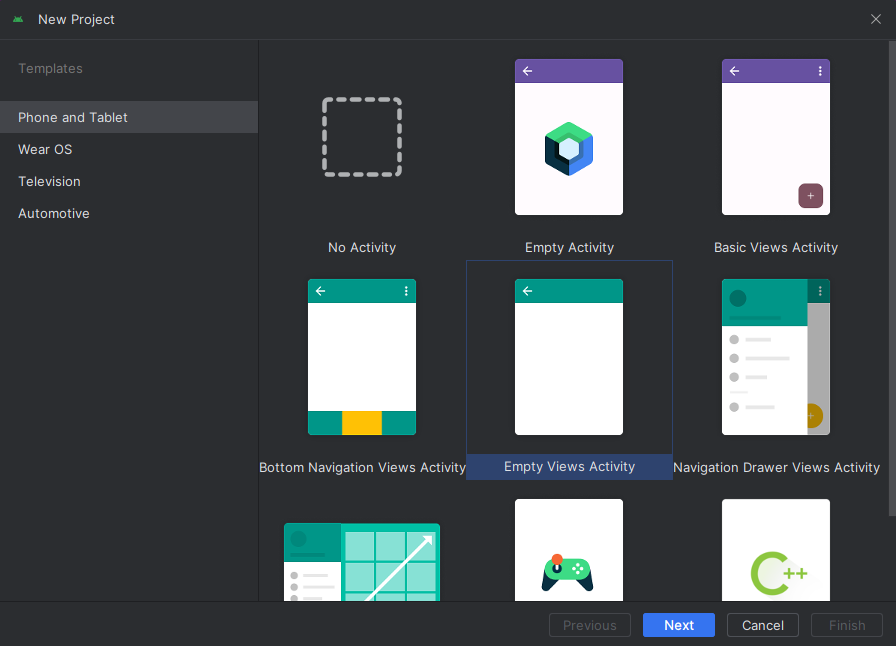
From Android Studio, select Start a new Android Studio project.
Under Phone and Tablet, select the Empty Activity project template.
For the Minimum SDK, select API 26: Android 8.0 (Oreo), or later. See SDK support versions.

Install the package
Locate your project level build.gradle, and add mavenCentral() to the list of repositories under buildscript and allprojects
buildscript {
    repositories {
    ...
        mavenCentral()
    ...
    }
}
allprojects {
    repositories {
    ...
        mavenCentral()
    ...
    }
}
Then, in your module level build.gradle, add the following lines to the dependencies and android sections:
android {
    ...
    packagingOptions {
        pickFirst  'META-INF/*'
    }
    compileOptions {
        sourceCompatibility JavaVersion.VERSION_1_8
        targetCompatibility JavaVersion.VERSION_1_8
    }
}

dependencies {
    ...
    implementation 'com.azure.android:azure-communication-calling:2.0.0'
    ...
}
Add permissions to application manifest
To request permissions required to make a call, you must first declare the permissions in the application manifest (app/src/main/AndroidManifest.xml). Replace the content of file with the following code:
<?xml version="1.0" encoding="utf-8"?>
<manifest xmlns:android="http://schemas.android.com/apk/res/android"
    package="com.contoso.acsquickstart">

    <uses-permission android:name="android.permission.INTERNET" />
    <uses-permission android:name="android.permission.ACCESS_NETWORK_STATE" />
    <uses-permission android:name="android.permission.ACCESS_WIFI_STATE" />
    <uses-permission android:name="android.permission.RECORD_AUDIO" />
    <uses-permission android:name="android.permission.CAMERA" />

    <application
        android:allowBackup="true"
        android:icon="@mipmap/ic_launcher"
        android:label="@string/app_name"
        android:roundIcon="@mipmap/ic_launcher_round"
        android:supportsRtl="true"
        android:theme="@style/AppTheme">
        <!--Our Calling SDK depends on the Apache HTTP SDK.
When targeting Android SDK 28+, this library needs to be explicitly referenced.
See https://developer.android.com/about/versions/pie/android-9.0-changes-28#apache-p-->
        <uses-library android:name="org.apache.http.legacy" android:required="false"/>
        <activity android:name=".MainActivity">
            <intent-filter>
                <action android:name="android.intent.action.MAIN" />

                <category android:name="android.intent.category.LAUNCHER" />
            </intent-filter>
        </activity>
    </application>

</manifest>
Set up the layout for the app
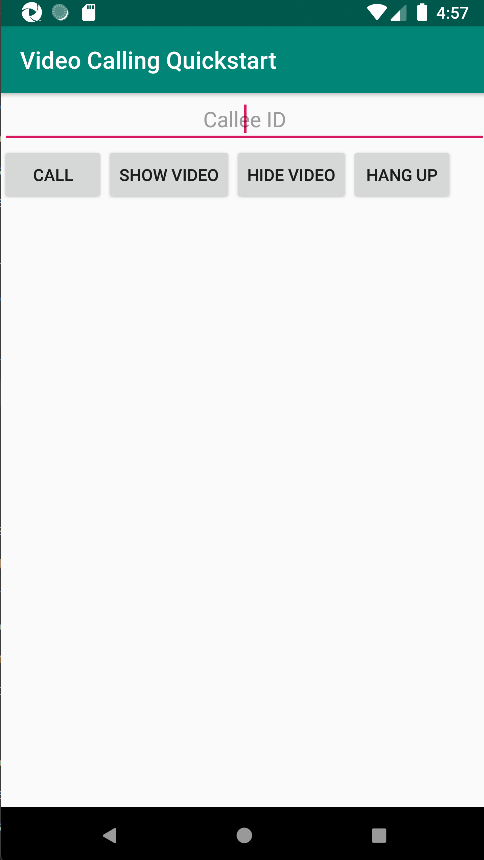
You need a text input for the callee ID or group call ID, a button for placing the call, and extra button for hanging up the call.
Also need two buttons to turn on and turn off the local video. You need to place two containers for local and remote video streams. You can add these buttons through the designer, or by editing the layout XML.
Go to app/src/main/res/layout/activity_main.xml, and replace the content of file with the following code:
<?xml version="1.0" encoding="utf-8"?>
<androidx.constraintlayout.widget.ConstraintLayout xmlns:android="http://schemas.android.com/apk/res/android"
    xmlns:app="http://schemas.android.com/apk/res-auto"
    xmlns:tools="http://schemas.android.com/tools"
    android:layout_width="match_parent"
    android:layout_height="match_parent"
    tools:context=".MainActivity">
    <LinearLayout
        android:layout_width="match_parent"
        android:layout_height="wrap_content"
        android:orientation="vertical">

        <EditText
            android:id="@+id/call_id"
            android:layout_width="match_parent"
            android:layout_height="wrap_content"
            android:ems="10"
            android:gravity="center"
            android:hint="Callee ID"
            android:inputType="textPersonName"
            app:layout_constraintBottom_toTopOf="@+id/call_button"
            app:layout_constraintEnd_toEndOf="parent"
            app:layout_constraintStart_toStartOf="parent"
            app:layout_constraintTop_toTopOf="parent"
            app:layout_constraintVertical_bias="0.064" />
        <LinearLayout
            android:layout_width="match_parent"
            android:layout_height="wrap_content">
            <Button
                android:id="@+id/call_button"
                android:layout_width="wrap_content"
                android:layout_height="wrap_content"
                android:layout_marginBottom="16dp"
                android:gravity="center"
                android:text="Call"
                app:layout_constraintBottom_toBottomOf="parent"
                app:layout_constraintEnd_toEndOf="parent"
                app:layout_constraintStart_toStartOf="parent" />
            <Button
                android:id="@+id/show_preview"
                android:layout_width="wrap_content"
                android:layout_height="wrap_content"
                android:layout_marginBottom="16dp"
                android:gravity="center"
                android:text="Show Video"
                app:layout_constraintBottom_toBottomOf="parent"
                app:layout_constraintEnd_toEndOf="parent"
                app:layout_constraintStart_toStartOf="parent" />
            <Button
                android:id="@+id/hide_preview"
                android:layout_width="wrap_content"
                android:layout_height="wrap_content"
                android:layout_marginBottom="16dp"
                android:gravity="center"
                android:text="Hide Video"
                app:layout_constraintBottom_toBottomOf="parent"
                app:layout_constraintEnd_toEndOf="parent"
                app:layout_constraintStart_toStartOf="parent" />
            <Button
                android:id="@+id/hang_up"
                android:layout_width="wrap_content"
                android:layout_height="wrap_content"
                android:layout_marginBottom="16dp"
                android:gravity="center"
                android:text="Hang Up"
                app:layout_constraintBottom_toBottomOf="parent"
                app:layout_constraintEnd_toEndOf="parent"
                app:layout_constraintStart_toStartOf="parent" />
        </LinearLayout>
        <ScrollView
            android:layout_width="match_parent"
            android:layout_height="wrap_content">
            <GridLayout
                android:id="@+id/remotevideocontainer"
                android:layout_width="match_parent"
                android:layout_height="wrap_content"
                android:columnCount="2"
                android:rowCount="2"
                android:padding="10dp"></GridLayout>
        </ScrollView>
    </LinearLayout>
    <FrameLayout
        android:layout_width="match_parent"
        android:layout_height="match_parent">
        <LinearLayout
            android:id="@+id/localvideocontainer"
            android:layout_width="180dp"
            android:layout_height="300dp"
            android:layout_gravity="right|bottom"
            android:orientation="vertical"
            android:padding="10dp">
            <Button
                android:id="@+id/switch_source"
                android:layout_width="match_parent"
                android:layout_height="wrap_content"
                android:gravity="center"
                android:text="Switch Source"
                android:visibility="invisible" />
        </LinearLayout>

    </FrameLayout>
</androidx.constraintlayout.widget.ConstraintLayout>
Create the main activity scaffolding and bindings
With the layout created, you can add the bindings, and the basic scaffolding of the activity. The activity handles requesting runtime permissions, creating the call agent, and placing the call when the button is pressed.
The onCreate method is overridden to invoke getAllPermissions and createAgent, and add the bindings for the call button. This event occurs only once when the activity is created. For more information about onCreate, see the guide Understand the activity lifecycle.
Go to MainActivity.java file, and replace the content with the following code:
package com.example.videocallingquickstart;

import androidx.appcompat.app.AppCompatActivity;
import androidx.core.app.ActivityCompat;

import android.Manifest;
import android.content.pm.PackageManager;
import android.media.AudioManager;
import android.os.Bundle;
import android.util.DisplayMetrics;
import android.util.Log;
import android.view.View;
import android.widget.Button;
import android.widget.EditText;
import android.widget.GridLayout;
import android.widget.Toast;
import android.widget.LinearLayout;
import android.content.Context;
import com.azure.android.communication.calling.CallState;
import com.azure.android.communication.calling.CallingCommunicationException;
import com.azure.android.communication.calling.ParticipantsUpdatedListener;
import com.azure.android.communication.calling.PropertyChangedEvent;
import com.azure.android.communication.calling.PropertyChangedListener;
import com.azure.android.communication.calling.StartCallOptions;
import com.azure.android.communication.calling.VideoDeviceInfo;
import com.azure.android.communication.common.CommunicationIdentifier;
import com.azure.android.communication.common.CommunicationTokenCredential;
import com.azure.android.communication.calling.CallAgent;
import com.azure.android.communication.calling.CallClient;
import com.azure.android.communication.calling.DeviceManager;
import com.azure.android.communication.calling.VideoOptions;
import com.azure.android.communication.calling.LocalVideoStream;
import com.azure.android.communication.calling.VideoStreamRenderer;
import com.azure.android.communication.calling.VideoStreamRendererView;
import com.azure.android.communication.calling.CreateViewOptions;
import com.azure.android.communication.calling.ScalingMode;
import com.azure.android.communication.calling.IncomingCall;
import com.azure.android.communication.calling.Call;
import com.azure.android.communication.calling.AcceptCallOptions;
import com.azure.android.communication.calling.ParticipantsUpdatedEvent;
import com.azure.android.communication.calling.RemoteParticipant;
import com.azure.android.communication.calling.RemoteVideoStream;
import com.azure.android.communication.calling.RemoteVideoStreamsEvent;
import com.azure.android.communication.calling.RendererListener;
import com.azure.android.communication.common.CommunicationUserIdentifier;
import com.azure.android.communication.common.MicrosoftTeamsUserIdentifier;
import com.azure.android.communication.common.PhoneNumberIdentifier;
import com.azure.android.communication.common.UnknownIdentifier;

import java.util.ArrayList;
import java.util.HashSet;
import java.util.List;
import java.util.HashMap;
import java.util.Map;
import java.util.concurrent.ExecutionException;
import java.util.concurrent.Executors;

import java.util.ArrayList;
import java.util.HashSet;
import java.util.List;
import java.util.HashMap;
import java.util.Map;
import java.util.concurrent.ExecutionException;
import java.util.concurrent.Executors;

public class MainActivity extends AppCompatActivity {

    private CallAgent callAgent;
    private VideoDeviceInfo currentCamera;
    private LocalVideoStream currentVideoStream;
    private DeviceManager deviceManager;
    private IncomingCall incomingCall;
    private Call call;
    VideoStreamRenderer previewRenderer;
    VideoStreamRendererView preview;
    final Map<Integer, StreamData> streamData = new HashMap<>();
    private boolean renderRemoteVideo = true;
    private ParticipantsUpdatedListener remoteParticipantUpdatedListener;
    private PropertyChangedListener onStateChangedListener;

    final HashSet<String> joinedParticipants = new HashSet<>();

    Button switchSourceButton;

    @Override
    protected void onCreate(Bundle savedInstanceState) {
        super.onCreate(savedInstanceState);
        setContentView(R.layout.activity_main);

        getAllPermissions();
        createAgent();

        handleIncomingCall();

        Button callButton = findViewById(R.id.call_button);
        callButton.setOnClickListener(l -> startCall());
        Button hangupButton = findViewById(R.id.hang_up);
        hangupButton.setOnClickListener(l -> hangUp());
        Button startVideo = findViewById(R.id.show_preview);
        startVideo.setOnClickListener(l -> turnOnLocalVideo());
        Button stopVideo = findViewById(R.id.hide_preview);
        stopVideo.setOnClickListener(l -> turnOffLocalVideo());

        switchSourceButton = findViewById(R.id.switch_source);
        switchSourceButton.setOnClickListener(l -> switchSource());

        setVolumeControlStream(AudioManager.STREAM_VOICE_CALL);
    }

	/**
     * Request each required permission if the app doesn't already have it.
     */
    private void getAllPermissions() {
        // See section on requesting permissions
    }

    /**
      * Create the call agent for placing calls
      */
    private void createAgent() {
        // See section on creating the call agent
    }

	/**
     * Handle incoming calls
     */
    private void handleIncomingCall() {
        // See section on answering incoming call
    }

	/**
     * Place a call to the callee id provided in `callee_id` text input.
     */
    private void startCall() {
        // See section on starting the call
    }

    /**
     * End calls
     */
    private void hangUp() {
        // See section on ending the call
    }

	/**
     * Mid-call operations
     */
    public void turnOnLocalVideo() {
        // See section
    }

    public void turnOffLocalVideo() {
        // See section
    }

	/**
     * Change the active camera for the next available
     */
	public void switchSource() {
		// See section
    }
}
Request permissions at runtime
For Android 6.0 and later (API level 23), and targetSdkVersion 23 or later, permissions are granted at runtime instead of when the app is installed. In order to support it, getAllPermissions can be implemented to call ActivityCompat.checkSelfPermission and ActivityCompat.requestPermissions for each required permission.
/**
 * Request each required permission if the app doesn't already have it.
 */
private void getAllPermissions() {
    String[] requiredPermissions = new String[]{Manifest.permission.RECORD_AUDIO, Manifest.permission.CAMERA, Manifest.permission.WRITE_EXTERNAL_STORAGE, Manifest.permission.READ_PHONE_STATE};
    ArrayList<String> permissionsToAskFor = new ArrayList<>();
    for (String permission : requiredPermissions) {
        if (ActivityCompat.checkSelfPermission(this, permission) != PackageManager.PERMISSION_GRANTED) {
            permissionsToAskFor.add(permission);
        }
    }
    if (!permissionsToAskFor.isEmpty()) {
        ActivityCompat.requestPermissions(this, permissionsToAskFor.toArray(new String[0]), 1);
    }
}
Note
When you're designing your app, consider when these permissions should be requested. Permissions should be requested as they are needed, not ahead of time. For more information, see, the Android Permissions Guide.
Object model
The following classes and interfaces handle some of the major features of the Azure Communication Services Calling SDK:
| Name | Description |
|---|---|
CallClient |
The main entry point to the Calling SDK. |
CallAgent |
Used to start and manage calls. |
CommunicationTokenCredential |
Used as the token credential to instantiate the CallAgent. |
CommunicationIdentifier |
Used as a different type of participant that might be part of a call. |
Create an agent from the user access token
You need a user token to create an authenticated call agent. Generally, this token is generated from a service with authentication specific to the application. For more information on user access tokens, see User access tokens.
For the quickstart, replace <User_Access_Token> with a user access token generated for your Azure Communication Services resource.
/**
 * Create the call agent for placing calls
 */
private void createAgent() {
    Context context = this.getApplicationContext();
    String userToken = "<USER_ACCESS_TOKEN>";
    try {
        CommunicationTokenCredential credential = new CommunicationTokenCredential(userToken);
        CallClient callClient = new CallClient();
        deviceManager = callClient.getDeviceManager(context).get();
        callAgent = callClient.createCallAgent(getApplicationContext(), credential).get();
    } catch (Exception ex) {
        Toast.makeText(context, "Failed to create call agent.", Toast.LENGTH_SHORT).show();
    }
}
Start a video call by using the call agent
You can place the call by using the call agent. All you need to do is provide a list of callee IDs and the call options.
To place a call with video, you have to enumerate local cameras by using the deviceManager getCameras API. After you select a desired camera, use it to construct a LocalVideoStream instance. Then pass it into videoOptions as an item in the localVideoStream array to a call method. When the call connects, it automatically starts sending a video stream from the selected camera to the other participant.
private void startCall() {
    Context context = this.getApplicationContext();
    EditText callIdView = findViewById(R.id.call_id);
    String callId = callIdView.getText().toString();
    ArrayList<CommunicationIdentifier> participants = new ArrayList<CommunicationIdentifier>();
    List<VideoDeviceInfo> cameras = deviceManager.getCameras();


    StartCallOptions options = new StartCallOptions();
    if(!cameras.isEmpty()) {
        currentCamera = getNextAvailableCamera(null);
        currentVideoStream = new LocalVideoStream(currentCamera, context);
        LocalVideoStream[] videoStreams = new LocalVideoStream[1];
        videoStreams[0] = currentVideoStream;
        VideoOptions videoOptions = new VideoOptions(videoStreams);
        options.setVideoOptions(videoOptions);
        showPreview(currentVideoStream);
    }
    participants.add(new CommunicationUserIdentifier(callId));

    call = callAgent.startCall(
            context,
            participants,
            options);

    //Subscribe to events on updates of call state and remote participants
    remoteParticipantUpdatedListener = this::handleRemoteParticipantsUpdate;
    onStateChangedListener = this::handleCallOnStateChanged;
    call.addOnRemoteParticipantsUpdatedListener(remoteParticipantUpdatedListener);
    call.addOnStateChangedListener(onStateChangedListener);
}
In this quickstart, you rely on the function getNextAvailableCamera to pick the camera that the call uses. The function takes the enumeration of cameras as input, and iterates through the list to get the next camera available. If the argument is null, the function picks the first device on the list. If there are no available cameras when you select Start Call, an audio call starts instead. But if the remote participant answered with video, you can still see the remote video stream.
private VideoDeviceInfo getNextAvailableCamera(VideoDeviceInfo camera) {
    List<VideoDeviceInfo> cameras = deviceManager.getCameras();
    int currentIndex = 0;
    if (camera == null) {
        return cameras.isEmpty() ? null : cameras.get(0);
    }

    for (int i = 0; i < cameras.size(); i++) {
        if (camera.getId().equals(cameras.get(i).getId())) {
            currentIndex = i;
            break;
        }
    }
    int newIndex = (currentIndex + 1) % cameras.size();
    return cameras.get(newIndex);
}
After you construct a LocalVideoStream instance, you can create a renderer to display it on the UI.
private void showPreview(LocalVideoStream stream) {
        previewRenderer = new VideoStreamRenderer(stream, this);
        LinearLayout layout = findViewById(R.id.localvideocontainer);
        preview = previewRenderer.createView(new CreateViewOptions(ScalingMode.FIT));
        preview.setTag(0);
        runOnUiThread(() -> {
            layout.addView(preview);
            switchSourceButton.setVisibility(View.VISIBLE);
        });
    }
To allow the user to toggle the local video source, use switchSource. This method picks the next available camera and defines it as the local stream.
public void switchSource() {
    if (currentVideoStream != null) {
        try {
            currentCamera = getNextAvailableCamera(currentCamera);
            currentVideoStream.switchSource(currentCamera).get();
        } catch (InterruptedException e) {
            e.printStackTrace();
        } catch (ExecutionException e) {
            e.printStackTrace();
        }
    }
}
Accept an incoming call
You can obtain an incoming call by subscribing to addOnIncomingCallListener on callAgent.
private void handleIncomingCall() {
    callAgent.addOnIncomingCallListener((incomingCall) -> {
        this.incomingCall = incomingCall;
        Executors.newCachedThreadPool().submit(this::answerIncomingCall);
    });
}
To accept a call with the video camera on, enumerate the local cameras by using the deviceManager getCameras API. Pick a camera, and construct a LocalVideoStream instance. Pass it into acceptCallOptions before calling the accept method on a call object.
private void answerIncomingCall() {
    Context context = this.getApplicationContext();
    if (incomingCall == null){
        return;
    }
    AcceptCallOptions acceptCallOptions = new AcceptCallOptions();
    List<VideoDeviceInfo> cameras = deviceManager.getCameras();
    if(!cameras.isEmpty()) {
        currentCamera = getNextAvailableCamera(null);
        currentVideoStream = new LocalVideoStream(currentCamera, context);
        LocalVideoStream[] videoStreams = new LocalVideoStream[1];
        videoStreams[0] = currentVideoStream;
        VideoOptions videoOptions = new VideoOptions(videoStreams);
        acceptCallOptions.setVideoOptions(videoOptions);
        showPreview(currentVideoStream);
    }
    try {
        call = incomingCall.accept(context, acceptCallOptions).get();
    } catch (InterruptedException e) {
        e.printStackTrace();
    } catch (ExecutionException e) {
        e.printStackTrace();
    }

    //Subscribe to events on updates of call state and remote participants
    remoteParticipantUpdatedListener = this::handleRemoteParticipantsUpdate;
    onStateChangedListener = this::handleCallOnStateChanged;
    call.addOnRemoteParticipantsUpdatedListener(remoteParticipantUpdatedListener);
    call.addOnStateChangedListener(onStateChangedListener);
}
Remote participant and remote video streams
All remote participants are available through the getRemoteParticipants() method on a call instance. Once the call becomes connected (CallState.CONNECTED), we can access the remote participants of the call and handle the remote video streams.
When you start a call or answer an incoming call, you need to subscribe to the addOnRemoteParticipantsUpdatedListener event to handle remote participants.
remoteParticipantUpdatedListener = this::handleRemoteParticipantsUpdate;
call.addOnRemoteParticipantsUpdatedListener(remoteParticipantUpdatedListener);
When you use event listeners that are defined within the same class, bind the listener to a variable. Pass the variable in as an argument to add and remove listener methods.
If you try to pass the listener in directly as an argument, you lose the reference to that listener. Java creates new instances of these listeners, not referencing previously created ones. You can't remove prior instances, because you don’t have a reference to them.
Note
When a user joins a call, they can access the current remote participants through the getRemoteParticipants() method. The addOnRemoteParticipantsUpdatedListener event will not trigger for these existing participants. This event will only trigger when a remote participant joins or leaves the call while the user is already in the call.
Remote video stream updates
For 1:1 calling, you need to handle added participants. When you remove the remote participant, the call ends. For added participants, you subscribe to addOnVideoStreamsUpdatedListener to handle video stream updates.
public void handleRemoteParticipantsUpdate(ParticipantsUpdatedEvent args) {
    handleAddedParticipants(args.getAddedParticipants());
}

private void handleAddedParticipants(List<RemoteParticipant> participants) {
    for (RemoteParticipant remoteParticipant : participants) {
        if(!joinedParticipants.contains(getId(remoteParticipant))) {
            joinedParticipants.add(getId(remoteParticipant));

            if (renderRemoteVideo) {
                for (RemoteVideoStream stream : remoteParticipant.getVideoStreams()) {
                    StreamData data = new StreamData(stream, null, null);
                    streamData.put(stream.getId(), data);
                    startRenderingVideo(data);
                }
            }
            remoteParticipant.addOnVideoStreamsUpdatedListener(videoStreamsEventArgs -> videoStreamsUpdated(videoStreamsEventArgs));
        }
    }
}

private void videoStreamsUpdated(RemoteVideoStreamsEvent videoStreamsEventArgs) {
    for(RemoteVideoStream stream : videoStreamsEventArgs.getAddedRemoteVideoStreams()) {
        StreamData data = new StreamData(stream, null, null);
        streamData.put(stream.getId(), data);
        if (renderRemoteVideo) {
            startRenderingVideo(data);
        }
    }

    for(RemoteVideoStream stream : videoStreamsEventArgs.getRemovedRemoteVideoStreams()) {
        stopRenderingVideo(stream);
    }
}


public String getId(final RemoteParticipant remoteParticipant) {
    final CommunicationIdentifier identifier = remoteParticipant.getIdentifier();
    if (identifier instanceof PhoneNumberIdentifier) {
        return ((PhoneNumberIdentifier) identifier).getPhoneNumber();
    } else if (identifier instanceof MicrosoftTeamsUserIdentifier) {
        return ((MicrosoftTeamsUserIdentifier) identifier).getUserId();
    } else if (identifier instanceof CommunicationUserIdentifier) {
        return ((CommunicationUserIdentifier) identifier).getId();
    } else {
        return ((UnknownIdentifier) identifier).getId();
    }
}
Render remote videos
Create a renderer of the remote video stream, and attach it to the view to start rendering the remote view. Dispose of the view to stop rendering it.
void startRenderingVideo(StreamData data){
    if (data.renderer != null) {
        return;
    }
    GridLayout layout = ((GridLayout)findViewById(R.id.remotevideocontainer));
    data.renderer = new VideoStreamRenderer(data.stream, this);
    data.renderer.addRendererListener(new RendererListener() {
        @Override
        public void onFirstFrameRendered() {
            String text = data.renderer.getSize().toString();
            Log.i("MainActivity", "Video rendering at: " + text);
        }

        @Override
        public void onRendererFailedToStart() {
            String text = "Video failed to render";
            Log.i("MainActivity", text);
        }
    });
    data.rendererView = data.renderer.createView(new CreateViewOptions(ScalingMode.FIT));
    data.rendererView.setTag(data.stream.getId());
    runOnUiThread(() -> {
        GridLayout.LayoutParams params = new GridLayout.LayoutParams(layout.getLayoutParams());
        DisplayMetrics displayMetrics = new DisplayMetrics();
        getWindowManager().getDefaultDisplay().getMetrics(displayMetrics);
        params.height = (int)(displayMetrics.heightPixels / 2.5);
        params.width = displayMetrics.widthPixels / 2;
        layout.addView(data.rendererView, params);
    });
}

void stopRenderingVideo(RemoteVideoStream stream) {
    StreamData data = streamData.get(stream.getId());
    if (data == null || data.renderer == null) {
        return;
    }
    runOnUiThread(() -> {
        GridLayout layout = findViewById(R.id.remotevideocontainer);
        for(int i = 0; i < layout.getChildCount(); ++ i) {
            View childView =  layout.getChildAt(i);
            if ((int)childView.getTag() == data.stream.getId()) {
                layout.removeViewAt(i);
            }
        }
    });
    data.rendererView = null;
    // Dispose renderer
    data.renderer.dispose();
    data.renderer = null;
}

static class StreamData {
    RemoteVideoStream stream;
    VideoStreamRenderer renderer;
    VideoStreamRendererView rendererView;
    StreamData(RemoteVideoStream stream, VideoStreamRenderer renderer, VideoStreamRendererView rendererView) {
        this.stream = stream;
        this.renderer = renderer;
        this.rendererView = rendererView;
    }
}
Call state update
The state of a call can change from connected to disconnected. When the call is connected, you handle the remote participant, and when the call is disconnected, you dispose of previewRenderer to stop local video.
private void handleCallOnStateChanged(PropertyChangedEvent args) {
        if (call.getState() == CallState.CONNECTED) {
            runOnUiThread(() -> Toast.makeText(this, "Call is CONNECTED", Toast.LENGTH_SHORT).show());
            handleCallState();
        }
        if (call.getState() == CallState.DISCONNECTED) {
            runOnUiThread(() -> Toast.makeText(this, "Call is DISCONNECTED", Toast.LENGTH_SHORT).show());
            if (previewRenderer != null) {
                previewRenderer.dispose();
            }
            switchSourceButton.setVisibility(View.INVISIBLE);
        }
    }
End a call
End the call by calling the hangUp() function on the call instance. Dispose of previewRenderer to stop local video.
private void hangUp() {
    try {
        call.hangUp().get();
        switchSourceButton.setVisibility(View.INVISIBLE);
    } catch (ExecutionException | InterruptedException e) {
        e.printStackTrace();
    }
    if (previewRenderer != null) {
        previewRenderer.dispose();
    }
}
Hide and show local video
When the call has started, you can stop local video rendering and streaming with turnOffLocalVideo(), this method removes the view that wraps the local render, and disposes of the current stream. To resume the stream and render the local preview again, use turnOnLocalVideo(), this method shows the video preview and starts streaming.
public void turnOnLocalVideo() {
    List<VideoDeviceInfo> cameras = deviceManager.getCameras();
    if(!cameras.isEmpty()) {
        try {
            currentVideoStream = new LocalVideoStream(currentCamera, this);
            showPreview(currentVideoStream);
            call.startVideo(this, currentVideoStream).get();
            switchSourceButton.setVisibility(View.VISIBLE);
        } catch (CallingCommunicationException acsException) {
            acsException.printStackTrace();
        } catch (ExecutionException | InterruptedException e) {
            e.printStackTrace();
        }
    }
}

public void turnOffLocalVideo() {
    try {
        LinearLayout container = findViewById(R.id.localvideocontainer);
        for (int i = 0; i < container.getChildCount(); ++i) {
            Object tag = container.getChildAt(i).getTag();
            if (tag != null && (int)tag == 0) {
                container.removeViewAt(i);
            }
        }
        switchSourceButton.setVisibility(View.INVISIBLE);
        previewRenderer.dispose();
        previewRenderer = null;
        call.stopVideo(this, currentVideoStream).get();
    } catch (CallingCommunicationException acsException) {
        acsException.printStackTrace();
    } catch (ExecutionException | InterruptedException e) {
        e.printStackTrace();
    }
}
Run the code
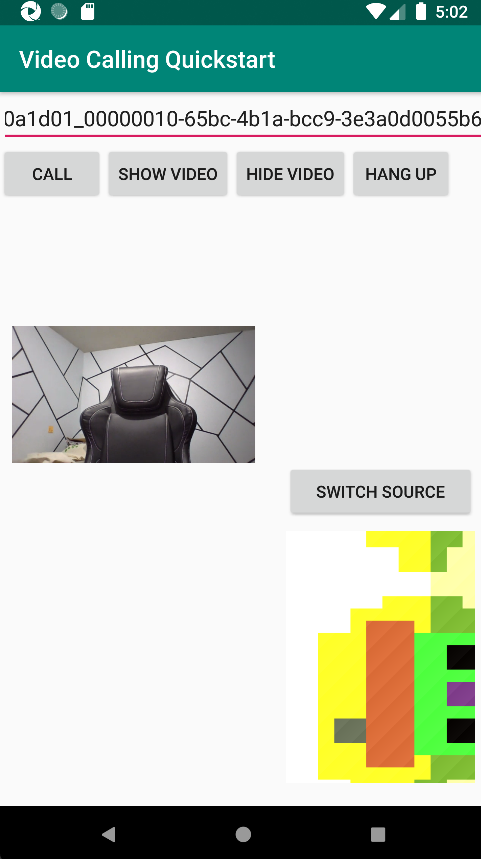
You can now launch the app by using the Run App button on the toolbar of Android Studio.
| Completed application | 1:1 call |
|---|---|
|
|
Add group call capability
Now you can update your app to let the user choose between 1:1 calls or group calls.
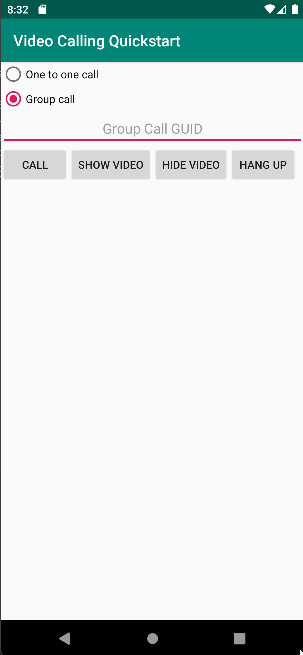
Update layout
Use radio buttons to select if the SDK creates a 1:1 call or joins a group call. The radio buttons are at the top, so the first section of app/src/main/res/layout/activity_main.xml end as follows.
<?xml version="1.0" encoding="utf-8"?>
<androidx.constraintlayout.widget.ConstraintLayout xmlns:android="http://schemas.android.com/apk/res/android"
    xmlns:app="http://schemas.android.com/apk/res-auto"
    xmlns:tools="http://schemas.android.com/tools"
    android:layout_width="match_parent"
    android:layout_height="match_parent"
    tools:context=".MainActivity">
    <LinearLayout
        android:layout_width="match_parent"
        android:layout_height="wrap_content"
        android:orientation="vertical">

        <RadioGroup
            android:layout_width="match_parent"
            android:layout_height="wrap_content">

            <RadioButton
                android:id="@+id/one_to_one_call"
                android:layout_width="match_parent"
                android:layout_height="wrap_content"
                android:text="One to one call" />

            <RadioButton
                android:id="@+id/group_call"
                android:layout_width="match_parent"
                android:layout_height="wrap_content"
                android:text="Group call" />

        </RadioGroup>

        <EditText
            android:id="@+id/call_id"
            android:layout_width="match_parent"
            android:layout_height="wrap_content"
            android:ems="10"
            android:gravity="center"
            android:hint="Callee ID"
            android:inputType="textPersonName"
            app:layout_constraintBottom_toTopOf="@+id/call_button"
            app:layout_constraintEnd_toEndOf="parent"
            app:layout_constraintStart_toStartOf="parent"
            app:layout_constraintTop_toTopOf="parent"
            app:layout_constraintVertical_bias="0.064" />
.
.
.
</androidx.constraintlayout.widget.ConstraintLayout>
Update MainActivity.Java
You can now update the elements and logic to decide when to create a 1:1 call, and when to join a group call. The first portion of code requires updates to add dependencies, items, and other configurations.
Dependencies:
import android.widget.RadioButton;
import com.azure.android.communication.calling.GroupCallLocator;
import com.azure.android.communication.calling.JoinCallOptions;
import java.util.UUID;
Global elements:
RadioButton oneToOneCall, groupCall;
Update onCreate():
@Override
protected void onCreate(Bundle savedInstanceState) {
    super.onCreate(savedInstanceState);
    setContentView(R.layout.activity_main);

    getAllPermissions();
    createAgent();

    handleIncomingCall();

    Button callButton = findViewById(R.id.call_button);
    callButton.setOnClickListener(l -> startCall());
    Button hangupButton = findViewById(R.id.hang_up);
    hangupButton.setOnClickListener(l -> hangUp());
    Button startVideo = findViewById(R.id.show_preview);
    startVideo.setOnClickListener(l -> turnOnLocalVideo());
    Button stopVideo = findViewById(R.id.hide_preview);
    stopVideo.setOnClickListener(l -> turnOffLocalVideo());

    switchSourceButton = findViewById(R.id.switch_source);
    switchSourceButton.setOnClickListener(l -> switchSource());

    setVolumeControlStream(AudioManager.STREAM_VOICE_CALL);

    oneToOneCall = findViewById(R.id.one_to_one_call);
    oneToOneCall.setOnClickListener(this::onCallTypeSelected);
    oneToOneCall.setChecked(true);
    groupCall = findViewById(R.id.group_call);
    groupCall.setOnClickListener(this::onCallTypeSelected);

}
Update startCall():
private void startCall() {
        Context context = this.getApplicationContext();
        EditText callIdView = findViewById(R.id.call_id);
        String callId = callIdView.getText().toString();
        ArrayList<CommunicationIdentifier> participants = new ArrayList<CommunicationIdentifier>();
        List<VideoDeviceInfo> cameras = deviceManager.getCameras();


        if(oneToOneCall.isChecked()){
        StartCallOptions options = new StartCallOptions();
        if(!cameras.isEmpty()) {
            currentCamera = getNextAvailableCamera(null);
            currentVideoStream = new LocalVideoStream(currentCamera, context);
            LocalVideoStream[] videoStreams = new LocalVideoStream[1];
            videoStreams[0] = currentVideoStream;
            VideoOptions videoOptions = new VideoOptions(videoStreams);
            options.setVideoOptions(videoOptions);
            showPreview(currentVideoStream);
        }
        participants.add(new CommunicationUserIdentifier(callId));

        call = callAgent.startCall(
                context,
                participants,
                options);
        }
        else{

            JoinCallOptions options = new JoinCallOptions();
            if(!cameras.isEmpty()) {
                currentCamera = getNextAvailableCamera(null);
                currentVideoStream = new LocalVideoStream(currentCamera, context);
                LocalVideoStream[] videoStreams = new LocalVideoStream[1];
                videoStreams[0] = currentVideoStream;
                VideoOptions videoOptions = new VideoOptions(videoStreams);
                options.setVideoOptions(videoOptions);
                showPreview(currentVideoStream);
            }
            GroupCallLocator groupCallLocator = new GroupCallLocator(UUID.fromString(callId));

            call = callAgent.join(
                    context,
                    groupCallLocator,
                    options);
        }


        remoteParticipantUpdatedListener = this::handleRemoteParticipantsUpdate;
        onStateChangedListener = this::handleCallOnStateChanged;
        call.addOnRemoteParticipantsUpdatedListener(remoteParticipantUpdatedListener);
        call.addOnStateChangedListener(onStateChangedListener);
    }
Add onCallTypeSelected():
public void onCallTypeSelected(View view) {
    boolean checked = ((RadioButton) view).isChecked();
    EditText callIdView = findViewById(R.id.call_id);

    switch(view.getId()) {
        case R.id.one_to_one_call:
            if (checked){
                callIdView.setHint("Callee id");
            }
            break;
        case R.id.group_call:
            if (checked){
                callIdView.setHint("Group Call GUID");
            }
            break;
    }
}
Run the upgraded app
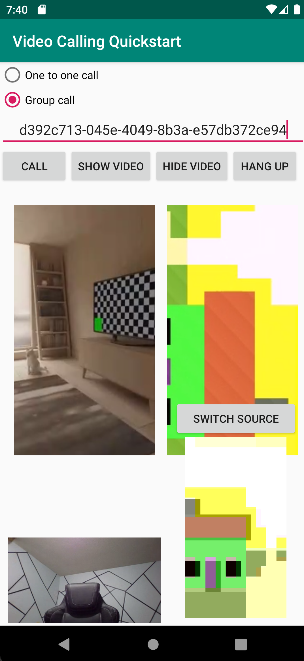
At this point, you can launch the app by using the Run App button on the toolbar of Android Studio.
| Screen update | Group call |
|---|---|
|
|
Get started with Azure Communication Services by using the Communication Services calling SDK to add one on one video calling to your app. You learn how to start and answer a video call using the Azure Communication Services Calling SDK for iOS.
Sample Code
If you'd like to skip ahead to the end, you can download this quickstart as a sample on GitHub.
Prerequisites
Obtain an Azure account with an active subscription. Create an account for free.
A Mac running Xcode, along with a valid developer certificate installed into your Keychain.
Create an active Communication Services resource. Create a Communication Services resource. You need to record your connection string for this quickstart.
A User Access Token for your Azure Communication Service. You can also use the Azure CLI and run the command with your connection string to create a user and an access token.
az communication identity token issue --scope voip --connection-string "yourConnectionString"For details, see Use Azure CLI to Create and Manage Access Tokens.
Setting up
Creating the Xcode project
In Xcode, create a new iOS project and select the Single View App template. This tutorial uses the SwiftUI framework, so you should set the Language to Swift and the User Interface to SwiftUI. You're not going to create tests during this quick start. Feel free to uncheck Include Tests.

Installing CocoaPods
Use this guide to install CocoaPods on your Mac.
Install the package and dependencies with CocoaPods
To create a
Podfilefor your application, open the terminal and navigate to the project folder and run pod init.Add the following code to the
Podfileand save. See SDK support versions.
platform :ios, '13.0'
use_frameworks!

target 'VideoCallingQuickstart' do
  pod 'AzureCommunicationCalling', '~> 1.0.0'
end
Run pod install.
Open the
.xcworkspacewith Xcode.
Using XCFramework directly
If you aren't using CocoaPods as a dependency manager, you can directly download the AzureCommunicationCalling.xcframework directly from our release page.
Is important to know that AzureCommunicationCalling has a dependency on AzureCommunicationCommon so you need to install it as well in your project.
Note
Although AzureCommunicationCommon is a pure swift package, you cannot install it using Swift Package Manager to use it with AzureCommunicationCalling because the latter is an Objective-C framework and Swift Package Manager deliberately do not support Swift ObjC interface headers by design which means is not possible to work together with AzureCommunicationCalling if installed using Swift Package Manager. You would have to either install via another dependency manager or generate a xcframework from AzureCommunicationCommon sources and import into your project.
Request access to the microphone and camera
To access the device's microphone and camera, you need to update your app's Information Property List with an NSMicrophoneUsageDescription and NSCameraUsageDescription. You set the associated value to a string that includes the dialog the system uses to request access from the user.
Right-click the Info.plist entry of the project tree and select Open As > Source Code. Add the following lines the top level <dict> section, and then save the file.
<key>NSMicrophoneUsageDescription</key>
<string>Need microphone access for VOIP calling.</string>
<key>NSCameraUsageDescription</key>
<string>Need camera access for video calling</string>
Set up the app framework
Open your project's ContentView.swift file and add an import declaration to the top of the file to import the AzureCommunicationCalling library and AVFoundation. AVFoundation is used to capture audio permission from code.
import AzureCommunicationCalling
import AVFoundation
Object model
The following classes and interfaces handle some of the major features of the Azure Communication Services Calling SDK for iOS.
| Name | Description |
|---|---|
CallClient |
The CallClient is the main entry point to the Calling SDK. |
CallAgent |
The CallAgent is used to start and manage calls. |
CommunicationTokenCredential |
The CommunicationTokenCredential is used as the token credential to instantiate the CallAgent. |
CommunicationIdentifier |
The CommunicationIdentifier is used to represent the identity of the user, which can be one of the following options: CommunicationUserIdentifier, PhoneNumberIdentifier or CallingApplication. |
Create the Call Agent
Replace the implementation of the ContentView struct with some simple UI controls that enable a user to initiate and end a call. We add business logic to these controls in this quickstart.
struct ContentView: View {
    @State var callee: String = ""
    @State var callClient: CallClient?
    @State var callAgent: CallAgent?
    @State var call: Call?
    @State var deviceManager: DeviceManager?
    @State var localVideoStream:[LocalVideoStream]?
    @State var incomingCall: IncomingCall?
    @State var sendingVideo:Bool = false
    @State var errorMessage:String = "Unknown"

    @State var remoteVideoStreamData:[Int32:RemoteVideoStreamData] = [:]
    @State var previewRenderer:VideoStreamRenderer? = nil
    @State var previewView:RendererView? = nil
    @State var remoteRenderer:VideoStreamRenderer? = nil
    @State var remoteViews:[RendererView] = []
    @State var remoteParticipant: RemoteParticipant?
    @State var remoteVideoSize:String = "Unknown"
    @State var isIncomingCall:Bool = false

    @State var callObserver:CallObserver?
    @State var remoteParticipantObserver:RemoteParticipantObserver?

    var body: some View {
        NavigationView {
            ZStack{
                Form {
                    Section {
                        TextField("Who would you like to call?", text: $callee)
                        Button(action: startCall) {
                            Text("Start Call")
                        }.disabled(callAgent == nil)
                        Button(action: endCall) {
                            Text("End Call")
                        }.disabled(call == nil)
                        Button(action: toggleLocalVideo) {
                            HStack {
                                Text(sendingVideo ? "Turn Off Video" : "Turn On Video")
                            }
                        }
                    }
                }
                // Show incoming call banner
                if (isIncomingCall) {
                    HStack() {
                        VStack {
                            Text("Incoming call")
                                .padding(10)
                                .frame(maxWidth: .infinity, alignment: .topLeading)
                        }
                        Button(action: answerIncomingCall) {
                            HStack {
                                Text("Answer")
                            }
                            .frame(width:80)
                            .padding(.vertical, 10)
                            .background(Color(.green))
                        }
                        Button(action: declineIncomingCall) {
                            HStack {
                                Text("Decline")
                            }
                            .frame(width:80)
                            .padding(.vertical, 10)
                            .background(Color(.red))
                        }
                    }
                    .frame(maxWidth: .infinity, alignment: .topLeading)
                    .padding(10)
                    .background(Color.gray)
                }
                ZStack{
                    VStack{
                        ForEach(remoteViews, id:\.self) { renderer in
                            ZStack{
                                VStack{
                                    RemoteVideoView(view: renderer)
                                        .frame(width: .infinity, height: .infinity)
                                        .background(Color(.lightGray))
                                }
                            }
                            Button(action: endCall) {
                                Text("End Call")
                            }.disabled(call == nil)
                            Button(action: toggleLocalVideo) {
                                HStack {
                                    Text(sendingVideo ? "Turn Off Video" : "Turn On Video")
                                }
                            }
                        }

                    }.frame(maxWidth: .infinity, maxHeight: .infinity, alignment: .topLeading)
                    VStack{
                        if(sendingVideo)
                        {
                            VStack{
                                PreviewVideoStream(view: previewView!)
                                    .frame(width: 135, height: 240)
                                    .background(Color(.lightGray))
                            }
                        }
                    }.frame(maxWidth:.infinity, maxHeight:.infinity,alignment: .bottomTrailing)
                }
            }
     .navigationBarTitle("Video Calling Quickstart")
        }.onAppear{
            // Authenticate the client

            // Initialize the CallAgent and access Device Manager

            // Ask for permissions
        }
    }
}

//Functions and Observers

struct PreviewVideoStream: UIViewRepresentable {
    let view:RendererView
    func makeUIView(context: Context) -> UIView {
        return view
    }
    func updateUIView(_ uiView: UIView, context: Context) {}
}

struct RemoteVideoView: UIViewRepresentable {
    let view:RendererView
    func makeUIView(context: Context) -> UIView {
        return view
    }
    func updateUIView(_ uiView: UIView, context: Context) {}
}

struct ContentView_Previews: PreviewProvider {
    static var previews: some View {
        ContentView()
    }
}
Authenticate the client
In order to initialize a CallAgent instance, you need a User Access Token, which enables it to make, and receive calls. Refer to the user access token documentation, if you don't have a token available.
Once you have a token, Add the following code to the onAppear callback in ContentView.swift. You need to replace <USER ACCESS TOKEN> with a valid user access token for your resource:
var userCredential: CommunicationTokenCredential?
do {
    userCredential = try CommunicationTokenCredential(token: "<USER ACCESS TOKEN>")
} catch {
    print("ERROR: It was not possible to create user credential.")
    return
}
Initialize the CallAgent and access Device Manager
To create a CallAgent instance from a CallClient, use the callClient.createCallAgent method that asynchronously returns a CallAgent object once it's initialized. DeviceManager lets you enumerate local devices that can be used in a call to transmit audio/video streams. It also allows you to request permission from a user to access microphone/camera.
self.callClient = CallClient()
self.callClient?.createCallAgent(userCredential: userCredential!) { (agent, error) in
    if error != nil {
        print("ERROR: It was not possible to create a call agent.")
        return
    }

    else {
        self.callAgent = agent
        print("Call agent successfully created.")
        self.callAgent!.delegate = incomingCallHandler
        self.callClient?.getDeviceManager { (deviceManager, error) in
            if (error == nil) {
                print("Got device manager instance")
                self.deviceManager = deviceManager
            } else {
                print("Failed to get device manager instance")
            }
        }
    }
}
Ask for permissions
We need to add the following code to the onAppear callback to ask for permissions for audio and video.
AVAudioSession.sharedInstance().requestRecordPermission { (granted) in
    if granted {
        AVCaptureDevice.requestAccess(for: .video) { (videoGranted) in
            /* NO OPERATION */
        }
    }
}
Configure audio session
You use an AVAudioSession object to configure your app’s audio session. Here is an example of enabling bluetooth audio device for your app:
func configureAudioSession() -> Error? {
    // Retrieve the audio session.
    let audioSession: AVAudioSession = AVAudioSession.sharedInstance()
    // set options to allow bluetooth device
    let options: AVAudioSession.CategoryOptions = .allowBluetooth
    var configError: Error?
    do {
        // Set the audio session category.
        try audioSession.setCategory(.playAndRecord, options: options)
        print("configureAudioSession successfully")
    } catch {
        print("configureAudioSession failed")
        configError = error
    }
    return configError
}
Display local video
Before starting a call, you can manage settings related to video. In this quickstart, we introduce the implementation of toggling local video before or during a call.
First we need to access local cameras with deviceManager. Once the desired camera is selected, we can construct LocalVideoStream and create a VideoStreamRenderer, and then attach it to previewView. During the call, we can use startVideo or stopVideo to start or stop sending LocalVideoStream to remote participants. This function also works with handling incoming calls.
func toggleLocalVideo() {
    // toggling video before call starts
    if (call == nil)
    {
        if(!sendingVideo)
        {
            self.callClient = CallClient()
            self.callClient?.getDeviceManager { (deviceManager, error) in
                if (error == nil) {
                    print("Got device manager instance")
                    self.deviceManager = deviceManager
                } else {
                    print("Failed to get device manager instance")
                }
            }
            guard let deviceManager = deviceManager else {
                return
            }
            let camera = deviceManager.cameras.first
            let scalingMode = ScalingMode.fit
            if (self.localVideoStream == nil) {
                self.localVideoStream = [LocalVideoStream]()
            }
            localVideoStream!.append(LocalVideoStream(camera: camera!))
            previewRenderer = try! VideoStreamRenderer(localVideoStream: localVideoStream!.first!)
            previewView = try! previewRenderer!.createView(withOptions: CreateViewOptions(scalingMode:scalingMode))
            self.sendingVideo = true
        }
        else{
            self.sendingVideo = false
            self.previewView = nil
            self.previewRenderer!.dispose()
            self.previewRenderer = nil
        }
    }
    // toggle local video during the call
    else{
        if (sendingVideo) {
            call!.stopVideo(stream: localVideoStream!.first!) { (error) in
                if (error != nil) {
                    print("cannot stop video")
                }
                else {
                    self.sendingVideo = false
                    self.previewView = nil
                    self.previewRenderer!.dispose()
                    self.previewRenderer = nil
                }
            }
        }
        else {
            guard let deviceManager = deviceManager else {
                return
            }
            let camera = deviceManager.cameras.first
            let scalingMode = ScalingMode.fit
            if (self.localVideoStream == nil) {
                self.localVideoStream = [LocalVideoStream]()
            }
            localVideoStream!.append(LocalVideoStream(camera: camera!))
            previewRenderer = try! VideoStreamRenderer(localVideoStream: localVideoStream!.first!)
            previewView = try! previewRenderer!.createView(withOptions: CreateViewOptions(scalingMode:scalingMode))
            call!.startVideo(stream:(localVideoStream?.first)!) { (error) in
                if (error != nil) {
                    print("cannot start video")
                }
                else {
                    self.sendingVideo = true
                }
            }
        }
    }
}
Place an outgoing call
The startCall method is set as the action that is performed when the Start Call button is tapped. In this quickstart, outgoing calls are audio only by default. To start a call with video, we need to set VideoOptions with LocalVideoStream and pass it with startCallOptions to set initial options for the call.
func startCall() {
        let startCallOptions = StartCallOptions()
        if(sendingVideo)
        {
            if (self.localVideoStream == nil) {
                self.localVideoStream = [LocalVideoStream]()
            }
            let videoOptions = VideoOptions(localVideoStreams: localVideoStream!)
            startCallOptions.videoOptions = videoOptions
        }
        let callees:[CommunicationIdentifier] = [CommunicationUserIdentifier(self.callee)]
        self.callAgent?.startCall(participants: callees, options: startCallOptions) { (call, error) in
            setCallAndObserver(call: call, error: error)
        }
    }
CallObserver and RemoteParticipantObserver are used to manage mid-call events and remote participants. We set the observers in the setCallAndObserver function.
func setCallAndObserver(call: Call!, error: Error?) {
    if error == nil {
        self.call = call
        self.callObserver = CallObserver(self)
        self.call!.delegate = self.callObserver
        self.remoteParticipantObserver = RemoteParticipantObserver(self)
    } else {
        print("Failed to get call object")
    }
}
Answer an incoming call
To answer an incoming call, implement an IncomingCallHandler to display the incoming call banner in order to answer or decline the call. Put the following implementation in IncomingCallHandler.swift.
final class IncomingCallHandler: NSObject, CallAgentDelegate, IncomingCallDelegate {
    public var contentView: ContentView?
    private var incomingCall: IncomingCall?

    private static var instance: IncomingCallHandler?
    static func getOrCreateInstance() -> IncomingCallHandler {
        if let c = instance {
            return c
        }
        instance = IncomingCallHandler()
        return instance!
    }

    private override init() {}

    public func callAgent(_ callAgent: CallAgent, didReceiveIncomingCall incomingCall: IncomingCall) {
        self.incomingCall = incomingCall
        self.incomingCall?.delegate = self
        contentView?.showIncomingCallBanner(self.incomingCall!)
    }

    public func callAgent(_ callAgent: CallAgent, didUpdateCalls args: CallsUpdatedEventArgs) {
        if let removedCall = args.removedCalls.first {
            contentView?.callRemoved(removedCall)
            self.incomingCall = nil
        }
    }
}
We need to create an instance of IncomingCallHandler by adding the following code to the onAppear callback in ContentView.swift:
let incomingCallHandler = IncomingCallHandler.getOrCreateInstance()
incomingCallHandler.contentView = self
Set a delegate to the CallAgent after the CallAgent being successfully created:
self.callAgent!.delegate = incomingCallHandler
Once there's an incoming call, the IncomingCallHandler calls the function showIncomingCallBanner to display answer and decline button.
func showIncomingCallBanner(_ incomingCall: IncomingCall?) {
    isIncomingCall = true
    self.incomingCall = incomingCall
}
The actions attached to answer and decline are implemented as the following code. In order to answer the call with video, we need to turn on the local video and set the options of AcceptCallOptions with localVideoStream.
func answerIncomingCall() {
    isIncomingCall = false
    let options = AcceptCallOptions()
    if (self.incomingCall != nil) {
        guard let deviceManager = deviceManager else {
            return
        }
        if (self.localVideoStream == nil) {
            self.localVideoStream = [LocalVideoStream]()
        }
        if(sendingVideo)
        {
            let camera = deviceManager.cameras.first
            localVideoStream!.append(LocalVideoStream(camera: camera!))
            let videoOptions = VideoOptions(localVideoStreams: localVideoStream!)
            options.videoOptions = videoOptions
        }
        self.incomingCall!.accept(options: options) { (call, error) in
            setCallAndObserver(call: call, error: error)
        }
    }
}

func declineIncomingCall() {
    self.incomingCall!.reject { (error) in }
    isIncomingCall = false
}
Remote participant video streams
We can create a RemoteVideoStreamData class to handle rendering video streams of remote participant.
public class RemoteVideoStreamData : NSObject, RendererDelegate {
    public func videoStreamRenderer(didFailToStart renderer: VideoStreamRenderer) {
        owner.errorMessage = "Renderer failed to start"
    }

    private var owner:ContentView
    let stream:RemoteVideoStream
    var renderer:VideoStreamRenderer? {
        didSet {
            if renderer != nil {
                renderer!.delegate = self
            }
        }
    }

    var views:[RendererView] = []
    init(view:ContentView, stream:RemoteVideoStream) {
        owner = view
        self.stream = stream
    }

    public func videoStreamRenderer(didRenderFirstFrame renderer: VideoStreamRenderer) {
        let size:StreamSize = renderer.size
        owner.remoteVideoSize = String(size.width) + " X " + String(size.height)
    }
}
Subscribe to events
We can implement a CallObserver class to subscribe to a collection of events to be notified when values change during the call.
public class CallObserver: NSObject, CallDelegate, IncomingCallDelegate {
    private var owner: ContentView
    init(_ view:ContentView) {
            owner = view
    }

    public func call(_ call: Call, didChangeState args: PropertyChangedEventArgs) {
        if(call.state == CallState.connected) {
            initialCallParticipant()
        }
    }

    // render remote video streams when remote participant changes
    public func call(_ call: Call, didUpdateRemoteParticipant args: ParticipantsUpdatedEventArgs) {
        for participant in args.addedParticipants {
            participant.delegate = owner.remoteParticipantObserver
            for stream in participant.videoStreams {
                if !owner.remoteVideoStreamData.isEmpty {
                    return
                }
                let data:RemoteVideoStreamData = RemoteVideoStreamData(view: owner, stream: stream)
                let scalingMode = ScalingMode.fit
                data.renderer = try! VideoStreamRenderer(remoteVideoStream: stream)
                let view:RendererView = try! data.renderer!.createView(withOptions: CreateViewOptions(scalingMode:scalingMode))
                data.views.append(view)
                self.owner.remoteViews.append(view)
                owner.remoteVideoStreamData[stream.id] = data
            }
            owner.remoteParticipant = participant
        }
    }

    // Handle remote video streams when the call is connected
    public func initialCallParticipant() {
        for participant in owner.call!.remoteParticipants {
            participant.delegate = owner.remoteParticipantObserver
            for stream in participant.videoStreams {
                renderRemoteStream(stream)
            }
            owner.remoteParticipant = participant
        }
    }

    //create render for RemoteVideoStream and attach it to view
    public func renderRemoteStream(_ stream: RemoteVideoStream!) {
        if !owner.remoteVideoStreamData.isEmpty {
            return
        }
        let data:RemoteVideoStreamData = RemoteVideoStreamData(view: owner, stream: stream)
        let scalingMode = ScalingMode.fit
        data.renderer = try! VideoStreamRenderer(remoteVideoStream: stream)
        let view:RendererView = try! data.renderer!.createView(withOptions: CreateViewOptions(scalingMode:scalingMode))
        self.owner.remoteViews.append(view)
        owner.remoteVideoStreamData[stream.id] = data
    }
}
Remote participant Management
All remote participants are represented with the RemoteParticipant type and are available through the remoteParticipants collection on a call instance once the call becomes connected (CallState.connected).
Note
When a user joins a call, they can access the current remote participants through the RemoteParticipants collection. The didUpdateRemoteParticipant event will not trigger for these existing participants. This event will only trigger when a remote participant joins or leaves the call while the user is already in the call.
We can implement a RemoteParticipantObserver class to subscribe to the updates on remote video streams of remote participants.
public class RemoteParticipantObserver : NSObject, RemoteParticipantDelegate {
    private var owner:ContentView
    init(_ view:ContentView) {
        owner = view
    }

    public func renderRemoteStream(_ stream: RemoteVideoStream!) {
        let data:RemoteVideoStreamData = RemoteVideoStreamData(view: owner, stream: stream)
        let scalingMode = ScalingMode.fit
        data.renderer = try! VideoStreamRenderer(remoteVideoStream: stream)
        let view:RendererView = try! data.renderer!.createView(withOptions: CreateViewOptions(scalingMode:scalingMode))
        self.owner.remoteViews.append(view)
        owner.remoteVideoStreamData[stream.id] = data
    }

    // render RemoteVideoStream when remote participant turns on the video, dispose the renderer when remote video is off
    public func remoteParticipant(_ remoteParticipant: RemoteParticipant, didUpdateVideoStreams args: RemoteVideoStreamsEventArgs) {
        for stream in args.addedRemoteVideoStreams {
            renderRemoteStream(stream)
        }
        for stream in args.removedRemoteVideoStreams {
            for data in owner.remoteVideoStreamData.values {
                data.renderer?.dispose()
            }
            owner.remoteViews.removeAll()
        }
    }
}
Run the code
You can build and run your app on iOS simulator by selecting Product > Run or by using the (⌘-R) keyboard shortcut.
In this quickstart, you learn how to start a 1:1 video call using the Azure Communication Services Calling SDK for Windows.
UWP sample code
Prerequisites
To complete this tutorial, you need the following prerequisites:
An Azure account with an active subscription. Create an account for free.
Install Visual Studio 2022 with Universal Windows Platform development workload.
A deployed Communication Services resource. Create a Communication Services resource. You need to record your connection string for this quickstart.
A User Access Token for your Azure Communication Service. You can also use the Azure CLI and run the command with your connection string to create a user and an access token.
az communication identity token issue --scope voip --connection-string "yourConnectionString"For details, see Use Azure CLI to Create and Manage Access Tokens.
Setting up
Creating the project
In Visual Studio, create a new project with the Blank App (Universal Windows) template to set up a single-page Universal Windows Platform (UWP) app.
Install the package
Right click your project and go to Manage Nuget Packages to install Azure.Communication.Calling.WindowsClient 1.2.0-beta.1 or superior version. Make sure Include Preleased is checked.
Request access
Go to Package.appxmanifest and click Capabilities.
Check Internet (Client & Server) to gain inbound and outbound access to the Internet.
Check Microphone to access the audio feed of the microphone.
Check WebCam to access the camera of the device.
Add the following code to your Package.appxmanifest by right-clicking and choosing View Code.
<Extensions>
<Extension Category="windows.activatableClass.inProcessServer">
<InProcessServer>
<Path>RtmMvrUap.dll</Path>
<ActivatableClass ActivatableClassId="VideoN.VideoSchemeHandler" ThreadingModel="both" />
</InProcessServer>
</Extension>
</Extensions>
Set up the app framework
We need to configure a basic layout to attach our logic. In order to place an outbound call, we need a TextBox to provide the User ID of the callee. We also need a Start Call button and a Hang Up button.
We also need to preview the local video and render the remote video of the other participant. So we need two elements to display the video streams.
Open the MainPage.xaml of your project and replace the content with following implementation.
<Page
    x:Class="CallingQuickstart.MainPage"
    xmlns="http://schemas.microsoft.com/winfx/2006/xaml/presentation"
    xmlns:x="http://schemas.microsoft.com/winfx/2006/xaml"
    xmlns:local="using:CallingQuickstart"
    xmlns:d="http://schemas.microsoft.com/expression/blend/2008"
    xmlns:mc="http://schemas.openxmlformats.org/markup-compatibility/2006"
    mc:Ignorable="d"
    Background="{ThemeResource ApplicationPageBackgroundThemeBrush}">

    <Grid x:Name="MainGrid" HorizontalAlignment="Stretch">
        <Grid.RowDefinitions>
            <RowDefinition Height="*"/>
            <RowDefinition Height="Auto"/>
            <RowDefinition Height="200*"/>
            <RowDefinition Height="60*"/>
            <RowDefinition Height="Auto"/>
        </Grid.RowDefinitions>

        <Grid Grid.Row="0" x:Name="AppTitleBar" Background="LightSeaGreen">
            <!-- Width of the padding columns is set in LayoutMetricsChanged handler. -->
            <!-- Using padding columns instead of Margin ensures that the background paints the area under the caption control buttons (for transparent buttons). -->
            <TextBlock x:Name="QuickstartTitle" Text="Calling Quickstart sample title bar" Style="{StaticResource CaptionTextBlockStyle}" Padding="4,4,0,0"/>
        </Grid>

        <TextBox Grid.Row="1" x:Name="CalleeTextBox" PlaceholderText="Who would you like to call?" TextWrapping="Wrap" VerticalAlignment="Center" />

        <Grid Grid.Row="2" Background="LightGray">
            <Grid.RowDefinitions>
                <RowDefinition/>
            </Grid.RowDefinitions>
            <Grid.ColumnDefinitions>
                <ColumnDefinition Width="*"/>
                <ColumnDefinition Width="*"/>
            </Grid.ColumnDefinitions>
            <MediaPlayerElement x:Name="LocalVideo" HorizontalAlignment="Center" Stretch="UniformToFill" Grid.Column="0" VerticalAlignment="Center" AutoPlay="True" />
            <MediaPlayerElement x:Name="RemoteVideo" HorizontalAlignment="Center" Stretch="UniformToFill" Grid.Column="1" VerticalAlignment="Center" AutoPlay="True" />
        </Grid>
        <StackPanel Grid.Row="3" Orientation="Vertical" Grid.RowSpan="2">
            <StackPanel Orientation="Horizontal" Margin="10">
                <TextBlock VerticalAlignment="Center">Cameras:</TextBlock>
                <ComboBox x:Name="CameraList" HorizontalAlignment="Left" Grid.Column="0" DisplayMemberPath="Name" SelectionChanged="CameraList_SelectionChanged" Margin="10"/>
            </StackPanel>
            <StackPanel Orientation="Horizontal">
                <Button x:Name="CallButton" Content="Start/Join call" Click="CallButton_Click" VerticalAlignment="Center" Margin="10,0,0,0" Height="40" Width="123"/>
                <Button x:Name="HangupButton" Content="Hang up" Click="HangupButton_Click" VerticalAlignment="Center" Margin="10,0,0,0" Height="40" Width="123"/>
                <CheckBox x:Name="MuteLocal" Content="Mute" Margin="10,0,0,0" Click="MuteLocal_Click" Width="74"/>
                <CheckBox x:Name="BackgroundBlur" Content="Background blur" Width="142" Margin="10,0,0,0" Click="BackgroundBlur_Click"/>
            </StackPanel>
        </StackPanel>
        <TextBox Grid.Row="4" x:Name="Stats" Text="" TextWrapping="Wrap" VerticalAlignment="Center" Height="30" Margin="0,2,0,0" BorderThickness="2" IsReadOnly="True" Foreground="LightSlateGray" />
    </Grid>
</Page>
Open to App.xaml.cs (right click and choose View Code) and add this line to the top:
using CallingQuickstart;
Open the MainPage.xaml.cs (right click and choose View Code) and replace the content with following implementation:
using Azure.Communication.Calling.WindowsClient;
using System;
using System.Collections.Generic;
using System.Linq;
using System.Threading.Tasks;
using Windows.ApplicationModel;
using Windows.ApplicationModel.Core;
using Windows.Media.Core;
using Windows.Networking.PushNotifications;
using Windows.UI;
using Windows.UI.ViewManagement;
using Windows.UI.Xaml;
using Windows.UI.Xaml.Controls;
using Windows.UI.Xaml.Media;
using Windows.UI.Xaml.Navigation;

namespace CallingQuickstart
{
    public sealed partial class MainPage : Page
    {
        private const string authToken = "<Azure Communication Services auth token>";

        private CallClient callClient;
        private CallTokenRefreshOptions callTokenRefreshOptions;
        private CallAgent callAgent;
        private CommunicationCall call = null;

        private LocalOutgoingAudioStream micStream;
        private LocalOutgoingVideoStream cameraStream;

        #region Page initialization
        public MainPage()
        {
            this.InitializeComponent();

            // Hide default title bar.
            var coreTitleBar = CoreApplication.GetCurrentView().TitleBar;
            coreTitleBar.ExtendViewIntoTitleBar = true;

            QuickstartTitle.Text = $"{Package.Current.DisplayName} - Ready";
            Window.Current.SetTitleBar(AppTitleBar);

            CallButton.IsEnabled = true;
            HangupButton.IsEnabled = !CallButton.IsEnabled;
            MuteLocal.IsChecked = MuteLocal.IsEnabled = !CallButton.IsEnabled;

            ApplicationView.PreferredLaunchViewSize = new Windows.Foundation.Size(800, 600);
            ApplicationView.PreferredLaunchWindowingMode = ApplicationViewWindowingMode.PreferredLaunchViewSize;
        }

        protected override async void OnNavigatedTo(NavigationEventArgs e)
        {
            await InitCallAgentAndDeviceManagerAsync();

            base.OnNavigatedTo(e);
        }
#endregion

        private async Task InitCallAgentAndDeviceManagerAsync()
        {
            // Initialize call agent and Device Manager
        }

        private async void Agent_OnIncomingCallAsync(object sender, IncomingCall incomingCall)
        {
            // Accept an incoming call
        }

        private async void CallButton_Click(object sender, RoutedEventArgs e)
        {
            // Start a call with video
        }

        private async void HangupButton_Click(object sender, RoutedEventArgs e)
        {
            // End the current call
        }

        private async void Call_OnStateChangedAsync(object sender, PropertyChangedEventArgs args)
        {
            var call = sender as CommunicationCall;

            if (call != null)
            {
                var state = call.State;

                await Dispatcher.RunAsync(Windows.UI.Core.CoreDispatcherPriority.Normal, () =>
                {
                    QuickstartTitle.Text = $"{Package.Current.DisplayName} - {state.ToString()}";
                    Window.Current.SetTitleBar(AppTitleBar);

                    HangupButton.IsEnabled = state == CallState.Connected || state == CallState.Ringing;
                    CallButton.IsEnabled = !HangupButton.IsEnabled;
                    MuteLocal.IsEnabled = !CallButton.IsEnabled;
                });

                switch (state)
                {
                    case CallState.Connected:
                        {
                            break;
                        }
                    case CallState.Disconnected:
                        {
                            break;
                        }
                    default: break;
                }
            }
        }

        private async void CameraList_SelectionChanged(object sender, SelectionChangedEventArgs e)
        {
            // Handle camera selection
        }
    }
}
Object model
The following classes and interfaces handle some of the major features of the Azure Communication Services Calling SDK:
| Name | Description |
|---|---|
CallClient |
The CallClient is the main entry point to the Calling client library. |
CallAgent |
The CallAgent is used to start and join calls. |
CommunicationCall |
The CommunicationCall is used to manage placed or joined calls. |
CallTokenCredential |
The CallTokenCredential is used as the token credential to instantiate the CallAgent. |
CommunicationUserIdentifier |
The CommunicationUserIdentifier is used to represent the identity of the user, which can be one of the following options: CommunicationUserIdentifier, PhoneNumberIdentifier or CallingApplication. |
Authenticate the client
To initialize a CallAgent, you need a User Access Token. Generally this token is generated from a service with authentication specific to the application. For more information on user access tokens, check the User Access Tokens guide.
For the quickstart, replace <AUTHENTICATION_TOKEN> with a user access token generated for your Azure Communication Service resource.
Once you have a token, initialize a CallAgent instance with it, which enable us to make and receive calls. In order to access the cameras on the device, we also need to get Device Manager instance.
Add the following code to the InitCallAgentAndDeviceManagerAsync function.
this.callClient = new CallClient(new CallClientOptions() {
    Diagnostics = new CallDiagnosticsOptions() {
        AppName = "CallingQuickstart",
        AppVersion="1.0",
        Tags = new[] { "Calling", "ACS", "Windows" }
        }
    });

// Set up local video stream using the first camera enumerated
var deviceManager = await this.callClient.GetDeviceManagerAsync();
var camera = deviceManager?.Cameras?.FirstOrDefault();
var mic = deviceManager?.Microphones?.FirstOrDefault();
micStream = new LocalOutgoingAudioStream();

CameraList.ItemsSource = deviceManager.Cameras.ToList();

if (camera != null)
{
    CameraList.SelectedIndex = 0;
}

callTokenRefreshOptions = new CallTokenRefreshOptions(false);
callTokenRefreshOptions.TokenRefreshRequested += OnTokenRefreshRequestedAsync;

var tokenCredential = new CallTokenCredential(authToken, callTokenRefreshOptions);

var callAgentOptions = new CallAgentOptions()
{
    DisplayName = "Contoso",
    //https://github.com/lukes/ISO-3166-Countries-with-Regional-Codes/blob/master/all/all.csv
    EmergencyCallOptions = new EmergencyCallOptions() { CountryCode = "840" }
};


try
{
    this.callAgent = await this.callClient.CreateCallAgentAsync(tokenCredential, callAgentOptions);
    //await this.callAgent.RegisterForPushNotificationAsync(await this.RegisterWNS());
    this.callAgent.CallsUpdated += OnCallsUpdatedAsync;
    this.callAgent.IncomingCallReceived += OnIncomingCallAsync;

}
catch(Exception ex)
{
    if (ex.HResult == -2147024809)
    {
        // E_INVALIDARG
        // Handle possible invalid token
    }
}
Start a call with video
Add the implementation to the CallButton_Click to start a call with video. We need to enumerate the cameras with device manager instance and construct LocalOutgoingVideoStream. We need to set the VideoOptions with LocalVideoStream and pass it with startCallOptions to set initial options for the call. By attaching LocalOutgoingVideoStream to a MediaElement, we can see the preview of the local video.
var callString = CalleeTextBox.Text.Trim();

if (!string.IsNullOrEmpty(callString))
{
    if (callString.StartsWith("8:")) // 1:1 Azure Communication Services call
    {
        call = await StartAcsCallAsync(callString);
    }
    else if (callString.StartsWith("+")) // 1:1 phone call
    {
        call = await StartPhoneCallAsync(callString, "+12133947338");
    }
    else if (Guid.TryParse(callString, out Guid groupId))// Join group call by group guid
    {
        call = await JoinGroupCallByIdAsync(groupId);
    }
    else if (Uri.TryCreate(callString, UriKind.Absolute, out Uri teamsMeetinglink)) //Teams meeting link
    {
        call = await JoinTeamsMeetingByLinkAsync(teamsMeetinglink);
    }
}

if (call != null)
{
    call.RemoteParticipantsUpdated += OnRemoteParticipantsUpdatedAsync;
    call.StateChanged += OnStateChangedAsync;
}
Add the methods to start or join the different types of Call (1:1 Azure Communication Services call, 1:1 phone call, Azure Communication Services Group call, Teams meeting join, etc.).
private async Task<CommunicationCall> StartAcsCallAsync(string acsCallee)
{
    var options = await GetStartCallOptionsAsync();
    var call = await this.callAgent.StartCallAsync( new [] { new UserCallIdentifier(acsCallee) }, options);
    return call;
}

private async Task<CommunicationCall> StartPhoneCallAsync(string acsCallee, string alternateCallerId)
{
    var options = await GetStartCallOptionsAsync();
    options.AlternateCallerId = new PhoneNumberCallIdentifier(alternateCallerId);

    var call = await this.callAgent.StartCallAsync( new [] { new PhoneNumberCallIdentifier(acsCallee) }, options);
    return call;
}

private async Task<CommunicationCall> JoinGroupCallByIdAsync(Guid groupId)
{
    var joinCallOptions = await GetJoinCallOptionsAsync();

    var groupCallLocator = new GroupCallLocator(groupId);
    var call = await this.callAgent.JoinAsync(groupCallLocator, joinCallOptions);
    return call;
}

private async Task<CommunicationCall> JoinTeamsMeetingByLinkAsync(Uri teamsCallLink)
{
    var joinCallOptions = await GetJoinCallOptionsAsync();

    var teamsMeetingLinkLocator = new TeamsMeetingLinkLocator(teamsCallLink.AbsoluteUri);
    var call = await callAgent.JoinAsync(teamsMeetingLinkLocator, joinCallOptions);
    return call;
}

private async Task<StartCallOptions> GetStartCallOptionsAsync()
{
    return new StartCallOptions() {
        OutgoingAudioOptions = new OutgoingAudioOptions() { IsOutgoingAudioMuted = true, OutgoingAudioStream = micStream  },
        OutgoingVideoOptions = new OutgoingVideoOptions() { OutgoingVideoStreams = new OutgoingVideoStream[] { cameraStream } }
    };
}

private async Task<JoinCallOptions> GetJoinCallOptionsAsync()
{
    return new JoinCallOptions() {
        OutgoingAudioOptions = new OutgoingAudioOptions() { IsOutgoingAudioMuted = true },
        OutgoingVideoOptions = new OutgoingVideoOptions() { OutgoingVideoStreams = new OutgoingVideoStream[] { cameraStream } }
    };
}
Add the code to create the LocalVideoStream depending on the selected camera on the CameraList_SelectionChanged method.
var selectedCamera = CameraList.SelectedItem as VideoDeviceDetails;
cameraStream = new LocalOutgoingVideoStream(selectedCamera);

 var localUri = await cameraStream.StartPreviewAsync();
await Dispatcher.RunAsync(Windows.UI.Core.CoreDispatcherPriority.Normal, () =>
{
    LocalVideo.Source = MediaSource.CreateFromUri(localUri);
});

if (call != null)
{
    await call?.StartVideoAsync(cameraStream);
}
Accept an incoming call
Add the implementation to the OnIncomingCallAsync to answer an incoming call with video, pass the LocalVideoStream to acceptCallOptions.
var incomingCall = args.IncomingCall;

var acceptCallOptions = new AcceptCallOptions() {
    IncomingVideoOptions = new IncomingVideoOptions()
    {
        IncomingVideoStreamKind = VideoStreamKind.RemoteIncoming
    }
};

_ = await incomingCall.AcceptAsync(acceptCallOptions);
Remote participant and remote video streams
All remote participants are available through the RemoteParticipants collection on a call instance. Once the call becomes connected (CallState.Connected), we can access the remote participants of the call and handle the remote video streams.
Note
When a user joins a call, they can access the current remote participants through the RemoteParticipants collection. The RemoteParticipantsUpdated event will not trigger for these existing participants. This event will only trigger when a remote participant joins or leaves the call while the user is already in the call.
private async void Call_OnVideoStreamsUpdatedAsync(object sender, RemoteVideoStreamsEventArgs args)
{
    foreach (var remoteVideoStream in args.AddedRemoteVideoStreams)
    {
        await Dispatcher.RunAsync(Windows.UI.Core.CoreDispatcherPriority.Normal, async () =>
        {
            RemoteVideo.Source = await remoteVideoStream.Start();
        });
    }

    foreach (var remoteVideoStream in args.RemovedRemoteVideoStreams)
    {
        remoteVideoStream.Stop();
    }
}

private async void Agent_OnCallsUpdatedAsync(object sender, CallsUpdatedEventArgs args)
{
    var removedParticipants = new List<RemoteParticipant>();
    var addedParticipants = new List<RemoteParticipant>();

    foreach(var call in args.RemovedCalls)
    {
        removedParticipants.AddRange(call.RemoteParticipants.ToList<RemoteParticipant>());
    }

    foreach (var call in args.AddedCalls)
    {
        addedParticipants.AddRange(call.RemoteParticipants.ToList<RemoteParticipant>());
    }

    await OnParticipantChangedAsync(removedParticipants, addedParticipants);
}

private async Task OnParticipantChangedAsync(IEnumerable<RemoteParticipant> removedParticipants, IEnumerable<RemoteParticipant> addedParticipants)
{
    foreach (var participant in removedParticipants)
    {
        foreach(var incomingVideoStream in  participant.IncomingVideoStreams)
        {
            var remoteVideoStream = incomingVideoStream as RemoteIncomingVideoStream;
            if (remoteVideoStream != null)
            {
                await remoteVideoStream.StopPreviewAsync();
            }
        }
        participant.VideoStreamStateChanged -= OnVideoStreamStateChanged;
    }

    foreach (var participant in addedParticipants)
    {
        participant.VideoStreamStateChanged += OnVideoStreamStateChanged;
    }
}

private void OnVideoStreamStateChanged(object sender, VideoStreamStateChangedEventArgs e)
{
    CallVideoStream callVideoStream = e.CallVideoStream;

    switch (callVideoStream.StreamDirection)
    {
        case StreamDirection.Outgoing:
            OnOutgoingVideoStreamStateChanged(callVideoStream as OutgoingVideoStream);
            break;
        case StreamDirection.Incoming:
            OnIncomingVideoStreamStateChanged(callVideoStream as IncomingVideoStream);
            break;
    }
}

private async void OnIncomingVideoStreamStateChanged(IncomingVideoStream incomingVideoStream)
{
    switch (incomingVideoStream.State)
    {
        case VideoStreamState.Available:
        {
            switch (incomingVideoStream.Kind)
            {
                case VideoStreamKind.RemoteIncoming:
                    var remoteVideoStream = incomingVideoStream as RemoteIncomingVideoStream;
                    var uri = await remoteVideoStream.StartPreviewAsync();

                    await Dispatcher.RunAsync(Windows.UI.Core.CoreDispatcherPriority.Normal, () =>
                    {
                        RemoteVideo.Source = MediaSource.CreateFromUri(uri);
                    });
                    break;

                case VideoStreamKind.RawIncoming:
                    break;
            }
            break;
        }
        case VideoStreamState.Started:
            break;
        case VideoStreamState.Stopping:
            break;
        case VideoStreamState.Stopped:
            if (incomingVideoStream.Kind == VideoStreamKind.RemoteIncoming)
            {
                var remoteVideoStream = incomingVideoStream as RemoteIncomingVideoStream;
                await remoteVideoStream.StopPreviewAsync();
            }
            break;
        case VideoStreamState.NotAvailable:
            break;
    }

}
Render remote videos
For each remote video stream, attach it to the MediaElement.
private async Task AddVideoStreamsAsync(IReadOnlyList<RemoteVideoStream> remoteVideoStreams)
{
    foreach (var remoteVideoStream in remoteVideoStreams)
    {
        var remoteUri = await remoteVideoStream.Start();

        await Dispatcher.RunAsync(Windows.UI.Core.CoreDispatcherPriority.Normal, () =>
        {
            RemoteVideo.Source = remoteUri;
            RemoteVideo.Play();
        });
    }
}
Call state update
We need to clean the video renderers once the call is disconnected and handle the case when the remote participants initially join the call.
private async void Call_OnStateChanged(object sender, PropertyChangedEventArgs args)
{
    switch (((Call)sender).State)
    {
        case CallState.Disconnected:
            await Dispatcher.RunAsync(Windows.UI.Core.CoreDispatcherPriority.Normal, () =>
            {
                LocalVideo.Source = null;
                RemoteVideo.Source = null;
            });
            break;

        case CallState.Connected:
            foreach (var remoteParticipant in call.RemoteParticipants)
            {
                String remoteParticipantMRI = remoteParticipant.Identifier.ToString();
                remoteParticipantDictionary.TryAdd(remoteParticipantMRI, remoteParticipant);
                await AddVideoStreams(remoteParticipant.VideoStreams);
                remoteParticipant.OnVideoStreamsUpdated += Call_OnVideoStreamsUpdated;
            }
            break;

        default:
            break;
    }
}
End a call
End the current call when the Hang Up button is clicked. Add the implementation to the HangupButton_Click to end a call with the callAgent we created, and tear down the participant update and call state event handlers.
var call = this.callAgent?.Calls?.FirstOrDefault();
if (call != null)
{
    try
    {
        await call.HangUpAsync(new HangUpOptions() { ForEveryone = true });
    }
    catch(Exception ex)
    {
    }
}
Run the code
You can build and run the code on Visual Studio. For solution platforms, we support ARM64, x64 and x86.
You can make an outbound video call by providing a user ID in the text field and clicking the Start Call button.
Note: Calling 8:echo123 stops the video stream because echo bot doesn't support video streaming.
For more information on user IDs (identity) check the User Access Tokens guide.
WinUI 3 sample code
Prerequisites
To complete this tutorial, you need the following prerequisites:
An Azure account with an active subscription. Create an account for free.
Install Visual Studio 2022 and Windows App SDK version 1.2 preview 2.
Basic understanding of how to create a WinUI 3 app. Create your first WinUI 3 (Windows App SDK) project is a good resource to start with.
A deployed Communication Services resource. Create a Communication Services resource. You need to record your connection string for this quickstart.
A User Access Token for your Azure Communication Service. You can also use the Azure CLI and run the command with your connection string to create a user and an access token.
az communication identity token issue --scope voip --connection-string "yourConnectionString"For details, see Use Azure CLI to Create and Manage Access Tokens.
Setting up
Creating the project
In Visual Studio, create a new project with the Blank App, Packaged (WinUI 3 in Desktop) template to set up a single-page WinUI 3 app.
Install the package
Right click your project and go to Manage Nuget Packages to install Azure.Communication.Calling.WindowsClient 1.0.0 or superior version. Make sure Include Preleased is checked.
Request access
Add the following code to your app.manifest:
<file name="RtmMvrMf.dll">
    <activatableClass name="VideoN.VideoSchemeHandler" threadingModel="both" xmlns="urn:schemas-microsoft-com:winrt.v1" />
</file>
Set up the app framework
We need to configure a basic layout to attach our logic. In order to place an outbound call, we need a TextBox to provide the User ID of the callee. We also need a Start Call button and a Hang Up button.
We also need to preview the local video and render the remote video of the other participant. So we need two elements to display the video streams.
Open the MainWindow.xaml of your project and replace the content with following implementation.
<Page
    x:Class="CallingQuickstart.MainPage"
    xmlns="http://schemas.microsoft.com/winfx/2006/xaml/presentation"
    xmlns:x="http://schemas.microsoft.com/winfx/2006/xaml"
    xmlns:local="using:CallingQuickstart"
    xmlns:d="http://schemas.microsoft.com/expression/blend/2008"
    xmlns:mc="http://schemas.openxmlformats.org/markup-compatibility/2006"
    mc:Ignorable="d">

    <Grid x:Name="MainGrid">
        <Grid.RowDefinitions>
            <RowDefinition Height="32"/>
            <RowDefinition Height="Auto"/>
            <RowDefinition Height="200*"/>
            <RowDefinition Height="60*"/>
            <RowDefinition Height="Auto"/>
        </Grid.RowDefinitions>

        <Grid Grid.Row="0" x:Name="AppTitleBar" Background="LightSeaGreen">
            <!-- Width of the padding columns is set in LayoutMetricsChanged handler. -->
            <!-- Using padding columns instead of Margin ensures that the background paints the area under the caption control buttons (for transparent buttons). -->
            <TextBlock x:Name="QuickstartTitle" Text="Calling Quickstart sample title bar" Style="{StaticResource CaptionTextBlockStyle}" Padding="4,4,0,0"/>
        </Grid>

        <TextBox Grid.Row="1" x:Name="CalleeTextBox" PlaceholderText="Who would you like to call?" TextWrapping="Wrap" VerticalAlignment="Center" />

        <Grid Grid.Row="2" Background="LightGray">
            <Grid.RowDefinitions>
                <RowDefinition/>
            </Grid.RowDefinitions>
            <Grid.ColumnDefinitions>
                <ColumnDefinition Width="*"/>
                <ColumnDefinition Width="*"/>
            </Grid.ColumnDefinitions>
            <MediaPlayerElement x:Name="LocalVideo" HorizontalAlignment="Center" Stretch="UniformToFill" Grid.Column="0" VerticalAlignment="Center" AutoPlay="True" />
            <MediaPlayerElement x:Name="RemoteVideo" HorizontalAlignment="Center" Stretch="UniformToFill" Grid.Column="1" VerticalAlignment="Center" AutoPlay="True" />
        </Grid>
        <StackPanel Grid.Row="3" Orientation="Vertical" Grid.RowSpan="2">
            <StackPanel Orientation="Horizontal" Margin="10">
                <TextBlock VerticalAlignment="Center">Cameras:</TextBlock>
                <ComboBox x:Name="CameraList" HorizontalAlignment="Left" Grid.Column="0" DisplayMemberPath="Name" SelectionChanged="CameraList_SelectionChanged" Margin="10"/>
            </StackPanel>
            <StackPanel Orientation="Horizontal">
                <Button x:Name="CallButton" Content="Start/Join call" Click="CallButton_Click" VerticalAlignment="Center" Margin="10,0,0,0" Height="40" Width="123"/>
                <Button x:Name="HangupButton" Content="Hang up" Click="HangupButton_Click" VerticalAlignment="Center" Margin="10,0,0,0" Height="40" Width="123"/>
                <CheckBox x:Name="MuteLocal" Content="Mute" Margin="10,0,0,0" Click="MuteLocal_Click" Width="74"/>
                <CheckBox x:Name="BackgroundBlur" Content="Background blur" Width="142" Margin="10,0,0,0" Click="BackgroundBlur_Click"/>
            </StackPanel>
        </StackPanel>
        <TextBox Grid.Row="4" x:Name="Stats" Text="" TextWrapping="Wrap" VerticalAlignment="Center" Height="30" Margin="0,2,0,0" BorderThickness="2" IsReadOnly="True" Foreground="LightSlateGray" />
    </Grid>
</Page>
Open to App.xaml.cs (right click and choose View Code) and add this line to the top:
using CallingQuickstart;
Open the MainWindow.xaml.cs (right click and choose View Code) and replace the content with following implementation:
using Azure.Communication.Calling.WindowsClient;
using Azure.WinRT.Communication;
using Microsoft.UI.Xaml;
using System;
using System.Collections.Generic;
using System.Linq;
using System.Threading.Tasks;
using Windows.Media.Core;

namespace CallingQuickstart
{
    public sealed partial class MainWindow : Window
    {
        CallAgent callAgent;
        Call call;
        DeviceManager deviceManager;
        Dictionary<string, RemoteParticipant> remoteParticipantDictionary = new Dictionary<string, RemoteParticipant>();

        public MainWindow()
        {
            this.InitializeComponent();
            Task.Run(() => this.InitCallAgentAndDeviceManagerAsync()).Wait();
        }

        private async Task InitCallAgentAndDeviceManagerAsync()
        {
            // Initialize call agent and Device Manager
        }

        private async void Agent_OnIncomingCallAsync(object sender, IncomingCall incomingCall)
        {
            // Accept an incoming call
        }

        private async void CallButton_Click(object sender, RoutedEventArgs e)
        {
            // Start a call with video
        }

        private async void HangupButton_Click(object sender, RoutedEventArgs e)
        {
            // End the current call
        }

        private async void Call_OnStateChangedAsync(object sender, PropertyChangedEventArgs args)
        {
            var state = (sender as Call)?.State;
            this.DispatcherQueue.TryEnqueue(() => {
                State.Text = state.ToString();
            });
        }
    }
}
Object model
The following classes and interfaces handle some of the major features of the Azure Communication Services Calling SDK:
| Name | Description |
|---|---|
CallClient |
The CallClient is the main entry point to the Calling client library. |
CallAgent |
The CallAgent is used to start and join calls. |
CommunicationCall |
The CommunicationCall is used to manage placed or joined calls. |
CallTokenCredential |
The CallTokenCredential is used as the token credential to instantiate the CallAgent. |
CommunicationUserIdentifier |
The CommunicationUserIdentifier is used to represent the identity of the user, which can be one of the following options: CommunicationUserIdentifier, PhoneNumberIdentifier or CallingApplication. |
Authenticate the client
To initialize a CallAgent, you need a User Access Token. Generally this token is generated from a service with authentication specific to the application. For more information on user access tokens, check the User Access Tokens guide.
For the quickstart, replace <AUTHENTICATION_TOKEN> with a user access token generated for your Azure Communication Service resource.
Once you have a token initialize a CallAgent instance with it, which enable us to make and receive calls. In order to access the cameras on the device, we also need to get Device Manager instance.
Add the following code to the InitCallAgentAndDeviceManagerAsync function.
var callClient = new CallClient();
this.deviceManager = await callClient.GetDeviceManagerAsync();

var tokenCredential = new CallTokenCredential("<AUTHENTICATION_TOKEN>");
var callAgentOptions = new CallAgentOptions()
{
    DisplayName = "<DISPLAY_NAME>"
};

this.callAgent = await callClient.CreateCallAgentAsync(tokenCredential, callAgentOptions);
this.callAgent.OnCallsUpdated += Agent_OnCallsUpdatedAsync;
this.callAgent.OnIncomingCall += Agent_OnIncomingCallAsync;
Start a call with video
Add the implementation to the CallButton_Click to start a call with video. We need to enumerate the cameras with device manager instance and construct LocalVideoStream. We need to set the VideoOptions with LocalVideoStream and pass it with startCallOptions to set initial options for the call. By attaching LocalVideoStream to a MediaPlayerElement, we can see the preview of the local video.
var startCallOptions = new StartCallOptions();

if (this.deviceManager.Cameras?.Count > 0)
{
    var videoDeviceInfo = this.deviceManager.Cameras?.FirstOrDefault();
    if (videoDeviceInfo != null)
    {
        var selectedCamera = CameraList.SelectedItem as VideoDeviceDetails;
        cameraStream = new LocalOutgoingVideoStream(selectedCamera);

        var localUri = await cameraStream.StartPreviewAsync();
        await Dispatcher.RunAsync(Windows.UI.Core.CoreDispatcherPriority.Normal, () =>
        {
            LocalVideo.Source = MediaSource.CreateFromUri(localUri);
        });

        startCallOptions.VideoOptions = new OutgoingVideoOptions(new[] { cameraStream });
    }
}

var callees = new ICommunicationIdentifier[1]
{
    new CommunicationUserIdentifier(CalleeTextBox.Text.Trim())
};

this.call = await this.callAgent.StartCallAsync(callees, startCallOptions);
this.call.OnRemoteParticipantsUpdated += Call_OnRemoteParticipantsUpdatedAsync;
this.call.OnStateChanged += Call_OnStateChangedAsync;
Accept an incoming call
Add the implementation to the Agent_OnIncomingCallAsync to answer an incoming call with video, pass the LocalVideoStream to acceptCallOptions.
var acceptCallOptions = new AcceptCallOptions();

if (this.deviceManager.Cameras?.Count > 0)
{
    var videoDeviceInfo = this.deviceManager.Cameras?.FirstOrDefault();
    if (videoDeviceInfo != null)
    {
        var selectedCamera = CameraList.SelectedItem as VideoDeviceDetails;
        cameraStream = new LocalOutgoingVideoStream(selectedCamera);

        var localUri = await cameraStream.StartPreviewAsync();
        await Dispatcher.RunAsync(Windows.UI.Core.CoreDispatcherPriority.Normal, () =>
        {
            LocalVideo.Source = MediaSource.CreateFromUri(localUri);
        });

        acceptCallOptions.VideoOptions = new OutgoingVideoOptions(new[] { localVideoStream });
    }
}

call = await incomingCall.AcceptAsync(acceptCallOptions);
Remote participant and remote video streams
All remote participants are available through the RemoteParticipants collection on a call instance. Once the call is connected, we can access the remote participants of the call and handle the remote video streams.
Note
When a user joins a call, they can access the current remote participants through the RemoteParticipants collection. The OnRemoteParticipantsUpdated event will not trigger for these existing participants. This event will only trigger when a remote participant joins or leaves the call while the user is already in the call.
private async void Call_OnVideoStreamsUpdatedAsync(object sender, RemoteVideoStreamsEventArgs args)
{
    foreach (var remoteVideoStream in args.AddedRemoteVideoStreams)
    {
        this.DispatcherQueue.TryEnqueue(async () => {
            RemoteVideo.Source = MediaSource.CreateFromUri(await remoteVideoStream.Start());
            RemoteVideo.MediaPlayer.Play();
        });
    }

    foreach (var remoteVideoStream in args.RemovedRemoteVideoStreams)
    {
        remoteVideoStream.Stop();
    }
}

private async void Agent_OnCallsUpdatedAsync(object sender, CallsUpdatedEventArgs args)
{
    foreach (var call in args.AddedCalls)
    {
        foreach (var remoteParticipant in call.RemoteParticipants)
        {
            var remoteParticipantMRI = remoteParticipant.Identifier.ToString();
            this.remoteParticipantDictionary.TryAdd(remoteParticipantMRI, remoteParticipant);
            await AddVideoStreamsAsync(remoteParticipant.VideoStreams);
            remoteParticipant.OnVideoStreamsUpdated += Call_OnVideoStreamsUpdatedAsync;
        }
    }
}

private async void Call_OnRemoteParticipantsUpdatedAsync(object sender, ParticipantsUpdatedEventArgs args)
{
    foreach (var remoteParticipant in args.AddedParticipants)
    {
        String remoteParticipantMRI = remoteParticipant.Identifier.ToString();
        this.remoteParticipantDictionary.TryAdd(remoteParticipantMRI, remoteParticipant);
        await AddVideoStreamsAsync(remoteParticipant.VideoStreams);
        remoteParticipant.OnVideoStreamsUpdated += Call_OnVideoStreamsUpdatedAsync;
    }

    foreach (var remoteParticipant in args.RemovedParticipants)
    {
        String remoteParticipantMRI = remoteParticipant.Identifier.ToString();
        this.remoteParticipantDictionary.Remove(remoteParticipantMRI);
    }
}
Render remote videos
For each remote video stream, attach it to the MediaPlayerElement.
private async Task AddVideoStreamsAsync(IReadOnlyList<RemoteVideoStream> remoteVideoStreams)
{
    foreach (var remoteVideoStream in remoteVideoStreams)
    {
        var remoteUri = await remoteVideoStream.Start();

        this.DispatcherQueue.TryEnqueue(() => {
            RemoteVideo.Source = MediaSource.CreateFromUri(remoteUri);
            RemoteVideo.MediaPlayer.Play();
        });
    }
}
Call state update
We need to clean the video renderers once the call is disconnected and handle the case when the remote participants initially join the call.
private async void Call_OnStateChanged(object sender, PropertyChangedEventArgs args)
{
    switch (((Call)sender).State)
    {
        case CallState.Disconnected:
            this.DispatcherQueue.TryEnqueue(() => { =>
            {
                LocalVideo.Source = null;
                RemoteVideo.Source = null;
            });
            break;

        case CallState.Connected:
            foreach (var remoteParticipant in call.RemoteParticipants)
            {
                String remoteParticipantMRI = remoteParticipant.Identifier.ToString();
                remoteParticipantDictionary.TryAdd(remoteParticipantMRI, remoteParticipant);
                await AddVideoStreams(remoteParticipant.VideoStreams);
                remoteParticipant.OnVideoStreamsUpdated += Call_OnVideoStreamsUpdated;
            }
            break;

        default:
            break;
    }
}
End a call
End the current call when the Hang Up button is clicked. Add the implementation to the HangupButton_Click to end a call with the callAgent we created, and tear down the participant update and call state event handlers.
this.call.OnRemoteParticipantsUpdated -= Call_OnRemoteParticipantsUpdatedAsync;
this.call.OnStateChanged -= Call_OnStateChangedAsync;
await this.call.HangUpAsync(new HangUpOptions());
Run the code
You can build and run the code on Visual Studio. For solution platforms, we support ARM64, x64 and x86.
You can make an outbound video call by providing a user ID in the text field and clicking the Start Call button.
Note: Calling 8:echo123 stops the video stream because echo bot doesn't support video streaming.
For more information on user IDs (identity) check the User Access Tokens guide.
In this quickstart, you learn how to start a call using the Azure Communication Services Calling SDK for Unity. For receiving and rendering video frames on the Unity platform, refer to the Raw Media Access Quickstart.
You can download the sample app from GitHub.
Prerequisites
To complete this tutorial, you need the following prerequisites:
An Azure account with an active subscription. Create an account for free.
Install Unity Hub and Unity Editor with Universal Windows Platform development workload.
A deployed Communication Services resource. Create a Communication Services resource. You need to record your connection string for this quickstart.
A User Access Token for your Azure Communication Service. You can also use the Azure CLI and run the command with your connection string to create a user and an access token.
az communication identity token issue --scope voip --connection-string "yourConnectionString"For details, see Use Azure CLI to Create and Manage Access Tokens.
Setting up
Creating the project
In Unity Hub, create a new project with the 2D Core template to set up the unity project.
Install the package
There are two ways to install the Azure Communication Calling SDK for Unity.
Download the SDK from the public npm feed and import it in Unity Editor's package manager, found under the Windows tab.
Download the Mixed Reality Feature Tool from Microsoft and install it via the mixed reality tool manager.
Set up the app framework
We need to configure a basic layout to attach our logic. In order to place an outbound call, we need a TextBox to provide the User ID of the callee. We also need a Start/Join call button and a Hang up button.
Create a new scene called Main in your project.
Open the Main.unity file and replace the content with following implementation:
Main.Unity Code
Main.unity
%YAML 1.1
%TAG !u! tag:unity3d.com,2011:
--- !u!29 &1
OcclusionCullingSettings:
  m_ObjectHideFlags: 0
  serializedVersion: 2
  m_OcclusionBakeSettings:
    smallestOccluder: 5
    smallestHole: 0.25
    backfaceThreshold: 100
  m_SceneGUID: 00000000000000000000000000000000
  m_OcclusionCullingData: {fileID: 0}
--- !u!104 &2
RenderSettings:
  m_ObjectHideFlags: 0
  serializedVersion: 9
  m_Fog: 0
  m_FogColor: {r: 0.5, g: 0.5, b: 0.5, a: 1}
  m_FogMode: 3
  m_FogDensity: 0.01
  m_LinearFogStart: 0
  m_LinearFogEnd: 300
  m_AmbientSkyColor: {r: 0.212, g: 0.227, b: 0.259, a: 1}
  m_AmbientEquatorColor: {r: 0.114, g: 0.125, b: 0.133, a: 1}
  m_AmbientGroundColor: {r: 0.047, g: 0.043, b: 0.035, a: 1}
  m_AmbientIntensity: 1
  m_AmbientMode: 3
  m_SubtractiveShadowColor: {r: 0.42, g: 0.478, b: 0.627, a: 1}
  m_SkyboxMaterial: {fileID: 0}
  m_HaloStrength: 0.5
  m_FlareStrength: 1
  m_FlareFadeSpeed: 3
  m_HaloTexture: {fileID: 0}
  m_SpotCookie: {fileID: 10001, guid: 0000000000000000e000000000000000, type: 0}
  m_DefaultReflectionMode: 0
  m_DefaultReflectionResolution: 128
  m_ReflectionBounces: 1
  m_ReflectionIntensity: 1
  m_CustomReflection: {fileID: 0}
  m_Sun: {fileID: 0}
  m_IndirectSpecularColor: {r: 0, g: 0, b: 0, a: 1}
  m_UseRadianceAmbientProbe: 0
--- !u!157 &3
LightmapSettings:
  m_ObjectHideFlags: 0
  serializedVersion: 12
  m_GIWorkflowMode: 1
  m_GISettings:
    serializedVersion: 2
    m_BounceScale: 1
    m_IndirectOutputScale: 1
    m_AlbedoBoost: 1
    m_EnvironmentLightingMode: 0
    m_EnableBakedLightmaps: 0
    m_EnableRealtimeLightmaps: 0
  m_LightmapEditorSettings:
    serializedVersion: 12
    m_Resolution: 2
    m_BakeResolution: 40
    m_AtlasSize: 1024
    m_AO: 0
    m_AOMaxDistance: 1
    m_CompAOExponent: 1
    m_CompAOExponentDirect: 0
    m_ExtractAmbientOcclusion: 0
    m_Padding: 2
    m_LightmapParameters: {fileID: 0}
    m_LightmapsBakeMode: 1
    m_TextureCompression: 1
    m_FinalGather: 0
    m_FinalGatherFiltering: 1
    m_FinalGatherRayCount: 256
    m_ReflectionCompression: 2
    m_MixedBakeMode: 2
    m_BakeBackend: 0
    m_PVRSampling: 1
    m_PVRDirectSampleCount: 32
    m_PVRSampleCount: 500
    m_PVRBounces: 2
    m_PVREnvironmentSampleCount: 500
    m_PVREnvironmentReferencePointCount: 2048
    m_PVRFilteringMode: 2
    m_PVRDenoiserTypeDirect: 0
    m_PVRDenoiserTypeIndirect: 0
    m_PVRDenoiserTypeAO: 0
    m_PVRFilterTypeDirect: 0
    m_PVRFilterTypeIndirect: 0
    m_PVRFilterTypeAO: 0
    m_PVREnvironmentMIS: 0
    m_PVRCulling: 1
    m_PVRFilteringGaussRadiusDirect: 1
    m_PVRFilteringGaussRadiusIndirect: 5
    m_PVRFilteringGaussRadiusAO: 2
    m_PVRFilteringAtrousPositionSigmaDirect: 0.5
    m_PVRFilteringAtrousPositionSigmaIndirect: 2
    m_PVRFilteringAtrousPositionSigmaAO: 1
    m_ExportTrainingData: 0
    m_TrainingDataDestination: TrainingData
    m_LightProbeSampleCountMultiplier: 4
  m_LightingDataAsset: {fileID: 0}
  m_LightingSettings: {fileID: 0}
--- !u!196 &4
NavMeshSettings:
  serializedVersion: 2
  m_ObjectHideFlags: 0
  m_BuildSettings:
    serializedVersion: 2
    agentTypeID: 0
    agentRadius: 0.5
    agentHeight: 2
    agentSlope: 45
    agentClimb: 0.4
    ledgeDropHeight: 0
    maxJumpAcrossDistance: 0
    minRegionArea: 2
    manualCellSize: 0
    cellSize: 0.16666667
    manualTileSize: 0
    tileSize: 256
    accuratePlacement: 0
    maxJobWorkers: 0
    preserveTilesOutsideBounds: 0
    debug:
      m_Flags: 0
  m_NavMeshData: {fileID: 0}
--- !u!1 &247756367
GameObject:
  m_ObjectHideFlags: 0
  m_CorrespondingSourceObject: {fileID: 0}
  m_PrefabInstance: {fileID: 0}
  m_PrefabAsset: {fileID: 0}
  serializedVersion: 6
  m_Component:
  - component: {fileID: 247756370}
  - component: {fileID: 247756369}
  - component: {fileID: 247756368}
  m_Layer: 0
  m_Name: EventSystem
  m_TagString: Untagged
  m_Icon: {fileID: 0}
  m_NavMeshLayer: 0
  m_StaticEditorFlags: 0
  m_IsActive: 1
--- !u!114 &247756368
MonoBehaviour:
  m_ObjectHideFlags: 0
  m_CorrespondingSourceObject: {fileID: 0}
  m_PrefabInstance: {fileID: 0}
  m_PrefabAsset: {fileID: 0}
  m_GameObject: {fileID: 247756367}
  m_Enabled: 1
  m_EditorHideFlags: 0
  m_Script: {fileID: 11500000, guid: 4f231c4fb786f3946a6b90b886c48677, type: 3}
  m_Name:
  m_EditorClassIdentifier:
  m_SendPointerHoverToParent: 1
  m_HorizontalAxis: Horizontal
  m_VerticalAxis: Vertical
  m_SubmitButton: Submit
  m_CancelButton: Cancel
  m_InputActionsPerSecond: 10
  m_RepeatDelay: 0.5
  m_ForceModuleActive: 0
--- !u!114 &247756369
MonoBehaviour:
  m_ObjectHideFlags: 0
  m_CorrespondingSourceObject: {fileID: 0}
  m_PrefabInstance: {fileID: 0}
  m_PrefabAsset: {fileID: 0}
  m_GameObject: {fileID: 247756367}
  m_Enabled: 1
  m_EditorHideFlags: 0
  m_Script: {fileID: 11500000, guid: 76c392e42b5098c458856cdf6ecaaaa1, type: 3}
  m_Name:
  m_EditorClassIdentifier:
  m_FirstSelected: {fileID: 0}
  m_sendNavigationEvents: 1
  m_DragThreshold: 10
--- !u!4 &247756370
Transform:
  m_ObjectHideFlags: 0
  m_CorrespondingSourceObject: {fileID: 0}
  m_PrefabInstance: {fileID: 0}
  m_PrefabAsset: {fileID: 0}
  m_GameObject: {fileID: 247756367}
  m_LocalRotation: {x: 0, y: 0, z: 0, w: 1}
  m_LocalPosition: {x: 0, y: 0, z: 0}
  m_LocalScale: {x: 1, y: 1, z: 1}
  m_ConstrainProportionsScale: 0
  m_Children: []
  m_Father: {fileID: 0}
  m_RootOrder: 2
  m_LocalEulerAnglesHint: {x: 0, y: 0, z: 0}
--- !u!1 &293984669
GameObject:
  m_ObjectHideFlags: 0
  m_CorrespondingSourceObject: {fileID: 0}
  m_PrefabInstance: {fileID: 0}
  m_PrefabAsset: {fileID: 0}
  serializedVersion: 6
  m_Component:
  - component: {fileID: 293984671}
  - component: {fileID: 293984670}
  m_Layer: 0
  m_Name: AppManager
  m_TagString: Untagged
  m_Icon: {fileID: 0}
  m_NavMeshLayer: 0
  m_StaticEditorFlags: 0
  m_IsActive: 1
--- !u!114 &293984670
MonoBehaviour:
  m_ObjectHideFlags: 0
  m_CorrespondingSourceObject: {fileID: 0}
  m_PrefabInstance: {fileID: 0}
  m_PrefabAsset: {fileID: 0}
  m_GameObject: {fileID: 293984669}
  m_Enabled: 1
  m_EditorHideFlags: 0
  m_Script: {fileID: 11500000, guid: 7c7d18b32fdb6b14e857ebb6d9627958, type: 3}
  m_Name:
  m_EditorClassIdentifier:
  callStatus: {fileID: 1529611528}
  videoPlayer: {fileID: 0}
--- !u!4 &293984671
Transform:
  m_ObjectHideFlags: 0
  m_CorrespondingSourceObject: {fileID: 0}
  m_PrefabInstance: {fileID: 0}
  m_PrefabAsset: {fileID: 0}
  m_GameObject: {fileID: 293984669}
  m_LocalRotation: {x: 0, y: 0, z: 0, w: 1}
  m_LocalPosition: {x: 0, y: 0, z: 0}
  m_LocalScale: {x: 1, y: 1, z: 1}
  m_ConstrainProportionsScale: 0
  m_Children: []
  m_Father: {fileID: 0}
  m_RootOrder: 1
  m_LocalEulerAnglesHint: {x: 0, y: 0, z: 0}
--- !u!1 &438770860
GameObject:
  m_ObjectHideFlags: 0
  m_CorrespondingSourceObject: {fileID: 0}
  m_PrefabInstance: {fileID: 0}
  m_PrefabAsset: {fileID: 0}
  serializedVersion: 6
  m_Component:
  - component: {fileID: 438770861}
  - component: {fileID: 438770863}
  - component: {fileID: 438770862}
  m_Layer: 5
  m_Name: Text (TMP)
  m_TagString: Untagged
  m_Icon: {fileID: 0}
  m_NavMeshLayer: 0
  m_StaticEditorFlags: 0
  m_IsActive: 1
--- !u!224 &438770861
RectTransform:
  m_ObjectHideFlags: 0
  m_CorrespondingSourceObject: {fileID: 0}
  m_PrefabInstance: {fileID: 0}
  m_PrefabAsset: {fileID: 0}
  m_GameObject: {fileID: 438770860}
  m_LocalRotation: {x: 0, y: 0, z: 0, w: 1}
  m_LocalPosition: {x: 0, y: 0, z: 0}
  m_LocalScale: {x: 1, y: 1, z: 1}
  m_ConstrainProportionsScale: 0
  m_Children: []
  m_Father: {fileID: 1732033234}
  m_RootOrder: 0
  m_LocalEulerAnglesHint: {x: 0, y: 0, z: 0}
  m_AnchorMin: {x: 0, y: 0}
  m_AnchorMax: {x: 1, y: 1}
  m_AnchoredPosition: {x: 0, y: 0}
  m_SizeDelta: {x: 0, y: 0}
  m_Pivot: {x: 0.5, y: 0.5}
--- !u!114 &438770862
MonoBehaviour:
  m_ObjectHideFlags: 0
  m_CorrespondingSourceObject: {fileID: 0}
  m_PrefabInstance: {fileID: 0}
  m_PrefabAsset: {fileID: 0}
  m_GameObject: {fileID: 438770860}
  m_Enabled: 1
  m_EditorHideFlags: 0
  m_Script: {fileID: 11500000, guid: f4688fdb7df04437aeb418b961361dc5, type: 3}
  m_Name:
  m_EditorClassIdentifier:
  m_Material: {fileID: 0}
  m_Color: {r: 1, g: 1, b: 1, a: 1}
  m_RaycastTarget: 1
  m_RaycastPadding: {x: 0, y: 0, z: 0, w: 0}
  m_Maskable: 1
  m_OnCullStateChanged:
    m_PersistentCalls:
      m_Calls: []
  m_text: Start Call
  m_isRightToLeft: 0
  m_fontAsset: {fileID: 11400000, guid: 8f586378b4e144a9851e7b34d9b748ee, type: 2}
  m_sharedMaterial: {fileID: 2180264, guid: 8f586378b4e144a9851e7b34d9b748ee, type: 2}
  m_fontSharedMaterials: []
  m_fontMaterial: {fileID: 0}
  m_fontMaterials: []
  m_fontColor32:
    serializedVersion: 2
    rgba: 4281479730
  m_fontColor: {r: 0.19607843, g: 0.19607843, b: 0.19607843, a: 1}
  m_enableVertexGradient: 0
  m_colorMode: 3
  m_fontColorGradient:
    topLeft: {r: 1, g: 1, b: 1, a: 1}
    topRight: {r: 1, g: 1, b: 1, a: 1}
    bottomLeft: {r: 1, g: 1, b: 1, a: 1}
    bottomRight: {r: 1, g: 1, b: 1, a: 1}
  m_fontColorGradientPreset: {fileID: 0}
  m_spriteAsset: {fileID: 0}
  m_tintAllSprites: 0
  m_StyleSheet: {fileID: 0}
  m_TextStyleHashCode: -1183493901
  m_overrideHtmlColors: 0
  m_faceColor:
    serializedVersion: 2
    rgba: 4294967295
  m_fontSize: 24
  m_fontSizeBase: 24
  m_fontWeight: 400
  m_enableAutoSizing: 0
  m_fontSizeMin: 18
  m_fontSizeMax: 72
  m_fontStyle: 0
  m_HorizontalAlignment: 2
  m_VerticalAlignment: 512
  m_textAlignment: 65535
  m_characterSpacing: 0
  m_wordSpacing: 0
  m_lineSpacing: 0
  m_lineSpacingMax: 0
  m_paragraphSpacing: 0
  m_charWidthMaxAdj: 0
  m_enableWordWrapping: 1
  m_wordWrappingRatios: 0.4
  m_overflowMode: 0
  m_linkedTextComponent: {fileID: 0}
  parentLinkedComponent: {fileID: 0}
  m_enableKerning: 1
  m_enableExtraPadding: 0
  checkPaddingRequired: 0
  m_isRichText: 1
  m_parseCtrlCharacters: 1
  m_isOrthographic: 1
  m_isCullingEnabled: 0
  m_horizontalMapping: 0
  m_verticalMapping: 0
  m_uvLineOffset: 0
  m_geometrySortingOrder: 0
  m_IsTextObjectScaleStatic: 0
  m_VertexBufferAutoSizeReduction: 0
  m_useMaxVisibleDescender: 1
  m_pageToDisplay: 1
  m_margin: {x: 0, y: 0, z: 0, w: 0}
  m_isUsingLegacyAnimationComponent: 0
  m_isVolumetricText: 0
  m_hasFontAssetChanged: 0
  m_baseMaterial: {fileID: 0}
  m_maskOffset: {x: 0, y: 0, z: 0, w: 0}
--- !u!222 &438770863
CanvasRenderer:
  m_ObjectHideFlags: 0
  m_CorrespondingSourceObject: {fileID: 0}
  m_PrefabInstance: {fileID: 0}
  m_PrefabAsset: {fileID: 0}
  m_GameObject: {fileID: 438770860}
  m_CullTransparentMesh: 1
--- !u!1 &519420028
GameObject:
  m_ObjectHideFlags: 0
  m_CorrespondingSourceObject: {fileID: 0}
  m_PrefabInstance: {fileID: 0}
  m_PrefabAsset: {fileID: 0}
  serializedVersion: 6
  m_Component:
  - component: {fileID: 519420032}
  - component: {fileID: 519420031}
  - component: {fileID: 519420029}
  m_Layer: 0
  m_Name: Main Camera
  m_TagString: MainCamera
  m_Icon: {fileID: 0}
  m_NavMeshLayer: 0
  m_StaticEditorFlags: 0
  m_IsActive: 1
--- !u!81 &519420029
AudioListener:
  m_ObjectHideFlags: 0
  m_CorrespondingSourceObject: {fileID: 0}
  m_PrefabInstance: {fileID: 0}
  m_PrefabAsset: {fileID: 0}
  m_GameObject: {fileID: 519420028}
  m_Enabled: 1
--- !u!20 &519420031
Camera:
  m_ObjectHideFlags: 0
  m_CorrespondingSourceObject: {fileID: 0}
  m_PrefabInstance: {fileID: 0}
  m_PrefabAsset: {fileID: 0}
  m_GameObject: {fileID: 519420028}
  m_Enabled: 1
  serializedVersion: 2
  m_ClearFlags: 2
  m_BackGroundColor: {r: 0.19215687, g: 0.3019608, b: 0.4745098, a: 0}
  m_projectionMatrixMode: 1
  m_GateFitMode: 2
  m_FOVAxisMode: 0
  m_SensorSize: {x: 36, y: 24}
  m_LensShift: {x: 0, y: 0}
  m_FocalLength: 50
  m_NormalizedViewPortRect:
    serializedVersion: 2
    x: 0
    y: 0
    width: 1
    height: 1
  near clip plane: 0.3
  far clip plane: 1000
  field of view: 60
  orthographic: 1
  orthographic size: 5
  m_Depth: -1
  m_CullingMask:
    serializedVersion: 2
    m_Bits: 4294967295
  m_RenderingPath: -1
  m_TargetTexture: {fileID: 0}
  m_TargetDisplay: 0
  m_TargetEye: 0
  m_HDR: 1
  m_AllowMSAA: 0
  m_AllowDynamicResolution: 0
  m_ForceIntoRT: 0
  m_OcclusionCulling: 0
  m_StereoConvergence: 10
  m_StereoSeparation: 0.022
--- !u!4 &519420032
Transform:
  m_ObjectHideFlags: 0
  m_CorrespondingSourceObject: {fileID: 0}
  m_PrefabInstance: {fileID: 0}
  m_PrefabAsset: {fileID: 0}
  m_GameObject: {fileID: 519420028}
  m_LocalRotation: {x: 0, y: 0, z: 0, w: 1}
  m_LocalPosition: {x: 0, y: 0, z: -10}
  m_LocalScale: {x: 1, y: 1, z: 1}
  m_ConstrainProportionsScale: 0
  m_Children: []
  m_Father: {fileID: 0}
  m_RootOrder: 0
  m_LocalEulerAnglesHint: {x: 0, y: 0, z: 0}
--- !u!1 &857336305
GameObject:
  m_ObjectHideFlags: 0
  m_CorrespondingSourceObject: {fileID: 0}
  m_PrefabInstance: {fileID: 0}
  m_PrefabAsset: {fileID: 0}
  serializedVersion: 6
  m_Component:
  - component: {fileID: 857336306}
  - component: {fileID: 857336309}
  - component: {fileID: 857336308}
  - component: {fileID: 857336307}
  m_Layer: 5
  m_Name: Placeholder
  m_TagString: Untagged
  m_Icon: {fileID: 0}
  m_NavMeshLayer: 0
  m_StaticEditorFlags: 0
  m_IsActive: 1
--- !u!224 &857336306
RectTransform:
  m_ObjectHideFlags: 0
  m_CorrespondingSourceObject: {fileID: 0}
  m_PrefabInstance: {fileID: 0}
  m_PrefabAsset: {fileID: 0}
  m_GameObject: {fileID: 857336305}
  m_LocalRotation: {x: 0, y: 0, z: 0, w: 1}
  m_LocalPosition: {x: 0, y: 0, z: 0}
  m_LocalScale: {x: 1, y: 1, z: 1}
  m_ConstrainProportionsScale: 0
  m_Children: []
  m_Father: {fileID: 1787936407}
  m_RootOrder: 0
  m_LocalEulerAnglesHint: {x: 0, y: 0, z: 0}
  m_AnchorMin: {x: 0, y: 0}
  m_AnchorMax: {x: 1, y: 1}
  m_AnchoredPosition: {x: 0, y: 0}
  m_SizeDelta: {x: 0, y: 0}
  m_Pivot: {x: 0.5, y: 0.5}
--- !u!114 &857336307
MonoBehaviour:
  m_ObjectHideFlags: 0
  m_CorrespondingSourceObject: {fileID: 0}
  m_PrefabInstance: {fileID: 0}
  m_PrefabAsset: {fileID: 0}
  m_GameObject: {fileID: 857336305}
  m_Enabled: 1
  m_EditorHideFlags: 0
  m_Script: {fileID: 11500000, guid: 306cc8c2b49d7114eaa3623786fc2126, type: 3}
  m_Name:
  m_EditorClassIdentifier:
  m_IgnoreLayout: 1
  m_MinWidth: -1
  m_MinHeight: -1
  m_PreferredWidth: -1
  m_PreferredHeight: -1
  m_FlexibleWidth: -1
  m_FlexibleHeight: -1
  m_LayoutPriority: 1
--- !u!114 &857336308
MonoBehaviour:
  m_ObjectHideFlags: 0
  m_CorrespondingSourceObject: {fileID: 0}
  m_PrefabInstance: {fileID: 0}
  m_PrefabAsset: {fileID: 0}
  m_GameObject: {fileID: 857336305}
  m_Enabled: 1
  m_EditorHideFlags: 0
  m_Script: {fileID: 11500000, guid: f4688fdb7df04437aeb418b961361dc5, type: 3}
  m_Name:
  m_EditorClassIdentifier:
  m_Material: {fileID: 0}
  m_Color: {r: 1, g: 1, b: 1, a: 1}
  m_RaycastTarget: 1
  m_RaycastPadding: {x: 0, y: 0, z: 0, w: 0}
  m_Maskable: 1
  m_OnCullStateChanged:
    m_PersistentCalls:
      m_Calls: []
  m_text: Who Would you like to call?
  m_isRightToLeft: 0
  m_fontAsset: {fileID: 11400000, guid: 8f586378b4e144a9851e7b34d9b748ee, type: 2}
  m_sharedMaterial: {fileID: 2180264, guid: 8f586378b4e144a9851e7b34d9b748ee, type: 2}
  m_fontSharedMaterials: []
  m_fontMaterial: {fileID: 0}
  m_fontMaterials: []
  m_fontColor32:
    serializedVersion: 2
    rgba: 2150773298
  m_fontColor: {r: 0.19607843, g: 0.19607843, b: 0.19607843, a: 0.5}
  m_enableVertexGradient: 0
  m_colorMode: 3
  m_fontColorGradient:
    topLeft: {r: 1, g: 1, b: 1, a: 1}
    topRight: {r: 1, g: 1, b: 1, a: 1}
    bottomLeft: {r: 1, g: 1, b: 1, a: 1}
    bottomRight: {r: 1, g: 1, b: 1, a: 1}
  m_fontColorGradientPreset: {fileID: 0}
  m_spriteAsset: {fileID: 0}
  m_tintAllSprites: 0
  m_StyleSheet: {fileID: 0}
  m_TextStyleHashCode: -1183493901
  m_overrideHtmlColors: 0
  m_faceColor:
    serializedVersion: 2
    rgba: 4294967295
  m_fontSize: 14
  m_fontSizeBase: 14
  m_fontWeight: 400
  m_enableAutoSizing: 0
  m_fontSizeMin: 18
  m_fontSizeMax: 72
  m_fontStyle: 2
  m_HorizontalAlignment: 1
  m_VerticalAlignment: 256
  m_textAlignment: 65535
  m_characterSpacing: 0
  m_wordSpacing: 0
  m_lineSpacing: 0
  m_lineSpacingMax: 0
  m_paragraphSpacing: 0
  m_charWidthMaxAdj: 0
  m_enableWordWrapping: 0
  m_wordWrappingRatios: 0.4
  m_overflowMode: 0
  m_linkedTextComponent: {fileID: 0}
  parentLinkedComponent: {fileID: 0}
  m_enableKerning: 1
  m_enableExtraPadding: 1
  checkPaddingRequired: 0
  m_isRichText: 1
  m_parseCtrlCharacters: 1
  m_isOrthographic: 1
  m_isCullingEnabled: 0
  m_horizontalMapping: 0
  m_verticalMapping: 0
  m_uvLineOffset: 0
  m_geometrySortingOrder: 0
  m_IsTextObjectScaleStatic: 0
  m_VertexBufferAutoSizeReduction: 0
  m_useMaxVisibleDescender: 1
  m_pageToDisplay: 1
  m_margin: {x: 0, y: 0, z: 0, w: 0}
  m_isUsingLegacyAnimationComponent: 0
  m_isVolumetricText: 0
  m_hasFontAssetChanged: 0
  m_baseMaterial: {fileID: 0}
  m_maskOffset: {x: 0, y: 0, z: 0, w: 0}
--- !u!222 &857336309
CanvasRenderer:
  m_ObjectHideFlags: 0
  m_CorrespondingSourceObject: {fileID: 0}
  m_PrefabInstance: {fileID: 0}
  m_PrefabAsset: {fileID: 0}
  m_GameObject: {fileID: 857336305}
  m_CullTransparentMesh: 1
--- !u!1 &963546686
GameObject:
  m_ObjectHideFlags: 0
  m_CorrespondingSourceObject: {fileID: 0}
  m_PrefabInstance: {fileID: 0}
  m_PrefabAsset: {fileID: 0}
  serializedVersion: 6
  m_Component:
  - component: {fileID: 963546687}
  - component: {fileID: 963546690}
  - component: {fileID: 963546689}
  - component: {fileID: 963546688}
  m_Layer: 5
  m_Name: InputField (TMP)
  m_TagString: Untagged
  m_Icon: {fileID: 0}
  m_NavMeshLayer: 0
  m_StaticEditorFlags: 0
  m_IsActive: 1
--- !u!224 &963546687
RectTransform:
  m_ObjectHideFlags: 0
  m_CorrespondingSourceObject: {fileID: 0}
  m_PrefabInstance: {fileID: 0}
  m_PrefabAsset: {fileID: 0}
  m_GameObject: {fileID: 963546686}
  m_LocalRotation: {x: 0, y: 0, z: 0, w: 1}
  m_LocalPosition: {x: 0, y: 0, z: 0}
  m_LocalScale: {x: 1, y: 1, z: 1}
  m_ConstrainProportionsScale: 0
  m_Children:
  - {fileID: 1787936407}
  m_Father: {fileID: 1843906927}
  m_RootOrder: 0
  m_LocalEulerAnglesHint: {x: 0, y: 0, z: 0}
  m_AnchorMin: {x: 0.5, y: 0.5}
  m_AnchorMax: {x: 0.5, y: 0.5}
  m_AnchoredPosition: {x: 0.00002861, y: 327}
  m_SizeDelta: {x: 1337.7578, y: 71.4853}
  m_Pivot: {x: 0.5, y: 0.5}
--- !u!114 &963546688
MonoBehaviour:
  m_ObjectHideFlags: 0
  m_CorrespondingSourceObject: {fileID: 0}
  m_PrefabInstance: {fileID: 0}
  m_PrefabAsset: {fileID: 0}
  m_GameObject: {fileID: 963546686}
  m_Enabled: 1
  m_EditorHideFlags: 0
  m_Script: {fileID: 11500000, guid: 2da0c512f12947e489f739169773d7ca, type: 3}
  m_Name:
  m_EditorClassIdentifier:
  m_Navigation:
    m_Mode: 3
    m_WrapAround: 0
    m_SelectOnUp: {fileID: 0}
    m_SelectOnDown: {fileID: 0}
    m_SelectOnLeft: {fileID: 0}
    m_SelectOnRight: {fileID: 0}
  m_Transition: 1
  m_Colors:
    m_NormalColor: {r: 1, g: 1, b: 1, a: 1}
    m_HighlightedColor: {r: 0.9607843, g: 0.9607843, b: 0.9607843, a: 1}
    m_PressedColor: {r: 0.78431374, g: 0.78431374, b: 0.78431374, a: 1}
    m_SelectedColor: {r: 0.9607843, g: 0.9607843, b: 0.9607843, a: 1}
    m_DisabledColor: {r: 0.78431374, g: 0.78431374, b: 0.78431374, a: 0.5019608}
    m_ColorMultiplier: 1
    m_FadeDuration: 0.1
  m_SpriteState:
    m_HighlightedSprite: {fileID: 0}
    m_PressedSprite: {fileID: 0}
    m_SelectedSprite: {fileID: 0}
    m_DisabledSprite: {fileID: 0}
  m_AnimationTriggers:
    m_NormalTrigger: Normal
    m_HighlightedTrigger: Highlighted
    m_PressedTrigger: Pressed
    m_SelectedTrigger: Selected
    m_DisabledTrigger: Disabled
  m_Interactable: 1
  m_TargetGraphic: {fileID: 963546689}
  m_TextViewport: {fileID: 1787936407}
  m_TextComponent: {fileID: 1676708954}
  m_Placeholder: {fileID: 857336308}
  m_VerticalScrollbar: {fileID: 0}
  m_VerticalScrollbarEventHandler: {fileID: 0}
  m_LayoutGroup: {fileID: 0}
  m_ScrollSensitivity: 1
  m_ContentType: 0
  m_InputType: 0
  m_AsteriskChar: 42
  m_KeyboardType: 0
  m_LineType: 0
  m_HideMobileInput: 0
  m_HideSoftKeyboard: 0
  m_CharacterValidation: 0
  m_RegexValue:
  m_GlobalPointSize: 14
  m_CharacterLimit: 0
  m_OnEndEdit:
    m_PersistentCalls:
      m_Calls: []
  m_OnSubmit:
    m_PersistentCalls:
      m_Calls: []
  m_OnSelect:
    m_PersistentCalls:
      m_Calls: []
  m_OnDeselect:
    m_PersistentCalls:
      m_Calls: []
  m_OnTextSelection:
    m_PersistentCalls:
      m_Calls: []
  m_OnEndTextSelection:
    m_PersistentCalls:
      m_Calls: []
  m_OnValueChanged:
    m_PersistentCalls:
      m_Calls:
      - m_Target: {fileID: 293984670}
        m_TargetAssemblyTypeName: CallClientHost, Assembly-CSharp
        m_MethodName: set_CalleeIdentity
        m_Mode: 0
        m_Arguments:
          m_ObjectArgument: {fileID: 0}
          m_ObjectArgumentAssemblyTypeName: UnityEngine.Object, UnityEngine
          m_IntArgument: 0
          m_FloatArgument: 0
          m_StringArgument:
          m_BoolArgument: 0
        m_CallState: 2
  m_OnTouchScreenKeyboardStatusChanged:
    m_PersistentCalls:
      m_Calls: []
  m_CaretColor: {r: 0.19607843, g: 0.19607843, b: 0.19607843, a: 1}
  m_CustomCaretColor: 0
  m_SelectionColor: {r: 0.65882355, g: 0.80784315, b: 1, a: 0.7529412}
  m_Text:
  m_CaretBlinkRate: 0.85
  m_CaretWidth: 1
  m_ReadOnly: 0
  m_RichText: 1
  m_GlobalFontAsset: {fileID: 11400000, guid: 8f586378b4e144a9851e7b34d9b748ee, type: 2}
  m_OnFocusSelectAll: 1
  m_ResetOnDeActivation: 1
  m_RestoreOriginalTextOnEscape: 1
  m_isRichTextEditingAllowed: 0
  m_LineLimit: 0
  m_InputValidator: {fileID: 0}
--- !u!114 &963546689
MonoBehaviour:
  m_ObjectHideFlags: 0
  m_CorrespondingSourceObject: {fileID: 0}
  m_PrefabInstance: {fileID: 0}
  m_PrefabAsset: {fileID: 0}
  m_GameObject: {fileID: 963546686}
  m_Enabled: 1
  m_EditorHideFlags: 0
  m_Script: {fileID: 11500000, guid: fe87c0e1cc204ed48ad3b37840f39efc, type: 3}
  m_Name:
  m_EditorClassIdentifier:
  m_Material: {fileID: 0}
  m_Color: {r: 1, g: 1, b: 1, a: 1}
  m_RaycastTarget: 1
  m_RaycastPadding: {x: 0, y: 0, z: 0, w: 0}
  m_Maskable: 1
  m_OnCullStateChanged:
    m_PersistentCalls:
      m_Calls: []
  m_Sprite: {fileID: 10911, guid: 0000000000000000f000000000000000, type: 0}
  m_Type: 1
  m_PreserveAspect: 0
  m_FillCenter: 1
  m_FillMethod: 4
  m_FillAmount: 1
  m_FillClockwise: 1
  m_FillOrigin: 0
  m_UseSpriteMesh: 0
  m_PixelsPerUnitMultiplier: 1
--- !u!222 &963546690
CanvasRenderer:
  m_ObjectHideFlags: 0
  m_CorrespondingSourceObject: {fileID: 0}
  m_PrefabInstance: {fileID: 0}
  m_PrefabAsset: {fileID: 0}
  m_GameObject: {fileID: 963546686}
  m_CullTransparentMesh: 1
--- !u!1 &1184525248
GameObject:
  m_ObjectHideFlags: 0
  m_CorrespondingSourceObject: {fileID: 0}
  m_PrefabInstance: {fileID: 0}
  m_PrefabAsset: {fileID: 0}
  serializedVersion: 6
  m_Component:
  - component: {fileID: 1184525249}
  - component: {fileID: 1184525251}
  - component: {fileID: 1184525250}
  m_Layer: 5
  m_Name: Status Header
  m_TagString: Untagged
  m_Icon: {fileID: 0}
  m_NavMeshLayer: 0
  m_StaticEditorFlags: 0
  m_IsActive: 1
--- !u!224 &1184525249
RectTransform:
  m_ObjectHideFlags: 0
  m_CorrespondingSourceObject: {fileID: 0}
  m_PrefabInstance: {fileID: 0}
  m_PrefabAsset: {fileID: 0}
  m_GameObject: {fileID: 1184525248}
  m_LocalRotation: {x: 0, y: 0, z: 0, w: 1}
  m_LocalPosition: {x: 0, y: 0, z: 0}
  m_LocalScale: {x: 1, y: 1, z: 1}
  m_ConstrainProportionsScale: 0
  m_Children: []
  m_Father: {fileID: 1843906927}
  m_RootOrder: 3
  m_LocalEulerAnglesHint: {x: 0, y: 0, z: 0}
  m_AnchorMin: {x: 0.5, y: 0.5}
  m_AnchorMax: {x: 0.5, y: 0.5}
  m_AnchoredPosition: {x: -23, y: -303}
  m_SizeDelta: {x: 159.05, y: 33.5037}
  m_Pivot: {x: 0.5, y: 0.5}
--- !u!114 &1184525250
MonoBehaviour:
  m_ObjectHideFlags: 0
  m_CorrespondingSourceObject: {fileID: 0}
  m_PrefabInstance: {fileID: 0}
  m_PrefabAsset: {fileID: 0}
  m_GameObject: {fileID: 1184525248}
  m_Enabled: 1
  m_EditorHideFlags: 0
  m_Script: {fileID: 11500000, guid: f4688fdb7df04437aeb418b961361dc5, type: 3}
  m_Name:
  m_EditorClassIdentifier:
  m_Material: {fileID: 0}
  m_Color: {r: 1, g: 1, b: 1, a: 1}
  m_RaycastTarget: 1
  m_RaycastPadding: {x: 0, y: 0, z: 0, w: 0}
  m_Maskable: 1
  m_OnCullStateChanged:
    m_PersistentCalls:
      m_Calls: []
  m_text: Status
  m_isRightToLeft: 0
  m_fontAsset: {fileID: 11400000, guid: 8f586378b4e144a9851e7b34d9b748ee, type: 2}
  m_sharedMaterial: {fileID: 2180264, guid: 8f586378b4e144a9851e7b34d9b748ee, type: 2}
  m_fontSharedMaterials: []
  m_fontMaterial: {fileID: 0}
  m_fontMaterials: []
  m_fontColor32:
    serializedVersion: 2
    rgba: 4294967295
  m_fontColor: {r: 1, g: 1, b: 1, a: 1}
  m_enableVertexGradient: 0
  m_colorMode: 3
  m_fontColorGradient:
    topLeft: {r: 1, g: 1, b: 1, a: 1}
    topRight: {r: 1, g: 1, b: 1, a: 1}
    bottomLeft: {r: 1, g: 1, b: 1, a: 1}
    bottomRight: {r: 1, g: 1, b: 1, a: 1}
  m_fontColorGradientPreset: {fileID: 0}
  m_spriteAsset: {fileID: 0}
  m_tintAllSprites: 0
  m_StyleSheet: {fileID: 0}
  m_TextStyleHashCode: -1183493901
  m_overrideHtmlColors: 0
  m_faceColor:
    serializedVersion: 2
    rgba: 4294967295
  m_fontSize: 24
  m_fontSizeBase: 24
  m_fontWeight: 400
  m_enableAutoSizing: 0
  m_fontSizeMin: 18
  m_fontSizeMax: 72
  m_fontStyle: 0
  m_HorizontalAlignment: 1
  m_VerticalAlignment: 256
  m_textAlignment: 65535
  m_characterSpacing: 0
  m_wordSpacing: 0
  m_lineSpacing: 0
  m_lineSpacingMax: 0
  m_paragraphSpacing: 0
  m_charWidthMaxAdj: 0
  m_enableWordWrapping: 1
  m_wordWrappingRatios: 0.4
  m_overflowMode: 0
  m_linkedTextComponent: {fileID: 0}
  parentLinkedComponent: {fileID: 0}
  m_enableKerning: 1
  m_enableExtraPadding: 0
  checkPaddingRequired: 0
  m_isRichText: 1
  m_parseCtrlCharacters: 1
  m_isOrthographic: 1
  m_isCullingEnabled: 0
  m_horizontalMapping: 0
  m_verticalMapping: 0
  m_uvLineOffset: 0
  m_geometrySortingOrder: 0
  m_IsTextObjectScaleStatic: 0
  m_VertexBufferAutoSizeReduction: 0
  m_useMaxVisibleDescender: 1
  m_pageToDisplay: 1
  m_margin: {x: 0, y: 2.5243988, z: 10.097656, w: -2.5243645}
  m_isUsingLegacyAnimationComponent: 0
  m_isVolumetricText: 0
  m_hasFontAssetChanged: 0
  m_baseMaterial: {fileID: 0}
  m_maskOffset: {x: 0, y: 0, z: 0, w: 0}
--- !u!222 &1184525251
CanvasRenderer:
  m_ObjectHideFlags: 0
  m_CorrespondingSourceObject: {fileID: 0}
  m_PrefabInstance: {fileID: 0}
  m_PrefabAsset: {fileID: 0}
  m_GameObject: {fileID: 1184525248}
  m_CullTransparentMesh: 1
--- !u!1 &1332239153
GameObject:
  m_ObjectHideFlags: 0
  m_CorrespondingSourceObject: {fileID: 0}
  m_PrefabInstance: {fileID: 0}
  m_PrefabAsset: {fileID: 0}
  serializedVersion: 6
  m_Component:
  - component: {fileID: 1332239154}
  - component: {fileID: 1332239157}
  - component: {fileID: 1332239156}
  - component: {fileID: 1332239155}
  m_Layer: 5
  m_Name: Hang Up Button
  m_TagString: Untagged
  m_Icon: {fileID: 0}
  m_NavMeshLayer: 0
  m_StaticEditorFlags: 0
  m_IsActive: 1
--- !u!224 &1332239154
RectTransform:
  m_ObjectHideFlags: 0
  m_CorrespondingSourceObject: {fileID: 0}
  m_PrefabInstance: {fileID: 0}
  m_PrefabAsset: {fileID: 0}
  m_GameObject: {fileID: 1332239153}
  m_LocalRotation: {x: 0, y: 0, z: 0, w: 1}
  m_LocalPosition: {x: 0, y: 0, z: 0}
  m_LocalScale: {x: 1, y: 1, z: 1}
  m_ConstrainProportionsScale: 0
  m_Children:
  - {fileID: 1917486034}
  m_Father: {fileID: 1843906927}
  m_RootOrder: 2
  m_LocalEulerAnglesHint: {x: 0, y: 0, z: 0}
  m_AnchorMin: {x: 0.5, y: 0.5}
  m_AnchorMax: {x: 0.5, y: 0.5}
  m_AnchoredPosition: {x: -277, y: -329}
  m_SizeDelta: {x: 212.1357, y: 53.698}
  m_Pivot: {x: 0.5, y: 0.5}
--- !u!114 &1332239155
MonoBehaviour:
  m_ObjectHideFlags: 0
  m_CorrespondingSourceObject: {fileID: 0}
  m_PrefabInstance: {fileID: 0}
  m_PrefabAsset: {fileID: 0}
  m_GameObject: {fileID: 1332239153}
  m_Enabled: 1
  m_EditorHideFlags: 0
  m_Script: {fileID: 11500000, guid: 4e29b1a8efbd4b44bb3f3716e73f07ff, type: 3}
  m_Name:
  m_EditorClassIdentifier:
  m_Navigation:
    m_Mode: 3
    m_WrapAround: 0
    m_SelectOnUp: {fileID: 0}
    m_SelectOnDown: {fileID: 0}
    m_SelectOnLeft: {fileID: 0}
    m_SelectOnRight: {fileID: 0}
  m_Transition: 1
  m_Colors:
    m_NormalColor: {r: 1, g: 1, b: 1, a: 1}
    m_HighlightedColor: {r: 0.9607843, g: 0.9607843, b: 0.9607843, a: 1}
    m_PressedColor: {r: 0.78431374, g: 0.78431374, b: 0.78431374, a: 1}
    m_SelectedColor: {r: 0.9607843, g: 0.9607843, b: 0.9607843, a: 1}
    m_DisabledColor: {r: 0.78431374, g: 0.78431374, b: 0.78431374, a: 0.5019608}
    m_ColorMultiplier: 1
    m_FadeDuration: 0.1
  m_SpriteState:
    m_HighlightedSprite: {fileID: 0}
    m_PressedSprite: {fileID: 0}
    m_SelectedSprite: {fileID: 0}
    m_DisabledSprite: {fileID: 0}
  m_AnimationTriggers:
    m_NormalTrigger: Normal
    m_HighlightedTrigger: Highlighted
    m_PressedTrigger: Pressed
    m_SelectedTrigger: Selected
    m_DisabledTrigger: Disabled
  m_Interactable: 1
  m_TargetGraphic: {fileID: 1332239156}
  m_OnClick:
    m_PersistentCalls:
      m_Calls:
      - m_Target: {fileID: 293984670}
        m_TargetAssemblyTypeName: AppManager, Assembly-CSharp
        m_MethodName: HangupButton_Click
        m_Mode: 1
        m_Arguments:
          m_ObjectArgument: {fileID: 0}
          m_ObjectArgumentAssemblyTypeName: UnityEngine.Object, UnityEngine
          m_IntArgument: 0
          m_FloatArgument: 0
          m_StringArgument:
          m_BoolArgument: 0
        m_CallState: 2
--- !u!114 &1332239156
MonoBehaviour:
  m_ObjectHideFlags: 0
  m_CorrespondingSourceObject: {fileID: 0}
  m_PrefabInstance: {fileID: 0}
  m_PrefabAsset: {fileID: 0}
  m_GameObject: {fileID: 1332239153}
  m_Enabled: 1
  m_EditorHideFlags: 0
  m_Script: {fileID: 11500000, guid: fe87c0e1cc204ed48ad3b37840f39efc, type: 3}
  m_Name:
  m_EditorClassIdentifier:
  m_Material: {fileID: 0}
  m_Color: {r: 1, g: 1, b: 1, a: 1}
  m_RaycastTarget: 1
  m_RaycastPadding: {x: 0, y: 0, z: 0, w: 0}
  m_Maskable: 1
  m_OnCullStateChanged:
    m_PersistentCalls:
      m_Calls: []
  m_Sprite: {fileID: 10905, guid: 0000000000000000f000000000000000, type: 0}
  m_Type: 1
  m_PreserveAspect: 0
  m_FillCenter: 1
  m_FillMethod: 4
  m_FillAmount: 1
  m_FillClockwise: 1
  m_FillOrigin: 0
  m_UseSpriteMesh: 0
  m_PixelsPerUnitMultiplier: 1
--- !u!222 &1332239157
CanvasRenderer:
  m_ObjectHideFlags: 0
  m_CorrespondingSourceObject: {fileID: 0}
  m_PrefabInstance: {fileID: 0}
  m_PrefabAsset: {fileID: 0}
  m_GameObject: {fileID: 1332239153}
  m_CullTransparentMesh: 1
--- !u!1 &1529611526
GameObject:
  m_ObjectHideFlags: 0
  m_CorrespondingSourceObject: {fileID: 0}
  m_PrefabInstance: {fileID: 0}
  m_PrefabAsset: {fileID: 0}
  serializedVersion: 6
  m_Component:
  - component: {fileID: 1529611527}
  - component: {fileID: 1529611529}
  - component: {fileID: 1529611528}
  m_Layer: 5
  m_Name: Status
  m_TagString: Untagged
  m_Icon: {fileID: 0}
  m_NavMeshLayer: 0
  m_StaticEditorFlags: 0
  m_IsActive: 1
--- !u!224 &1529611527
RectTransform:
  m_ObjectHideFlags: 0
  m_CorrespondingSourceObject: {fileID: 0}
  m_PrefabInstance: {fileID: 0}
  m_PrefabAsset: {fileID: 0}
  m_GameObject: {fileID: 1529611526}
  m_LocalRotation: {x: 0, y: 0, z: 0, w: 1}
  m_LocalPosition: {x: 0, y: 0, z: 0}
  m_LocalScale: {x: 1, y: 1, z: 1}
  m_ConstrainProportionsScale: 0
  m_Children: []
  m_Father: {fileID: 1843906927}
  m_RootOrder: 4
  m_LocalEulerAnglesHint: {x: 0, y: 0, z: 0}
  m_AnchorMin: {x: 0.5, y: 0.5}
  m_AnchorMax: {x: 0.5, y: 0.5}
  m_AnchoredPosition: {x: -2.525, y: -344.75}
  m_SizeDelta: {x: 200, y: 50}
  m_Pivot: {x: 0.5, y: 0.5}
--- !u!114 &1529611528
MonoBehaviour:
  m_ObjectHideFlags: 0
  m_CorrespondingSourceObject: {fileID: 0}
  m_PrefabInstance: {fileID: 0}
  m_PrefabAsset: {fileID: 0}
  m_GameObject: {fileID: 1529611526}
  m_Enabled: 1
  m_EditorHideFlags: 0
  m_Script: {fileID: 11500000, guid: f4688fdb7df04437aeb418b961361dc5, type: 3}
  m_Name:
  m_EditorClassIdentifier:
  m_Material: {fileID: 0}
  m_Color: {r: 1, g: 1, b: 1, a: 1}
  m_RaycastTarget: 1
  m_RaycastPadding: {x: 0, y: 0, z: 0, w: 0}
  m_Maskable: 1
  m_OnCullStateChanged:
    m_PersistentCalls:
      m_Calls: []
  m_text: Disconnected
  m_isRightToLeft: 0
  m_fontAsset: {fileID: 11400000, guid: 8f586378b4e144a9851e7b34d9b748ee, type: 2}
  m_sharedMaterial: {fileID: 2180264, guid: 8f586378b4e144a9851e7b34d9b748ee, type: 2}
  m_fontSharedMaterials: []
  m_fontMaterial: {fileID: 0}
  m_fontMaterials: []
  m_fontColor32:
    serializedVersion: 2
    rgba: 4294967295
  m_fontColor: {r: 1, g: 1, b: 1, a: 1}
  m_enableVertexGradient: 0
  m_colorMode: 3
  m_fontColorGradient:
    topLeft: {r: 1, g: 1, b: 1, a: 1}
    topRight: {r: 1, g: 1, b: 1, a: 1}
    bottomLeft: {r: 1, g: 1, b: 1, a: 1}
    bottomRight: {r: 1, g: 1, b: 1, a: 1}
  m_fontColorGradientPreset: {fileID: 0}
  m_spriteAsset: {fileID: 0}
  m_tintAllSprites: 0
  m_StyleSheet: {fileID: 0}
  m_TextStyleHashCode: -1183493901
  m_overrideHtmlColors: 0
  m_faceColor:
    serializedVersion: 2
    rgba: 4294967295
  m_fontSize: 30
  m_fontSizeBase: 30
  m_fontWeight: 400
  m_enableAutoSizing: 0
  m_fontSizeMin: 18
  m_fontSizeMax: 72
  m_fontStyle: 0
  m_HorizontalAlignment: 1
  m_VerticalAlignment: 256
  m_textAlignment: 65535
  m_characterSpacing: 0
  m_wordSpacing: 0
  m_lineSpacing: 0
  m_lineSpacingMax: 0
  m_paragraphSpacing: 0
  m_charWidthMaxAdj: 0
  m_enableWordWrapping: 1
  m_wordWrappingRatios: 0.4
  m_overflowMode: 0
  m_linkedTextComponent: {fileID: 0}
  parentLinkedComponent: {fileID: 0}
  m_enableKerning: 1
  m_enableExtraPadding: 0
  checkPaddingRequired: 0
  m_isRichText: 1
  m_parseCtrlCharacters: 1
  m_isOrthographic: 1
  m_isCullingEnabled: 0
  m_horizontalMapping: 0
  m_verticalMapping: 0
  m_uvLineOffset: 0
  m_geometrySortingOrder: 0
  m_IsTextObjectScaleStatic: 0
  m_VertexBufferAutoSizeReduction: 0
  m_useMaxVisibleDescender: 1
  m_pageToDisplay: 1
  m_margin: {x: 0, y: 0, z: -25.861023, w: 0}
  m_isUsingLegacyAnimationComponent: 0
  m_isVolumetricText: 0
  m_hasFontAssetChanged: 0
  m_baseMaterial: {fileID: 0}
  m_maskOffset: {x: 0, y: 0, z: 0, w: 0}
--- !u!222 &1529611529
CanvasRenderer:
  m_ObjectHideFlags: 0
  m_CorrespondingSourceObject: {fileID: 0}
  m_PrefabInstance: {fileID: 0}
  m_PrefabAsset: {fileID: 0}
  m_GameObject: {fileID: 1529611526}
  m_CullTransparentMesh: 1
--- !u!1 &1676708952
GameObject:
  m_ObjectHideFlags: 0
  m_CorrespondingSourceObject: {fileID: 0}
  m_PrefabInstance: {fileID: 0}
  m_PrefabAsset: {fileID: 0}
  serializedVersion: 6
  m_Component:
  - component: {fileID: 1676708953}
  - component: {fileID: 1676708955}
  - component: {fileID: 1676708954}
  m_Layer: 5
  m_Name: Text
  m_TagString: Untagged
  m_Icon: {fileID: 0}
  m_NavMeshLayer: 0
  m_StaticEditorFlags: 0
  m_IsActive: 1
--- !u!224 &1676708953
RectTransform:
  m_ObjectHideFlags: 0
  m_CorrespondingSourceObject: {fileID: 0}
  m_PrefabInstance: {fileID: 0}
  m_PrefabAsset: {fileID: 0}
  m_GameObject: {fileID: 1676708952}
  m_LocalRotation: {x: 0, y: 0, z: 0, w: 1}
  m_LocalPosition: {x: 0, y: 0, z: 0}
  m_LocalScale: {x: 1, y: 1, z: 1}
  m_ConstrainProportionsScale: 0
  m_Children: []
  m_Father: {fileID: 1787936407}
  m_RootOrder: 1
  m_LocalEulerAnglesHint: {x: 0, y: 0, z: 0}
  m_AnchorMin: {x: 0, y: 0}
  m_AnchorMax: {x: 1, y: 1}
  m_AnchoredPosition: {x: 0, y: 0}
  m_SizeDelta: {x: 0, y: 0}
  m_Pivot: {x: 0.5, y: 0.5}
--- !u!114 &1676708954
MonoBehaviour:
  m_ObjectHideFlags: 0
  m_CorrespondingSourceObject: {fileID: 0}
  m_PrefabInstance: {fileID: 0}
  m_PrefabAsset: {fileID: 0}
  m_GameObject: {fileID: 1676708952}
  m_Enabled: 1
  m_EditorHideFlags: 0
  m_Script: {fileID: 11500000, guid: f4688fdb7df04437aeb418b961361dc5, type: 3}
  m_Name:
  m_EditorClassIdentifier:
  m_Material: {fileID: 0}
  m_Color: {r: 1, g: 1, b: 1, a: 1}
  m_RaycastTarget: 1
  m_RaycastPadding: {x: 0, y: 0, z: 0, w: 0}
  m_Maskable: 1
  m_OnCullStateChanged:
    m_PersistentCalls:
      m_Calls: []
  m_text: "\u200B"
  m_isRightToLeft: 0
  m_fontAsset: {fileID: 11400000, guid: 8f586378b4e144a9851e7b34d9b748ee, type: 2}
  m_sharedMaterial: {fileID: 2180264, guid: 8f586378b4e144a9851e7b34d9b748ee, type: 2}
  m_fontSharedMaterials: []
  m_fontMaterial: {fileID: 0}
  m_fontMaterials: []
  m_fontColor32:
    serializedVersion: 2
    rgba: 4281479730
  m_fontColor: {r: 0.19607843, g: 0.19607843, b: 0.19607843, a: 1}
  m_enableVertexGradient: 0
  m_colorMode: 3
  m_fontColorGradient:
    topLeft: {r: 1, g: 1, b: 1, a: 1}
    topRight: {r: 1, g: 1, b: 1, a: 1}
    bottomLeft: {r: 1, g: 1, b: 1, a: 1}
    bottomRight: {r: 1, g: 1, b: 1, a: 1}
  m_fontColorGradientPreset: {fileID: 0}
  m_spriteAsset: {fileID: 0}
  m_tintAllSprites: 0
  m_StyleSheet: {fileID: 0}
  m_TextStyleHashCode: -1183493901
  m_overrideHtmlColors: 0
  m_faceColor:
    serializedVersion: 2
    rgba: 4294967295
  m_fontSize: 14
  m_fontSizeBase: 14
  m_fontWeight: 400
  m_enableAutoSizing: 0
  m_fontSizeMin: 18
  m_fontSizeMax: 72
  m_fontStyle: 0
  m_HorizontalAlignment: 1
  m_VerticalAlignment: 256
  m_textAlignment: 65535
  m_characterSpacing: 0
  m_wordSpacing: 0
  m_lineSpacing: 0
  m_lineSpacingMax: 0
  m_paragraphSpacing: 0
  m_charWidthMaxAdj: 0
  m_enableWordWrapping: 0
  m_wordWrappingRatios: 0.4
  m_overflowMode: 0
  m_linkedTextComponent: {fileID: 0}
  parentLinkedComponent: {fileID: 0}
  m_enableKerning: 1
  m_enableExtraPadding: 1
  checkPaddingRequired: 0
  m_isRichText: 1
  m_parseCtrlCharacters: 1
  m_isOrthographic: 1
  m_isCullingEnabled: 0
  m_horizontalMapping: 0
  m_verticalMapping: 0
  m_uvLineOffset: 0
  m_geometrySortingOrder: 0
  m_IsTextObjectScaleStatic: 0
  m_VertexBufferAutoSizeReduction: 0
  m_useMaxVisibleDescender: 1
  m_pageToDisplay: 1
  m_margin: {x: 0, y: 0, z: 0, w: 0}
  m_isUsingLegacyAnimationComponent: 0
  m_isVolumetricText: 0
  m_hasFontAssetChanged: 0
  m_baseMaterial: {fileID: 0}
  m_maskOffset: {x: 0, y: 0, z: 0, w: 0}
--- !u!222 &1676708955
CanvasRenderer:
  m_ObjectHideFlags: 0
  m_CorrespondingSourceObject: {fileID: 0}
  m_PrefabInstance: {fileID: 0}
  m_PrefabAsset: {fileID: 0}
  m_GameObject: {fileID: 1676708952}
  m_CullTransparentMesh: 1
--- !u!1 &1732033233
GameObject:
  m_ObjectHideFlags: 0
  m_CorrespondingSourceObject: {fileID: 0}
  m_PrefabInstance: {fileID: 0}
  m_PrefabAsset: {fileID: 0}
  serializedVersion: 6
  m_Component:
  - component: {fileID: 1732033234}
  - component: {fileID: 1732033237}
  - component: {fileID: 1732033236}
  - component: {fileID: 1732033235}
  m_Layer: 5
  m_Name: Start Call Button
  m_TagString: Untagged
  m_Icon: {fileID: 0}
  m_NavMeshLayer: 0
  m_StaticEditorFlags: 0
  m_IsActive: 1
--- !u!224 &1732033234
RectTransform:
  m_ObjectHideFlags: 0
  m_CorrespondingSourceObject: {fileID: 0}
  m_PrefabInstance: {fileID: 0}
  m_PrefabAsset: {fileID: 0}
  m_GameObject: {fileID: 1732033233}
  m_LocalRotation: {x: 0, y: 0, z: 0, w: 1}
  m_LocalPosition: {x: 0, y: 0, z: 0}
  m_LocalScale: {x: 1, y: 1, z: 1}
  m_ConstrainProportionsScale: 0
  m_Children:
  - {fileID: 438770861}
  m_Father: {fileID: 1843906927}
  m_RootOrder: 1
  m_LocalEulerAnglesHint: {x: 0, y: 0, z: 0}
  m_AnchorMin: {x: 0.5, y: 0.5}
  m_AnchorMax: {x: 0.5, y: 0.5}
  m_AnchoredPosition: {x: -525.52, y: -329}
  m_SizeDelta: {x: 212.1357, y: 53.698}
  m_Pivot: {x: 0.5, y: 0.5}
--- !u!114 &1732033235
MonoBehaviour:
  m_ObjectHideFlags: 0
  m_CorrespondingSourceObject: {fileID: 0}
  m_PrefabInstance: {fileID: 0}
  m_PrefabAsset: {fileID: 0}
  m_GameObject: {fileID: 1732033233}
  m_Enabled: 1
  m_EditorHideFlags: 0
  m_Script: {fileID: 11500000, guid: 4e29b1a8efbd4b44bb3f3716e73f07ff, type: 3}
  m_Name:
  m_EditorClassIdentifier:
  m_Navigation:
    m_Mode: 3
    m_WrapAround: 0
    m_SelectOnUp: {fileID: 0}
    m_SelectOnDown: {fileID: 0}
    m_SelectOnLeft: {fileID: 0}
    m_SelectOnRight: {fileID: 0}
  m_Transition: 1
  m_Colors:
    m_NormalColor: {r: 1, g: 1, b: 1, a: 1}
    m_HighlightedColor: {r: 0.9607843, g: 0.9607843, b: 0.9607843, a: 1}
    m_PressedColor: {r: 0.78431374, g: 0.78431374, b: 0.78431374, a: 1}
    m_SelectedColor: {r: 0.9607843, g: 0.9607843, b: 0.9607843, a: 1}
    m_DisabledColor: {r: 0.78431374, g: 0.78431374, b: 0.78431374, a: 0.5019608}
    m_ColorMultiplier: 1
    m_FadeDuration: 0.1
  m_SpriteState:
    m_HighlightedSprite: {fileID: 0}
    m_PressedSprite: {fileID: 0}
    m_SelectedSprite: {fileID: 0}
    m_DisabledSprite: {fileID: 0}
  m_AnimationTriggers:
    m_NormalTrigger: Normal
    m_HighlightedTrigger: Highlighted
    m_PressedTrigger: Pressed
    m_SelectedTrigger: Selected
    m_DisabledTrigger: Disabled
  m_Interactable: 1
  m_TargetGraphic: {fileID: 1732033236}
  m_OnClick:
    m_PersistentCalls:
      m_Calls:
      - m_Target: {fileID: 293984670}
        m_TargetAssemblyTypeName: CallClientHost, Assembly-CSharp
        m_MethodName: CallButton_Click
        m_Mode: 1
        m_Arguments:
          m_ObjectArgument: {fileID: 0}
          m_ObjectArgumentAssemblyTypeName: UnityEngine.Object, UnityEngine
          m_IntArgument: 0
          m_FloatArgument: 0
          m_StringArgument:
          m_BoolArgument: 0
        m_CallState: 2
--- !u!114 &1732033236
MonoBehaviour:
  m_ObjectHideFlags: 0
  m_CorrespondingSourceObject: {fileID: 0}
  m_PrefabInstance: {fileID: 0}
  m_PrefabAsset: {fileID: 0}
  m_GameObject: {fileID: 1732033233}
  m_Enabled: 1
  m_EditorHideFlags: 0
  m_Script: {fileID: 11500000, guid: fe87c0e1cc204ed48ad3b37840f39efc, type: 3}
  m_Name:
  m_EditorClassIdentifier:
  m_Material: {fileID: 0}
  m_Color: {r: 1, g: 1, b: 1, a: 1}
  m_RaycastTarget: 1
  m_RaycastPadding: {x: 0, y: 0, z: 0, w: 0}
  m_Maskable: 1
  m_OnCullStateChanged:
    m_PersistentCalls:
      m_Calls: []
  m_Sprite: {fileID: 10905, guid: 0000000000000000f000000000000000, type: 0}
  m_Type: 1
  m_PreserveAspect: 0
  m_FillCenter: 1
  m_FillMethod: 4
  m_FillAmount: 1
  m_FillClockwise: 1
  m_FillOrigin: 0
  m_UseSpriteMesh: 0
  m_PixelsPerUnitMultiplier: 1
--- !u!222 &1732033237
CanvasRenderer:
  m_ObjectHideFlags: 0
  m_CorrespondingSourceObject: {fileID: 0}
  m_PrefabInstance: {fileID: 0}
  m_PrefabAsset: {fileID: 0}
  m_GameObject: {fileID: 1732033233}
  m_CullTransparentMesh: 1
--- !u!1 &1787936406
GameObject:
  m_ObjectHideFlags: 0
  m_CorrespondingSourceObject: {fileID: 0}
  m_PrefabInstance: {fileID: 0}
  m_PrefabAsset: {fileID: 0}
  serializedVersion: 6
  m_Component:
  - component: {fileID: 1787936407}
  - component: {fileID: 1787936408}
  m_Layer: 5
  m_Name: Text Area
  m_TagString: Untagged
  m_Icon: {fileID: 0}
  m_NavMeshLayer: 0
  m_StaticEditorFlags: 0
  m_IsActive: 1
--- !u!224 &1787936407
RectTransform:
  m_ObjectHideFlags: 0
  m_CorrespondingSourceObject: {fileID: 0}
  m_PrefabInstance: {fileID: 0}
  m_PrefabAsset: {fileID: 0}
  m_GameObject: {fileID: 1787936406}
  m_LocalRotation: {x: 0, y: 0, z: 0, w: 1}
  m_LocalPosition: {x: 0, y: 0, z: 0}
  m_LocalScale: {x: 1, y: 1, z: 1}
  m_ConstrainProportionsScale: 0
  m_Children:
  - {fileID: 857336306}
  - {fileID: 1676708953}
  m_Father: {fileID: 963546687}
  m_RootOrder: 0
  m_LocalEulerAnglesHint: {x: 0, y: 0, z: 0}
  m_AnchorMin: {x: 0, y: 0}
  m_AnchorMax: {x: 1, y: 1}
  m_AnchoredPosition: {x: 0, y: -0.4999962}
  m_SizeDelta: {x: -20, y: -13}
  m_Pivot: {x: 0.5, y: 0.5}
--- !u!114 &1787936408
MonoBehaviour:
  m_ObjectHideFlags: 0
  m_CorrespondingSourceObject: {fileID: 0}
  m_PrefabInstance: {fileID: 0}
  m_PrefabAsset: {fileID: 0}
  m_GameObject: {fileID: 1787936406}
  m_Enabled: 1
  m_EditorHideFlags: 0
  m_Script: {fileID: 11500000, guid: 3312d7739989d2b4e91e6319e9a96d76, type: 3}
  m_Name:
  m_EditorClassIdentifier:
  m_Padding: {x: -8, y: -5, z: -8, w: -5}
  m_Softness: {x: 0, y: 0}
--- !u!1 &1843906923
GameObject:
  m_ObjectHideFlags: 0
  m_CorrespondingSourceObject: {fileID: 0}
  m_PrefabInstance: {fileID: 0}
  m_PrefabAsset: {fileID: 0}
  serializedVersion: 6
  m_Component:
  - component: {fileID: 1843906927}
  - component: {fileID: 1843906926}
  - component: {fileID: 1843906925}
  - component: {fileID: 1843906924}
  m_Layer: 5
  m_Name: Canvas
  m_TagString: Untagged
  m_Icon: {fileID: 0}
  m_NavMeshLayer: 0
  m_StaticEditorFlags: 0
  m_IsActive: 1
--- !u!114 &1843906924
MonoBehaviour:
  m_ObjectHideFlags: 0
  m_CorrespondingSourceObject: {fileID: 0}
  m_PrefabInstance: {fileID: 0}
  m_PrefabAsset: {fileID: 0}
  m_GameObject: {fileID: 1843906923}
  m_Enabled: 1
  m_EditorHideFlags: 0
  m_Script: {fileID: 11500000, guid: dc42784cf147c0c48a680349fa168899, type: 3}
  m_Name:
  m_EditorClassIdentifier:
  m_IgnoreReversedGraphics: 1
  m_BlockingObjects: 0
  m_BlockingMask:
    serializedVersion: 2
    m_Bits: 4294967295
--- !u!114 &1843906925
MonoBehaviour:
  m_ObjectHideFlags: 0
  m_CorrespondingSourceObject: {fileID: 0}
  m_PrefabInstance: {fileID: 0}
  m_PrefabAsset: {fileID: 0}
  m_GameObject: {fileID: 1843906923}
  m_Enabled: 1
  m_EditorHideFlags: 0
  m_Script: {fileID: 11500000, guid: 0cd44c1031e13a943bb63640046fad76, type: 3}
  m_Name:
  m_EditorClassIdentifier:
  m_UiScaleMode: 0
  m_ReferencePixelsPerUnit: 100
  m_ScaleFactor: 1
  m_ReferenceResolution: {x: 800, y: 600}
  m_ScreenMatchMode: 0
  m_MatchWidthOrHeight: 0
  m_PhysicalUnit: 3
  m_FallbackScreenDPI: 96
  m_DefaultSpriteDPI: 96
  m_DynamicPixelsPerUnit: 1
  m_PresetInfoIsWorld: 0
--- !u!223 &1843906926
Canvas:
  m_ObjectHideFlags: 0
  m_CorrespondingSourceObject: {fileID: 0}
  m_PrefabInstance: {fileID: 0}
  m_PrefabAsset: {fileID: 0}
  m_GameObject: {fileID: 1843906923}
  m_Enabled: 1
  serializedVersion: 3
  m_RenderMode: 0
  m_Camera: {fileID: 0}
  m_PlaneDistance: 100
  m_PixelPerfect: 0
  m_ReceivesEvents: 1
  m_OverrideSorting: 0
  m_OverridePixelPerfect: 0
  m_SortingBucketNormalizedSize: 0
  m_AdditionalShaderChannelsFlag: 25
  m_SortingLayerID: 0
  m_SortingOrder: 0
  m_TargetDisplay: 0
--- !u!224 &1843906927
RectTransform:
  m_ObjectHideFlags: 0
  m_CorrespondingSourceObject: {fileID: 0}
  m_PrefabInstance: {fileID: 0}
  m_PrefabAsset: {fileID: 0}
  m_GameObject: {fileID: 1843906923}
  m_LocalRotation: {x: 0, y: 0, z: 0, w: 1}
  m_LocalPosition: {x: 0, y: 0, z: 0}
  m_LocalScale: {x: 0, y: 0, z: 0}
  m_ConstrainProportionsScale: 0
  m_Children:
  - {fileID: 963546687}
  - {fileID: 1732033234}
  - {fileID: 1332239154}
  - {fileID: 1184525249}
  - {fileID: 1529611527}
  m_Father: {fileID: 0}
  m_RootOrder: 3
  m_LocalEulerAnglesHint: {x: 0, y: 0, z: 0}
  m_AnchorMin: {x: 0, y: 0}
  m_AnchorMax: {x: 0, y: 0}
  m_AnchoredPosition: {x: 0, y: 0}
  m_SizeDelta: {x: 0, y: 0}
  m_Pivot: {x: 0, y: 0}
--- !u!1 &1917486033
GameObject:
  m_ObjectHideFlags: 0
  m_CorrespondingSourceObject: {fileID: 0}
  m_PrefabInstance: {fileID: 0}
  m_PrefabAsset: {fileID: 0}
  serializedVersion: 6
  m_Component:
  - component: {fileID: 1917486034}
  - component: {fileID: 1917486036}
  - component: {fileID: 1917486035}
  m_Layer: 5
  m_Name: Text (TMP)
  m_TagString: Untagged
  m_Icon: {fileID: 0}
  m_NavMeshLayer: 0
  m_StaticEditorFlags: 0
  m_IsActive: 1
--- !u!224 &1917486034
RectTransform:
  m_ObjectHideFlags: 0
  m_CorrespondingSourceObject: {fileID: 0}
  m_PrefabInstance: {fileID: 0}
  m_PrefabAsset: {fileID: 0}
  m_GameObject: {fileID: 1917486033}
  m_LocalRotation: {x: 0, y: 0, z: 0, w: 1}
  m_LocalPosition: {x: 0, y: 0, z: 0}
  m_LocalScale: {x: 1, y: 1, z: 1}
  m_ConstrainProportionsScale: 0
  m_Children: []
  m_Father: {fileID: 1332239154}
  m_RootOrder: 0
  m_LocalEulerAnglesHint: {x: 0, y: 0, z: 0}
  m_AnchorMin: {x: 0, y: 0}
  m_AnchorMax: {x: 1, y: 1}
  m_AnchoredPosition: {x: 0, y: 0}
  m_SizeDelta: {x: 0, y: 0}
  m_Pivot: {x: 0.5, y: 0.5}
--- !u!114 &1917486035
MonoBehaviour:
  m_ObjectHideFlags: 0
  m_CorrespondingSourceObject: {fileID: 0}
  m_PrefabInstance: {fileID: 0}
  m_PrefabAsset: {fileID: 0}
  m_GameObject: {fileID: 1917486033}
  m_Enabled: 1
  m_EditorHideFlags: 0
  m_Script: {fileID: 11500000, guid: f4688fdb7df04437aeb418b961361dc5, type: 3}
  m_Name:
  m_EditorClassIdentifier:
  m_Material: {fileID: 0}
  m_Color: {r: 1, g: 1, b: 1, a: 1}
  m_RaycastTarget: 1
  m_RaycastPadding: {x: 0, y: 0, z: 0, w: 0}
  m_Maskable: 1
  m_OnCullStateChanged:
    m_PersistentCalls:
      m_Calls: []
  m_text: Hang Up
  m_isRightToLeft: 0
  m_fontAsset: {fileID: 11400000, guid: 8f586378b4e144a9851e7b34d9b748ee, type: 2}
  m_sharedMaterial: {fileID: 2180264, guid: 8f586378b4e144a9851e7b34d9b748ee, type: 2}
  m_fontSharedMaterials: []
  m_fontMaterial: {fileID: 0}
  m_fontMaterials: []
  m_fontColor32:
    serializedVersion: 2
    rgba: 4281479730
  m_fontColor: {r: 0.19607843, g: 0.19607843, b: 0.19607843, a: 1}
  m_enableVertexGradient: 0
  m_colorMode: 3
  m_fontColorGradient:
    topLeft: {r: 1, g: 1, b: 1, a: 1}
    topRight: {r: 1, g: 1, b: 1, a: 1}
    bottomLeft: {r: 1, g: 1, b: 1, a: 1}
    bottomRight: {r: 1, g: 1, b: 1, a: 1}
  m_fontColorGradientPreset: {fileID: 0}
  m_spriteAsset: {fileID: 0}
  m_tintAllSprites: 0
  m_StyleSheet: {fileID: 0}
  m_TextStyleHashCode: -1183493901
  m_overrideHtmlColors: 0
  m_faceColor:
    serializedVersion: 2
    rgba: 4294967295
  m_fontSize: 24
  m_fontSizeBase: 24
  m_fontWeight: 400
  m_enableAutoSizing: 0
  m_fontSizeMin: 18
  m_fontSizeMax: 72
  m_fontStyle: 0
  m_HorizontalAlignment: 2
  m_VerticalAlignment: 512
  m_textAlignment: 65535
  m_characterSpacing: 0
  m_wordSpacing: 0
  m_lineSpacing: 0
  m_lineSpacingMax: 0
  m_paragraphSpacing: 0
  m_charWidthMaxAdj: 0
  m_enableWordWrapping: 1
  m_wordWrappingRatios: 0.4
  m_overflowMode: 0
  m_linkedTextComponent: {fileID: 0}
  parentLinkedComponent: {fileID: 0}
  m_enableKerning: 1
  m_enableExtraPadding: 0
  checkPaddingRequired: 0
  m_isRichText: 1
  m_parseCtrlCharacters: 1
  m_isOrthographic: 1
  m_isCullingEnabled: 0
  m_horizontalMapping: 0
  m_verticalMapping: 0
  m_uvLineOffset: 0
  m_geometrySortingOrder: 0
  m_IsTextObjectScaleStatic: 0
  m_VertexBufferAutoSizeReduction: 0
  m_useMaxVisibleDescender: 1
  m_pageToDisplay: 1
  m_margin: {x: 0, y: 0, z: 0, w: 0}
  m_isUsingLegacyAnimationComponent: 0
  m_isVolumetricText: 0
  m_hasFontAssetChanged: 0
  m_baseMaterial: {fileID: 0}
  m_maskOffset: {x: 0, y: 0, z: 0, w: 0}
--- !u!222 &1917486036
CanvasRenderer:
  m_ObjectHideFlags: 0
  m_CorrespondingSourceObject: {fileID: 0}
  m_PrefabInstance: {fileID: 0}
  m_PrefabAsset: {fileID: 0}
  m_GameObject: {fileID: 1917486033}
  m_CullTransparentMesh: 1
Create a script called AppManager.cs and link it to the AppManager object in Unity Editor. Replace the content with the following implementation:
using Azure.Communication.Calling.UnityClient;
using System.Runtime.InteropServices.ComTypes;
using System;
using UnityEngine;
using System.Linq;
using UnityEngine.UI;
using TMPro;

/// <summary>
/// A singleton which hosts an Azure Communication calling client. This calling client
/// is then shared across the application.
/// </summary>

public class AppManager : MonoBehaviour
{
    private CallClient callClient;
    private CallAgent callAgent;
    private DeviceManager deviceManager;
    private CommunicationCall call;
    private LocalOutgoingAudioStream micStream;
    private LocalVideoStream cameraStream;

    public string CalleeIdentity { get; set; }

    public TMP_Text callStatus;

    public static AppManager Instance;

    private void Awake()
    {
        // start of new code
        if (Instance != null)
        {
            Destroy(gameObject);
            return;
        }
        // end of new code

        callClient = new CallClient();

        Instance = this;
        DontDestroyOnLoad(gameObject);

        InitCallAgentAndDeviceManagerAsync();
    }

    public async void CallButton_Click()
    {
        // Start a call
    }

    public async void HangupButton_Click()
    {
        // Hang up a call
    }

#region API event handlers
    private async void OnIncomingCallAsync(object sender, IncomingCallReceivedEventArgs args)
    {
        // Handle incoming call event
    }

    private async void OnStateChangedAsync(object sender, Azure.Communication.Calling.UnityClient.PropertyChangedEventArgs args)
    {
        // Handle connected and disconnected state change of a call
    }

    private async void OnRemoteParticipantsUpdatedAsync(object sender, ParticipantsUpdatedEventArgs args)
    {
        // Handle remote participant arrival or departure events and subscribe to individual participant's VideoStreamStateChanged event
    }

    private void OnVideoStreamStateChanged(object sender, VideoStreamStateChangedEventArgs e)
    {
        // Handle incoming or outgoing video stream change events
    }

    private async void OnIncomingVideoStreamStateChangedAsync(IncomingVideoStream incomingVideoStream)
    {
        // Handle incoming IncomingVideoStreamStateChanged event and process individual VideoStreamState
    }
#endregion

    //Used For Updating the UI
    private void Update()
    {
        if (call != null)
        {
            switch (call.State)
            {
                case CallState.Connected:
                    if (callStatus.text != "Connected")
                        callStatus.text = "Connected";
                    break;
                case CallState.Disconnected:
                    if (callStatus.text != "Disconnected")
                        callStatus.text = "Disconnected";
                    break;
            }
        }
    }
}
In the GameObject called AppManager, drag the newly created script into its script component. Drag the Status text object into the Call Status text field to enable UI updates of the Call state. The SDK provides video through URI, but currently, Unity's video player may not support URI playback.
Object model
The next table listed the classes and interfaces handle some of the major features of the Azure Communication Services Calling SDK:
| Name | Description |
|---|---|
CallClient |
The CallClient is the main entry point to the Calling SDK. |
CallAgent |
The CallAgent is used to start and manage calls. |
Call |
The CommunicationCall is used to manage an ongoing call. |
CallTokenCredential |
The CallTokenCredential is used as the token credential to instantiate the CallAgent. |
CallIdentifier |
The CallIdentifier is used to represent the identity of the user, which can be one of the following options: UserCallIdentifier, PhoneNumberCallIdentifier etc. |
Authenticate the client
Initialize a CallAgent instance with a User Access Token that enables us to make and receive calls, and optionally obtain a DeviceManager instance to query for client device configurations.
In the code, replace <AUTHENTICATION_TOKEN> with a User Access Token. Refer to the user access token documentation if you don't already have a token available.
Add InitCallAgentAndDeviceManagerAsync function, which bootstraps the SDK. This helper can be customized to meet the requirements of your application.
private async void InitCallAgentAndDeviceManagerAsync()
{

    deviceManager = await callClient.GetDeviceManager();

    var tokenCredential = new CallTokenCredential(<AUTHENTICATION_TOKEN>);

    var callAgentOptions = new CallAgentOptions()
    {
        DisplayName = $"{Environment.MachineName}/{Environment.UserName}",
    };

    callAgent = await callClient.CreateCallAgent(tokenCredential, callAgentOptions);
    callAgent.IncomingCallReceived += OnIncomingCallAsync;
}
Start a call with video
Once a StartCallOptions object is obtained, CallAgent can be used to initiate the Azure Communication Services call:
public async void CallButton_Click()
{
    var startCallOptions = new StartCallOptions();
    startCallOptions = new StartCallOptions()
    {
        OutgoingVideoOptions = new OutgoingVideoOptions() { Streams = new OutgoingVideoStream[] { cameraStream } }
    };

    var callee = new UserCallIdentifier(CalleeIdentity);

    call = await callAgent.StartCallAsync(new CallIdentifier[] { callee }, startCallOptions);
    // Set up handler for remote participant updated events, such as VideoStreamStateChanged event
    call.RemoteParticipantsUpdated += OnRemoteParticipantsUpdatedAsync;
    // Set up handler for call StateChanged event
    call.StateChanged += OnStateChangedAsync;
}
Handle remote participant and remote incoming video
Incoming video is associated with specific remote participants, therefore RemoteParticipantsUpdated is the key event to stay notified and obtain references to the changing participants.
private void OnRemoteParticipantsUpdatedAsync(object sender, ParticipantsUpdatedEventArgs args)
{
    foreach (var participant in args.RemovedParticipants)
    {
        foreach (var incomingVideoStream in participant.IncomingVideoStreams)
        {
            var remoteVideoStream = incomingVideoStream as RemoteVideoStream;
            if (remoteVideoStream != null)
            {
                remoteVideoStream.Stop();
            }
        }
        // Tear down the event handler on the departing participant
        participant.VideoStreamStateChanged -= OnVideoStreamStateChanged;
    }

    foreach (var participant in args.AddedParticipants)
    {
        // Set up handler for VideoStreamStateChanged of the participant who just joined the call
        participant.VideoStreamStateChanged += OnVideoStreamStateChanged;
    }
}
All remote participants are available through the RemoteParticipants collection on a call instance. Once the call is connected, we can access the remote participants of the call and handle the remote video streams.
private void OnVideoStreamStateChanged(object sender, VideoStreamStateChangedEventArgs e)
{
    CallVideoStream callVideoStream = e.Stream;

    switch (callVideoStream.Direction)
    {
        case StreamDirection.Outgoing:
            //OnOutgoingVideoStreamStateChanged(callVideoStream as OutgoingVideoStream);
            break;
        case StreamDirection.Incoming:
            OnIncomingVideoStreamStateChangedAsync(callVideoStream as IncomingVideoStream);
            break;
    }
}
A video stream will transit through a sequence of internal states. VideoStreamState.Available is the preferred state to bind the video stream to UI element for rendering the video stream, such as MediaPlayerElement, and VideoStreamState.Stopped is typically where the cleanup tasks such as stopping video preview should be done.
private async void OnIncomingVideoStreamStateChangedAsync(IncomingVideoStream incomingVideoStream)
{
    switch (incomingVideoStream.State)
    {
        case VideoStreamState.Available:
            switch (incomingVideoStream.Kind)
            {
                case VideoStreamKind.RemoteIncoming:
                    var remoteVideoStream = incomingVideoStream as RemoteVideoStream;
                    var uri = await remoteVideoStream.StartAsync();
                    break;

                case VideoStreamKind.RawIncoming:
                    break;
            }
            break;

        case VideoStreamState.Started:
            break;

        case VideoStreamState.Stopping:
        case VideoStreamState.Stopped:
            if (incomingVideoStream.Kind == VideoStreamKind.RemoteIncoming)
            {
                var remoteVideoStream = incomingVideoStream as RemoteVideoStream;
                remoteVideoStream.Stop();
            }
            break;

        case VideoStreamState.NotAvailable:
            break;
    }
}
End a call
End the current call when the Hang up button is clicked. Add the implementation to the HangupButton_Click to end a call, and stop the preview and video streams.
public async void HangupButton_Click()
{
    if (call != null)
    {
        try
        {
            await call.HangUpAsync(new HangUpOptions() { ForEveryone = false });
        }
        catch (Exception ex)
        {
        }
    }
}
Accept an incoming call
IncomingCallReceived event sink is set up in the SDK bootstrap helper InitCallAgentAndDeviceManagerAsync.
callAgent.IncomingCallReceived += OnIncomingCallAsync;
Application has an opportunity to configure how the incoming call should be accepted, such as video and audio stream kinds.
private async void OnIncomingCallAsync(object sender, IncomingCallReceivedEventArgs args)
{
    var incomingCall = args.IncomingCall;

    var acceptCallOptions = new AcceptCallOptions()
    {
        IncomingVideoOptions = new IncomingVideoOptions()
        {
            StreamKind = VideoStreamKind.RemoteIncoming
        }
    };

    call = await incomingCall.AcceptAsync(acceptCallOptions);
    // Set up handler for remote participant updated events, such as VideoStreamStateChanged event
    call.RemoteParticipantsUpdated += OnRemoteParticipantsUpdatedAsync;
    // Set up handler for incoming call StateChanged event
    call.StateChanged += OnStateChangedAsync;
}
Monitor and response to call state change event
StateChanged event on Call object is fired when an in progress call transactions from one state to another. Application is offered the opportunities to reflect the state changes on UI or insert business logics.
private async void OnStateChangedAsync(object sender, Azure.Communication.Calling.UnityClient.PropertyChangedEventArgs args)
{
    var call = sender as CommunicationCall;

    if (call != null)
    {
        var state = call.State;

        switch (state)
        {
            case CallState.Connected:
                {
                    await call.StartAudioAsync(micStream);
                    break;
                }
            case CallState.Disconnected:
                {
                    call.RemoteParticipantsUpdated -= OnRemoteParticipantsUpdatedAsync;
                    call.StateChanged -= OnStateChangedAsync;

                    call.Dispose();

                    break;
                }
            default: break;
        }
    }
}
Run the code
You can build and run the code on Unity Editor or devices that uses Unity.
You can make an outbound call by providing a user ID in the text field and clicking the Start Call/Join button. Calling 8:echo123 connects you with an echo bot, this feature is great for getting started and verifying your audio devices are working.
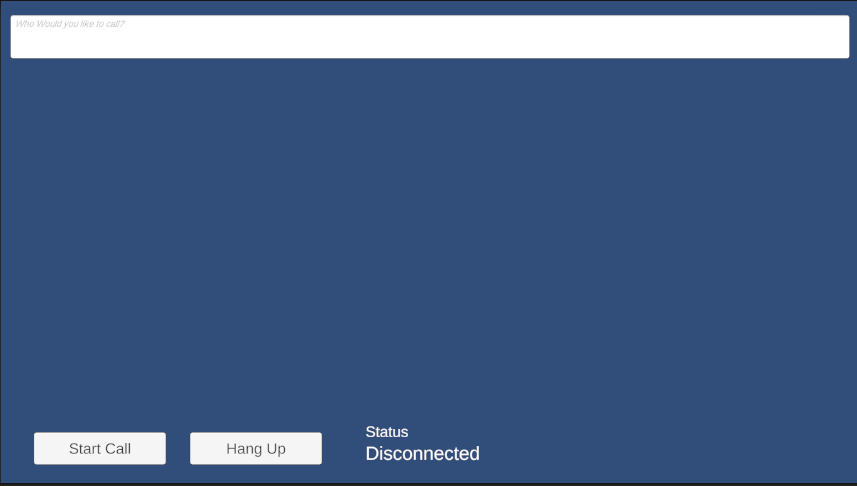
Clean up resources
If you want to clean up and remove a Communication Services subscription, you can delete the resource or resource group. Deleting the resource group also deletes any other resources associated with it. Learn more about cleaning up resources.
Next steps
For more information, see the following articles:
- Check out our calling hero sample
- Get started with the UI Library
- Learn about Calling SDK capabilities
- Learn more about how calling works