Note
Access to this page requires authorization. You can try signing in or changing directories.
Access to this page requires authorization. You can try changing directories.
This article provides step-by-step instructions on how to create and integrate a Microsoft Copilot Studio agent with Azure Communication Services. This article shows you how to create voice-enabled agents that your users can call into.
Download the sample
Find the project for this sample on GitHub. You can download this code and run it locally to try it for yourself.
Prerequisites
- An Azure account with an active subscription. For more information, see Create an account for free.
- An Azure Communication Services resource. For more information, see Create a new Azure Communication Services resource. You need to record your resource connection string for this sample.
- A new web service application that uses the Call Automation SDK.
- An Azure AI multiservice resource and a custom domain.
- Azure Communication Services and Azure AI.
- A Copilot Studio User License so that you can create and publish an agent.
Step 1: Create your agent in Copilot Studio
After you sign in to or sign up for Copilot Studio, the home page opens. On the left pane, select Create.

On the Create page, select New agent.
Use chat to describe your agent. Use the provided questions for guidance.
After you provide all the requested information, select Create.

For more information on how to create and customize your agent, you can see the Copilot Studio quickstart.
Step 2: Disable authentication
After you create your agent, you need to make some updates so that you can integrate it with Azure Communication Services.
Go to the Settings tab.

On the left pane, select Security.
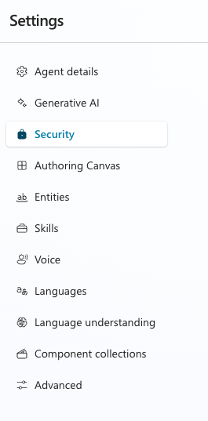
Select Authentication > No Authentication, and then select Save.

Step 3: Get the Web Channel Security key
Go back to the Security section and select Web Channel Security. Copy and save the key. You need it when you deploy your application.
Step 4: Publish the agent
After you update your agent settings and save your agent key, you can publish your agent.
Step 5: Set up the code
After you create your agent, make sure to download the sample. After you download the sample, you need to update some of the properties:
- Your connection string: You can get your connection string from your Azure Communication Services resource.
- Microsoft Copilot Studio Direct Line key: You saved your Web Channel Security key in step 3.
- Azure AI Services custom endpoint: You can get this endpoint from your Azure AI services resource.
- A port to receive event notifications from Azure Communication Services: You can use tools like dev tunnels to help set one up.
Step 6: Understand the code
You must be familiar with a few basic concepts that the sample uses to build out this workflow.
Register an incoming call
Register an incoming call event so that your application knows when a call is coming in and needs to answer.
Answer a call with real-time transcription
When you answer the call, you also enable streaming of real-time transcription. The speech-to-text converted content that the caller is saying is streamed in near real time.
app.MapPost("/api/incomingCall", async (
    [FromBody] EventGridEvent[] eventGridEvents,
    ILogger<Program> logger) =>
{
    foreach (var eventGridEvent in eventGridEvents)
    {
        logger.LogInformation($"Incoming Call event received : {JsonConvert.SerializeObject(eventGridEvent)}");
        // Handle system events
        if (eventGridEvent.TryGetSystemEventData(out object eventData))
        {
            // Handle the subscription validation event.
            if (eventData is SubscriptionValidationEventData subscriptionValidationEventData)
            {
                var responseData = new SubscriptionValidationResponse
                {
                    ValidationResponse = subscriptionValidationEventData.ValidationCode
                };
                return Results.Ok(responseData);
            }
        }
        var jsonObject = JsonNode.Parse(eventGridEvent.Data).AsObject();
        var incomingCallContext = (string)jsonObject["incomingCallContext"];
        var callbackUri = new Uri(baseUri + $"/api/calls/{Guid.NewGuid()}");

        var answerCallOptions = new AnswerCallOptions(incomingCallContext, callbackUri)
        {
            CallIntelligenceOptions = new CallIntelligenceOptions()
            {
                CognitiveServicesEndpoint = new Uri(cognitiveServicesEndpoint)
            },
            TranscriptionOptions = new TranscriptionOptions(new Uri($"wss://{baseWssUri}/ws"), "en-US", true, TranscriptionTransport.Websocket)
            {
                EnableIntermediateResults = true
            }
        };

        try
        {
            AnswerCallResult answerCallResult = await client.AnswerCallAsync(answerCallOptions);

            var correlationId = answerCallResult?.CallConnectionProperties.CorrelationId;
            logger.LogInformation($"Correlation Id: {correlationId}");

            if (correlationId != null)
            {
                CallStore[correlationId] = new CallContext()
                {
                    CorrelationId = correlationId
                };
            }
        }
        catch (Exception ex)
        {
            logger.LogError($"Answer call exception : {ex.StackTrace}");
        }
    }
    return Results.Ok();
});
Establish a Copilot connection
After the call is connected, the application needs to establish a connection to the AI agent that you built by using Direct Line APIs with WebSocket.
Start a conversation
var response = await httpClient.PostAsync("https://directline.botframework.com/v3/directline/conversations", null);
response.EnsureSuccessStatusCode();
var content = await response.Content.ReadAsStringAsync();
return JsonConvert.DeserializeObject(content);
Listen to the WebSocket connection
await webSocket.ConnectAsync(new Uri(streamUrl), cancellationToken);

var buffer = new byte[4096]; // Set the buffer size to 4096 bytes
var messageBuilder = new StringBuilder();

while (webSocket.State == WebSocketState.Open && !cancellationToken.IsCancellationRequested)
{
    messageBuilder.Clear(); // Reset buffer for each new message
    WebSocketReceiveResult result;
    do
    {
        result = await webSocket.ReceiveAsync(new ArraySegment<byte>(buffer), cancellationToken);
        messageBuilder.Append(Encoding.UTF8.GetString(buffer, 0, result.Count));
    }
    while (!result.EndOfMessage); // Continue until we've received the full message
}
Detect the barge-in
The application uses intermediate results that are received from real-time transcription to detect barge-in from the caller and cancels the play operation.
if (data.Contains("Intermediate"))
{
    Console.WriteLine("\nCanceling prompt");
    if (callMedia != null)
    {
        await callMedia.CancelAllMediaOperationsAsync();
    }
}
When the AI agent provides responses, the application uses the Play API to convert that text to audio for the text-to-speech service.
var ssmlPlaySource = new SsmlSource($"{message}");

var playOptions = new PlayToAllOptions(ssmlPlaySource)
{
    OperationContext = "Testing"
};

await callConnectionMedia.PlayToAllAsync(playOptions);
When the caller asks to speak to a representative, the AI agent escalates the call by transferring it to a human agent.
if (botActivity.Type == "handoff")
{
    var transferOptions = new TransferToParticipantOptions(agentPhoneIdentity)
    {
        SourceCallerIdNumber = acsPhoneIdentity
    };

    await Task.Delay(6000);
    await callConnection.TransferCallToParticipantAsync(transferOptions);
}
Step 7: Run the agent
Now you can make a call and talk to your agent.
Tips
Topics
To optimize for voice, we recommend that you update topics where you're using the Message type of text to speech, because it optimizes the agent's responses for speech scenarios.
System topics
Your agent has system topics built in by default. You can choose to disable these topics. If you want to continue using them, your application should build logic to handle these topics. For example, you need to build agent transfer into your application to escalate the call from this Copilot agent to a human representative.