Note
Access to this page requires authorization. You can try signing in or changing directories.
Access to this page requires authorization. You can try changing directories.
The Chat SDK works seamlessly with Microsoft Teams in the context of a meeting. Only a Teams user can send file attachments to an Azure Communication Services user. An Azure Communication Services user can't send file attachments to a Teams user. For the current capabilities, see Teams interop Chat.
Add file attachment support
The Chat SDK provides the previewUrl property for each file attachment. Specifically, previewUrl links to a webpage on SharePoint where the user can see the content of the file, edit the file, and download the file if permission allows.
Some constraints are associated with this feature:
The Teams admin of the sender's tenant could impose policies that limit or disable this feature entirely. For example, the Teams admin could disable certain permissions (such as
Anyone) that could cause the file attachment URL (previewUrl) to be inaccessible.We currently support only two file permissions:
AnyonePeople you choose(with email address)
Let your Teams users know that all other permissions (such as
People in your organization) aren't supported. Your Teams users should double-check to make sure the default permission is supported after they upload the file on their Teams client.The direct download URL (
url) isn't supported.
In addition to regular files (with AttachmentType of file), the Chat SDK also provides the AttachmentType property of image. Azure Communication Services users can attach images in a way that mirrors the behavior of how the Microsoft Teams client converts image attachment to inline images at the UI layer. For more information, see Handle image attachments.
Azure Communication Services users can add images via Upload from this device, which renders on the Teams side and the Chat SDK returns such attachments as image. For images uploaded via Attach cloud files, images are treated as regular files on the Teams side so that the Chat SDK returns such attachments as file.
Also note that Azure Communication Services users can only upload files by using drag-and-drop or via the attachment menu commands Upload from this device and Attach cloud files. Certain types of messages with embedded media (such as video clips, audio messages, and weather cards) aren't currently supported.
This tutorial describes how to enable file attachment support by using the Azure Communication Services Chat SDK for JavaScript.
Sample code
Find the finalized code of this tutorial on GitHub.
Prerequisites
- Review the quickstart Join your Chat app to a Teams meeting.
- Create an Azure Communication Services resource. For more information, see Create an Azure Communication Services resource. You need to record your connection string for this tutorial.
- Set up a Teams meeting by using your business account and have the meeting URL ready.
- Use the Chat SDK for JavaScript (@azure/communication-chat) 1.5.0 or the latest. For more information, see Azure Communication Chat client library for JavaScript.
Goals
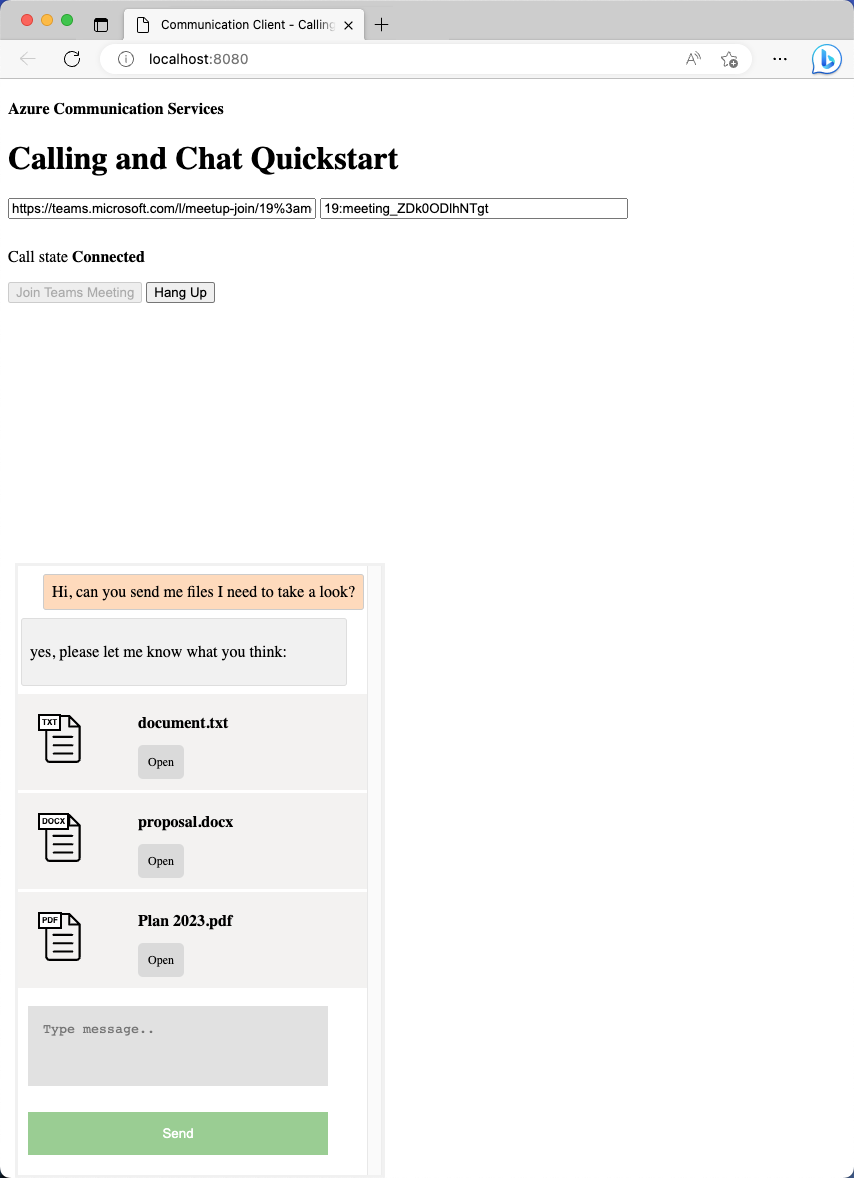
- Render file attachment in the message thread. Each file attachment card has an Open button.
- Render image attachments as inline images.
Handle file attachments
The Chat SDK for JavaScript returns a ChatAttachmentType property of file for regular file attachments and image for message-inlined images.
export interface ChatMessageReceivedEvent extends BaseChatMessageEvent {
  /**
   * Content of the message.
   */
  message: string;

  /**
   * Chat message attachment.
   */
  attachments?: ChatAttachment[];

  ...
}

export interface ChatAttachment {
  /** Id of the attachment */
  id: string;
  /** The type of attachment. */
  attachmentType: AttachmentType;
  /** The name of the attachment content. */
  name?: string;
  /** The URL that is used to provide the original size of the inline images */
  url?: string;
  /** The URL that provides the preview of the attachment */
  previewUrl?: string;
}

/** Type of supported attachments. */
export type ChatAttachmentType = "image" | "file" | "unknown";
For example, the following JSON shows what ChatAttachment might look like for an image attachment and a file attachment:
"attachments": [
    {
        "id": "08a182fe-0b29-443e-8d7f-8896bc1908a2",
        "attachmentType": "file",
        "name": "business report.pdf",
        "previewUrl": "https://contoso.sharepoint.com/:u:/g/user/h8jTwB0Zl1AY"
    },
    {
        "id": "9d89acb2-c4e4-4cab-b94a-7c12a61afe30",
        "attachmentType": "image",
        "name": "Screenshot.png",
        "url": "https://contoso.communication.azure.com/chat/threads/19:9d89acb29d89acb2@thread.v2/messages/123/images/9d89acb2-c4e4-4cab-b94a-7c12a61afe30/views/original?api-version=2023-11-15-preview",
        "previewUrl": "https://contoso.communication.azure.com/chat/threads/19:9d89acb29d89acb2@thread.v2/messages/123/images/9d89acb2-c4e4-4cab-b94a-7c12a61afe30/views/small?api-version=2023-11-15-preview"
      }
]
Now let's go back to the event handler you created in Quickstart: Join your Chat app to a Teams meeting and add some extra logic to handle attachments with the attachmentType property of file:
chatClient.on("chatMessageReceived", (e) => {
  console.log("Notification chatMessageReceived!");
  // Check whether the notification is intended for the current thread
  if (threadIdInput.value != e.threadId) {
     return;
  }

  if (e.sender.communicationUserId != userId) {
    renderReceivedMessage(e);
  } else {
    renderSentMessage(e.message);
  }
});

async function renderReceivedMessage(event) {
    messages += `<div class="container lighter"> ${event.message} </div>`;
    messagesContainer.innerHTML = messages;

    // Get the list of attachments and calls renderFileAttachments to construct a file attachment card
    var attachmentHtml = event.attachments
        .filter(attachment => attachment.attachmentType === "file")
        .map(attachment => renderFileAttachments(attachment))
        .join('');
    messagesContainer.innerHTML += attachmentHtml;
}

function renderFileAttachments(attachment) {
    var re = /(?:\.([^.]+))?$/;
    var fileExtension = re.exec(attachment.name)[1];
    return '<div class="attachment-container">' +
        '<img class="attachment-icon" alt="attachment file icon" />' +
        '<div>' +
        '<p class="attachment-type">' + fileExtension + '</p>' +
        '<p>' + attachment.name + '</p>' +
        '<a href=' + attachment.previewUrl + ' target="_blank" rel="noreferrer">Open</a>' +
        '</div>' +
        '</div>';
}
Make sure you add some CSS for the attachment card:
  /* Let's make the chat popup scrollable */
  .chat-popup {

     ...

     max-height: 650px;
     overflow-y: scroll;
}

 .attachment-container {
     overflow: hidden;
     background: #f3f2f1;
     padding: 20px;
     margin: 0;
     border-radius: 10px;
}
 .attachment-container img {
     width: 50px;
     height: 50px;
     float: left;
     margin: 0;
}
 .attachment-container p {
     font-weight: 700;
     margin: 0 5px 20px 0;
}
 .attachment-container {
     display: grid;
     grid-template-columns: 100px 1fr;
     margin-top: 5px;
}
 .attachment-icon {
     content: url("data:image/svg+xml;base64, ...");
}
 .attachment-container a {
     background-color: #dadada;
     color: black;
     font-size: 12px;
     padding: 10px;
     border: none;
     cursor: pointer;
     border-radius: 5px;
     text-align: center;
     margin-right: 10px;
     text-decoration: none;
     margin-top: 10px;
}
 .attachment-container a:hover {
     background-color: black;
     color: white;
}
 .attachment-type {
     position: absolute;
     color: black;
     border: 2px solid black;
     background-color: white;
     margin-top: 50px;
     font-family: sans-serif;
     font-weight: 400;
     padding: 2px;
     text-transform: uppercase;
     font-size: 8px;
}
That's all you need for handling file attachments. Next, let's run the code.
Run the code
For webpack, you can use the webpack-dev-server property to build and run your app. Run the following command to bundle your application host on a local web server:
npx webpack-dev-server --entry ./client.js --output bundle.js --debug --devtool inline-source-map
Or:
npm start
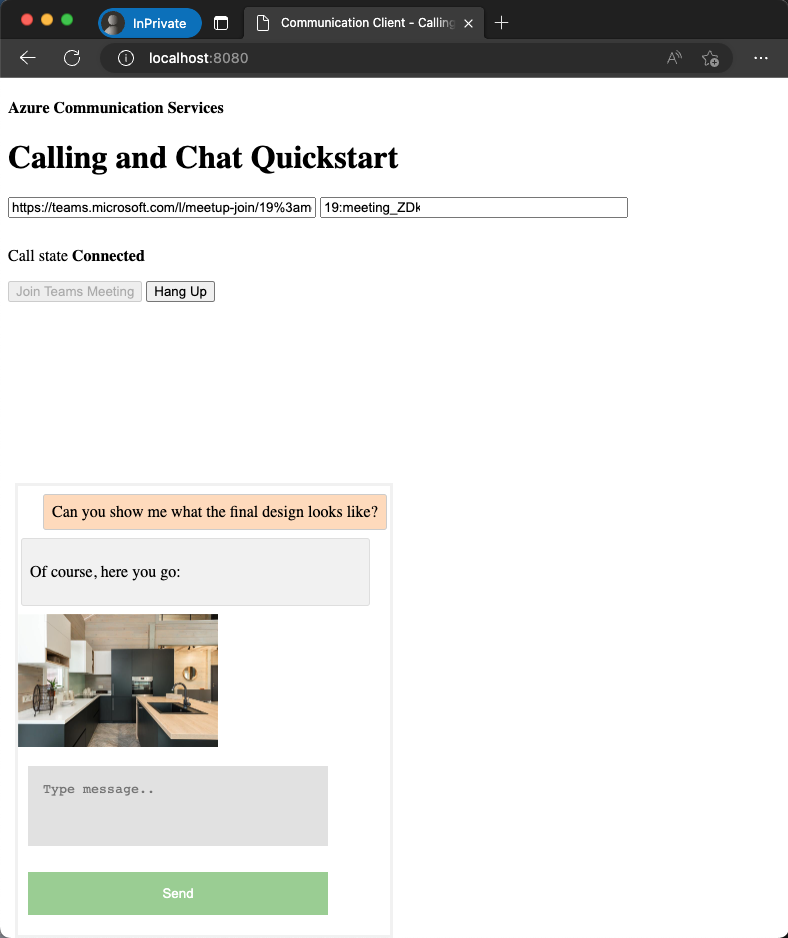
File attachment demo
Open your browser and go to
http://localhost:8080/. Enter the meeting URL and the thread ID.Send some file attachments from the Teams client.
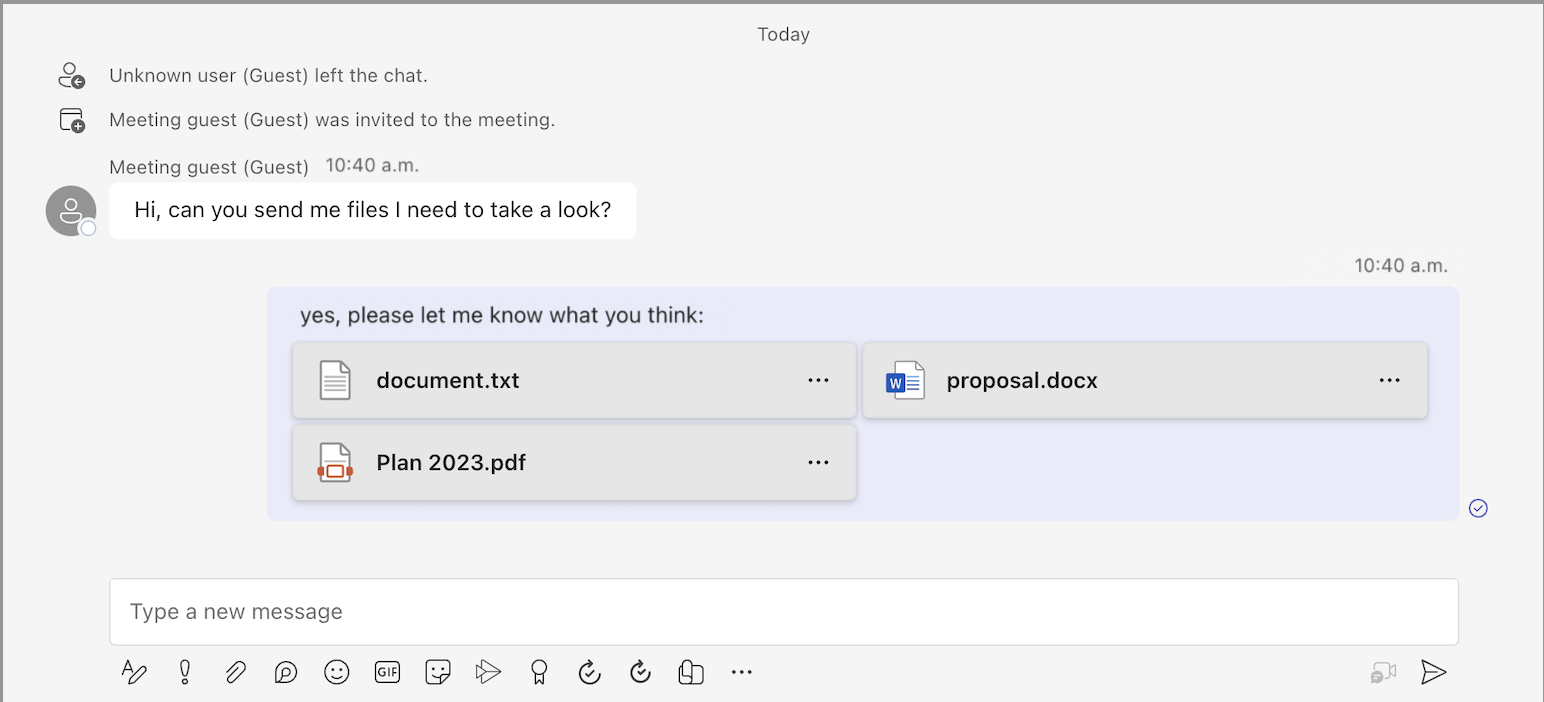
You should see the new message being rendered along with file attachments.
Handle image attachments
Image attachments need to be treated differently than standard file attachments. Image attachments have the attachmentType property of image, which requires the communication token to retrieve either the preview or full-size images.
Before you continue, complete the tutorial that demonstrates how to enable inline image support in your Chat app. This tutorial describes how to fetch images that require a communication token in the request header. After you receive the image blob, you need to create an ObjectUrl property that points to this blob. Then you inject this URL into the src attribute of each inline image.
Now that you're familiar with how inline images work, you can render image attachments like a regular inline image.
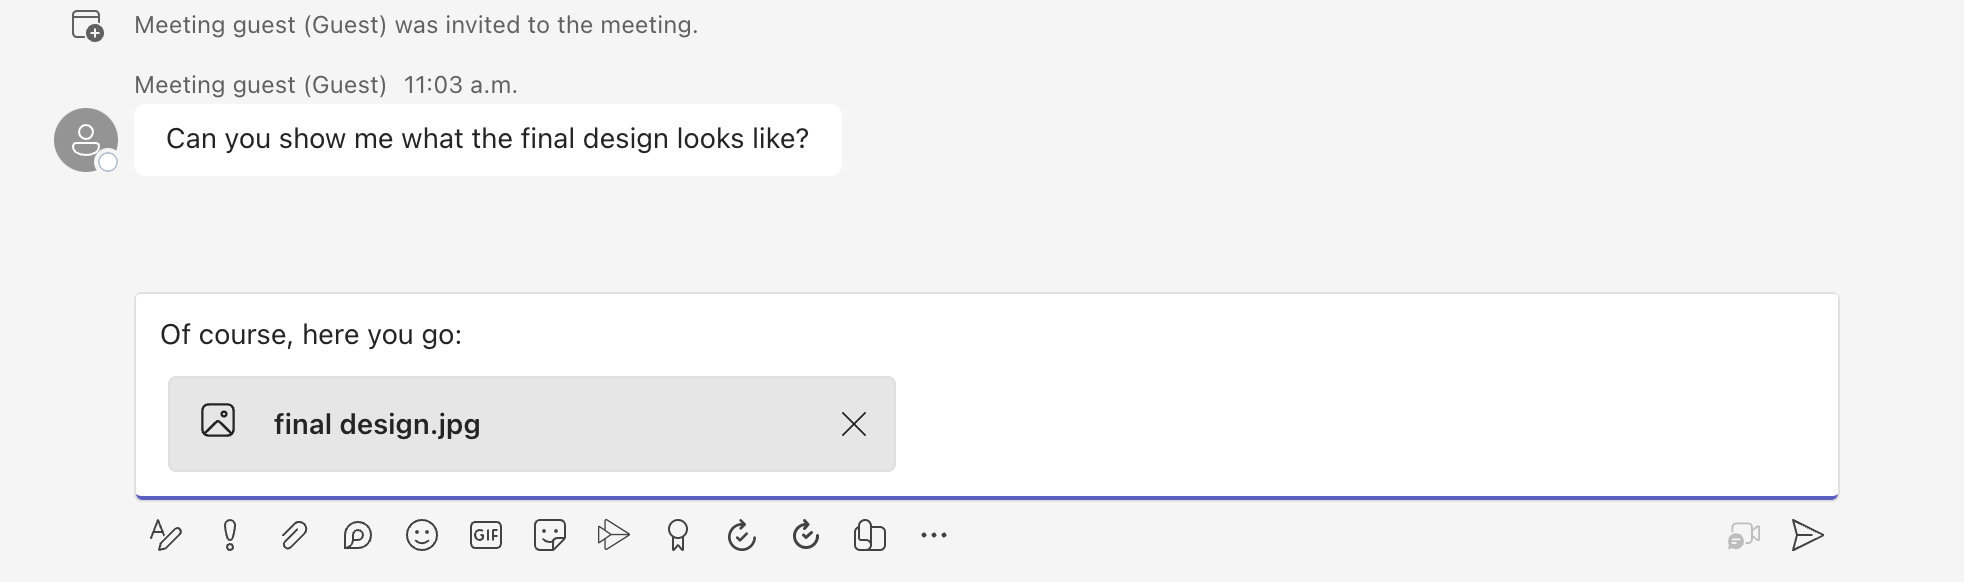
First, inject an image tag into message content whenever there's an image attachment:
async function renderReceivedMessage(event) {
    messages += `<div class="container lighter"> ${event.message} </div>`;
    messagesContainer.innerHTML = messages;
    console.log(event);
    // Filter out inline images from attachments
    const imageAttachments = event.attachments?.filter(
        (attachment) =>
        attachment.attachmentType === "image" && !messages.includes(attachment.id)
    );
    // Inject image tag for all image attachments
    var imageAttachmentHtml =
        imageAttachments
        .map((attachment) => renderImageAttachments(attachment))
        .join("") ?? "";
    messagesContainer.innerHTML += imageAttachmentHtml;

    // Get list of attachments and calls renderFileAttachments to construct a file attachment card
    var attachmentHtml =
        event.attachments
        ?.filter((attachment) => attachment.attachmentType === "file")
        .map((attachment) => renderFileAttachments(attachment))
        .join("") ?? "";
    messagesContainer.innerHTML += attachmentHtml;

    // Fetch and render preview images
    fetchPreviewImages(imageAttachments);
}

function renderImageAttachments(attachment) {
    return `<img alt="image" src="" itemscope="png" id="${attachment.id}" style="max-width: 100px">`
}
Now, let's borrow fetchPreviewImages() from the Tutorial: Enable inline image support and use it as is without any changes:
function fetchPreviewImages(attachments) {
    if (!attachments.length > 0) {
        return;
    }
    Promise.all(
        attachments.map(async (attachment) => {
            const response = await fetch(attachment.previewUrl, {
                method: 'GET',
                headers: {
                    'Authorization': 'Bearer ' + tokenString,
                },
            });
            return {
                id: attachment.id,
                content: await response.blob(),
            };
        }),
    ).then((result) => {
        result.forEach((imageRef) => {
            const urlCreator = window.URL || window.webkitURL;
            const url = urlCreator.createObjectURL(imageRef.content);
            document.getElementById(imageRef.id).src = url;
        });
    }).catch((e) => {
        console.log('error fetching preview images');
    });
}
This function needs a tokenString property, so you need a global copy initialized in init(), as shown in the following code snippet:
var tokenString = '';

async function init() {
    ...
    const {
        token,
        expiresOn
    } = tokenResponse;

    tokenString = token;
    ...
}
Now you have image attachment support. Continue to run the code and see it in action.
Image attachment demo
Send some image attachments from the Teams client.
After you send the image attachment, notice that it becomes an inline image on the Teams client side.
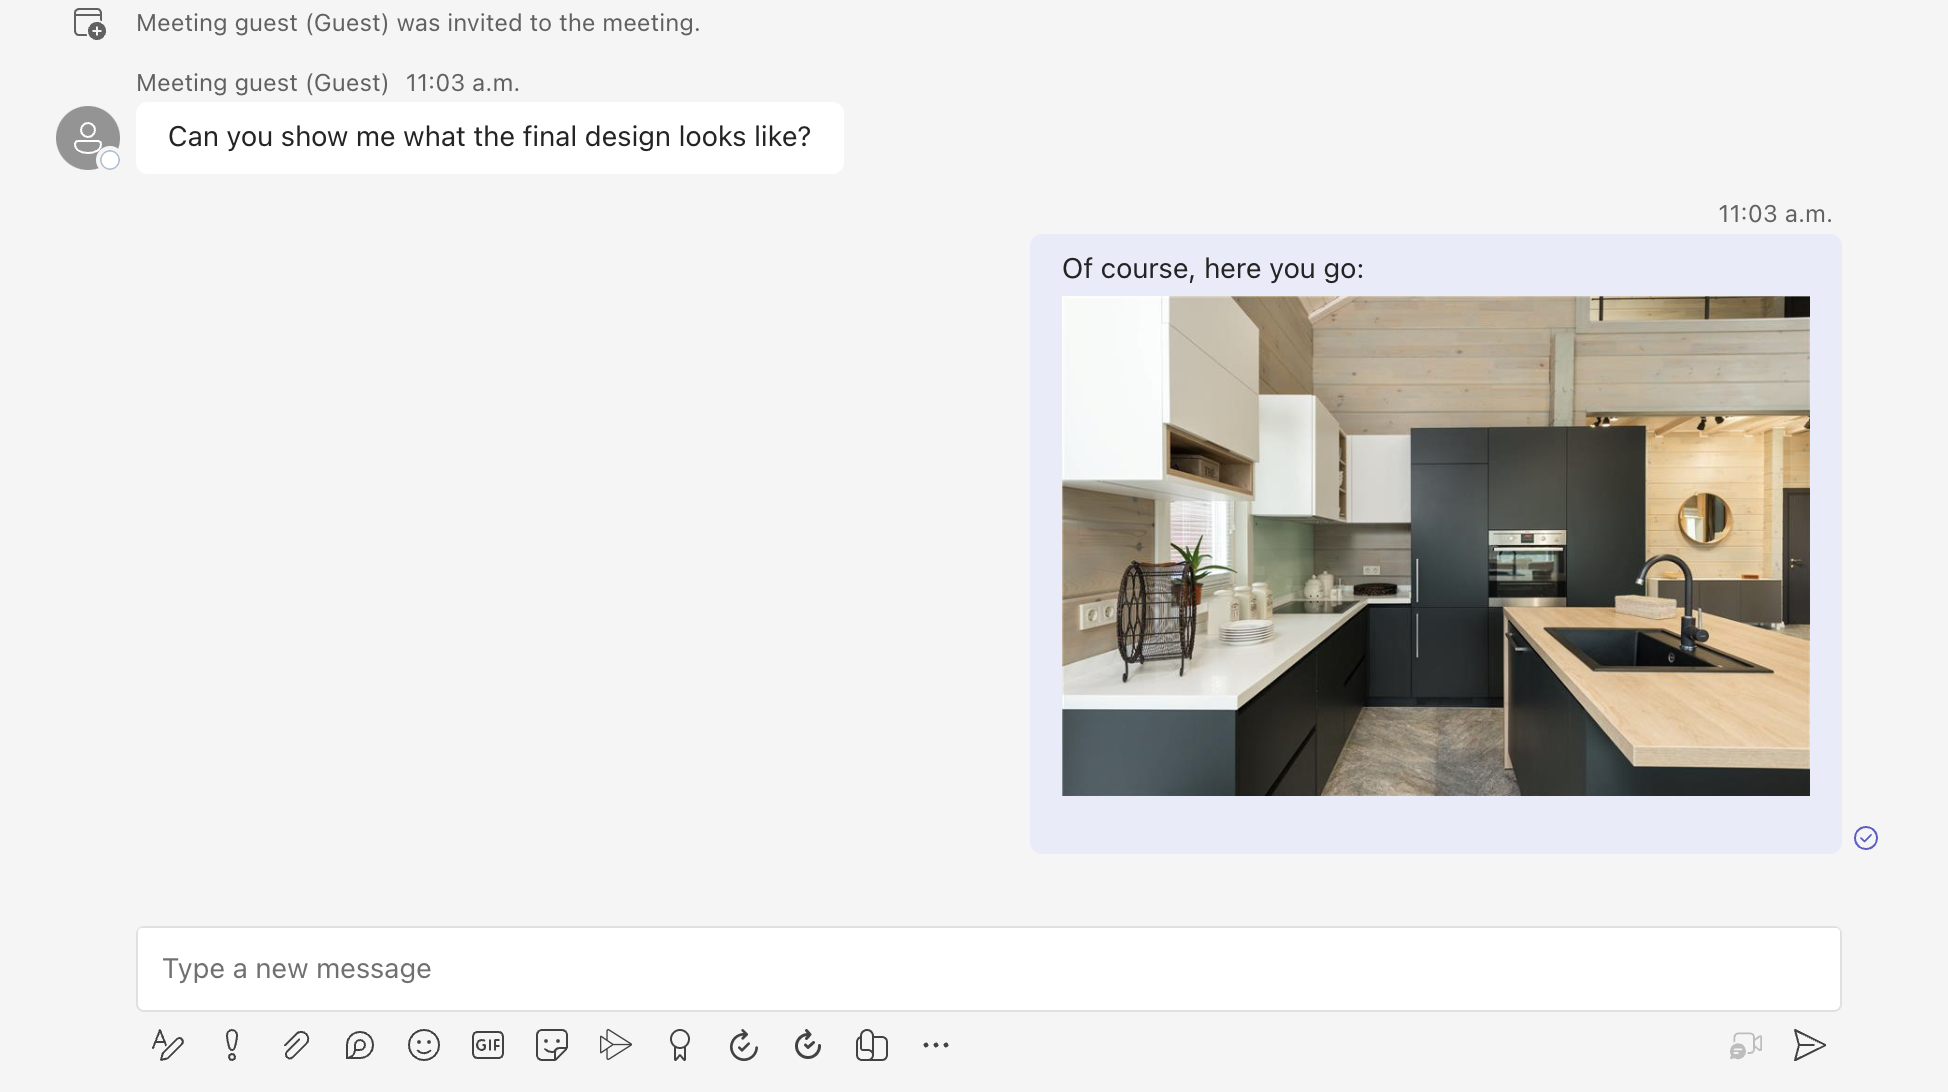
Return to the sample app and make sure the same image is rendered.
This tutorial describes how to enable file attachment support by using the Azure Communication Services Chat SDK for C#.
In this tutorial, you learn how to:
- Handle file attachments.
- Handle image attachments.
Prerequisites
- Review the quickstart Join your Chat app to a Teams meeting.
- Create an Azure Communication Services resource as described in Create an Azure Communication Services resource. You need to record your connection string for this tutorial.
- Set up a Teams meeting by using your business account and have the meeting URL ready.
- Download the Chat SDK for C# (@azure/communication-chat) 1.3.0 or the latest. For more information, see Azure Communication Chat client library.
Sample code
Find the finalized code for this tutorial at GitHub.
Handle file attachments
The Chat SDK for C# returns a ChatAttachmentType property of file for regular file attachments and image for inline images.
public readonly partial struct ChatAttachmentType : IEquatable<ChatAttachmentType>
{
        private const string ImageValue = "image";
        private const string FileValue = "file";
        /// <summary> image. </summary>
        public static ChatAttachmentType Image { get; } = new ChatAttachmentType(ImageValue);
        /// <summary> file. </summary>
        public static ChatAttachmentType File { get; } = new ChatAttachmentType(FileValue);
}
For example, the following JSON shows what ChatAttachment might look like for an image attachment and a file attachment when you receive requests from the server side:
"attachments": [
    {
        "id": "08a182fe-0b29-443e-8d7f-8896bc1908a2",
        "attachmentType": "file",
        "name": "business report.pdf",
        "previewUrl": "https://contoso.sharepoint.com/:u:/g/user/h8jTwB0Zl1AY"
    },
    {
        "id": "9d89acb2-c4e4-4cab-b94a-7c12a61afe30",
        "attachmentType": "image",
        "name": "Screenshot.png",
        "url": "https://contoso.communication.azure.com/chat/threads/19:9d89acb29d89acb2@thread.v2/messages/123/images/9d89acb2-c4e4-4cab-b94a-7c12a61afe30/views/original?api-version=2023-11-15-preview",
        "previewUrl": "https://contoso.communication.azure.com/chat/threads/19:9d89acb29d89acb2@thread.v2/messages/123/images/9d89acb2-c4e4-4cab-b94a-7c12a61afe30/views/small?api-version=2023-11-15-preview"
      }
]
Now go back to the event handler you created in the previous quickstart and add some extra logic to handle attachments with the ChatAttachmentType property of file:
await foreach (ChatMessage message in allMessages)
{
    // Get message attachments that are of type 'file'
    IEnumerable<ChatAttachment> fileAttachments = message.Content.Attachments.Where(x => x.AttachmentType == ChatAttachmentType.File);
    var chatAttachmentFileUris = new List<Uri>();
    foreach (var file in fileAttachments)
    {
        chatAttachmentFileUris.Add(file.PreviewUri);
    }

    // Build message list
    if (message.Type == ChatMessageType.Html || message.Type == ChatMessageType.Text)
    {
        textMessages++;
        var userPrefix = message.Sender.Equals(currentUser) ? "[you]:" : "";
        var strippedMessage = StripHtml(message.Content.Message);


        var chatAttachments = fileAttachments.Count() > 0 ? "[Attachments]:\n" + string.Join(",\n", chatAttachmentFileUris) : "";
        messageList.Add(long.Parse(message.SequenceId), $"{userPrefix}{strippedMessage}\n{chatAttachments}");
    }
}
Specifically, for each file attachment, you get the previewUrl property and construct a list of URLs in the for loop. Then you embed the string along with the Chat message content.
Handle image attachments
You need to handle image attachments differently than standard file attachments. Image attachments have the ChatAttachmentType property of image, which requires the communication token to retrieve either the preview or full-size images.
Before you continue, finish the Enable inline image support tutorial. To identity image attachments, you need to find out if the message content contains the same image ID from the attachments.
bool isImageAttachment = message.Content.Message.Contains(x.Id);
If this flag is true, then you apply inline image logic to render it:
IEnumerable<ChatAttachment> imageAttachments = message.Content.Attachments.Where(x => x.AttachmentType == ChatAttachmentType.Image);
// Fetch image and render
var chatAttachmentImageUris = new List<Uri>();
foreach (ChatAttachment imageAttachment in imageAttachments)
{
    client.DefaultRequestHeaders.Authorization = new System.Net.Http.Headers.AuthenticationHeaderValue("Bearer", communicationTokenCredential.GetToken().Token);
    var response = await client.GetAsync(imageAttachment.PreviewUri);
    var randomAccessStream = await response.Content.ReadAsStreamAsync();
    await Dispatcher.RunAsync(CoreDispatcherPriority.Normal, async () =>
    {
        var bitmapImage = new BitmapImage();
        await bitmapImage.SetSourceAsync(randomAccessStream.AsRandomAccessStream());
        InlineImage.Source = bitmapImage;
    });
    chatAttachmentImageUris.Add(imageAttachment.PreviewUri);
}
Now your app supports image attachments.
Next steps
- Learn more about how you can enable inline image support.
- Learn more about other supported interoperability features.
- Check out our Chat hero sample.
- Learn more about how Chat works.