A Communication Services user can join a Teams meeting as an anonymous user using the Calling SDK. Joining the meeting adds them as a participant to the meeting chat as well, where they can send and receive messages with other users in the meeting. The user won't have access to chat messages that were sent before they joined the meeting and they won't be able to send or receive messages after the meeting ends. To join the meeting and start chatting, you can follow the next steps.
Create a new Node.js application
Open your terminal or command window, create a new directory for your app, and navigate to it.
Console
mkdir chat-interop-quickstart && cd chat-interop-quickstart
Run npm init -y to create a package.json file with default settings.
Console
npm init -y
Install the chat packages
Use the npm install command to install the necessary Communication Services SDKs for JavaScript.
The --save option lists the library as a dependency in your package.json file.
Set up the app framework
This quickstart uses webpack to bundle the application assets. Run the following command to install the webpack, webpack-cli and webpack-dev-server npm packages and list them as development dependencies in your package.json:
Create an index.html file in the root directory of your project. We use this file to configure a basic layout that will allow the user to join a meeting and start chatting.
Add the Teams UI controls
Replace the code in index.html with the following snippet.
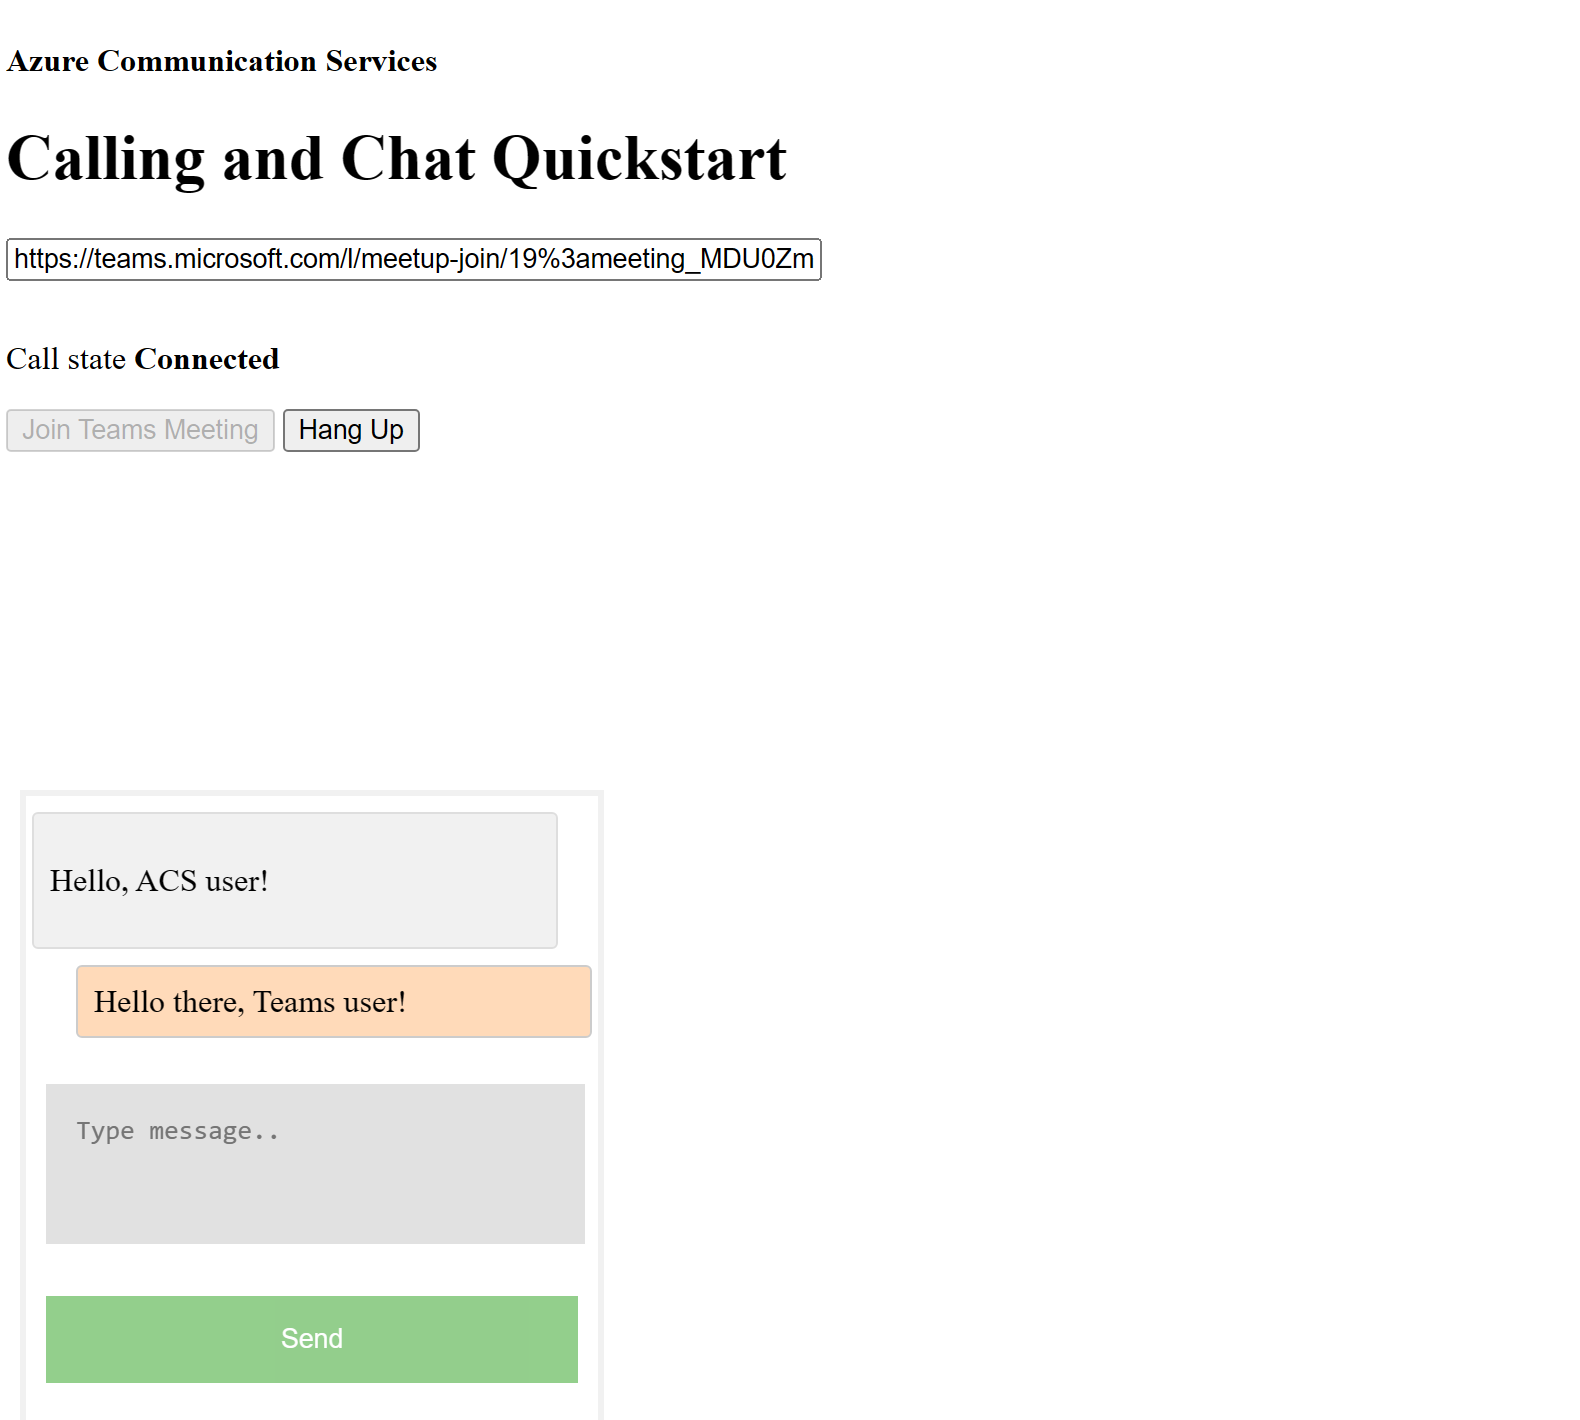
The text box at the top of the page will be used to enter the Teams meeting context. The 'Join Teams Meeting' button is used to join the specified meeting.
A chat pop-up appears at the bottom of the page. It can be used to send messages on the meeting thread, and it displays in real time any messages sent on the thread while the Communication Services user is a member.
Replace the content of the client.js file with the following snippet.
Within the snippet, replace
SECRET_CONNECTION_STRING with your Communication Service's connection string
JavaScript
import { CallClient } from"@azure/communication-calling";
import { AzureCommunicationTokenCredential } from"@azure/communication-common";
import { CommunicationIdentityClient } from"@azure/communication-identity";
import { ChatClient } from"@azure/communication-chat";
let call;
let callAgent;
let chatClient;
let chatThreadClient;
const meetingLinkInput = document.getElementById("teams-link-input");
const callButton = document.getElementById("join-meeting-button");
const hangUpButton = document.getElementById("hang-up-button");
const callStateElement = document.getElementById("call-state");
const messagesContainer = document.getElementById("messages-container");
const chatBox = document.getElementById("chat-box");
const sendMessageButton = document.getElementById("send-message");
const messageBox = document.getElementById("message-box");
var userId = "";
var messages = "";
var chatThreadId = "";
asyncfunctioninit() {
const connectionString = "<SECRET_CONNECTION_STRING>";
const endpointUrl = connectionString.split(";")[0].replace("endpoint=", "");
const identityClient = new CommunicationIdentityClient(connectionString);
let identityResponse = await identityClient.createUser();
userId = identityResponse.communicationUserId;
console.log(`\nCreated an identity with ID: ${identityResponse.communicationUserId}`);
let tokenResponse = await identityClient.getToken(identityResponse, ["voip", "chat"]);
const { token, expiresOn } = tokenResponse;
console.log(`\nIssued an access token that expires at: ${expiresOn}`);
console.log(token);
const callClient = new CallClient();
const tokenCredential = new AzureCommunicationTokenCredential(token);
callAgent = await callClient.createCallAgent(tokenCredential);
callButton.disabled = false;
chatClient = new ChatClient(endpointUrl, new AzureCommunicationTokenCredential(token));
console.log("Azure Communication Chat client created!");
}
init();
const joinCall = (urlString, callAgent) => {
const url = new URL(urlString);
console.log(url);
if (url.pathname.startsWith("/meet")) {
// Short teams URL, so for now call meetingID and pass code APIreturn callAgent.join({
meetingId: url.pathname.split("/").pop(),
passcode: url.searchParams.get("p"),
});
} else {
return callAgent.join({ meetingLink: urlString }, {});
}
};
callButton.addEventListener("click", async () => {
// join with meeting linktry {
call = joinCall(meetingLinkInput.value, callAgent);
} catch {
thrownewError("Could not join meeting - have you set your connection string?");
}
// Chat thread ID is provided from the call info, after connection.
call.on("stateChanged", async () => {
callStateElement.innerText = call.state;
if (call.state === "Connected" && !chatThreadClient) {
chatThreadId = call.info?.threadId;
chatThreadClient = chatClient.getChatThreadClient(chatThreadId);
chatBox.style.display = "block";
messagesContainer.innerHTML = messages;
// open notifications channelawait chatClient.startRealtimeNotifications();
// subscribe to new message notifications
chatClient.on("chatMessageReceived", (e) => {
console.log("Notification chatMessageReceived!");
// check whether the notification is intended for the current threadif (chatThreadId != e.threadId) {
return;
}
if (e.sender.communicationUserId != userId) {
renderReceivedMessage(e.message);
} else {
renderSentMessage(e.message);
}
});
}
});
// toggle button and chat box states
hangUpButton.disabled = false;
callButton.disabled = true;
console.log(call);
});
asyncfunctionrenderReceivedMessage(message) {
messages += '<div class="container lighter">' + message + "</div>";
messagesContainer.innerHTML = messages;
}
asyncfunctionrenderSentMessage(message) {
messages += '<div class="container darker">' + message + "</div>";
messagesContainer.innerHTML = messages;
}
hangUpButton.addEventListener("click", async () => {
// end the current callawait call.hangUp();
// Stop notifications
chatClient.stopRealtimeNotifications();
// toggle button states
hangUpButton.disabled = true;
callButton.disabled = false;
callStateElement.innerText = "-";
// toggle chat states
chatBox.style.display = "none";
messages = "";
// Remove local ref
chatThreadClient = undefined;
});
sendMessageButton.addEventListener("click", async () => {
let message = messageBox.value;
let sendMessageRequest = { content: message };
let sendMessageOptions = { senderDisplayName: "Jack" };
let sendChatMessageResult = await chatThreadClient.sendMessage(
sendMessageRequest,
sendMessageOptions
);
let messageId = sendChatMessageResult.id;
messageBox.value = "";
console.log(`Message sent!, message id:${messageId}`);
});
Display names of the chat thread participants aren't set by the Teams client. The names are returned as null in the API for listing participants, in the participantsAdded event and in the participantsRemoved event. The display names of the chat participants can be retrieved from the remoteParticipants field of the call object. On receiving a notification about a roster change, you can use this code to retrieve the name of the user that was added or removed:
var displayName = call.remoteParticipants.find(p => p.identifier.communicationUserId == '<REMOTE_USER_ID>').displayName;
Run the code
Use the webpack-dev-server to build and run your app. Run the following command to bundle your application host on a local webserver:
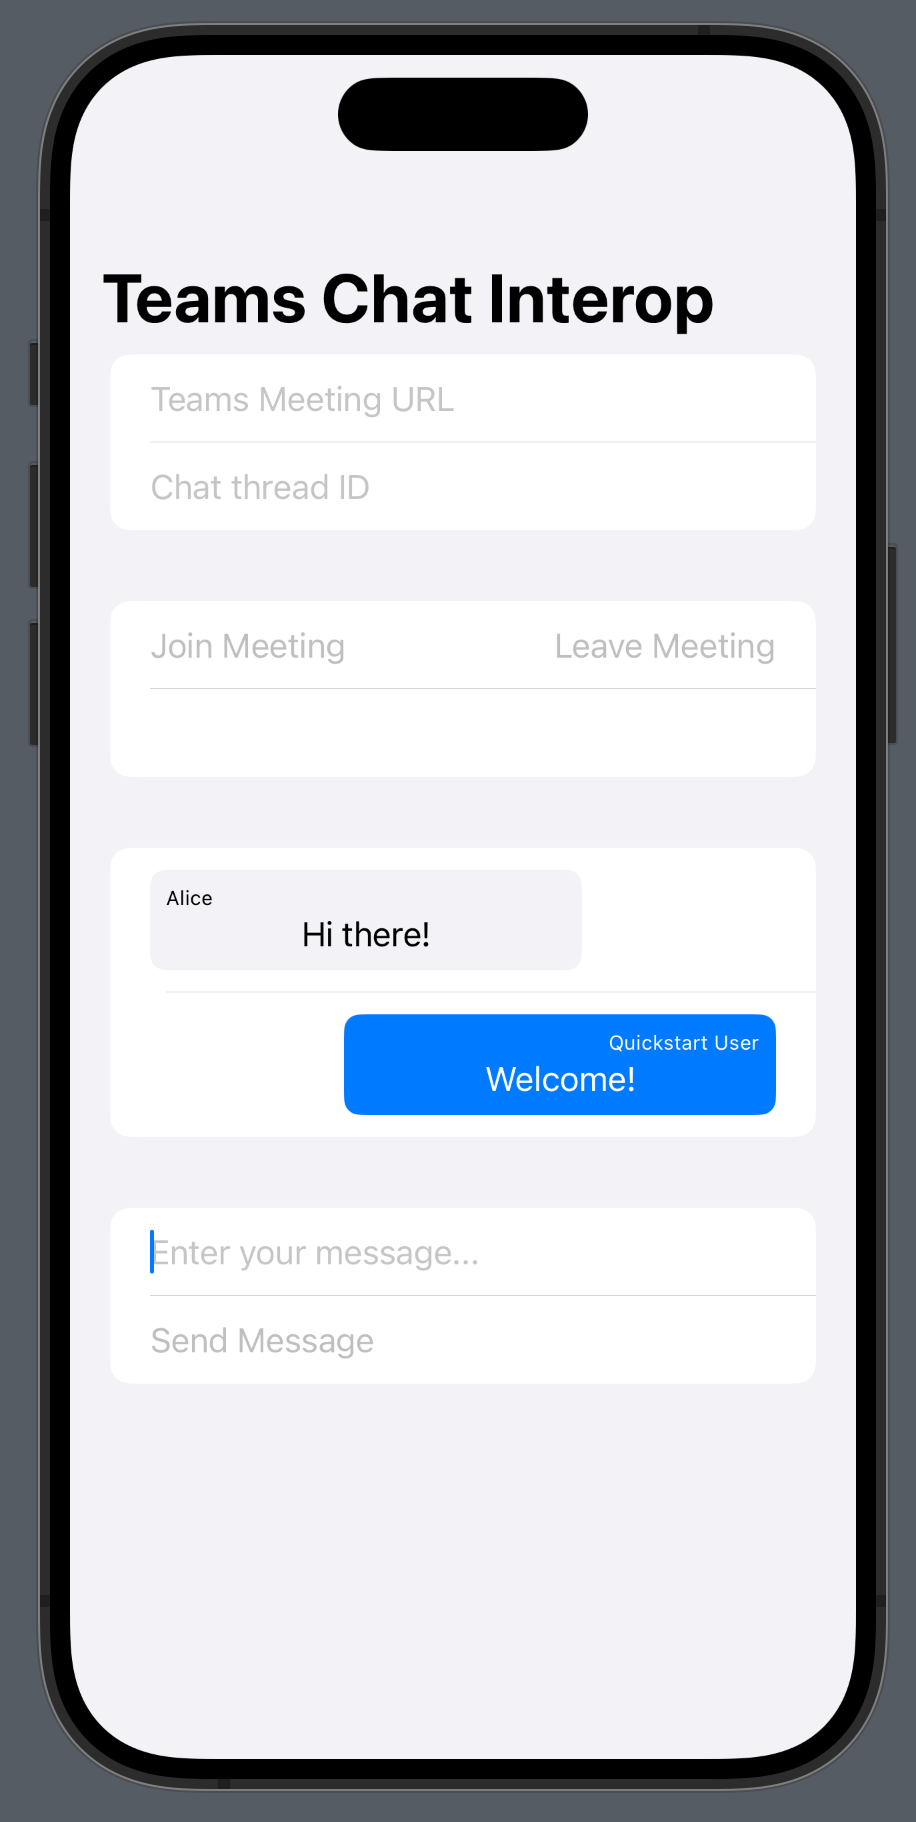
Open your browser and navigate to http://localhost:8080/. You should see app launched as shown in the following screenshot:
Insert the Teams meeting link into the text box. Press Join Teams Meeting to join the Teams meeting. After the Communication Services user has been admitted into the meeting, you can chat from within your Communication Services application. Navigate to the box at the bottom of the page to start chatting. For simplicity, the application only shows the last two messages in the chat.
A User Access Token for your Azure Communication Service. You can also use the Azure CLI and run the command with your connection string to create a user and an access token.
Azure CLI
az communication user-identity token issue --scope voip chat --connection-string"yourConnectionString"
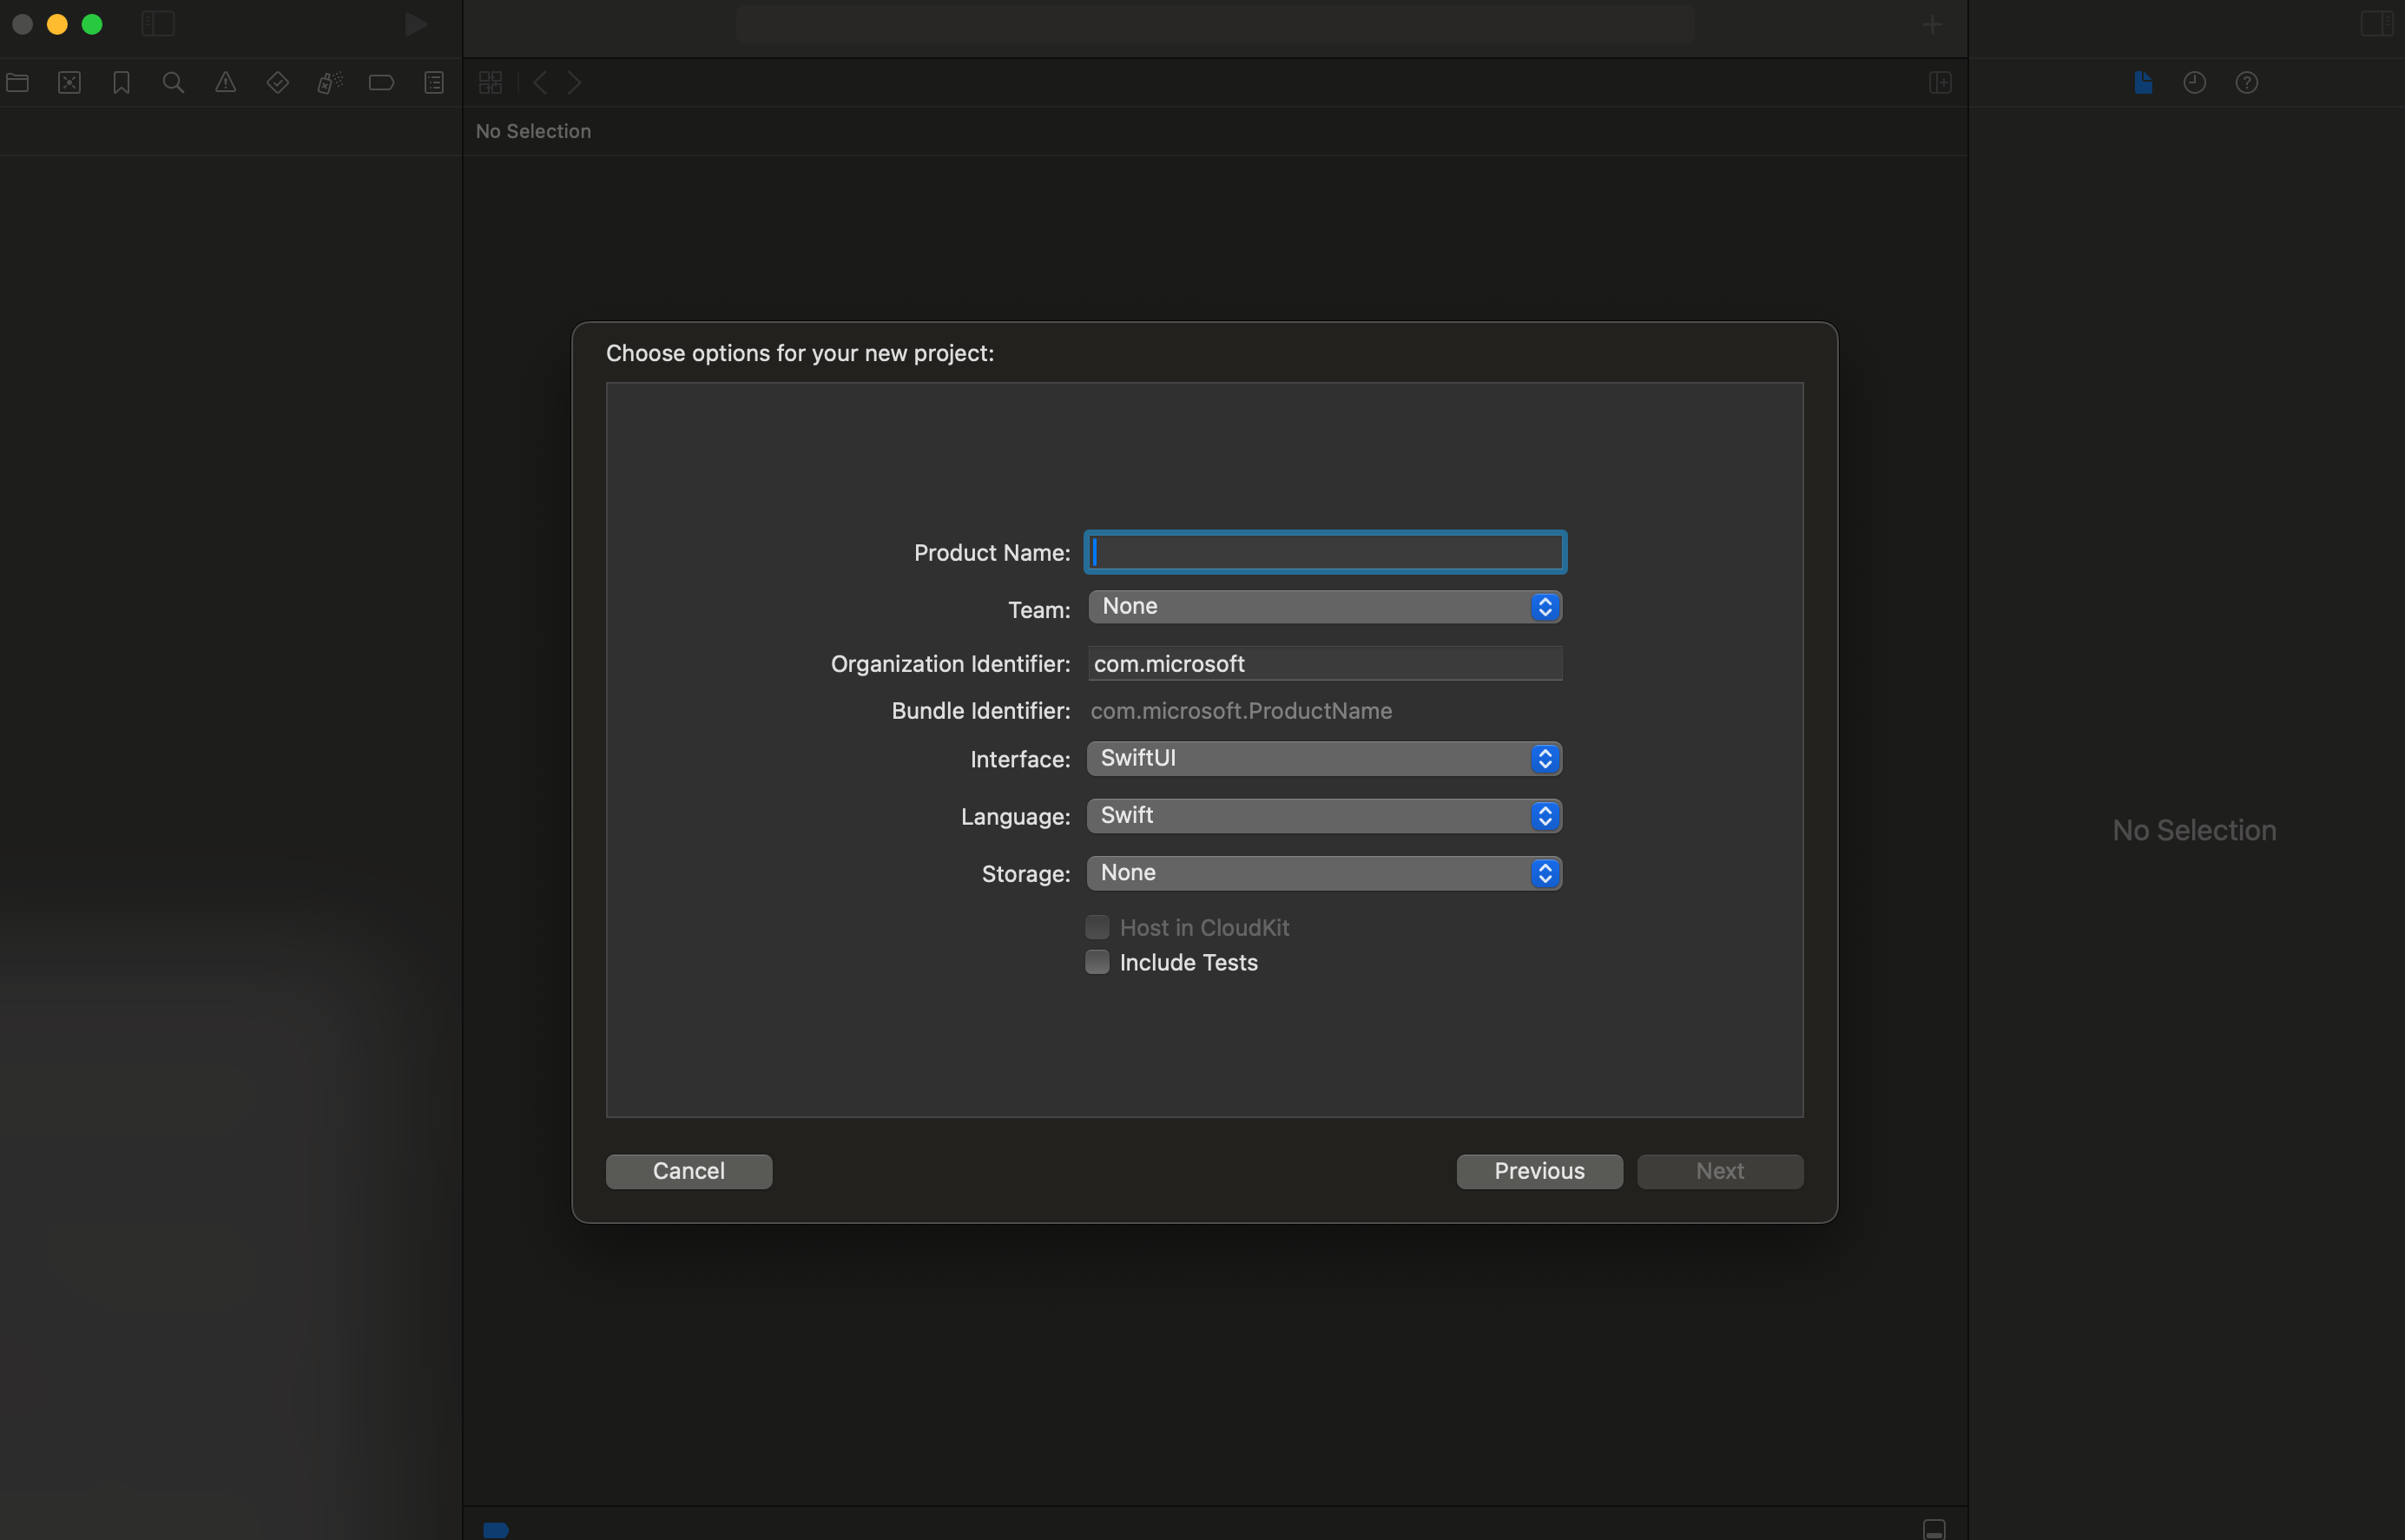
In Xcode, create a new iOS project and select the Single View App template. This tutorial uses the SwiftUI framework, so you should set the Language to Swift and the User Interface to SwiftUI. You're not going to create tests during this quick start. Feel free to uncheck Include Tests.
Install the package and dependencies with CocoaPods
To create a Podfile for your application, open the terminal and navigate to the project folder and run pod init.
Add the following code to the Podfile under the target, and save.
Ruby
target 'Chat Teams Interop'do# Comment the next line if you don't want to use dynamic frameworks
use_frameworks!
# Pods for Chat Teams Interop
pod 'AzureCommunicationCalling'
pod 'AzureCommunicationChat'end
Run pod install.
Open the .xcworkspace file with Xcode.
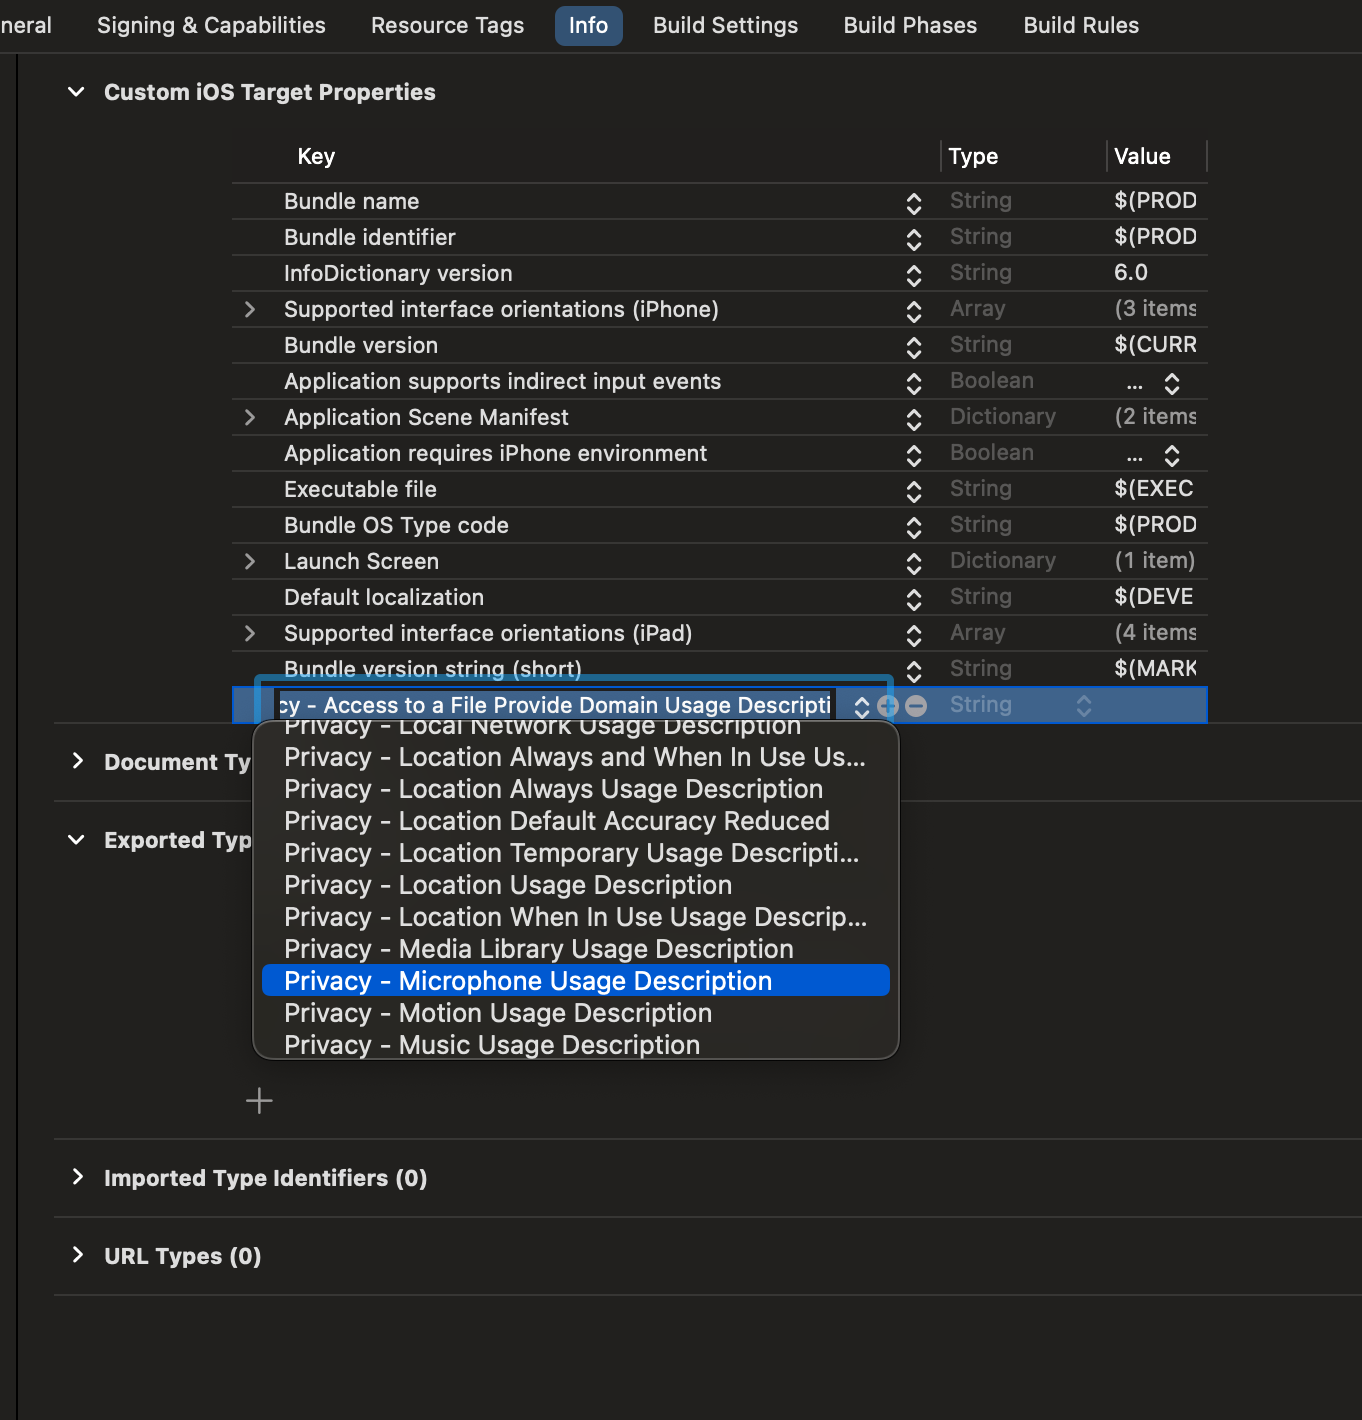
Request access to the microphone
In order to access the device's microphone, you need to update your app's Information Property List with an NSMicrophoneUsageDescription. You set the associated value to a string that was included in the dialog the system uses to request access from the user.
Under the target, select the Info tab and add a string for ‘Privacy - Microphone Usage Description’
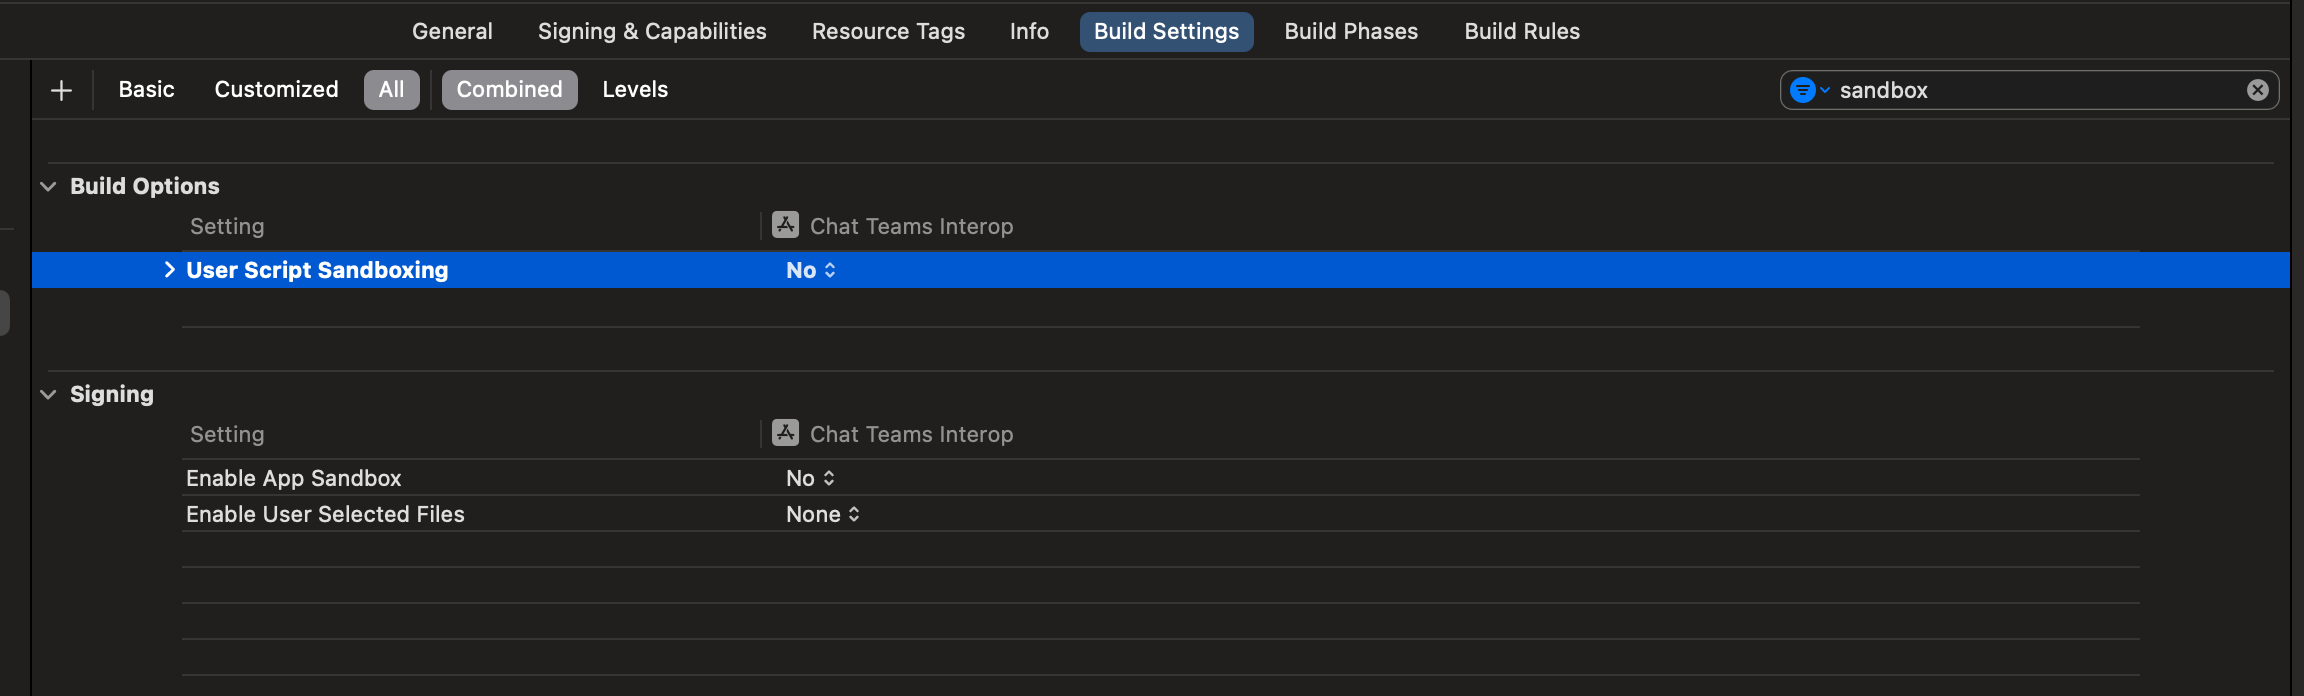
Disable User Script Sandboxing
Some of the scripts within the linked libraries write files during the build process. To allow this, disable the User Script Sandboxing in Xcode.
Under the build settings, search for sandbox and set User Script Sandboxing to No.
Joining the meeting chat
A Communication Services user can join a Teams meeting as an anonymous user using the Calling SDK. Once a user has joined the Teams meeting, they can send and receive messages with other meeting attendees. The user won't have access to chat messages sent prior to joining, nor will they be able to send or receive messages when they aren't in the meeting.
To join the meeting and start chatting, you can follow the next steps.
Set up the app framework
Import the Azure Communication packages in ContentView.swift by adding the following snippet:
Replace <ADD_YOUR_ENDPOINT_URL_HERE> with the endpoint for your Communication Services resource.
Replace <ADD_YOUR_USER_TOKEN_HERE> with the token generated above, via the Azure client command line.
Read more about user access tokens: User Access Token
Replace Quickstart User with the display name you'd like to use in the Chat.
To hold the state, add the following variables to the ContentView struct:
Now let's add the main body var to hold the UI elements. We attach business logic to these controls in this quickstart. Add the following code to the ContentView struct:
We will initialize the ChatThreadClient after the user has joined the meeting. This requires us to check the meeting status from the delegate and then initialize the ChatThreadClient with the threadId when joined to the meeting.
Create the connectChat() function with the following code:
Add the following helper function to the ContentView, used to parse the Chat thread ID from the Team's meeting link, if possible. In the case that this extraction fails, the user will need to manually enter the Chat thread ID using Graph APIs to retrieve the thread ID.
Add the sendMessage() function to ContentView. This function uses the ChatThreadClient to send messages from the user.
Swift
funcsendMessage() {
let message = SendChatMessageRequest(
content: self.chatMessage,
senderDisplayName: displayName,
type: .text
)
self.chatThreadClient?.send(message: message) { result, _inswitch result {
case .success:
print("Chat message sent")
self.chatMessage = ""caselet .failure(error):
self.message = "Failed to send message: " + error.localizedDescription + "\n Has your token expired?"
}
}
}
Enable receiving messages
To receive messages, we implement the handler for ChatMessageReceived events. When new messages are sent to the thread, this handler adds the messages to the meetingMessages variable so they can be displayed in the UI.
First add the following struct to ContentView.swift. The UI uses the data in the struct to display our Chat messages.
Next add the receiveMessage() function to ContentView. This called when a messaging event occurs. Note that you need to register for all events that you want to handle in the switch statement via the chatClient?.register() method.
Swift
funcreceiveMessage(event: TrouterEvent) -> Void {
switch event {
caselet .chatMessageReceivedEvent(messageEvent):
let message = MeetingMessage.fromTrouter(event: messageEvent)
self.meetingMessages.append(message)
/// OTHER EVENTS// case .realTimeNotificationConnected:// case .realTimeNotificationDisconnected:// case .typingIndicatorReceived(_):// case .readReceiptReceived(_):// case .chatMessageEdited(_):// case .chatMessageDeleted(_):// case .chatThreadCreated(_):// case .chatThreadPropertiesUpdated(_):// case .chatThreadDeleted(_):// case .participantsAdded(_):// case .participantsRemoved(_):default:
break
}
}
Finally, we need to implement the delegate handler for the call client. This handler is used to check the call status and initialize the chat client when the user joins the meeting.
When the user leaves the Team's meeting, we clear the Chat messages from the UI and hang up the call. The full code is shown below.
Swift
funcleaveMeeting() {
iflet call = self.call {
self.chatClient?.unregister(event: .chatMessageReceived)
self.chatClient?.stopRealTimeNotifications()
call.hangUp(options: nil) { (error) iniflet e = error {
self.message = "Leaving Teams meeting failed: " + e.localizedDescription
} else {
self.message = "Leaving Teams meeting was successful"
}
}
self.meetingMessages.removeAll()
} else {
self.message = "No active call to hangup"
}
}
Get a Teams meeting chat thread for a Communication Services user
The Teams meeting details can be retrieved using Graph APIs, detailed in Graph documentation. The Communication Services Calling SDK accepts a full Teams meeting link or a meeting ID. They're returned as part of the onlineMeeting resource, accessible under the joinWebUrl property
With the Graph APIs, you can also obtain the threadID. The response has a chatInfo object that contains the threadID.
Run the code
Run the application.
To join the Teams meeting, enter your Team's meeting link in the UI.
After you join the Team's meeting, you need to admit the user to the meeting in your Team's client. Once the user is admitted and has joined the chat, you're able to send and receive messages.
A Communication Services user that joins a Teams meeting as a guest user can access the meeting's chat only when they've joined the Teams meeting call. See the Teams interop documentation to learn how to add a Communication Services user to a Teams meeting call.
You must be a member of the owning organization of both entities to use this feature.
Joining the meeting chat
Once Teams interoperability is enabled, a Communication Services user can join the Teams call as an external user using the Calling SDK. Joining the call adds them as a participant to the meeting chat as well, where they can send and receive messages with other users on the call. The user doesn't have access to chat messages that were sent before they joined the call. To join the meeting and start chatting, you can follow the next steps.
Add Chat to the Teams calling app
In your module level build.gradle, add the dependency on the chat SDK.
Important
Known issue: When using Android Chat and Calling SDK together in the same application, the Chat SDK's real-time notifications feature won't work. You'll get a dependency resolution issue. While we're working on a solution, you can turn off the real-time notifications feature by adding the following exclusions to the Chat SDK dependency in the app's build.gradle file:
Replace the code in activity_main.xml with the following snippet. It adds inputs for the thread ID and for sending messages, a button for sending the typed message and a basic chat layout.
To the MainActivity class, add the following variables:
    // InitiatorId is used to differentiate incoming messages from outgoing messages
    private static final String InitiatorId = "<USER_ID>";
    private static final String ResourceUrl = "<COMMUNICATION_SERVICES_RESOURCE_ENDPOINT>";
    private String threadId;
    private ChatThreadAsyncClient chatThreadAsyncClient;

    // The list of ids corresponsding to messages which have already been processed
    ArrayList<String> chatMessages = new ArrayList<>();
Replace <USER_ID> with the ID of the user initiating the chat.
Replace <COMMUNICATION_SERVICES_RESOURCE_ENDPOINT> with the endpoint for your Communication Services resource.
Initialize the ChatThreadClient
After joining the meeting, instantiate the ChatThreadClient and make the chat components visible.
Update the end of the MainActivity.joinTeamsMeeting() method with the code below:
    private void joinTeamsMeeting() {
        ...
        EditText threadIdView = findViewById(R.id.teams_meeting_thread_id);
        threadId = threadIdView.getText().toString();
        // Initialize Chat Thread Client
        chatThreadAsyncClient = new ChatThreadClientBuilder()
                .endpoint(ResourceUrl)
                .credential(new CommunicationTokenCredential(UserToken))
                .chatThreadId(threadId)
                .buildAsyncClient();
        Button sendMessageButton = findViewById(R.id.send_message_button);
        EditText messageBody = findViewById(R.id.message_body);
        // Register the method for sending messages and toggle the visibility of chat components
        sendMessageButton.setOnClickListener(l -> sendMessage());
        sendMessageButton.setVisibility(View.VISIBLE);
        messageBody.setVisibility(View.VISIBLE);

        // Start the polling for chat messages immediately
        handler.post(runnable);
    }
Enable sending messages
Add the sendMessage() method to MainActivity. It uses the ChatThreadClient to send messages on behalf of the user.
    private void sendMessage() {
        // Retrieve the typed message content
        EditText messageBody = findViewById(R.id.message_body);
        // Set request options and send message
        SendChatMessageOptions options = new SendChatMessageOptions();
        options.setContent(messageBody.getText().toString());
        options.setSenderDisplayName("Test User");
        chatThreadAsyncClient.sendMessage(options);
        // Clear the text box
        messageBody.setText("");
    }
Enable polling for messages and rendering them in the application
Important
Known issue: Since the Chat SDK's real-time notifications feature does not work together with the Calling SDK's, we will have to poll the GetMessages API at predefined intervals. In our sample we will use 3-second intervals.
We can obtain the following data from the message list returned by the GetMessages API:
The text and html messages on the thread since joining
Changes to the thread roster
Updates to the thread topic
To the MainActivity class, add a handler and a runnable task that will be run at 3-second intervals:
    private Handler handler = new Handler();
    private Runnable runnable = new Runnable() {
        @Override
        public void run() {
            try {
                retrieveMessages();
            } catch (InterruptedException e) {
                e.printStackTrace();
            }
            // Repeat every 3 seconds
            handler.postDelayed(runnable, 3000);
        }
    };
Note that the task has already been started at the end of the MainActivity.joinTeamsMeeting() method updated in the initialization step.
Finally, we add the method for querying all accessible messages on the thread, parsing them by message type and displaying the html and text ones:
    private void retrieveMessages() throws InterruptedException {
        // Initialize the list of messages not yet processed
        ArrayList<ChatMessage> newChatMessages = new ArrayList<>();

        // Retrieve all messages accessible to the user
        PagedAsyncStream<ChatMessage> messagePagedAsyncStream
                = this.chatThreadAsyncClient.listMessages(new ListChatMessagesOptions(), null);
        // Set up a lock to wait until all returned messages have been inspected
        CountDownLatch latch = new CountDownLatch(1);
        // Traverse the returned messages
        messagePagedAsyncStream.forEach(new AsyncStreamHandler<ChatMessage>() {
            @Override
            public void onNext(ChatMessage message) {
                // Messages that should be displayed in the chat
                if ((message.getType().equals(ChatMessageType.TEXT)
                    || message.getType().equals(ChatMessageType.HTML))
                    && !chatMessages.contains(message.getId())) {
                    newChatMessages.add(message);
                    chatMessages.add(message.getId());
                }
                if (message.getType().equals(ChatMessageType.PARTICIPANT_ADDED)) {
                    // Handle participants added to chat operation
                    List<ChatParticipant> participantsAdded = message.getContent().getParticipants();
                    CommunicationIdentifier participantsAddedBy = message.getContent().getInitiatorCommunicationIdentifier();
                }
                if (message.getType().equals(ChatMessageType.PARTICIPANT_REMOVED)) {
                    // Handle participants removed from chat operation
                    List<ChatParticipant> participantsRemoved = message.getContent().getParticipants();
                    CommunicationIdentifier participantsRemovedBy = message.getContent().getInitiatorCommunicationIdentifier();
                }
                if (message.getType().equals(ChatMessageType.TOPIC_UPDATED)) {
                    // Handle topic updated
                    String newTopic = message.getContent().getTopic();
                    CommunicationIdentifier topicUpdatedBy = message.getContent().getInitiatorCommunicationIdentifier();
                }
            }
            @Override
            public void onError(Throwable throwable) {
                latch.countDown();
            }
            @Override
            public void onComplete() {
                latch.countDown();
            }
        });
        // Wait until the operation completes
        latch.await(1, TimeUnit.MINUTES);
        // Returned messages should be ordered by the createdOn field to be guaranteed a proper chronological order
        // For the purpose of this demo we will just reverse the list of returned messages
        Collections.reverse(newChatMessages);
        for (ChatMessage chatMessage : newChatMessages)
        {
            LinearLayout chatBoxLayout = findViewById(R.id.chat_box_layout);
            // For the purpose of this demo UI, we don't need to use HTML formatting for displaying messages
            // The Teams client always sends html messages in meeting chats
            String message = Html.fromHtml(chatMessage.getContent().getMessage(), Html.FROM_HTML_MODE_LEGACY).toString().trim();
            TextView messageView = new TextView(this);
            messageView.setText(message);
            // Compare with sender identifier and align LEFT/RIGHT accordingly
            // Azure Communication Services users are of type CommunicationUserIdentifier
            CommunicationIdentifier senderId = chatMessage.getSenderCommunicationIdentifier();
            if (senderId instanceof CommunicationUserIdentifier
                && InitiatorId.equals(((CommunicationUserIdentifier) senderId).getId())) {
                messageView.setTextColor(Color.GREEN);
                messageView.setGravity(Gravity.RIGHT);
            } else {
                messageView.setTextColor(Color.BLUE);
                messageView.setGravity(Gravity.LEFT);
            }
            // Note: messages with the deletedOn property set to a timestamp, should be marked as deleted
            // Note: messages with the editedOn property set to a timestamp, should be marked as edited
            messageView.setTypeface(Typeface.SANS_SERIF, Typeface.BOLD);
            chatBoxLayout.addView(messageView);
        }
    }
Display names of the chat thread participants aren't set by the Teams client. The names are returned as null in the API for listing participants, in the participantsAdded event and in the participantsRemoved event. The display names of the chat participants can be retrieved from the remoteParticipants field of the call object.
Get a Teams meeting chat thread for a Communication Services user
The Teams meeting details can be retrieved using Graph APIs, detailed in Graph documentation. The Communication Services Calling SDK accepts a full Teams meeting link or a meeting ID. They're returned as part of the onlineMeeting resource, accessible under the joinWebUrl property
With the Graph APIs, you can also obtain the threadID. The response has a chatInfo object that contains the threadID.
Run the code
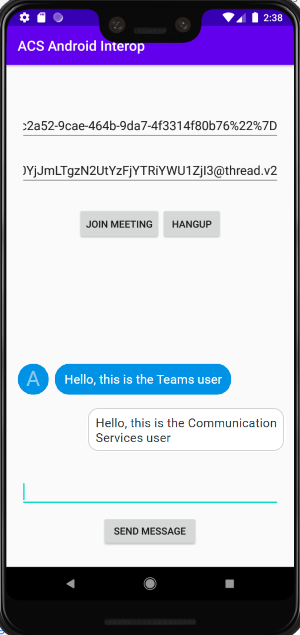
The app can now be launched using the "Run App" button on the toolbar (Shift+F10).
To join the Teams meeting and chat, enter your Team's meeting link and the thread ID in the UI.
After joining the Team's meeting, you need to admit the user to the meeting in your Team's client. Once the user is admitted and has joined the chat, you're able to send and receive messages.
A Communication Services user can join a Teams meeting as an anonymous user using the Calling SDK. Joining the meeting adds them as a participant to the meeting chat as well, where they can send and receive messages with other users in the meeting. The user won't have access to chat messages that were sent before they joined the meeting, and they won't be able to send or receive messages after the meeting ends. To join the meeting and start chatting, you can follow the next steps.
Run the code
You can build and run the code on Visual Studio. Note the solution platforms we support: x64,x86, and ARM64.
Open an instance of PowerShell, Windows Terminal, Command Prompt, or equivalent and navigate to the directory that you'd like to clone the sample to.
Select the proper platform from the 'Solution Platforms' dropdown list in Visual Studio before running the code, i.e., x64
Make sure you have the 'Developer Mode' in Windows 10 enabled (Developer Settings)
The next steps will not work if this is not configured properly
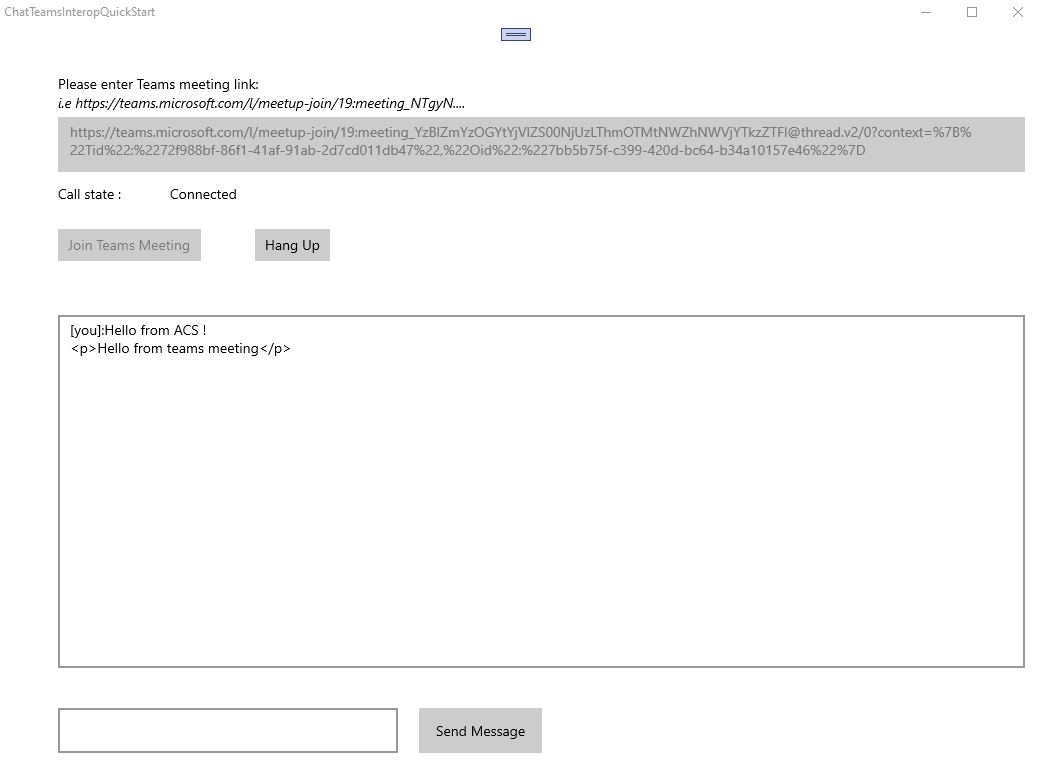
Press F5 to start the project in debugging mode.
Paste a valid teams meeting link on the 'Teams Meeting Link' box (see next section)
Press 'Join Teams meeting' to start chatting.
Important
Once the calling SDK establishes the connection with the teams meeting See Communication Services calling Windows app, the key functions to handle chat operations are:
StartPollingForChatMessages and SendMessageButton_Click. Both code snippets are in ChatTeamsInteropQuickStart\MainPage.xaml.cs
C#
///<summary>/// Background task that keeps polling for chat messages while the call connection is established///</summary>privateasync Task StartPollingForChatMessages()
{
CommunicationTokenCredential communicationTokenCredential = new(user_token_);
chatClient_ = new ChatClient(EndPointFromConnectionString(), communicationTokenCredential);
await Task.Run(async () =>
{
keepPolling_ = true;
ChatThreadClient chatThreadClient = chatClient_.GetChatThreadClient(thread_Id_);
int previousTextMessages = 0;
while (keepPolling_)
{
try
{
CommunicationUserIdentifier currentUser = new(user_Id_);
AsyncPageable<ChatMessage> allMessages = chatThreadClient.GetMessagesAsync();
SortedDictionary<long, string> messageList = new();
int textMessages = 0;
string userPrefix;
awaitforeach (ChatMessage message in allMessages)
{
if (message.Type == ChatMessageType.Html || message.Type == ChatMessageType.Text)
{
textMessages++;
userPrefix = message.Sender.Equals(currentUser) ? "[you]:" : "";
messageList.Add(long.Parse(message.SequenceId), $"{userPrefix}{StripHtml(message.Content.Message)}");
}
}
//Update UI just when there are new messagesif (textMessages > previousTextMessages)
{
previousTextMessages = textMessages;
await Dispatcher.RunAsync(CoreDispatcherPriority.Normal, () =>
{
TxtChat.Text = string.Join(Environment.NewLine, messageList.Values.ToList());
});
}
if (!keepPolling_)
{
return;
}
await SetInCallState(true);
await Task.Delay(3000);
}
catch (Exception e)
{
await Dispatcher.RunAsync(CoreDispatcherPriority.Normal, () =>
{
_ = new MessageDialog($"An error occurred while fetching messages in PollingChatMessagesAsync(). The application will shutdown. Details : {e.Message}").ShowAsync();
throw e;
});
await SetInCallState(false);
}
}
});
}
privateasyncvoidSendMessageButton_Click(object sender, RoutedEventArgs e)
{
SendMessageButton.IsEnabled = false;
ChatThreadClient chatThreadClient = chatClient_.GetChatThreadClient(thread_Id_);
_ = await chatThreadClient.SendMessageAsync(TxtMessage.Text);
TxtMessage.Text = "";
SendMessageButton.IsEnabled = true;
}
Get a Teams meeting link
The Teams meeting link can be retrieved using Graph APIs, detailed in Graph documentation. This link is returned as part of the onlineMeeting resource, accessible under the joinWebUrl property.
You can also get the required meeting link from the Join Meeting URL in the Teams meeting invite itself.
A Teams meeting link looks like this: https://teams.microsoft.com/l/meetup-join/meeting_chat_thread_id/1606337455313?context=some_context_here.
If your teams link has a different format to this, you need to retrieve the thread ID using the Graph API.
If you want to clean up and remove a Communication Services subscription, you can delete the resource or resource group. Deleting the resource group also deletes any other resources associated with it. Learn more about cleaning up resources.
The Microsoft Teams JavaScript client library can help you integrate native Teams features right in your application. In this module, you'll learn how to integrate the Teams chat capability in your app by using the Teams JavaScript client library.
Overview of chat hero sample using Azure Communication Services to enable developers to learn more about the inner workings of the sample and learn how to modify it.