Note
Access to this page requires authorization. You can try signing in or changing directories.
Access to this page requires authorization. You can try changing directories.
Important
This feature of Azure Communication Services is currently in preview. Features in preview are publicly available and can be used by all new and existing Microsoft customers.
Preview APIs and SDKs are provided without a service-level agreement. We recommend that you don't use them for production workloads. Certain features might not be supported or capabilities might be constrained.
For more information, see Supplemental Terms of Use for Microsoft Azure Previews.
In an Azure Communication Services Chat, we can enable file sharing between communication users. Azure Communication Services Chat is different from the Teams Interoperability Chat, or Interop Chat. If you want to enable file sharing in an Interop Chat, see Add file sharing with UI Library in Teams Interoperability Chat.
This article describes how to configure the Azure Communication Services UI Library Chat Composite to enable file sharing. The UI Library Chat Composite provides a set of rich components and UI controls we can use to enable file sharing. We're using Azure Blob Storage to enable the storage of the files that are shared through the chat thread.
Important
Azure Communication Services doesn't provide a file storage service. You need to use your own file storage service for sharing files. This tutorial describes how to use Azure Blob Storage.
Download code
Access the full code for this tutorial at UI Library Sample - File Sharing using UI Chat Composite. If you want to use file sharing using UI Components, see UI Library Sample - File Sharing using UI Components.
Prerequisites
- An Azure account with an active subscription. For details, see Create an account for free.
- Visual Studio Code on one of the supported platforms.
- Node.js, Active LTS, and Maintenance LTS versions (10.14.1 recommended). Use the
node --versioncommand to check your version. - An active Communication Services resource and connection string. Create a Communication Services resource.
To use this article, you need to know how to set up and run a Chat Composite. For more information about how to set up and run a Chat Composite, see the ChatComposite tutorial.
Overview
The UI Library Chat Composite supports file sharing by enabling developers to pass the URL to a hosted file that is sent through the Azure Communication Services chat service. The UI Library renders the attached file and supports multiple extensions to configure the look and feel of the file sent. More specifically, it supports the following features:
- Attach file button for picking files through the OS File Picker.
- Configure allowed file extensions.
- Enable/disable multiple uploads.
- File Icons for a wide variety of file types.
- File upload/download cards with progress indicators.
- Ability to dynamically validate each file upload and display errors on the UI.
- Ability to cancel an upload and remove an uploaded file before sending.
- View uploaded files in MessageThread, download them. Allows asynchronous downloads.
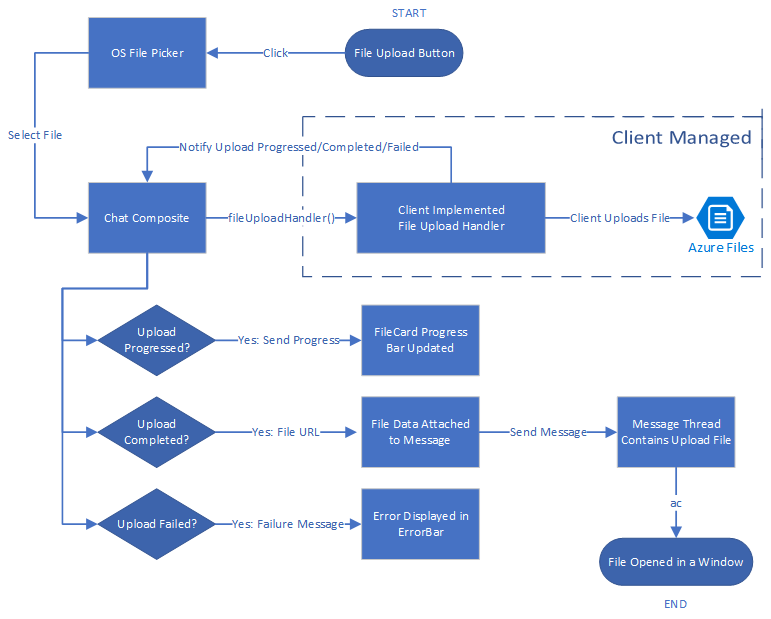
The following diagram shows a typical flow of a file sharing scenario for both upload and download. The section marked as Client Managed shows the building blocks where developers need to implement them.

Set up file storage using Azure Blob
You can follow the tutorial Upload file to Azure Blob Storage with an Azure Function to write the backend code required for file sharing.
Once implemented, you can call this Azure Function inside the handleAttachmentSelection function to upload files to Azure Blob Storage. For the remaining of the tutorial, we assume you generated the function using the tutorial for Azure Blob Storage linked previously.
Securing your Azure Blob storage container
This article assumes that your Azure blob storage container allows public access to the files you upload. Making your Azure storage containers public isn't recommended for real world production applications.
For downloading the files, you upload to Azure blob storage. Then you can use shared access signatures (SAS). A shared access signature (SAS) provides secure delegated access to resources in your storage account. With a SAS, you have granular control over how a client can access your data.
The downloadable GitHub sample showcases the use of SAS for creating SAS URLs to Azure Storage contents. Additionally, you can read more about SAS.
UI Library requires a React environment to be set up. Next we do that. If you already have a React App, you can skip this section.
Set up react app
We use the create-react-app template for this quickstart. For more information, see: Get Started with React
npx create-react-app ui-library-quickstart-composites --template typescript

cd ui-library-quickstart-composites
At the end of this process, you should have a full application inside of the folder ui-library-quickstart-composites.
For this quickstart, we're modifying files inside of the src folder.
Install the package
Use the npm install command to install the beta Azure Communication Services UI Library for JavaScript.
npm install @azure/communication-react@1.16.0-beta.1
@azure/communication-react specifies core Azure Communication Services as peerDependencies so that
you can most consistently use the API from the core libraries in your application. You need to install those libraries as well:
npm install @azure/communication-calling@1.24.1-beta.2
npm install @azure/communication-chat@1.6.0-beta.1
Create React app
Let's test the Create React App installation by running:
npm run start
Configuring Chat Composite to enable file sharing
You need to replace the variable values for both common variable required to initialize the chat composite.
App.tsx
import { initializeFileTypeIcons } from '@fluentui/react-file-type-icons';
import {
  ChatComposite,
  AttachmentUploadTask,
  AttachmentUploadOptions,
  AttachmentSelectionHandler,
  fromFlatCommunicationIdentifier,
  useAzureCommunicationChatAdapter
} from '@azure/communication-react';
import React, { useMemo } from 'react';

initializeFileTypeIcons();

function App(): JSX.Element {
  // Common variables
  const endpointUrl = 'INSERT_ENDPOINT_URL';
  const userId = ' INSERT_USER_ID';
  const displayName = 'INSERT_DISPLAY_NAME';
  const token = 'INSERT_ACCESS_TOKEN';
  const threadId = 'INSERT_THREAD_ID';

  // We can't even initialize the Chat and Call adapters without a well-formed token.
  const credential = useMemo(() => {
    try {
      return new AzureCommunicationTokenCredential(token);
    } catch {
      console.error('Failed to construct token credential');
      return undefined;
    }
  }, [token]);

  // Memoize arguments to `useAzureCommunicationChatAdapter` so that
  // a new adapter is only created when an argument changes.
  const chatAdapterArgs = useMemo(
    () => ({
      endpoint: endpointUrl,
      userId: fromFlatCommunicationIdentifier(userId) as CommunicationUserIdentifier,
      displayName,
      credential,
      threadId
    }),
    [userId, displayName, credential, threadId]
  );
  const chatAdapter = useAzureCommunicationChatAdapter(chatAdapterArgs);

  if (!!chatAdapter) {
    return (
      <>
        <div style={containerStyle}>
          <ChatComposite
            adapter={chatAdapter}
            options={{
              attachmentOptions: {
                uploadOptions: uploadOptions,
                downloadOptions: downloadOptions,
              }
            }} />
        </div>
      </>
    );
  }
  if (credential === undefined) {
    return <h3>Failed to construct credential. Provided token is malformed.</h3>;
  }
  return <h3>Initializing...</h3>;
}

const uploadOptions: AttachmentUploadOptions = {
  // default is false
  disableMultipleUploads: false,
  // define mime types
  supportedMediaTypes: ["image/jpg", "image/jpeg"]
  handleAttachmentSelection: attachmentSelectionHandler,
}

const attachmentSelectionHandler: AttachmentSelectionHandler = async (uploadTasks) => {
  for (const task of uploadTasks) {
    try {
      const uniqueFileName = `${v4()}-${task.file?.name}`;
      const url = await uploadFileToAzureBlob(task);
      task.notifyUploadCompleted(uniqueFileName, url);
    } catch (error) {
      if (error instanceof Error) {
        task.notifyUploadFailed(error.message);
      }
    }
  }
}

const uploadFileToAzureBlob = async (uploadTask: AttachmentUploadTask) => {
  // You need to handle the file upload here and upload it to Azure Blob Storage.
  // This is how you can configure the upload
  // Optionally, you can also update the file upload progress.
  uploadTask.notifyUploadProgressChanged(0.2);
  return {
    url: 'https://sample.com/sample.jpg', // Download URL of the file.
  };
Configure upload method to use Azure Blob storage
To enable Azure Blob Storage upload, we modify the uploadFileToAzureBlob method we declared previously with the following code. You need to replace the Azure Function information to upload files.
App.tsx
const uploadFileToAzureBlob = async (uploadTask: AttachmentUploadTask) => {
  const file = uploadTask.file;
  if (!file) {
    throw new Error("uploadTask.file is undefined");
  }

  const filename = file.name;
  const fileExtension = file.name.split(".").pop();

  // Following is an example of calling an Azure Function to handle file upload
  // The https://learn.microsoft.com/azure/developer/javascript/how-to/with-web-app/azure-function-file-upload
  // tutorial uses 'username' parameter to specify the storage container name.
  // the container in the tutorial is private by default. To get default downloads working in
  // this sample, you need to change the container's access level to Public via Azure Portal.
  const username = "ui-library";

  // You can get function url from the Azure Portal:
  const azFunctionBaseUri = "<YOUR_AZURE_FUNCTION_URL>";
  const uri = `${azFunctionBaseUri}&username=${username}&filename=${filename}`;

  const formData = new FormData();
  formData.append(file.name, file);

  const response = await axios.request({
    method: "post",
    url: uri,
    data: formData,
    onUploadProgress: (p) => {
      // Optionally, you can update the file upload progress.
      uploadTask.notifyUploadProgressChanged(p.loaded / p.total);
    },
  });

  const storageBaseUrl = "https://<YOUR_STORAGE_ACCOUNT>.blob.core.windows.net";

  return {
    url: `${storageBaseUrl}/${username}/${filename}`,
  };
};
Error handling
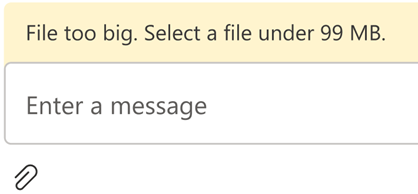
When an upload fails, the UI Library Chat Composite displays an error message.

Here's sample code showcasing how you can fail an upload due to a size validation error:
App.tsx
import { AttachmentSelectionHandler } from from '@azure/communication-react';

const attachmentSelectionHandler: AttachmentSelectionHandler = async (uploadTasks) => {
  for (const task of uploadTasks) {
    if (task.file && task.file.size > 99 * 1024 * 1024) {
      // Notify ChatComposite about upload failure.
      // Allows you to provide a custom error message.
      task.notifyUploadFailed('File too big. Select a file under 99 MB.');
    }
  }
}

export const attachmentUploadOptions: AttachmentUploadOptions = {
  handleAttachmentSelection: attachmentSelectionHandler
};
File downloads - advanced usage
By default, the UI library opens a new tab pointing to the URL you set when you notifyUploadCompleted. Alternatively, you can use a custom logic to handle attachment downloads via actionsForAttachment. Let's take a look of an example.
App.tsx
import { AttachmentDownloadOptions } from "communication-react";

const downloadOptions: AttachmentDownloadOptions = {
  actionsForAttachment: handler
}

const handler = async (attachment: AttachmentMetadata, message?: ChatMessage) => {
   // here we are returning a static action for all attachments and all messages
   // alternately, you can provide custom menu actions based on properties in `attachment` or `message`
   return [defaultAttachmentMenuAction];
};

const customHandler = = async (attachment: AttachmentMetadata, message?: ChatMessage) => {
   if (attachment.extension === "pdf") {
    return [
      {
        title: "Custom button",
        icon: (<i className="custom-icon"></i>),
        onClick: () => {
          return new Promise((resolve, reject) => {
              // custom logic here
              window.alert("custom button clicked");
              resolve();
              // or to reject("xxxxx") with a custom message
          })
        }
      },
      defaultAttachmentMenuAction
    ];
  } else if (message?.senderId === "user1") {
    return [
      {
        title: "Custom button 2",
        icon: (<i className="custom-icon-2"></i>),
        onClick: () => {
          return new Promise((resolve, reject) => {
            window.alert("custom button 2 clicked");
            resolve();
          })
        }
      },
      // you can also override the default action partially
      {
        ...defaultAttachmentMenuAction,
        onClick: () => {
          return new Promise((resolve, reject) => {
            window.alert("default button clicked");
            resolve();
          })
        }
      }
    ];
  }
}
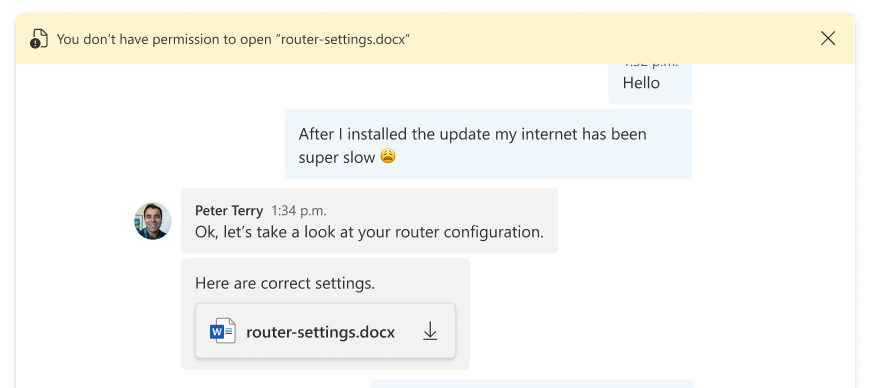
If there were any issues during the download and the user needs to be notified, you can throw an error with a message in the onClick function. Then the message displays in the error bar on top of the Chat Composite.

Clean up resources
If you want to clean up and remove a Communication Services subscription, you can delete the resource or resource group. Deleting the resource group also deletes any other resources associated with it. You can find out more about cleaning up Azure Communication Services resources and cleaning Azure Function Resources.
Next steps
Related articles
- Add chat to your app
- Creating user access tokens
- Learn about client and server architecture
- Learn about authentication
- Add file sharing with UI Library in Teams Interoperability Chat
- Add file sharing with UI Library in Azure Communication Services Chat
- Add inline image with UI Library in Teams Interoperability Chat