Connect Qlik Sense to Azure Cosmos DB and visualize your data
APPLIES TO:
NoSQL
MongoDB
Qlik Sense is a data visualization tool that combines data from different sources into a single view. Qlik Sense indexes every possible relationship in your data so that you can gain immediate insights to the data. You can visualize Azure Cosmos DB data by using Qlik Sense. This article describes the steps required to connect Azure Cosmos DB to Qlik Sense and visualize your data.
Note
Connecting Qlik Sense to Azure Cosmos DB is currently supported for API for NoSQL and MongoDB accounts only.
You can Connect Qlik Sense to Azure Cosmos DB with:
Azure Cosmos DB API for NoSQL by using the ODBC connector.
Azure Cosmos DB's API for MongoDB by using the Qlik Sense MongoDB connector (currently in preview).
Azure Cosmos DB's API for MongoDB and NoSQL by using REST API connector in Qlik Sense.
Azure Cosmos DB MongoDB API by using the gRPC connector for Qlik Core. This article describes the details of connecting to the Azure Cosmos DB API for NoSQL by using the ODBC connector.
This article describes the details of connecting to the Azure Cosmos DB API for NoSQL by using the ODBC connector.
Prerequisites
Before following the instructions in this article, ensure that you have the following resources ready:
Download the Qlik Sense Desktop or set up Qlik Sense in Azure by Installing the Qlik Sense marketplace item.
Download the video game data, this sample data is in CSV format. You will store this data in an Azure Cosmos DB account and visualize it in Qlik Sense.
Create an Azure Cosmos DB API for NoSQL account by using the steps described in create an account section of the quickstart article.
Create a database and a collection – You can use set the collection throughput value to 1000 RU/s.
Load the sample video game sales data to your Azure Cosmos DB account.
Download, install, and configure the ODBC driver by using the steps in the connect to Azure Cosmos DB with ODBC driver article. The video game data is a simple data set and you don’t have to edit the schema, just use the default collection-mapping schema.
Connect Qlik Sense to Azure Cosmos DB
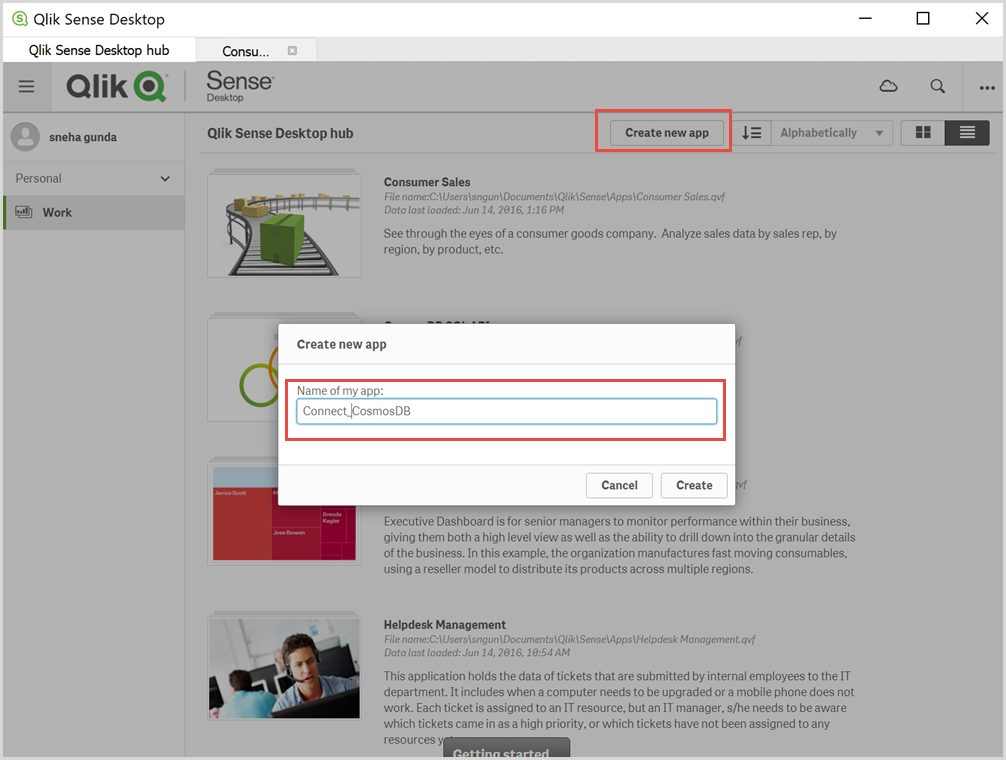
Open Qlik Sense and select Create new app. Provide a name for your app and select Create.

After the new app is created successfully, select Open app and choose Add data from files and other sources.
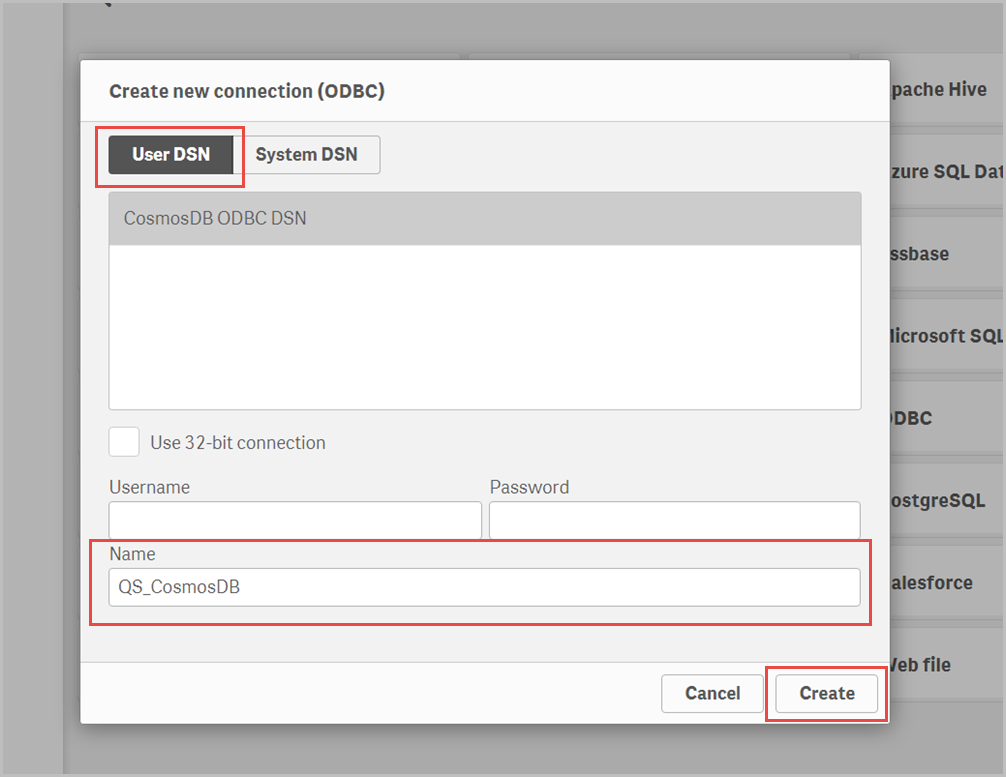
From the data sources, select ODBC to open the new connection setup window.
Switch to User DSN and choose the ODBC connection you created earlier. Provide a name for the connection and select Create.

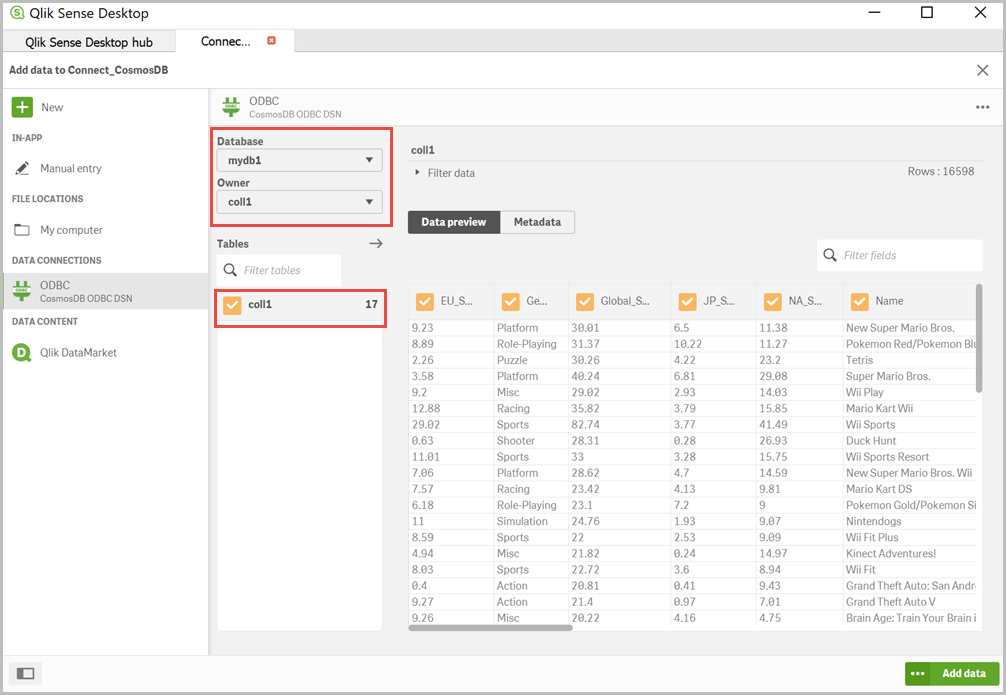
After you create the connection, you can choose the database, collection where the video game data is located and then preview it.

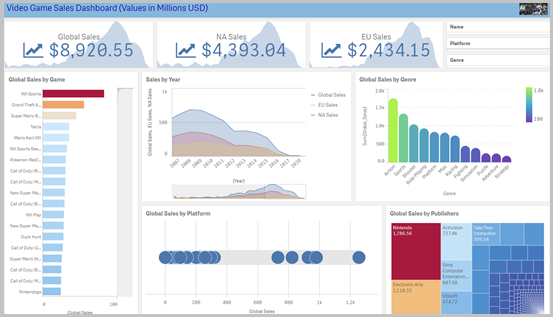
Next select Add data to load the data to Qlik Sense. After you load data to Qlik Sense, you can generate insights and perform analysis on the data. You can either use the insights or build your own app exploring the video games sales. The following image shows

Limitations when connecting with ODBC
Azure Cosmos DB is a schema-less distributed database with drivers modeled around developer needs. The ODBC driver requires a database with schema to infer columns, their data types, and other properties. The regular SQL query or the DML syntax with relational capability is not applicable to Azure Cosmos DB API for NoSQL because API for NoSQL is not ANSI SQL. Due to this reason, the SQL statements issued through the ODBC driver are translated into Azure Cosmos DB-specific SQL syntax that doesn’t have equivalents for all constructs. To prevent these translation issues, you must apply a schema when setting up the ODBC connection. The connect with ODBC driver article gives you suggestions and methods to help you configure the schema. Make sure to create this mapping for every database/collection within the Azure Cosmos DB account.
Next Steps
If you are using a different visualization tool such as Power BI, you can connect to it by using the instructions in the following doc: