Note
Access to this page requires authorization. You can try signing in or changing directories.
Access to this page requires authorization. You can try changing directories.
This article explains how partner administrators of indirect enrollments and enterprise administrators of direct and indirect Enterprise Agreement (EA) enrollments can view a summary of their usage data, Azure Prepayment consumed, and charges associated with other usage in the Azure portal. Charges are presented at the summary level across all accounts and subscriptions of the enrollment.
Check out the EA admin manage consumption and invoices video. It's part of the Enterprise Customer Billing Experience in the Azure portal series of videos.
Prerequisites
To review and verify the charges on your invoice, you must be an Enterprise Administrator or partner administrator. For more information, see Understand Azure Enterprise Agreement administrative roles in Azure. If you don't know who the Enterprise Administrator is for your organization, create a support request in the Azure portal.
Review usage charges
To view detailed usage for specific accounts, download the usage detail report. Usage files can be large. If you prefer, you can use the exports feature to get the same data exported to an Azure Storage account. For more information, see Export usage details to a storage account.
Enterprise Administrators and partner administrators can view historical data usage for terminated enrollments just as they do for active ones using the following information.
Note
Old Partner can access their usage details for up to 120 days after their participation in the agreement has ended.
As an enterprise administrator:
- Sign in to the Azure portal.
- Search for Cost Management + Billing and then select it.
- Select Billing scopes from the navigation menu and then select the billing account that you want to work with.
- In the navigation menu, select Usage + Charges.
- To view details from previous years, select a Timespan.

As a partner administrator:
- Sign in to the Azure portal.
- Search for Cost Management + Billing and then select it.
- Select Billing scopes from the navigation menu and then select the billing account that you want to work with.
- In the left navigation menu, select Billing profiles and select the billing profile that you want to work with.
- In the navigation menu, select Usage + Charges.
- To view details from previous years, select a Timespan.
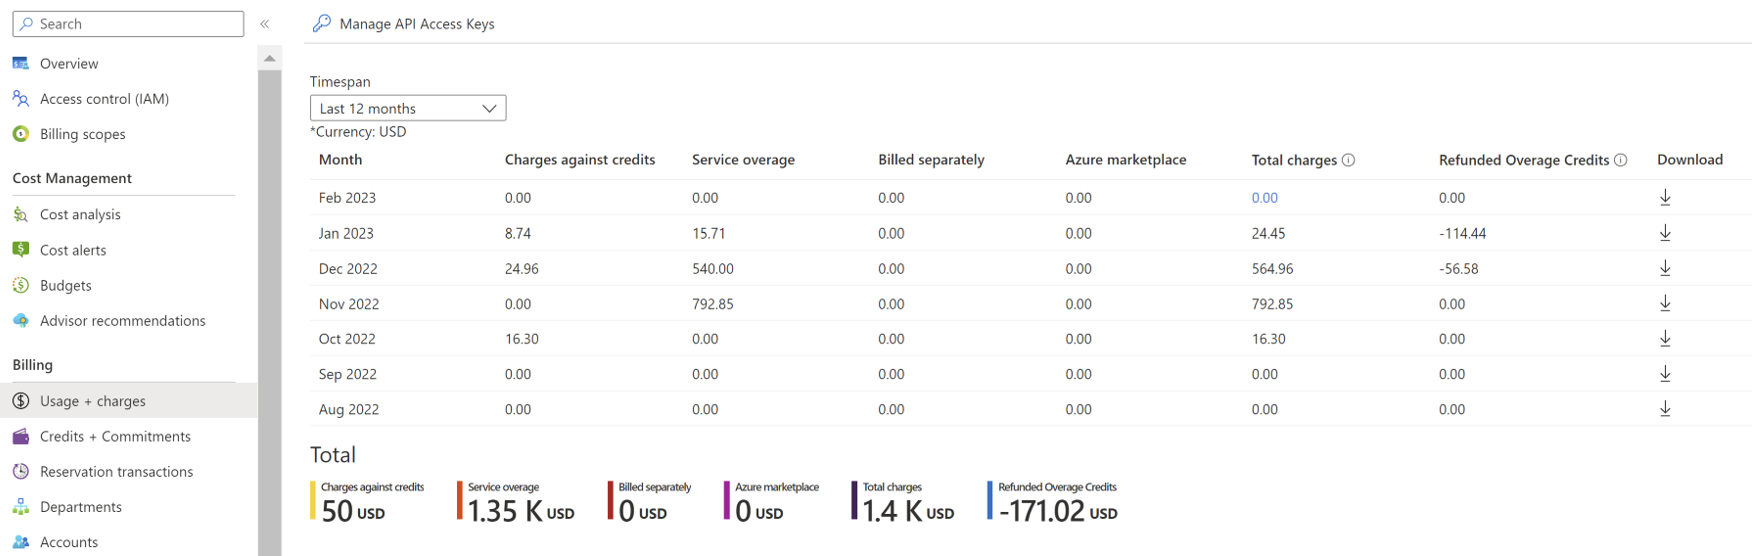
The following table lists the terms and descriptions shown on the Usage + Charges page in the Azure portal. Charges shown in the Azure portal are in USD currency.
| Term | Description |
|---|---|
| Month | The month when consumption and purchases were made. |
| Charges against Credits | The credit applied during the specific period. |
| Service Overage | Your organization's usage charges exceed your credit balance. |
| Billed Separately | Charges for services that aren't eligible to use available credit. |
| Azure Marketplace | Azure Marketplace charges that are billed separately. |
| Total Charges | Charges against credits + Service Overage + Billed Separately + Azure Marketplace |
| Refunded Overage credits | Sum of refunded overage amount. The following section describes it further. |
Understand refunded overage credits
This section explains how the previous refunded overage credits process worked and how the new process works.
Previously, when a reservation purchase refund occurred in a closed billing period, Microsoft updated your account retroactively, sometimes going back multiple years. The refund, if applied retroactively, could negatively affect financial reporting and cause problems.
Now, to prevent problems with the new process, a refund is applied as a credit. The refund doesn't cause any change to a closed billing period. A refund is reimbursed to the same payment method that you used when you made the purchase. If the refund results from an overage, then a credit note is issued to you. If a refund goes toward Azure prepayment (also called Monetary Commitment (MC)), then the overage portion results in issuing a credit note. Azure prepayment is applied as an adjustment.
Note
The reservation refund applies only to purchase refunds completed in previously closed billing periods. There's no change to refund behavior completed in an open billing period. When a refund is completed before the purchase is invoiced, then the refund is reimbursed as part of the purchase and noted on the invoice.
Overage refund examples
Let's look at a detailed overage refund example with the previous process. Assume that a reservation was bought in February 2022 with an overage credit (no Azure prepayment or Monetary Commitment was involved). You decided to return the reservation in August 2022. Refunds use the same payment method as the purchase. So, you received a credit note in August 2022 for the February 2022 billing period. However, the credit amount reflects the month of purchase. In this example, that's February 2022. The refund results in the change to the service overage and total charges.
Here's how a refund example appeared in the Azure portal for the previous refund process. The following points explain the refund.

- After the reservation return in August 2022, you get $400 as a credit note for the refund amount.
- The service overage is changed from $1947.03 to $1547.03. The total charges change from $1947.83 to $1547.83. However, the changes don’t reconcile with the usage details file. In this example, that's $1947.83. Also, the invoice for February 2022 didn't reconcile.
- Return line items appear for the month of return. For example, August 2022 in usage details file.
Now, let's look at the new process. There are no changes to the purchase month overage or to total charges, February 2022. Credits given for the month are viewed in the new Refunded overage credits column.
Here's how the example now appears in the Azure portal.

- After the reservation return in August 2022, you get entitled to $400 credits. You receive the credit note for the refund amount. There's no change to the process.
- There are no changes to the February 2022 service overage or total charges after the refund. You're able to reconcile the refund as you review the usage details file and your invoice.
- Return line items continue to appear in the month of return. For example August 2022, because there's no behavior or process change.
Purchase refund with overage and monetary credit examples
In the previous refund process, assume that you bought a reservation June 2022 using overage and monetary credit. Later, you returned some reservations in July 2022 after you received your invoice.
Example of the previous refund process
Refunds use the same payment methods used for the purchase. In July 2022, your monetary credit is adjusted with the relative credit amount. In August 2022, you also receive a credit for the overage portion of the refund. The credit amount and adjustment appears in the Azure portal for June 2022. The adjustment for the month of return (June 2022) results in a change as service overage. You can view the total charges on the Usage + charges page. You can see the Credit applied towards charges value shown on the Credits + Commitments page.

- After the reservation return was completed for July 2022, you get entitled to $200 of credits. You receive the credit note for the refund amount of $100. The other $100 goes back to monetary credit under Adjustments.
- The adjustment changes the service overage for June 2022. The adjustment also changes the total charges. They no longer reconcile with the invoice received for June 2022. And, it changes the credits applied for charges in June 2022.
- The return line items are shown for the return month (July 2022) in the usage details file.
Example of the current refund process
In the current refund process, totals in the purchase month overage, total charges, and Credits applied towards Charges don't change (for example, June 2022). Credits given for that month are shown under Refunded overage credits. Adjustments are shown for the refund month on the Credits + Commitments page.

- After the reservation return completed for July 2022, you get entitled to $100 credit. You receive the credit note for the refund amount. You can view it on the Invoices page. The same credit appears under Refunded overage credits on the Usage & Charges page. The $100 of adjustments are shown on the Credits + Commitments page. There's no change for adjustments shown on the Credits + Commitments page.
- There are no changes to the June 2022 service overage, total charges, and Credits applied towards charges after as refund. You can reconcile your totals with the usage details file and with the invoice.
- The return line items continue to appear for the month of return (for example, July 2022) in the usage details file. There's no behavior or process change.
Important
- When there are adjustment charges, back-dated credits, or discounts for the account that result in an invoice getting rebilled, it resets the refund behavior. Refunds are shown in the rebilled invoice for the rebilled period.
- If a purchase and refund occur in the same month before they get billed, both the positive and negative adjustments get shown on the next invoice.
Common refunded overage credits questions
Question: What refunds are included in Refunded Overage Credits?
Answer: The Refunded Overage Credits attribute applies to reservation and savings plan refunds.
Question: Are Refunded Overage credits values included in total charges?
Answer: No, it's standalone field that shows the sum of credits received for the month.
Question: Does the new behavior apply to all refunds that happened previously?
Answer: No, it only applies to overage refunds that happen in the future. Refunded overage credits appear as 0 for previous months.
Question: Why do I see some overage refunds going back to the purchase month?
Answer: If the refund is a combination of Overage and monetary credit, then refunds that were completed by August 1 still go back to the purchase month.
Question: Why do I see some refunds that aren't included in Refunded Overage credits?
Answer: If the refund happened before the purchase is invoiced, then it appears on the invoice and it reduces the purchase charge. The invoice date cut-off is the fifth day of every month (UTC 12:00 am). Any refunds that happen between the first and fifth day are considered as being on the previous month's invoice because the purchase isn't invoiced yet.
Question: How do I reconcile the amount shown in Refunded Overage Credits?
Answer:
- In the Azure portal, navigate to Reservation Transactions.
- Sum all the refunds. They get shown as an overage for the month.
- Navigate to Usage + charges look at the value shown in Refunded Overage Credits. The value is sum of all reservation and savings plan refunds that happened in the month.


Question: How do I reconcile the reservation-related credits provided as adjustments?
Answer:
- Go to the Reservation Transactions page and look in the MC column at the refund amount for the month you want to reconcile.

- Navigate to the Credits + Commitments page and look at the value shown in Adjustments. It shows all refunds applied to the MC balance for the month.


Note
Savings plan refunds aren't shown on the Reservation Transactions page. However, Refunded Overage Credits shows the sum of reservations and savings plans.
Download usage charges CSV file
Enterprise administrators and partner administrators use the Download Usage + Charges page to download the following reports as CSV files.
- Usage Details - Depending on your selection, the CSV file provides all charges (usage and purchases) including reservation (RI) purchases. Or, amortized charges (usage and purchases) including reservation purchases.
- Marketplace Store Charge - The Marketplace Store Charge CSV file contains the usage-based Marketplace charges breakdown by day for the specified billing period.
- Price sheet - The Price Sheet CSV file contains the applicable rate for each meter for the given Enrollment and Billing Period.
- Balance and Summary - The Balance and Summary CSV file contains a monthly summary of information for balances, new purchases, Marketplace service charges, adjustments, and overage charges.
Note
The download URI for all the CSV files is valid for one hour. Ensure that you download the file before it expires. Otherwise, you have to retry the download.
- Select the Download symbol next to the month's report.
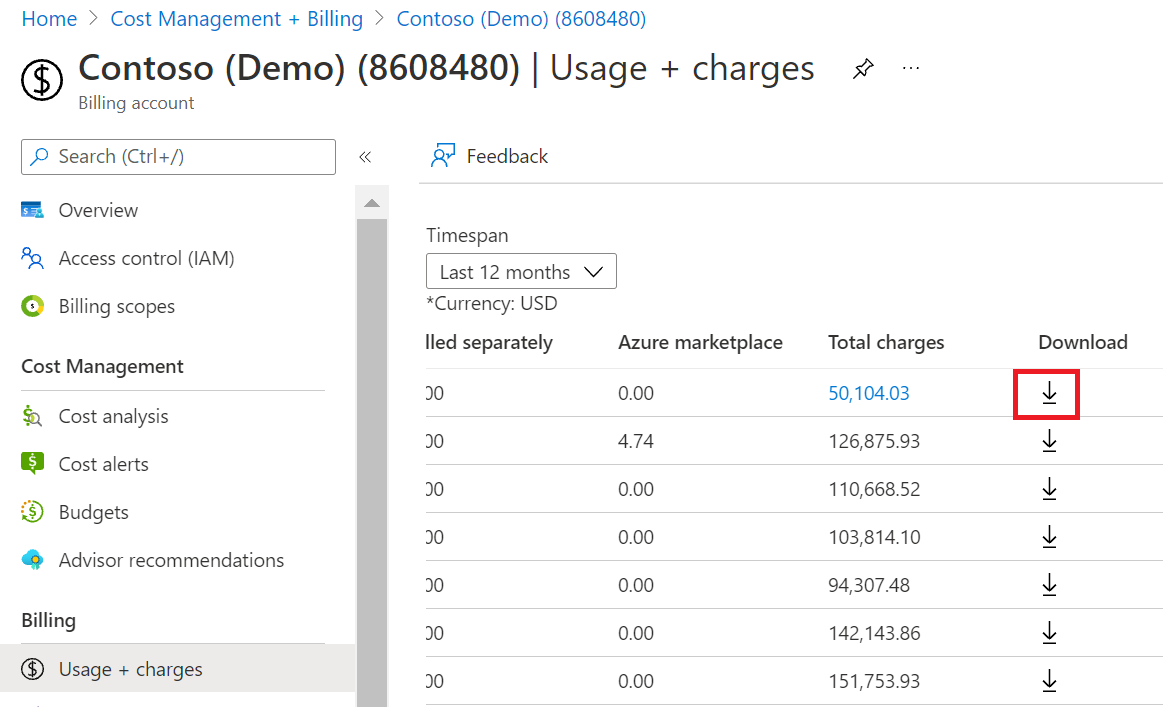
- On the Download Usage + Charges page, select Prepare document for the report that you want to download.
- It could take a while for Azure to prepare your download, depending on your monthly usage. When it's ready for download, select Download csv.
Enterprise administrators and partner administrators can also view an overall summary of the charges for the selected Timespan at the bottom of the Usage + charges page.

Download or view your Azure billing invoice
An EA administrator can download the invoice from the Azure portal or send it in email. Invoices are sent to whoever is set up to receive invoices for the enrollment. If someone other than an EA administrator needs an email copy of the invoice, an EA administrator can send them a copy.
Only an Enterprise Administrator has permission to view and download the billing invoice. To learn more about getting access to billing information, see Manage access to Azure billing using roles.
You receive an Azure invoice when any of the following events occur during your billing cycle:
- Service overage - Your organization's usage charges exceed your credit balance.
- Charges billed separately - The services your organization used aren't covered by the credit. You get invoiced for the following services despite your credit balance:
- Canonical
- Citrix XenApp Essentials
- Citrix XenDesktop
- Registered User
- Openlogic
- Remote Access Rights XenApp Essentials Registered User
- Ubuntu Advantage
- Visual Studio Enterprise (Monthly)
- Visual Studio Enterprise (Annual)
- Visual Studio Professional (Monthly)
- Visual Studio Professional (Annual)
- Marketplace charges - Azure Marketplace purchases and usage aren't covered by your organization's credit. So, you get invoiced for Marketplace charges despite your credit balance. In the Azure portal, an Enterprise Administrator can enable and disable Marketplace purchases.
Your invoice displays Azure usage charges with costs associated to them first, followed by any Marketplace charges. If you have a credit balance, it gets applied to Azure usage. Your invoice shows Azure usage and Marketplace usage without any cost last.
Advanced report download
You can use the Download Advanced Report to get reports that cover specific date ranges for the selected accounts. The output file is in CSV format to accommodate large record sets.
- Sign in to the Azure portal.
- Search for Cost Management + Billing and select it.
- Select Billing scopes from the navigation menu and then select the billing account that you want to work with.4. In the left navigation menu, select Billing profiles and select the billing profile that you want to work with.
- In the navigation menu, select Usage + Charges.
- At the top of the Usage + charges page, select Download Advanced report.
- Select a date range and the accounts to include in the report.
- Select Download.
- You can also download files from the Report History. It shows the latest reports that you downloaded.

Note
- Inactive accounts for the selected time range aren't shown.
- The download start date must be within 90 days of the end date. You can’t select a range longer than 90 days.
Download your Azure invoices (.pdf)
For EA enrollments, you can download your invoice in the Azure portal.
- Sign in to the Azure portal.
- Search for Cost Management + Billing and select it.
- Select Billing scopes from the navigation menu and then select the billing account that you want to work with.
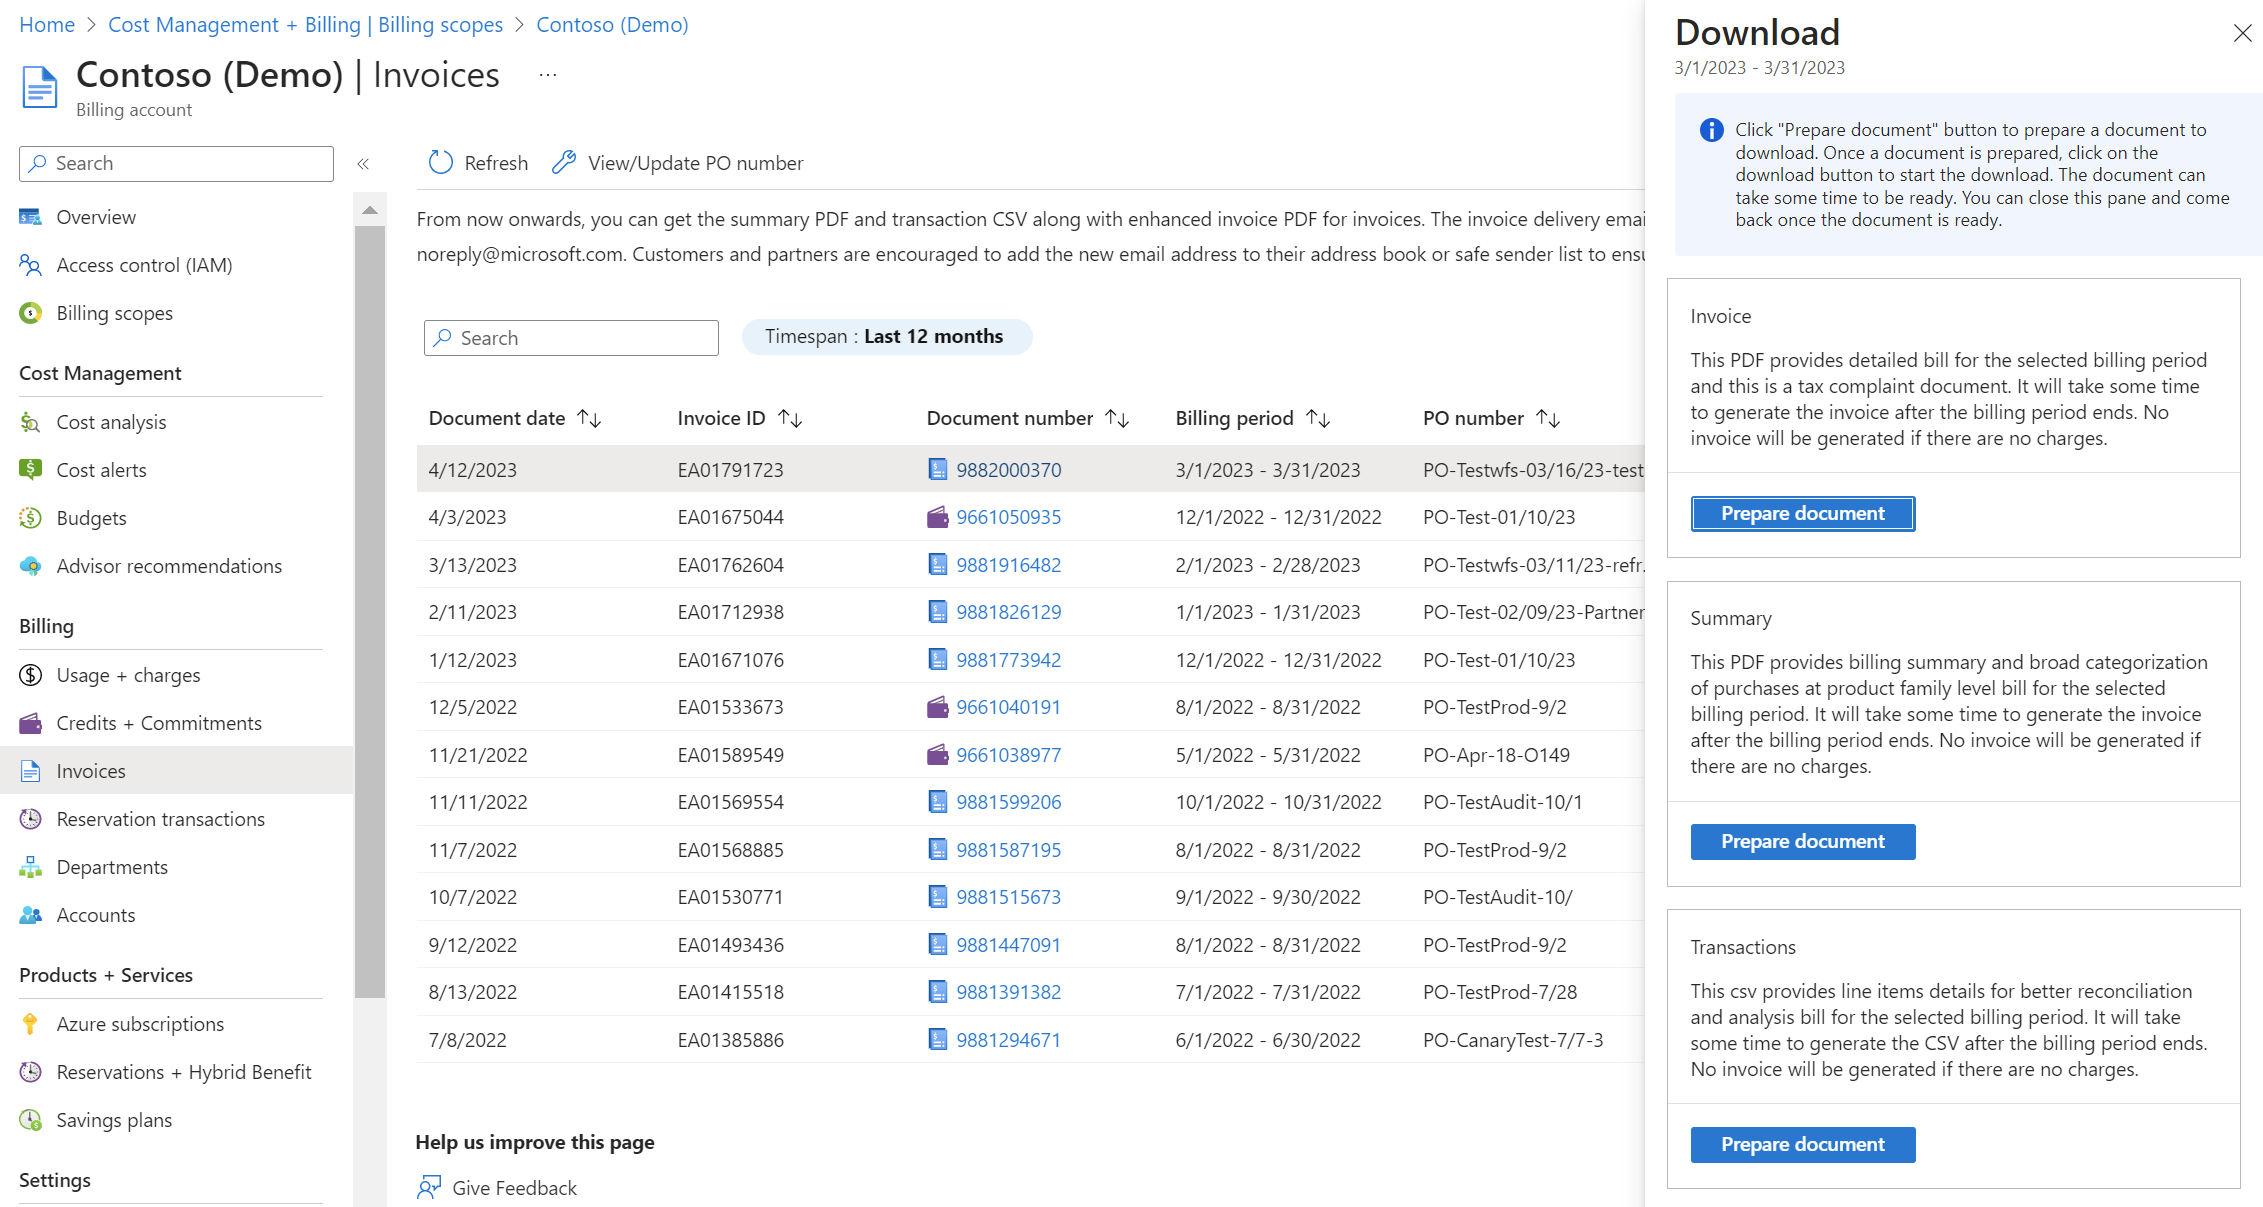
- In the navigation menu, select Invoices. The Invoices page shows all the invoices and credit memos generated for the last 12 months.
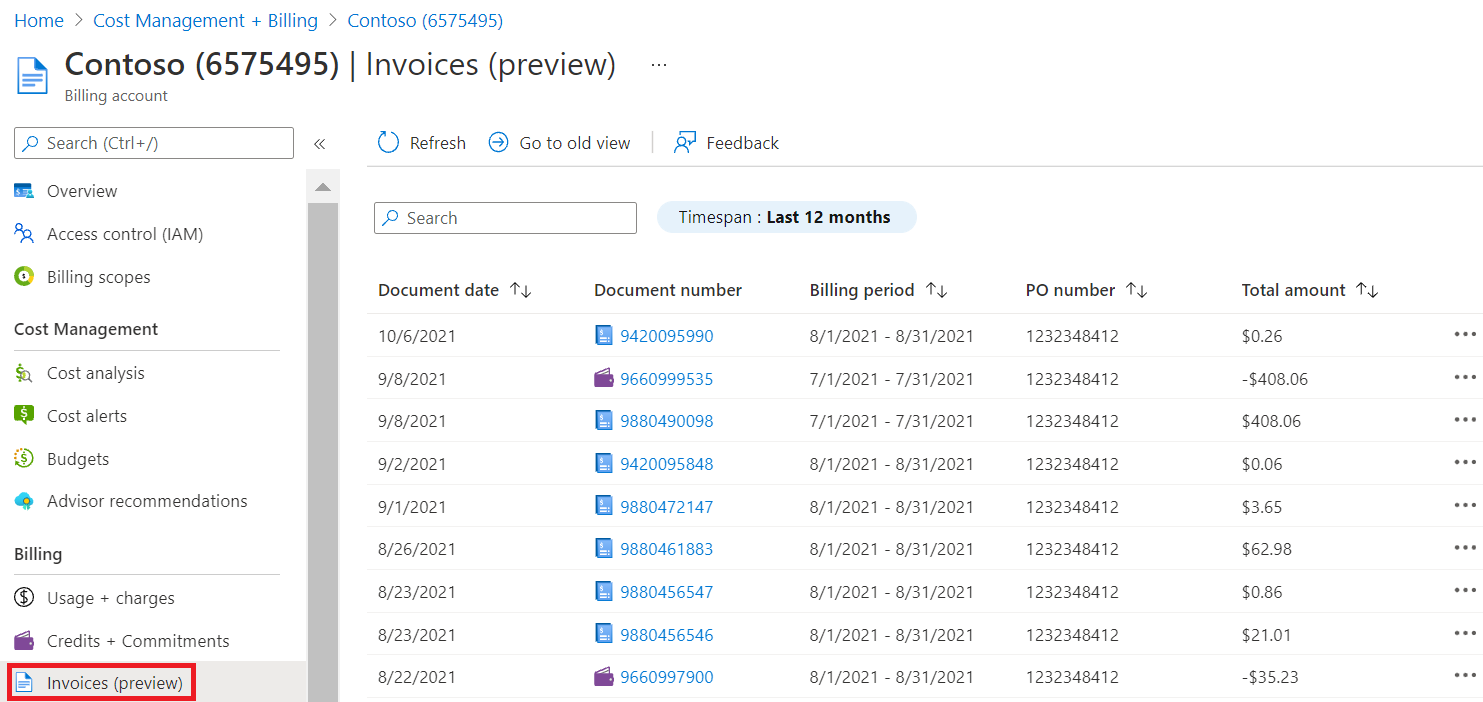
- On the Invoices page, find the row of the invoice that you want to download. To the right of the row, select the ellipsis (…) symbol.
- In the context menu, select Download.
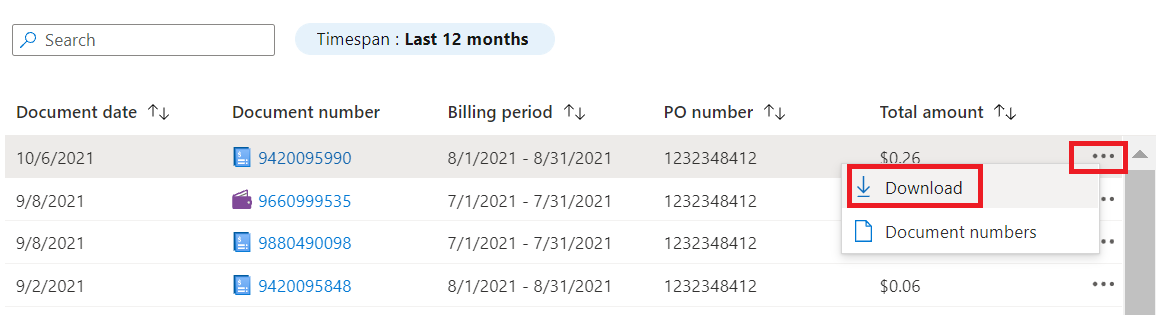
- Select Prepare document to prepare the document that you want to download.
- When the document is prepared, select Download.

You can select a Timespan to view up to the last three years of invoice details.
If the invoice has multiple line items that exceed 40 pages for a PDF file, it gets split into multiple document numbers.
The following table lists the terms and descriptions shown on the Invoices page:
| Term | Description |
|---|---|
| Document date | Date that the invoice or credit memo was generated. |
| Document number | Invoice or credit memo number. |
| Billing Period | Billing period that the invoice or credit memo. |
| PO number | PO number for the invoice or credit memo. |
| Total Amount | Total amount of the invoice or credit. |
Updated direct EA billing invoice documents
Azure is enhancing its invoicing experience. The enhanced experience includes an improved invoice PDF file, a summary PDF, and a transactions file.
There are no changes to invoices generated before November 18, 2022.
The invoice notification email address is changing from msftinv@microsoft.com to microsoft-noreply@microsoft.com for customers and partners under the enhanced invoicing experience.
We recommend that you add the new email address to your address book or safe sender list to ensure that you receive the emails.
For more information about invoice documents, see Direct EA billing invoice documents.
Update a PO number for an upcoming overage invoice
In the Azure portal, an Enterprise Administrator for a direct EA enrollment and a partner administrator for an indirect enrollment can update the purchase order (PO) for the upcoming Azure Overage/Marketplace invoices. The PO number can get updated anytime before the invoice is created during the current billing period.
For a new enrollment, the default PO number is the enrollment number.
If you don’t change the PO number, then the same PO number is used for all upcoming invoices. The PO number doesn't automatically increment. If you want to get new PO number for each month, then update it from Azure portal.
Starting in May 2025, the EA admin won't receive a notification email reminding them to update the PO number. However, you can create a custom alert to send an email notification to yourself every month before an invoice is finalized. Then you can use the email notification as a reminder to update your PO number. For more information, see Subscribe to scheduled alerts. Set the alert Frequency to Custom, Repeat every month, and then choose a day early in the month to give yourself enough time to update the PO before the invoice is finalized. To view your usage and charges anytime, you can use the Usage + Charges tab in the Azure portal. Here's an example of how to set up a custom alert to remind you to update your PO number:

If you want to update the PO number after your invoice is generated, then contact Azure support in the Azure portal.
Note
PO number update is only used for Overage/Marketplace invoices. To update a PO number for other invoices such as the invoice for a prepayment purchase, contact your Software Advisor (direct customer) or your partner (indirect customer). They in-turn, can contact the Regional Operation Center to update a PO number using the Cases & Support at the Volume Licensing Central portal. Check out the Manage purchase order number in the Azure portal video.
The EA admin can update the PO number for a billing account:
- Sign in to the Azure portal.
- Search for Cost Management + Billing and then select Billing scopes.
- Select your billing scope, and then in the left menu under Settings, select Properties.
- Select Update PO number.
- Enter a PO number and then select Update.
Or the EA admin can update the PO number in the Invoice area for the upcoming invoice:
- Sign in to the Azure portal.
- Search for Cost Management + Billing and then select Billing scopes.
- Select your billing scope, then in the left menu under Billing, select Invoices.
- Select Update PO number.
- Enter a PO number and then select Update.
As a partner admin, you can update the PO number for a billing account:
- Sign in to the Azure portal.
- Search for Cost Management + Billing and then select it
- Select Billing scopes from the navigation menu and then select the billing account that you want to work with.
- In the left navigation menu, select Billing profiles and select the billing profile that you want to work with.
- In the left navigation menu, select Properties.
- Next to PO number, select Edit.
- Enter a PO number and then select Update.
Review credit charges
The information in this section describes how an EA administrator or partner administrator can view the starting balance, ending balance, and credit adjustments for your Azure Prepayment (previously called monetary commitment).
- Sign in to the Azure portal.
- Search for Cost Management + Billing and select it.
- For EA administrators, select Billing scopes from the navigation menu and then select the billing account that you want to work with.
- For partner administrators, select Billing scopes from the navigation menu and then select the billing account that you want to work with. Navigate to Billing profile and select the billing profile that you want to work with.
- In the navigation menu, select Credits + Commitments.
- The Credits tab shows a breakdown of your credits and a graph showing your balance over time.
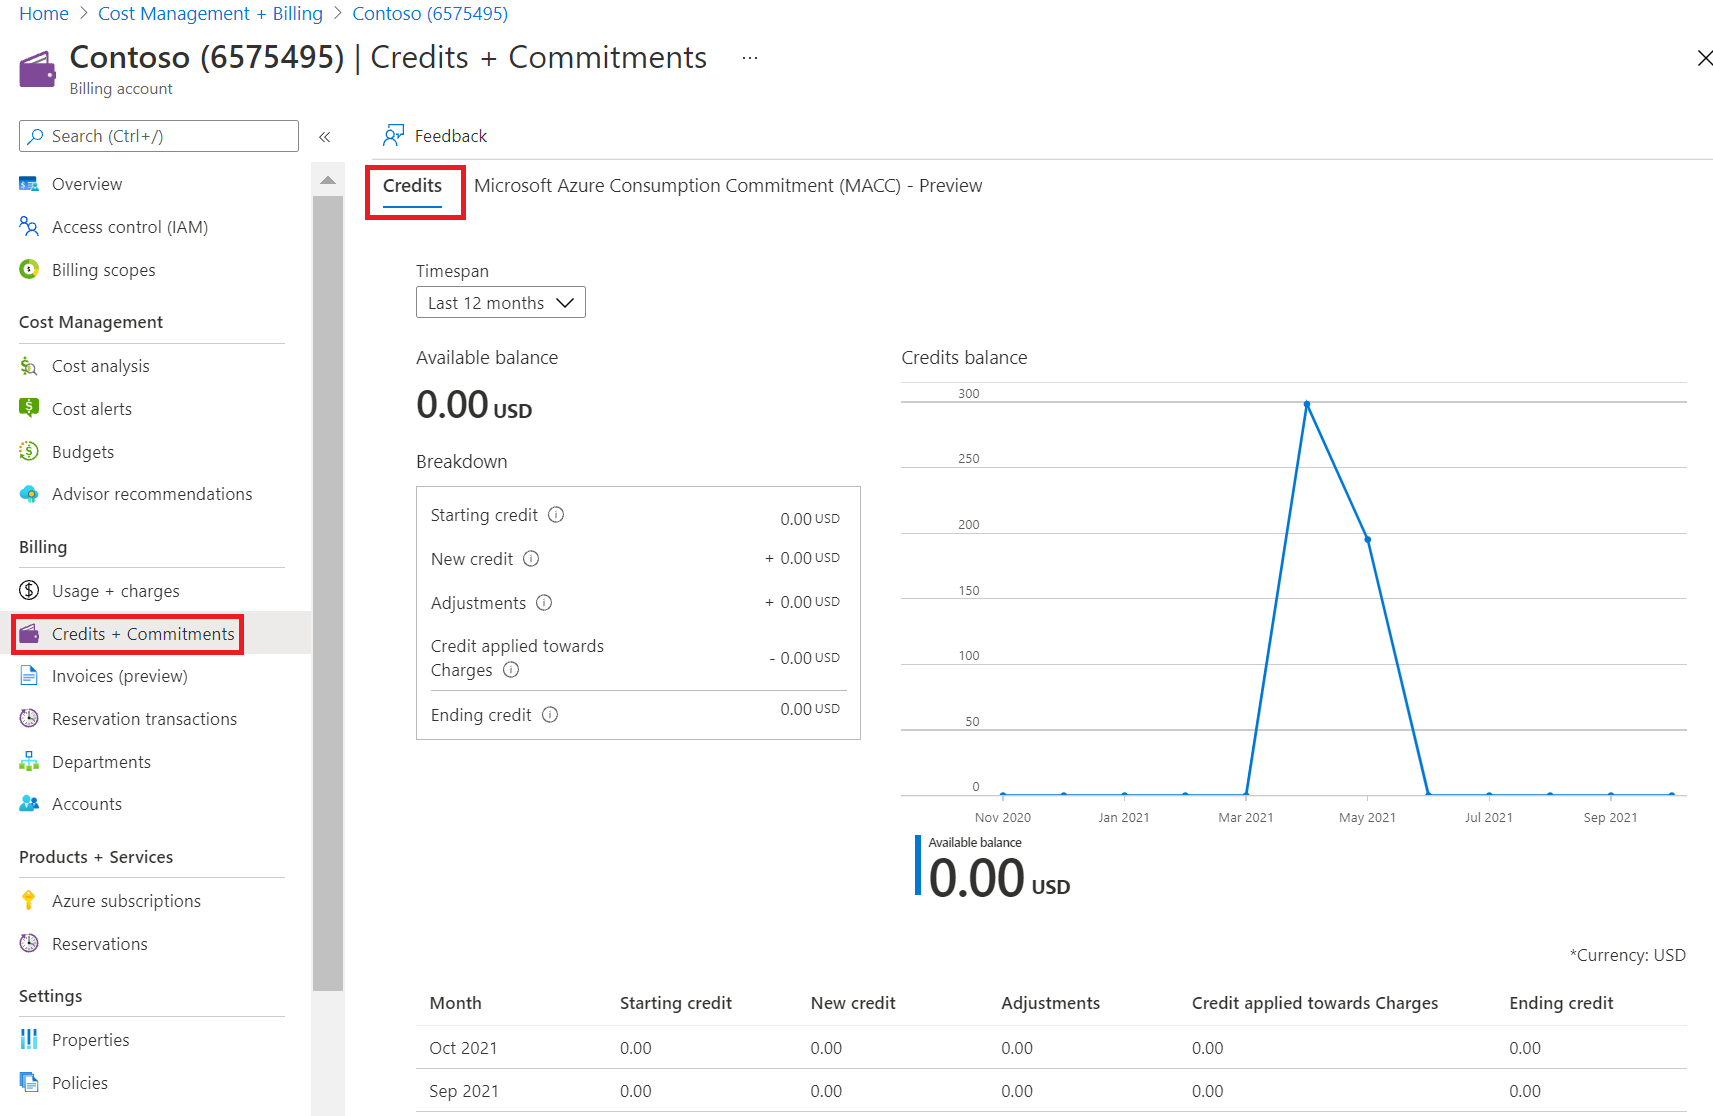

The following table lists the terms and descriptions shown on the Credits tab.
| Term | Description |
|---|---|
| Month | Month of the credit |
| Starting credit | Starting credit for that month |
| New credit | New credits added |
| Adjustments | Adjustments made in the month |
| Credit applied toward charges | Total amount of the invoice or credit generated |
| Ending credit | Credit end balance |
The following items are the Accounting codes and description for the adjustments.
| Accounting Code | Description |
|---|---|
| F2 | Contractual Credit |
| F3 | Strategic Investment Credit: Future Utilization Credit |
| O1 | Offer Conversion Credit |
| O2 | Pricing or Billing Credit |
| O3 | Deployment Credit |
| O4 | Offset Service Credit |
| O5 | Coverage Gap Credit |
| O6 | Subscription Interrupt Credit |
| O7 | Technical Concession Credit |
| O8 | Usage Emission Credit |
| O9 | Fraud False Positive Credit |
| O10 | Pricing Alignment Credit |
| O11 | Sponsorship Continuity Credit |
| O12 | Exchange Rate Reconciliation Credit |
| O13 | Microsoft Internal Credit |
| O14 | Supporting Documentation Credit |
| O15 | Support Troubleshooting Credit |
| O16 | Data Center Credit |
| O17 | Backdated Pricing Credit |
| O18 | Strategic Investment Credit: Offset of Past Utilization |
| O19 | Licensing Benefit Credit |
| O20 | Return of Reservation Credit |
| O21 | Service Level Agreement Credit |
| P1 | Custom Billing Credit |
| P2 | Strategic Investment Credit: Planned Usage Credit |
| T1 | Contractual Fund Transfer |
| T2 | Strategic Investment Credit: Transfer of Funds |
| T3 | Volume Licensing Reconciliation Credit |
| T4 | Separate Channel Balance Transfer |
| T5 | Exchange adjustment for Azure reservation |
| U1 | Latent Onboarding Credit |
| U2 | Funding Transfer |
| U3 | Contract Term Transfer |
| U4 | Strategic Investment Credit: Transfer of Utilization |
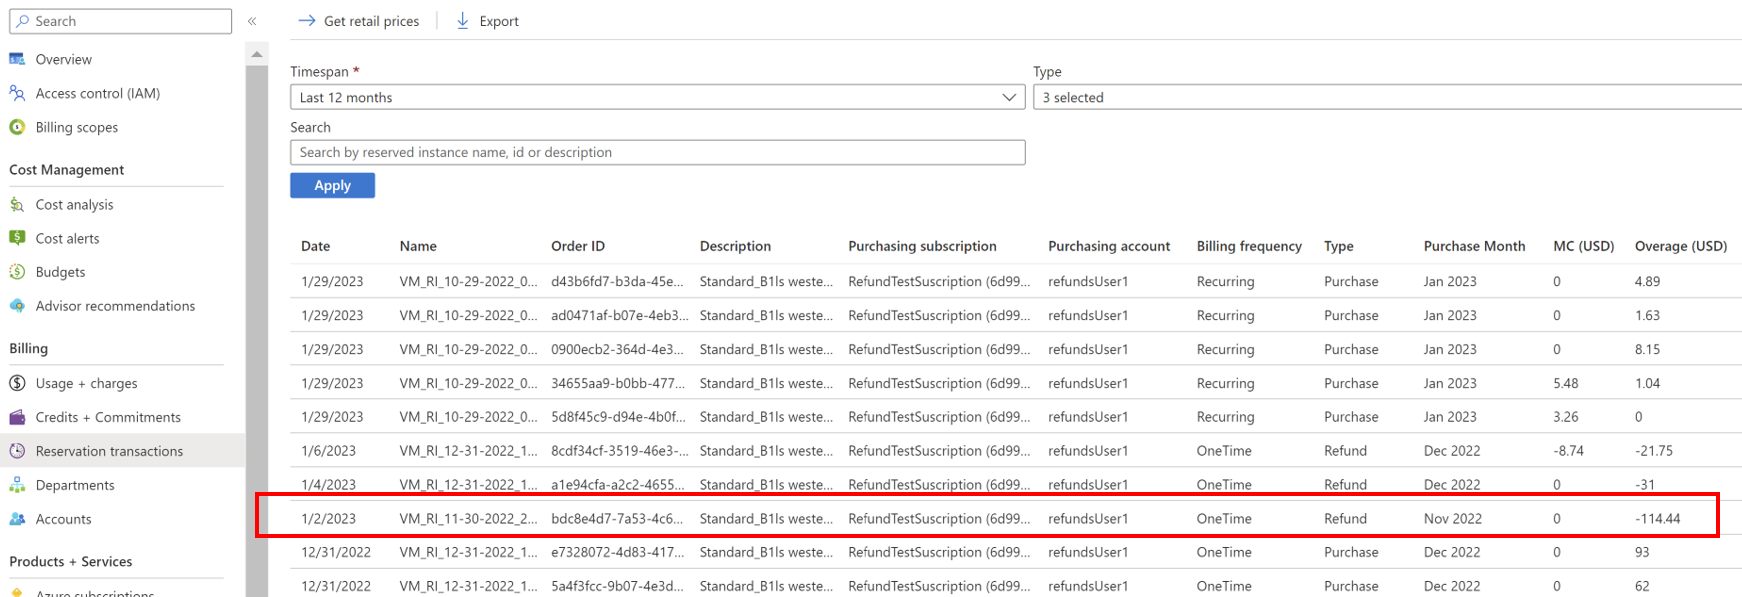
Review reservation transaction details
You can view all the reservations placed for an Enterprise Agreement in the Azure portal.
- Sign in to the Azure portal.
- Search for Cost Management + Billing and select it.
- Select Billing scopes from the navigation menu and then select the billing account that you want to work with.
- For a partner administrator, after you select a billing account, select the billing profile that you want to work with.
- In the navigation menu, select Reservation transactions. Prices shown in the following image are examples.
The following table lists the terms and descriptions shown on the Reservation transactions page.
| Term | Description |
|---|---|
| Date | Date that the reservation was made |
| Name | Name of the reservation |
| Description | Description of the reservation |
| Purchasing Subscription | Subscription under which the reservation made |
| Purchasing account | The purchasing account under which account the reservation made |
| Billing frequency | Billing frequency of the reservation |
| Type | Type of the transaction. For example, Purchase or Refund. |
| Purchase Month | Month of the Purchase |
| MC (USD) | Indicates the Monetary Commitment value |
| Overage (USD) | Indicates the Service Overage value |
| Quantity | Reservation quantity that was purchased |
| Amount (USD) | Reservation cost |
Note
The newly added column Purchase Month will help identify in which month the refunds are updated and helps to reconcile reservation refunds.
CSV report formatting issues
When you view CSV reports in Excel and your billing currency is Euros, you might have formatting issues that involve commas and periods.
The costs shown are examples.
For example, you might see:
| ServiceResource | ResourceQtyConsumed | ResourceRate | ExtendedCost |
|---|---|---|---|
| Hours | 24 | 0,0535960591133005 | 12,863,054,187,192,100,000,000 |
However, you should see:
| ServiceResource | ResourceQtyConsumed | ResourceRate | ExtendedCost |
|---|---|---|---|
| Hours | 24 | 0,0535960591133005 | 1,2863054187192120000000 |
The formatting issue occurs because of default settings in Excel's import functionality. Excel imports all fields as General text and assumes that a number is separated in the mathematical standard. For example: 1,000.00.
If your currency uses a period (.) for the thousandth place separator and a comma (,) for the decimal place separator, it gets displayed incorrectly. For example: 1.000,00. The import results might vary depending on your regional language setting.
To import the CSV file without formatting issues:
- In Microsoft Excel, go to File > Open. The Text Import Wizard appears.
- Under Original Data Type, choose delimited. Default is Fixed Width.
- Select Next.
- Under Delimiters, select the box for Comma. Clear Tab if selected.
- Select Next.
- Scroll over to the ResourceRate and ExtendedCost columns.
- Select the ResourceRate column. It appears highlighted in black.
- Under the Column Data Format section, select Text instead of General. The column header changes from General to Text.
- Repeat steps 8 and 9 for the Extended Cost column, and then select Finish.
Tip
If you set CSV files to automatically open in Excel, you must use the Open function in Excel instead. In Excel, go to File > Open.
Next steps
- To learn about common tasks that an enterprise administrator accomplishes in the Azure portal, see EA Billing administration on the Azure portal.