Note
Access to this page requires authorization. You can try signing in or changing directories.
Access to this page requires authorization. You can try changing directories.
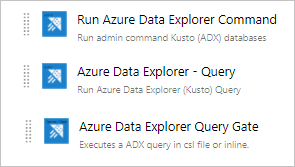
Azure DevOps Services provides development collaboration tools such as high-performance pipelines, free private Git repositories, configurable Kanban boards, and extensive automated and continuous testing capabilities. Azure Pipelines is an Azure DevOps capability that enables you to manage CI/CD to deploy your code with high-performance pipelines that work with any language, platform, and cloud. Azure Data Explorer - Pipeline Tools is the Azure Pipelines task that enables you to create release pipelines and deploy your database changes to your Azure Data Explorer databases. It is available for free in the Visual Studio Marketplace. The extension includes the following basic tasks:
Azure Data Explorer command - Run admin commands against an Azure Data Explorer cluster
Azure Data Explorer query - Run queries against an Azure Data Explorer cluster and parse the results
Azure Data Explorer query server gate - Agentless task to gate releases depending on the query outcome
This document describes a simple example of using the Azure Data Explorer - Pipeline Tools task to deploy schema changes to your database. For complete CI/CD pipelines, refer to Azure DevOps documentation.
Prerequisites
- An Azure subscription. Create a free Azure account.
- An Azure Data Explorer cluster and database. Create a cluster and database.
- Azure Data Explorer cluster setup:
- Create Microsoft Entra app by provisioning a Microsoft Entra application.
- Grant access to your Microsoft Entra App on your Azure Data Explorer database by managing Azure Data Explorer database permissions.
- Azure DevOps setup:
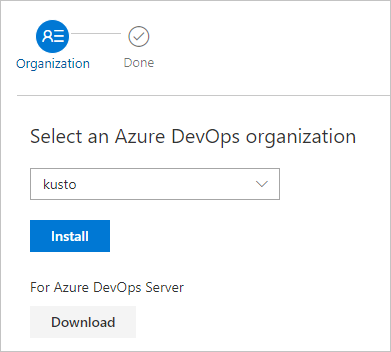
- Extension Installation:
If you're the Azure DevOps instance owner, install the extension from the Marketplace, otherwise contact your Azure DevOps instance owner and ask them to install it.
Prepare your content for release
You can use the following methods to execute admin commands against a cluster within a task:
Use a search pattern to get multiple command files from a local agent folder (build sources or release artifacts). The single-line option supports multiple files with one command per file.

Write commands inline.
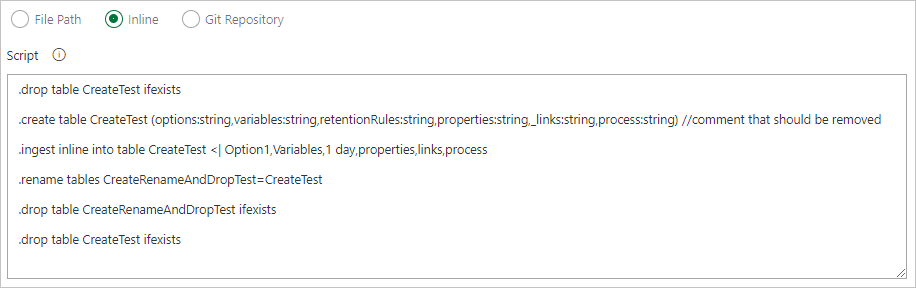
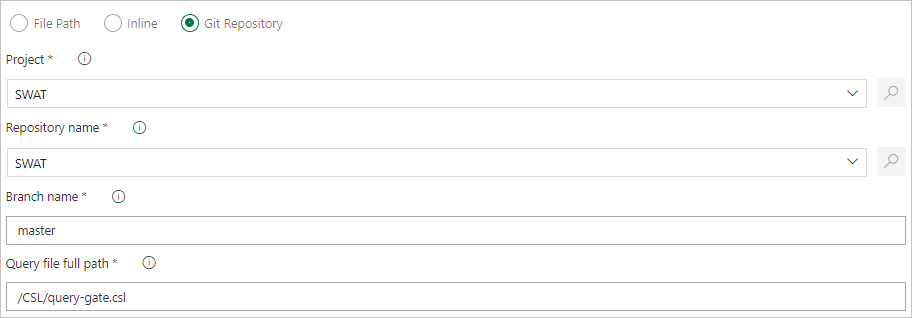
Specify a file path to get command files directly from Git source control (recommended).
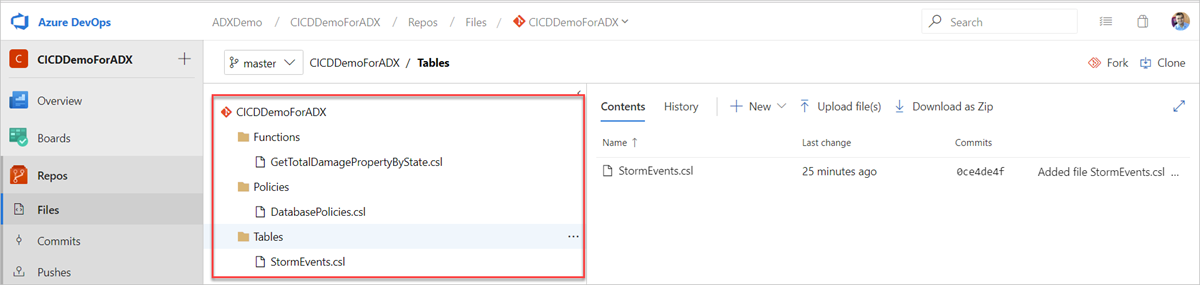
Create the following sample folders (Functions, Policies, Tables) in your Git repository. Copy the files from the samples repo into the respective folders, and commit the changes. The sample files are provided to execute the following workflow.
Tip
When creating your own workflow, we recommend making your code idempotent. For example, use
.create-merge tableinstead of.create table, and use the.create-or-alterfunction instead of the.createfunction.
Create a release pipeline
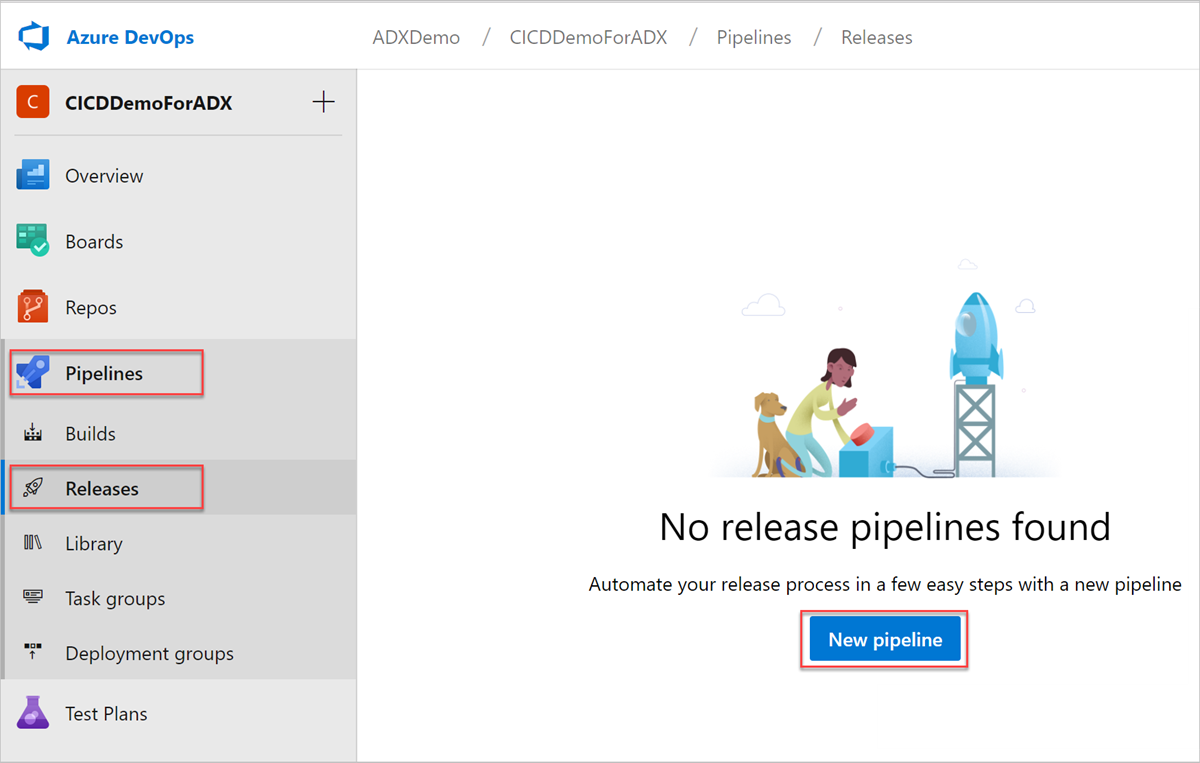
Sign in to your Azure DevOps organization.
Select Pipelines > Releases from the left-hand menu, and then select New pipeline.
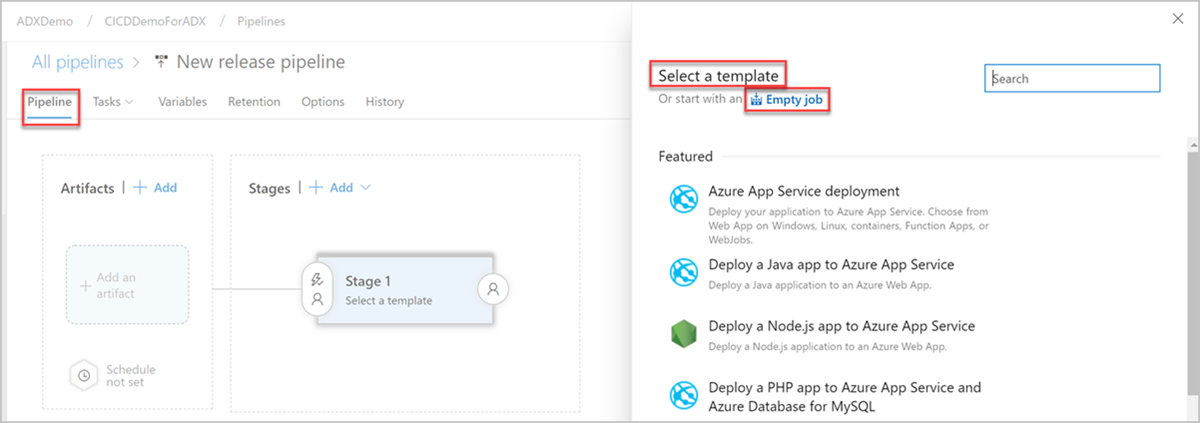
The New release pipeline window opens. In the Pipelines tab, in the Select a template pane, select Empty job.
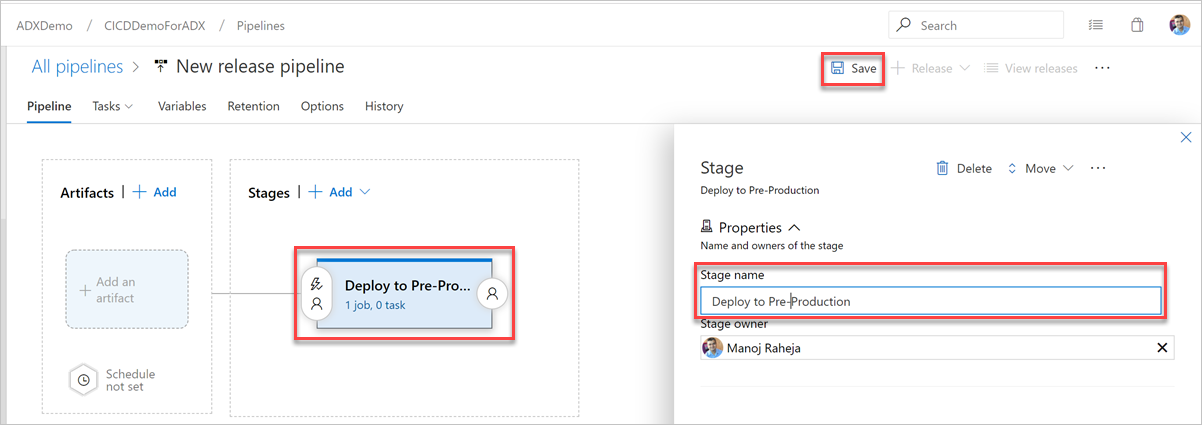
Select the Stage button. In the Stage pane, add the Stage name, and then select Save to save your pipeline.
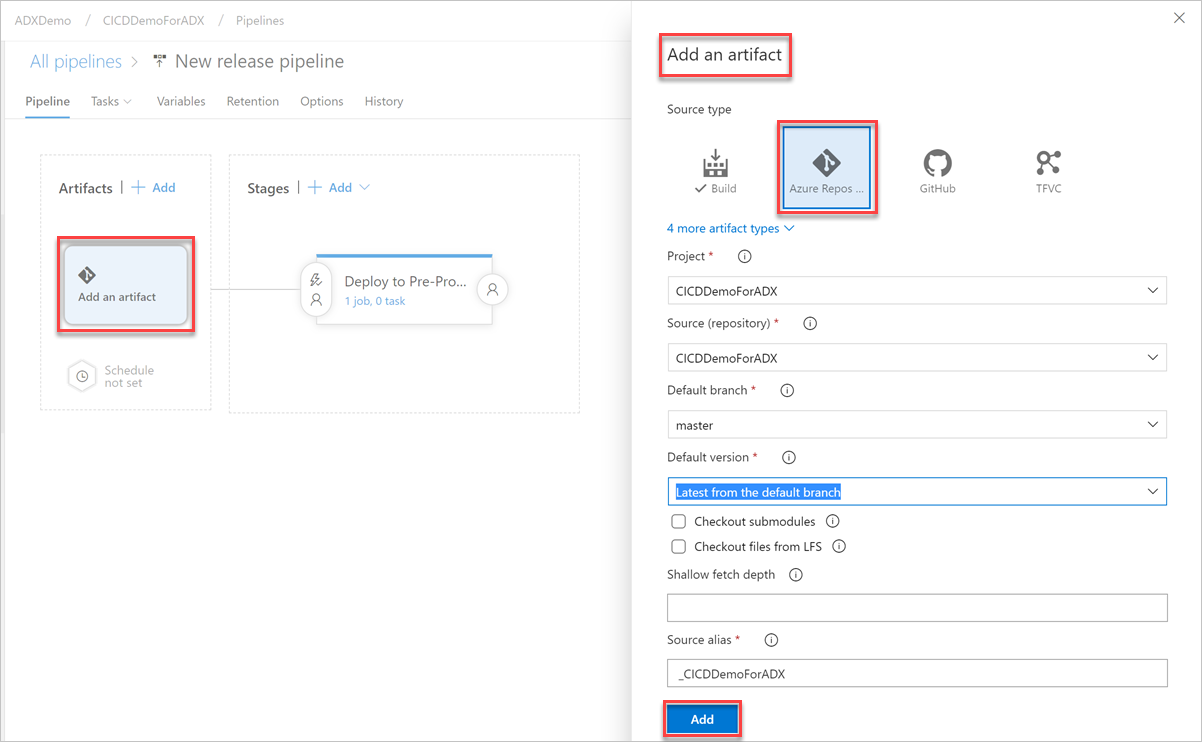
Select Add an artifact button. In the Add an artifact pane, select the repository where your code exists, fill out relevant information, and select Add. Select Save to save your pipeline.
In the Variables tab, select + Add to create a variable for Endpoint URL used in the task. Enter the Name and Value of the endpoint, and then select Save to save your pipeline.
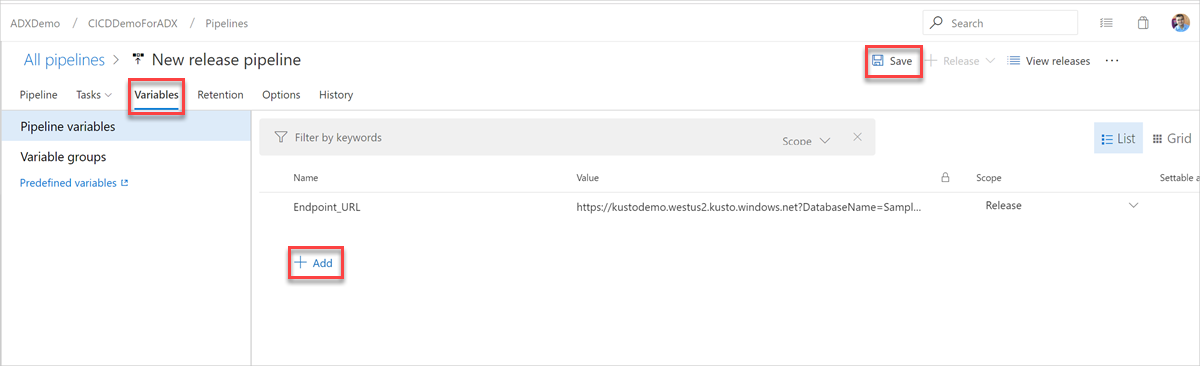
To find your endpoint URL, go to the overview page of your Azure Data Explorer cluster in the Azure portal and copy the cluster URI. Construct the variable URI in the following format
https://<ClusterURI>?DatabaseName=<DBName>. For example, https://kustodocs.westus.kusto.windows.net?DatabaseName=SampleDB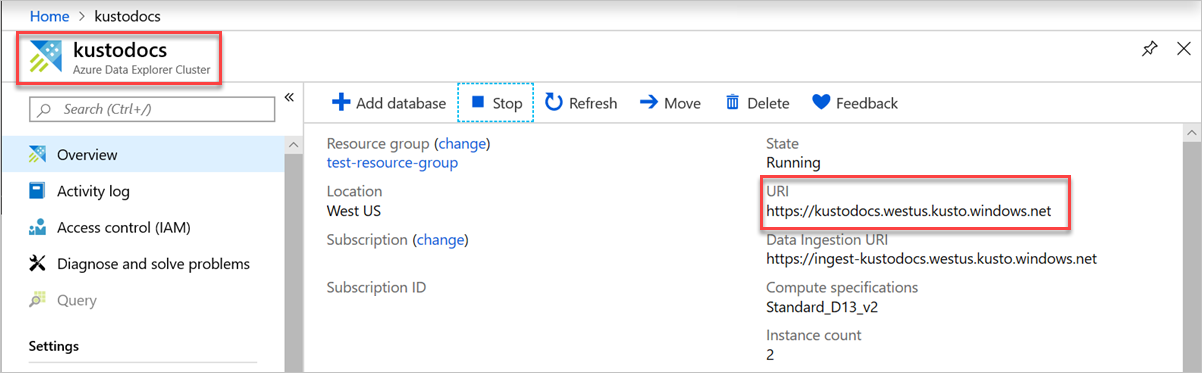
Create a task deploy the folders
In the Pipeline tab, select 1 job, 0 task to add tasks.

Repeat the following steps to create command tasks to deploy files from the Tables, Functions, and Policies folders:
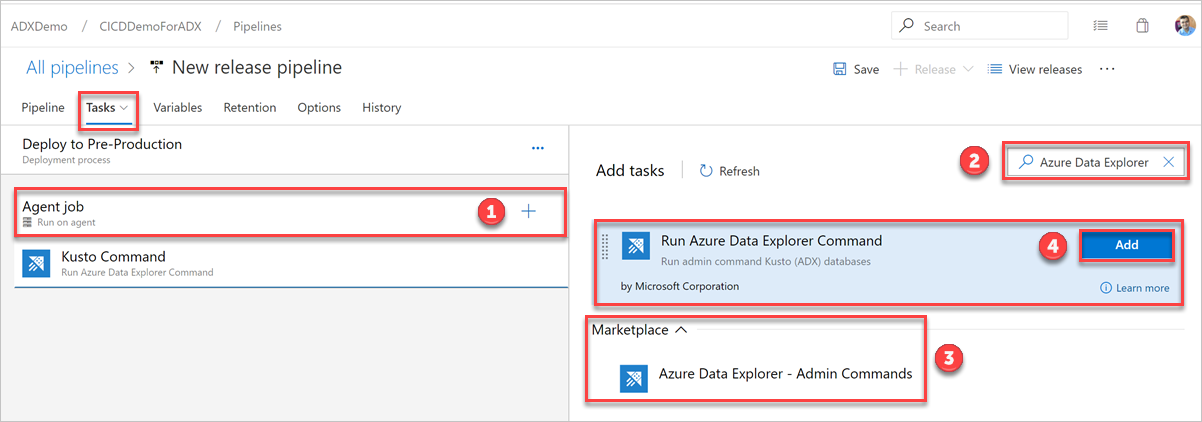
In the Tasks tab, select + by Agent job and search for Azure Data Explorer.
Under Run Azure Data Explorer Command, select Add.
Select Kusto Command and update the task with the following information:
Display name: Name of the task. For example,
Deploy <FOLDER>where<FOLDER>is the name of the folder for the deployment task you're creating.File path: For each folder, specify the path as
*/<FOLDER>/*.cslwhere<FOLDER>is the relevant folder for the task.Endpoint URL: Specify the
EndPoint URLvariable created in previous step.Use Service Endpoint: Select this option.
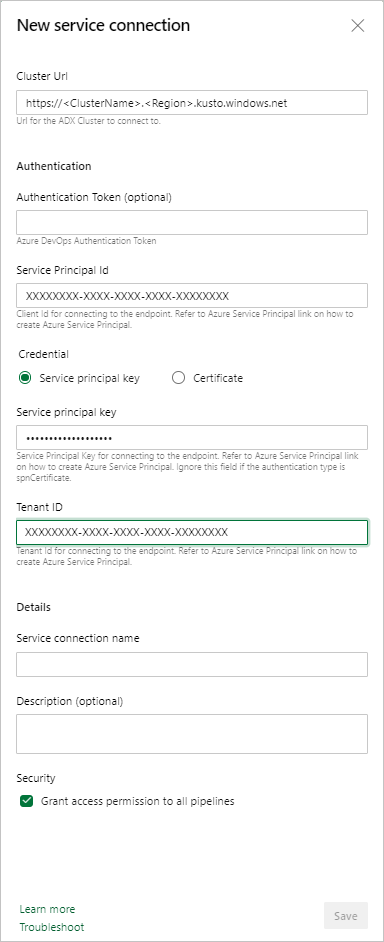
Service Endpoint: Select an existing service endpoint or create a new one (+ New) providing the following information in the Add Azure Data Explorer service connection window:
Setting Suggested value Authentication method Set up Federated Identity Credentials (FIC) (recommended), or Select Service Principal Authentication (SPA). Connection name Enter a name to identify this service endpoint Cluster Url Value can be found in the overview section of your Azure Data Explorer Cluster in the Azure portal Service Principal Id Enter the Microsoft Entra App ID (created as prerequisite) Service Principal App Key Enter the Microsoft Entra App Key (created as prerequisite) Microsoft Entra tenant ID Enter your Microsoft Entra tenant (such as microsoft.com or contoso.com)
Select Allow all pipelines to use this connection checkbox and then select OK.
If your admin commands are long-running asynchronous operations, select the Wait for long Async Admin commands to complete checkbox. When enabled, the task polls the operation status using
.show operationsuntil the command completes.
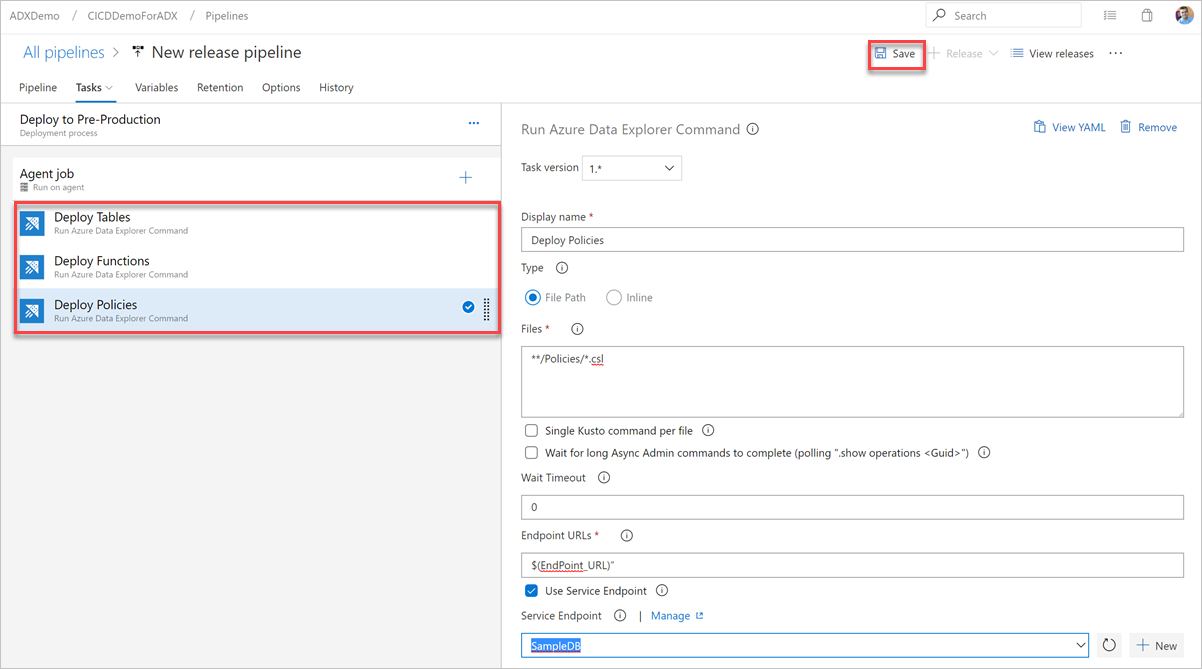
Select Save, and then in the Tasks tab, verify that there are three tasks: Deploy Tables, Deploy Functions, and Deploy Policies.
Create a Query task
If necessary, create a task to run a query against the cluster. Running queries in a Build or Release pipeline can be used to validate a dataset and have a step succeed or fail based on the query results. The tasks success criteria can be based on a row count threshold or a single value depending on what the query returns.
In the Tasks tab, select + by Agent job and search for Azure Data Explorer.
Under Run Azure Data Explorer Query, select Add.
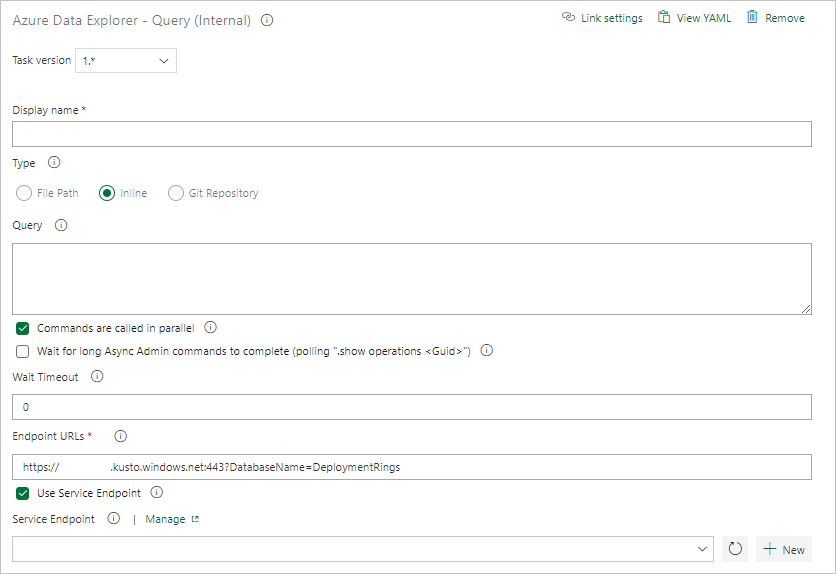
Select Kusto Query and update the task with the following information:
- Display name: Name of the task. For example, Query cluster.
- Type: Select Inline.
- Query: Enter the query you want to run.
- Endpoint URL: Specify the
EndPoint URLvariable created earlier. - Use Service Endpoint: Select this option.
- Service Endpoint: Select a service endpoint.
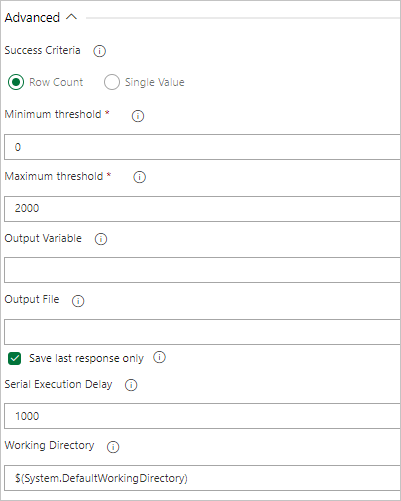
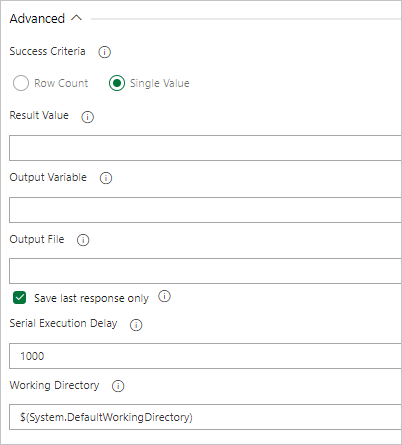
Under Task Results, select the task's success criteria based on the results of your query, as follows:
If your query returns rows, select Row Count and provide the criteria you require.
If your query returns a value, select Single Value and provide the expected result.
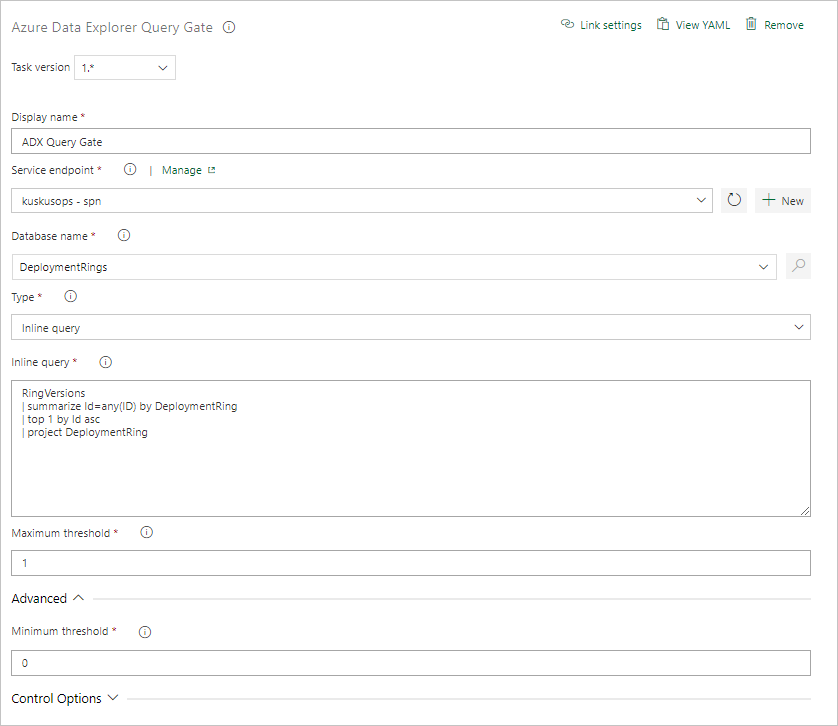
Create a Query Server Gate task
If necessary, create a task to run a query against a cluster and gate the release progress pending Query Results Row Count. The Server Query Gate task is an agentless job, meaning that the query runs directly on the Azure DevOps Server.
In the Tasks tab, select + by Agentless job and search for Azure Data Explorer.
Under Run Azure Data Explorer Query Server Gate, select Add.
Select Kusto Query Server Gate and then select Server Gate Test.
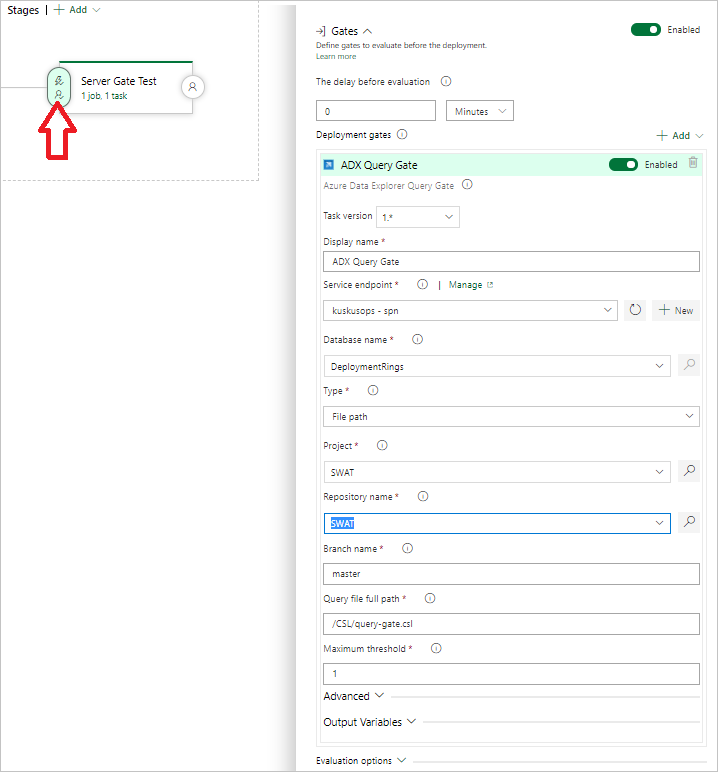
Configure the task providing the following information:
- Display name: Name of the gate.
- Service Endpoint: Select a service endpoint.
- Database name: Specify the database name.
- Type: Select Inline query.
- Query: Enter the query you want to run.
- Maximum threshold: Specify the maximum row count for the query's success criteria.
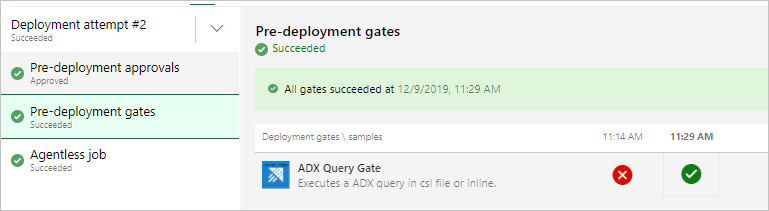
Note
You should see results like the following When running the release.
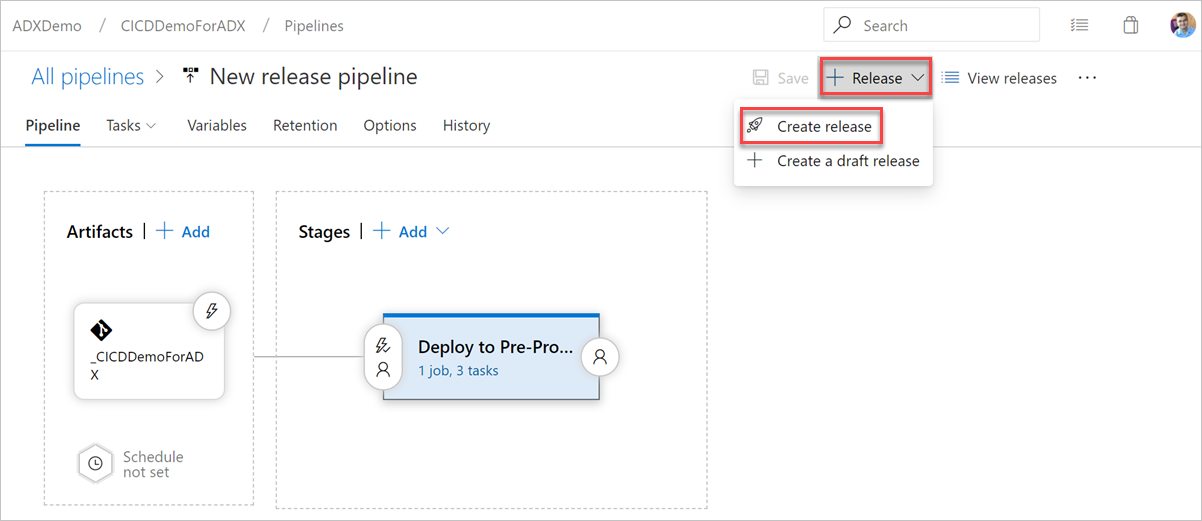
Run the release
Select + Release > Create release to start a release.
In the Logs tab, check the deployment status is successful.
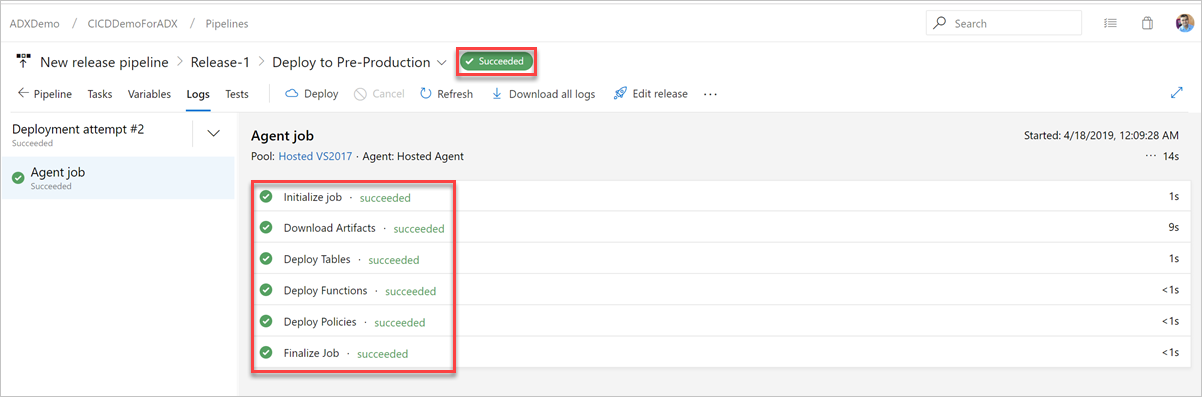
Now the creation of a release pipeline for deployment to preproduction is complete.
Keyless authentication support for Azure Data Explorer DevOps tasks
The extension supports keyless authentication for Azure Data Explorer clusters. Keyless authentication lets you authenticate to Azure Data Explorer clusters without using a key. It's more secure and easier to manage.
Note
Kusto Fabric cluster URLs are not supported for Workload Identity Federation (WIF) and Managed Identity authentication.
Use Federated Identity Credentials (FIC) authentication in an Azure Data Explorer service connection
Note
Starting with extension version 4.0.x, the Azure Data Explorer Service Endpoint supports Workload Identity Federation (WIF) authentication in addition to Service Principal Authentication.
In your DevOps instance, go to Project Settings > Service connections > New service connection > Azure Data Explorer.
Select Federated Identity Credentials, and enter your cluster URL, service principal ID, tenant ID, a service connection name, and then select Save.
In the Azure portal, open the Microsoft Entra app for the specified service principal.
Under Certificates & secrets, select Federated credentials.
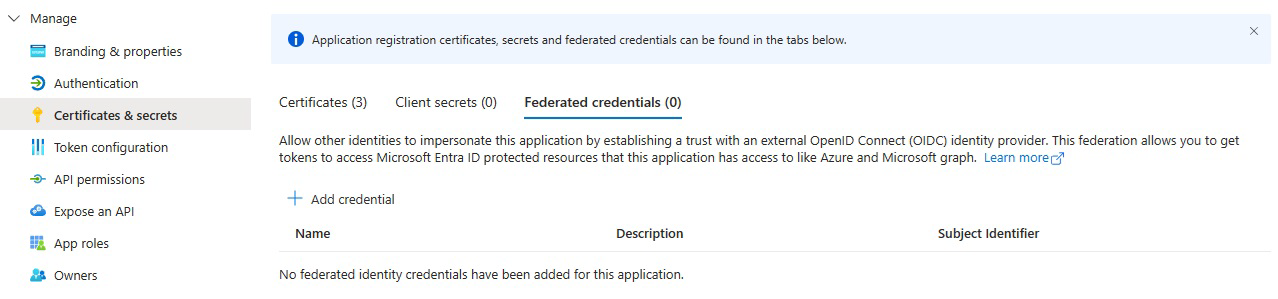
Select Add credential and then for Federated credential scenario, select Other issuer, and fill out the settings using the following information:
Issuer:
<https://vstoken.dev.azure.com/{System.CollectionId}>where{System.CollectionId}is the collection ID of your Azure DevOps organization. You can find the collection ID in the following ways:- In the Azure DevOps classic release pipeline, select Initialize job. The collection ID is displayed in the logs.
Subject identifier:
<sc://{DevOps_Org_name}/{Project_Name}/{Service_Connection_Name}>where{DevOps_Org_name}is the Azure DevOps organization name,{Project_Name}is the project name, and{Service_Connection_Name}is the service connection name you created earlier.Note
If there is space in your service connection name, you can use it with the space in the field. For example:
sc://MyOrg/MyProject/My Service Connection.Name: Enter a name for the credential.
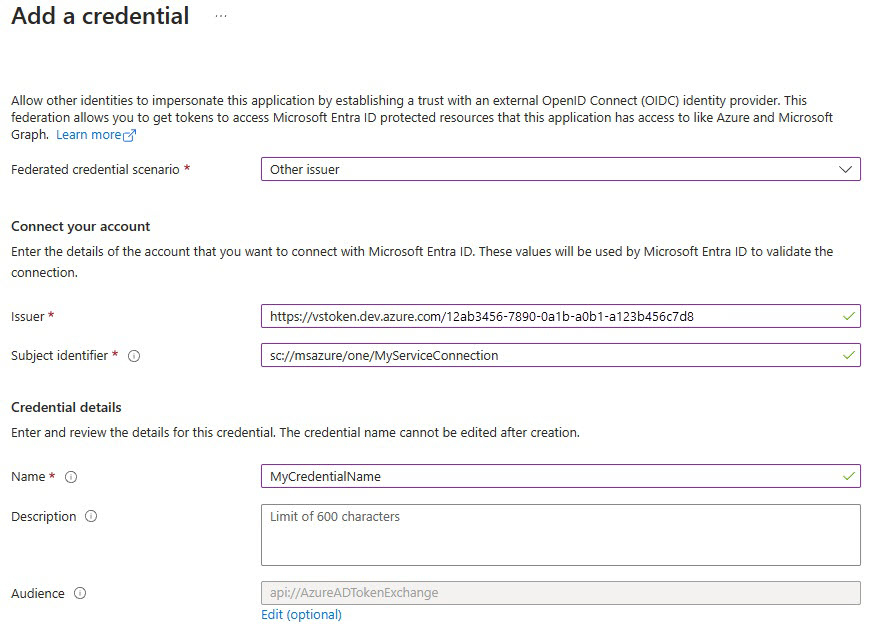
Select Add.
Use Federated Identity Credentials or Managed Identity in an Azure Resource Manager (ARM) service connection
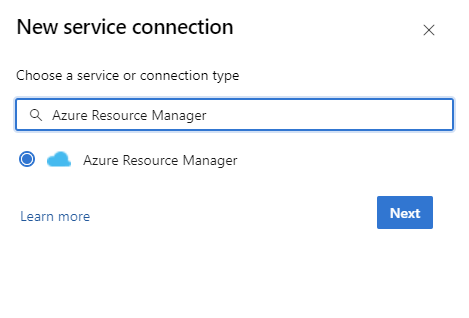
In your DevOps instance, go to Project Settings > Service connections > New service connection > Azure Resource Manager.
Under Authentication method, select Workload Identity Federation (automatic) to proceed. You can also use the manual Workload Identity Federation (manual) option to specify the Workload Identity Federation details or the Managed Identity option. Learn more about setting up a managed identity using Azure Resource Management in Azure Resource Manager (ARM) Service Connections.
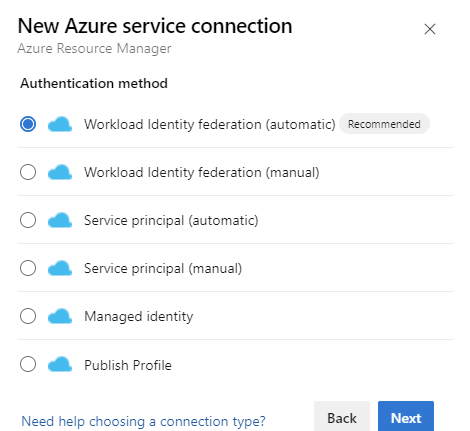
Fill out the required details, select Verify, and then select Save.
YAML pipeline configuration
You can configure tasks using the Azure DevOps web UI or YAML code within the pipeline schema.
The extension provides three pipeline tasks, all accessible via YAML:
- Azure Data Explorer Command (
ADXAdminCommand@5) — Run admin/control commands against an ADX cluster - Azure Data Explorer Query — Run queries against an ADX cluster and parse the results
- Azure Data Explorer Query Server Gate — Agentless task to gate releases depending on query outcome
Tip
For enhanced security, use Workload Identity Federation or Managed Identity authentication via an Azure Resource Manager service connection instead of storing credentials directly in your pipeline. These keyless authentication methods are the recommended best practice.
Admin command sample — inline commands
The following sample runs an inline admin command using an Azure Resource Manager (ARM) service connection, which supports Workload Identity Federation (WIF) and Managed Identity authentication:
steps:
- task: Azure-Kusto.ADXAdminCommands.PublishToADX.ADXAdminCommand@5
  displayName: 'Run inline ADX admin command'
  inputs:
    clusterUri: 'https://<ClusterName>.<Region>.kusto.windows.net'
    databaseName: '<DatabaseName>'
    commandsSource: 'inline'
    inlineCommands: |
      .create-merge table MyTable (Id:int, Name:string, Timestamp:datetime)
      .create-or-alter function MyFunction() { MyTable | take 10 }
    azureSubscription: '<ARM Service Connection Name>'
  continueOnError: true
Admin command sample — file-based commands
The following sample runs admin commands from files matching a glob pattern, using AAD App Registration authentication:
steps:
- task: Azure-Kusto.ADXAdminCommands.PublishToADX.ADXAdminCommand@5
  displayName: 'Deploy schema from files'
  inputs:
    clusterUri: 'https://<ClusterName>.<Region>.kusto.windows.net'
    databaseName: '<DatabaseName>'
    commandsSource: 'files'
    commandFilesPattern: '**/*.csl'
    aadAppId: '$(AAD_APP_ID)'
    aadAppKey: '$(AAD_APP_KEY)'
    aadTenantId: '$(AAD_TENANT_ID)'
  continueOnError: true
You can also use **/*.kql as the glob pattern depending on your file naming convention.
Admin command sample — Azure Resource Manager service connection
The following sample uses an Azure Resource Manager service connection, which supports Workload Identity Federation (WIF) and Managed Identity for keyless authentication:
steps:
- task: Azure-Kusto.ADXAdminCommands.PublishToADX.ADXAdminCommand@5
  displayName: 'Deploy schema via ARM service connection'
  inputs:
    clusterUri: 'https://<ClusterName>.<Region>.kusto.windows.net'
    databaseName: '<DatabaseName>'
    commandsSource: 'files'
    commandFilesPattern: '**/*.csl'
    azureSubscription: '<ARM Service Connection Name>'
  continueOnError: true
  condition: ne(variables['ProductVersion'], '')
Task input parameters
The following table describes the key input parameters for the ADXAdminCommand@5 task:
| Parameter | Description |
|---|---|
clusterUri |
The base URI for the Kusto cluster (for example, https://<ClusterName>.<Region>.kusto.windows.net) |
databaseName |
The name of the target database |
commandsSource |
The source of commands: inline for inline KQL commands, or files for file-based commands |
inlineCommands |
Inline KQL commands to run (used when commandsSource is inline) |
commandFilesPattern |
Glob pattern for script files (used when commandsSource is files), for example **/*.csl or **/*.kql |
aadAppId |
The Microsoft Entra App (Service Principal) ID for AAD App authentication |
aadAppKey |
The Microsoft Entra App key/secret for AAD App authentication |
aadTenantId |
The Microsoft Entra tenant ID for AAD App authentication |
azureSubscription |
The name of the Azure Resource Manager service connection for ARM-based authentication (supports WIF and Managed Identity) |
Authentication methods
The extension supports the following authentication methods:
- Azure Active Directory (AAD) App Registration — Use
aadAppId,aadAppKey, andaadTenantIdto authenticate with a Service Principal. Store credentials as secure pipeline variables. - Certificate-based authentication — Use a certificate instead of an app key for Service Principal authentication. Store the certificate details as secure pipeline variables.
- Managed Identity — Use an Azure Resource Manager service connection configured with Managed Identity. Set the
azureSubscriptioninput to the service connection name. - Workload Identity Federation (WIF) — Use an Azure Resource Manager service connection with Workload Identity Federation (automatic or manual). This is the recommended keyless approach. Set the
azureSubscriptioninput to the service connection name.
Note
Workload Identity Federation (WIF) is a newer addition to the extension. It enables secretless authentication and is the recommended approach for new pipelines. For setup instructions, see Use Federated Identity Credentials or Managed Identity in an Azure Resource Manager (ARM) service connection.
Query sample
steps:
- task: Azure-Kusto.PublishToADX.ADXQuery.ADXQuery@5
  displayName: '<Task Display Name>'
  inputs:
    targetType: 'inline'
    script: |
     let badVer=
     RunnersLogs | where Timestamp > ago(30m)
         | where EventText startswith "$$runnerresult" and Source has "ShowDiagnostics"
         | extend State = extract(@"Status='(.*)', Duration.*",1, EventText)
         | where State == "Unhealthy"
         | extend Reason = extract(@'"NotHealthyReason":"(.*)","IsAttentionRequired.*',1, EventText)
         | extend Cluster = extract(@'Kusto.(Engine|DM|CM|ArmResourceProvider).(.*).ShowDiagnostics',2, Source)
         | where Reason != "Merge success rate past 60min is < 90%"
         | where Reason != "Ingestion success rate past 5min is < 90%"
         | where Reason != "Ingestion success rate past 5min is < 90%, Merge success rate past 60min is < 90%"
         | where isnotempty(Cluster)
         | summarize max(Timestamp) by Cluster,Reason
         | order by  max_Timestamp desc
         | where Reason startswith "Differe"
         | summarize by Cluster
     ;
      DimClusters | where Cluster in (badVer)
     | summarize by Cluster , CmConnectionString , ServiceConnectionString ,DeploymentRing
     | extend ServiceConnectionString = strcat("#connect ", ServiceConnectionString)
     | where DeploymentRing == "$(DeploymentRing)"
    kustoUrls: 'https://<ClusterName>.kusto.windows.net?DatabaseName=<DatabaseName>'
    authType: 'kustoserviceconn'
    connectedServiceName: '<connection service name>'
    minThreshold: '0'
    maxThreshold: '10'
  continueOnError: true