Note
Access to this page requires authorization. You can try signing in or changing directories.
Access to this page requires authorization. You can try changing directories.
APPLIES TO:  Azure Data Factory
Azure Synapse Analytics
Microsoft Purview
Azure Data Factory
Azure Synapse Analytics
Microsoft Purview
Tip
Try out Data Factory in Microsoft Fabric, an all-in-one analytics solution for enterprises. Microsoft Fabric covers everything from data movement to data science, real-time analytics, business intelligence, and reporting. Learn how to start a new trial for free!
This article explores common troubleshooting methods for self-hosted integration runtime (IR) in Azure Data Factory and Synapse workspaces.
Gather self-hosted IR logs
Azure Data Factory and Azure Synapse Analytics
For failed activities that are running on a self-hosted IR or a shared IR, the service supports viewing and uploading error logs. To get the error report ID, follow the instructions here, and then enter the report ID to search for related known issues.
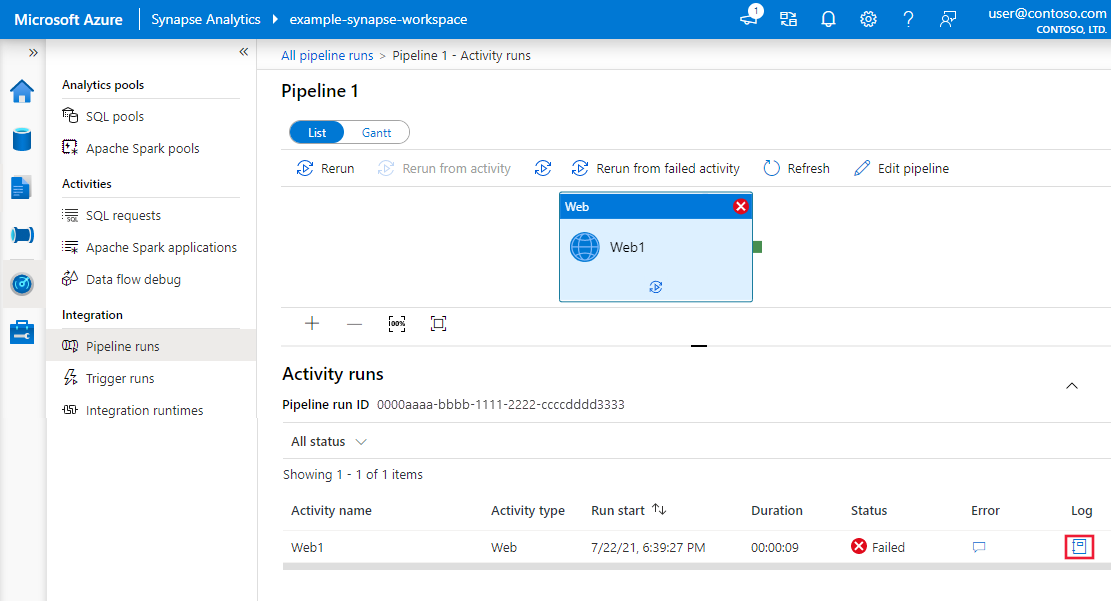
On the Monitor page for the service UI, select Pipeline runs.
Under Activity runs, in the Error column, select the highlighted button to display the activity logs, as shown in the following screenshot:
The activity logs are displayed for the failed activity run.
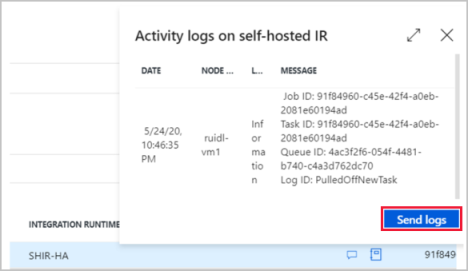
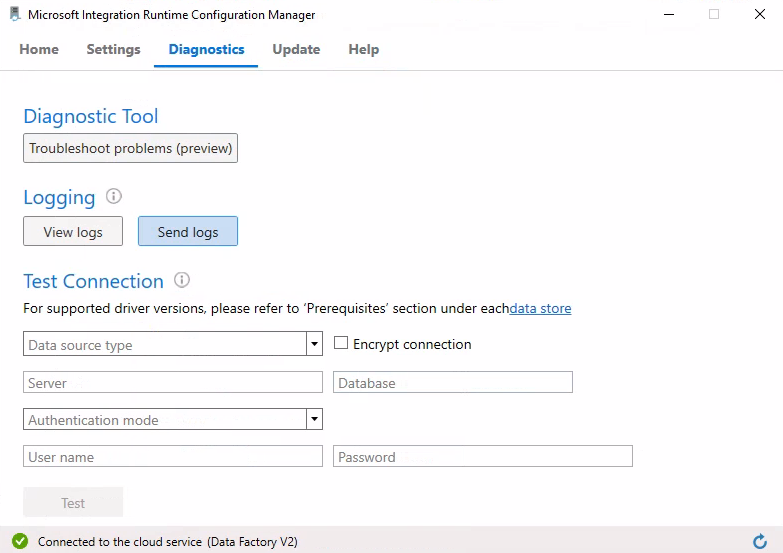
For further assistance, select Send logs.
The Share the self-hosted integration runtime (IR) logs with Microsoft window opens.
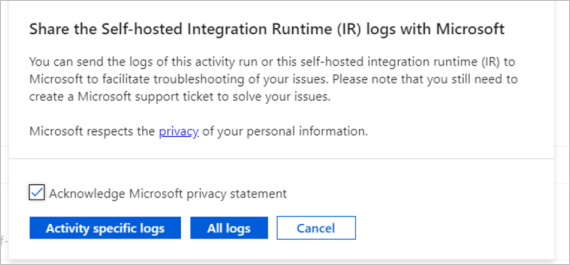
Select which logs you want to send.
- For a self-hosted IR, you can upload logs that are related to the failed activity or all logs on the self-hosted IR node.
- For a shared IR, you can upload only logs that are related to the failed activity.
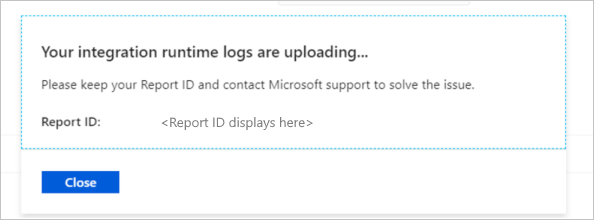
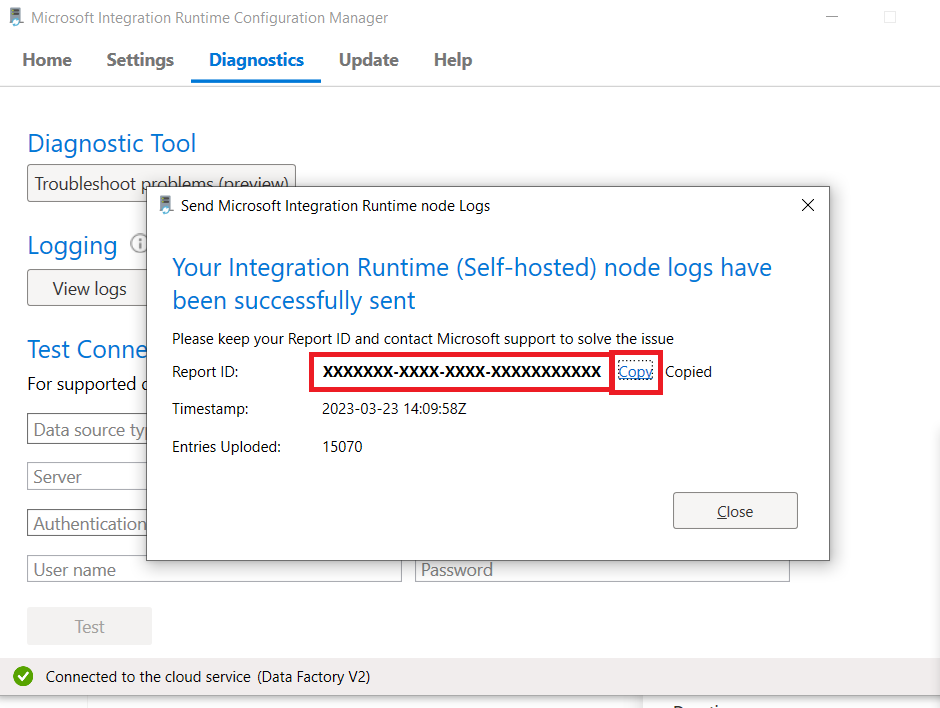
When the logs are uploaded, keep a record of the Report ID for later use if you need further assistance to solve the issue.

Note
Log viewing and uploading requests are executed on all online self-hosted IR instances. If any logs are missing, make sure that all the self-hosted IR instances are online.
Microsoft Purview
For failed Microsoft Purview activities that are running on a self-hosted IR or shared IR, the service supports viewing and uploading error logs from the Windows Event Viewer.
You can look up any errors you see in the error guide below. To get support and troubleshooting guidance for SHIR issues, you may need to generate an error report ID and reach out to Microsoft support.
To generate the error report ID for Microsoft Support, follow these instructions:
Before starting a scan in the Microsoft Purview governance portal:
- Navigate to the machine where the self-hosted integration runtime is installed and open the Windows Event Viewer.
- Clear the Windows Event Viewer logs in the Integration Runtime section. Right-click on the logs and select the clear logs option.
- Navigate back to the Microsoft Purview governance portal and start the scan.
Once the scan shows status Failed, navigate back to the SHIR VM, or machine and refresh the event viewer in the Integration Runtime section.
The activity logs are displayed for the failed scan run.
For further assistance from Microsoft, select Send Logs.
The Share the self-hosted integration runtime (SHIR) logs with Microsoft window opens.
Select which logs you want to send.
- For a self-hosted IR, you can upload logs that are related to the failed activity or all logs on the self-hosted IR node.
- For a shared IR, you can upload only logs that are related to the failed activity.
When the logs are uploaded, keep a record of the Report ID for later use if you need further assistance to solve the issue.


Note
Log viewing and uploading requests are executed on all online self-hosted IR instances. If any logs are missing, make sure that all the self-hosted IR instances are online.
Self-hosted IR general failure or error
Out of memory issue
Symptoms
An OutOfMemoryException (OOM) error occurs when you try to run a lookup activity with a linked IR or a self-hosted IR.
Cause
A new activity can throw an OOM error if the IR machine experiences momentary high memory usage. The issue might be caused by a large volume of concurrent activity, and the error is by design.
Resolution
Check the resource usage and concurrent activity execution on the IR node. Adjust the internal and trigger time of activity runs to avoid too much execution on a single IR node at the same time.
Concurrent jobs limit issue
Symptoms
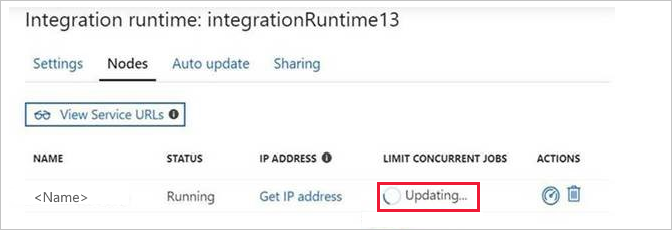
When you try to increase the concurrent jobs limit from UI, the process hangs in Updating status.
Example scenario: The maximum concurrent jobs value is currently set to 24, and you want to increase the count so that your jobs can run faster. The minimum value that you can enter is 3, and the maximum value is 32. You increase the value from 24 to 32 and then select the Update button. The process gets stuck in Updating status, as shown in the following screenshot. You refresh the page, and the value is still displayed as 24. It hasn't been updated to 32 as you had expected.
Cause
The limit on the number of concurrent jobs depends on the computer's logic core and memory. Try to adjust the value downward to a value such as 24, and then view the result.
Tip
- To learn more about logic core count and to determine your machine's logic core count, see Four ways to find the number of cores in your CPU on Windows 10.
- To learn how to calculate the math.log, go to the Logarithm calculator.
Self-hosted IR high availability (HA) SSL certificate issue
Symptoms
The self-hosted IR work node has reported the following error:
"Failed to pull shared states from primary node net.tcp://abc.cloud.corp.Microsoft.com:8060/ExternalService.svc/. Activity ID: XXXXX The X.509 certificate CN=abc.cloud.corp.Microsoft.com, OU=test, O=Microsoft chain building failed. The certificate that was used has a trust chain that cannot be verified. Replace the certificate or change the certificateValidationMode. The revocation function was unable to check revocation because the revocation server was offline."
Cause
When you handle cases that are related to an SSL/TLS handshake, you might encounter some issues related to certificate chain verification.
Resolution
Here's a quick, intuitive way to troubleshoot an X.509 certificate chain build failure:
Export the certificate, which needs to be verified. To do so, do the following:
a. In Windows, select Start, start typing certificates, and then select Manage computer certificates.
b. In File Explorer, on the left pane, search for the certificate that you want to check, right-click it, and then select All tasks > Export.
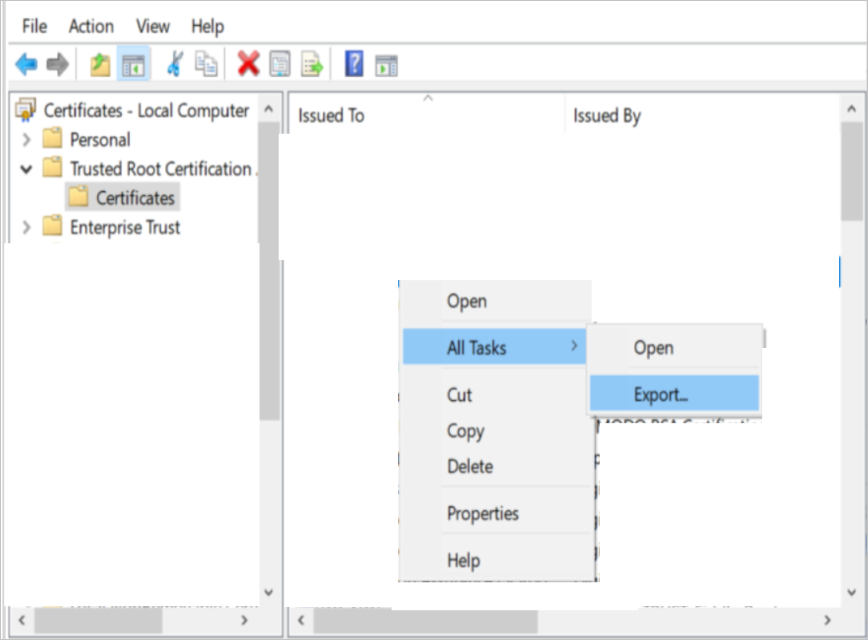
Copy the exported certificate to the client machine.
On the client side, in a Command Prompt window, run the following command. Be sure to replace <certificate path> and <output txt file path> with the actual paths.
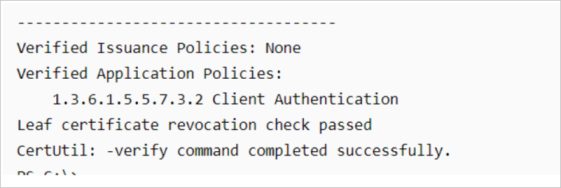
Certutil -verify -urlfetch <certificate path> > <output txt file path>For example:
Certutil -verify -urlfetch c:\users\test\desktop\servercert02.cer > c:\users\test\desktop\Certinfo.txtCheck for errors in the output TXT file. You can find the error summary at the end of the TXT file.
For example:

If you don't see an error at the end of the log file, as shown in the following screenshot, you can consider that the certificate chain has been built successfully on the client machine.
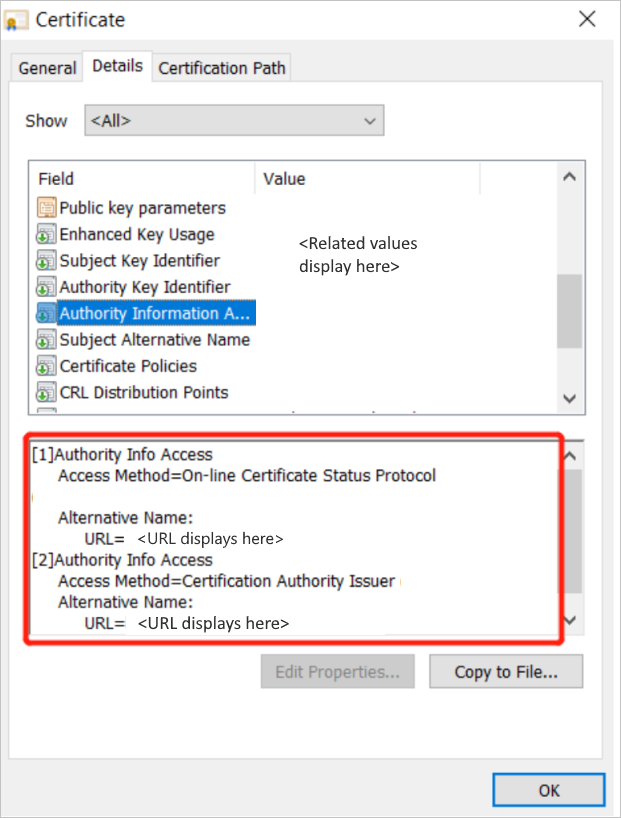
If an AIA (Authority Information Access), CDP (CRL Distribution Point), or OCSP (Online Certificate Status Protocol) file name extension is configured in the certificate file, you can check it in a more intuitive way:
Get this information by checking the certificate details, as shown in the following screenshot:
Run the following command. Be sure to replace <certificate path> with the actual path of the certificate.
Certutil -URL <certificate path>The URL Retrieval tool opens.
To verify certificates with AIA, CDP, and OCSP file name extensions, select Retrieve.
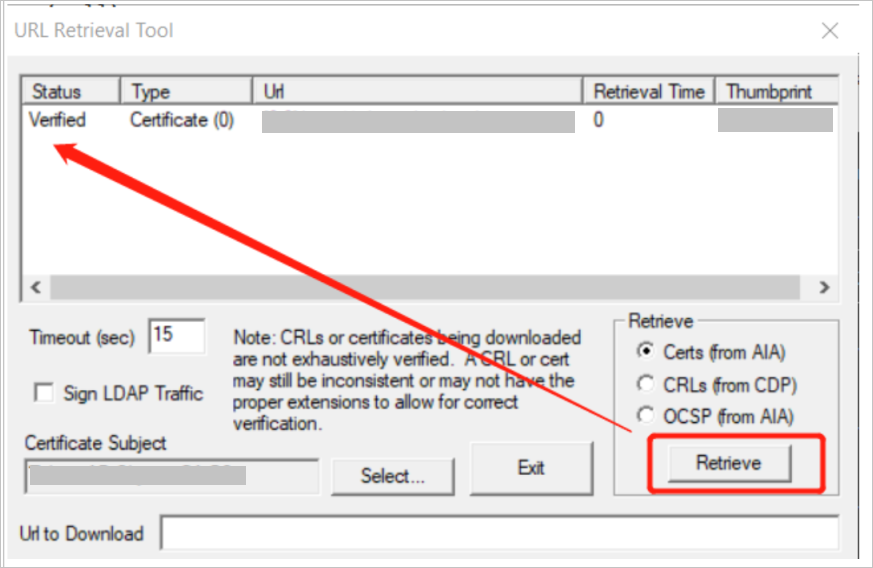
You've built the certificate chain successfully if the certificate status from AIA is Verified and the certificate status from CDP or OCSP is Verified.
If you fail when you try to retrieve AIA or CDP, work with your network team to get the client machine ready to connect to the target URL. It will be enough if either the HTTP path or the Lightweight Directory Access Protocol (LDAP) path can be verified.
Self-hosted IR could not load file or assembly
Symptoms
You get the following error message:
"Could not load file or assembly 'XXXXXXXXXXXXXXXX, Version=4.0.2.0, Culture=neutral, PublicKeyToken=XXXXXXXXX' or one of its dependencies. The system cannot find the file specified. Activity ID: 92693b45-b4bf-4fc8-89da-2d3dc56f27c3"
Here is a more specific error message:
"Could not load file or assembly 'System.ValueTuple, Version=4.0.2.0, Culture=neutral, PublicKeyToken=XXXXXXXXX' or one of its dependencies. The system cannot find the file specified. Activity ID: 92693b45-b4bf-4fc8-89da-2d3dc56f27c3"
Cause
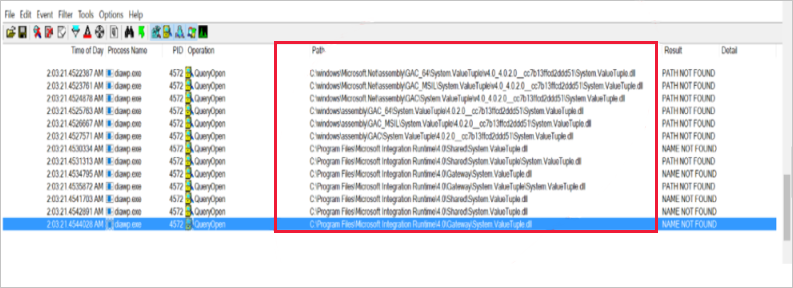
In Process Monitor, you can view the following result:
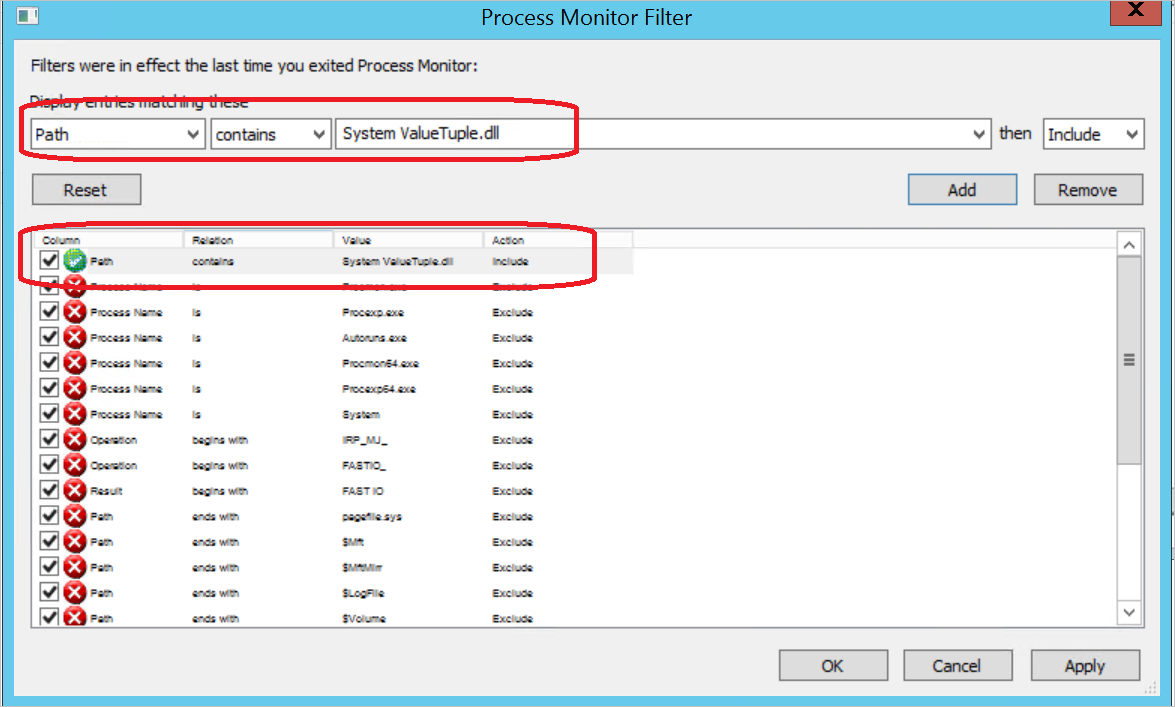
Tip
In Process Monitor, you can set filters as shown in following screenshot.
The preceding error message says that the DLL System.ValueTuple is not located in the related Global Assembly Cache (GAC) folder, in the C:\Program Files\Microsoft Integration Runtime\4.0\Gateway folder, or in the C:\Program Files\Microsoft Integration Runtime\4.0\Shared folder.
Basically, the process loads the DLL first from the GAC folder, then from the Shared folder, and finally from the Gateway folder. Therefore, you can load the DLL from any path that's helpful.
Resolution
You'll find the System.ValueTuple.dll file in the C:\Program Files\Microsoft Integration Runtime\4.0\Gateway\DataScan folder. To resolve the issue, copy the System.ValueTuple.dll file to the C:\Program Files\Microsoft Integration Runtime\4.0\Gateway folder.
You can use the same method to resolve other missing file or assembly issues.
More information about this issue
The reason why you see the System.ValueTuple.dll under %windir%\Microsoft.NET\assembly and %windir%\assembly is that this is a .NET behavior.
In the following error, you can clearly see that the System.ValueTuple assembly is missing. This issue arises when the application tries to check the System.ValueTuple.dll assembly.
"<LogProperties><ErrorInfo>[{"Code":0,"Message":"The type initializer for 'Npgsql.PoolManager' threw an exception.","EventType":0,"Category":5,"Data":{},"MsgId":null,"ExceptionType":"System.TypeInitializationException","Source":"Npgsql","StackTrace":"","InnerEventInfos":[{"Code":0,"Message":"Could not load file or assembly 'System.ValueTuple, Version=4.0.2.0, Culture=neutral, PublicKeyToken=XXXXXXXXX' or one of its dependencies. The system cannot find the file specified.","EventType":0,"Category":5,"Data":{},"MsgId":null,"ExceptionType":"System.IO.FileNotFoundException","Source":"Npgsql","StackTrace":"","InnerEventInfos":[]}]}]</ErrorInfo></LogProperties>"
For more information about GAC, see Global Assembly Cache.
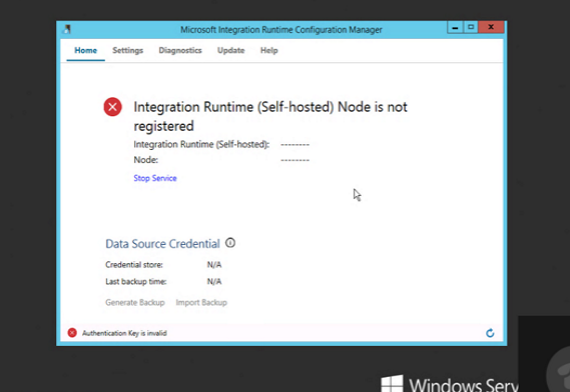
Self-hosted integration runtime Authentication Key is missing
Symptoms
The self-hosted integration runtime suddenly goes offline without an Authentication Key, and the Event Log displays the following error message:
"Authentication Key is not assigned yet"

Cause
- The self-hosted IR node or logical self-hosted IR in the Azure portal was deleted.
- A clean uninstall was performed.
Resolution
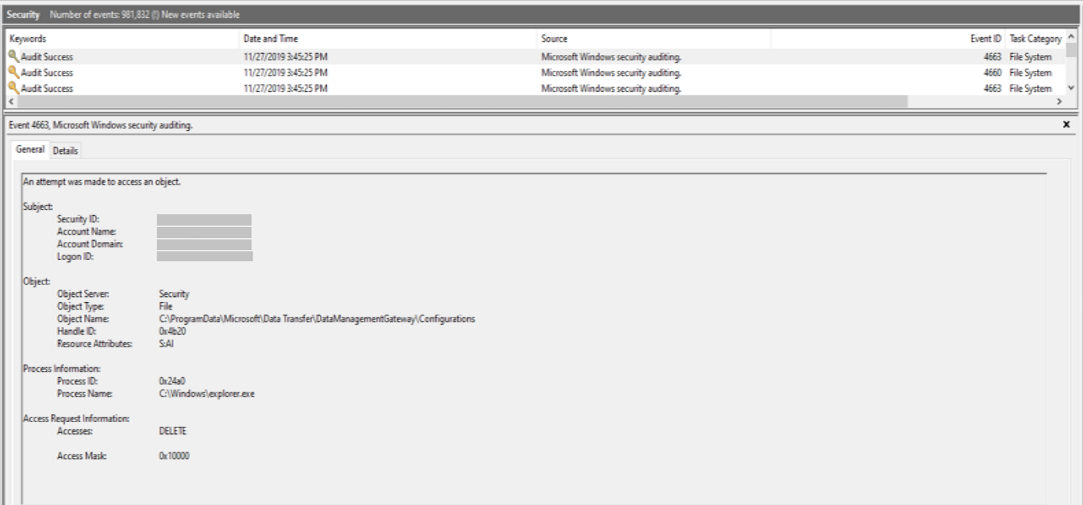
If neither of the preceding causes applies, you can go to the %programdata%\Microsoft\Data Transfer\DataManagementGateway folder to see whether the Configurations file has been deleted. If it was deleted, follow the instructions in the Netwrix article Detect who deleted a file from your Windows file servers.
Can't use self-hosted IR to bridge two on-premises datastores
Symptoms
After you create self-hosted IRs for both the source and destination datastores, you want to connect the two IRs to finish a copy activity. If the datastores are configured in different virtual networks, or the datastores can't understand the gateway mechanism, you receive either of the following errors:
- "The driver of source cannot be found in destination IR"
- "The source cannot be accessed by the destination IR"
Cause
The self-hosted IR is designed as a central node of a copy activity, not a client agent that needs to be installed for each datastore.
In this case, you should create the linked service for each datastore with the same IR, and the IR should be able to access both datastore through the network. It doesn't matter whether the IR is installed at the source datastore or the destination datastore, or on a third machine. If two linked services are created with different IRs but used in the same copy activity, the destination IR is used, and you need to install the drivers for both datastores on the destination IR machine.
Resolution
Install drivers for both the source and destination datastores on the destination IR, and make sure that it can access the source datastore.
If the traffic can't pass through the network between two datastores (for example, they're configured in two virtual networks), you might not finish copying in one activity even with the IR installed. If you can't finish copying in a single activity, you can create two copy activities with two IRs, each in a VENT:
- Copy one IR from datastore 1 to Azure Blob Storage
- Copy another IR from Azure Blob Storage to datastore 2.
This solution could simulate the requirement to use the IR to create a bridge that connects two disconnected datastores.
Credential sync issue causes credential loss from HA
Symptoms
If the data source credential "XXXXXXXXXX" is deleted from the current integration runtime node with payload, you receive the following error message:
"When you delete the link service on Azure portal, or the task has the wrong payload, please create new link service with your credential again."
Cause
Your self-hosted IR is built in HA mode with two nodes, but the nodes aren't in a credentials sync state. This means that the credentials stored in the dispatcher node aren't synced to other worker nodes. If any failover happens from the dispatcher node to the worker node, and the credentials exist only in the previous dispatcher node, the task will fail when you're trying to access credentials, and you'll receive the preceding error.
Resolution
The only way to avoid this issue is to make sure that the two nodes are in credentials sync state. If they aren't in sync, you have to reenter the credentials for the new dispatcher.
Can't choose the certificate because the private key is missing
Symptoms
You've imported a PFX file to the certificate store.
When you selected the certificate through the IR Configuration Manager UI, you received the following error message:
"Failed to change intranet communication encryption mode. It is likely that certificate '<certificate name>' may not have a private key that is capable of key exchange or the process may not have access rights for the private key. Please see inner exception for detail.""
Cause
- The user account has a low privilege level and can't access the private key.
- The certificate was generated as a signature but not as a key exchange.
Resolution
To operate the UI, use an account with appropriate privileges for accessing the private key.
Import the certificate by running the following command:
certutil -importpfx FILENAME.pfx AT_KEYEXCHANGE
Self-hosted integration runtime nodes out of the sync issue
Symptoms
Self-hosted integration runtime nodes try to sync the credentials across nodes but get stuck in the process and encounter the error message below after a while:
"The Integration Runtime (Self-hosted) node is trying to sync the credentials across nodes. It may take several minutes."
Note
If this error appears for over 10 minutes, please check the connectivity with the dispatcher node.
Cause
The reason is that the worker nodes do not have access to the private keys. This can be confirmed from the self-hosted integration runtime logs below:
[14]0460.3404::05/07/21-00:23:32.2107988 [System] A fatal error occurred when attempting to access the TLS server credential private key. The error code returned from the cryptographic module is 0x8009030D. The internal error state is 10001.You have no issue with the sync process when you use the service principal authentication in the linked service. However, when you switch the authentication type to account key, the syncing issue started. This is because the self-hosted integration runtime service runs under a service account (NT SERVICE\DIAHostService) and it need to be added to the private key permissions.
Resolution
To solve this issue, you need to add the self-hosted integration runtime service account (NT SERVICE\DIAHostService) to the private key permissions. You can apply the following steps:
Open your Microsoft Management Console (MMC) Run Command.

In the MMC pane, apply the following steps:
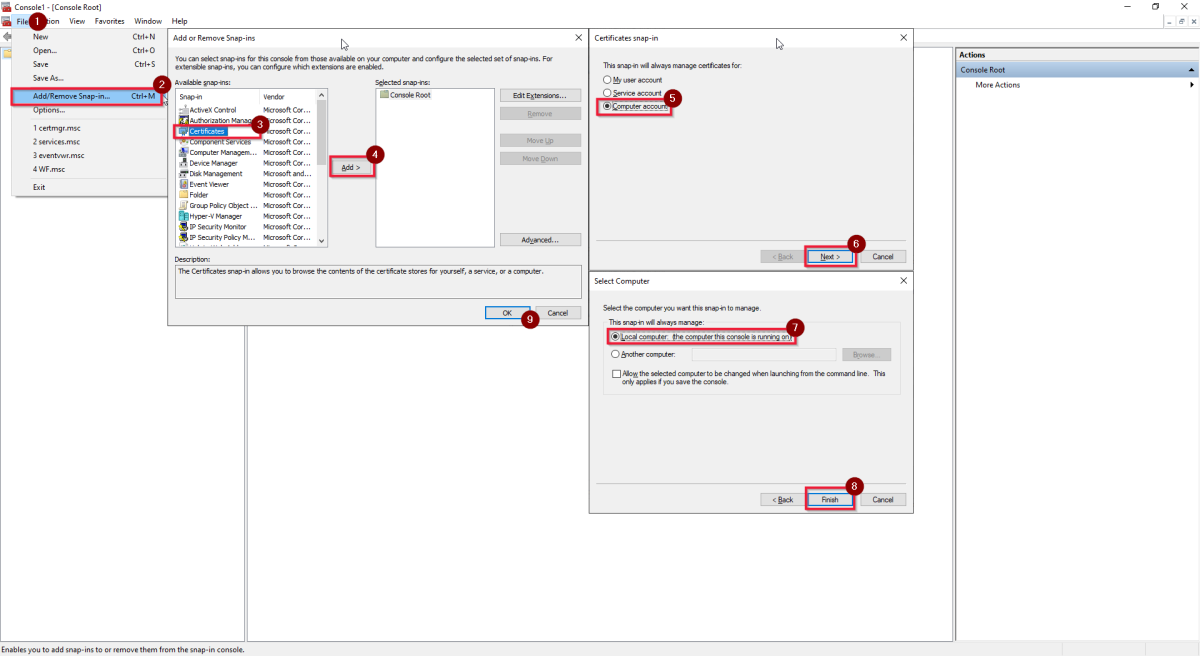
- Select File.
- Choose Add/Remove Snap-in in th drop-down menu.
- Select Certificates in the "Available snap-ins" pane.
- Select Add.
- In the pop-up "Certificates snap-in" pane, choose Computer account.
- Select Next.
- In the "Select Computer" pane, choose Local computer: the computer this console is running on.
- Select Finish.
- Select OK in the "Add or Remove Snap-ins" pane.
In the pane of MMC, move on with the following steps:
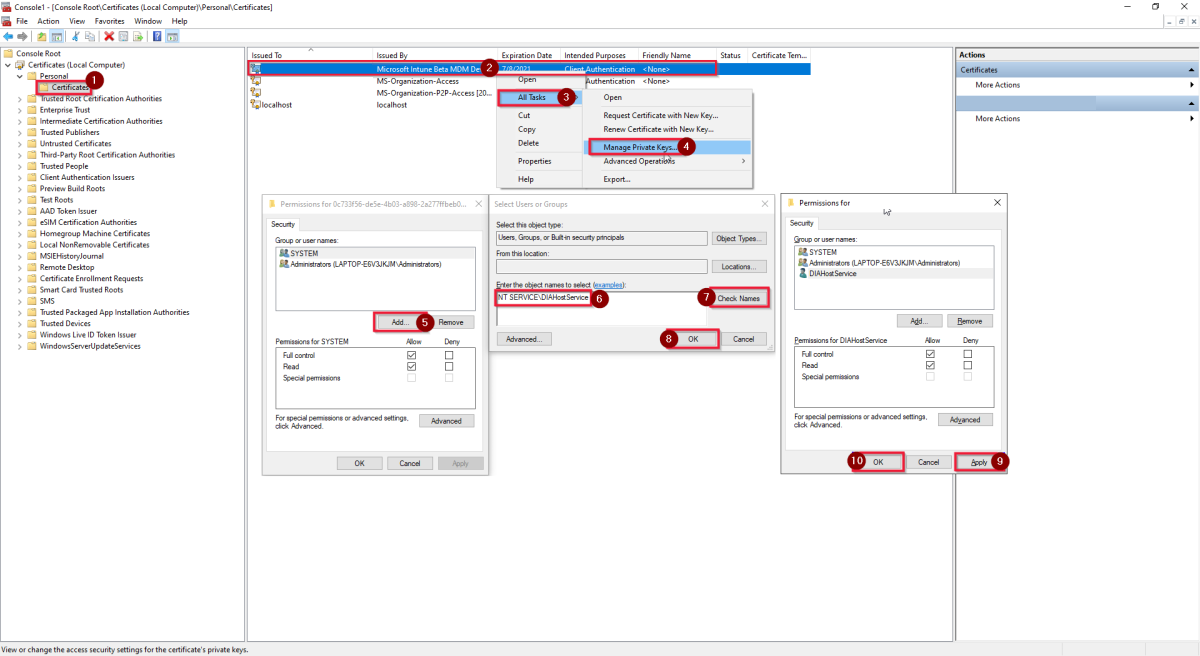
- From the left folder list, select Console Root -> Certificates (Local Computer) -> Personal -> Certificates.
- Right-click the Microsoft Intune Beta MDM.
- Select All Tasks in the drop-down list.
- Select Manage Private Keys.
- Select Add under "Group or user names".
- Select NT SERVICE\DIAHostService to grant it full control access to this certificate, apply and safe.
- Select Check Names and then select OK.
- In the "Permissions" pane, select Apply and then select OK.


UserErrorJreNotFound error message when you run a copy activity to Azure
Symptoms
When you try to copy content to Microsoft Azure by using a Java-based tool or program (for example, copying ORC or Parquet format files), you receive an error message that resembles the following:
ErrorCode=UserErrorJreNotFound,'Type=Microsoft.DataTransfer.Common.Shared.HybridDeliveryException,Message=Java Runtime Environment is not found. Go to
http://go.microsoft.com/fwlink/?LinkId=808605to download and install on your Integration Runtime (Self-hosted) node machine. Note 64-bit Integration Runtime requires 64-bit JRE and 32-bit Integration Runtime requires 32-bit JRE.,Source=Microsoft.DataTransfer.Common,''Type=System.DllNotFoundException,Message=Unable to load DLL 'jvm.dll': The specified module could not be found. (Exception from HRESULT: 0x8007007E),Source=Microsoft.DataTransfer.Richfile.HiveOrcBridgeCause
This issue occurs for either of the following reasons:
Java Runtime Environment (JRE) isn't installed correctly on your Integration Runtime server.
Your Integration Runtime server lacks the required dependency for JRE.
By default, Integration Runtime resolves the JRE path by using registry entries. Those entries should be automatically set during JRE installation.
Resolution
Follow the steps in this section carefully. Serious problems might occur if you modify the registry incorrectly. Before you modify it, back up the registry for restoration in case problems occur.
To fix this issue, follow these steps to verify the status of the JRE installation:
Make sure that Integration Runtime (Diahost.exe) and JRE are installed on the same platform. Check the following conditions:
64-bit JRE for 64-bit ADF Integration Runtime should be installed in the folder:
C:\Program Files\Java\Note
The folder is not
C:\Program Files (x86)\Java\Java Runtime (JRE) is version 11 or greater, from a JRE provider such as Microsoft OpenJDK 11 or Eclipse Temurin 11. Ensure that the JAVA_HOME system environment variable is set to the JDK folder (not just the JRE folder) you may also need to add the bin folder to your system's PATH environment variable.
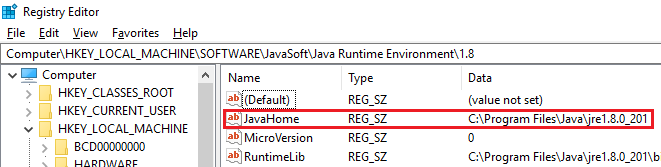
Check the registry for the appropriate settings. To do this, follow these steps:
In the Run menu, type Regedit, and then press Enter.
In the navigation pane, locate the following subkey:
HKEY_LOCAL_MACHINE\SOFTWARE\JavaSoft\Java Runtime Environment.In the Details pane, there should be a Current Version entry that shows the JRE version (for example, 1.8).

In the navigation pane, locate a subkey that is an exact match for the version (for example 1.8) under the JRE folder. In the details pane, there should be a JavaHome entry. The value of this entry is the JRE installation path.
Locate the bin\server folder in the following path:
C:\Program Files\Java\jre1.8.0_74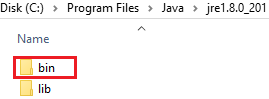
Check whether this folder contains a jvm.dll file. If it does not, check for the file in the
bin\clientfolder.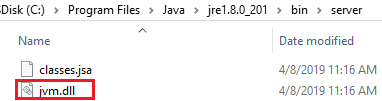
Note
- If any of these configurations are not as described in these steps, use the JRE windows installer to fix the problems.
- If all the configurations in these steps are correct as described, there may be a VC++ runtime library missing in the system. You can fix this problem by installing the VC++ 2010 Redistributable Package.
Self-hosted IR setup
Integration runtime registration error
Symptoms
You might occasionally want to run a self-hosted IR in a different account for either of the following reasons:
- Company policy disallows the service account.
- Some authentication is required.
After you change the service account on the service pane, you might find that the integration runtime stops working, and you get the following error message:
"The Integration Runtime (Self-hosted) node has encountered an error during registration. Cannot connect to the Integration Runtime (Self-hosted) Host Service."
Cause
Many resources are granted only to the service account. When you change the service account to another account, the permissions of all dependent resources remain unchanged.
Resolution
Go to the integration runtime event log to check the error.
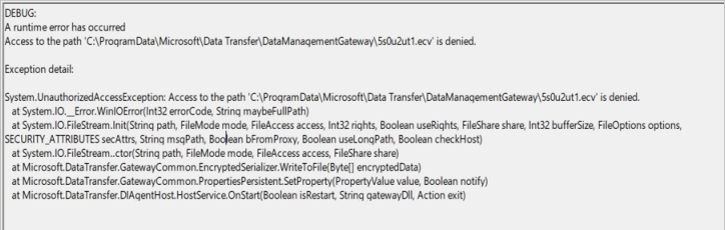
If the error in the event log is "UnauthorizedAccessException," do the following:
Check the DIAHostService logon service account in the Windows service panel.
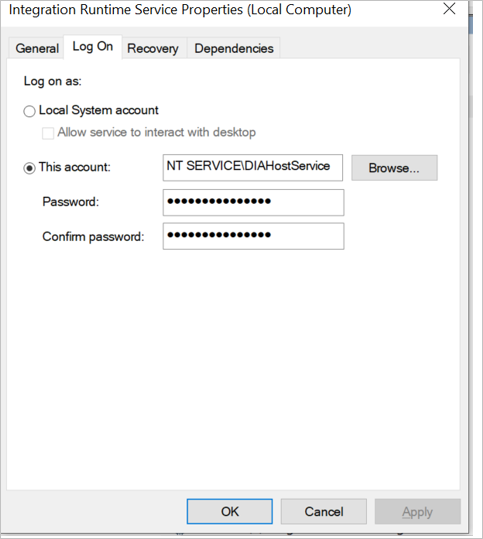
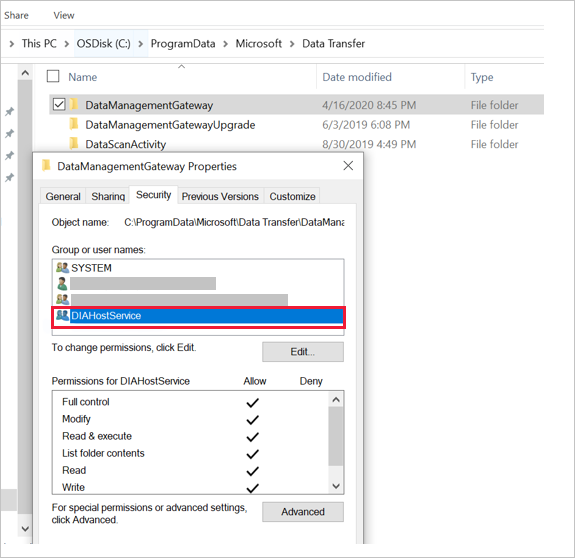
Check to see whether the logon service account has read/write permissions for the %programdata%\Microsoft\DataTransfer\DataManagementGateway folder.
By default, if the service logon account hasn't been changed, it should have read/write permissions.
If you've changed the service logon account, mitigate the issue by doing the following:
a. Perform a clean uninstallation of the current self-hosted IR.
b. Install the self-hosted IR bits.
c. Change the service account by doing the following:i. Go to the self-hosted IR installation folder, and then switch to the Microsoft Integration Runtime\4.0\Shared folder.
ii. Open a Command Prompt window by using elevated privileges. Replace <user> and <password> with your own username and password, and then run the following command:
dmgcmd.exe -SwitchServiceAccount "<user>" "<password>"
iii. If you want to change to the LocalSystem account, be sure to use the correct format for this account:dmgcmd.exe -SwitchServiceAccount "NT Authority\System" ""
Do not use this format:dmgcmd.exe -SwitchServiceAccount "LocalSystem" ""
iv. Optionally, because Local System has higher privileges than Administrator, you can also directly change it in "Services".
v. You can use a local/domain user for the IR service logon account.d. Register the integration runtime.
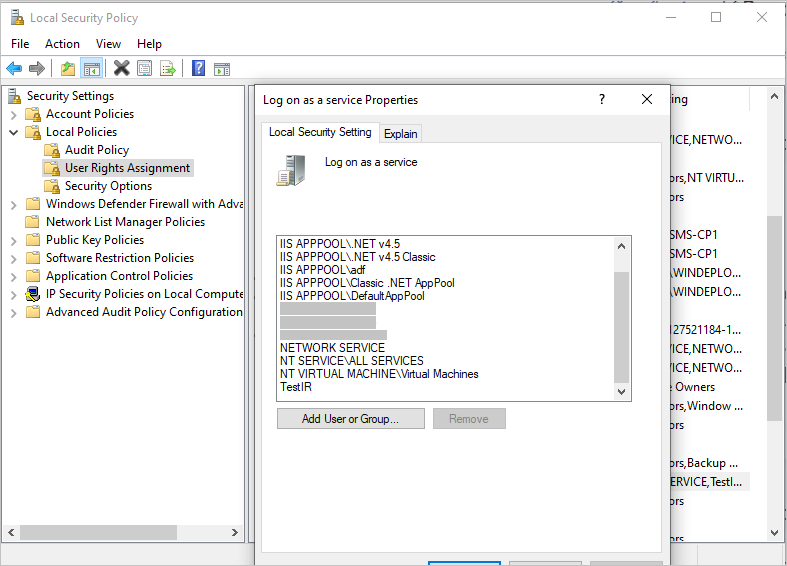
If the error is "Service 'Integration Runtime Service' (DIAHostService) failed to start. Verify that you have sufficient privileges to start system services," do the following:
Check the DIAHostService logon service account in the Windows service panel.
Check to see whether the logon service account has Log on as a service permission to start the Windows service:
More information
If neither of the preceding two resolution patterns applies in your case, try to collect the following Windows event logs:
- Applications and Services Logs > Integration Runtime
- Windows Logs > Application
Can't find the Register button to register a self-hosted IR
Symptoms
When you register a self-hosted IR, the Register button isn't displayed on the Configuration Manager pane.
Cause
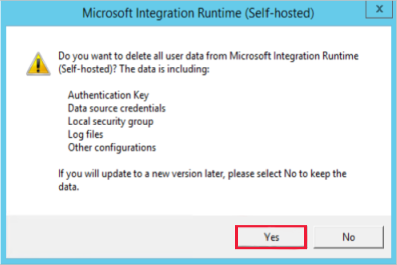
As of the release of Integration Runtime 3.0, the Register button on existing integration runtime nodes has been removed to enable a cleaner and more secure environment. If a node has been registered to an integration runtime, whether it's online or not, re-register it to another integration runtime by uninstalling the previous node, and then install and register the node.
Resolution
In Control Panel, uninstall the existing integration runtime.
Important
In the following process, select Yes. Do not keep data during the uninstallation process.
If you don't have the integration runtime installer MSI file, go to download center to download the latest integration runtime.
Install the MSI file, and register the integration runtime.
Unable to register the self-hosted IR because of localhost
Symptoms
You're unable to register the self-hosted IR on a new machine when you use get_LoopbackIpOrName.
Debug: A runtime error has occurred. The type initializer for 'Microsoft.DataTransfer.DIAgentHost.DataSourceCache' threw an exception. A non-recoverable error occurred during a database lookup.
Exception detail: System.TypeInitializationException: The type initializer for 'Microsoft.DataTransfer.DIAgentHost.DataSourceCache' threw an exception. ---> System.Net.Sockets.SocketException: A non-recoverable error occurred during a database lookup at System.Net.Dns.GetAddrInfo(String name).
Cause
The issue usually occurs when the localhost is being resolved.
Resolution
Use localhost IP address 127.0.0.1 to host the file and resolve the issue.
Self-hosted setup failed
Symptoms
You're unable to uninstall an existing IR, install a new IR, or upgrade an existing IR to a new IR.
Cause
The integration runtime installation depends on the Windows Installer service. You might experience installation problems for the following reasons:
- Insufficient available disk space.
- Lack of permissions.
- The Windows NT service is locked.
- CPU utilization is too high.
- The MSI file is hosted in a slow network location.
- Some system files or registries were touched unintentionally.
The IR service account failed to fetch certificate access
Symptoms
When you install a self-hosted IR via Microsoft Integration Runtime Configuration Manager, a certificate with a trusted certificate authority (CA) is generated. The certificate couldn't be applied to encrypt communication between two nodes, and the following error message is displayed:
"Failed to change Intranet communication encryption mode: Failed to grant Integration Runtime service account the access of to the certificate '<certificate name>'. Error code 103"
Cause
The certificate is using key storage provider (KSP) storage, which is not supported yet. To date, self-hosted IR supports only cryptographic service provider (CSP) storage.
Resolution
We recommend that you use CSP certificates in this case.
Solution 1
To import the certificate, run the following command:
Certutil.exe -CSP "CSP or KSP" -ImportPFX FILENAME.pfx
Solution 2
To convert the certificate, run the following commands:
openssl pkcs12 -in .\xxxx.pfx -out .\xxxx_new.pem -password pass: <EnterPassword>openssl pkcs12 -export -in .\xxxx_new.pem -out xxxx_new.pfxBefore and after conversion:


Self-hosted integration runtime version 5.x
For the upgrade to version 5.x of the self-hosted integration runtime, we require .NET Framework Runtime 4.7.2 or later. On the download page, you'll find download links for the latest 4.x version and the latest two 5.x versions.
For Azure Data Factory v2 and Azure Synapse customers:
- If automatic update is on and you've already upgraded your .NET Framework Runtime to 4.7.2 or later, the self-hosted integration runtime will be automatically upgraded to the latest 5.x version.
- If automatic update is on and you haven't upgraded your .NET Framework Runtime to 4.7.2 or later, the self-hosted integration runtime won't be automatically upgraded to the latest 5.x version. The self-hosted integration runtime will stay in the current 4.x version. You can see a warning for a .NET Framework Runtime upgrade in the portal and the self-hosted integration runtime client.
- If automatic update is off and you've already upgraded your .NET Framework Runtime to 4.7.2 or later, you can manually download the latest 5.x and install it on your machine.
- If automatic update is off and you haven't upgraded your .NET Framework Runtime to 4.7.2 or later. When you try to manually install self-hosted integration runtime 5.x and register the key, you will be required to upgrade your .NET Framework Runtime version first.
Self-hosted IR connectivity issues
Self-hosted integration runtime can't connect to the cloud service
Symptoms
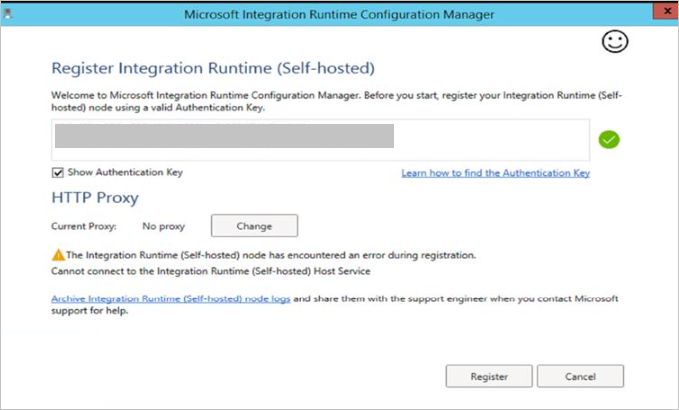
When you attempt to register the self-hosted integration runtime, Configuration Manager displays the following error message:
"The Integration Runtime (Self-hosted) node has encountered an error during registration."
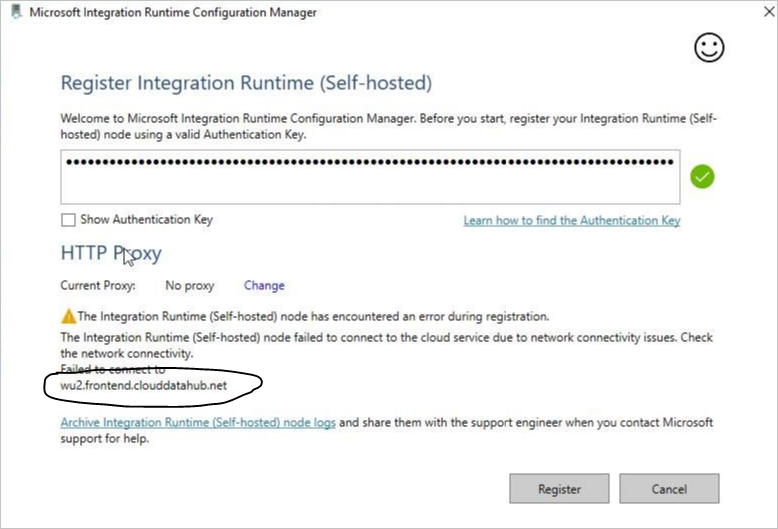
Cause
The self-hosted IR can't connect to the service back end. This issue is usually caused by network settings in the firewall.
Resolution
Check to see whether the integration runtime service is running. If it is, go to step 2.

If no proxy is configured on the self-hosted IR, which is the default setting, run the following PowerShell command on the machine where the self-hosted integration runtime is installed:
(New-Object System.Net.WebClient).DownloadString("https://wu2.frontend.clouddatahub.net/")Note
The service URL might vary, depending on the location of your data factory or Synapse workspace instance. To find the service URL, use the Manage page of the UI in your data factory or Azure Synapse instance to find Integration runtimes and click your self-hosted IR to edit it. There select the Nodes tab and click View Service URLs.
The following is the expected response:

If you don't receive the response you had expected, use one of the following methods, as appropriate:
- If you receive a "Remote name could not be resolved" message, there's a Domain Name System (DNS) issue. Contact your network team to fix the issue.
- If you receive an "ssl/tls cert is not trusted" message, check the certificate (
https://wu2.frontend.clouddatahub.net/) to see whether it's trusted on the machine, and then install the public certificate by using Certificate Manager. This action should mitigate the issue. - Go to Windows > Event viewer (logs) > Applications and Services Logs > Integration Runtime, and check for any failure that's caused by DNS, a firewall rule, or company network settings. If you find such a failure, forcibly close the connection. Because every company has its own customized network settings, contact your network team to troubleshoot these issues.
If "proxy" has been configured on the self-hosted integration runtime, verify that your proxy server can access the service endpoint. For a sample command, see PowerShell, web requests, and proxies.
$user = $env:username
$webproxy = (get-itemproperty 'HKCU:\Software\Microsoft\Windows\CurrentVersion\Internet
Settings').ProxyServer
$pwd = Read-Host "Password?" -assecurestring
$proxy = new-object System.Net.WebProxy
$proxy.Address = $webproxy
$account = new-object System.Net.NetworkCredential($user,[Runtime.InteropServices.Marshal]::PtrToStringAuto([Runtime.InteropServices.Marshal]::SecureStringToBSTR($pwd)), "")
$proxy.credentials = $account
$url = "https://wu2.frontend.clouddatahub.net/"
$wc = new-object system.net.WebClient
$wc.proxy = $proxy
$webpage = $wc.DownloadData($url)
$string = [System.Text.Encoding]::ASCII.GetString($webpage)
$string
The following is the expected response:
Note
Proxy considerations:
- Check to see whether the proxy server needs to be put on the Safe Recipients list. If so, make sure these domains are on the Safe Recipients list.
- Check to see whether SSL/TLS certificate
wu2.frontend.clouddatahub.net/is trusted on the proxy server. - If you're using Active Directory authentication on the proxy, change the service account to the user account that can access the proxy as "Integration Runtime Service."
Error message: Self-hosted integration runtime node/logical self-hosted IR is in Inactive/ "Running (Limited)" state
Cause
The self-hosted integrated runtime node might have a status of Inactive, as shown in the following screenshot:
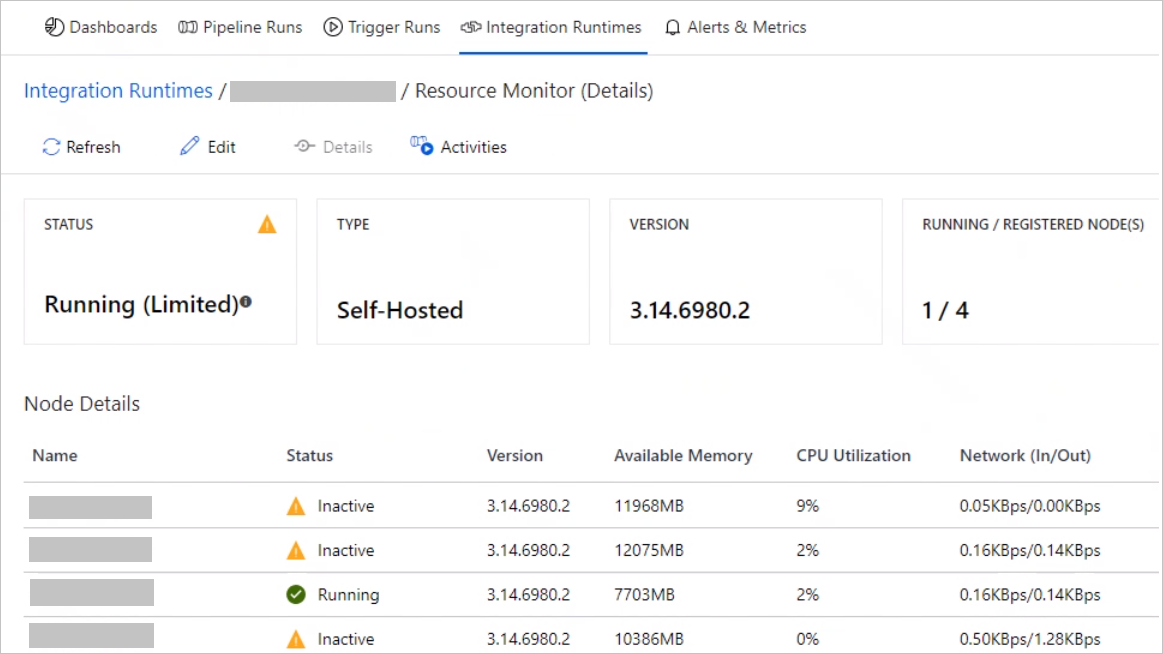
This behavior occurs when nodes can't communicate with each other.
Resolution
Log in to the node-hosted virtual machine (VM). Under Applications and Services Logs > Integration Runtime, open Event Viewer, and filter the error logs.
Check to see whether an error log contains the following error:
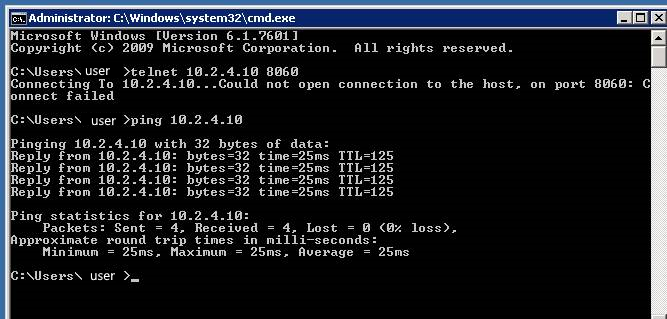
System.ServiceModel.EndpointNotFoundException: Could not connect to net.tcp://xxxxxxx.bwld.com:8060/ExternalService.svc/WorkerManager. The connection attempt lasted for a time span of 00:00:00.9940994. TCP error code 10061: No connection could be made because the target machine actively refused it 10.2.4.10:8060.
System.Net.Sockets.SocketException: No connection could be made because the target machine actively refused it.
10.2.4.10:8060
at System.Net.Sockets.Socket.DoConnect(EndPoint endPointSnapshot, SocketAddress socketAddress)
at System.Net.Sockets.Socket.Connect(EndPoint remoteEP)
at System.ServiceModel.Channels.SocketConnectionInitiator.Connect(Uri uri, TimeSpan timeout)
If you see this error, run the following command in a Command Prompt window:
telnet 10.2.4.10 8060If you receive the "Could not open connection to the host" command-line error that's shown in the following screenshot, contact your IT department for help to fix this issue. After you can successfully telnet, contact Microsoft Support if you still have issues with the integration runtime node status.
Check to see whether the error log contains the following entry:
Error log: Cannot connect to worker manager: net.tcp://xxxxxx:8060/ExternalService.svc/ No DNS entries exist for host azranlcir01r1. No such host is known Exception detail: System.ServiceModel.EndpointNotFoundException: No DNS entries exist for host xxxxx. ---> System.Net.Sockets.SocketException: No such host is known at System.Net.Dns.GetAddrInfo(String name) at System.Net.Dns.InternalGetHostByName(String hostName, Boolean includeIPv6) at System.Net.Dns.GetHostEntry(String hostNameOrAddress) at System.ServiceModel.Channels.DnsCache.Resolve(Uri uri) --- End of inner exception stack trace --- Server stack trace: at System.ServiceModel.Channels.DnsCache.Resolve(Uri uri)To resolve the issue, try one or both of the following methods:
- Put all the nodes in the same domain.
- Add the IP to host mapping in all the hosted VM's host files.
Connectivity issue between the self-hosted IR and your data factory or Azure Synapse instance or the self-hosted IR and the data source or sink
To troubleshoot the network connectivity issue, you should know how to collect the network trace, understand how to use it, and analyze the Microsoft Network Monitor (Netmon) trace before applying the Netmon Tools in real cases from the self-hosted IR.
Symptoms
You might occasionally need to troubleshoot certain connectivity issues between the self-hosted IR and your data factory or Azure Synapse instance, as shown in the following screenshot, or between the self-hosted IR and the data source or sink.
In either instance, you might encounter the following errors:
"Copy failed with error:Type=Microsoft.DataTransfer.Common.Shared.HybridDeliveryException,Message=Cannot connect to SQL Server: 'IP address'"
"One or more errors occurred. An error occurred while sending the request. The underlying connection was closed: An unexpected error occurred on a receive. Unable to read data from the transport connection: An existing connection was forcibly closed by the remote host. An existing connection was forcibly closed by the remote host Activity ID."
Resolution
When you encounter the preceding errors, troubleshoot them by following the instructions in this section.
Collect a Netmon trace for analysis:
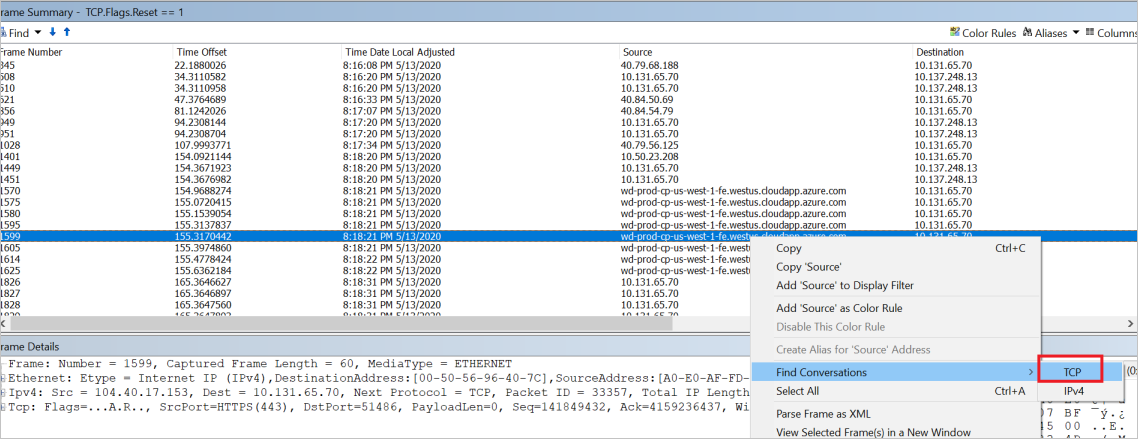
You can set the filter to see a reset from the server to the client side. In the following example screenshot, you can see that the server side is the Data Factory server.
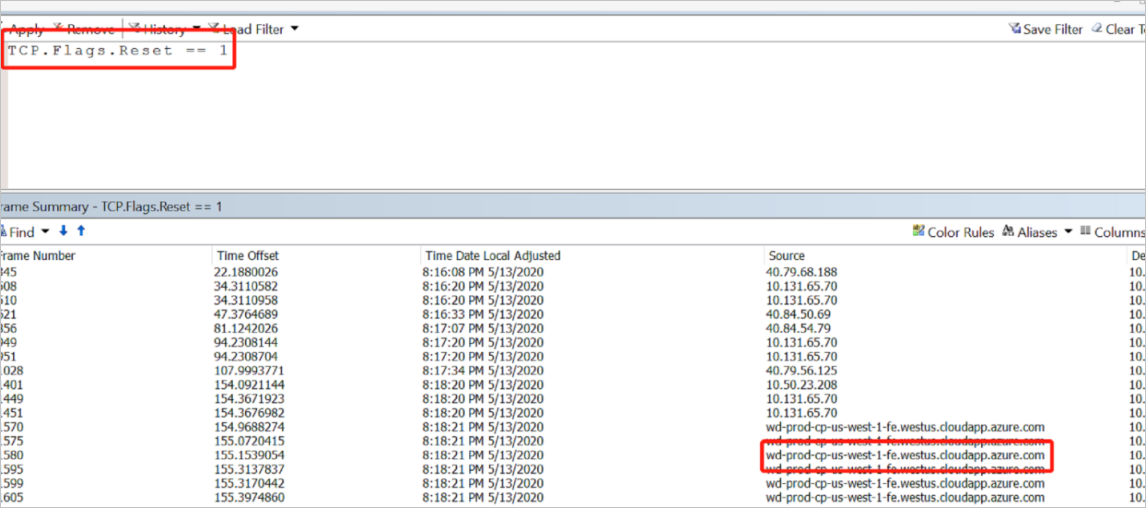
When you get the reset package, you can find the conversation by following Transmission Control Protocol (TCP).
Get the conversation between the client and the Data Factory server by removing the filter.
An analysis of the Netmon trace you've collected shows that the Time to Live (TTL)) total is 64. According to the values mentioned in the IP Time to Live (TTL) and Hop Limit Basics article, extracted in the following list, you can see that it's the Linux System that resets the package and causes the disconnection.
Default TTL and Hop Limit values vary between different operating systems, as listed here:
- Linux kernel 2.4 (circa 2001): 255 for TCP, User Datagram Protocol (UDP), and Internet Control Message Protocol (ICMP)
- Linux kernel 4.10 (2015): 64 for TCP, UDP, and ICMP
- Windows XP (2001): 128 for TCP, UDP, and ICMP
- Windows 10 (2015): 128 for TCP, UDP, and ICMP
- Windows Server 2008: 128 for TCP, UDP, and ICMP
- Windows Server 2019 (2018): 128 for TCP, UDP, and ICMP
- macOS (2001): 64 for TCP, UDP, and ICMP
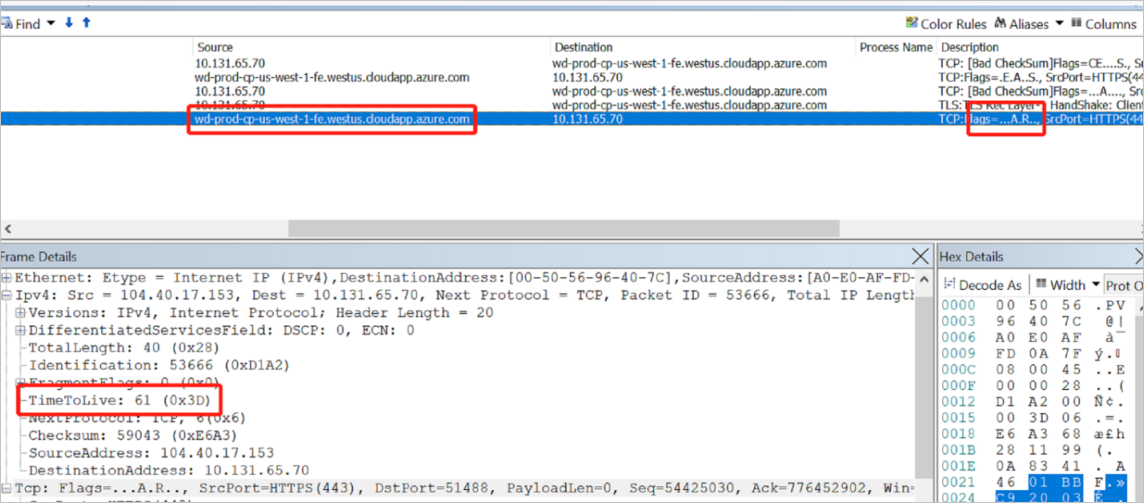
In the preceding example, the TTL is shown as 61 instead of 64, because when the network package reaches its destination, it needs to go through various hops, such as routers or network devices. The number of routers or network devices is deducted to produce the final TTL.
In this case, you can see that a reset can be sent from the Linux System with TTL 64.
To confirm where the reset device might come from, check the fourth hop from self-hosted IR.
Network package from Linux System A with TTL 64 -> B TTL 64 minus 1 = 63 -> C TTL 63 minus 1 = 62 -> TTL 62 minus 1 = 61 self-hosted IR
In an ideal situation, the TTL hops number would be 128, which means that the Windows operating system is running your data factory instance. As shown in the following example, 128 minus 107 = 21 hops, which means that 21 hops for the package were sent from the data factory instance to the self-hosted IR during the TCP 3 handshake.

Therefore, you need to engage the network team to check to see what the fourth hop is from the self-hosted IR. If it's the firewall, as with the Linux System, check any logs to see why that device resets the package after the TCP 3 handshake.
If you're unsure where to investigate, try to get the Netmon trace from both the self-hosted IR and the firewall during the problematic time. This approach will help you figure out which device might have reset the package and caused the disconnection. In this case, you also need to engage your network team to move forward.
Analyze the Netmon trace
Note
The following instructions apply to the Netmon trace. Because Netmon trace is currently out of support, you can use Wireshark for this purpose.
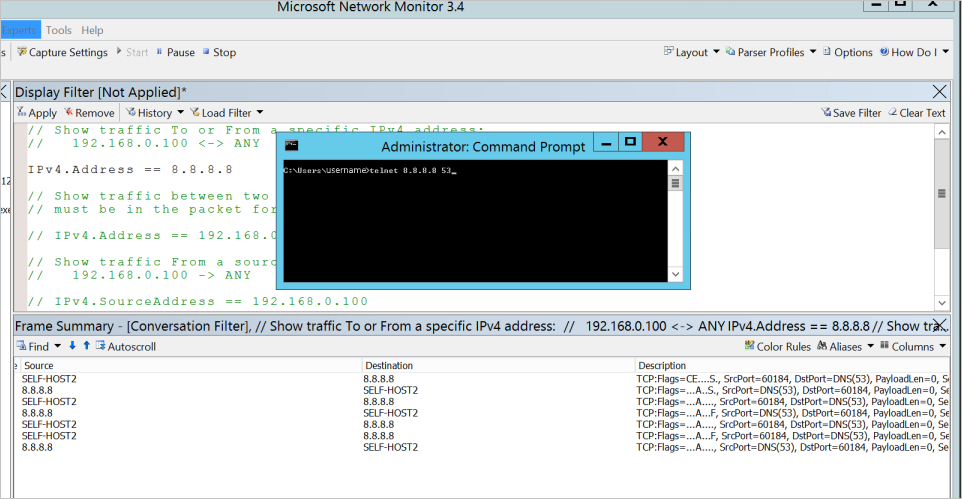
When you try to telnet 8.8.8.8 888 with the collected Netmon trace, you should see the trace in the following screenshots:

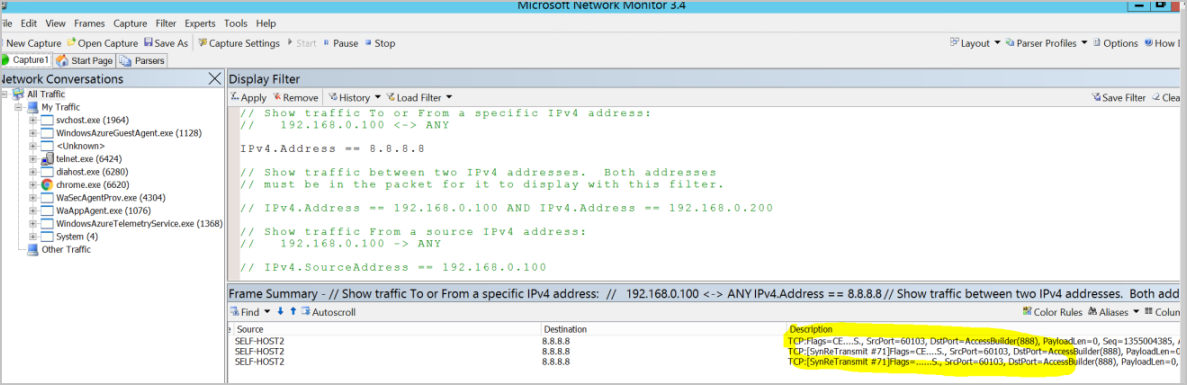
The preceding images show that you couldn't make a TCP connection to the 8.8.8.8 server side on port 888, so you see two SynReTransmit additional packages there. Because source SELF-HOST2 couldn't connect to 8.8.8.8 with the first package, it will keep trying to make the connection.
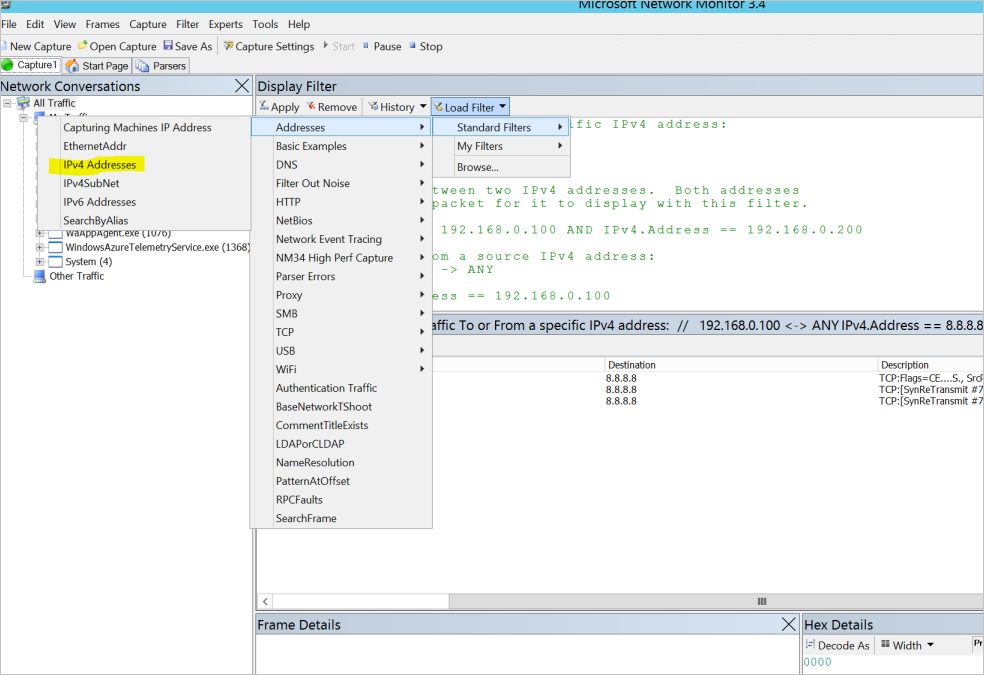
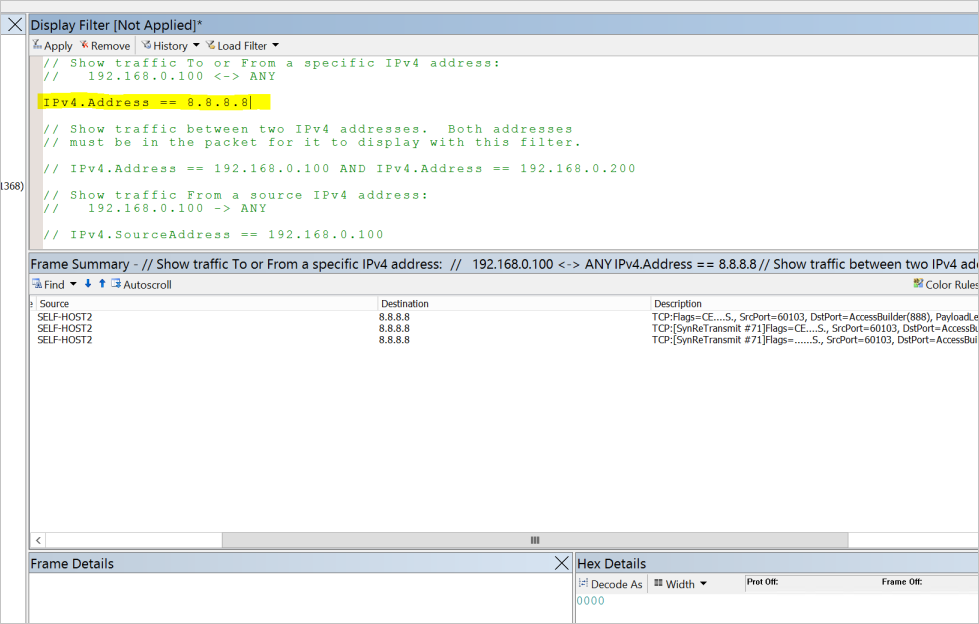
Tip
To make this connection, try the following solution:
- Select Load Filter > Standard Filter > Addresses > IPv4 Addresses.
- To apply the filter, enter IPv4.Address == 8.8.8.8, and then select Apply. You should then see the communication from the local machine to destination 8.8.8.8.
Successful scenarios are shown in the following examples:
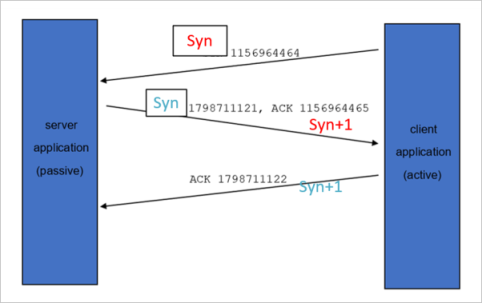
If you can telnet 8.8.8.8 53 without any issues, there's a successful TCP 3 handshake, and the session finishes with a TCP 4 handshake.

The preceding TCP 3 handshake produces the following workflow:
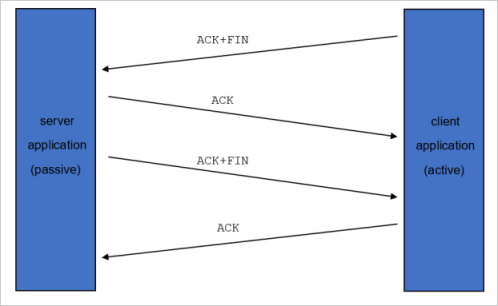
The TCP 4 handshake to finish the session is illustrated by the following workflows:

Determine whether this notification affects you
This notification applies to the following scenarios:
Scenario 1: Outbound communication from a self-hosted integration runtime that's running on-premises behind a corporate firewall
How to determine whether you're affected:
You are not affected if you're defining firewall rules based on fully qualified domain names (FQDNs) that use the approach described in Set up a firewall configuration and allowlist for IP addresses.
You are affected if you're explicitly enabling the allowlist for outbound IPs on your corporate firewall.
If you're affected, take the following action: by November 8, 2020, notify your network infrastructure team to update your network configuration to use the latest data factory IP addresses. To download the latest IP addresses, go to Discover service tags by using downloadable JSON files.
Scenario 2: Outbound communication from a self-hosted integration runtime that's running on an Azure VM inside a customer-managed Azure virtual network
How to determine whether you're affected:
Check to see whether you have any outbound network security group (NSG) rules in a private network that contains self-hosted integration runtime. If there are no outbound restrictions, you aren't affected.
If you have outbound rule restrictions, check to see whether you're using service tags. If you're using service tags, you're not affected. There's no need to change or add anything, because the new IP range is under your existing service tags.

You are affected if you're explicitly enabling the allowlist for outbound IP addresses on your NSG rules setting on the Azure virtual network.
If you're affected, take the following action: by November 8, 2020, notify your network infrastructure team to update the NSG rules on your Azure virtual network configuration to use the latest data factory IP addresses. To download the latest IP addresses, go to Discover service tags by using downloadable JSON files.
Scenario 3: Outbound communication from SSIS Integration Runtime in a customer-managed Azure virtual network
How to determine whether you're affected:
Check to see whether you have any outbound NSG rules in a private network that contains SQL Server Integration Services (SSIS) Integration Runtime. If there are no outbound restrictions, you aren't affected.
If you have outbound rule restrictions, check to see whether you're using service tags. If you're using service tags, you're not affected. There's no need to change or add anything because the new IP range is under your existing service tags.
You are affected if you're explicitly enabling the allowlist for outbound IP addresses on your NSG rules setting on the Azure virtual network.
If you're affected, take the following action: by November 8, 2020, notify your network infrastructure team to update the NSG rules on your Azure virtual network configuration to use the latest data factory IP addresses. To download the latest IP addresses, go to Discover service tags by using downloadable JSON files.
Couldn't establish a trust relationship for the SSL/TLS secure channel
Symptoms
The self-hosted IR couldn't connect to the Azure Data Factory or Azure Synapse service.
When you check the self-hosted IR event log after going to Windows > Event viewer (logs) > Applications and Services Logs > Integration Runtime, you'll find the following error message.
"The underlying connection was closed: Could not establish trust relationship for the SSL/TLS secure channel. The remote certificate is invalid according to the validation procedure."
The simplest way to check the server certificate of the service is to open the service URL in your browser. For example, open the check server certificate link (
https://eu.frontend.clouddatahub.net/) on the machine where the self-hosted IR is installed, and then view the server certificate information.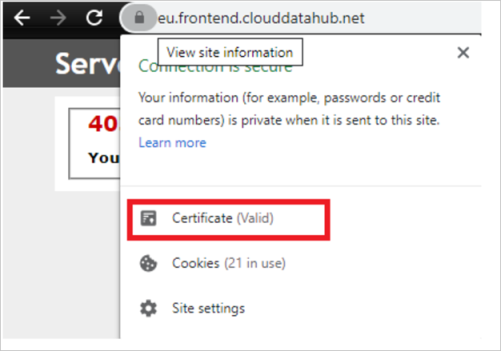
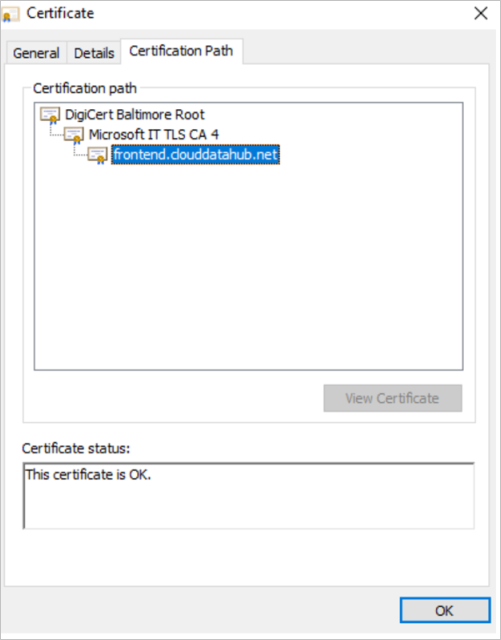
Cause
There are two possible reasons for this issue:
- Reason 1: The root CA of the service's server certificate isn't trusted on the machine where the self-hosted IR is installed.
- Reason 2: You're using a proxy in your environment, the server certificate of the service is replaced by the proxy, and the replaced server certificate isn't trusted by the machine where the self-hosted IR is installed.
Resolution
- For reason 1: Make sure that the service's server certificate and its certificate chain are trusted by the machine where the self-hosted IR is installed.
- For reason 2: Either trust the replaced root CA on the self-hosted IR machine, or configure the proxy not to replace the service's server certificate.
For more information about trusting certificates on Windows, see Installing the trusted root certificate.
Additional information
We've rolled out a new SSL certificate, which is signed from DigiCert. Check to see whether the DigiCert Global Root G2 is in the trusted root CA.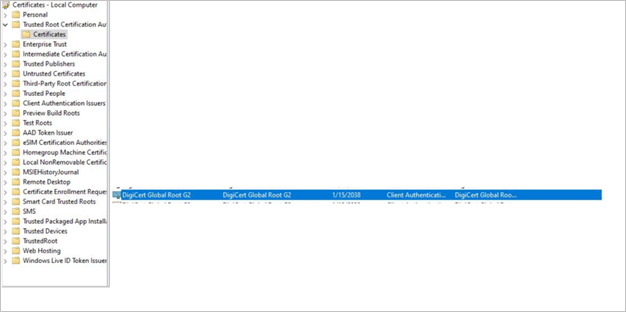
If it isn't in the trusted root CA, download it here.
Related content
For more help with troubleshooting, try the following resources: