Note
Access to this page requires authorization. You can try signing in or changing directories.
Access to this page requires authorization. You can try changing directories.
APPLIES TO:  Azure Data Factory
Azure Synapse Analytics
Azure Data Factory
Azure Synapse Analytics
Tip
Try out Data Factory in Microsoft Fabric, an all-in-one analytics solution for enterprises. Microsoft Fabric covers everything from data movement to data science, real-time analytics, business intelligence, and reporting. Learn how to start a new trial for free!
In this tutorial, you create an Azure data factory with a pipeline that loads delta data based on change data capture (CDC) information in the source Azure SQL Managed Instance database to an Azure blob storage.
You perform the following steps in this tutorial:
- Prepare the source data store
- Create a data factory.
- Create linked services.
- Create source and sink datasets.
- Create, debug and run the pipeline to check for changed data
- Modify data in the source table
- Complete, run and monitor the full incremental copy pipeline
Overview
The Change Data Capture technology supported by data stores such as Azure SQL Managed Instances (MI) and SQL Server can be used to identify changed data. This tutorial describes how to use Azure Data Factory with SQL Change Data Capture technology to incrementally load delta data from Azure SQL Managed Instance into Azure Blob Storage. For more concrete information about SQL Change Data Capture technology, see Change data capture in SQL Server.
End-to-end workflow
Here are the typical end-to-end workflow steps to incrementally load data using the Change Data Capture technology.
Note
Both Azure SQL MI and SQL Server support the Change Data Capture technology. This tutorial uses Azure SQL Managed Instance as the source data store. You can also use an on-premises SQL Server.
High-level solution
In this tutorial, you create a pipeline that performs the following operations:
- Create a lookup activity to count the number of changed records in the SQL Database CDC table and pass it to an IF Condition activity.
- Create an If Condition to check whether there are changed records and if so, invoke the copy activity.
- Create a copy activity to copy the inserted/updated/deleted data between the CDC table to Azure Blob Storage.
If you don't have an Azure subscription, create a free account before you begin.
Prerequisites
- Azure SQL Managed Instance. You use the database as the source data store. If you don't have an Azure SQL Managed Instance, see the Create an Azure SQL Database Managed Instance article for steps to create one.
- Azure Storage account. You use the blob storage as the sink data store. If you don't have an Azure storage account, see the Create a storage account article for steps to create one. Create a container named raw.
Create a data source table in Azure SQL Database
Launch SQL Server Management Studio, and connect to your Azure SQL Managed Instances server.
In Server Explorer, right-click your database and choose the New Query.
Run the following SQL command against your Azure SQL Managed Instances database to create a table named
customersas data source store.create table customers ( customer_id int, first_name varchar(50), last_name varchar(50), email varchar(100), city varchar(50), CONSTRAINT "PK_Customers" PRIMARY KEY CLUSTERED ("customer_id") );Enable Change Data Capture mechanism on your database and the source table (customers) by running the following SQL query:
Note
- Replace <your source schema name> with the schema of your Azure SQL MI that has the customers table.
- Change data capture doesn't do anything as part of the transactions that change the table being tracked. Instead, the insert, update, and delete operations are written to the transaction log. Data that is deposited in change tables will grow unmanageably if you do not periodically and systematically prune the data. For more information, see Enable Change Data Capture for a database
EXEC sys.sp_cdc_enable_db

EXEC sys.sp_cdc_enable_table
@source_schema = 'dbo',
@source_name = 'customers',
@role_name = NULL,
@supports_net_changes = 1
Insert data into the customers table by running the following command:
 insert into customers
     (customer_id, first_name, last_name, email, city)
 values
     (1, 'Chevy', 'Leward', 'cleward0@mapy.cz', 'Reading'),
     (2, 'Sayre', 'Ateggart', 'sateggart1@nih.gov', 'Portsmouth'),
    (3, 'Nathalia', 'Seckom', 'nseckom2@blogger.com', 'Portsmouth');
Note
No historical changes to the table are captured prior to change data capture being enabled.
Create a data factory
Follow the steps in the article Quickstart: Create a data factory by using the Azure portal to create a data factory if you don't already have one to work with.
Create linked services
You create linked services in a data factory to link your data stores and compute services to the data factory. In this section, you create linked services to your Azure Storage account and Azure SQL MI.
Create Azure Storage linked service.
In this step, you link your Azure Storage Account to the data factory.
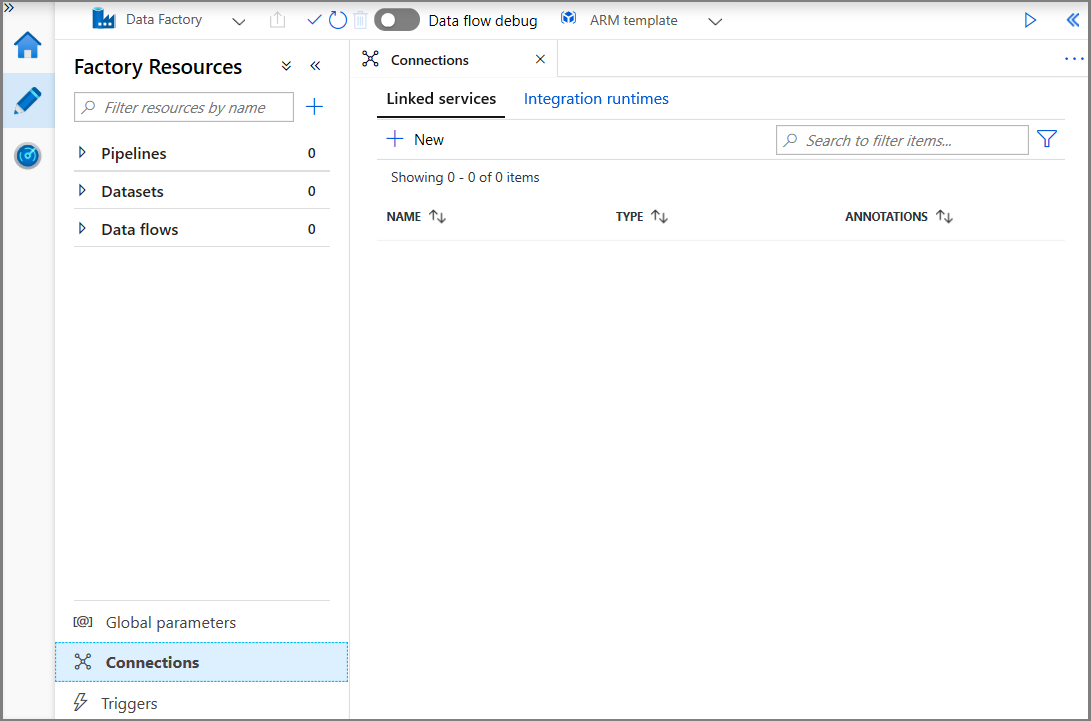
Click Connections, and click + New.
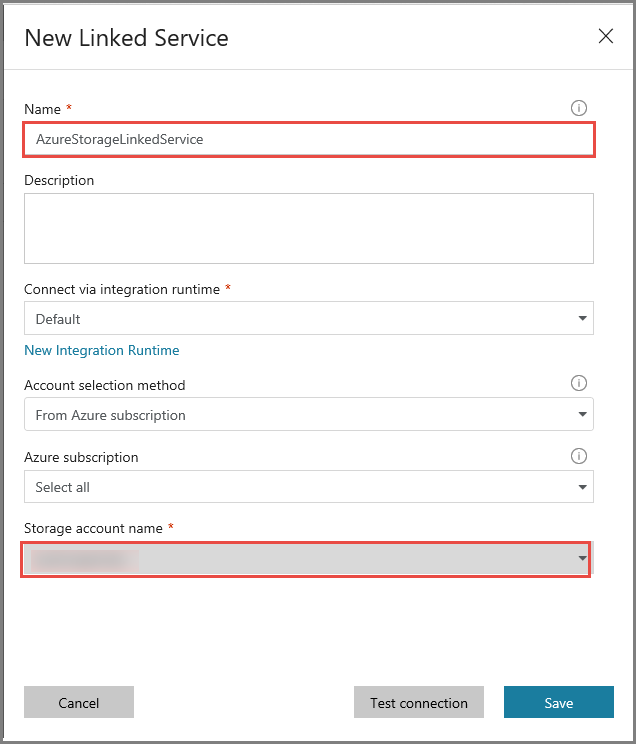
In the New Linked Service window, select Azure Blob Storage, and click Continue.

In the New Linked Service window, do the following steps:
- Enter AzureStorageLinkedService for Name.
- Select your Azure Storage account for Storage account name.
- Click Save.
Create Azure SQL MI Database linked service.
In this step, you link your Azure SQL MI database to the data factory.
Note
For those using SQL MI see here for information regarding access via public vs private endpoint. If using private endpoint one would need to run this pipeline using a self-hosted integration runtime. The same would apply to those running SQL Server on-prem, in a VM or VNet scenarios.
Click Connections, and click + New.
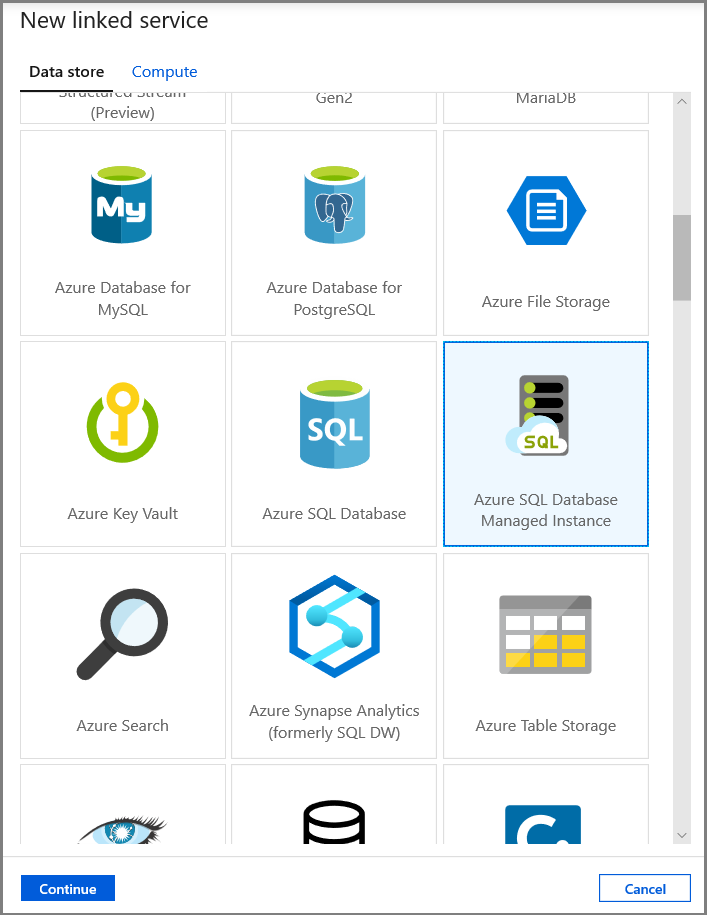
In the New Linked Service window, select Azure SQL Database Managed Instance, and click Continue.
In the New Linked Service window, do the following steps:
- Enter AzureSqlMI1 for the Name field.
- Select your SQL server for the Server name field.
- Select your SQL database for the Database name field.
- Enter name of the user for the User name field.
- Enter password for the user for the Password field.
- Click Test connection to test the connection.
- Click Save to save the linked service.

Create datasets
In this step, you create datasets to represent data source and data destination.
Create a dataset to represent source data
In this step, you create a dataset to represent the source data.
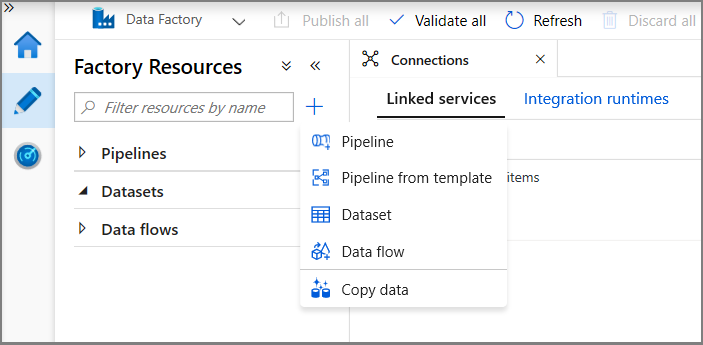
In the treeview, click + (plus), and click Dataset.
Select Azure SQL Database Managed Instance, and click Continue.
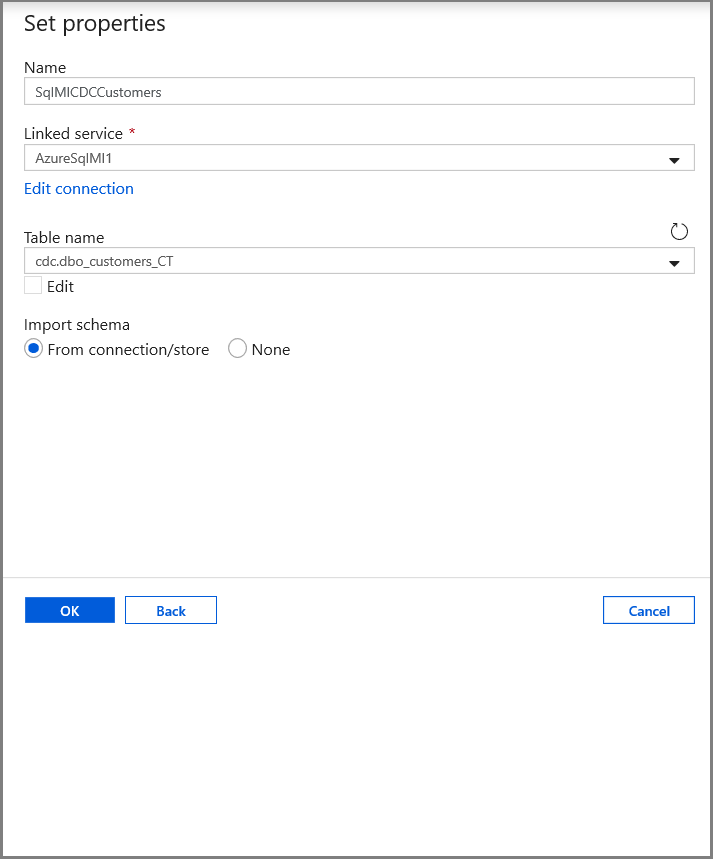
In the Set properties tab, set the dataset name and connection information:
- Select AzureSqlMI1 for Linked service.
- Select [dbo].[dbo_customers_CT] for Table name. Note: this table was automatically created when CDC was enabled on the customers table. Changed data is never queried from this table directly but is instead extracted through the CDC functions.
Create a dataset to represent data copied to sink data store.
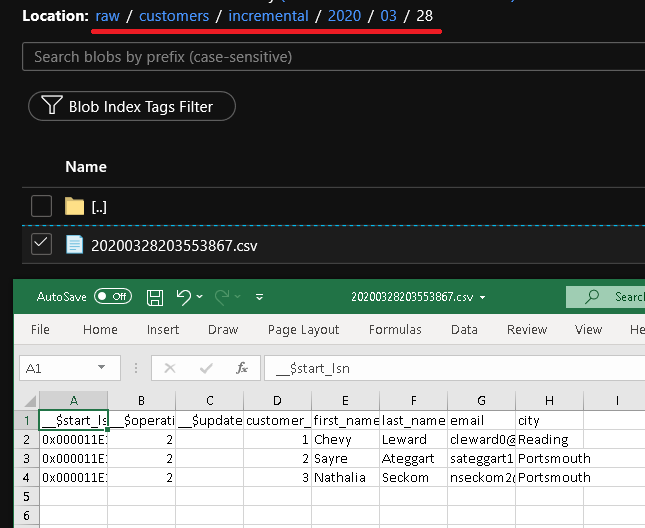
In this step, you create a dataset to represent the data that is copied from the source data store. You created the data lake container in your Azure Blob Storage as part of the prerequisites. Create the container if it does not exist (or) set it to the name of an existing one. In this tutorial, the output file name is dynamically generated by using the trigger time, which will be configured later.
In the treeview, click + (plus), and click Dataset.
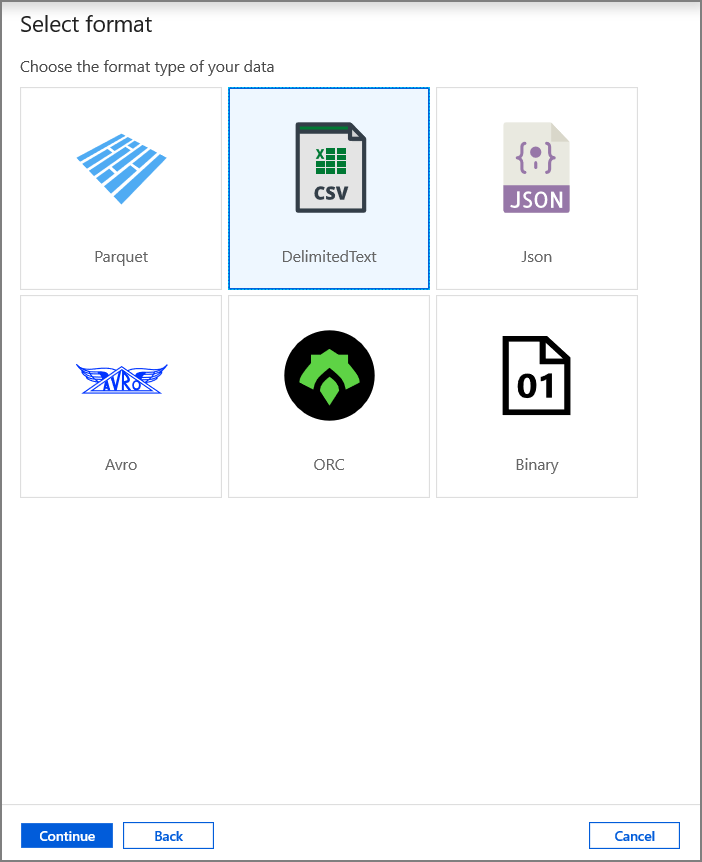
Select Azure Blob Storage, and click Continue.

Select DelimitedText, and click Continue.
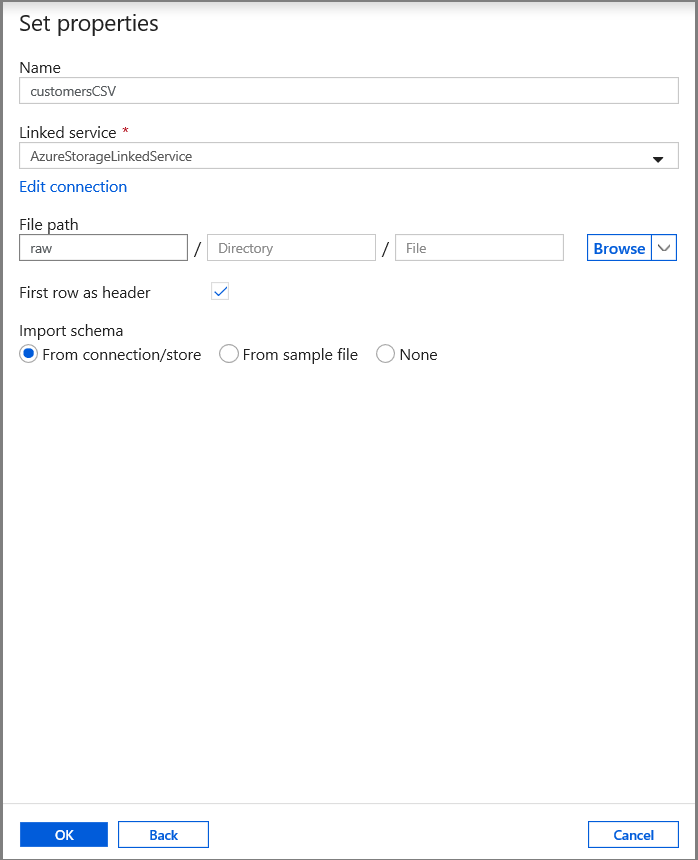
In the Set Properties tab, set the dataset name and connection information:
- Select AzureStorageLinkedService for Linked service.
- Enter raw for container part of the filePath.
- Enable First row as header
- Click Ok
Create a pipeline to copy the changed data
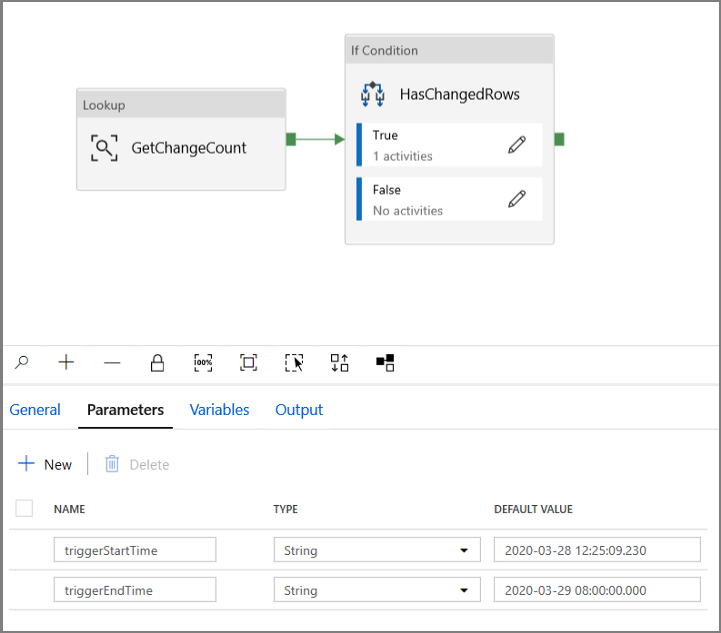
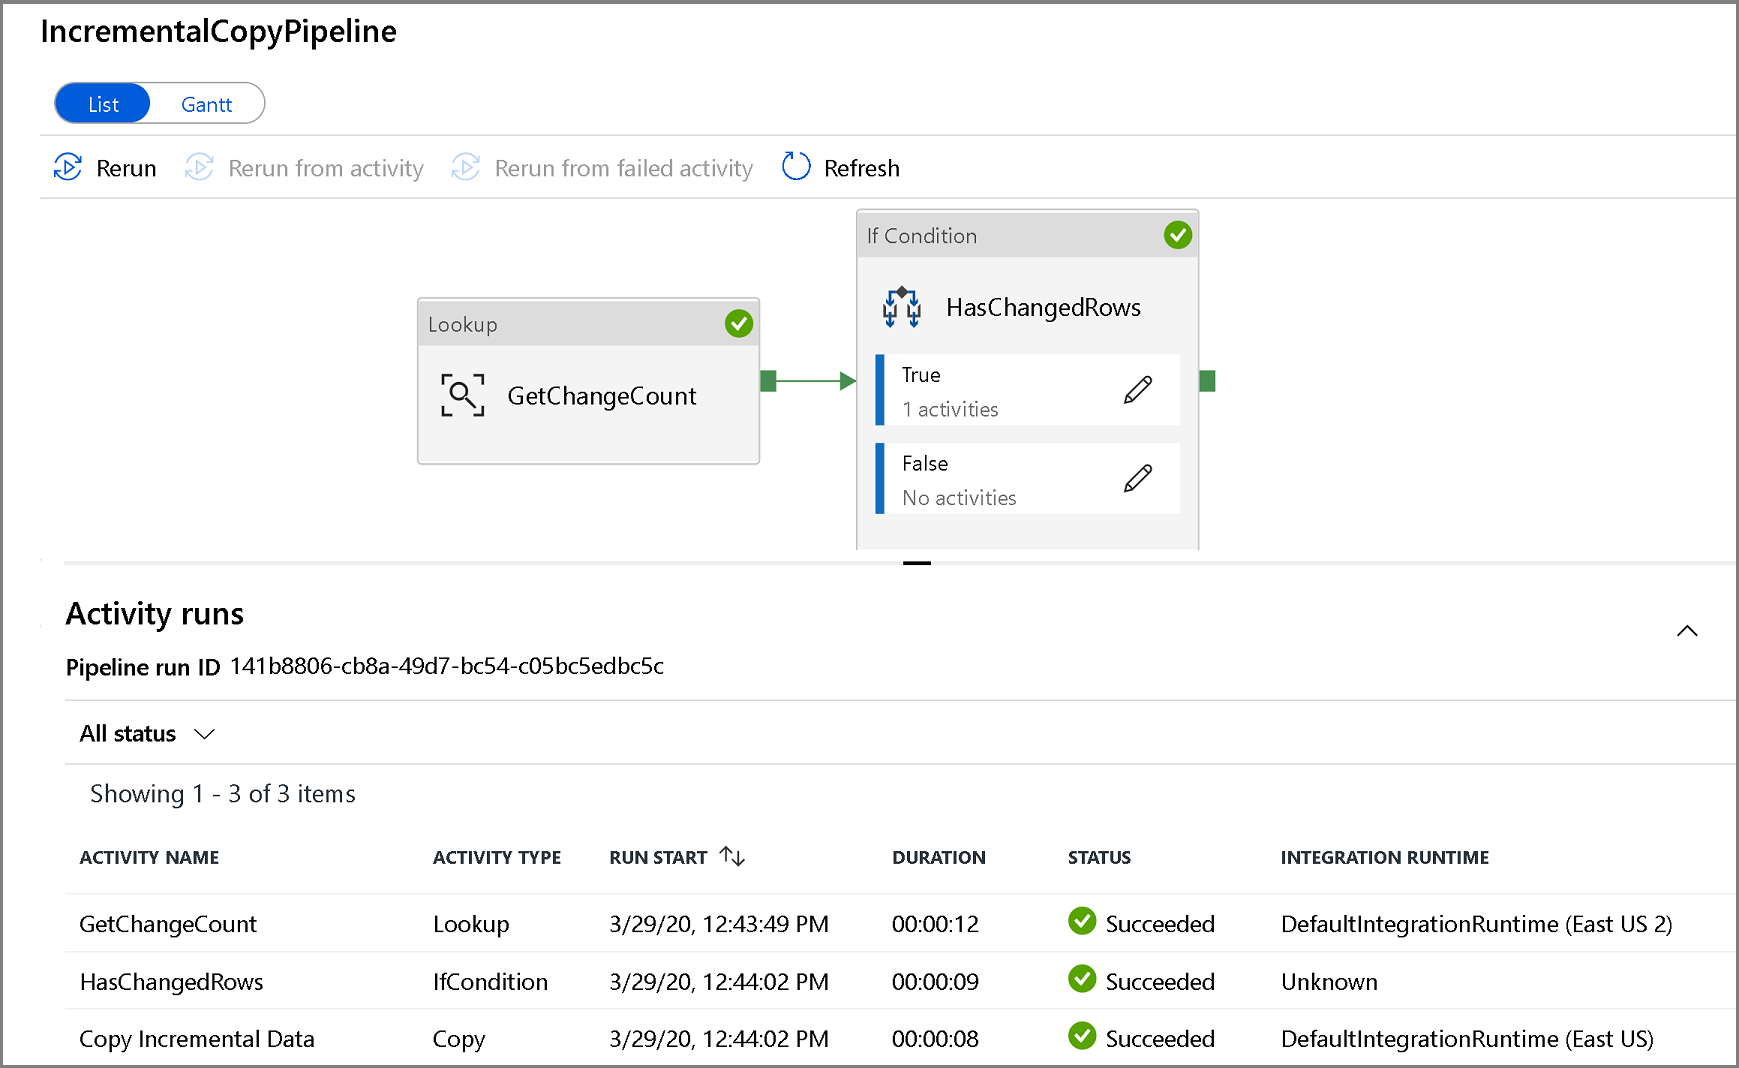
In this step, you create a pipeline, which first checks the number of changed records present in the change table using a lookup activity. An IF condition activity checks whether the number of changed records is greater than zero and runs a copy activity to copy the inserted/updated/deleted data from Azure SQL Database to Azure Blob Storage. Lastly, a tumbling window trigger is configured and the start and end times will be passed to the activities as the start and end window parameters.
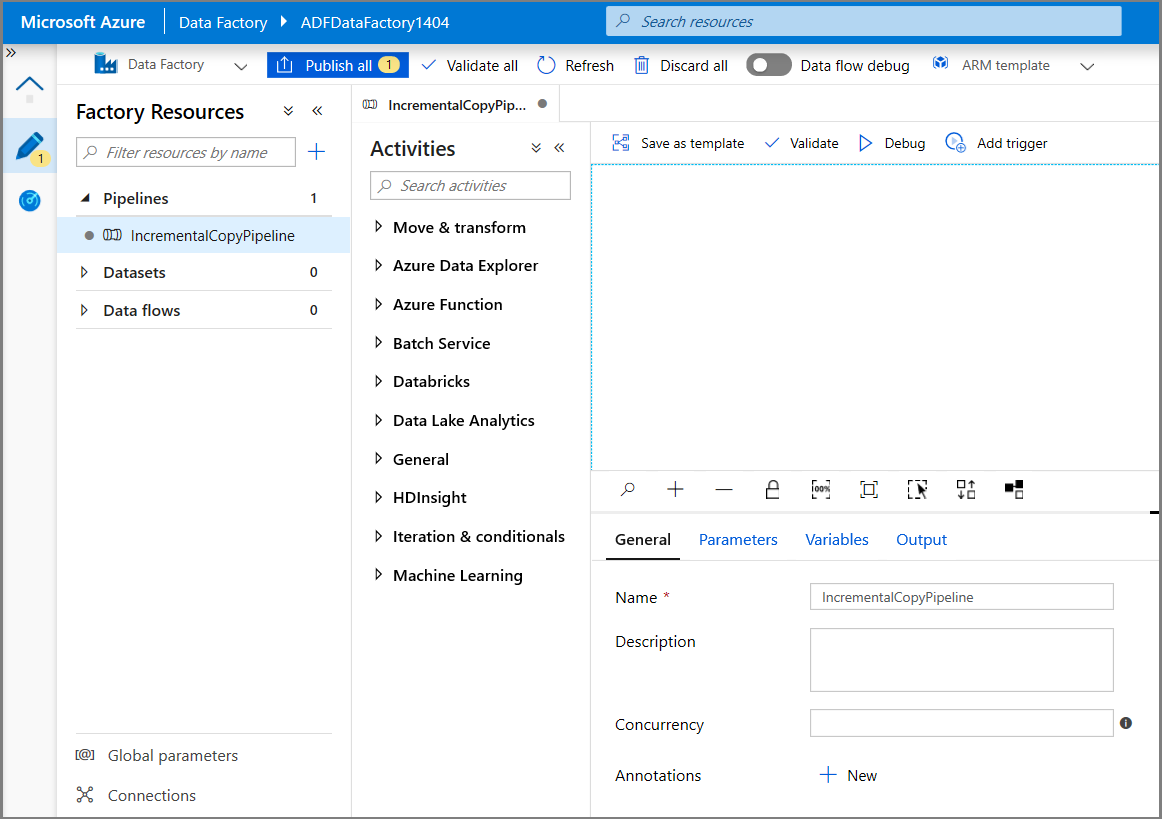
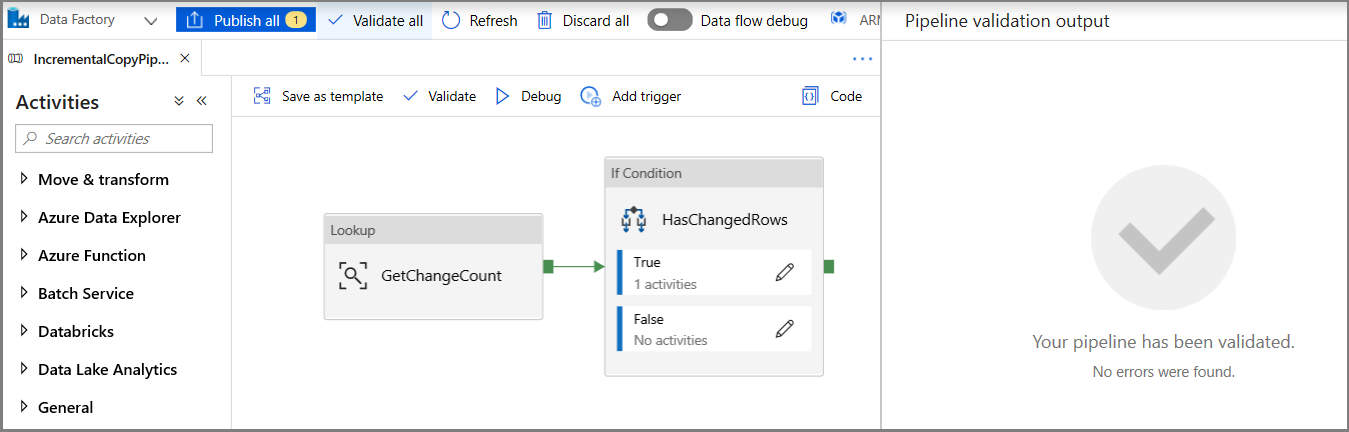
In the Data Factory UI, switch to the Edit tab. Click + (plus) in the left pane, and click Pipeline.

You see a new tab for configuring the pipeline. You also see the pipeline in the treeview. In the Properties window, change the name of the pipeline to IncrementalCopyPipeline.
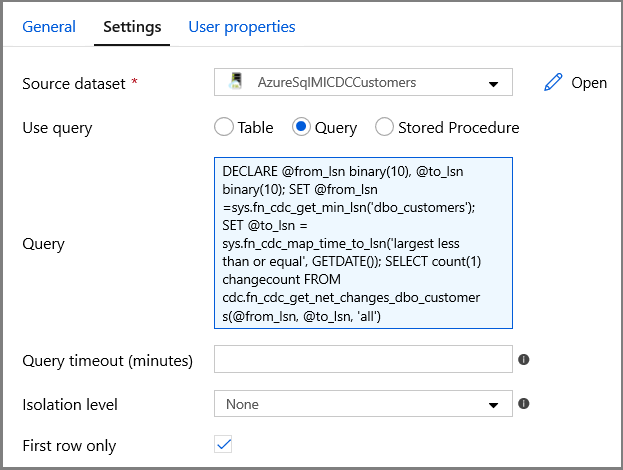
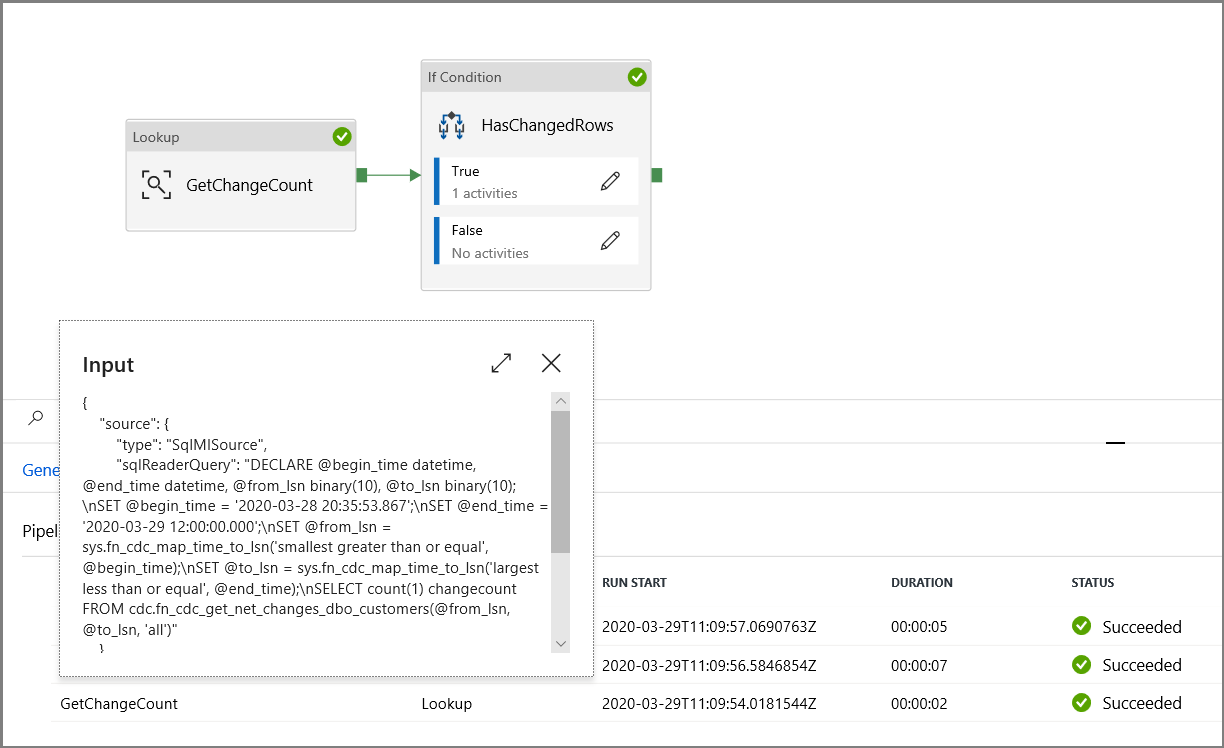
Expand General in the Activities toolbox, and drag-drop the Lookup activity to the pipeline designer surface. Set the name of the activity to GetChangeCount. This activity gets the number of records in the change table for a given time window.

Switch to the Settings in the Properties window:
Specify the SQL MI dataset name for the Source Dataset field.
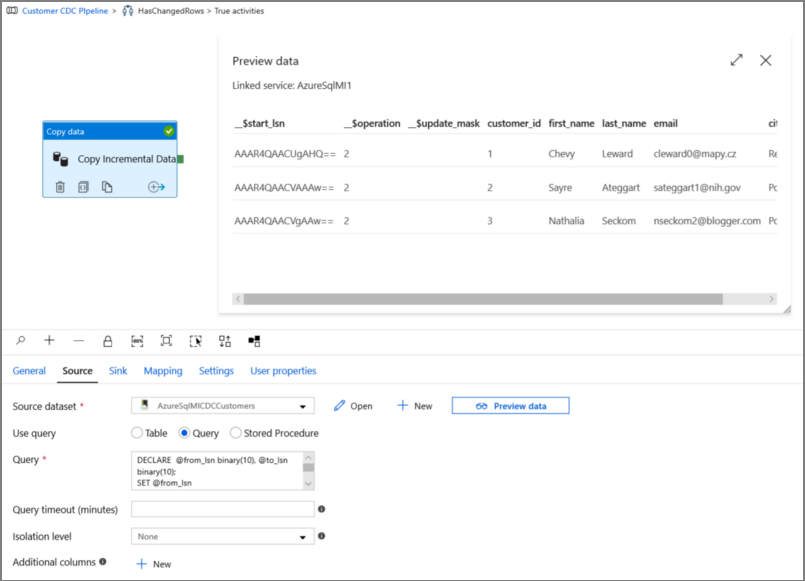
Select the Query option and enter the following into the query box:
DECLARE @from_lsn binary(10), @to_lsn binary(10); SET @from_lsn =sys.fn_cdc_get_min_lsn('dbo_customers'); SET @to_lsn = sys.fn_cdc_map_time_to_lsn('largest less than or equal', GETDATE()); SELECT count(1) changecount FROM cdc.fn_cdc_get_net_changes_dbo_customers(@from_lsn, @to_lsn, 'all')- Enable First row only
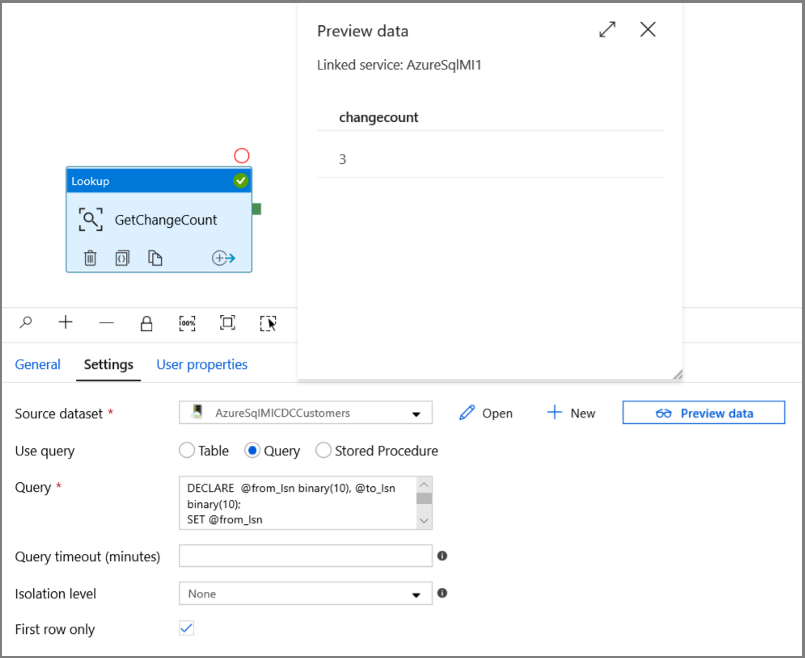
Click the Preview data button to ensure a valid output is obtained by the lookup activity
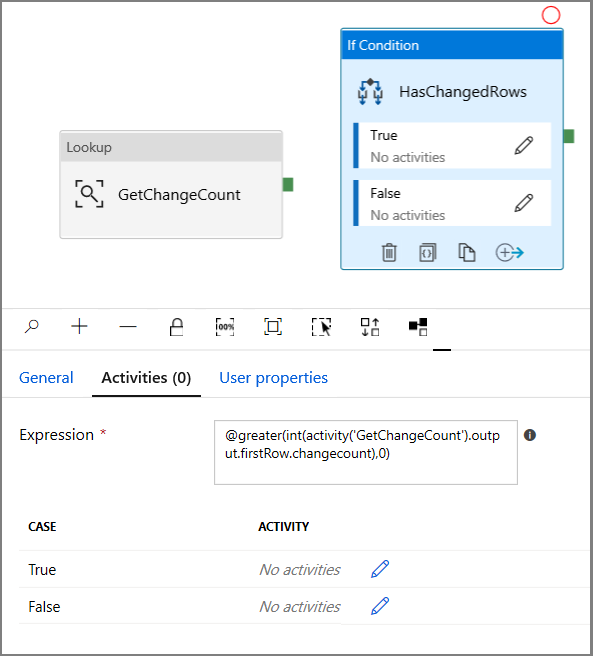
Expand Iteration & conditionals in the Activities toolbox, and drag-drop the If Condition activity to the pipeline designer surface. Set the name of the activity to HasChangedRows.
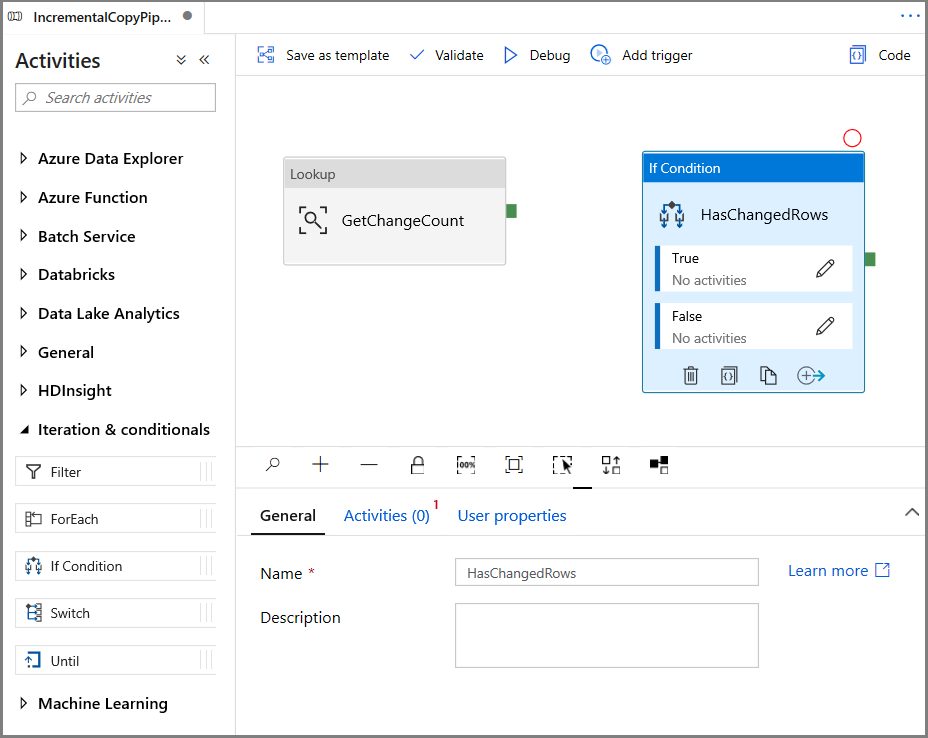
Switch to the Activities in the Properties window:
- Enter the following Expression
@greater(int(activity('GetChangeCount').output.firstRow.changecount),0)- Click on the pencil icon to edit the True condition.
- Expand General in the Activities toolbox and drag-drop a Wait activity to the pipeline designer surface. This is a temporary activity in order to debug the If condition and will be changed later in the tutorial.
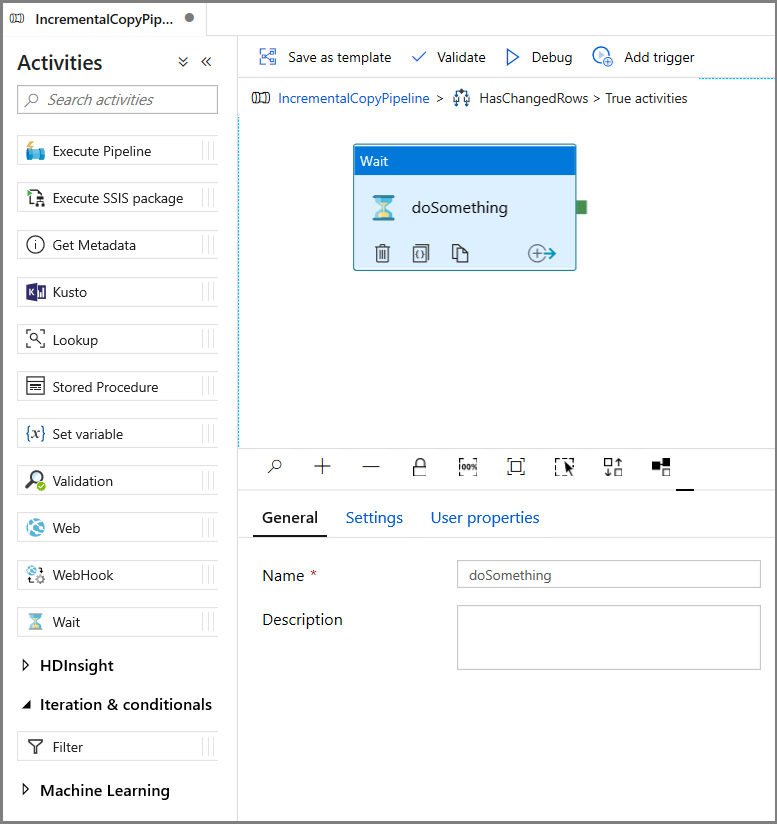
- Click on the IncrementalCopyPipeline breadcrumb to return to the main pipeline.
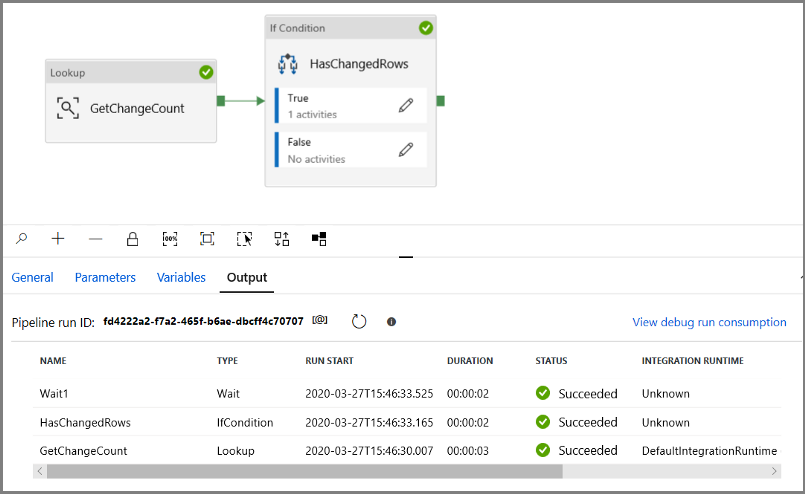
Run the pipeline in Debug mode to verify the pipeline executes successfully.
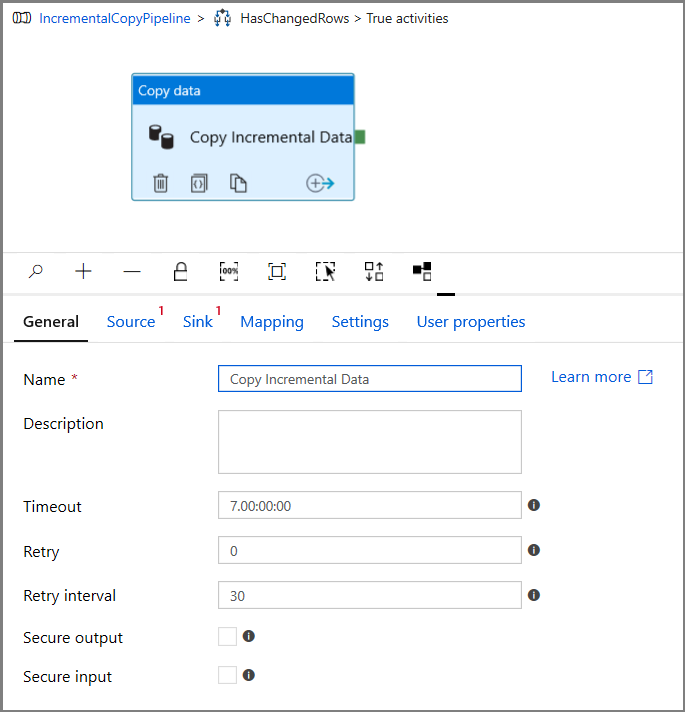
Next, return to the True condition step and delete the Wait activity. In the Activities toolbox, expand Move & transform, and drag-drop a Copy activity to the pipeline designer surface. Set the name of the activity to IncrementalCopyActivity.
Switch to the Source tab in the Properties window, and do the following steps:
Specify the SQL MI dataset name for the Source Dataset field.
Select Query for Use Query.
Enter the following for Query.
DECLARE @from_lsn binary(10), @to_lsn binary(10);
SET @from_lsn =sys.fn_cdc_get_min_lsn('dbo_customers');
SET @to_lsn = sys.fn_cdc_map_time_to_lsn('largest less than or equal', GETDATE());
SELECT * FROM cdc.fn_cdc_get_net_changes_dbo_customers(@from_lsn, @to_lsn, 'all')
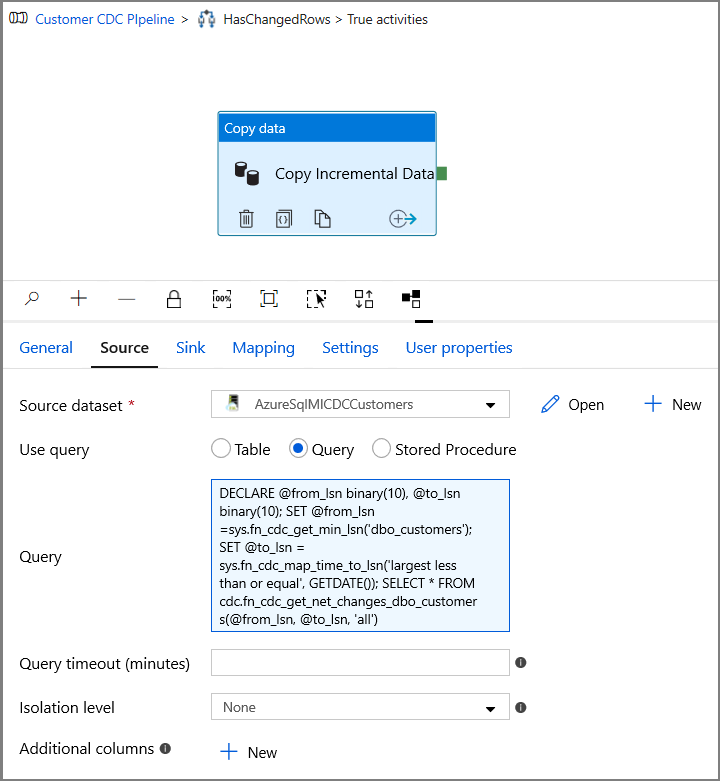
Click preview to verify that the query returns the changed rows correctly.
Switch to the Sink tab, and specify the Azure Storage dataset for the Sink Dataset field.

Click back to the main pipeline canvas and connect the Lookup activity to the If Condition activity one by one. Drag the green button attached to the Lookup activity to the If Condition activity.

Click Validate on the toolbar. Confirm that there are no validation errors. Close the Pipeline Validation Report window by clicking >>.
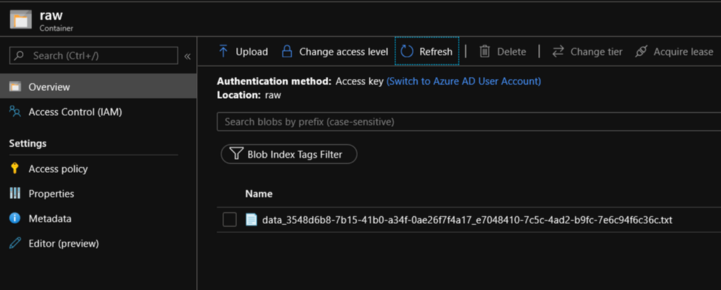
Click Debug to test the pipeline and verify that a file is generated in the storage location.
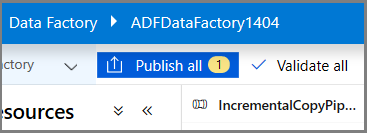
Publish entities (linked services, datasets, and pipelines) to the Data Factory service by clicking the Publish all button. Wait until you see the Publishing succeeded message.
Configure the tumbling window trigger and CDC window parameters
In this step, you create a tumbling window trigger to run the job on a frequent schedule. You will use the WindowStart and WindowEnd system variables of the tumbling window trigger and pass them as parameters to your pipeline to be used in the CDC query.
Navigate to the Parameters tab of the IncrementalCopyPipeline pipeline and using the + New button add two parameters (triggerStartTime and triggerEndTime) to the pipeline, which will represent the tumbling window start and end time. For debugging purposes add default values in the format YYYY-MM-DD HH24:MI:SS.FFF but ensure the triggerStartTime is not prior to CDC being enabled on the table, otherwise this will result in an error.
Click on the settings tab of the Lookup activity and configure the query to use the start and end parameters. Copy the following into the query:
@concat('DECLARE @begin_time datetime, @end_time datetime, @from_lsn binary(10), @to_lsn binary(10);
SET @begin_time = ''',pipeline().parameters.triggerStartTime,''';
SET @end_time = ''',pipeline().parameters.triggerEndTime,''';
SET @from_lsn = sys.fn_cdc_map_time_to_lsn(''smallest greater than or equal'', @begin_time);
SET @to_lsn = sys.fn_cdc_map_time_to_lsn(''largest less than'', @end_time);
SELECT count(1) changecount FROM cdc.fn_cdc_get_net_changes_dbo_customers(@from_lsn, @to_lsn, ''all'')')
Navigate to the Copy activity in the True case of the If Condition activity and click on the Source tab. Copy the following into the query:
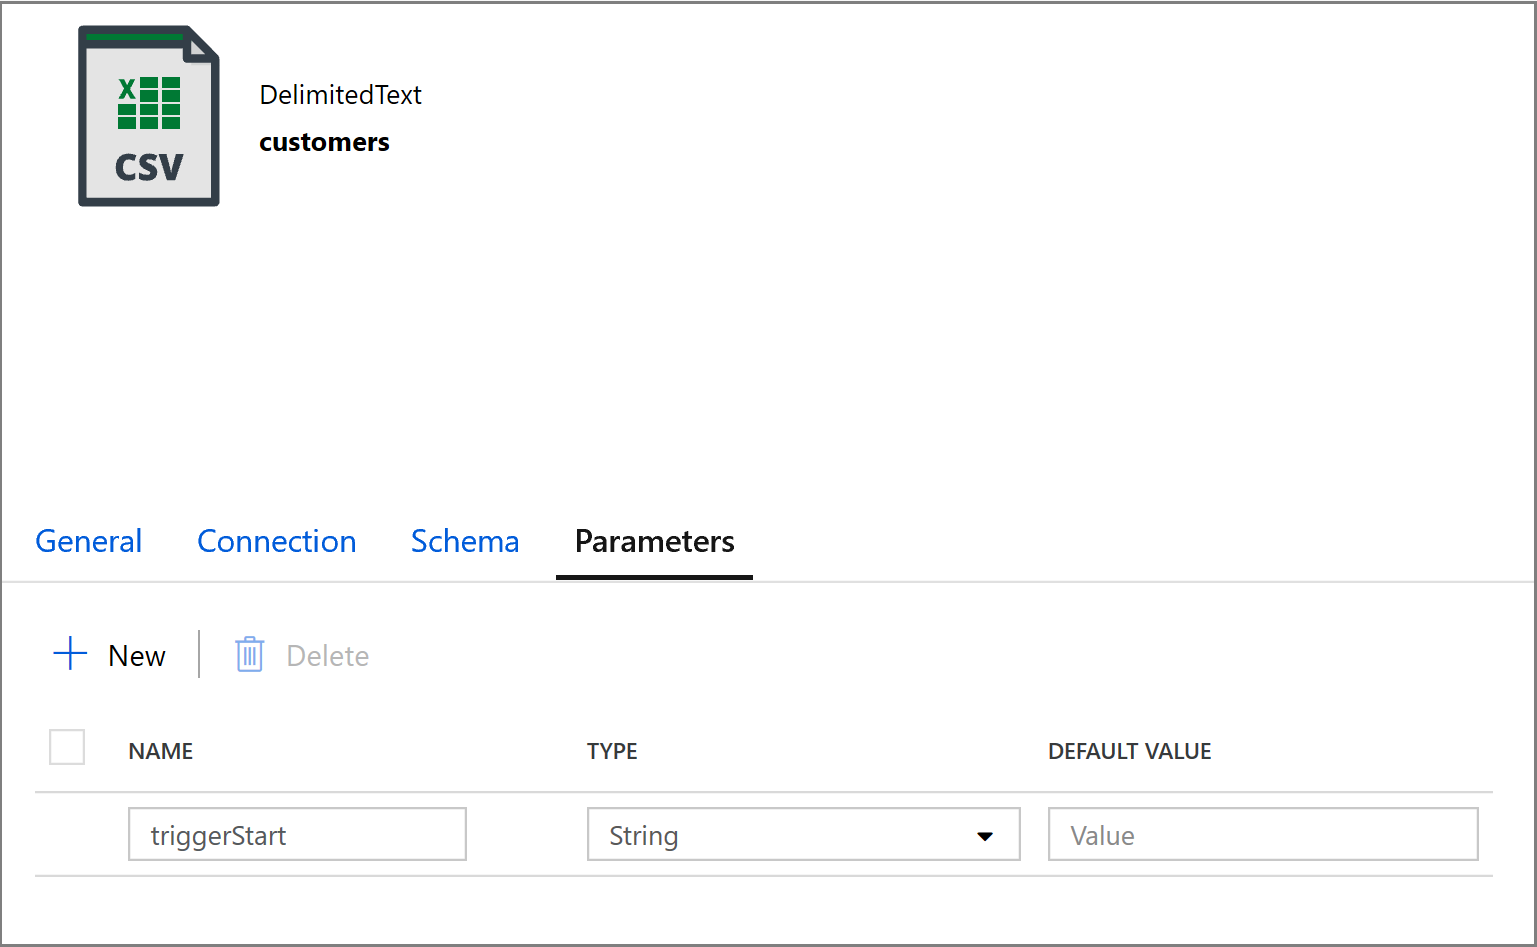
@concat('DECLARE @begin_time datetime, @end_time datetime, @from_lsn binary(10), @to_lsn binary(10);
SET @begin_time = ''',pipeline().parameters.triggerStartTime,''';
SET @end_time = ''',pipeline().parameters.triggerEndTime,''';
SET @from_lsn = sys.fn_cdc_map_time_to_lsn(''smallest greater than or equal'', @begin_time);
SET @to_lsn = sys.fn_cdc_map_time_to_lsn(''largest less than'', @end_time);
SELECT * FROM cdc.fn_cdc_get_net_changes_dbo_customers(@from_lsn, @to_lsn, ''all'')')
Click on the Sink tab of the Copy activity and click Open to edit the dataset properties. Click on the Parameters tab and add a new parameter called triggerStart
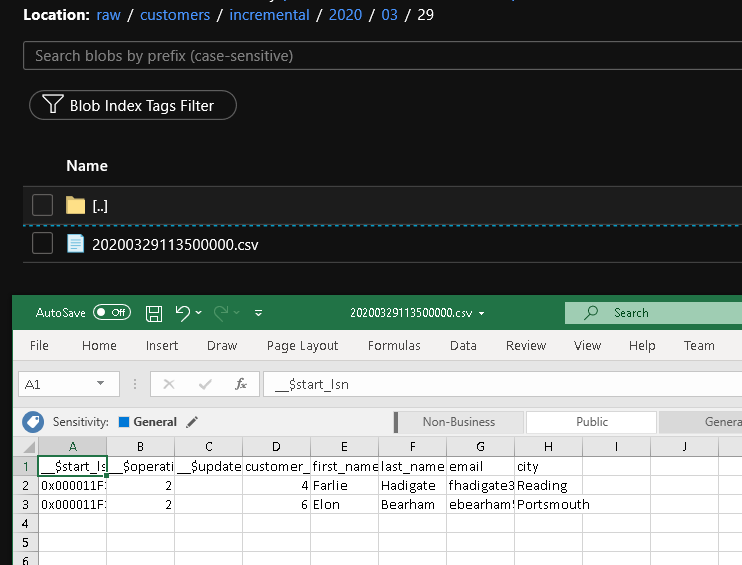
Next, configure the dataset properties to store the data in a customers/incremental subdirectory with date-based partitions.
Click on the Connection tab of the dataset properties and add dynamic content for both the Directory and the File sections.
Enter the following expression in the Directory section by clicking on the dynamic content link under the textbox:
@concat('customers/incremental/',formatDateTime(dataset().triggerStart,'yyyy/MM/dd'))Enter the following expression in the File section. This will create file names based on the trigger start date and time, suffixed with the csv extension:
@concat(formatDateTime(dataset().triggerStart,'yyyyMMddHHmmssfff'),'.csv')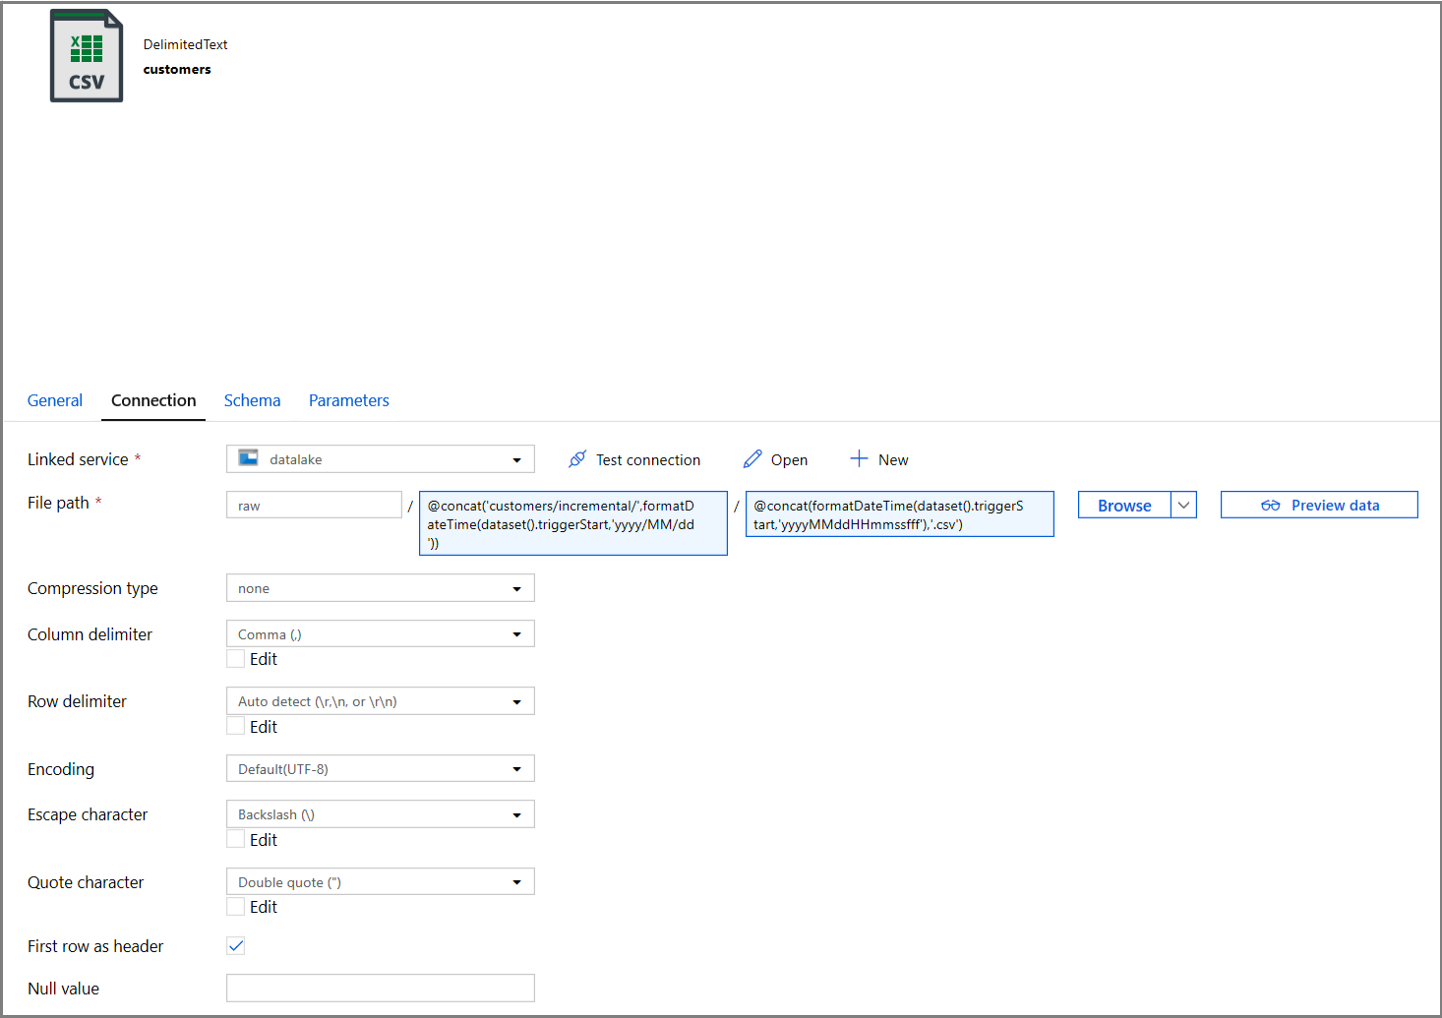
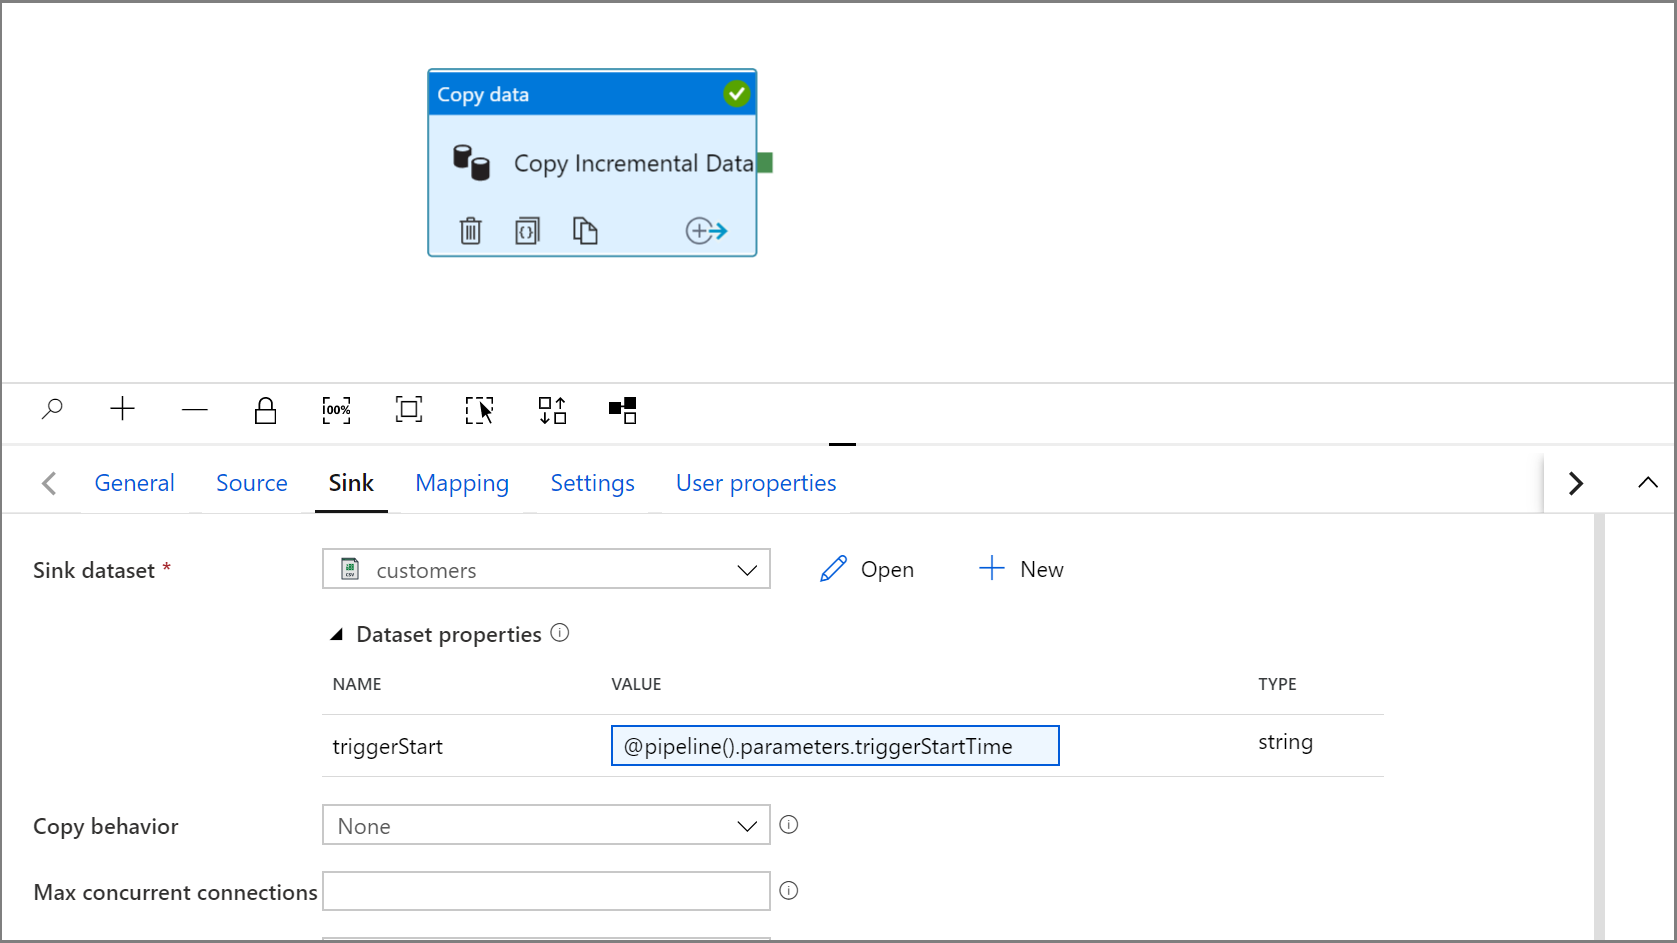
Navigate back to the Sink settings in Copy activity by clicking on the IncrementalCopyPipeline tab.
Expand the dataset properties and enter dynamic content in the triggerStart parameter value with the following expression:
@pipeline().parameters.triggerStartTime
Click Debug to test the pipeline and ensure the folder structure and output file is generated as expected. Download and open the file to verify the contents.
Ensure the parameters are being injected into the query by reviewing the Input parameters of the pipeline run.
Publish entities (linked services, datasets, and pipelines) to the Data Factory service by clicking the Publish all button. Wait until you see the Publishing succeeded message.
Finally, configure a tumbling window trigger to run the pipeline at a regular interval and set start and end time parameters.
- Click the Add trigger button, and select New/Edit

- Enter a trigger name and specify a start time, which is equal to the end time of the debug window above.
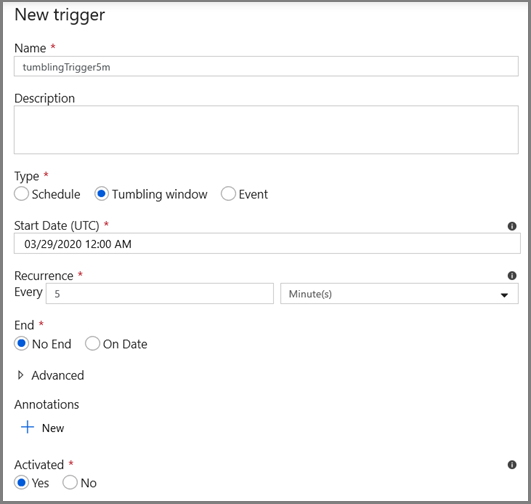
On the next screen, specify the following values for the start and end parameters respectively.
@formatDateTime(trigger().outputs.windowStartTime,'yyyy-MM-dd HH:mm:ss.fff')
@formatDateTime(trigger().outputs.windowEndTime,'yyyy-MM-dd HH:mm:ss.fff')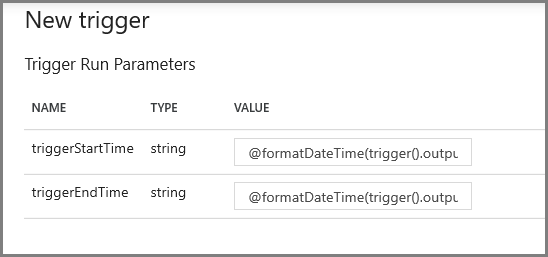
Note
The trigger will only run once it has been published. Additionally the expected behavior of tumbling window is to run all historical intervals from the start date until now. More information regarding tumbling window triggers can be found here.
Using SQL Server Management Studio make some additional changes to the customer table by running the following SQL:
insert into customers (customer_id, first_name, last_name, email, city) values (4, 'Farlie', 'Hadigate', 'fhadigate3@zdnet.com', 'Reading');
insert into customers (customer_id, first_name, last_name, email, city) values (5, 'Anet', 'MacColm', 'amaccolm4@yellowbook.com', 'Portsmouth');
insert into customers (customer_id, first_name, last_name, email, city) values (6, 'Elonore', 'Bearham', 'ebearham5@ebay.co.uk', 'Portsmouth');
update customers set first_name='Elon' where customer_id=6;
delete from customers where customer_id=5;
Click the Publish all button. Wait until you see the Publishing succeeded message.
After a few minutes the pipeline will have triggered and a new file will have been loaded into Azure Storage
Monitor the incremental copy pipeline
Click the Monitor tab on the left. You see the pipeline run in the list and its status. To refresh the list, click Refresh. Hover near the name of the pipeline to access the Rerun action and Consumption report.
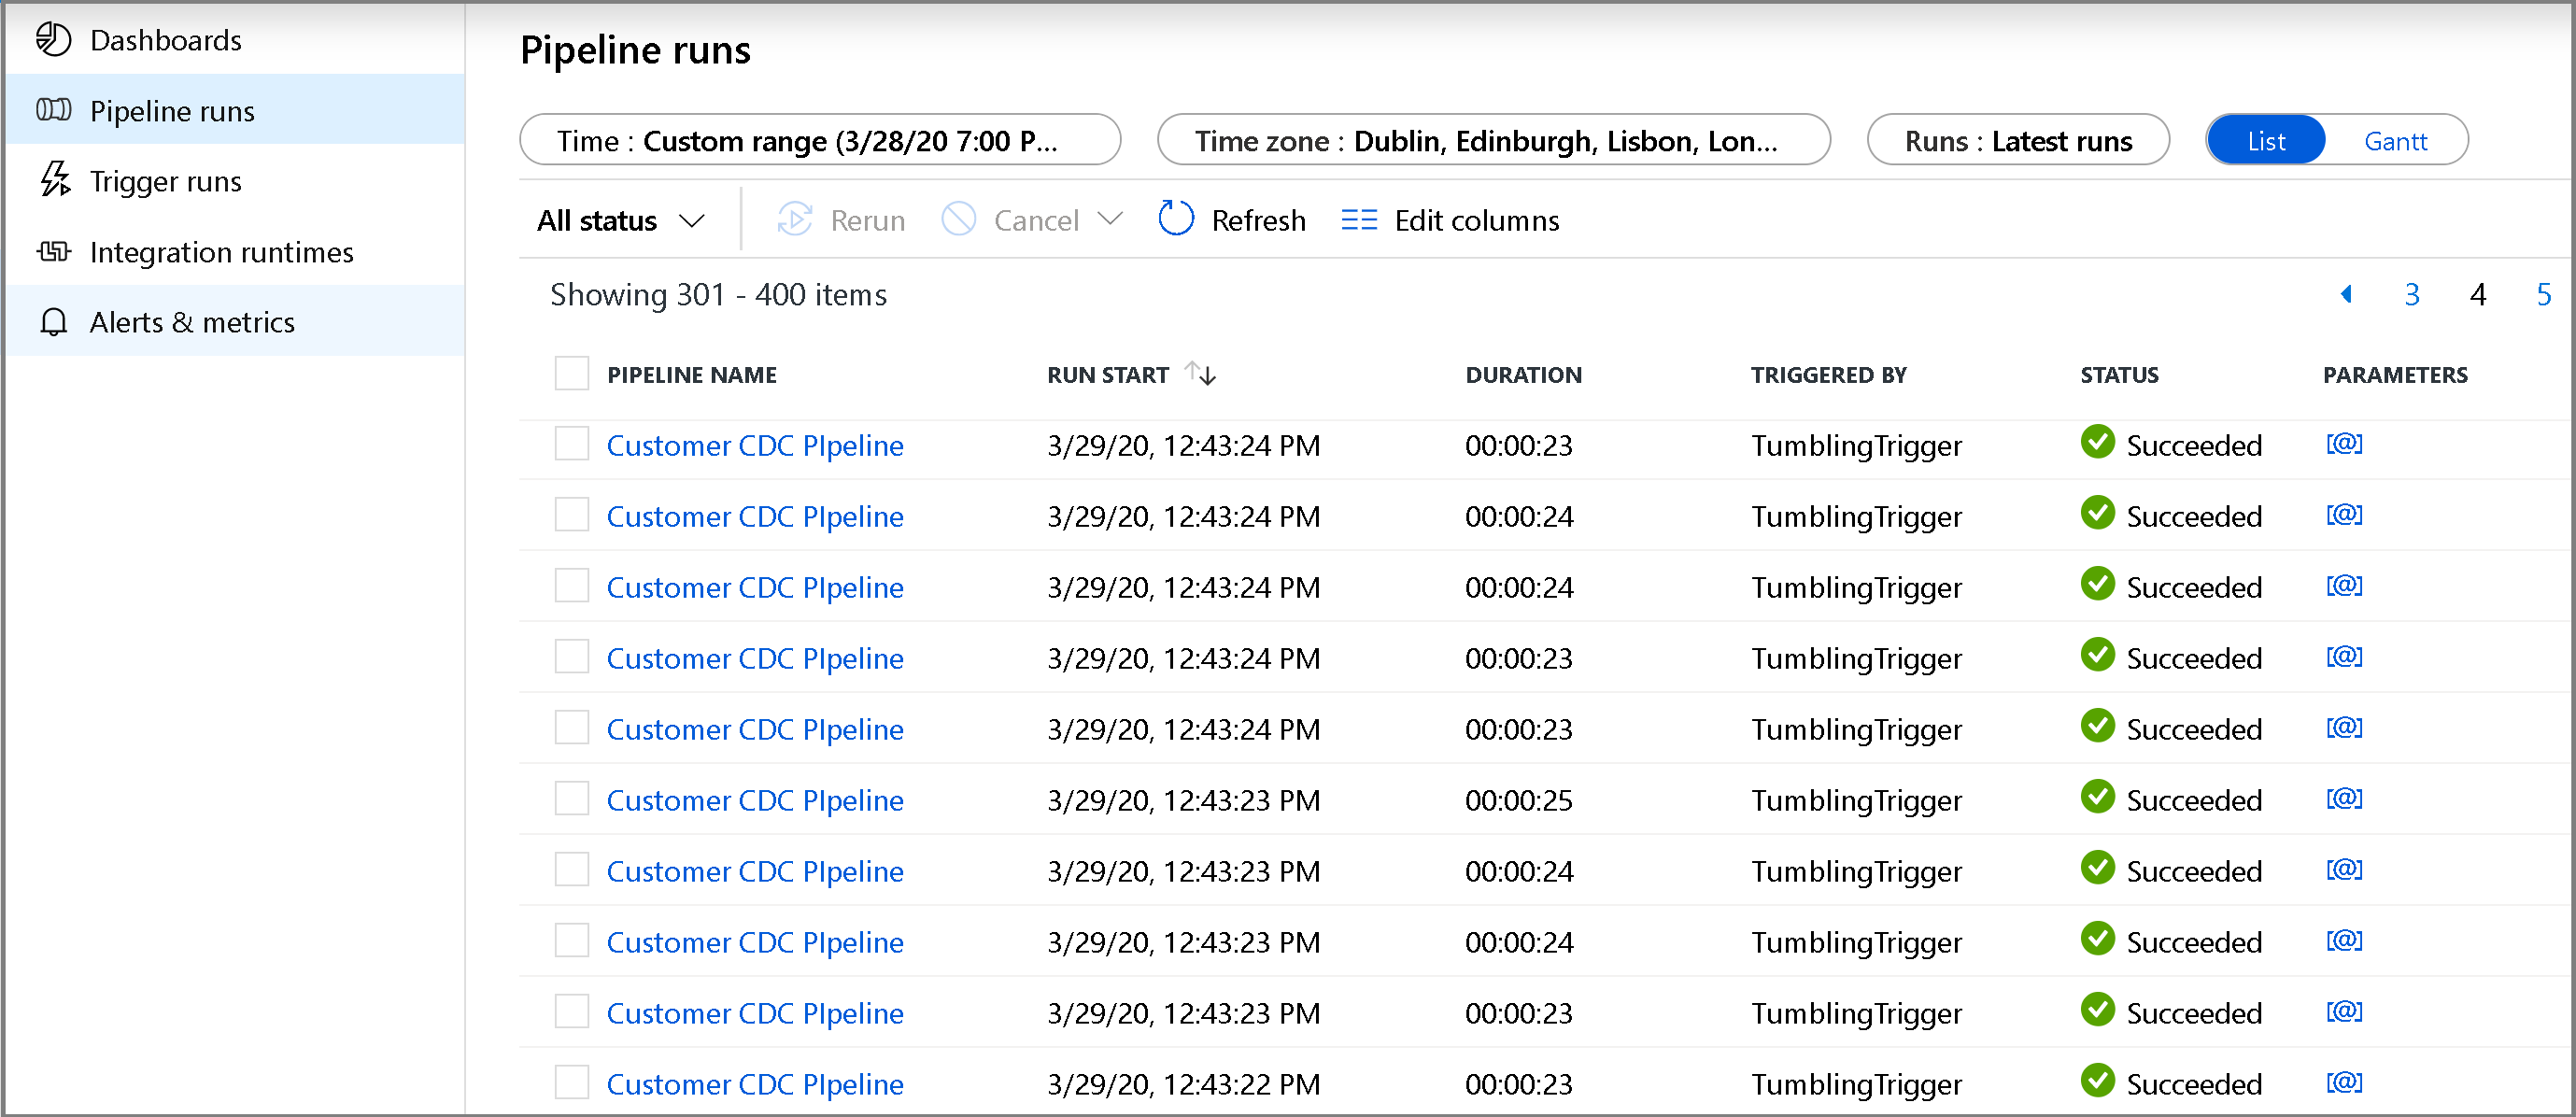
To view activity runs associated with the pipeline run, click the Pipeline name. If changed data was detected, there will be three activities including the copy activity otherwise there will only be two entries in the list. To switch back to the pipeline runs view, click the All Pipelines link at the top.
Review the results
You see the second file in the customers/incremental/YYYY/MM/DD folder of the raw container.
Related content
Advance to the following tutorial to learn about copying new and changed files only based on their LastModifiedDate: