Note
Access to this page requires authorization. You can try signing in or changing directories.
Access to this page requires authorization. You can try changing directories.
APPLIES TO:  Azure Stack Edge Pro - GPUAzure Stack Edge Pro 2Azure Stack Edge Pro RAzure Stack Edge Mini R
This tutorial describes how to create and manage a VM on your Azure Stack Edge Pro device using an Azure PowerShell script.
Prerequisites
Before you begin creating and managing a VM on your Azure Stack Edge Pro device using this script, you need to make sure you have completed the prerequisites listed in the following steps:
For Azure Stack Edge Pro device via the local web UI
Before you can deploy VMs on your Azure Stack Edge device, you must configure your client to connect to the device via Azure Resource Manager over Azure PowerShell. For detailed instructions, see Connect to Azure Resource Manager on your Azure Stack Edge device.
Make sure that you can use the following steps to access the device from your client. You've already done this configuration when you connected to Azure Resource Manager, and now you're verifying that the configuration was successful.
Verify that Azure Resource Manager communication is working by running the following command:
To call the local device APIs to authenticate, enter:
If you configured compute for Kubernetes, you can skip this step. Otherwise, ensure that you've enabled a network interface for compute by doing the following:
a. On your local user interface, go to Compute settings.
b. Select the network interface that you want to use to create a virtual switch. The VMs you create will be attached to a virtual switch that's attached to this port and the associated network. Be sure to choose a network that matches the IP address you'll use for the VM.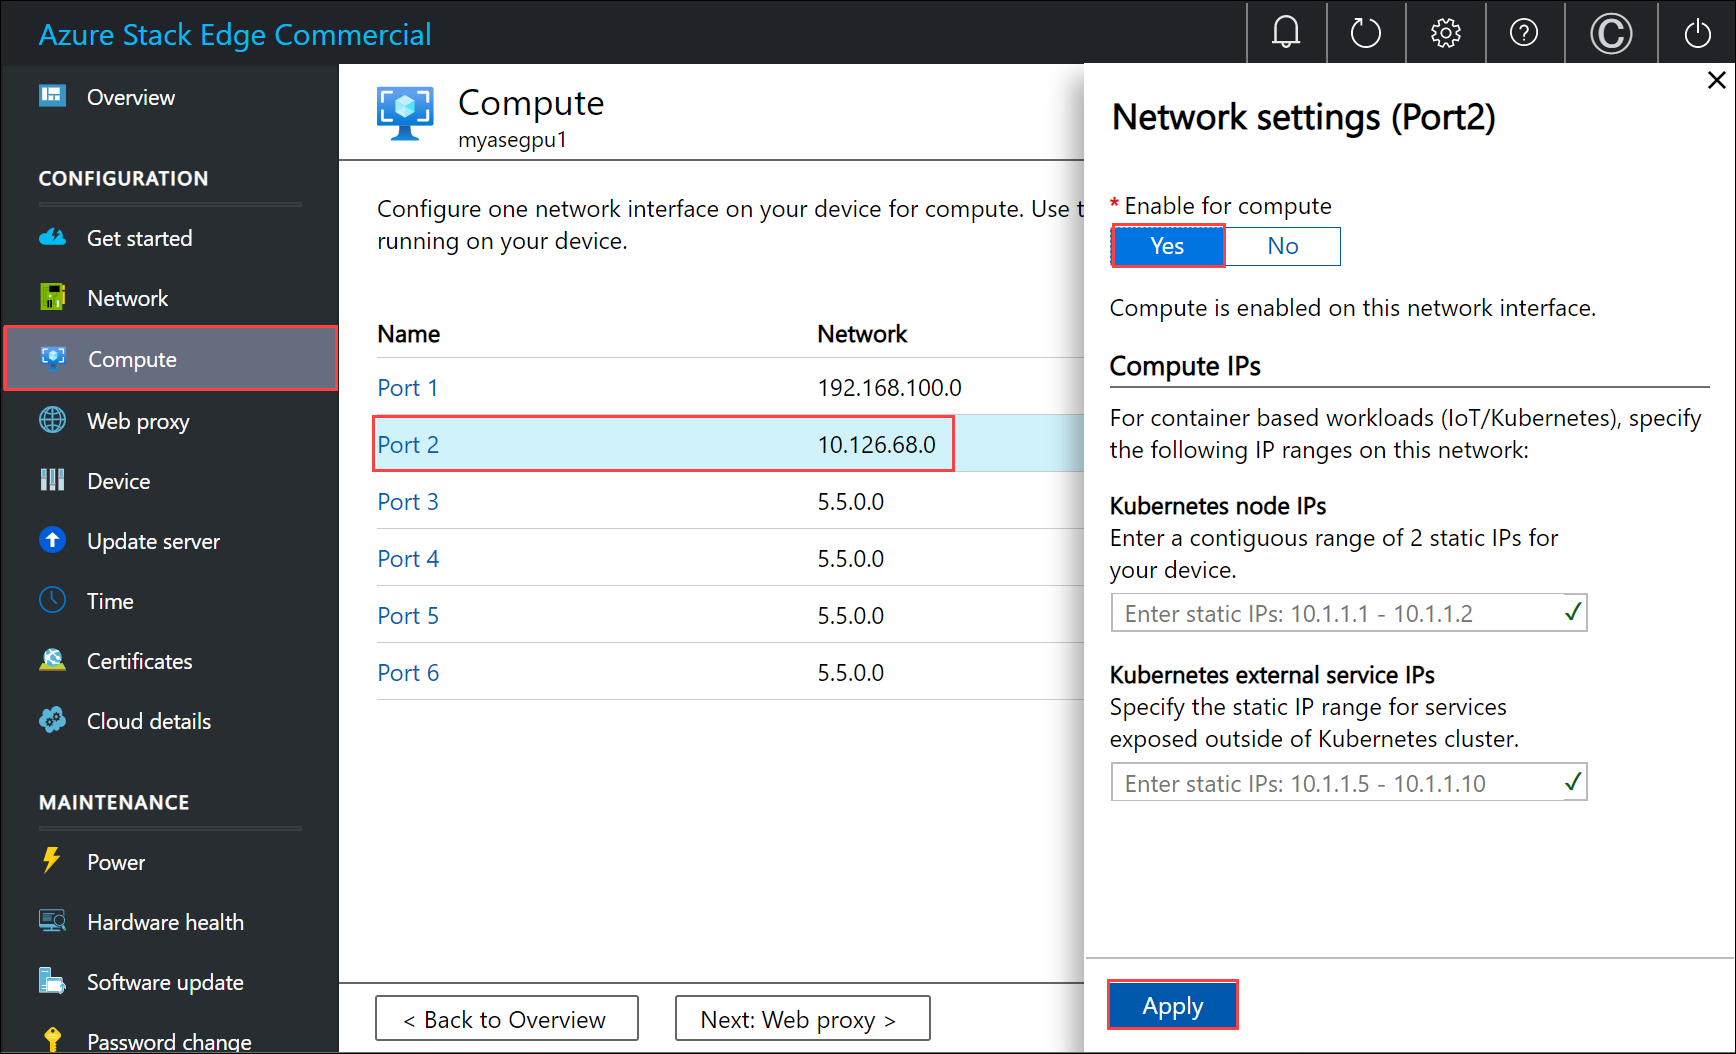
c. Under Enable for compute on the network interface, select Yes. Azure Stack Edge will create and manage a virtual switch that corresponds to that network interface. Don't enter specific IPs for Kubernetes at this time. It can take several minutes to enable compute.
Note
If you're creating GPU VMs, select a network interface that's connected to the internet. Doing so enables you to install a GPU extension on your device.
For your Windows client
Make sure that you have modified:
- The host file on the client, OR,
- The DNS server configuration
Important
We recommend that you modify the DNS server configuration for endpoint name resolution.
Start Notepad as an administrator (Administrator privileges is required to save the file), and then open the hosts file located at
C:\Windows\System32\Drivers\etc.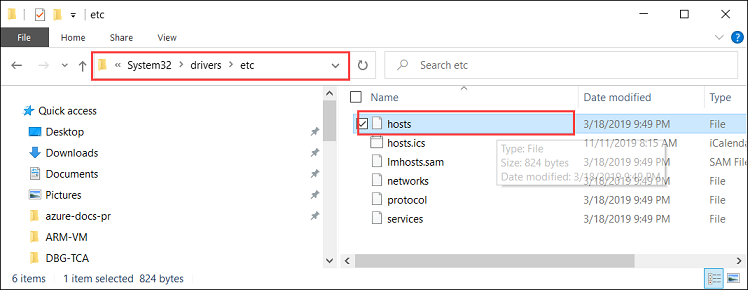
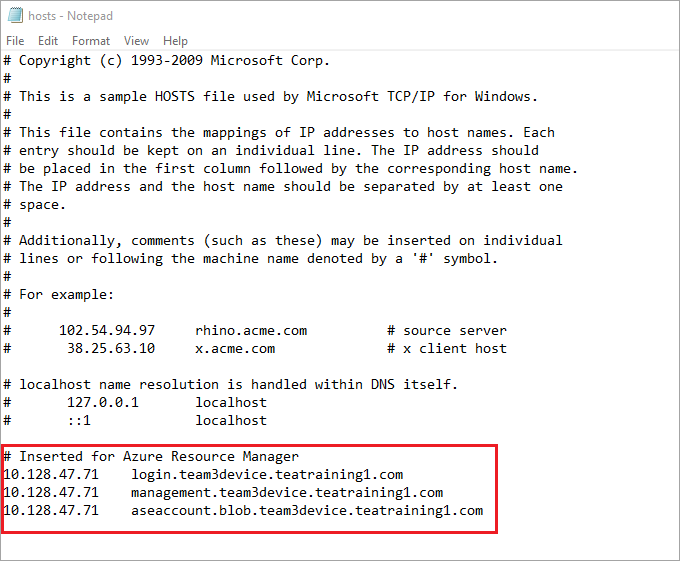
Add the following entries to your hosts file replacing with appropriate values for your device:
<device IP> login.<appliance name>.<DNS domain>
<device IP> management.<appliance name>.<DNS domain>
<device IP> <storage name>.blob.<appliance name>.<DNS domain>
For the storage account, you can provide a name that you want the script to use later to create a new storage account. The script doesn't check if that storage account is existing.
Use the following image for reference. Save the hosts file.
Download the PowerShell script used in this procedure.
Make sure that your Windows client is running PowerShell 5.0 or later.
Make sure that the
Azure.Storage Module version 4.5.0is installed on your system. You can get this module from the PowerShell Gallery. To install this module, type:Install-Module -Name Azure.Storage -RequiredVersion 4.5.0To verify the version of the installed module, type:
Get-InstalledModule -name Azure.StorageTo uninstall any other version modules, type:
Uninstall-Module -Name Azure.StorageDownload AzCopy 10 to your Windows client. Make a note of this location as you'll pass it as a parameter while running the script.
Make sure that your Windows client is running TLS 1.2 or later.
Create a VM
Run PowerShell as an administrator.
Go to the folder where you downloaded the script on your client.
Before you run the script, make sure you're still connected to the local Azure Resource Manager of the device and the connection hasn't expired.
PS C:\windows\system32> login-AzureRMAccount -EnvironmentName aztest1 -TenantId aaaabbbb-0000-cccc-1111-dddd2222eeee

Account               SubscriptionName              TenantId                             Environment
-------               ----------------              --------                             -----------
EdgeArmUser@localhost Default Provider Subscription aaaabbbb-0000-cccc-1111-dddd2222eeee aztest1

PS C:\windows\system32> cd C:\Users\v2
PS C:\Users\v2>
Use the following command to run the script:
.\ArmPowershellClient.ps1 -NicPrivateIp <Private IP> -VHDPath <Path> -VHDFile <VHD File, with extension> -StorageAccountName <Name> -OS <Windows/Linux> -VMSize <Supported VM Size> -VMUserName <Username to be used to sign in to VM> -VMPassword <Password for the VM> --AzCopy10Path <Absolute Path>If you want the IP to be dynamically allocated to the VM, omit the
-NicPrivateIpparameter.Here are the examples when the script is run to create a Windows VM and a Linux VM.
For a Windows VM:
Here's a sample output for a Windows VM that was created.
PS C:\Users\v2> .\ArmPowershellClient.ps1 -VHDPath \\asefs\Logs\vmvhd -VHDFile WindowsServer2016Datacenter.vhd -StorageAccountName myasesatest -OS Windows -VMSize Standard_D1_v2 -VMUserName Administrator -VMPassword Password1 -AzCopy10Path C:\Users\AzCopy10\AzCopy.exe
New-AzureRmResourceGroup -Name rg201221071831 -Location DBELocal -Force
Successfully created Resource Group:rg201221071831
Successfully created Resource Group:StorAccRG
Get-AzureRmStorageAccount -Name myasesatest -ResourceGroupName StorAccRG -ErrorAction SilentlyContinue
New-AzureRmStorageAccount -Name myasesatest  -ResourceGroupName StorAccRG -SkuName Standard_LRS -Location DBELocal

Created New Storage Account
Get-AzureRmStorageAccount -name myasesatest -resourcegroupname
StorageAccountName ResourceGroupName Location SkuName     Kind    AccessTier CreationTime          ProvisioningState EnableHttpsTrafficOnly
------------------ ----------------- -------- -------     ----    ---------- ------------          ----------------- ----------------------
myasesatest        StorAccRG         DBELocal StandardLRS Storage            12/22/2020 3:18:38 AM Succeeded         False
myasesatest        StorAccRG         DBELocal StandardLRS Storage            12/22/2020 3:18:38 AM Succeeded         False

 Uploading Vhd to Storage Account

New-AzureStorageContext -StorageAccountName myasesatest -StorageAccountKey hyibjhbVlOROgTlU1nQJIlxrg94eGDhF+RIQ71Z7UVZIxoOPMlHP274NUhZtA1hMxGBcpk2BVApiFasFPEhY/A== -Endpoint https://myasesatest.blob.myasegpuvm.wdshcsso.com/

New-AzureStorageAccountSASToken -Service Blob,File,Queue,Table -ResourceType Container,Service,Object -Permission

SAS Token : ?sv=2017-07-29&sig=TXaGbjum9tFFaJnu3SFmDuslJuqNiNQwvuHfpPJMYN0%3D&spr=https&se=2020-12-22T04%3A18%3A43Z&srt=sco&ss=bfqt&sp=racwdl

 C:\Users\AzCopy10\AzCopy.exe make https://myasesatest.blob.myasegpuvm.wdshcsso.com/vmimages?sv=2017-07-29&sig=TXaGbjum9tFFaJnu3SFmDuslJuqNiNQwvuHfpPJMYN0%3D&spr=https&se=2020-12-22T04%3A18%3A43Z&srt=sco&ss=bfqt&sp=racwdl

Successfully created the resource.

 AzCopy cp \\asefs\Logs\vmvhd\WindowsServer2016Datacenter.vhd https://myasesatest.blob.myasegpuvm.wdshcsso.com/vmimages?sv=2017-07-29&sig=TXaGbjum9tFFaJnu3SFmDuslJuqNiNQwvuHfpPJMYN0%3D&spr=https&se=2020-12-22T04%3A18%3A43Z&srt=sco&ss=bfqt&sp=racwdl

INFO: Scanning...

Job b6f54665-93c4-2f47-4770-5f3b7b0de2dc has started
Log file is located at: C:\Users\Administrator\.azcopy\b6f54665-93c4-2f47-4770-5f3b7b0de2dc.log

INFO: AzCopy.exe: A newer version 10.8.0 is available to download

99.9 %, 0 Done, 0 Failed, 1 Pending, 0 Skipped, 1 Total,  (Disk may be limiting speed)

Job b6f54665-93c4-2f47-4770-5f3b7b0de2dc summary
Elapsed Time (Minutes): 12.7717
Total Number Of Transfers: 1
Number of Transfers Completed: 1
Number of Transfers Failed: 0
Number of Transfers Skipped: 0
TotalBytesTransferred: 13958644224
Final Job Status: Completed

VHD Upload Done

 Creating a new managed disk

  = New-AzureRmDiskConfig -Location DBELocal -CreateOption Import -SourceUri

 Microsoft.Azure.Commands.Compute.Automation.Models.PSDisk

 New-AzureRmDisk -ResourceGroupName rg201221071831 -DiskName ld201221071831 -Disk

ResourceGroupName  : rg201221071831
ManagedBy          :
Sku                : Microsoft.Azure.Management.Compute.Models.DiskSku
Zones              :
TimeCreated        : 12/21/2020 7:31:35 PM
OsType             :
CreationData       : Microsoft.Azure.Management.Compute.Models.CreationData
DiskSizeGB         : 13
EncryptionSettings :
ProvisioningState  : Succeeded
Id                 : /subscriptions/aaaa0a0a-bb1b-cc2c-dd3d-eeeeee4e4e4e/resourceGroups/rg201221071831/providers/Microsoft.Compute/disks/ld201221071831
Name               : ld201221071831
Type               : Microsoft.Compute/disks
Location           : DBELocal
Tags               : {}

 Created a new managed disk

 Creating a new Image out of managed disk

ResourceGroupName    :
SourceVirtualMachine :
StorageProfile       : Microsoft.Azure.Management.Compute.Models.ImageStorageProfile
ProvisioningState    :
Id                   :
Name                 :
Type                 :
Location             : DBELocal
Tags                 :

 New-AzureRmImage -Image Microsoft.Azure.Commands.Compute.Automation.Models.PSImage -ImageName ig201221071831  -ResourceGroupName rg201221071831 -HyperVGeneration V1

ResourceGroupName    : rg201221071831
SourceVirtualMachine :
StorageProfile       : Microsoft.Azure.Management.Compute.Models.ImageStorageProfile
ProvisioningState    : Succeeded
Id                   : /subscriptions/aaaa0a0a-bb1b-cc2c-dd3d-eeeeee4e4e4e/resourceGroups/rg201221071831/providers/Microsoft.Compute/images/ig201221071831
Name                 : ig201221071831
Type                 : Microsoft.Compute/images
Location             : dbelocal
Tags                 : {}

 Created a new Image

 Using Vnet /subscriptions/aaaa0a0a-bb1b-cc2c-dd3d-eeeeee4e4e4e/resourceGroups/ASERG/providers/Microsoft.Network/virtualNetworks/ASEVNET

 Creating a new Network Interface
WARNING: The output object type of this cmdlet will be modified in a future release.

VirtualMachine              :
IpConfigurations            : {ip201221071831}
DnsSettings                 : Microsoft.Azure.Commands.Network.Models.PSNetworkInterfaceDnsSettings
MacAddress                  : 001DD87D7216
Primary                     :
EnableAcceleratedNetworking : False
EnableIPForwarding          : False
NetworkSecurityGroup        :
ProvisioningState           : Succeeded
VirtualMachineText          : null
IpConfigurationsText        : [
                                {
                                  "Name": "ip201221071831",
                                  "Etag": "W/\"27785dd5-d12a-4d73-9495-ffad7847261a\"",
                                  "Id": "/subscriptions/aaaa0a0a-bb1b-cc2c-dd3d-eeeeee4e4e4e/resourceGroups/rg201221071831/providers/Microsoft.Network/networkInterfaces/nic201221071831/ipConfigurations/ip201221071831",
                                  "PrivateIpAddress": "10.57.51.61",
                                  "PrivateIpAllocationMethod": "Dynamic",
                                  "Subnet": {
                                    "Id": "/subscriptions/aaaa0a0a-bb1b-cc2c-dd3d-eeeeee4e4e4e/resourceGroups/ASERG/providers/Microsoft.Network/virtualNetworks/ASEVNET/subnets/ASEVNETsubNet",
                                    "ResourceNavigationLinks": [],
                                    "ServiceEndpoints": []
                                  },
                                  "ProvisioningState": "Succeeded",
                                  "PrivateIpAddressVersion": "IPv4",
                                  "LoadBalancerBackendAddressPools": [],
                                  "LoadBalancerInboundNatRules": [],
                                  "Primary": true,
                                  "ApplicationGatewayBackendAddressPools": [],
                                  "ApplicationSecurityGroups": []
                                }
                              ]
DnsSettingsText             : {
                                "DnsServers": [],
                                "AppliedDnsServers": [],
                                "InternalDomainNameSuffix": "qgotb4hjdh4efnhn0vz5adtb3f.a--x.internal.cloudapp.net"
                              }
NetworkSecurityGroupText    : null
ResourceGroupName           : rg201221071831
Location                    : dbelocal
ResourceGuid                : e6327ab9-0855-4f04-9b36-17bbf31b5bd8
Type                        : Microsoft.Network/networkInterfaces
Tag                         :
TagsTable                   :
Name                        : nic201221071831
Etag                        : W/"27785dd5-d12a-4d73-9495-ffad7847261a"
Id                          : /subscriptions/aaaa0a0a-bb1b-cc2c-dd3d-eeeeee4e4e4e/resourceGroups/rg201221071831/providers/Microsoft.Network/networkInterfaces/nic201221071831

 Created Network Interface

 Creating a new VM

 New-AzureRmVMConfig -VMName VM201221071831 -VMSize Standard_D1_v2

 Set-AzureRmVMOperatingSystem -VM Microsoft.Azure.Commands.Compute.Models.PSVirtualMachine -Windows -ComputerName COM201221071831 -Credential System.Management.Automation.PSCredential

 Microsoft.Azure.Commands.Compute.Models.PSVirtualMachine = Set-AzureRmVMOSDisk -VM Microsoft.Azure.Commands.Compute.Models.PSVirtualMachine -Name osld201221071831 -Caching ReadWrite -CreateOption FromImage -Windows -StorageAccountType StandardLRS

 Add-AzureRmVMNetworkInterface -VM Microsoft.Azure.Commands.Compute.Models.PSVirtualMachine -Id /subscriptions/aaaa0a0a-bb1b-cc2c-dd3d-eeeeee4e4e4e/resourceGroups/rg201221071831/providers/Microsoft.Network/networkInterfaces/nic201221071831.Id

 Set-AzureRmVMSourceImage -VM Microsoft.Azure.Commands.Compute.Models.PSVirtualMachine -Id /subscriptions/aaaa0a0a-bb1b-cc2c-dd3d-eeeeee4e4e4e/resourceGroups/rg201221071831/providers/Microsoft.Compute/images/ig201221071831

 New-AzureRmVM -ResourceGroupName rg201221071831 -Location DBELocal -VM Microsoft.Azure.Commands.Compute.Models.PSVirtualMachine -Verbose
WARNING: Since the VM is created using premium storage or managed disk, existing standard storage account, myasesa1, is used for boot
diagnostics.
VERBOSE: Performing the operation "New" on target "VM201221071831".

Ticks             : 1533424841
Days              : 0
Hours             : 0
Milliseconds      : 342
Minutes           : 2
Seconds           : 33
TotalDays         : 0.00177479726967593
TotalHours        : 0.0425951344722222
TotalMilliseconds : 153342.4841
TotalMinutes      : 2.55570806833333
TotalSeconds      : 153.3424841

RequestId           :
IsSuccessStatusCode : True
StatusCode          : OK
ReasonPhrase        : OK

PS C:\Users\v2>
For a Linux VM:
Here's the sample of the command that was used to create a Linux VM.
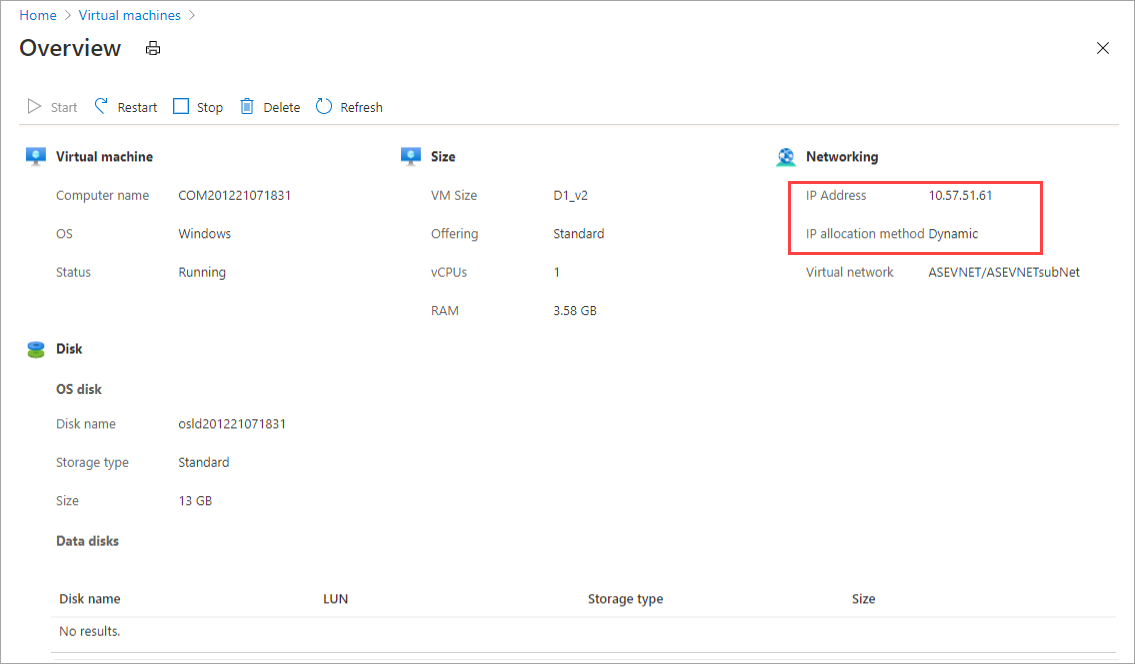
.\ArmPowershellClient.ps1 -VHDPath \\asefs\Logs\vmvhd -VHDFile ubuntu13.vhd -StorageAccountName myasesatest -OS Linux -VMSize Standard_D1_v2 -VMUserName Administrator -VMPassword Password1 -AzCopy10Path C:\Users\AzCopy10\AzCopy.exe
New-AzureRmResourceGroup -Name rg201221075546 -Location DBELocal -Force
Once you have successfully created the VMs, these VMs should show up in the list of virtual machines in the Azure portal. To view the VMs, in the Azure Stack Edge resource for your device in Azure portal, go to Edge services > Virtual machines.
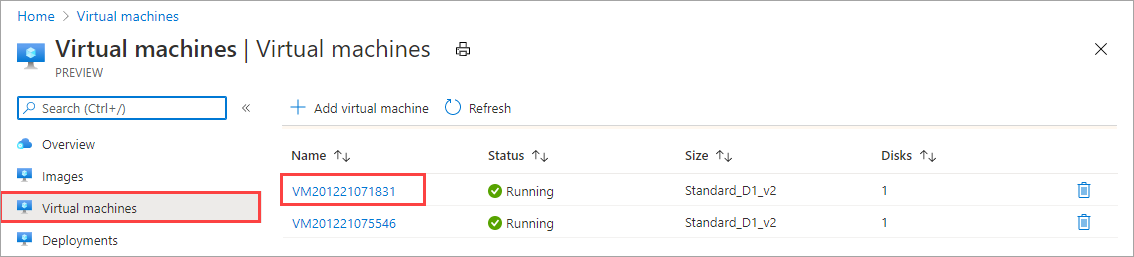
To view the details of a VM, select the VM name. Note the dynamic allocation of IP for this VM.
To clean up the resources that the script created, use the following commands:
Get-AzureRmVM | Remove-AzureRmVM -Force
Get-AzureRmNetworkInterface | Remove-AzureRmNetworkInterface -Force
Get-AzureRmImage | Remove-AzureRmImage -Force
Get-AzureRmDisk | Remove-AzureRmDisk -Force
Get-AzureRmStorageAccount | Remove-AzureRmStorageAccount -Force