Note
Access to this page requires authorization. You can try signing in or changing directories.
Access to this page requires authorization. You can try changing directories.
This tutorial is the first in the series of deployment tutorials that are required to completely deploy Azure Stack Edge Pro R. This tutorial describes how to prepare the Azure portal to deploy an Azure Stack Edge resource. The tutorial uses a 1-node Azure Stack Edge Pro R device shipped with an Uninterruptible Power Supply (UPS).
You need administrator privileges to complete the setup and configuration process. The portal preparation takes less than 10 minutes.
In this tutorial, you learn how to:
- Create a new resource
- Get the activation key
Get started
To deploy Azure Stack Edge Pro R, refer to the following tutorials in the prescribed sequence.
| To do this step | Use these documents |
|---|---|
| Preparation | These steps must be completed in preparation for the upcoming deployment. |
| Deployment configuration checklist | Use this checklist to gather and record information before and during the deployment. |
| Deployment prerequisites | These prerequisites validate the environment is ready for deployment. |
| Deployment tutorials | These tutorials are required to deploy your Azure Stack Edge Pro R device in production. |
| 1. Prepare the Azure portal for device | Create and configure your Azure Stack Edge resource before you install an Azure Stack Box Edge physical device. |
| 2. Install the device | Inspect and cable your physical device. |
| 3. Connect to the device | Once the device is installed, connect to device local web UI. |
| 4. Configure network settings | Configure network including the compute network and web proxy settings for your device. |
| 5. Configure device settings | Assign a device name and DNS domain, configure update server and device time. |
| 6. Configure security settings | Configure certificates, VPN, encryption-at-rest for your device. Use device generated certificates or bring your own certificates. |
| 7. Activate the device | Use the activation key from service to activate the device. The device is ready to set up SMB or NFS shares or connect via REST. |
| 8. Configure compute | Configure the compute role on your device. A Kubernetes cluster is also created. |
You can now begin to set up the Azure portal.
Deployment configuration checklist
Before you deploy your device, you need to collect information to configure the software on your Azure Stack Edge Pro device. Preparing some of this information ahead of time helps streamline the process of deploying the device in your environment. Use the Azure Stack Edge Pro R deployment configuration checklist to note down the configuration details as you deploy your device.
Prerequisites
Following are the configuration prerequisites for your Azure Stack Edge resource, your Azure Stack Edge device, and the datacenter network.
For the Azure Stack Edge resource
Before you begin, make sure that:
Your Microsoft Azure subscription is enabled for an Azure Stack Edge resource. Make sure that you used a supported subscription such as Microsoft Enterprise Agreement (EA), Cloud Solution Provider (CSP), or Microsoft Azure Sponsorship.
You have owner or contributor access at resource group level for the Azure Stack Edge, IoT Hub, and Azure Storage resources.
To create an order in the Azure Edge Hardware Center, you need to make sure that the Microsoft.EdgeOrder provider is registered. For information on how to register, go to Register resource provider.
To create any Azure Stack Edge resource, you should have permissions as a contributor (or higher) scoped at resource group level. You also need to make sure that the
Microsoft.DataBoxEdgeprovider is registered. For information on how to register, go to Register resource provider.- To create any IoT Hub resource, make sure that Microsoft.Devices provider is registered. For information on how to register, go to Register resource provider.
- To create a Storage account resource, again you need contributor or higher access scoped at the resource group level. Azure Storage is by default a registered resource provider.
You have admin or user access to Microsoft Entra ID Graph API. For more information, see Azure Active Directory Graph API.
You have your Microsoft Azure storage account with access credentials.
For the Azure Stack Edge device
Before you deploy a physical device, make sure that:
You've run the Azure Stack Network Readiness Checker tool to check network readiness for your Azure Stack Edge device. You can use the tool to check whether your firewall rules are blocking access to any essential URLs for the service and verify custom URLs, among other tests. For more information, see Check network readiness for your Azure Stack Edge device.
You've reviewed the safety information for this device at: Safety guidelines for your Azure Stack Edge device.
- You have received the physical device.
- You have access to a flat, stable, and level work surface where the device can rest safely.
- The site where you intend to set up the device has standard AC power from an independent source or a rack power distribution unit (PDU).
For the datacenter network
Before you begin, make sure that:
The network in your datacenter is configured per the networking requirements for your Azure Stack Edge device. For more information, see Azure Stack Edge Pro R System Requirements.
For normal operating conditions of your device, you have:
- A minimum of 10-Mbps download bandwidth to ensure the device stays updated.
- A minimum of 20-Mbps dedicated upload and download bandwidth to transfer files.
Create a new resource
If you have an existing Azure Stack Edge resource to manage your physical device, skip this step and go to Get the activation key.
Azure Edge Hardware Center (Preview) lets you explore and order a variety of hardware from the Azure hybrid portfolio including Azure Stack Edge Pro devices.
When you place an order through the Azure Edge Hardware Center, you can order multiple devices, to be shipped to more than one address, and you can reuse ship to addresses from other orders.
Ordering through Azure Edge Hardware Center will create an Azure resource that will contain all your order-related information. One resource each will be created for each of the units ordered. You will have to create an Azure Stack Edge resource after you receive the device to activate and manage it.
To place an order through the Azure Edge Hardware Center, do these steps:
Use your Microsoft Azure credentials to sign in to the Azure portal at this URL: https://portal.azure.com.
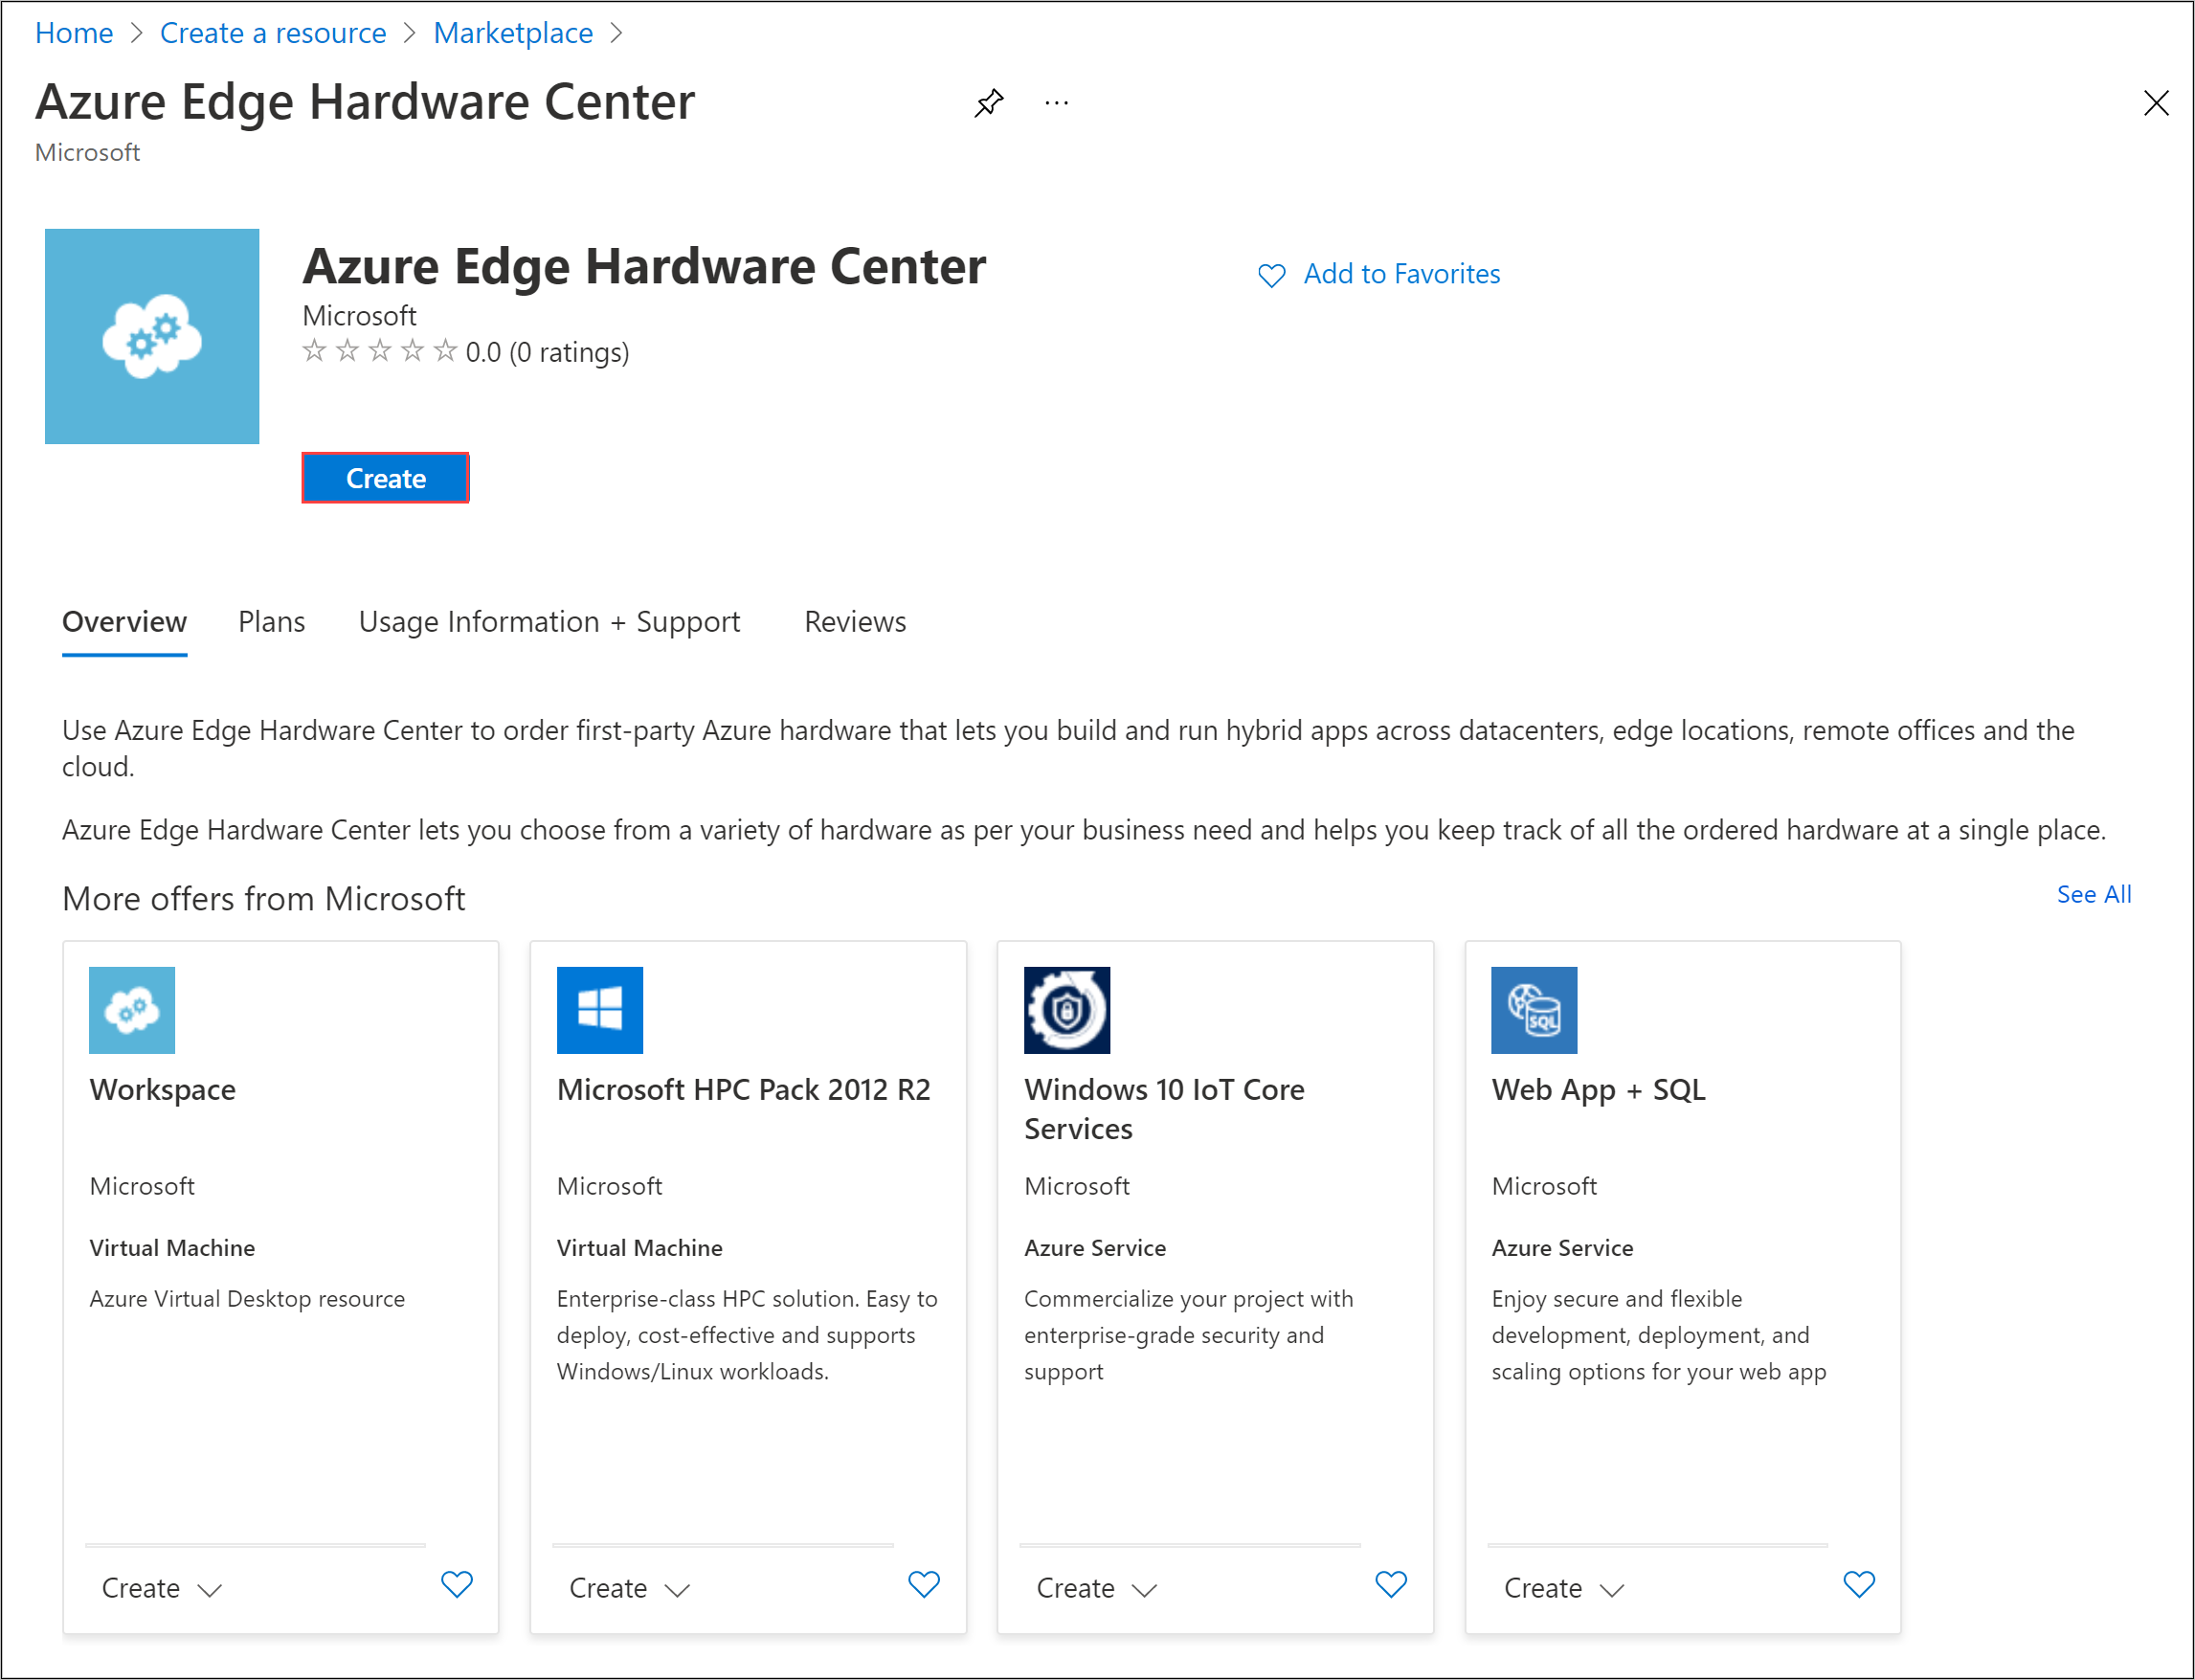
Select + Create a resource. Search for and select Azure Edge Hardware Center. In the Azure Edge Hardware Center, select Create.
Select a subscription, and then select Next.

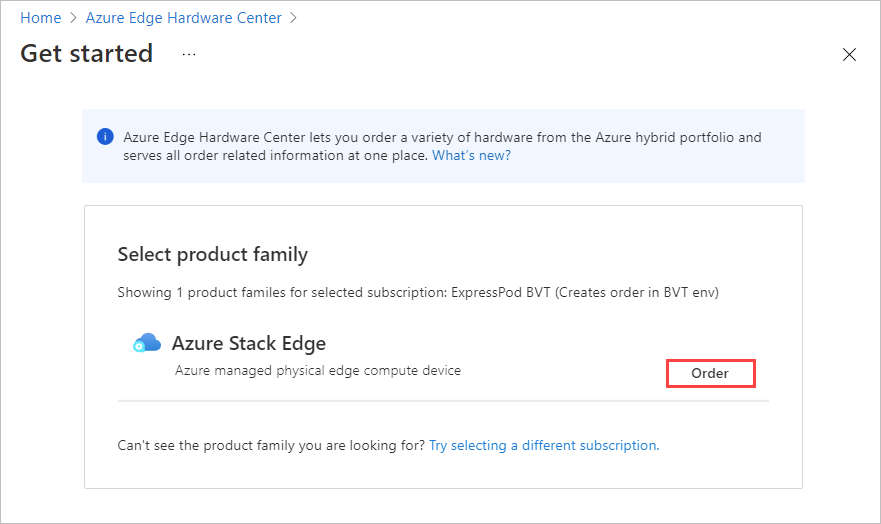
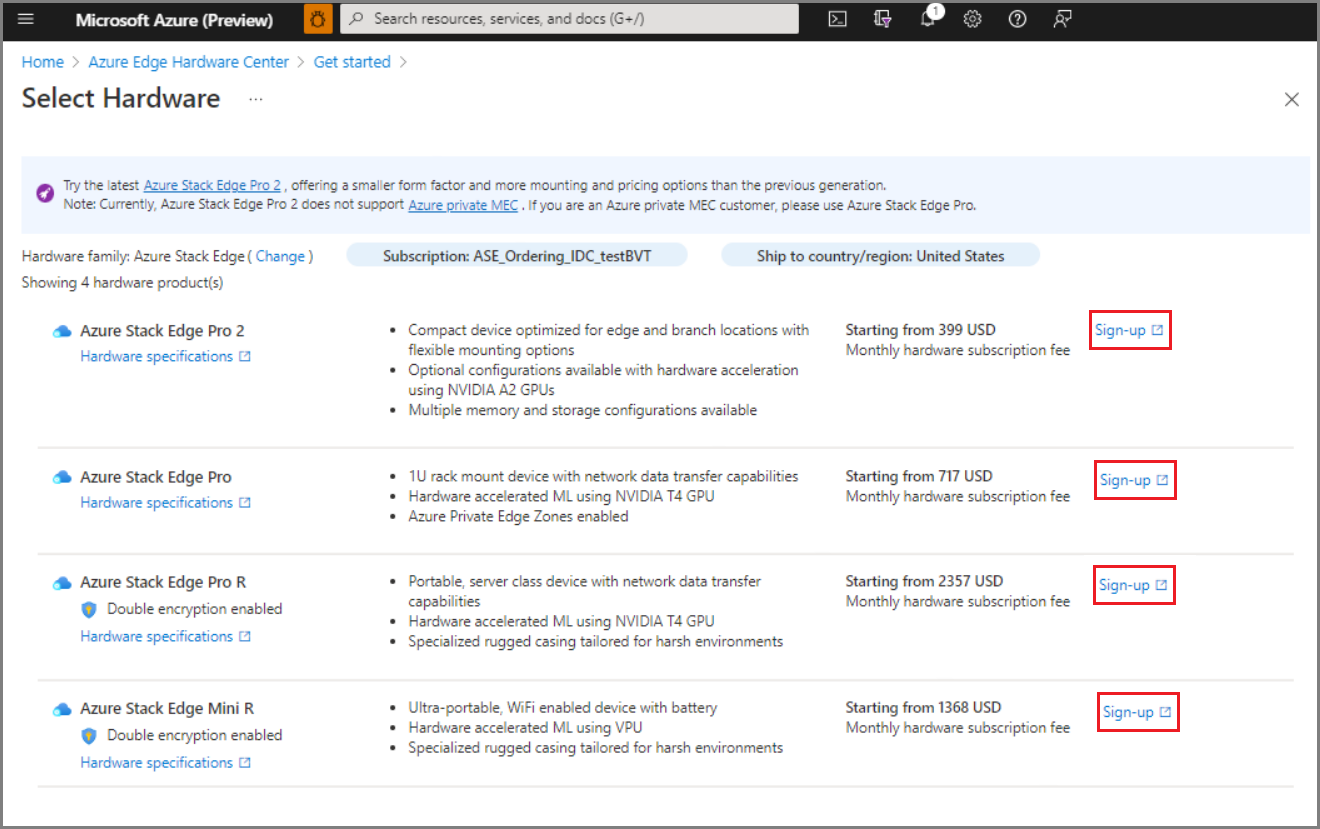
To start your order, select Order beside the product family that you want to order - for example, Azure Stack Edge. If you don't see the product family, you may need to use a different subscription; select Try selecting a different subscription.
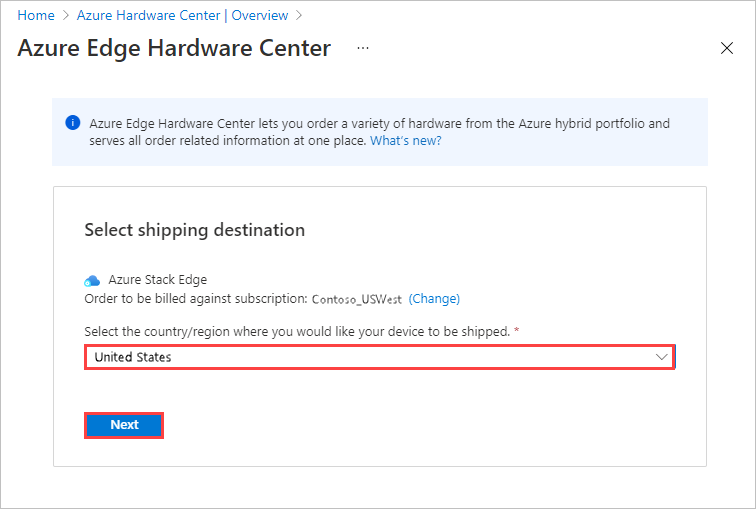
Select the shipping destination for your order.
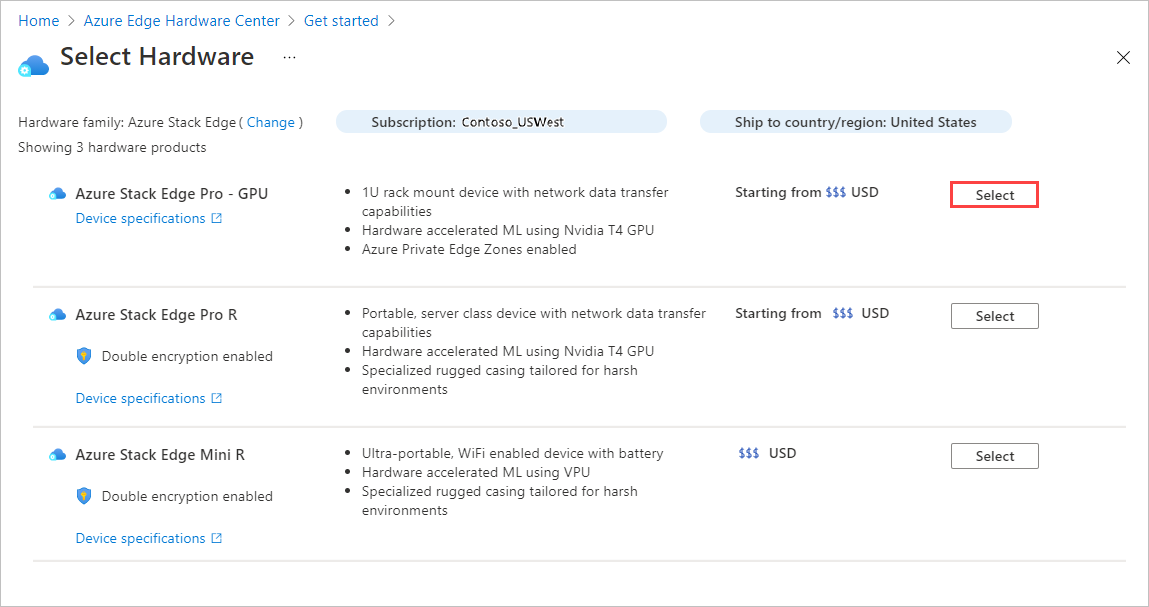
On the Select Hardware page, use the Select button to select the hardware product to order. For example, here Azure Stack Edge Pro - GPU was selected.
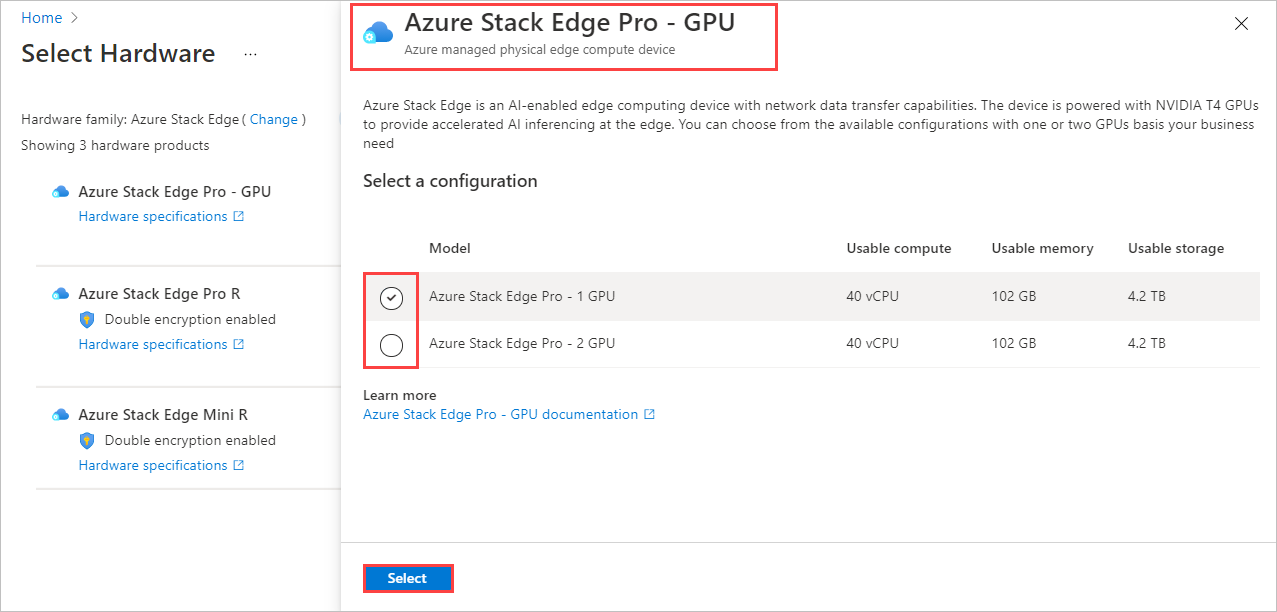
After you select a hardware product, you'll select the device configuration to order. For example, if you chose Azure Stack Edge Pro - GPU, you can choose from Azure Stack Edge Pro - 1 GPU and Azure Stack Edge Pro - 2 GPU models.
If you are placing a first-time order for Azure Stack Edge, select Sign-up and fill out the web form as part of the Azure Edge Hardware Center ordering experience.
The web form collects the following details about your deployment:
- Total deployment scale
- Cluster size
- Hardware requirements
- Geographic presence
Microsoft will evaluate the deployment details you provide and may contact you by email for more information. We have certain requirements in place for new customers to ensure that Azure Stack Edge is the right fit for the use case; not all requests will be fulfilled. If you have questions, you can send email to AzureStack1Pinquiry@microsoft.com.
Select the device configuration, and then choose Select. The available configurations depend on the hardware you selected. The screen below shows available configurations for Azure Stack Edge Pro - GPU devices.
If you're ordering Azure Stack Edge Mini R devices, which all have the same configuration, you won't see this screen.
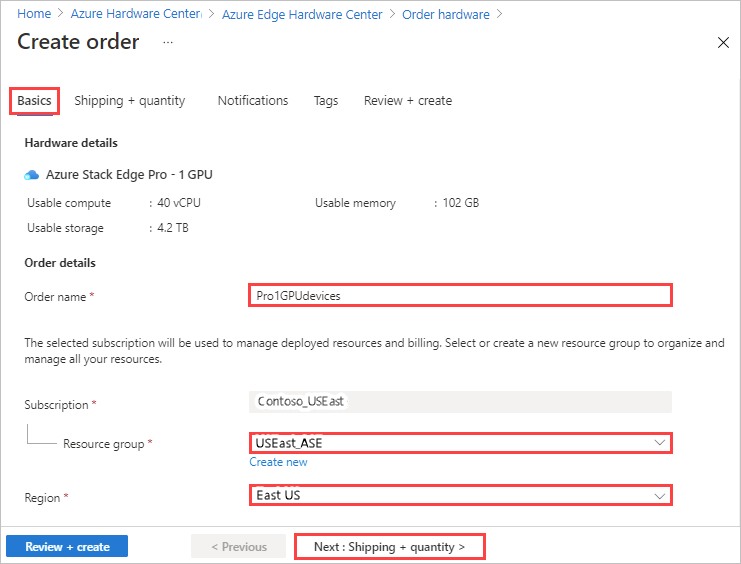
The Create order wizard opens.
On the Basics tab, provide an Order name, Resource group, and Region. Then select Next: Shipping + quantity >.
Next, you'll add each ship to address you want to send devices to and then specify how many devices to send to each address. You can order up to 20 units (devices) per order.
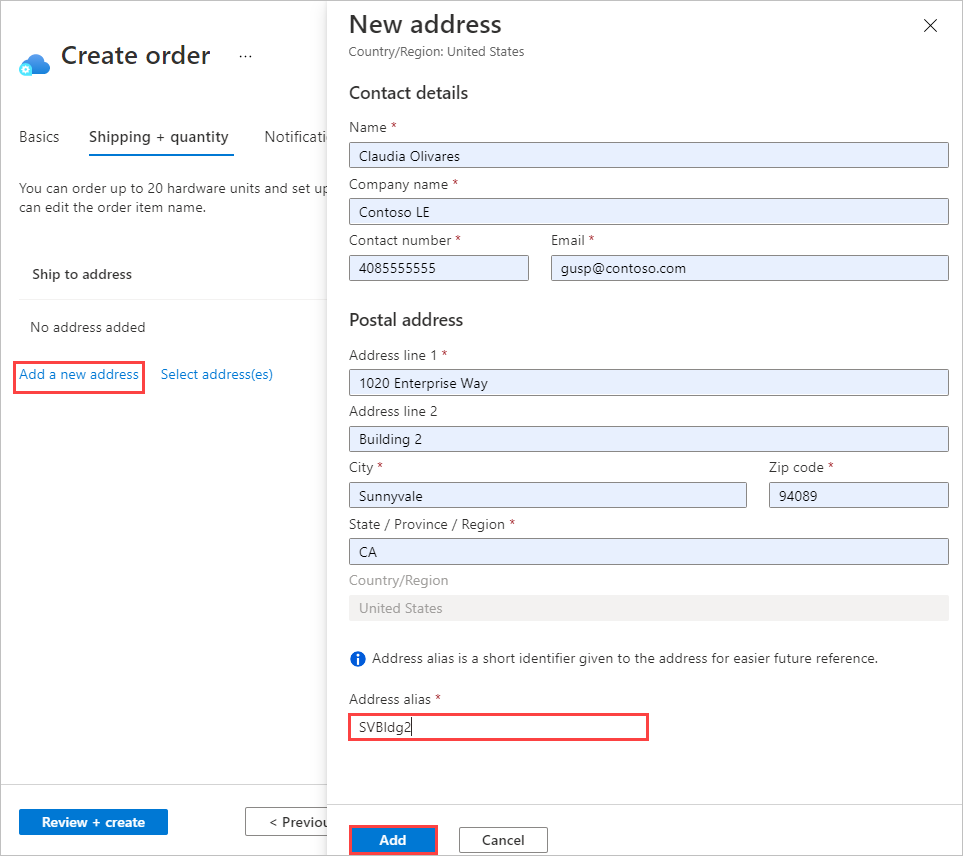
On the Shipping + quantity tab, add each ship to address to send devices to:
To add a new ship to address, select Add a new address.
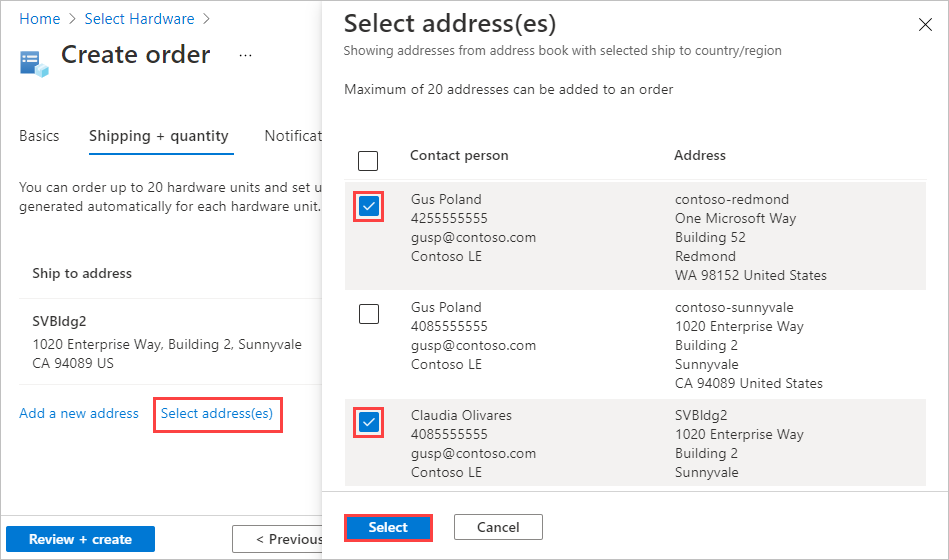
A required Address alias field on the New address screen identifies the address for later use. Select Add when you finish filling in the address fields. Then use Select address(es) to add the address to your order.
To use a ship to address from a previous order, or to use an address that you just added, choose Select address(es). Then, on the Select address(es) screen, select one or more addresses, and choose Select.
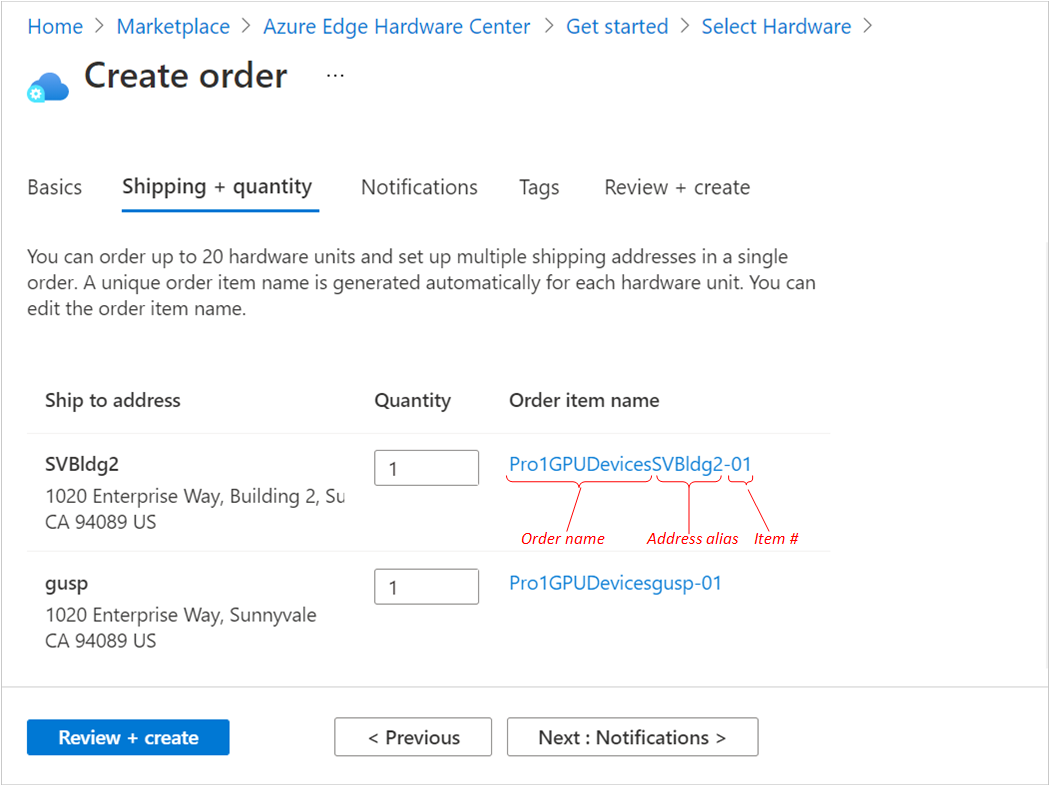
The Shipping + quantity tab now has a separate item for each ship to address.
Each order item name includes a name prefix (the order name followed by the address alias), with an item number for each device that is shipped to that address.
For each address, enter the Quantity of devices to ship on the Shipping + quantity tab.
When you enter a quantity of more than one, a +n more label appears after the order item name.
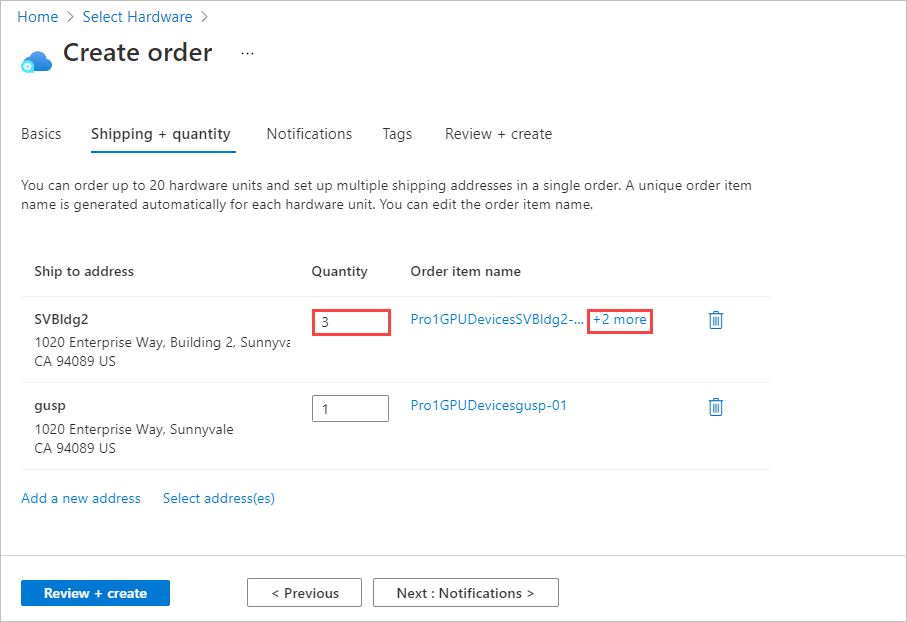
If you want to change the names of order items, select and click the order item name to open the Rename order item pane. If you're shipping more than one item to an address, select +n more.
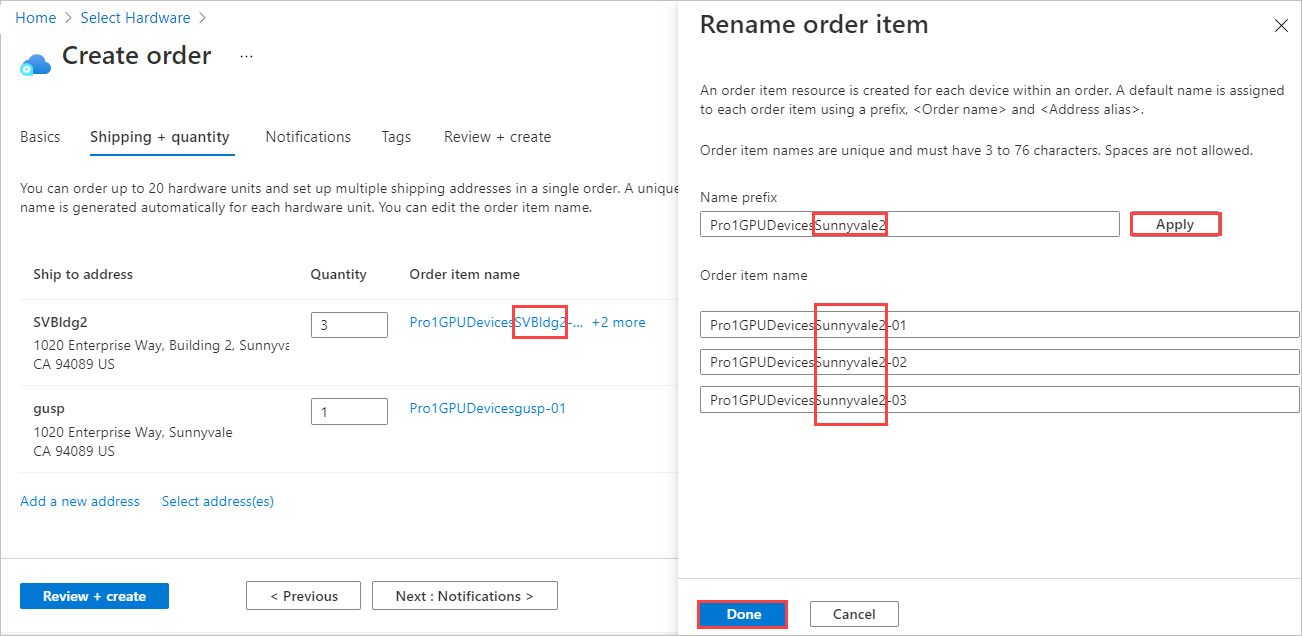
You can make two types of name change:
To use a different name prefix for all of the order items, edit the Name prefix and then select Apply, as shown on the following screen.
You can also edit the name of each order item individually.
When you finish, select Done.
Select Next: Notifications > to continue.
If you want to receive status notifications as your order progresses, enter the email address for each recipient on the Notifications tab.
To add an email address, enter the address, and select Add. You can add up to 20 email addresses.
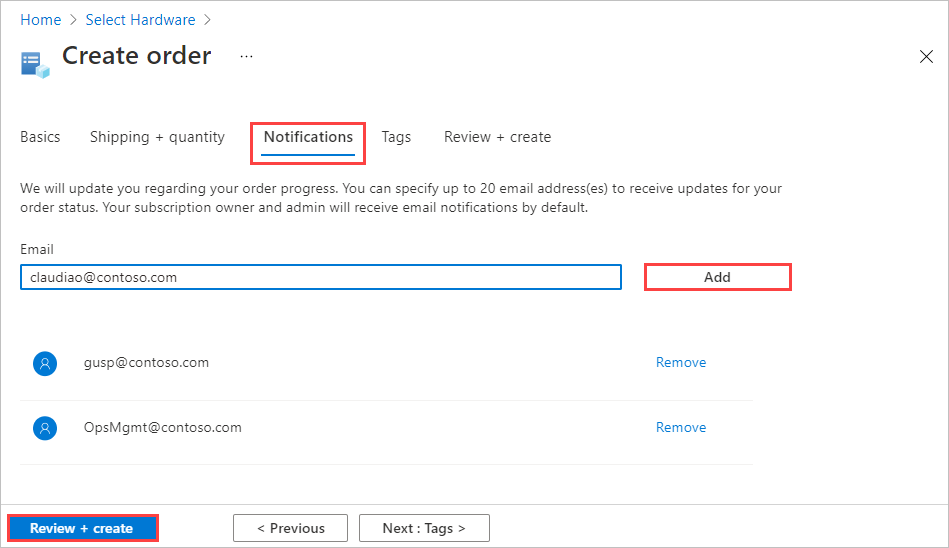
When you finish, select Review + create to continue.
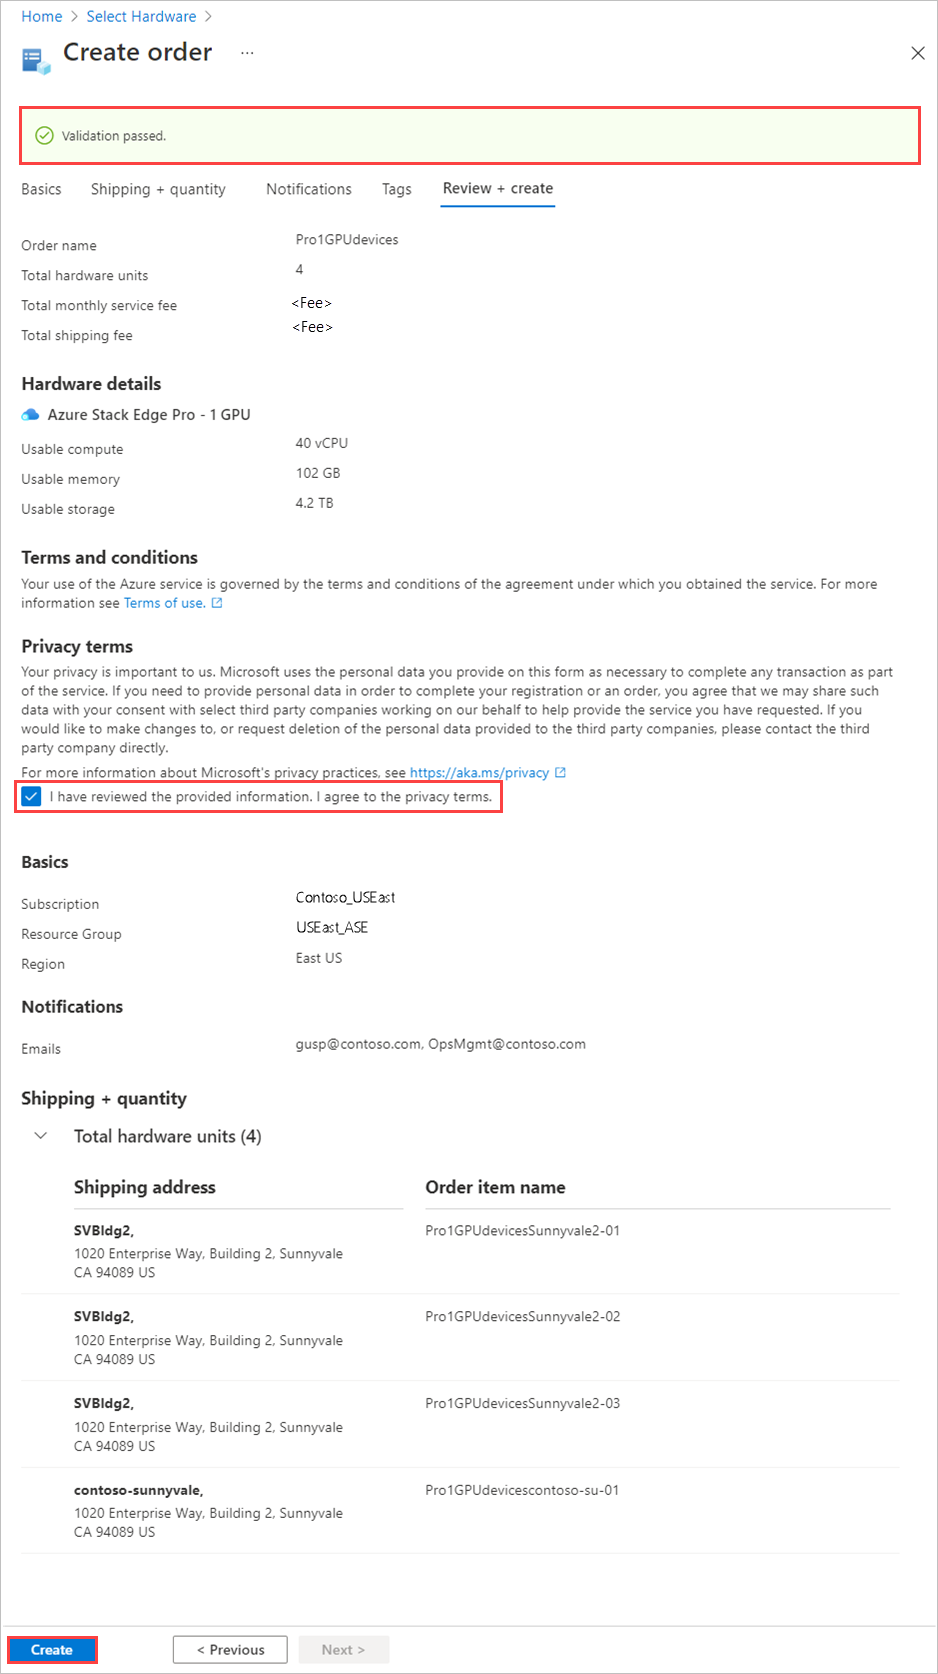
On the Review + create tab:
Review your order. The order is automatically validated when you open this screen. If you see a Validation failed banner, you'll have to fix the issues before you create the order.
Review the Privacy terms, and select the check box to agree to them.
Select Create.
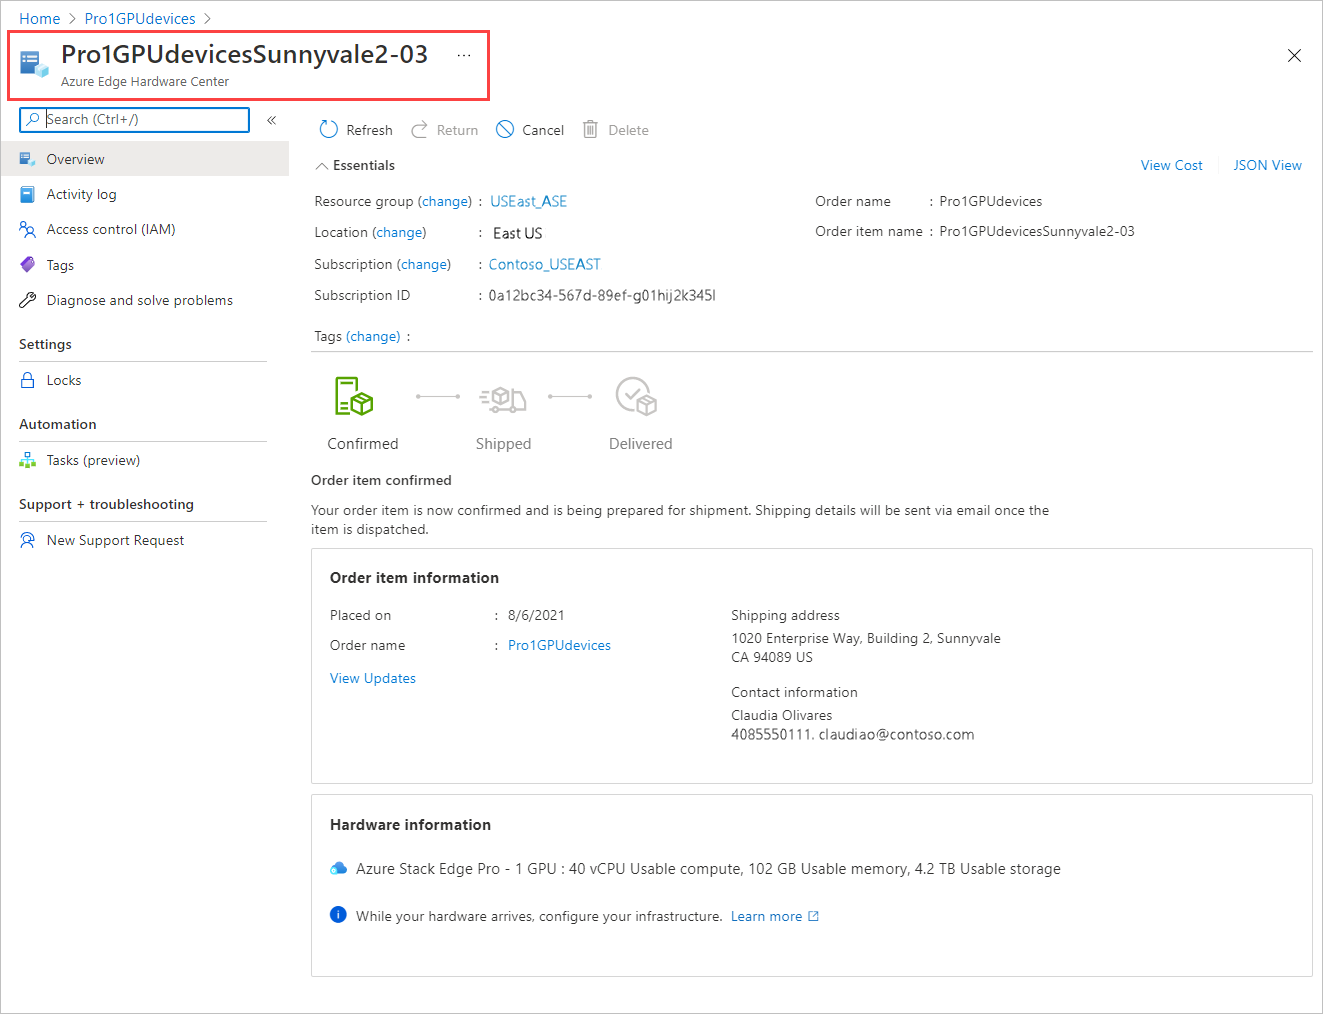
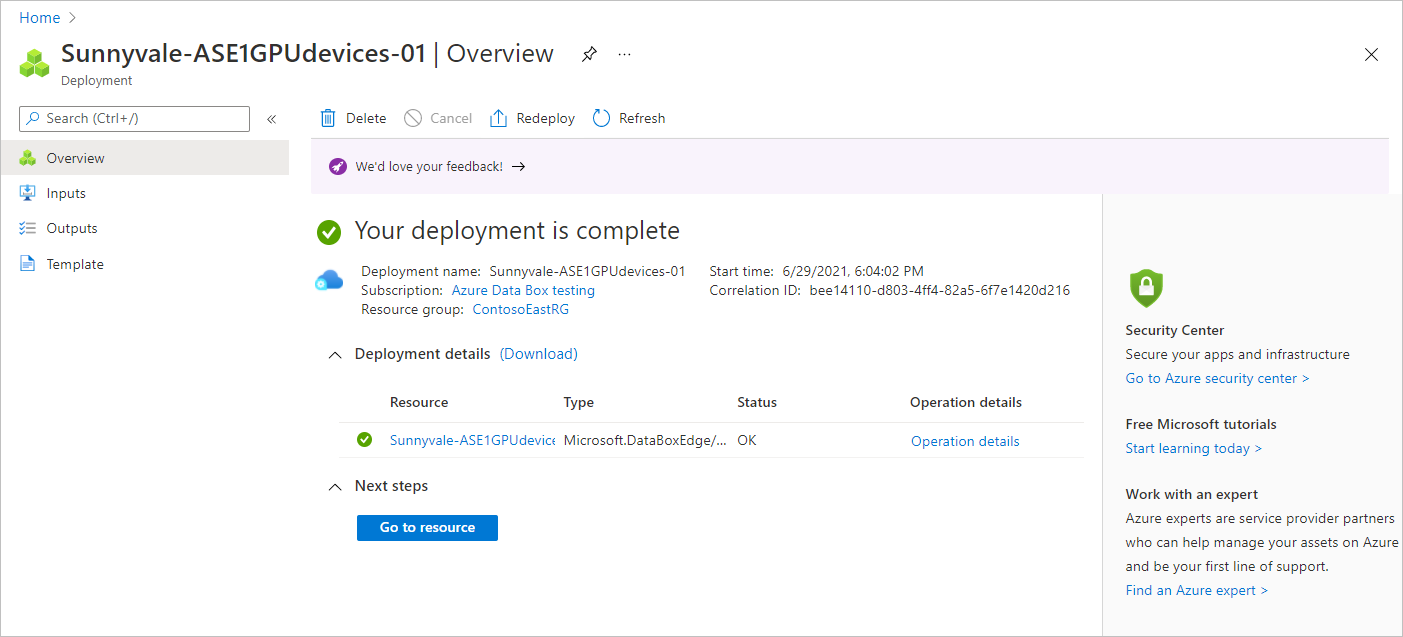
During deployment, the order opens in the portal, with the status of each order item displayed. After deployment completes, you may need to click the Down arrow by Deployment details to see the status of individual items.

To view details for an order item, shown below, select the item in the Resource column of the deployment details.
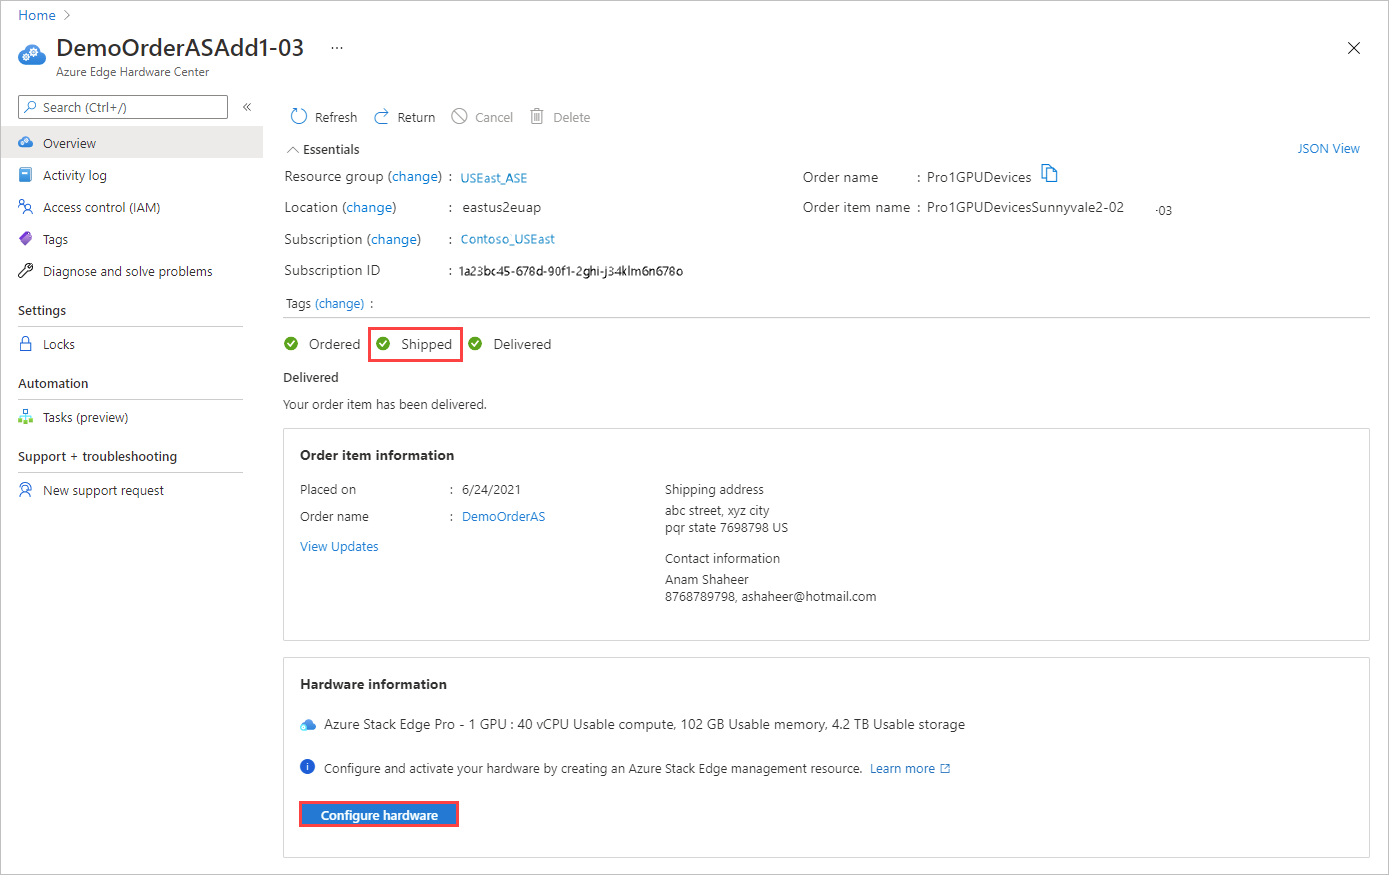
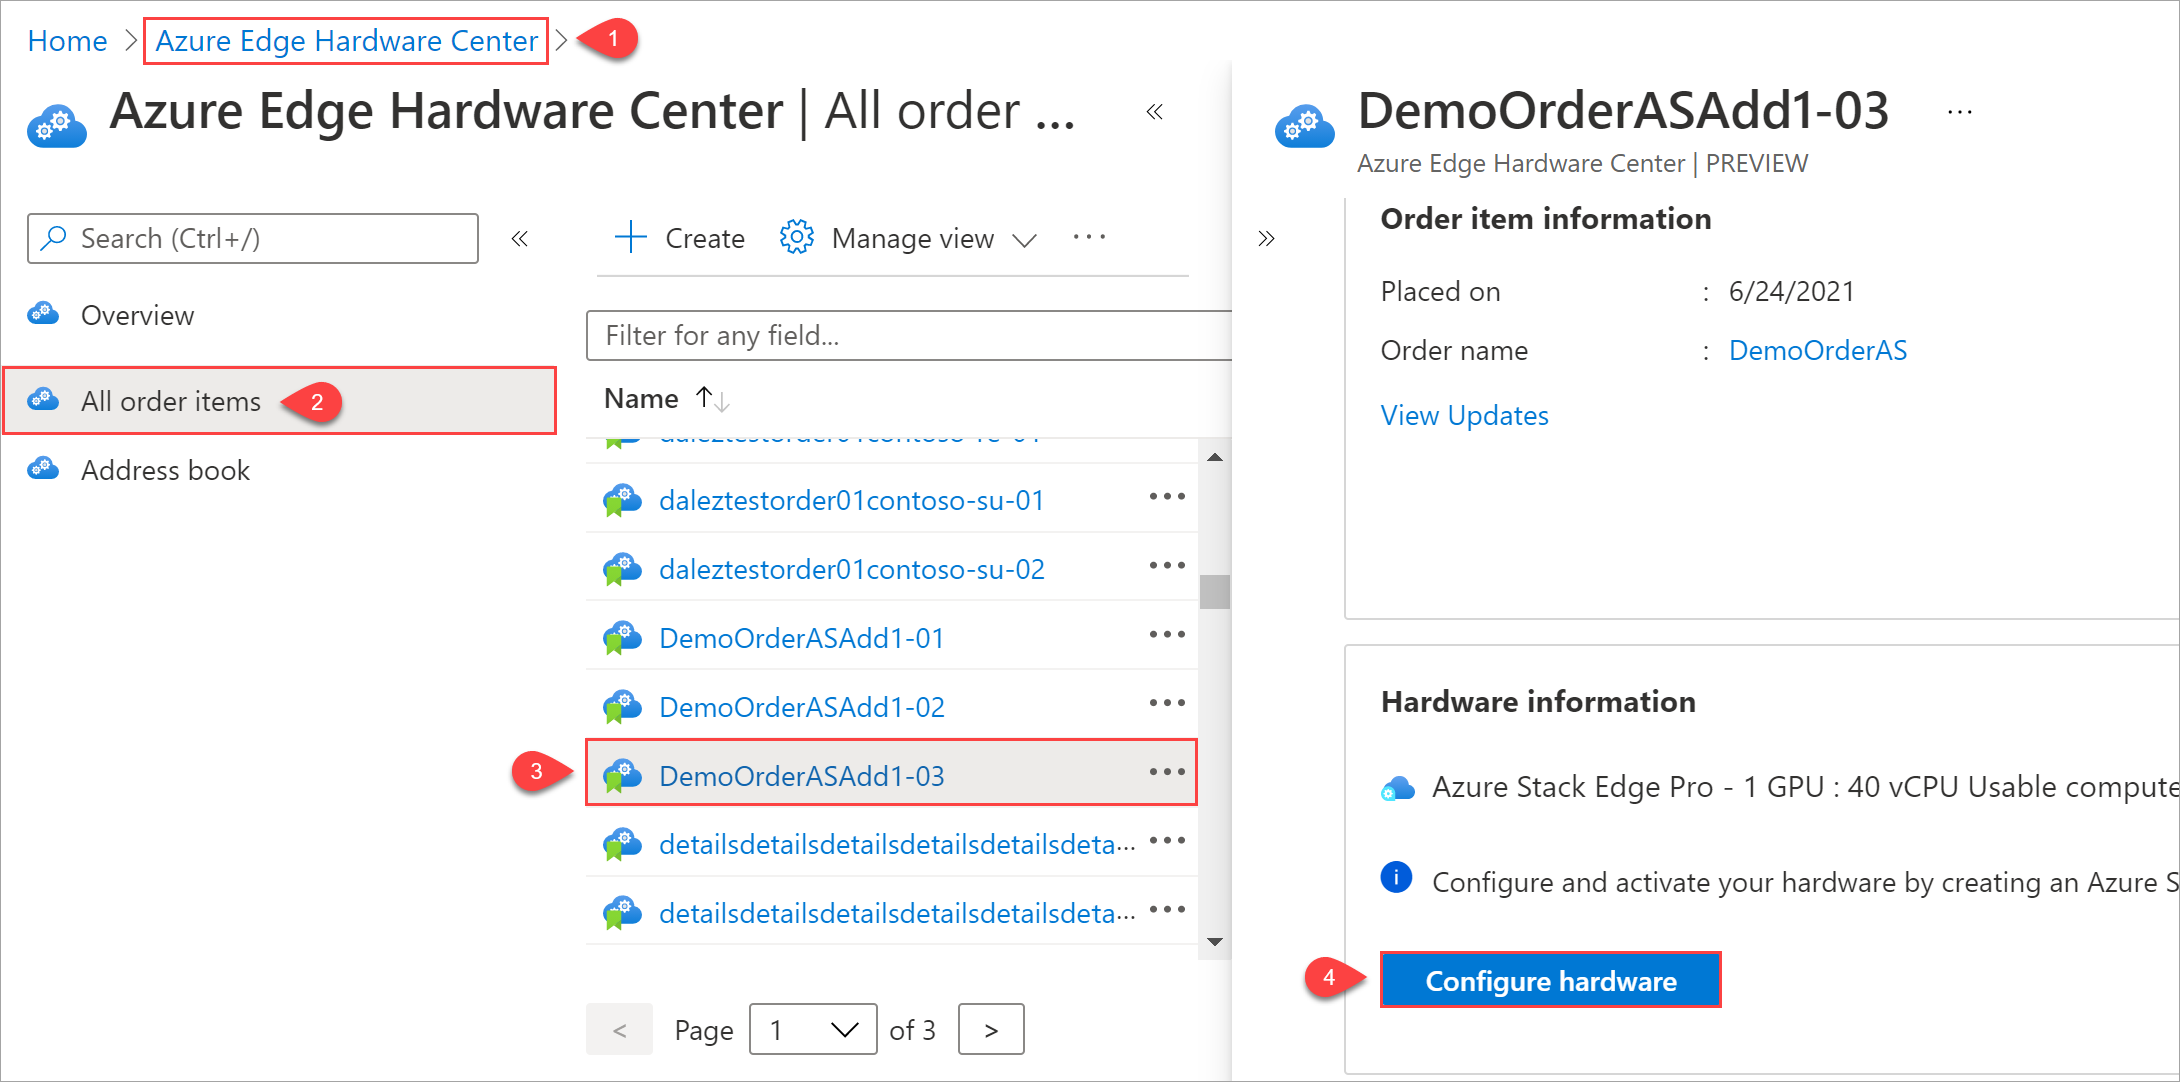
After a device ships (Shipped tag is green), a Configure hardware option is added to the item details. Select that option to create a management resource for the device in Azure Stack Edge.
The subscription, resource group, and deployment area are filled in from the order, but you can change them.
After you activate the device, you'll be able to open the management resource from the item, and open the order item from the management resource.
Create management resources for devices
To manage devices that you order from the Azure Edge Hardware Center, you'll create management resources in Azure Stack Edge.
When a device is activated, the management resource is associated with the order item. You'll be able to open the order item from the management resource and open the management resource from the order item.
After a device is shipped, a Configure hardware link is added to the order item detail, giving you a direct way to open a wizard for creating a management resource. You can also use the Create management resource option in Azure Stack Edge.
To create a management resource for a device ordered through the Azure Edge Hardware Center, do these steps:
Use your Microsoft Azure credentials to sign in to the Azure portal at this URL: https://portal.azure.com.
There are two ways to get started creating a new management resource:
Through the Azure Edge Hardware Center: Search for and select Azure Edge Hardware Center. In the Hardware Center, display All order items. Select the item Name. In the item Overview, select Configure hardware.
The Configure hardware option appears after a device is shipped.
In Azure Stack Edge: Search for and select Azure Stack Edge. Select + Create. Then select Create management resource.
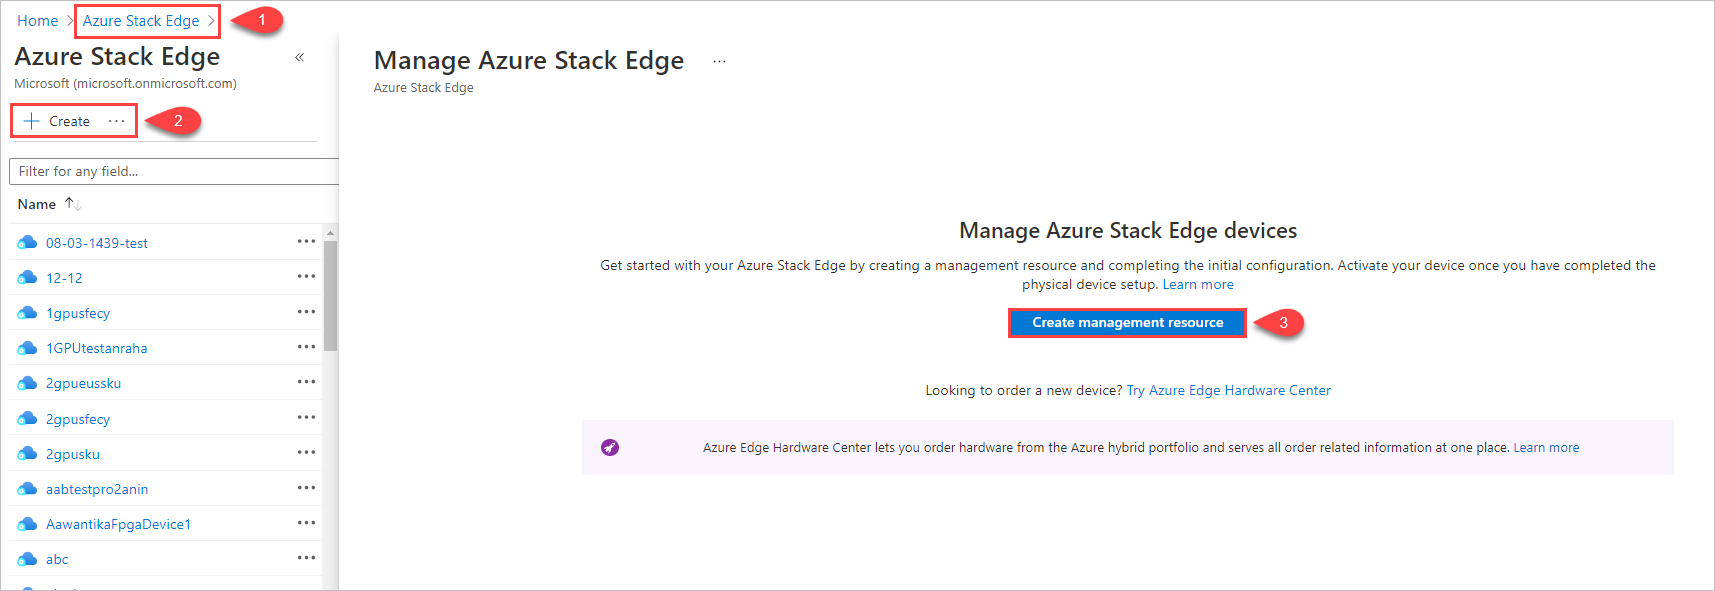
The Create management resource wizard opens.
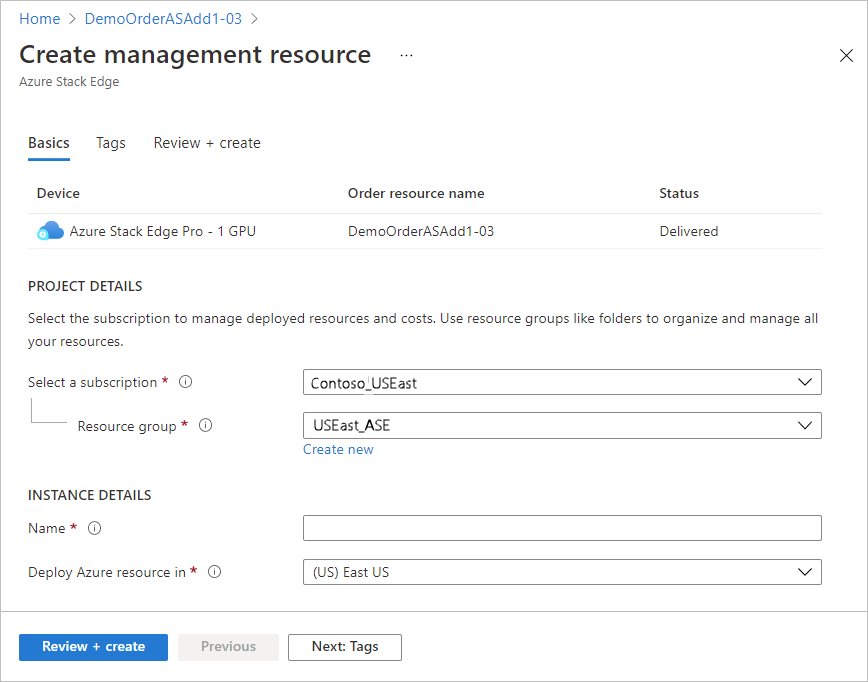
On the Basics tab, enter the following settings:
Setting Value Select a subscription1 Select the subscription to use for the management resource. Resource group1 Select the resource group to use for the management resource. Name Provide a name for the management resource. Deploy Azure resource in Select the country or region where the metadata for the management resource will reside. The metadata can be stored in a different location than the physical device. 1 An organization may use different subscriptions and resource groups to order devices than they use to manage them.

Select Review + create to continue.
On the Review + create tab, review basic settings for the management resource and the terms of use. Then select Create.
If you started this procedure by clicking Configure hardware for a delivered item in an Azure Edge Hardware Center order, the device, order resource name, and order status are listed at the top of the screen.
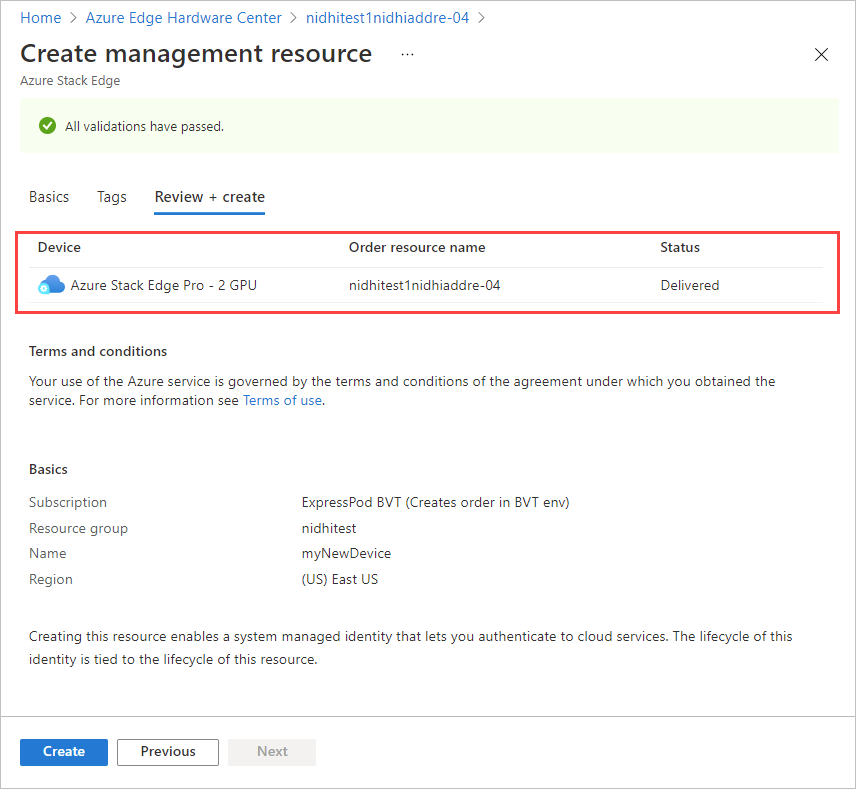
The Create button isn't available until all validation checks have passed.
When the process completes, the Overview pane for new resource opens.

Get the activation key
After the Azure Stack Edge resource is up and running, you'll need to get the activation key. This key is used to activate and connect your Azure Stack Edge Pro device with the resource. You can get this key now while you are in the Azure portal.
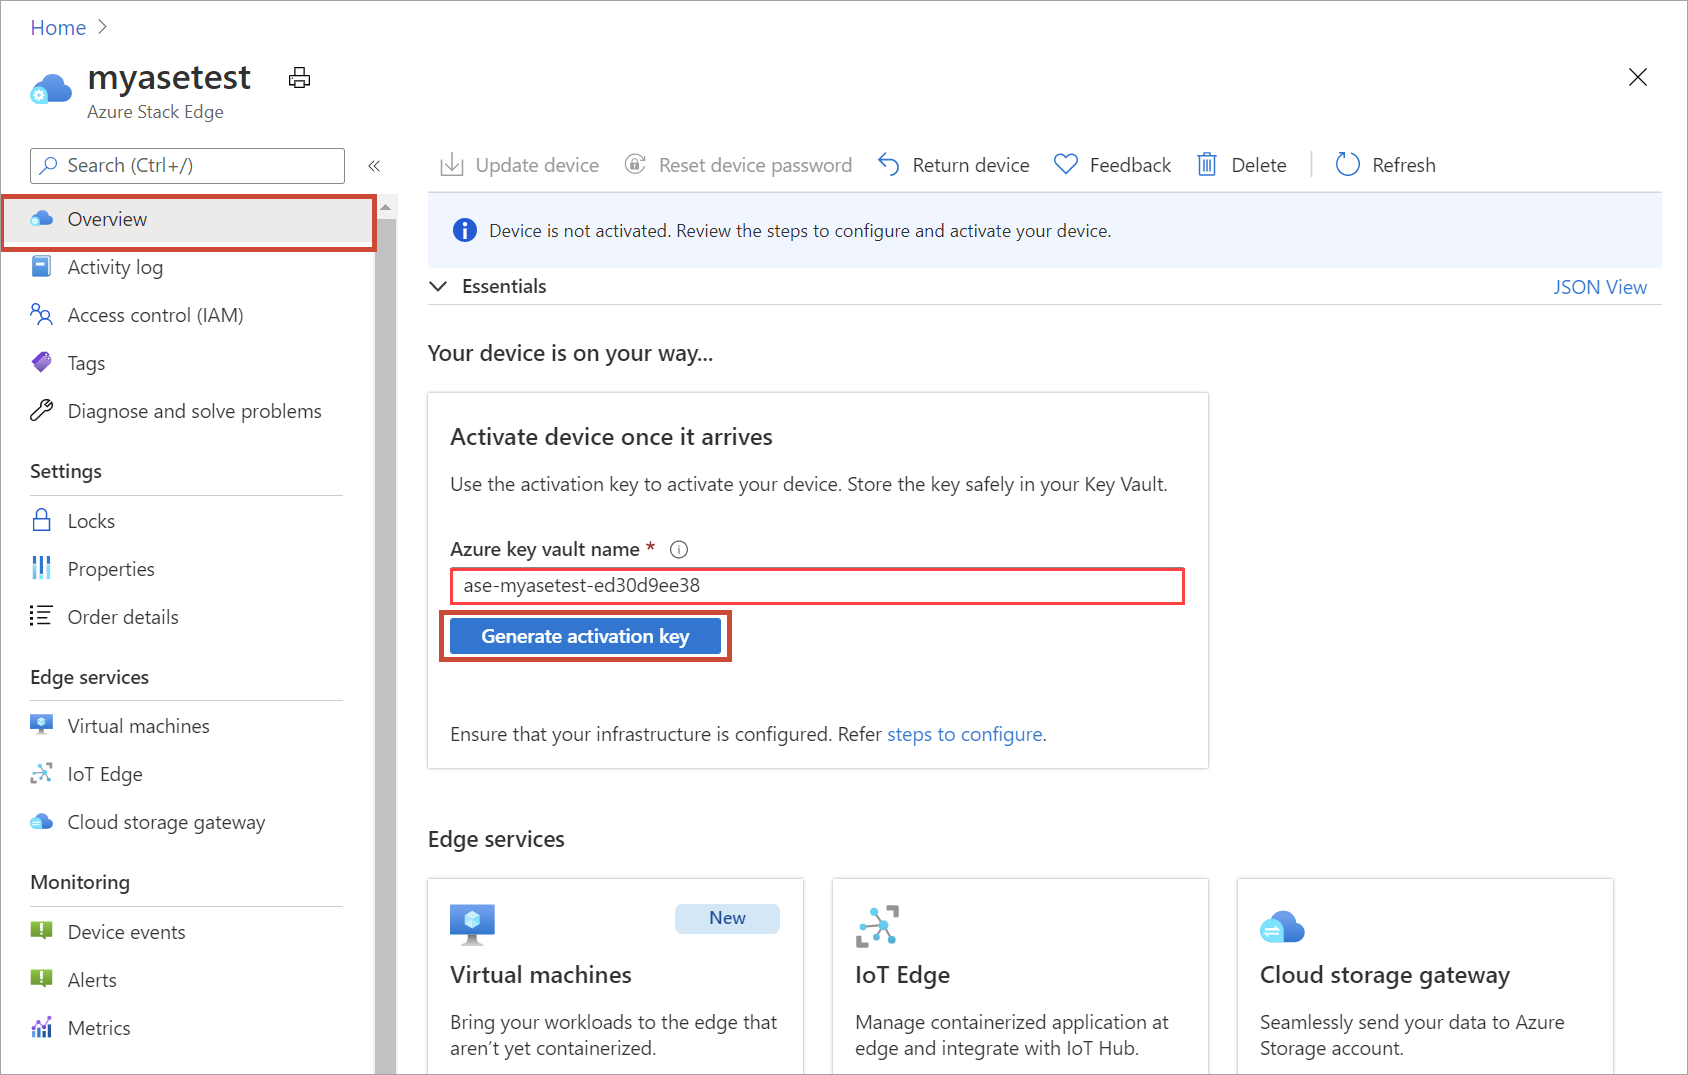
Select the resource that you created, and select Overview.
In the right pane, provide a name for the Azure Key Vault or accept the default name. The key vault name can be between 3 and 24 characters.
A key vault is created for each Azure Stack Edge resource that is activated with your device. The key vault lets you store and access secrets, for example, the Channel Integrity Key (CIK) for the service is stored in the key vault.
Once you've specified a key vault name, select Generate activation key to create an activation key.
Wait a few minutes while the key vault and activation key are created. Select the copy icon to copy the key and save it for later use.
Important
- The activation key expires three days after it is generated.
- If the key has expired, generate a new key. The older key is not valid.
Next steps
In this tutorial, you learned about Azure Stack Edge topics such as:
- Create a new resource
- Get the activation key
Advance to the next tutorial to learn how to install Azure Stack Edge.