Note
Access to this page requires authorization. You can try signing in or changing directories.
Access to this page requires authorization. You can try changing directories.
Azure Data Box Disk is a hybrid cloud solution that allows you to import your on-premises data into Azure in a quick, easy, and reliable way. You transfer your data to solid-state disks (SSDs) supplied by Microsoft and ship the disks back. This data is then uploaded to Azure.
This tutorial describes how you can order an Azure Data Box Disk. In this tutorial, you learn about:
- Order a Data Box Disk
- Track the order
- Cancel the order
Prerequisites
Before you deploy, complete the following configuration prerequisites for Data Box service and Data Box Disk.
For service
Before you begin, make sure that:
You have your Microsoft Azure storage account with access credentials, such as storage account name and access key.
The subscription you use for Data Box service is one of the following types:
- Microsoft Customer Agreement (MCA) for new subscriptions or Microsoft Enterprise Agreement (EA) for existing subscriptions. Read more about MCA for new subscriptions and EA subscriptions.
- Cloud Solution Provider (CSP). Learn more about Azure CSP program.
Note
This service is supported for the Azure CSP program in India if you are on the modern billing model. If you are on the legacy billing model as per your agreement, you will not be able to create Data Box orders.
- Microsoft Azure Sponsorship. Learn more about Azure sponsorship program.
- Microsoft Partner Network (MPN). Learn more about Microsoft Partner Network.
Ensure that you have owner or contributor access to the subscription to create a device order.
For device
Before you begin, make sure that:
- You have a client computer available from which you can copy the data. Your client computer must:
- Run a Supported operating system.
- Have other required software installed if it's a Windows client.
Important
Hardware encryption support for Data Box Disk is currently available for regions within the US, Europe, and Japan.
Azure Data Box disk with hardware encryption requires a SATA III connection. All other connections, including USB, are not supported.
Order Data Box Disk
You can order Data Box Disks using either the Azure portal or Azure CLI.
Sign in to:
- The Azure portal at this URL: https://portal.azure.com to order Data Box Disk.
- Or, the Azure Government portal at this URL: https://portal.azure.us. For more details, go to Connect to Azure Government using the portal.
Take the following steps to order Data Box Disk.
In the upper left corner of the portal, select + Create a resource, and search for Azure Data Box. Select Azure Data Box.
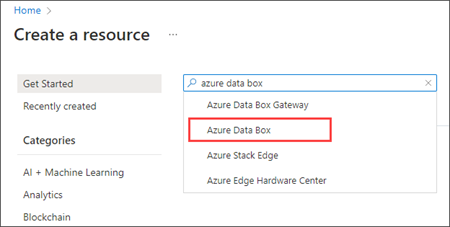
Select Create.
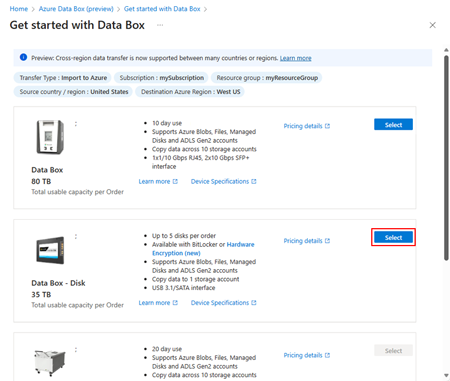
Check if Data Box service is available in your region. Enter or select the following information and select Apply.
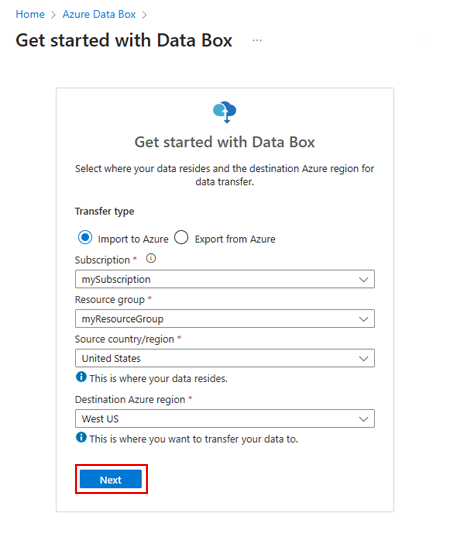
Setting Value Transfer type Import to Azure Subscription Select the subscription for which Data Box service is enabled.
The subscription is linked to your billing account.Resource group Select the resource group you want to use to order a Data Box.
A resource group is a logical container for the resources that can be managed or deployed together.Source country/region Select the country/region where your data currently resides. Destination Azure region Select the Azure region where you want to transfer data. Select Data Box Disk. The maximum capacity of the solution for a single order of five disks is 35 TB. You could create multiple orders for larger data sizes.
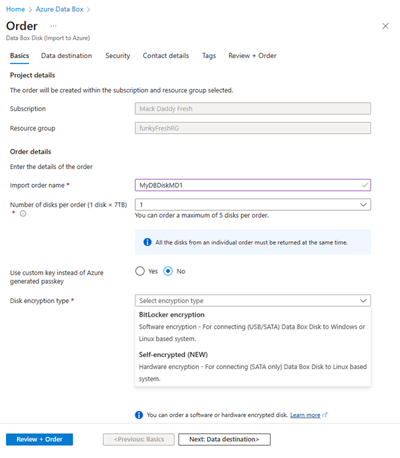
In Order, specify the Order details in the Basics tab. Enter or select the following information.
Important
Hardware encryption support for Data Box Disk is currently available for regions within the US, Europe, and Japan.
Hardware encrypted drives are only supported when using SATA 3 connections to Linux-based systems. Software encrypted drives use BitLocker technology, and can connect Data Box disks to either Windows- or Linux-based systems using USB or SATA connections.
Setting Value Subscription The subscription is automatically populated based on your earlier selection. Resource group The resource group you selected previously. Import order name Provide a friendly name to track the order.
The name can have between 3 and 24 characters that can be letters, numbers, and hyphens.
The name must start and end with a letter or a number.Number of disks per order Enter the number of disks you would like to order.
There can be a maximum of five disks per order (1 disk = 7TB).Disk passkey Supply the disk passkey if you check Use custom key instead of Azure generated passkey.
Provide a 12-character to 32-character alphanumeric key that has at least one numeric and one special character. The allowed special characters are@?_+.
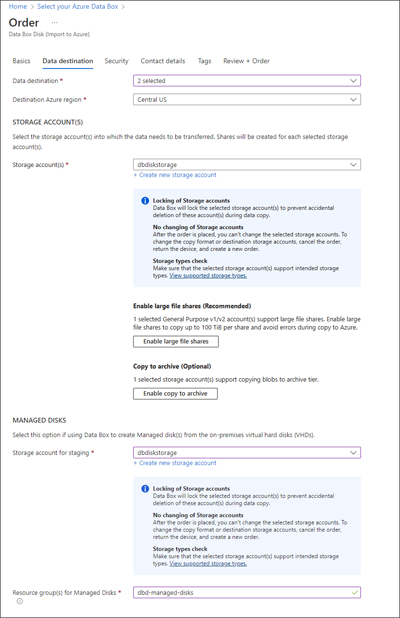
You can choose to skip this option and use the Azure generated passkey to unlock your disks.Disk encryption type Select between Software (BitLocker) encryption or Hardware(Self-encrypted) options. Hardware-encrypted disks require a SATA 3 connection and are only supported for Linux-based systems. On the Data destination screen, select the Data destination - either storage accounts or managed disks (or both).
Caution
Blob data can be uploaded to the archive tier, but will need to be rehydrated before reading or modifying. Data copied to the archive tier must remain for at least 180 days or be subject to an early deletion charge. Archive tier is not supported for ZRS, GZRS, or RA-GZRS accounts.
Setting Value Data destination Choose from storage account or managed disks or both.
Based on the specified Azure region, select a storage account from the filtered list of an existing storage account. Data Box Disk can be linked with only one storage account.
You can also create a new General-purpose v1, General-purpose v2, or Blob storage account.
Storage accounts with virtual networks are supported. To allow Data Box service to work with secured storage accounts, enable the trusted services within the storage account network firewall settings. For more information, see how to Add Azure Data Box as a trusted service.
To enable support for large file shares, select Enable large file shares. To enable the ability to move blob data to the archive tier, select Enable copy to archive.Destination Azure region Select a region for your storage account.
Currently, storage accounts in all regions in US, West and North Europe, Canada, and Australia are supported.Resource group If using Data Box Disk to create managed disks from the on-premises VHDs, you need to provide the resource group.
Create a new resource group if you intend to create managed disks from on-premises VHDs. Use an existing resource group only if it was created for Data Box Disk order for managed disk by Data Box service.
Only one resource group is supported.The storage account specified for managed disks is used as a staging storage account. The Data Box service uploads the VHDs to the staging storage account and then converts them into managed disks and moves to the resource groups. For more information, see Verify data upload to Azure.
Note
Data Box supports copying only 1 MiB aligned, fixed-size
.vhdfiles for creating managed disks. Dynamic VHDs, differencing VHDs,.vmdkor.vhdxfiles are not supported.If a page blob isn't successfully converted to a managed disk, it stays in the storage account and you're charged for storage.
Select Next: Security> to continue.
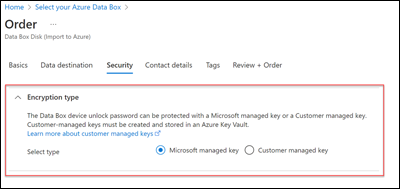
The Security screen lets you use your own encryption key.
All settings on the Security screen are optional. If you don't change any settings, the default settings apply.
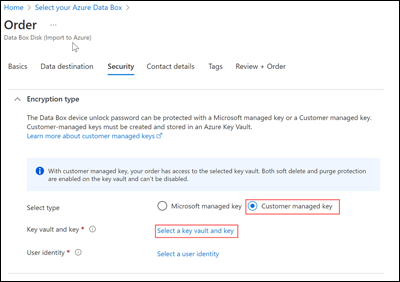
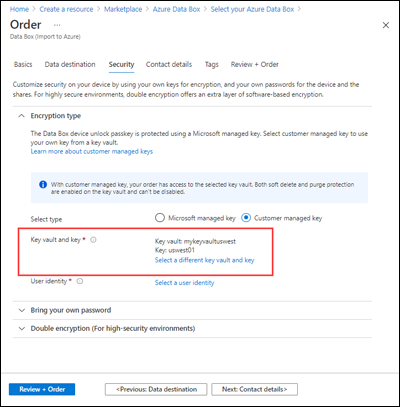
If you want to use your own customer-managed key to protect the unlock passkey for your new resource, expand Encryption type.
Configuring a customer-managed key for your Azure Data Box Disk is optional. By default, Data Box uses a Microsoft managed key to protect the unlock passkey.
A customer-managed key doesn't affect how data on the device is encrypted. The key is only used to encrypt the device unlock passkey.
If you don't want to use a customer-managed key, skip to Step 14.
To use a customer-managed key, select Customer managed key as the key type. Then choose Select a key vault and key.
In the Select key from Azure Key Vault blade:
- The Subscription is automatically populated.
- For Key vault, you can select an existing key vault from the dropdown list.
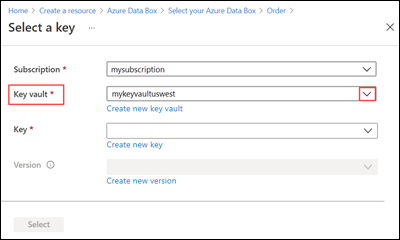
Or select Create new key vault if you want to create a new key vault.
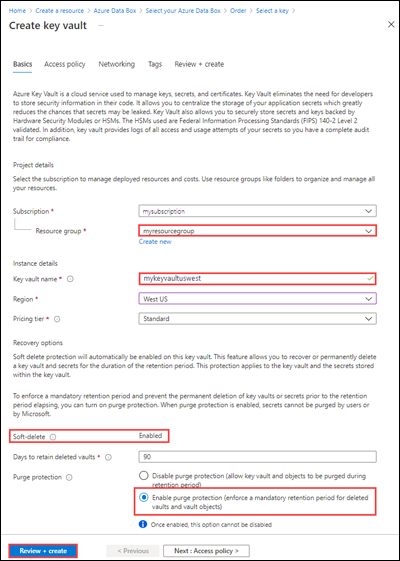
Then, on the Create key vault screen, enter the resource group and a key vault name. Ensure that Soft delete and Purge protection are enabled. Accept all other defaults, and select Review + Create.
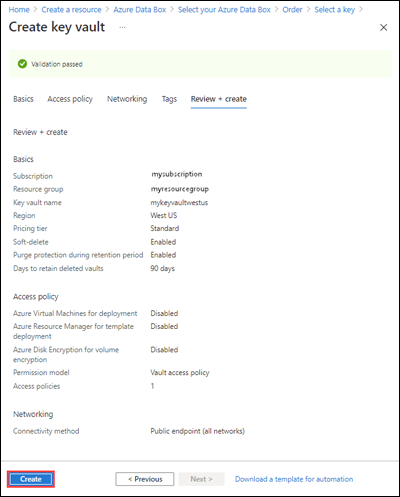
Review the information for your key vault, and select Create. Wait for a couple minutes for key vault creation to complete.
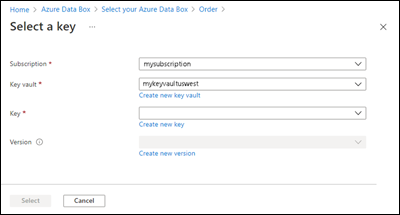
The Select a key blade will display your selected key vault.
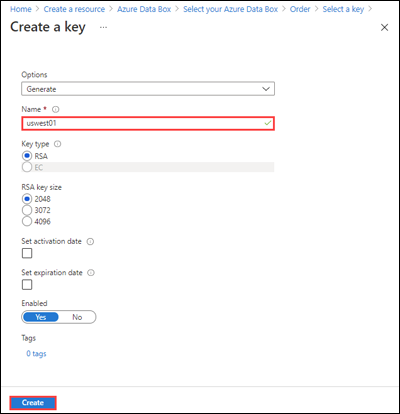
If you want to create a new key, select Create new key. You must use an RSA key. The size can be 2048 or greater. Enter a name for your new key, accept the other defaults, and select Create.
You're notified when the key has been created in your key vault. Your new key is selected on the Select a key blade.
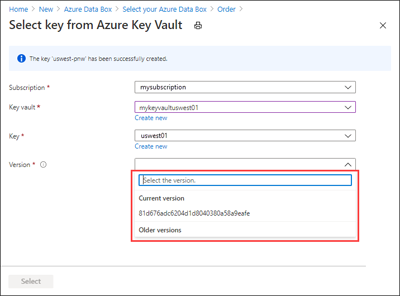
Select the Version of the key to use, and then choose Select.
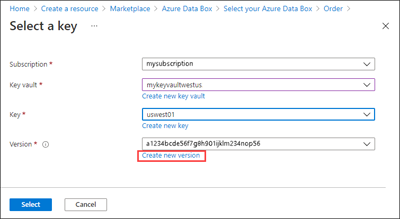
If you want to create a new key version, select Create new version.
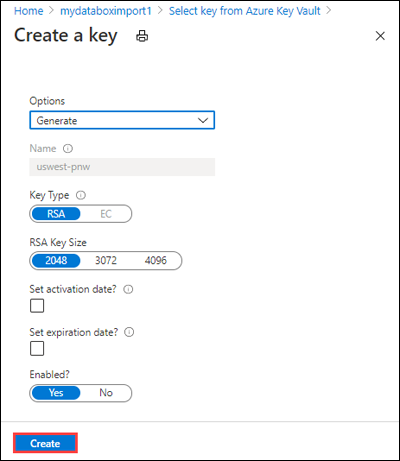
Choose settings for the new key version, and select Create.
The Encryption type settings on the Security screen show your key vault and key.
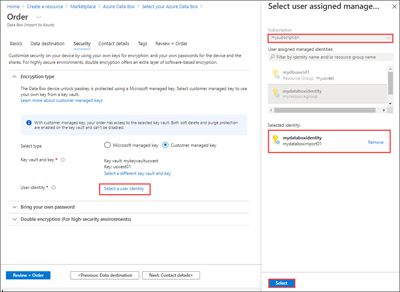
Select a user identity that you use to manage access to this resource. Choose Select a user identity. In the panel on the right, select the subscription and the managed identity to use. Then choose Select.
A user-assigned managed identity is a stand-alone Azure resource that can be used to manage multiple resources. For more information, see Managed identity types.
If you need to create a new managed identity, follow the guidance in Create, list, delete, or assign a role to a user-assigned managed identity using the Azure portal.
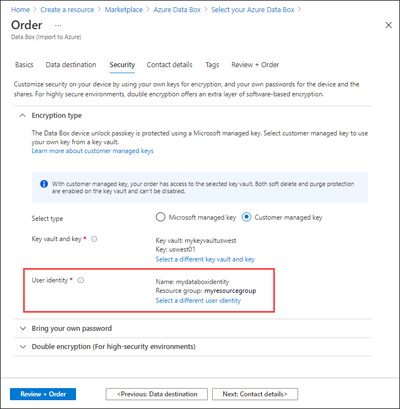
The user identity is shown in Encryption type settings.
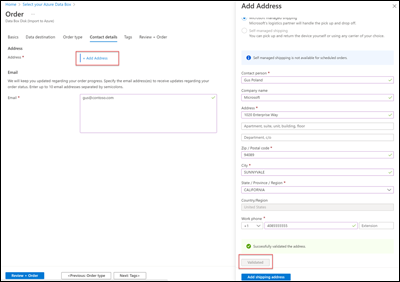
In the Contact details tab, select Add address and enter the address details. Select Validate address. The service validates the shipping address for service availability. If the service is available for the specified shipping address, you receive a notification to that effect.
If you have chosen self-managed shipping, see Use self-managed shipping.
Specify valid email addresses as the service sends email notifications regarding any updates to the order status to the specified email addresses.
We recommend that you use a group email so that you continue to receive notifications if an admin in the group leaves.
Review the information in the Review + Order tab related to the order, contact, notification, and privacy terms. Check the box corresponding to the agreement to privacy terms.
Select Order. The order takes a few minutes to be created.
Track the order
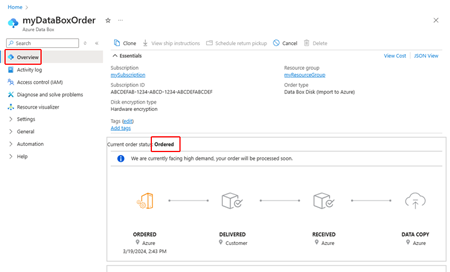
After you place the order, you can track the status of the order from Azure portal. Go to your order and then go to Overview to view the status. The portal shows the job in Ordered state.
If the disks aren't available, you receive a notification. If the disks are available, Microsoft identifies the disks for shipment and prepares the disk package. During disk preparation, following actions occur:
- Disks are encrypted using AES-128 BitLocker encryption.
- Disks are locked to prevent an unauthorized access to the disks.
- The passkey that unlocks the disks is generated during this process.
When the disk preparation is complete, the portal shows the order in Processed state.
Microsoft then prepares and dispatches your disks via a regional carrier. You receive a tracking number once the disks are shipped. The portal shows the order in Dispatched state.
Cancel the order
To cancel this order using the Azure portal, navigate to the Overview section and select Cancel from the command bar.
You can only cancel and order while it's being processed for shipment. The order can't be canceled after processing is complete.
To delete a canceled order, go to Overview and select Delete from the command bar.
Next steps
In this tutorial, you learned about Azure Data Box topics such as:
- Order Data Box Disk
- Track the order
- Cancel the order
Advance to the next tutorial to learn how to set up your Data Box Disk.
