Note
Access to this page requires authorization. You can try signing in or changing directories.
Access to this page requires authorization. You can try changing directories.
Note
These are instructions for the legacy create cluster UI, and are included only for historical accuracy. All customers should be using the updated create cluster UI.
This article explains the configuration options available when you create and edit Azure Databricks clusters. It focuses on creating and editing clusters using the UI. For other methods, see the Databricks CLI, the Clusters API, and Databricks Terraform provider.
For help deciding what combination of configuration options suits your needs best, see cluster configuration best practices.

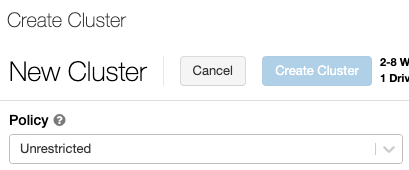
Cluster policy
A cluster policy limits the ability to configure clusters based on a set of rules. The policy rules limit the attributes or attribute values available for cluster creation. Cluster policies have ACLs that limit their use to specific users and groups and thus limit which policies you can select when you create a cluster.
To configure a cluster policy, select the cluster policy in the Policy drop-down.
Note
If no policies have been created in the workspace, the Policy drop-down does not display.
If you have:
- Cluster create permission, you can select the Unrestricted policy and create fully-configurable clusters. The Unrestricted policy does not limit any cluster attributes or attribute values.
- Both cluster create permission and access to cluster policies, you can select the Unrestricted policy and the policies you have access to.
- Access to cluster policies only, you can select the policies you have access to.
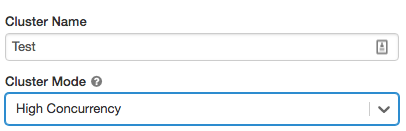
Cluster mode
Note
This article describes the legacy clusters UI. For information about the new clusters UI (in preview), see Compute configuration reference. This includes some terminology changes for cluster access types and modes. For a comparison of the new and legacy cluster types, see Clusters UI changes and cluster access modes. In the preview UI:
- Standard mode clusters are now called No Isolation Shared access mode clusters.
- High Concurrency with Tables ACLs are now called Shared access mode clusters.
Azure Databricks supports three cluster modes: Standard, High Concurrency, and Single Node. The default cluster mode is Standard.
Important
- If your workspace is assigned to a Unity Catalog metastore, High Concurrency clusters are not available. Instead, you use access mode to ensure the integrity of access controls and enforce strong isolation guarantees. See also Access modes.
- You cannot change the cluster mode after a cluster is created. If you want a different cluster mode, you must create a new cluster.
The cluster configuration includes an auto terminate setting whose default value depends on cluster mode:
- Standard and Single Node clusters terminate automatically after 120 minutes by default.
- High Concurrency clusters do not terminate automatically by default.
Standard clusters
Warning
Standard mode clusters (sometimes called No Isolation Shared clusters) can be shared by multiple users, with no isolation between users. If you use the High Concurrency cluster mode without additional security settings such as Table ACLs or Credential Passthrough, the same settings are used as Standard mode clusters. Account admins can prevent internal credentials from being automatically generated for Databricks workspace admins on these types of cluster. For more secure options, Databricks recommends alternatives such as high concurrency clusters with Table ACLs.
A Standard cluster is recommended for single users only. Standard clusters can run workloads developed in Python, SQL, R, and Scala.
High Concurrency clusters
A High Concurrency cluster is a managed cloud resource. The key benefits of High Concurrency clusters are that they provide fine-grained sharing for maximum resource utilization and minimum query latencies.
High Concurrency clusters can run workloads developed in SQL, Python, and R. The performance and security of High Concurrency clusters is provided by running user code in separate processes, which is not possible in Scala.
In addition, only High Concurrency clusters support table access control.
To create a High Concurrency cluster, set Cluster Mode to High Concurrency.
Single Node clusters
A Single Node cluster has no workers and runs Spark jobs on the driver node.
In contrast, a Standard cluster requires at least one Spark worker node in addition to the driver node to execute Spark jobs.
To create a Single Node cluster, set Cluster Mode to Single Node.
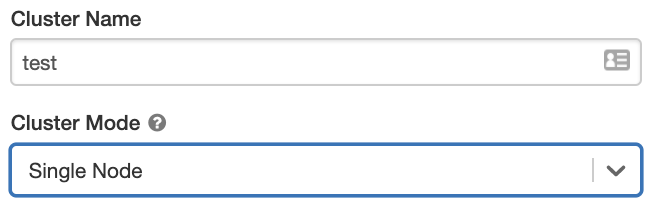
To learn more about working with Single Node clusters, see Single-node compute.
Pools
To reduce cluster start time, you can attach a cluster to a predefined pool of idle instances, for the driver and worker nodes. The cluster is created using instances in the pools. If a pool does not have sufficient idle resources to create the requested driver or worker nodes, the pool expands by allocating new instances from the instance provider. When an attached cluster is terminated, the instances it used are returned to the pools and can be reused by a different cluster.
If you select a pool for worker nodes but not for the driver node, the driver node inherit the pool from the worker node configuration.
Important
If you attempt to select a pool for the driver node but not for worker nodes, an error occurs and your cluster isn't created. This requirement prevents a situation where the driver node has to wait for worker nodes to be created, or vice versa.
See Pool configuration reference to learn more about working with pools in Azure Databricks.
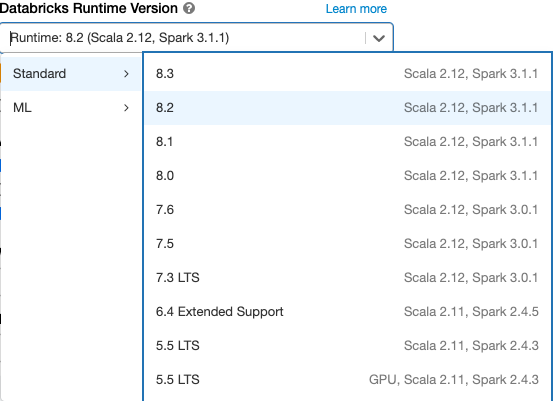
Databricks Runtime
Databricks runtimes are the set of core components that run on your clusters. All Databricks runtimes include Apache Spark and add components and updates that improve usability, performance, and security. For details, see Databricks Runtime release notes versions and compatibility.
Azure Databricks offers several types of runtimes and several versions of those runtime types in the Databricks Runtime Version drop-down when you create or edit a cluster.
Photon acceleration
Photon is available for clusters running Databricks Runtime 9.1 LTS and above.
To enable Photon acceleration, select the Use Photon Acceleration checkbox.
If desired, you can specify the instance type in the Worker Type and Driver Type drop-down.
Databricks recommends the following instance types for optimal price and performance:
- Standard_E4ds_v4
- Standard_E8ds_v4
- Standard_E16ds_v4
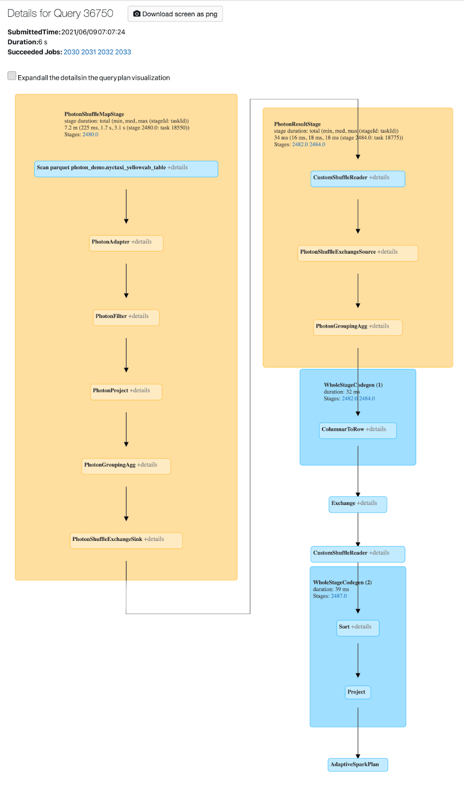
You can view Photon activity in the Spark UI. The following screenshot shows the query details DAG. There are two indications of Photon in the DAG. First, Photon operators start with “Photon”, for example, PhotonGroupingAgg. Second, in the DAG, Photon operators and stages are colored peach, while the non-Photon ones are blue.
Docker images
For some Databricks Runtime versions, you can specify a Docker image when you create a cluster. Example use cases include library customization, a golden container environment that doesn't change, and Docker CI/CD integration.
You can also use Docker images to create custom deep learning environments on clusters with GPU devices.
For instructions, see Customize containers with Databricks Container Service and Databricks Container Services on GPU compute.
Cluster node type
A cluster consists of one driver node and zero or more worker nodes.
You can pick separate cloud provider instance types for the driver and worker nodes, although by default the driver node uses the same instance type as the worker node. Different families of instance types fit different use cases, such as memory-intensive or compute-intensive workloads.
Note
If your security requirements include compute isolation, select a Standard_F72s_V2 instance as your worker type. These instance types represent isolated virtual machines that consume the entire physical host and provide the necessary level of isolation required to support, for example, US Department of Defense Impact Level 5 (IL5) workloads.
Driver node
The driver node maintains state information of all notebooks attached to the cluster. The driver node also maintains the SparkContext and interprets all the commands you run from a notebook or a library on the cluster, and runs the Apache Spark master that coordinates with the Spark executors.
The default value of the driver node type is the same as the worker node type. You can choose a larger driver node type with more memory if you are planning to collect() a lot of data from Spark workers and analyze them in the notebook.
Tip
Since the driver node maintains all of the state information of the notebooks attached, make sure to detach unused notebooks from the driver node.
Worker node
Azure Databricks worker nodes run the Spark executors and other services required for the proper functioning of the clusters. When you distribute your workload with Spark, all of the distributed processing happens on worker nodes. Azure Databricks runs one executor per worker node; therefore the terms executor and worker are used interchangeably in the context of the Azure Databricks architecture.
Tip
To run a Spark job, you need at least one worker node. If a cluster has zero workers, you can run non-Spark commands on the driver node, but Spark commands will fail.
GPU instance types
For computationally challenging tasks that demand high performance, like those associated with deep learning, Azure Databricks supports clusters accelerated with graphics processing units (GPUs). For more information, see GPU-enabled compute.
Spot instances
To save cost, you can choose to use spot instances, also known as Azure Spot VMs by checking the Spot instances checkbox.

The first instance will always be on-demand (the driver node is always on-demand) and subsequent instances will be spot instances. If spot instances are evicted due to unavailability, on-demand instances are deployed to replace evicted instances.
Cluster size and autoscaling
When you create an Azure Databricks cluster, you can either provide a fixed number of workers for the cluster or provide a minimum and maximum number of workers for the cluster.
When you provide a fixed size cluster, Azure Databricks ensures that your cluster has the specified number of workers. When you provide a range for the number of workers, Databricks chooses the appropriate number of workers required to run your job. This is referred to as autoscaling.
With autoscaling, Azure Databricks dynamically reallocates workers to account for the characteristics of your job. Certain parts of your pipeline may be more computationally demanding than others, and Databricks automatically adds additional workers during these phases of your job (and removes them when they're no longer needed).
Autoscaling makes it easier to achieve high cluster utilization, because you don't need to provision the cluster to match a workload. This applies especially to workloads whose requirements change over time (like exploring a dataset during the course of a day), but it can also apply to a one-time shorter workload whose provisioning requirements are unknown. Autoscaling thus offers two advantages:
- Workloads can run faster compared to a constant-sized under-provisioned cluster.
- Autoscaling clusters can reduce overall costs compared to a statically-sized cluster.
Depending on the constant size of the cluster and the workload, autoscaling gives you one or both of these benefits at the same time. The cluster size can go below the minimum number of workers selected when the cloud provider terminates instances. In this case, Azure Databricks continuously retries to re-provision instances in order to maintain the minimum number of workers.
Note
Autoscaling is not available for spark-submit jobs.
How autoscaling behaves
- Scales up from min to max in 2 steps.
- Can scale down even if the cluster is not idle by looking at shuffle file state.
- Scales down based on a percentage of current nodes.
- On job clusters, scales down if the cluster is underutilized over the last 40 seconds.
- On all-purpose clusters, scales down if the cluster is underutilized over the last 150 seconds.
- The
spark.databricks.aggressiveWindowDownSSpark configuration property specifies in seconds how often a cluster makes down-scaling decisions. Increasing the value causes a cluster to scale down more slowly. The maximum value is 600.
Enable and configure autoscaling
To allow Azure Databricks to resize your cluster automatically, you enable autoscaling for the cluster and provide the min and max range of workers.
Enable autoscaling.
All-Purpose cluster - On the Create Cluster page, select the Enable autoscaling checkbox in the Autopilot Options box:

Job cluster - On the Configure Cluster page, select the Enable autoscaling checkbox in the Autopilot Options box:

Configure the min and max workers.

When the cluster is running, the cluster detail page displays the number of allocated workers. You can compare number of allocated workers with the worker configuration and make adjustments as needed.
Important
If you are using an instance pool:
- Make sure the cluster size requested is less than or equal to the minimum number of idle instances in the pool. If it is larger, cluster startup time will be equivalent to a cluster that doesn't use a pool.
- Make sure the maximum cluster size is less than or equal to the maximum capacity of the pool. If it is larger, the cluster creation will fail.
Autoscaling example
If you reconfigure a static cluster to be an autoscaling cluster, Azure Databricks immediately resizes the cluster within the minimum and maximum bounds and then starts autoscaling. As an example, the following table demonstrates what happens to clusters with a certain initial size if you reconfigure a cluster to autoscale between 5 and 10 nodes.
| Initial size | Size after reconfiguration |
|---|---|
| 6 | 6 |
| 12 | 10 |
| 3 | 5 |
Autoscaling local storage
It can often be difficult to estimate how much disk space a particular job will take. To save you from having to estimate how many gigabytes of managed disk to attach to your cluster at creation time, Azure Databricks automatically enables autoscaling local storage on all Azure Databricks clusters.
With autoscaling local storage, Azure Databricks monitors the amount of free disk space available on your cluster's Spark workers. If a worker begins to run too low on disk, Databricks automatically attaches a new managed disk to the worker before it runs out of disk space. Disks are attached up to a limit of 5 TB of total disk space per virtual machine (including the virtual machine's initial local storage).
The managed disks attached to a virtual machine are detached only when the virtual machine is returned to Azure. That is, managed disks are never detached from a virtual machine as long as it is part of a running cluster. To scale down managed disk usage, Azure Databricks recommends using this feature in a cluster configured with Cluster size and autoscaling or Automatic termination.
Local disk encryption
Important
This feature is in Public Preview.
Some instance types you use to run clusters may have locally attached disks. Azure Databricks may store shuffle data or ephemeral data on these locally attached disks. To ensure that all data at rest is encrypted for all storage types, including shuffle data that is stored temporarily on your cluster's local disks, you can enable local disk encryption.
Important
Your workloads may run more slowly because of the performance impact of reading and writing encrypted data to and from local volumes.
When local disk encryption is enabled, Azure Databricks generates an encryption key locally that is unique to each cluster node and is used to encrypt all data stored on local disks. The scope of the key is local to each cluster node and is destroyed along with the cluster node itself. During its lifetime, the key resides in memory for encryption and decryption and is stored encrypted on the disk.
To enable local disk encryption, you must use the Clusters API. During cluster creation or edit, set:
{
  "enable_local_disk_encryption": true
}
See the Clusters API for examples of how to invoke these APIs.
Here is an example of a cluster create call that enables local disk encryption:
{
  "cluster_name": "my-cluster",
  "spark_version": "7.3.x-scala2.12",
  "node_type_id": "Standard_D3_v2",
  "enable_local_disk_encryption": true,
  "spark_conf": {
    "spark.speculation": true
  },
  "num_workers": 25
}
Security mode
If your workspace is assigned to a Unity Catalog metastore, you use security mode instead of High Concurrency cluster mode to ensure the integrity of access controls and enforce strong isolation guarantees. High Concurrency cluster mode is not available with Unity Catalog.
Under Advanced options, select from the following cluster security modes:
- None: No isolation. Does not enforce workspace-local table access control or credential passthrough. Cannot access Unity Catalog data.
- Single User: Can be used only by a single user (by default, the user who created the cluster). Other users cannot attach to the cluster. When accessing a view from a cluster with Single User security mode, the view is executed with the user's permissions. Single user clusters support workloads using Python, Scala, and R. Init scripts, library installation, and DBFS mounts are supported on single user clusters. Automated jobs should use single user clusters.
- User Isolation: Can be shared by multiple users. Only SQL workloads are supported. Library installation, init scripts, and DBFS mounts are disabled to enforce strict isolation among the cluster users.
- Table ACL only (Legacy): Enforces workspace-local table access control, but cannot access Unity Catalog data.
- Passthrough only (Legacy): Enforces workspace-local credential passthrough, but cannot access Unity Catalog data.
The only security modes supported for Unity Catalog workloads are Single User and User Isolation.
For more information, see Access modes.
Spark configuration
To fine tune Spark jobs, you can provide custom Spark configuration properties in a cluster configuration.
On the cluster configuration page, click the Advanced Options toggle.
Click the Spark tab.
In Spark config, enter the configuration properties as one key-value pair per line.
When you configure a cluster using the Cluster API, set Spark properties in the spark_conf field in the Create new cluster API or Update cluster configuration API.
Databricks does not recommend using global init scripts.
To set Spark properties for all clusters, create a global init script:
dbutils.fs.put("dbfs:/databricks/init/set_spark_params.sh","""
  |#!/bin/bash
  |
  |cat << 'EOF' > /databricks/driver/conf/00-custom-spark-driver-defaults.conf
  |[driver] {
  |  "spark.sql.sources.partitionOverwriteMode" = "DYNAMIC"
  |}
  |EOF
  """.stripMargin, true)
Retrieve a Spark configuration property from a secret
Databricks recommends storing sensitive information, such as passwords, in a secret instead of plaintext. To reference a secret in the Spark configuration, use the following syntax:
spark.<property-name> {{secrets/<scope-name>/<secret-name>}}
For example, to set a Spark configuration property called password to the value of the secret stored in secrets/acme_app/password:
spark.password {{secrets/acme-app/password}}
For more information, see Manage secrets.
Environment variables
You can configure custom environment variables that you can access from init scripts running on a cluster. Databricks also provides predefined environment variables that you can use in init scripts. You cannot override these predefined environment variables.
On the cluster configuration page, click the Advanced Options toggle.
Click the Spark tab.
Set the environment variables in the Environment Variables field.
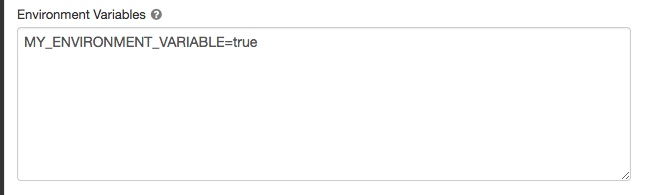
You can also set environment variables using the spark_env_vars field in the Create new cluster API or Update cluster configuration API.
Cluster tags
Cluster tags allow you to easily monitor the cost of cloud resources used by various groups in your organization. You can specify tags as key-value pairs when you create a cluster, and Azure Databricks applies these tags to cloud resources like VMs and disk volumes, as well as DBU usage reports.
For clusters launched from pools, the custom cluster tags are only applied to DBU usage reports and do not propagate to cloud resources.
For detailed information about how pool and cluster tag types work together, see Use tags to attribute and track usage.
For convenience, Azure Databricks applies four default tags to each cluster: Vendor, Creator, ClusterName, and ClusterId.
In addition, on job clusters, Azure Databricks applies two default tags: RunName and JobId.
On resources used by Databricks SQL, Azure Databricks also applies the default tag SqlWarehouseId.
Warning
Do not assign a custom tag with the key Name to a cluster. Every cluster has a tag Name whose value is set by Azure Databricks. If you change the value associated with the key Name, the cluster can no longer be tracked by Azure Databricks. As a consequence, the cluster might not be terminated after becoming idle and will continue to incur usage costs.
You can add custom tags when you create a cluster. To configure cluster tags:
On the cluster configuration page, click the Advanced Options toggle.
At the bottom of the page, click the Tags tab.
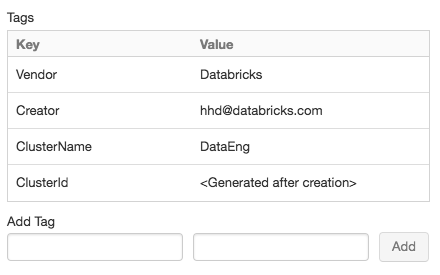
Add a key-value pair for each custom tag. You can add up to 43 custom tags.
SSH access to clusters
For security reasons, in Azure Databricks the SSH port is closed by default. If you want to enable SSH access to your Spark clusters, contact Azure Databricks support.
Note
SSH can be enabled only if your workspace is deployed in your own Azure virtual network.
Cluster log delivery
When you create a cluster, you can specify a location to deliver the logs for the Spark driver node, worker nodes, and events. Logs are delivered every five minutes to your chosen destination. When a cluster is terminated, Azure Databricks guarantees to deliver all logs generated up until the cluster was terminated.
The destination of the logs depends on the cluster ID. If the specified destination is
dbfs:/cluster-log-delivery, cluster logs for 0630-191345-leap375 are delivered to
dbfs:/cluster-log-delivery/0630-191345-leap375.
To configure the log delivery location:
On the cluster configuration page, click the Advanced Options toggle.
Click the Logging tab.
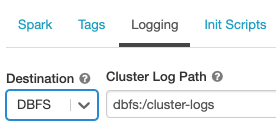
Select a destination type.
Enter the cluster log path.
Note
This feature is also available in the REST API. See the Clusters API.
Init scripts
A cluster node initialization—or init—script is a shell script that runs during startup for each cluster node before the Spark driver or worker JVM starts. You can use init scripts to install packages and libraries not included in the Databricks runtime, modify the JVM system classpath, set system properties and environment variables used by the JVM, or modify Spark configuration parameters, among other configuration tasks.
You can attach init scripts to a cluster by expanding the Advanced Options section and clicking the Init Scripts tab.
For detailed instructions, see What are init scripts?.