Select a cluster for the Databricks extension for Visual Studio Code
This article describes how to select an Azure Databricks cluster for the Databricks extension for Visual Studio Code to use. See What is the Databricks extension for Visual Studio Code?.
The following information assumes that you have already set up the Databricks extension for Visual Studio Code for authentication with your Azure Databricks workspace. See Authentication setup for the Databricks extension for VS Code.
Note
If you have already completed the VSCode extension for Databricks tutorial: Run Python on a cluster and as a job, and you want to keep using the Azure Databricks cluster from that tutorial, skip ahead to Select a workspace directory for the Databricks extension for Visual Studio Code.
With the extension and your code project opened, select an existing Azure Databricks cluster that you want to use, or create a new Azure Databricks cluster and use it.
Use an existing cluster
If you have an existing Azure Databricks cluster that you want to use, do one of the following:
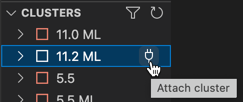
In the Clusters pane, do the following:
Note
The Clusters pane appears only if the
views.clusterexperimental feature is enabled. See Settings for the Databricks extension for Visual Studio Code.Next to the cluster that you want to use, click the plug (Attach cluster) icon.
Tip
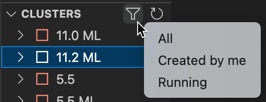
If the cluster is not visible in the Clusters pane, click the filter (Filter clusters) icon to see All clusters, clusters that are Created by me, or Running clusters. Or, click the arrowed circle (Refresh) icon next to the filter icon.
This procedure is complete. Continue with Select a workspace directory for the Databricks extension for Visual Studio Code.
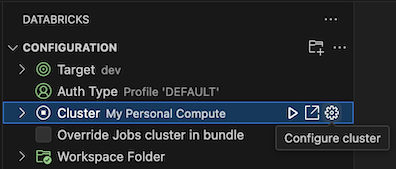
In the Configuration pane, do the following:
Next to Cluster, click the gear (Configure cluster) icon.
In the Command Palette, click the cluster that you want to use.
Continue with Select a workspace directory for the Databricks extension for Visual Studio Code.
Create a new cluster
If you do not have an existing Azure Databricks cluster, or you want to create a new one and use it, do the following:
In the Configuration pane, next to Cluster, click the gear (Configure cluster) icon.
In the Command Palette, click Create New Cluster.
When prompted to open the external website (your Azure Databricks workspace), click Open.
If prompted, sign in to your Azure Databricks workspace.
Follow the instructions to create a cluster.
Note
Databricks recommends that you create a Personal Compute cluster. This enables you to start running workloads immediately, minimizing compute management overhead.
- After the cluster is created and is running, go back to Visual Studio Code.
- Do one of the following:
In the Clusters pane, next to the cluster that you want to use, click the plug (Attach cluster) icon.
Note
The Clusters pane appears only if the
views.clusterexperimental feature is enabled. See Settings for the Databricks extension for Visual Studio Code.Tip
If the cluster is not visible, click the filter (Filter clusters) icon to see All clusters, clusters that are Created by me, or Running clusters. Or, click the arrowed circle (Refresh) icon.
This procedure is complete. Continue with Select a workspace directory for the Databricks extension for Visual Studio Code.
In the Configuration pane, next to Cluster, click the gear (Configure cluster) icon.
In the Command Palette, click the cluster that you want to use.
Continue with Select a workspace directory for the Databricks extension for Visual Studio Code.
Feedback
Coming soon: Throughout 2024 we will be phasing out GitHub Issues as the feedback mechanism for content and replacing it with a new feedback system. For more information see: https://aka.ms/ContentUserFeedback.
Submit and view feedback for