Note
Access to this page requires authorization. You can try signing in or changing directories.
Access to this page requires authorization. You can try changing directories.
Lakeflow Jobs provide a non-interactive way to run applications in an Azure Databricks cluster, for example, an ETL job or data analysis task that should run on a scheduled basis. Typically, these jobs run as the user that created them, but this can have some limitations:
- Creating and running jobs is dependent on the user having appropriate permissions.
- Only the user that created the job has access to the job.
- The user might be removed from the Azure Databricks workspace.
Using a service account—an account associated with an application rather than a specific user—is a common method to address these limitations. In Azure, you can use a Microsoft Entra ID application and service principal to create a service account.
An example of where this is important is when service principals control access to data stored in an Azure Data Lake Storage account. Running jobs with those service principals allows the jobs to access data in the storage account and provides control over data access scope.
This tutorial describes how to create a Microsoft Entra ID application and service principal and make that service principal the owner of a job. You'll also learn how to give job run permissions to other groups that don't own the job. The following is a high-level overview of the tasks this tutorial walks through:
- Create a service principal in Microsoft Entra ID .
- Create a personal access token (PAT) in Azure Databricks. You'll use the PAT to authenticate to the Databricks REST API.
- Add the service principal as a non-administrative user to Azure Databricks using the Databricks SCIM API.
- Create an Azure Key Vault-backed secret scope in Azure Databricks.
- Grant the service principal read access to the secret scope.
- Create a job in Azure Databricks and configure the job cluster to read secrets from the secret scope.
- Transfer ownership of the job to the service principal.
- Test the job by running it as the service principal.
If you don't have an Azure subscription, create a free account before you begin.
Note
You cannot use a cluster with credential passthrough enabled to run a job owned by a service principal. If your job requires a service principal to access Azure storage, see Connect to Azure Data Lake Storage or Blob Storage using Azure credentials.
Requirements
You'll need the following for this tutorial:
- A user account with the permissions required to register an application in your Microsoft Entra ID tenant.
- Administrative privileges in the Azure Databricks workspace where you'll run jobs.
- A tool for making API requests to Azure Databricks. This tutorial uses cURL, but you can use any tool that allows you to submit REST API requests.
Create a service principal in Microsoft Entra ID
A service principal is the identity of a Microsoft Entra ID application. To create the service principal that will be used to run jobs:
- In the Azure portal, select Microsoft Entra ID > App Registrations > New Registration. Enter a name for the application and click Register.
- Go to Certificates & secrets, click New client secret, and generate a new client secret. Copy and save the secret in a secure place.
- Go to Overview and note the Application (client) ID and Directory (tenant) ID.
Create the Azure Databricks personal access token
You'll use an Azure Databricks personal access token (PAT) to authenticate against the Databricks REST API. To create a PAT that can be used to make API requests:
- Go to your Azure Databricks workspace.
- Click your username in the top-right corner of the screen and click Settings.
- Click Developer.
- Next to Access tokens, click Manage.
- Click Generate New Token.
- Copy and save the token value.
Tip
This example uses a personal access token, but you can use a Microsoft Entra ID token for most APIs. A best practice is that a PAT is suitable for administrative configuration tasks, but Microsoft Entra ID tokens are preferred for production workloads.
You can restrict the generation of PATs to administrators only for security purposes. See Monitor and revoke personal access tokens for more details.
Add the service principal to the Azure Databricks workspace
You add the Microsoft Entra ID service principal to a workspace using the Service Principals API. You must also give the service principal permission to launch automated job clusters. You can grant this through the allow-cluster-create permission. Open a terminal and use the Databricks CLI to run the following command to add the service principal and grant the required permissions:
databricks service-principals create --json '{
  "schemas":[
    "urn:ietf:params:scim:schemas:core:2.0:ServicePrincipal"
  ],
  "applicationId":"<application-id>",
  "displayName": "test-sp",
  "entitlements":[
    {
      "value":"allow-cluster-create"
    }
  ]
}'
Replace <application-id> with the Application (client) ID for the Microsoft Entra ID application registration.
Create an Azure Key Vault-backed secret scope in Azure Databricks
Manage secret scopes provide secure storage and management of secrets. You'll store the secret associated with the service principal in a secret scope. You can store secrets in an Azure Databricks secret scope or an Azure Key Vault-backed secret scope. These instructions describe the Azure Key Vault-backed option:
- Create an Azure Key Vault instance in the Azure portal.
- Create the Azure Databricks secret scope backed by the Azure Key Vault instance.
Step 1: Create an Azure Key Vault instance
In the Azure portal, select Key Vaults > + Add and give the Key Vault a name.
Click Review + create.
After validation completes, click Create .
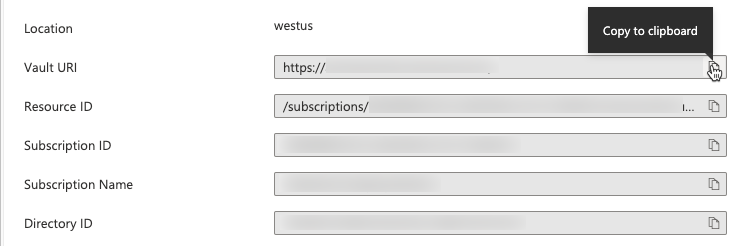
After creating the Key Vault, go to the Properties page for the new Key Vault.
Copy and save the Vault URI and Resource ID.
Step 2: Create An Azure Key Vault-backed secret scope
Azure Databricks resources can reference secrets stored in an Azure Key Vault by creating a Key Vault-backed secret scope. To create the Azure Databricks secret scope:
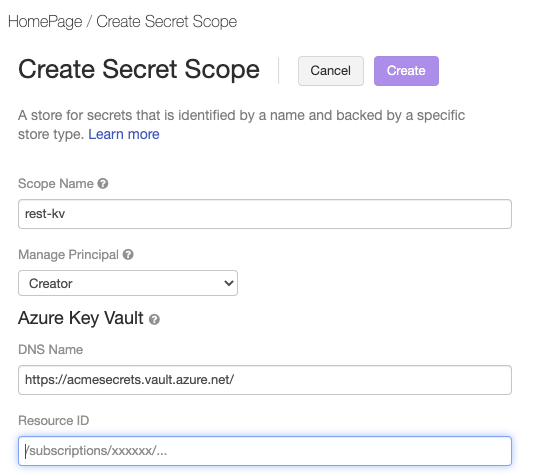
Go to the Azure Databricks Create Secret Scope page at
https://<per-workspace-url>/#secrets/createScope. Replaceper-workspace-urlwith the unique per-workspace URL for your Azure Databricks workspace.Enter a Scope Name.
Enter the Vault URI and Resource ID values for the Azure Key Vault you created in Step 1: Create an Azure Key Vault instance.
Click Create.
Save the client secret in Azure Key Vault
In the Azure portal, go to the Key vaults service.
Select the Key Vault created in Step 1: Create an Azure Key Vault instance.
Under Settings > Secrets, click Generate/Import.
Select the Manual upload option and enter the client secret in the Value field.
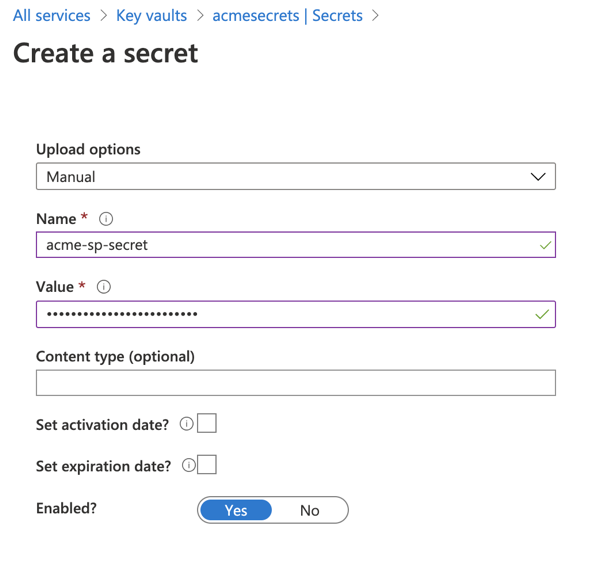
Click Create.
Grant the service principal read access to the secret scope
You've created a secret scope and stored the service principal's client secret in that scope. Now you'll give the service principal access to read the secret from the secret scope.
Open a terminal and use the Databricks CLI to run the following command:
databricks secrets put-acl <scope-name> <application-id> READ
- Replace
<scope-name>with the name of the Azure Databricks secret scope that contains the client secret. - Replace
<application-id>with theApplication (client) IDfor the Microsoft Entra ID application registration.
Create a job in Azure Databricks and configure the cluster to read secrets from the secret scope
You're now ready to create a job that can run as the new service principal. You'll use a notebook created in the Azure Databricks UI and add the configuration to allow the job cluster to retrieve the service principal's secret.
Go to your Azure Databricks landing page and select New > Notebook. Give your notebook a name and select SQL as the default language.
Enter
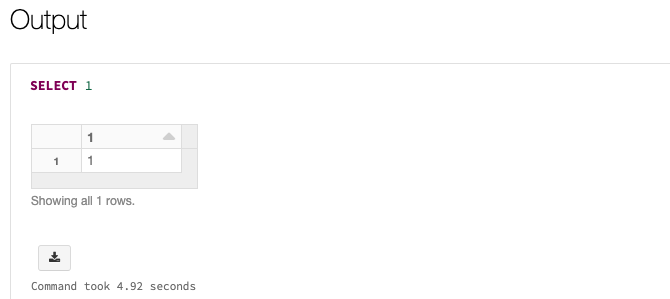
SELECT 1in the first cell of the notebook. This is a simple command that just displays 1 if it succeeds. If you have granted your service principal access to particular files or paths in Azure Data Lake Storage Gen 2, you can read from those paths instead.In your workspace, click
 Jobs & Pipelines in the sidebar.
Under Create, then Job.
Give the job and task a name, click Select Notebook, and select the notebook you just created.
Click Edit next to the Cluster information.
On the Configure Cluster page, click Advanced Options.
On the Spark tab, enter the following Spark Config:
fs.azure.account.auth.type.<storage-account>.dfs.core.windows.net OAuth fs.azure.account.oauth.provider.type.<storage-account>.dfs.core.windows.net org.apache.hadoop.fs.azurebfs.oauth2.ClientCredsTokenProvider fs.azure.account.oauth2.client.id.<storage-account>.dfs.core.windows.net <application-id> fs.azure.account.oauth2.client.secret.<storage-account>.dfs.core.windows.net {{secrets/<secret-scope-name>/<secret-name>}} fs.azure.account.oauth2.client.endpoint.<storage-account>.dfs.core.windows.net https://login.microsoftonline.com/<directory-id>/oauth2/token- Replace
<storage-account>with the name of the storage account containing your data. - Replace
<secret-scope-name>with the name of the Azure Databricks secret scope that contains the client secret. - Replace
<application-id>with theApplication (client) IDfor the Microsoft Entra ID application registration. - Replace
<secret-name>with the name associated with the client secret value in the secret scope. - Replace
<directory-id>with theDirectory (tenant) IDfor the Microsoft Entra ID application registration.
- Replace
Transfer ownership of the job to the service principal
A job can have exactly one owner, so you'll need to transfer ownership of the job from yourself to the service principal. To ensure that other users can manage the job, you can also grant CAN MANAGE permissions to a group. In this example, we use the Permissions API to set these permissions.
Open a terminal and use the Databricks CLI to run the following command:
databricks permissions set jobs <job-id> --json '{
  "access_control_list": [
    {
      "service_principal_name": "<application-id>",
      "permission_level": "IS_OWNER"
    },
    {
      "group_name": "admins",
      "permission_level": "CAN_MANAGE"
    }
  ]
}'
- Replace
<job-id>with the unique identifier of the job. To find the job ID, click Jobs & Pipelines in the sidebar and click the job name. The job ID is in the Job details side panel. - Replace
<application-id>with theApplication (client) IDfor the Microsoft Entra ID application registration.
The job will also need read permissions to the notebook. Use the Databricks CLI to run the following command to grant the required permissions:
databricks permissions set notebooks <notebook-id> --json '{
  "access_control_list": [
    {
      "service_principal_name": "<application-id>",
      "permission_level": "CAN_READ"
    }
  ]
}'
- Replace
<notebook-id>with the ID of the notebook associated with the job. To find the ID, go to the notebook in the Azure Databricks workspace and look for the numeric ID that followsnotebook/in the notebook's URL. - Replace
<application-id>with theApplication (client) IDfor the Microsoft Entra ID application registration.
Test the job
You run jobs with a service principal the same way you run jobs as a user, either through the UI, API, or CLI. To test the job using the Azure Databricks UI:
- Go to Jobs & Pipelines in the Azure Databricks UI and select the job.
- Click Run now.
You'll see a status of Succeeded for the job if everything runs correctly. You can select the job in the UI to verify the output:
Learn more
To learn more about creating and running jobs, see Lakeflow Jobs.