Note
Access to this page requires authorization. You can try signing in or changing directories.
Access to this page requires authorization. You can try changing directories.
Important
This feature has reached end-of-life and will no longer be available after June 9, 2026. If you configure this feature before the end-of-life date, you must migrate to the new network security perimeter feature by June 9, 2026. Existing customers have been contacted about the required migration. See Configure an Azure network security perimeter for Azure resources.
This page describes how to configure an Azure storage firewall for serverless compute using the Azure Databricks account console UI. You can also use the Network connectivity configurations API.
To configure a private endpoint for serverless compute access, see Configure private connectivity to Azure resources.
Note
Azure Databricks charges for networking costs when serverless workloads connect to customer resources, and when performance-intensive services egress data cross-region back to clients. See Understand Databricks networking costs.
Overview of firewall enablement for serverless compute
Serverless network connectivity is managed with network connectivity configurations (NCCs). Account admins create NCCs in the account console, and an NCC can be attached to one or more workspaces. NCCs are account-level regional constructs that are used to manage private endpoint creation and firewall enablement at scale.
An NCC defines network identities for Azure resources as default rules. When an NCC is attached to a workspace, serverless compute in that workspace uses one of those networks to connect to the Azure resource. You can allowlist these networks in your Azure resource firewalls. For non-storage Azure resource firewalls, contact your account team to learn about using stable NAT IPs.
NCC firewall enablement is supported from serverless SQL warehouses, jobs, notebooks, Lakeflow Spark Declarative Pipelines, and model serving endpoints.
You can also restrict workspace storage account access to authorized networks, including serverless compute. When an NCC is attached, its network rules are automatically added to the workspace storage account. See Enable firewall support for your workspace storage account.
For more information on NCCs, see What is a network connectivity configuration (NCC)?.
Cost implications of cross-region storage access
The firewall applies only when the Azure resources are in the same region as the Azure Databricks workspace. For cross-region traffic from Azure Databricks serverless compute (for example, workspace is in East US region and ADLS storage is in West Europe), Azure Databricks routes the traffic through an Azure NAT Gateway service.
Requirements
- Your workspace must be on the Premium plan.
- You must be an Azure Databricks account admin.
- Each NCC can be attached to up to 50 workspaces.
- Each Azure Databricks account can have up to 10 NCCs per supported region. NCCs provide shared stable IP CIDR blocks rather than distinct IP blocks per configuration, and these IP ranges are region-specific. For the list of supported regions, see Azure Databricks regions.
- You must have
WRITEaccess to your Azure storage account's network rules.
Step 1: Create a network connectivity configuration and copy subnet IDs
Databricks recommends sharing NCCs among workspaces in the same business unit and those sharing the same region and connectivity properties. For example, if some workspaces use storage firewall and other workspaces use the alternative approach of Private Link, use separate NCCs for those use cases.
- As an account admin, go to the account console.
- In the sidebar, click Security.
- Click Network connectivity configurations.
- Click Add network configuration.
- Type a name for the NCC.
- Choose the region. This must match your workspace region.
- Click Add.
- In the list of NCCs, click on your new NCC.
- In Default Rules under Network identities, click View all.
- In the dialog, click the Copy subnets button.
Step 2: Attach an NCC to workspaces
You can attach an NCC to up to 50 workspaces in the same region as the NCC.
To use the API to attach an NCC to a workspace, see the Account Workspaces API.
- In the account console sidebar, click Workspaces.
- Click your workspace's name.
- Click Update workspace.
- In the Network connectivity configurations field, select your NCC. If it's not visible, confirm that you've selected the same region for both the workspace and the NCC.
- Click Update.
- Wait 10 minutes for the change to take effect.
- Restart any running serverless compute resources in the workspace.
If you are using this feature to connect to the workspace storage account, your configuration is complete. The network rules are automatically added to the workspace storage account. For additional storage accounts, continue to the next step.
Step 3: Lock down your storage account
If you haven't already limited access to the Azure storage account to only allow-listed networks, do so now. You do not need to do this step for the workspace storage account.
Creating a storage firewall also affects connectivity from classic compute plane to your resources. You must also add network rules to connect to your storage accounts from classic compute resources.
- Go to the Azure portal.
- Navigate to your storage account for the data source.
- In the left nav, click Networking.
- In the field Public network access, check the value. By default, the value is Enabled from all networks. Change this to Enabled from selected virtual networks and IP addresses.
Step 4: Add Azure storage account network rules
You do not need to do this step for the workspace storage account.
In a text editor, copy and paste the following script, replacing the parameters with values for your Azure account:
# Define parameters

$subscription = `<YOUR_SUBSCRIPTION_ID>` # Replace with your Azure subscription ID or name
$resourceGroup = `<YOUR_RESOURCE_GROUP>` # Replace with your Azure resource group name
$accountName = `<YOUR_STORAGE_ACCOUNT_NAME>` # Replace with your Azure storage account name
$subnets = `<SUBNET_NAME_1>` # Replace with your actual subnet names

# Add network rules for each subnet
foreach ($subnet in $subnets) {
   az storage account network-rule add --subscription $subscription `
      --resource-group $resourceGroup `
      --account-name $accountName `
      --subnet $subnet
}
Launch Azure Cloud Shell.
In Azure Cloud Shell, using an editor, create a new file that ends with the
.ps1extension:vi ncc.ps1Paste the script from step 1 into your editor and then press
Esc, type:wq, and pressEnter.Run the following command to execute your script:
./ncc.ps1After running all the commands, you can use the Azure portal to view your storage account and confirm that there is an entry in the Virtual Networks table that represents the new subnet.
Tip
- When you add storage account network rules, use the Network Connectivity API to retrieve the latest subnets.
- Avoid storing NCC information locally.
- Ignore the mention of “Insufficient permissions” in the endpoint status column or the warning below the network list. They indicate only that you do not have permission to read the Azure Databricks subnets but it does not interfere with the ability for that Azure Databricks serverless subnet to contact your Azure storage.
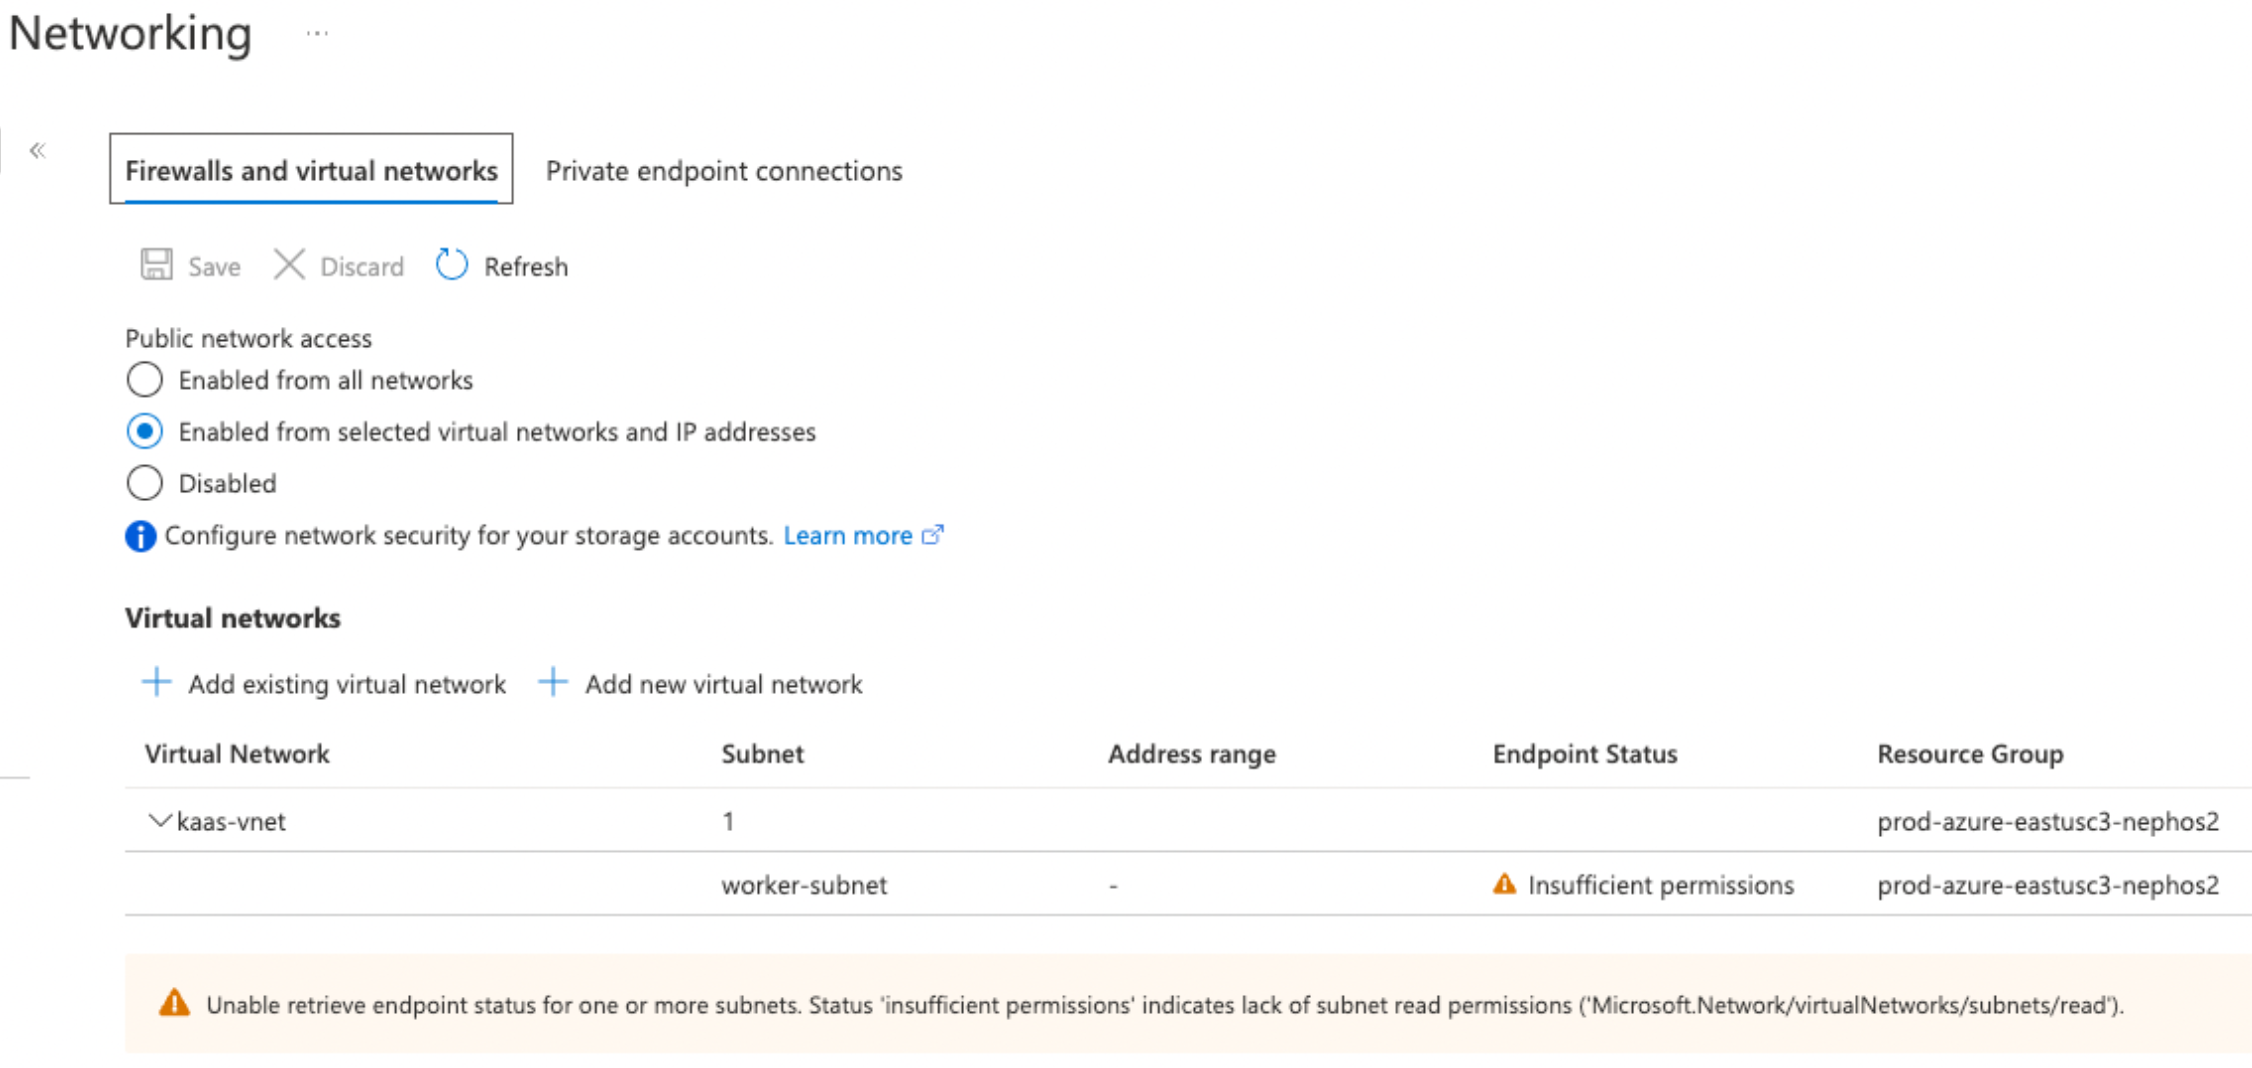
To confirm that your storage account uses these settings from the Azure portal, navigate to Networking in your storage account. Confirm that the Public network access is set to Enabled from selected virtual networks and IP addresses and allowed networks are listed in the Virtual Networks section.
Next steps
- Manage private endpoint rules: Control network traffic to and from your private endpoints by defining specific rules that permit or deny connections. See Manage private endpoint rules.
- Configure network policies: Implement network policies to provide additional security controls and access restrictions for your serverless compute environments. See What is serverless egress control?.
- Understand data transfer and connectivity costs: Learn about the costs associated with moving data into and out of serverless environments and network connectivity configurations. See Understand Databricks networking costs.