Note
Access to this page requires authorization. You can try signing in or changing directories.
Access to this page requires authorization. You can try changing directories.
This article describes how to configure private connectivity from serverless compute using the Azure Databricks account console UI. You can also use the Network connectivity configurations API.
If you configure your Azure resource to only accept connections from private endpoints, any connection to the resource from your classic Databricks compute resources also must use private endpoints.
To configure an Azure Storage firewall for serverless compute access using subnets, instead see Configure a firewall for serverless compute access (legacy). To manage existing private endpoint rules, see Manage private endpoint rules.
Note
Azure Databricks charges for networking costs when serverless workloads connect to customer resources. See Understand Databricks serverless networking costs.
Overview of private connectivity for serverless compute
Serverless network connectivity is managed with network connectivity configurations (NCCs). Account admins create NCCs in the account console, and a single NCC can be attached to one or more workspaces.
When you add a private endpoint in an NCC, Azure Databricks creates a private endpoint request to your Azure resource. Once the owner of the resource approves the request, Azure Databricks uses that private endpoint to access resources from the serverless compute plane. The private endpoint is dedicated to your Azure Databricks account and accessible only from authorized workspaces.
NCC private endpoints are supported from SQL warehouses, jobs, notebooks, Lakeflow Spark Declarative Pipelines, and model serving endpoints.
Note
NCC private endpoints are supported for data sources that you manage and the workspace storage account. For details on configuring private endpoints for the workspace storage account, see Enable firewall support for your workspace storage account.
Model serving uses Azure blob storage path to download model artifacts, so create a private endpoint for your sub-resource ID blob. You will need DFS to log models in Unity Catalog from serverless notebooks.
For more information on NCCs, see What is a network connectivity configuration (NCC)?.
Azure
Requirements
- Your account and workspace must be on the Premium plan.
- You must be an Azure Databricks account admin.
- Each Azure Databricks account can have up to 10 NCCs per region.
- Each region can have 100 private endpoints, distributed as needed across 1-10 NCCs.
- Each NCC can be attached to up to 50 workspaces.
Step 1: Create a network connectivity configuration
Databricks recommends sharing an NCC among workspaces in the same business unit and region. For example, if some workspaces use Private Link and other workspaces use firewall enablement, use separate NCCs for those use cases.
- As an account admin, go to the account console.
- In the sidebar, click Security.
- Click Network connectivity configurations.
- Click Add network configuration.
- Type a name for the NCC.
- Choose the region. This must match your workspace region.
- Click Add.
Step 2: Attach an NCC to a workspace
- In the account console sidebar, click Workspaces.
- Click your workspace's name.
- Click Update workspace.
- In the Network connectivity configurations field, select your NCC. If it's not visible, confirm that you've selected the same Azure region for both the workspace and the NCC.
- Click Update.
- Wait 10 minutes for the change to take effect.
- Restart any running serverless services in the workspace.
Step 3: Create private endpoint rules
You must create a private endpoint rule in your NCC for each Azure resource.
- Get a list of Azure resource IDs for all your destinations.
- In another browser tab, use the Azure portal navigate to your data source's Azure services.
- On its Overview page, look in the Essentials section.
- Click the JSON View link. The resource ID for the service is displayed at the top of the page.
- Copy that resource ID to another location. Repeat for all destinations. For more information about finding your resource ID, see Azure Private Endpoint private DNS zone values.
- Switch back to your account console browser tab.
- In the sidebar, click Security.
- Click Network connectivity configurations.
- Select the NCC that you created in step 1.
- In Private endpoint rules, click Add private endpoint rule.
- In the Destination Azure resource ID field, paste the resource ID for your resource.
- In the Azure subresource ID field, specify the destination ID and subresource type. Each private endpoint rule must use a different subresource ID. For a list of supported subresource types, see Supported resources.
- Click Add.
- Wait a few minutes until all endpoint rules have the status
PENDING.
Step 4: Approve the new private endpoints on your resources
The endpoints do not take effect until an admin approves them on the resource side. To approve using the Azure portal:
In the Azure portal, navigate to your resource.
In the sidebar, click Networking.
Click Private endpoint connections.
Click the Private access tab.
Under the Private endpoint connections, review the list of private endpoints.
Click the checkbox next to each one to approve, and click the Approve button above the list.
Return to your NCC in Azure Databricks and refresh the browser page until all endpoint rules have the status
ESTABLISHED.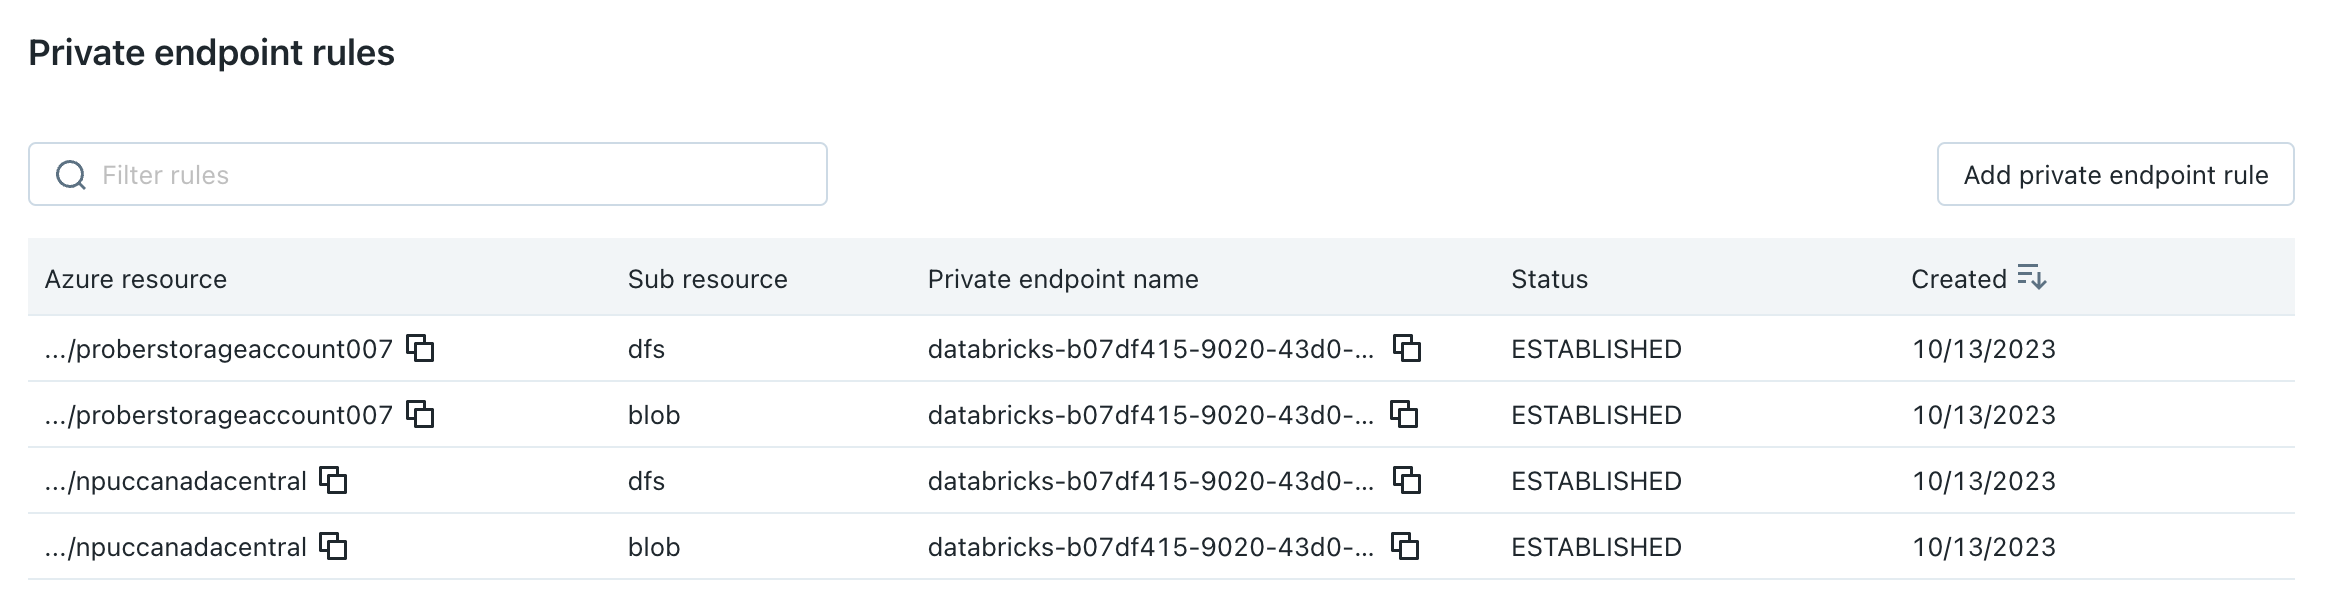
(Optional) Step 5: Set your resources to disallow public network access
If you haven't already restricted your resources to allow-listed networks only, you can do so now.
- Go to the Azure portal.
- Navigate to your storage account for the data source.
- In the sidebar, click Networking.
- In the field Public network access, check the value. By default, the value is Enabled from all networks. Change this to Disabled
Configure Private Link to Azure App Gateway v2
If you're configuring Private Link to an Azure App Gateway v2 resource, you must use the Network Connectivity Configurations REST API instead of the account console UI. Azure App Gateway v2 requires additional parameters: resource ID, group ID, and domain names.
- Use the following API call to create a private endpoint rule with domain name configuration:
curl --location 'https://accounts.azuredatabricks.net/api/2.0/accounts/<ACCOUNT_ID>/network-connectivity-configs/<NCC_ID>/private-endpoint-rules' \ --header 'Content-Type: application/json' \ --header 'Authorization: Bearer <TOKEN>' \ --data '{ "domain_names": [ "<YOUR_DOMAIN_HERE>" ], "resource_id": "<YOUR_APP_GATEWAY_RESOURCE_ID_HERE>", "group_id": "<GROUP_ID>" }' - If you need to modify the domain names for an existing private endpoint rule, use the following PATCH request:
curl --location --request PATCH 'https://accounts.azuredatabricks.net/api/2.0/accounts/<ACCOUNT_ID>/network-connectivity-configs/<NCC_ID>/private-endpoint-rules/<PRIVATE_ENDPOINT_RULE_ID>?update_mask=domain_names' \ --header 'Content-Type: application/json' \ --header 'Authorization: Bearer <TOKEN>' \ --data '{ "domain_names": [ "<YOUR_DOMAIN_HERE>" ] }' - To list, view, or delete App Gateway private endpoint rules, use the standard Network Connectivity Configurations API operations documented in the Network connectivity configurations API.
Step 7: Restart serverless compute plane resources and test the connection
- Wait five more minutes for the changes to propagate.
- Restart any running serverless compute plane resources in the workspaces that your NCC is attached to. If you don't have any running serverless compute plane resources, start one now.
- Confirm that all resources start successfully.
- Run at least one query on your data source to confirm that the serverless SQL warehouse can reach your data source.
Next steps
- Manage private endpoint rules: Update, review, and remove private endpoint rules. See Manage private endpoint rules.
- Configure a firewall for serverless compute access: Set up network firewall rules to control access to Azure services using subnets instead of private endpoints. See Configure a firewall for serverless compute access (legacy).
- Configure network policies: Implement additional network security controls and policies to govern serverless compute connectivity. See What is serverless egress control?.
- Understand serverless network security: Learn about network security options for serverless compute. See Serverless compute plane networking.
Azure China
Azure China requirements
- Your account and workspace must be on the Premium plan.
- You must be an Azure Databricks account admin.
- Each Azure Databricks account can have up to 10 NCCs per region.
- Each account can have up to 20 private endpoints in Azure China.
- Each NCC can be attached to up to 50 workspaces.
Note
In Azure China, NCCs are only supported in the China North 3 region. Because an NCC can only be attached to a workspace in the same region, your workspace must also be in China North 3.
Step 1: Create a network connectivity configuration (Azure China)
Databricks recommends sharing an NCC among workspaces in the same business unit and region. For example, if some workspaces use Private Link and other workspaces use different connectivity configurations, use separate NCCs for those use cases.
Note
Firewall enablement (subnet-based access) is not available in Azure China. Private endpoints are the only supported connectivity method for serverless compute in Azure China.
- As an account admin, go to the account console.
- In the sidebar, click Security.
- Click Network connectivity configurations.
- Click Add network configuration.
- Type a name for the NCC.
- Choose China North 3 as the region. This must match your workspace region.
- Click Add.
Step 2: Attach an NCC to a workspace (Azure China)
- In the account console sidebar, click Workspaces.
- Click your workspace's name.
- Click Update workspace.
- In the Network connectivity configurations field, select your NCC. If it's not visible, confirm that you've selected China North 3 as the Azure region for both the workspace and the NCC.
- Click Update.
- Wait 10 minutes for the change to take effect.
- Restart any running serverless services in the workspace.
Step 3: Create private endpoint rules (Azure China)
You must create a private endpoint rule in your NCC for each Azure resource. For the list of resources supported in Azure China, see Supported resources.
- Get a list of Azure resource IDs for all your destinations.
- In another browser tab, use the Azure portal navigate to your data source's Azure services.
- On its Overview page, look in the Essentials section.
- Click the JSON View link. The resource ID for the service is displayed at the top of the page.
- Copy that resource ID to another location. Repeat for all destinations. For more information about finding your resource ID, see Azure Private Endpoint private DNS zone values.
- Switch back to your account console browser tab.
- In the sidebar, click Security.
- Click Network connectivity configurations.
- Select the NCC that you created in step 1.
- In Private endpoint rules, click Add private endpoint rule.
- In the Destination Azure resource ID field, paste the resource ID for your resource.
- In the Azure subresource ID field, specify the destination ID and subresource type. Each private endpoint rule must use a different subresource ID.
- Click Add.
- Wait a few minutes until all endpoint rules have the status
PENDING.
Step 4: Approve the new private endpoints on your resources (Azure China)
The endpoints do not take effect until an admin approves them on the resource side. To approve using the Azure portal:
In the Azure portal, navigate to your resource.
In the sidebar, click Networking.
Click Private endpoint connections.
Click the Private access tab.
Under the Private endpoint connections, review the list of private endpoints.
Click the checkbox next to each one to approve, and click the Approve button above the list.
Return to your NCC in Azure Databricks and refresh the browser page until all endpoint rules have the status
ESTABLISHED.
(Optional) Step 5: Set your resources to disallow public network access (Azure China)
If you haven't already restricted your resources to allow-listed networks only, you can do so now.
- Go to the Azure portal.
- Navigate to your storage account for the data source.
- In the sidebar, click Networking.
- In the field Public network access, check the value. By default, the value is Enabled from all networks. Change this to Disabled
Configure Private Link to Azure App Gateway v2 (Azure China)
If you're configuring Private Link to an Azure App Gateway v2 resource, you must use the Network Connectivity Configurations REST API instead of the account console UI. Azure App Gateway v2 requires additional parameters: resource ID, group ID, and domain names.
- Use the following API call to create a private endpoint rule with domain name configuration:
curl --location 'https://accounts.databricks.azure.cn/api/2.0/accounts/<ACCOUNT_ID>/network-connectivity-configs/<NCC_ID>/private-endpoint-rules' \ --header 'Content-Type: application/json' \ --header 'Authorization: Bearer <TOKEN>' \ --data '{ "domain_names": [ "<YOUR_DOMAIN_HERE>" ], "resource_id": "<YOUR_APP_GATEWAY_RESOURCE_ID_HERE>", "group_id": "<GROUP_ID>" }' - If you need to modify the domain names for an existing private endpoint rule, use the following PATCH request:
curl --location --request PATCH 'https://accounts.databricks.azure.cn/api/2.0/accounts/<ACCOUNT_ID>/network-connectivity-configs/<NCC_ID>/private-endpoint-rules/<PRIVATE_ENDPOINT_RULE_ID>?update_mask=domain_names' \ --header 'Content-Type: application/json' \ --header 'Authorization: Bearer <TOKEN>' \ --data '{ "domain_names": [ "<YOUR_DOMAIN_HERE>" ] }' - To list, view, or delete App Gateway private endpoint rules, use the standard Network Connectivity Configurations API operations documented in the Network connectivity configurations API.
Step 7: Restart serverless compute plane resources and test the connection (Azure China)
- Wait five more minutes for the changes to propagate.
- Restart any running serverless compute plane resources in the workspaces that your NCC is attached to. If you don't have any running serverless compute plane resources, start one now.
- Confirm that all resources start successfully.
- Run at least one query on your data source to confirm that the serverless SQL warehouse can reach your data source.
Next steps (Azure China)
- Manage private endpoint rules: Update, review, and remove private endpoint rules. See Manage private endpoint rules.
- Understand serverless network security: Learn about network security options for serverless compute. See Serverless compute plane networking.