Secret scopes
Managing secrets begins with creating a secret scope. A secret scope is collection of secrets identified by a name.
A workspace is limited to a maximum of 1000 secret scopes. Contact your Azure Databricks support team if you need more.
Note
Databricks recommends aligning secret scopes to roles or applications rather than individuals.
Overview
There are two types of secret scope: Azure Key Vault-backed and Databricks-backed.
Azure Key Vault-backed scopes
To reference secrets stored in an Azure Key Vault, you can create a secret scope backed by Azure Key Vault. You can then leverage all of the secrets in the corresponding Key Vault instance from that secret scope. Because the Azure Key Vault-backed secret scope is a read-only interface to the Key Vault, the PutSecret and DeleteSecret the Secrets API operations are not allowed. To manage secrets in Azure Key Vault, you must use the Azure Set Secret REST API or Azure portal UI.
Databricks-backed scopes
A Databricks-backed secret scope is stored in (backed by) an encrypted database owned and managed by Azure Databricks. The secret scope name:
- Must be unique within a workspace.
- Must consist of alphanumeric characters, dashes, underscores,
@, and periods, and may not exceed 128 characters.
The names are considered non-sensitive and are readable by all users in the workspace.
You create a Databricks-backed secret scope using the Databricks CLI (version 0.205 and above). Alternatively, you can use the Secrets API.
Scope permissions
Scopes are created with permissions controlled by secret ACLs. By default, scopes are created with MANAGE permission for the user who created the scope (the “creator”), which lets the creator read secrets in the scope, write secrets to the scope, and change ACLs for the scope. If your account has the Premium plan, you can assign granular permissions at any time after you create the scope. For details, see Secret ACLs.
You can also override the default and explicitly grant MANAGE permission to all users when you create the scope. In fact, you must do this if your account does not have the Premium plan.
Note
Secret ACLs are at the scope level. If you use Azure Key Vault-backed scopes, users that are granted access to the scope have access to all secrets in the Azure Key Vault. To restrict access, use separate Azure key vault instances.
Create an Azure Key Vault-backed secret scope
This section describes how to create an Azure Key Vault-backed secret scope using the Azure portal and the Azure Databricks workspace UI. You can also create an Azure Key Vault-backed secret scope using the Databricks CLI.
Requirements
You must have the Key Vault Contributor, Contributor or Owner role on the Azure key vault instance that you want to use to back the secret scope.
If you do not have a key vault instance, follow the instructions in Create a Key Vault using the Azure portal.
Note
Creating an Azure Key Vault-backed secret scope requires the Contributor or Owner role on the Azure key vault instance even if the Azure Databricks service has previously been granted access to the key vault.
If the key vault exists in a different tenant than the Azure Databricks workspace, the Azure AD user who creates the secret scope must have permission to create service principals in the key vault’s tenant. Otherwise, the following error occurs:
Unable to grant read/list permission to Databricks service principal to KeyVault 'https://xxxxx.vault.azure.net/': Status code 403, {"odata.error":{"code":"Authorization_RequestDenied","message":{"lang":"en","value":"Insufficient privileges to complete the operation."},"requestId":"XXXXX","date":"YYYY-MM-DDTHH:MM:SS"}}
Configure your Azure key vault instance for Azure Databricks
Log in to the Azure Portal, find and select the Azure key vault instance.
Select the Access configuration tab under Settings.
Set Permission model to Vault access policy.
Note
Creating an Azure Key Vault-backed secret scope role grants the Get and List permissions to the application ID for the Azure Databricks service using key vault access policies. The Azure role-based access control permission model is not currently supported with Azure Databricks.
Select the Networking tab under Settings.
In Firewalls and virtual networks set Allow access from: to Allow public access from specific virtual networks and IP addresses.
Under Exception, check Allow trusted Microsoft services to bypass this firewall.
Note
You can also set Allow access from: to Allow public access from all networks.
Create an Azure Key Vault-backed secret scope
Go to
https://<databricks-instance>#secrets/createScope. Replace<databricks-instance>with the workspace URL of your Azure Databricks deployment. This URL is case sensitive (scope increateScopemust be uppercase).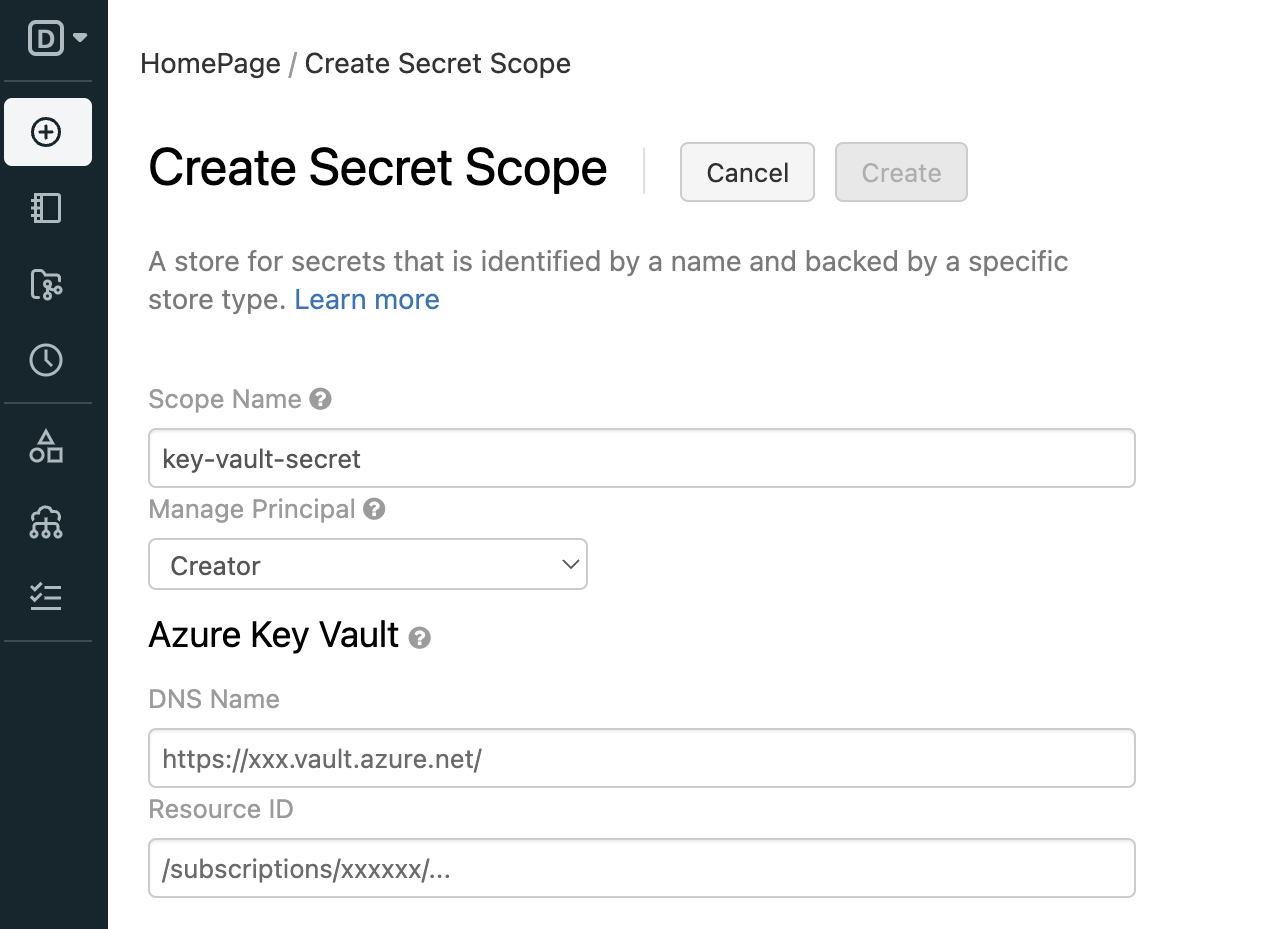
Enter the name of the secret scope. Secret scope names are case insensitive.
Use the Manage Principal drop-down to specify whether All Users have MANAGE permission for this secret scope or only the Creator of the secret scope (that is to say, you).
MANAGE permission allows users to read and write to this secret scope, and, in the case of accounts on the Premium plan, to change permissions for the scope.
Your account must have the Premium plan for you to be able to select Creator. This is the recommended approach: grant MANAGE permission to the Creator when you create the secret scope, and then assign more granular access permissions after you have tested the scope. For an example workflow, see Secret workflow example.
If your account has the Standard Plan, you must set the MANAGE permission to the “All Users” group. If you select Creator here, you will see an error message when you try to save the scope.
For more information about the MANAGE permission, see Secret ACLs.
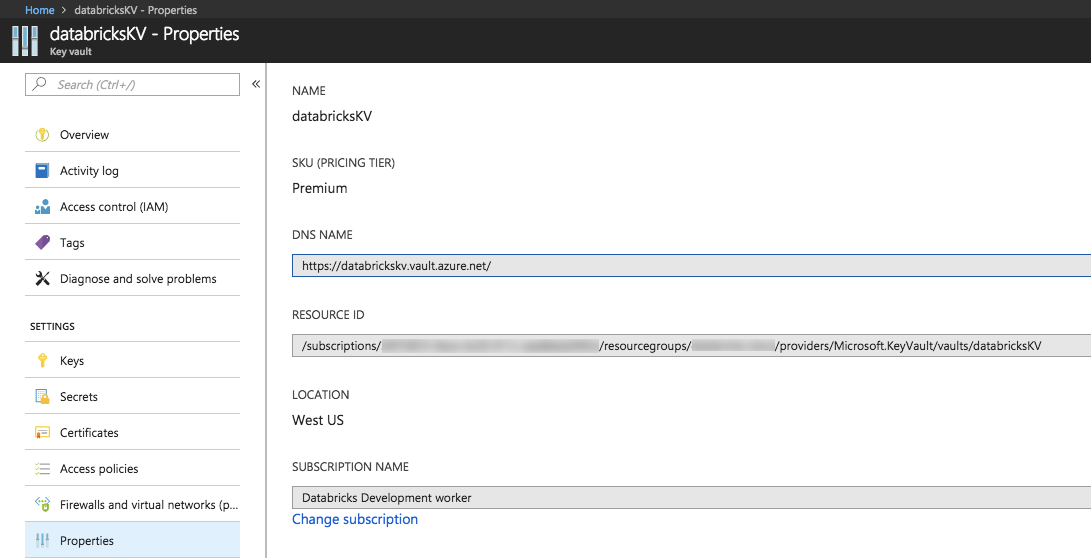
Enter the DNS Name (for example,
https://databrickskv.vault.azure.net/) and Resource ID, for example:/subscriptions/xxxxxxxx-xxxx-xxxx-xxxx-xxxxxxxxxxxx/resourcegroups/databricks-rg/providers/Microsoft.KeyVault/vaults/databricksKVThese properties are available from the Properties tab of an Azure Key Vault in your Azure portal.
Click the Create button.
Use the Databricks CLI
databricks secrets list-scopescommand to verify that the scope was created successfully.
Create a Databricks-backed secret scope
Secret scope names are case insensitive.
To create a scope using the Databricks CLI:
databricks secrets create-scope <scope-name>
By default, scopes are created with MANAGE permission for the user who created the scope. If your account does not have the Premium plan, you must override that default and explicitly grant the MANAGE permission to “users” (all users) when you create the scope:
databricks secrets create-scope <scope-name> --initial-manage-principal users
You can also create a Databricks-backed secret scope using the Secrets API.
If your account has the Premium plan, you can change permissions at any time after you create the scope. For details, see Secret ACLs.
Once you have created a Databricks-backed secret scope, you can add secrets.
List secret scopes
To list the existing scopes in a workspace using the CLI:
databricks secrets list-scopes
You can also list existing scopes using the Secrets API.
Delete a secret scope
Deleting a secret scope deletes all secrets and ACLs applied to the scope. To delete a scope using the CLI, run the following:
databricks secrets delete-scope <scope-name>
You can also delete a secret scope using the Secrets API.
Feedback
Coming soon: Throughout 2024 we will be phasing out GitHub Issues as the feedback mechanism for content and replacing it with a new feedback system. For more information see: https://aka.ms/ContentUserFeedback.
Submit and view feedback for