File Integrity Monitoring using the Log Analytics agent
To provide File Integrity Monitoring (FIM), the Log Analytics agent uploads data to the Log Analytics workspace. By comparing the current state of these items with the state during the previous scan, FIM notifies you if suspicious modifications have been made.
Note
As the Log Analytics agent (also known as MMA) is set to retire in August 2024, all Defender for Servers features that currently depend on it, including those described on this page, will be available through either Microsoft Defender for Endpoint integration or agentless scanning, before the retirement date. For more information about the roadmap for each of the features that are currently rely on Log Analytics Agent, see this announcement.
In this article, you'll learn how to:
- Enable File Integrity Monitoring with the Log Analytics agent
- Disable File Integrity Monitoring
- Monitor workspaces, entities, and files
- Compare baselines using File Integrity Monitoring
Note
File Integrity Monitoring might create the following account on monitored SQL Servers: NT Service\HealthService
If you delete the account, it will be automatically recreated.
Availability
| Aspect | Details |
|---|---|
| Release state: | General availability (GA) |
| Pricing: | Requires Microsoft Defender for Servers Plan 2. Using the Log Analytics agent, FIM uploads data to the Log Analytics workspace. Data charges apply, based on the amount of data you upload. See Log Analytics pricing to learn more. |
| Required roles and permissions: | Workspace owner can enable/disable FIM (for more information, see Azure Roles for Log Analytics). Reader can view results. |
| Clouds: | Supported only in regions where Azure Automation's change tracking solution is available. See Supported regions for linked Log Analytics workspace. Learn more about change tracking. |
Enable File Integrity Monitoring with the Log Analytics agent
FIM is only available from Defender for Cloud's pages in the Azure portal. There's currently no REST API for working with FIM.
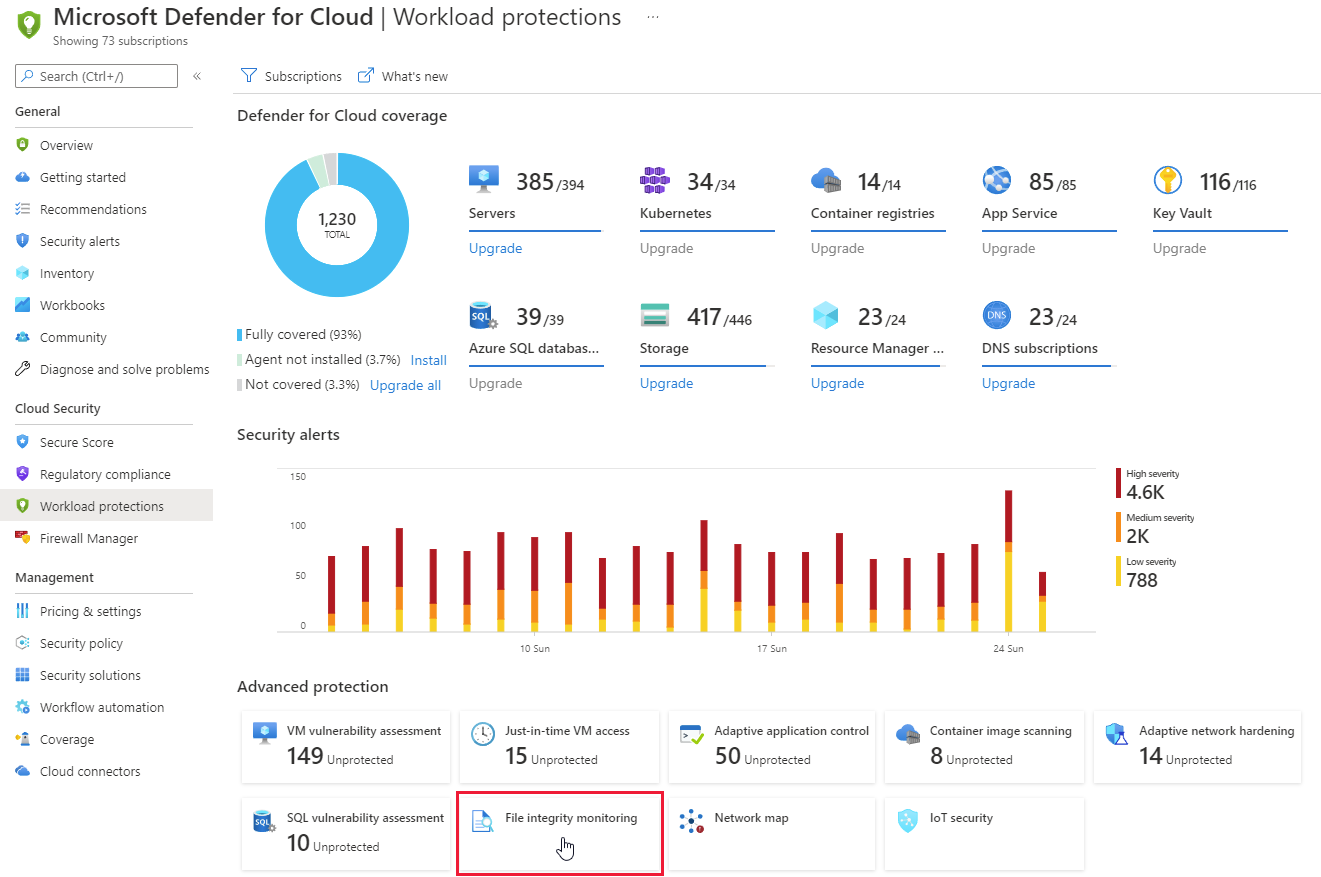
From the Workload protections dashboard's Advanced protection area, select File integrity monitoring.
The following information is provided for each workspace:
- Total number of changes that occurred in the last week (you might see a dash "-“ if FIM isn't enabled on the workspace)
- Total number of computers and VMs reporting to the workspace
- Geographic location of the workspace
- Azure subscription that the workspace is under
Use this page to:
Access and view the status and settings of each workspace
 Upgrade the workspace to use enhanced security features. This icon indicates that the workspace or subscription isn't protected with Microsoft Defender for Servers. To use the FIM features, your subscription must be protected with this plan. Learn about how to enable Defender for Servers.
 Enable FIM on all machines under the workspace and configure the FIM options. This icon indicates that FIM isn't enabled for the workspace. If there's no enable or upgrade button, and the space is blank, it means that FIM is already enabled on the workspace.
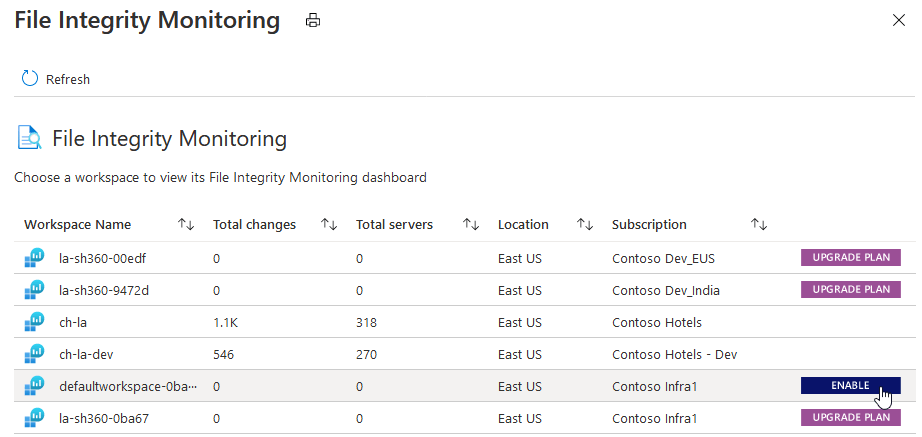
Select ENABLE. The details of the workspace including the number of Windows and Linux machines under the workspace is shown.
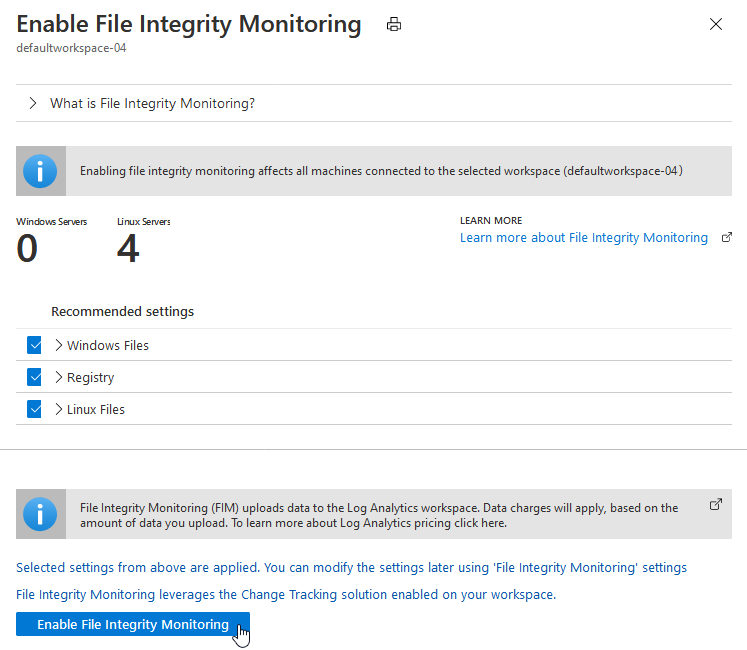
The recommended settings for Windows and Linux are also listed. Expand Windows files, Registry, and Linux files to see the full list of recommended items.
Clear the checkboxes for any recommended entities you don't want to be monitored by FIM.
Select Apply file integrity monitoring to enable FIM.

You can change the settings at any time. Learn more about editing monitored entities.
Disable File Integrity Monitoring
FIM uses the Azure Change Tracking solution to track and identify changes in your environment. By disabling FIM, you remove the Change Tracking solution from selected workspace.
To disable FIM:
From the File Integrity Monitoring dashboard for a workspace, select Disable.
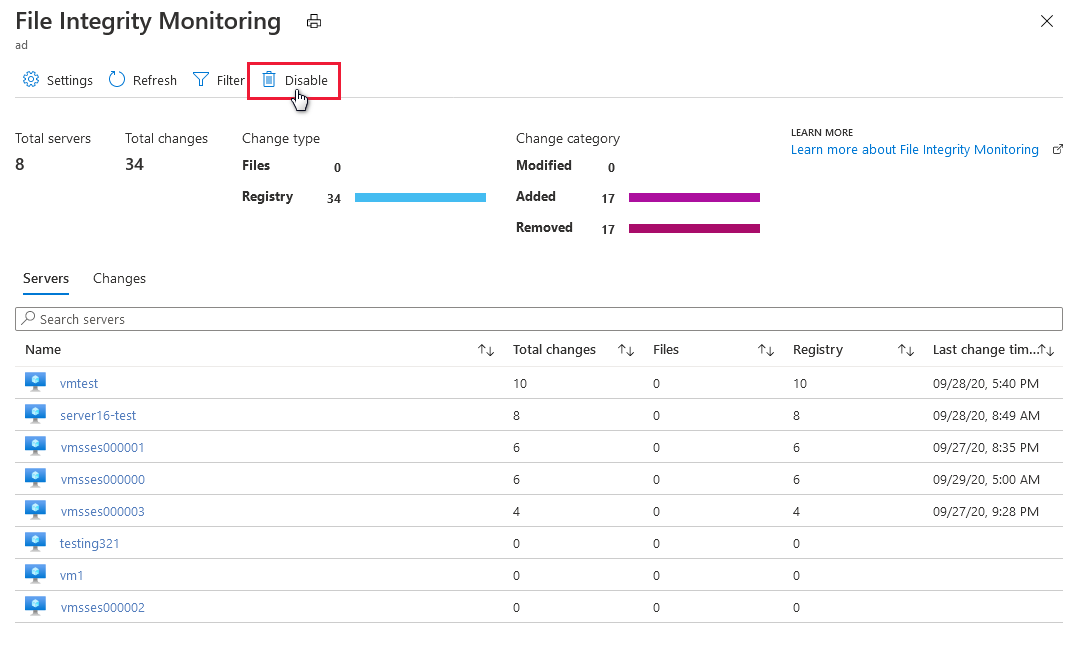
Select Remove.
Monitor workspaces, entities, and files
Audit monitored workspaces
The File integrity monitoring dashboard displays for workspaces where FIM is enabled. The FIM dashboard opens after you enable FIM on a workspace or when you select a workspace in the file integrity monitoring window that already has FIM enabled.
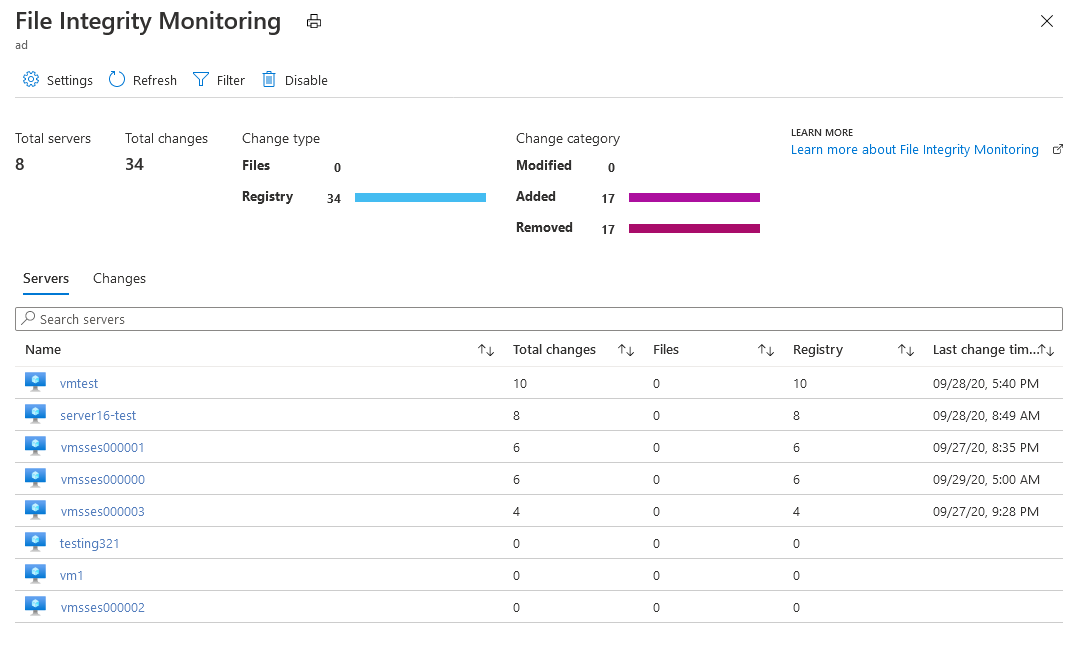
The FIM dashboard for a workspace displays the following details:
- Total number of machines connected to the workspace
- Total number of changes that occurred during the selected time period
- A breakdown of change type (files, registry)
- A breakdown of change category (modified, added, removed)
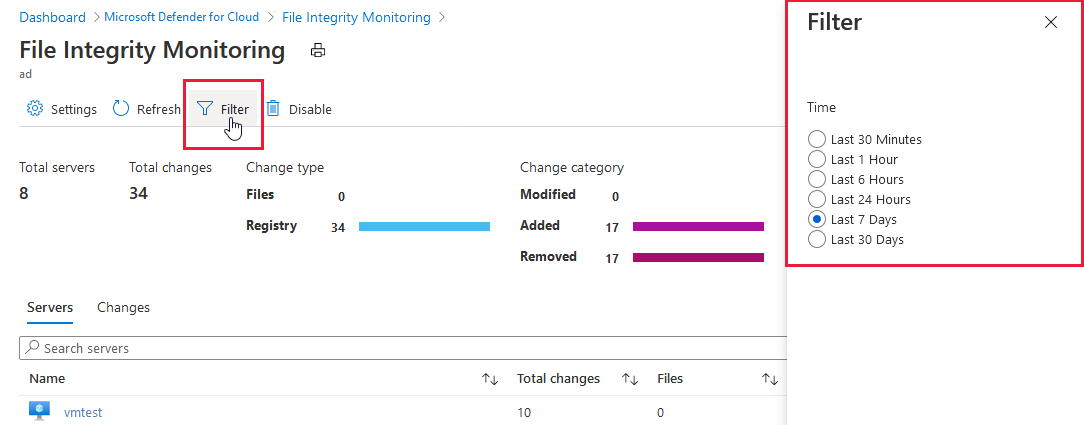
Select Filter at the top of the dashboard to change the time period for which changes are shown.
The Servers tab lists the machines reporting to this workspace. For each machine, the dashboard lists:
- Total changes that occurred during the selected period of time
- A breakdown of total changes as file changes or registry changes
When you select a machine, the query appears along with the results that identify the changes made during the selected time period for the machine. You can expand a change for more information.

The Changes tab (shown below) lists all changes for the workspace during the selected time period. For each entity that was changed, the dashboard lists the:
- Machine that the change occurred on
- Type of change (registry or file)
- Category of change (modified, added, removed)
- Date and time of change

Change details opens when you enter a change in the search field or select an entity listed under the Changes tab.

Edit monitored entities
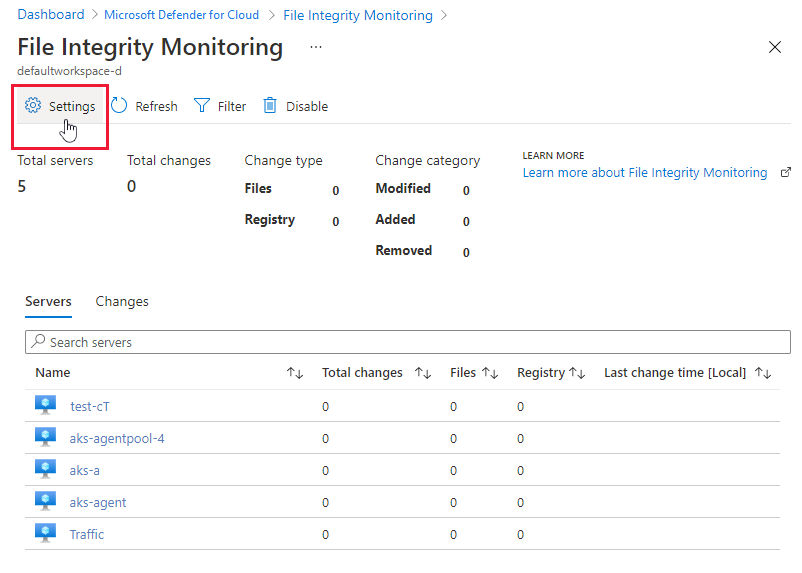
From the File Integrity Monitoring dashboard for a workspace, select Settings from the toolbar.
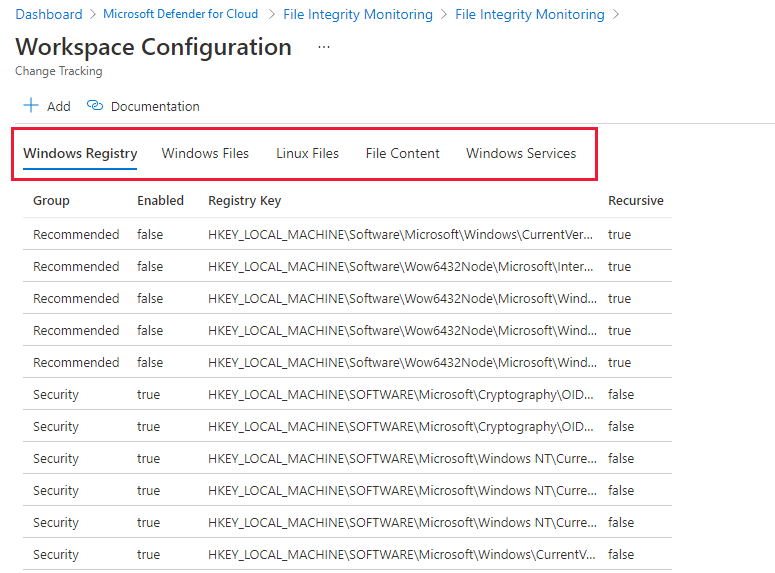
Workspace Configuration opens with tabs for each type of element that can be monitored:
- Windows registry
- Windows files
- Linux Files
- File content
- Windows services
Each tab lists the entities that you can edit in that category. For each entity listed, Defender for Cloud identifies whether FIM is enabled (true) or not enabled (false). Edit the entity to enable or disable FIM.
Select an entry from one of the tabs and edit any of the available fields in the Edit for Change Tracking pane. Options include:
- Enable (True) or disable (False) file integrity monitoring
- Provide or change the entity name
- Provide or change the value or path
- Delete the entity
Discard or save your changes.

Add a new entity to monitor
From the File Integrity Monitoring dashboard for a workspace, select Settings from the toolbar.
The Workspace Configuration opens.
On the Workspace Configuration:
Select the tab for the type of entity that you want to add: Windows registry, Windows files, Linux Files, file content, or Windows services.
Select Add.
In this example, we selected Linux Files.
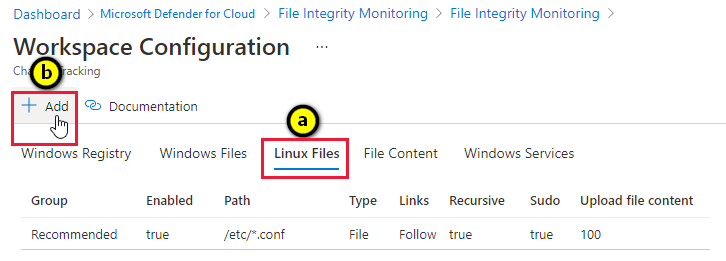
Select Add. Add for Change Tracking opens.
Enter the necessary information and select Save.

Folder and path monitoring using wildcards
Use wildcards to simplify tracking across directories. The following rules apply when you configure folder monitoring using wildcards:
- Wildcards are required for tracking multiple files.
- Wildcards can only be used in the last segment of a path, such as
C:\folder\fileor/etc/*.conf - If an environment variable includes a path that isn't valid, validation succeeds but the path fails when inventory runs.
- When setting the path, avoid general paths such as
c:\*.*, which results in too many folders being traversed.
Compare baselines using File Integrity Monitoring
File Integrity Monitoring (FIM) informs you when changes occur to sensitive areas in your resources, so you can investigate and address unauthorized activity. FIM monitors Windows files, Windows registries, and Linux files.
Enable built-in recursive registry checks
The FIM registry hive defaults provide a convenient way to monitor recursive changes within common security areas. For example, an adversary might configure a script to execute in LOCAL_SYSTEM context by configuring an execution at startup or shutdown. To monitor changes of this type, enable the built-in check.

Note
Recursive checks apply only to recommended security hives and not to custom registry paths.
Add a custom registry check
FIM baselines start by identifying characteristics of a known-good state for the operating system and supporting application. For this example, we'll focus on the password policy configurations for Windows Server 2008 and higher.
| Policy Name | Registry Setting |
|---|---|
| Domain controller: Refuse machine account password changes | MACHINE\System\CurrentControlSet\Services \Netlogon\Parameters\RefusePasswordChange |
| Domain member: Digitally encrypt or sign secure channel data (always) | MACHINE\System\CurrentControlSet\Services \Netlogon\Parameters\RequireSignOrSeal |
| Domain member: Digitally encrypt secure channel data (when possible) | MACHINE\System\CurrentControlSet\Services \Netlogon\Parameters\SealSecureChannel |
| Domain member: Digitally sign secure channel data (when possible) | MACHINE\System\CurrentControlSet\Services \Netlogon\Parameters\SignSecureChannel |
| Domain member: Disable machine account password changes | MACHINE\System\CurrentControlSet\Services \Netlogon\Parameters\DisablePasswordChange |
| Domain member: Maximum machine account password age | MACHINE\System\CurrentControlSet\Services \Netlogon\Parameters\MaximumPasswordAge |
| Domain member: Require strong (Windows 2000 or later) session key | MACHINE\System\CurrentControlSet\Services \Netlogon\Parameters\RequireStrongKey |
| Network security: Restrict NTLM: NTLM authentication in this domain | MACHINE\System\CurrentControlSet\Services \Netlogon\Parameters\RestrictNTLMInDomain |
| Network security: Restrict NTLM: Add server exceptions in this domain | MACHINE\System\CurrentControlSet\Services \Netlogon\Parameters\DCAllowedNTLMServers |
| Network security: Restrict NTLM: Audit NTLM authentication in this domain | MACHINE\System\CurrentControlSet\Services \Netlogon\Parameters\AuditNTLMInDomain |
Note
To learn more about registry settings supported by various operating system versions, refer to the Group Policy Settings reference spreadsheet.
To configure FIM to monitor registry baselines:
In the Add Windows Registry for Change Tracking window, select the Windows Registry Key text box.
Enter the following registry key:
HKEY_LOCAL_MACHINE\SYSTEM\CurrentControlSet\Services\Netlogon\Parameters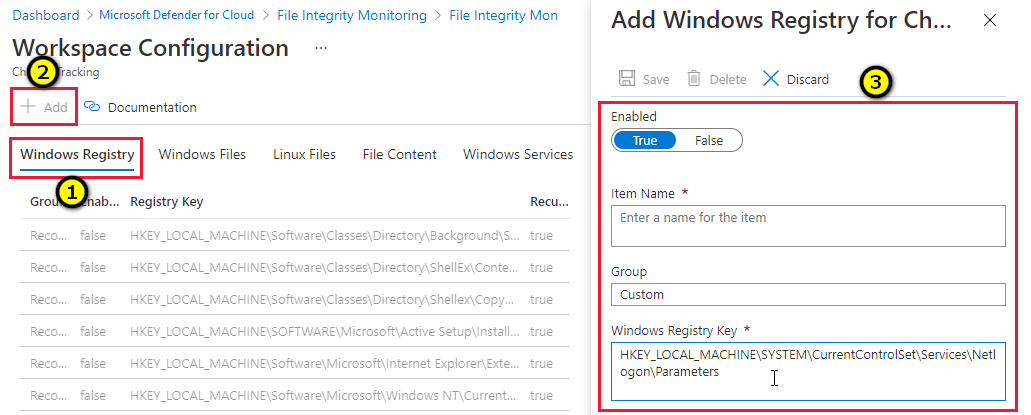
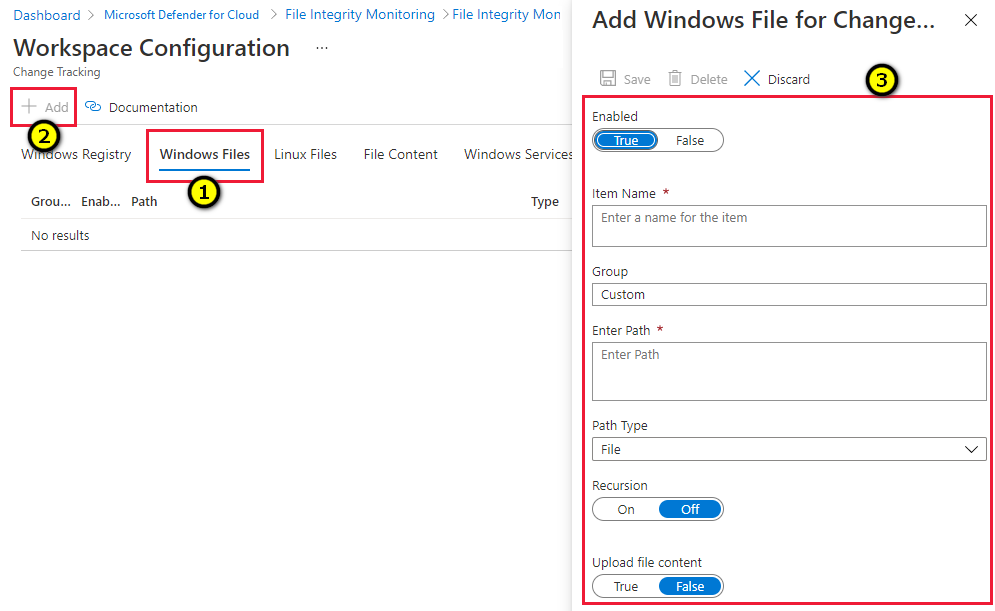
Track changes to Windows files
In the Add Windows File for Change Tracking window, in the Enter path text box, enter the folder that contains the files that you want to track. In the example in the following figure, Contoso Web App resides in the D:\ drive within the ContosWebApp folder structure.
Create a custom Windows file entry by providing a name of the setting class, enabling recursion, and specifying the top folder with a wildcard (*) suffix.
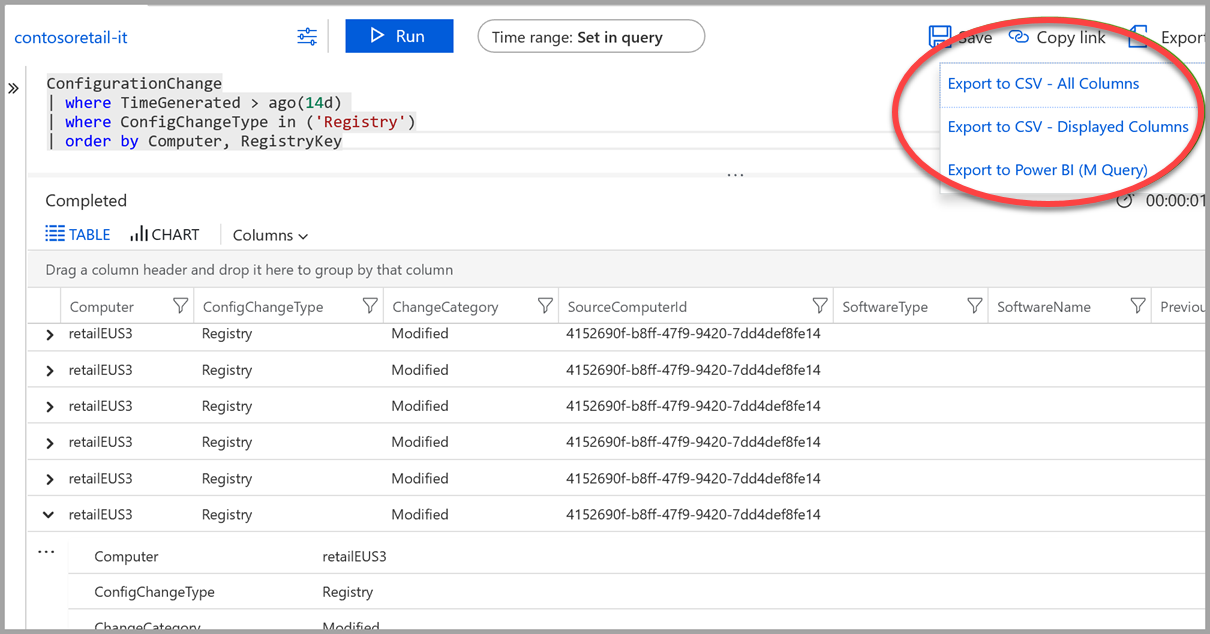
Retrieve change data
File Integrity Monitoring data resides within the Azure Log Analytics/ConfigurationChange table set.
Set a time range to retrieve a summary of changes by resource.
In the following example, we're retrieving all changes in the last 14 days in the categories of registry and files:
ConfigurationChange
| where TimeGenerated > ago(14d)
| where ConfigChangeType in ('Registry', 'Files')
| summarize count() by Computer, ConfigChangeType
To view details of the registry changes:
- Remove Files from the where clause.
- Remove the summarization line and replace it with an ordering clause:
ConfigurationChange
| where TimeGenerated > ago(14d)
| where ConfigChangeType in ('Registry')
| order by Computer, RegistryKey
Reports can be exported to CSV for archival and/or channeled to a Power BI report.
Next steps
Learn more about Defender for Cloud in:
- Setting security policies - Learn how to configure security policies for your Azure subscriptions and resource groups.
- Managing security recommendations - Learn how recommendations help you protect your Azure resources.
- Azure Security blog - Get the latest Azure security news and information.
Feedback
Coming soon: Throughout 2024 we will be phasing out GitHub Issues as the feedback mechanism for content and replacing it with a new feedback system. For more information see: https://aka.ms/ContentUserFeedback.
Submit and view feedback for